The Influence of the Rolling Direction on the Mechanical Properties of the Al-Alloy EN AW-5454-D
Abstract
:1. Introduction
2. Materials and Methods
2.1. Materials
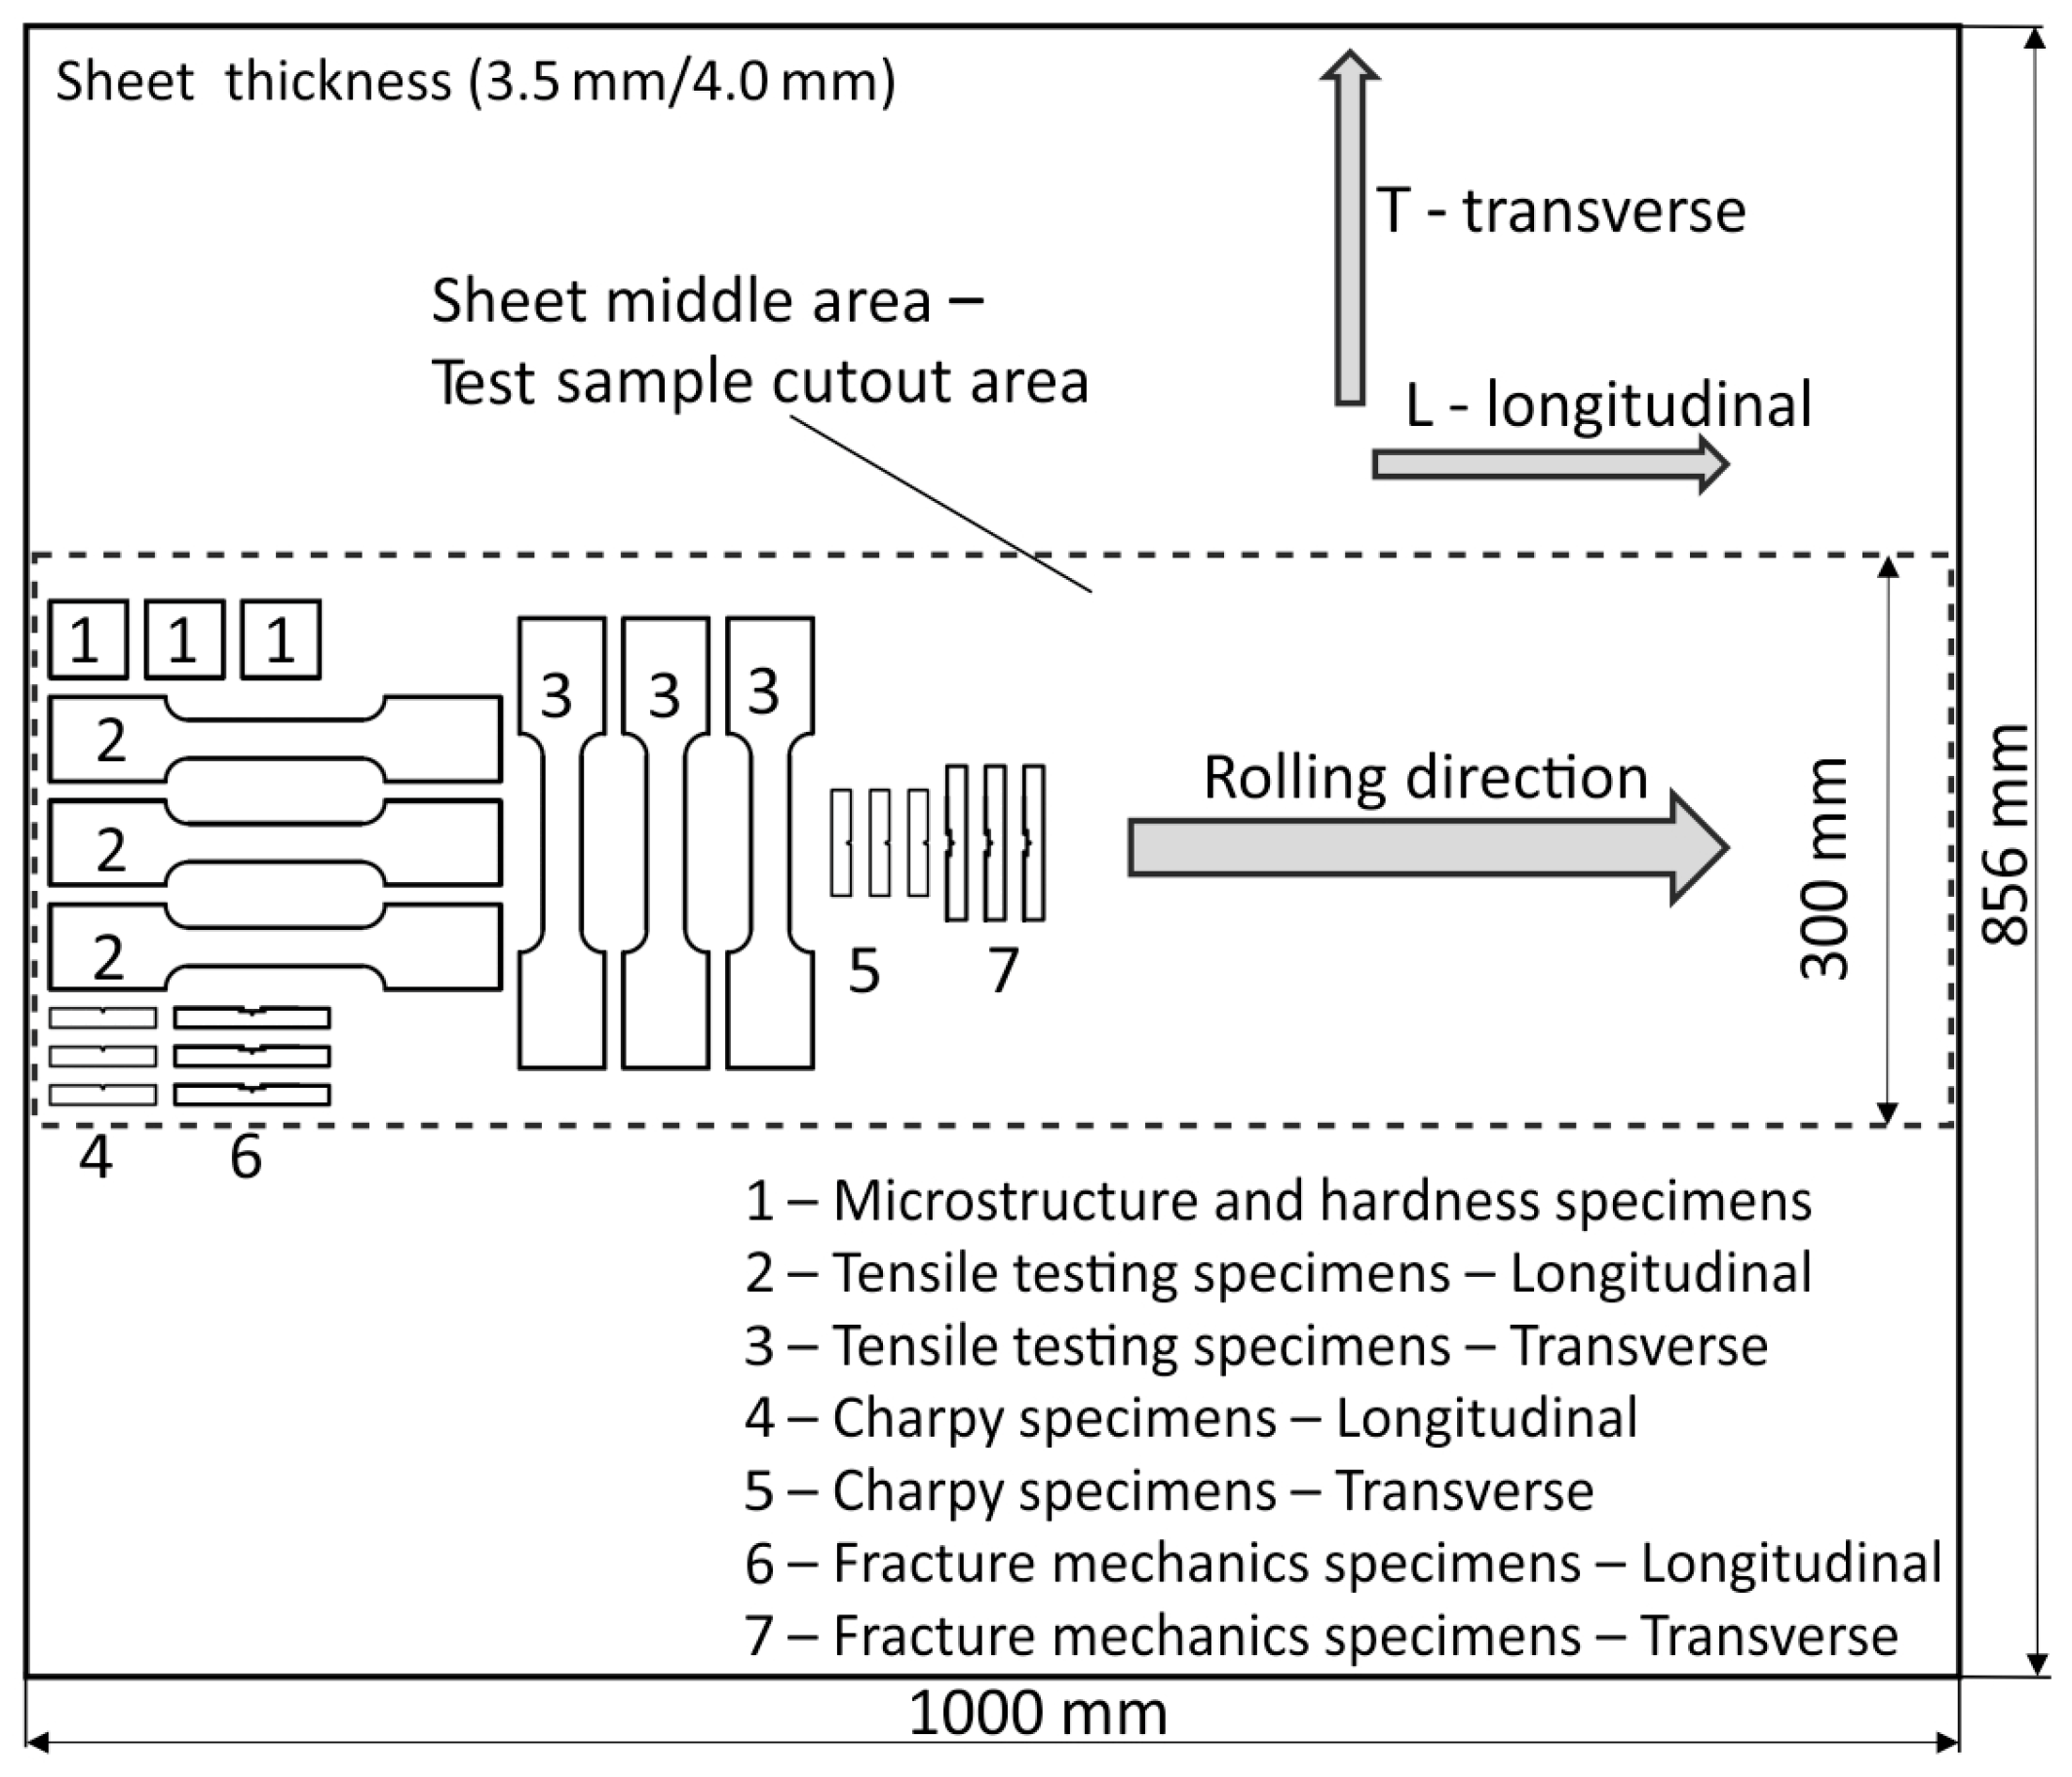
2.2. Sample Preparation, Performing of Analyses, and Testing
Metallographic Sample Preparation
2.3. Microstructural Analysis
2.3.1. Sample Preparation and Performance of the Hardness Measurements HV5
2.3.2. Sample Preparation and Performance of the Tensile Testing
2.4. Tensile Testing
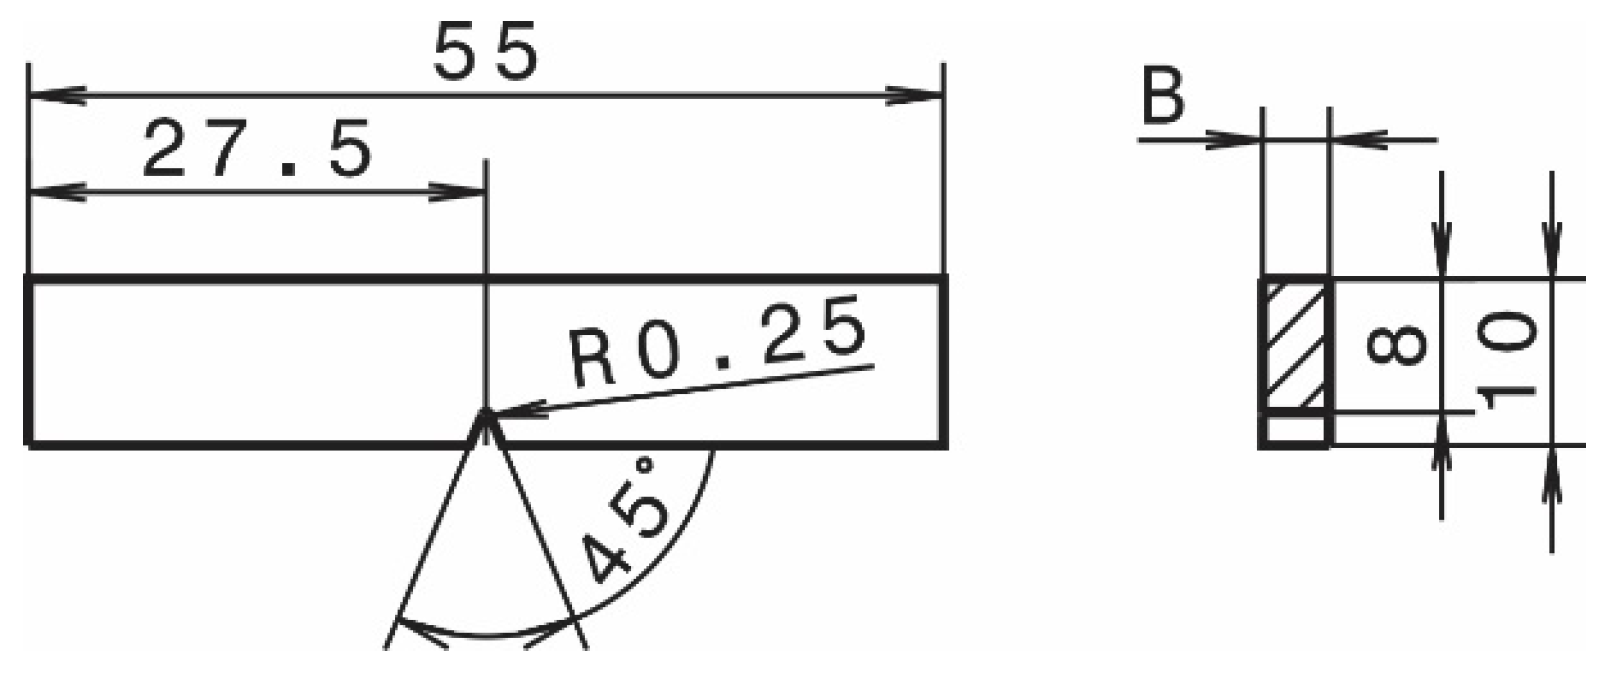
Sample Preparation and Performance of the Charpy Impact Toughness Tests
2.5. Instrumented Charpy Test
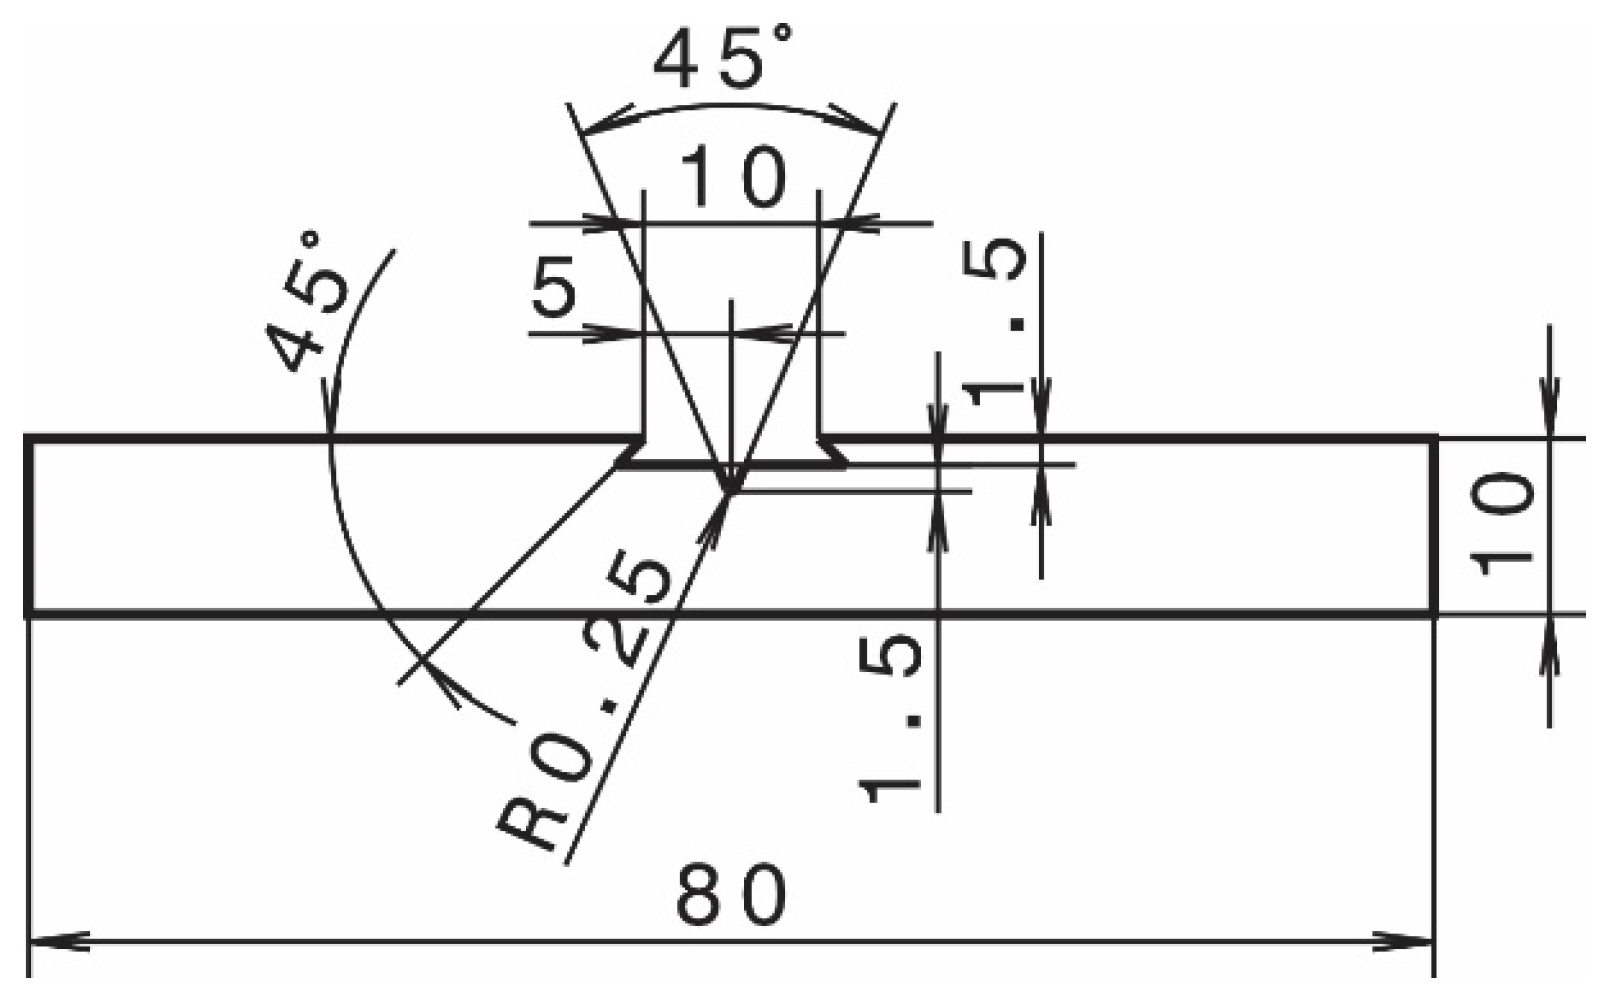
Sample Preparation and Performance of the Testing of Fracture Mechanics
2.6. Fracture Mechanics
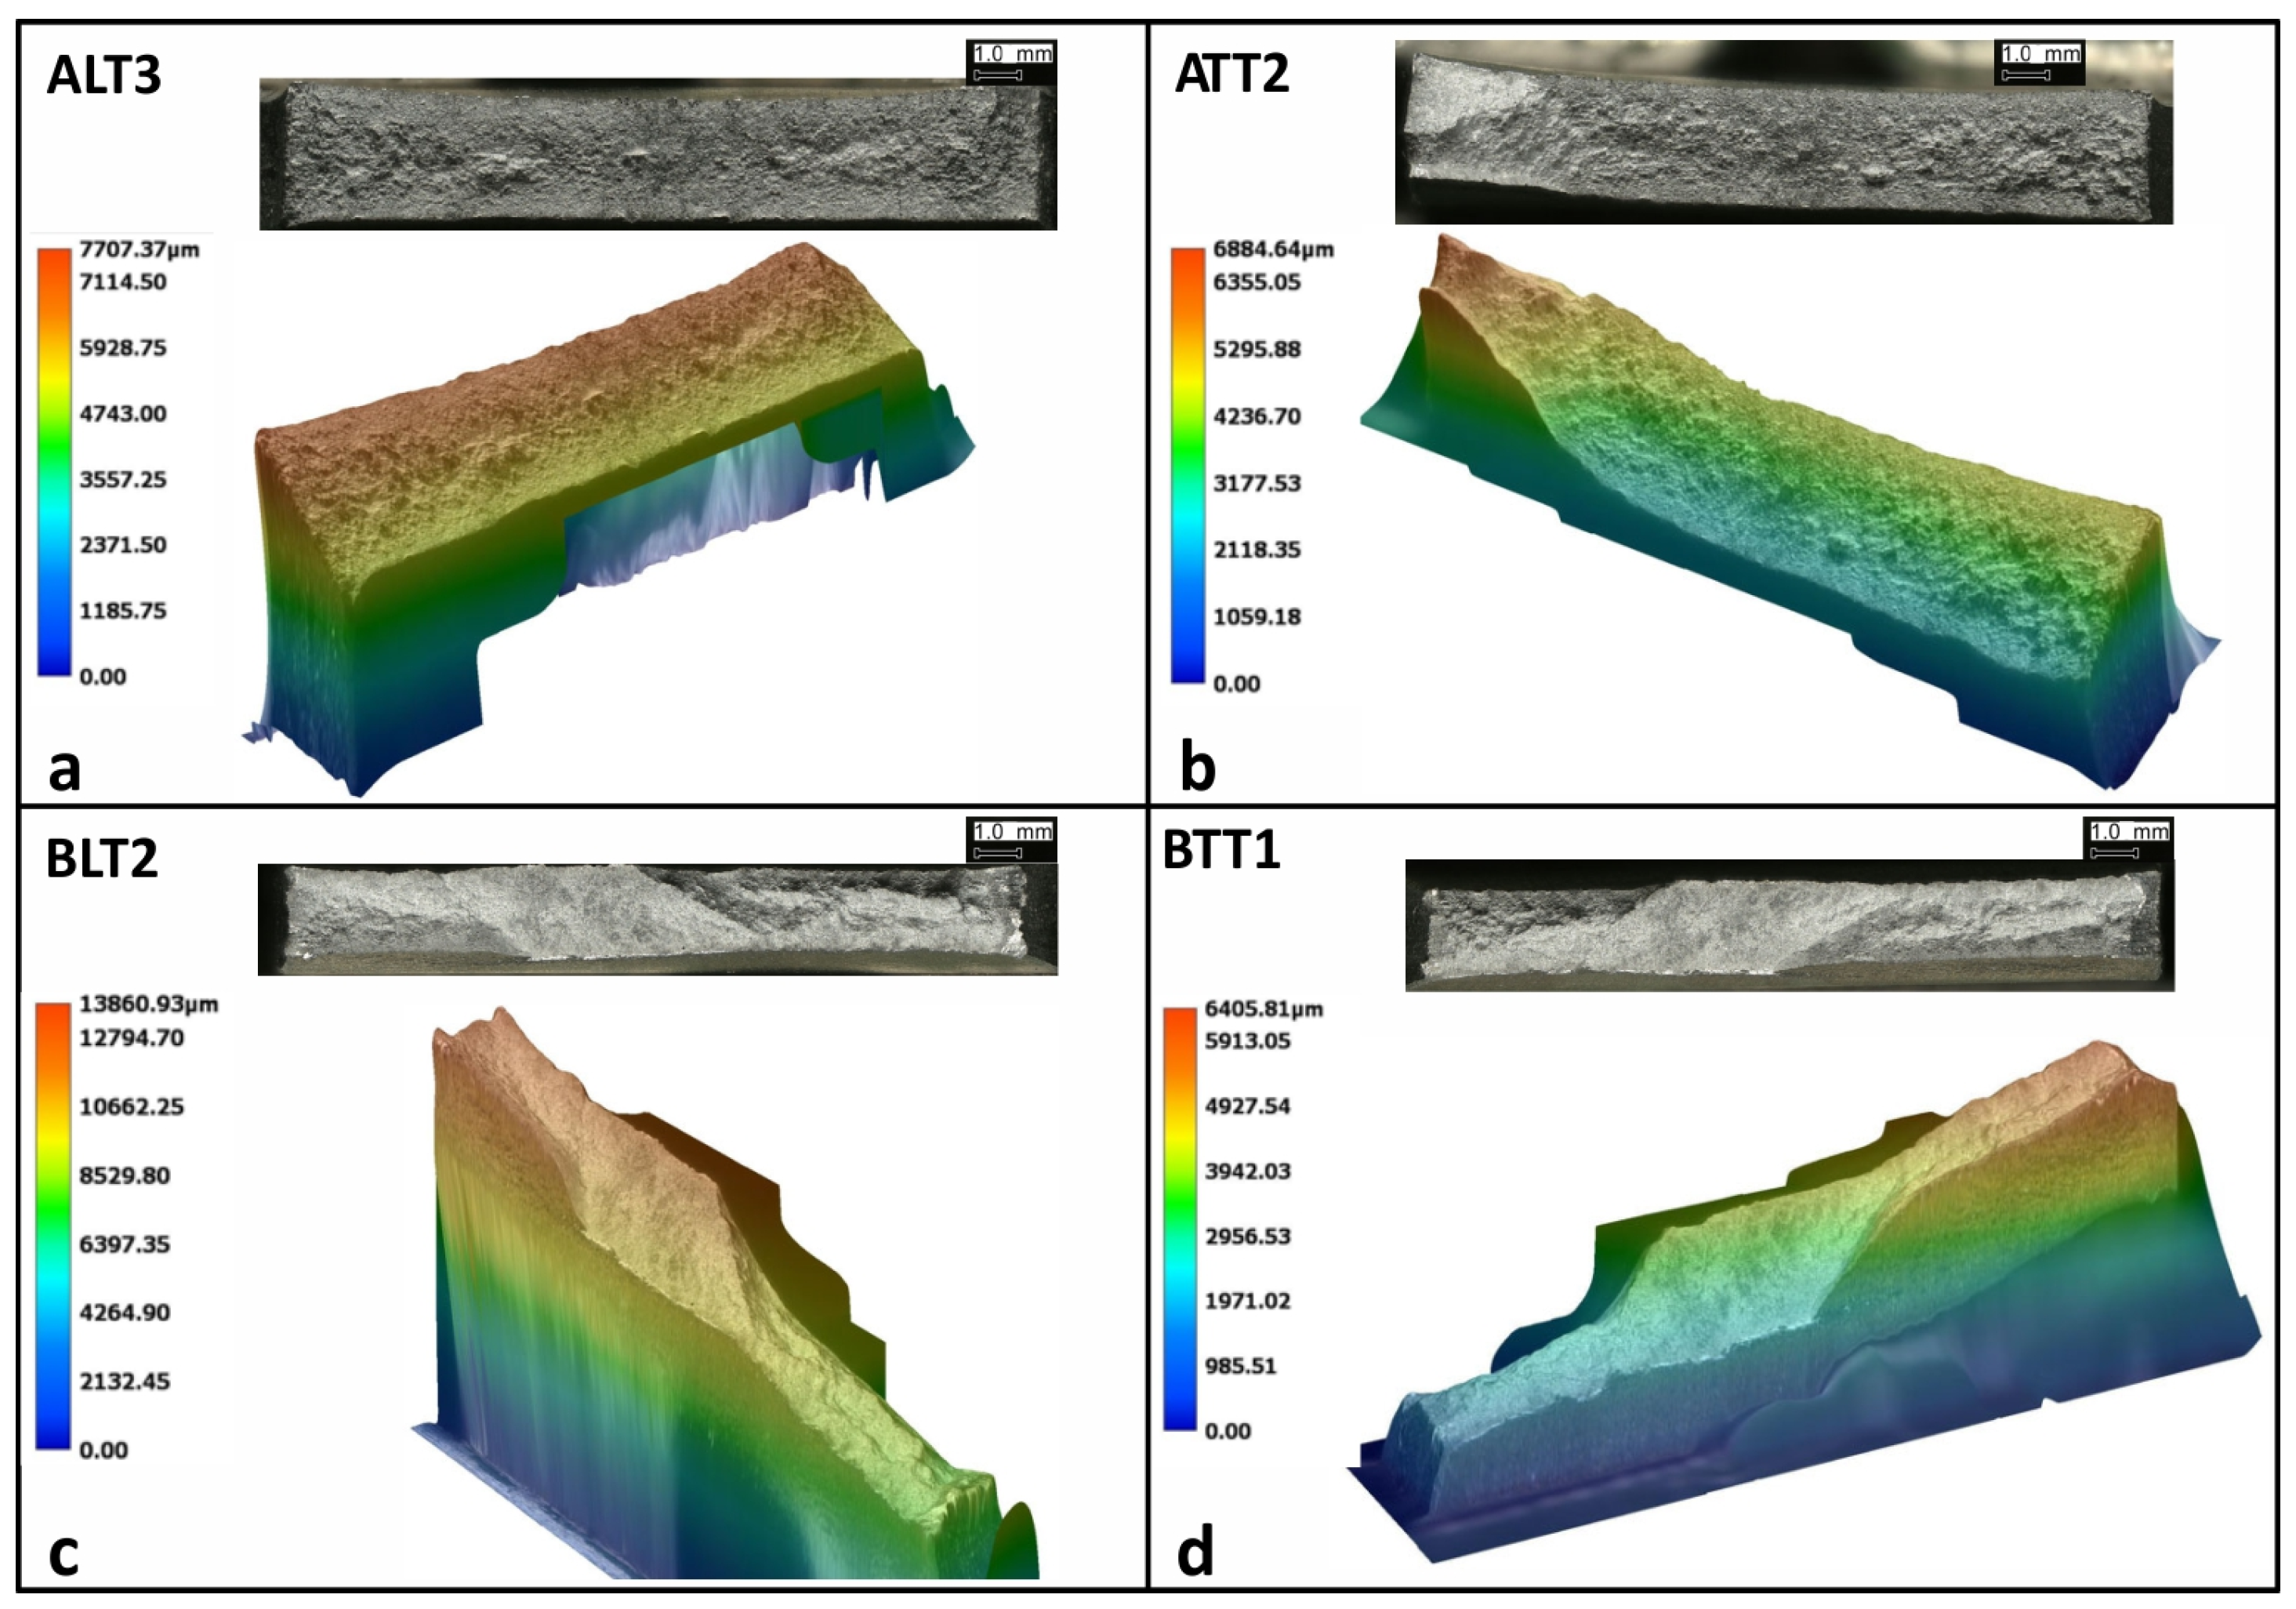
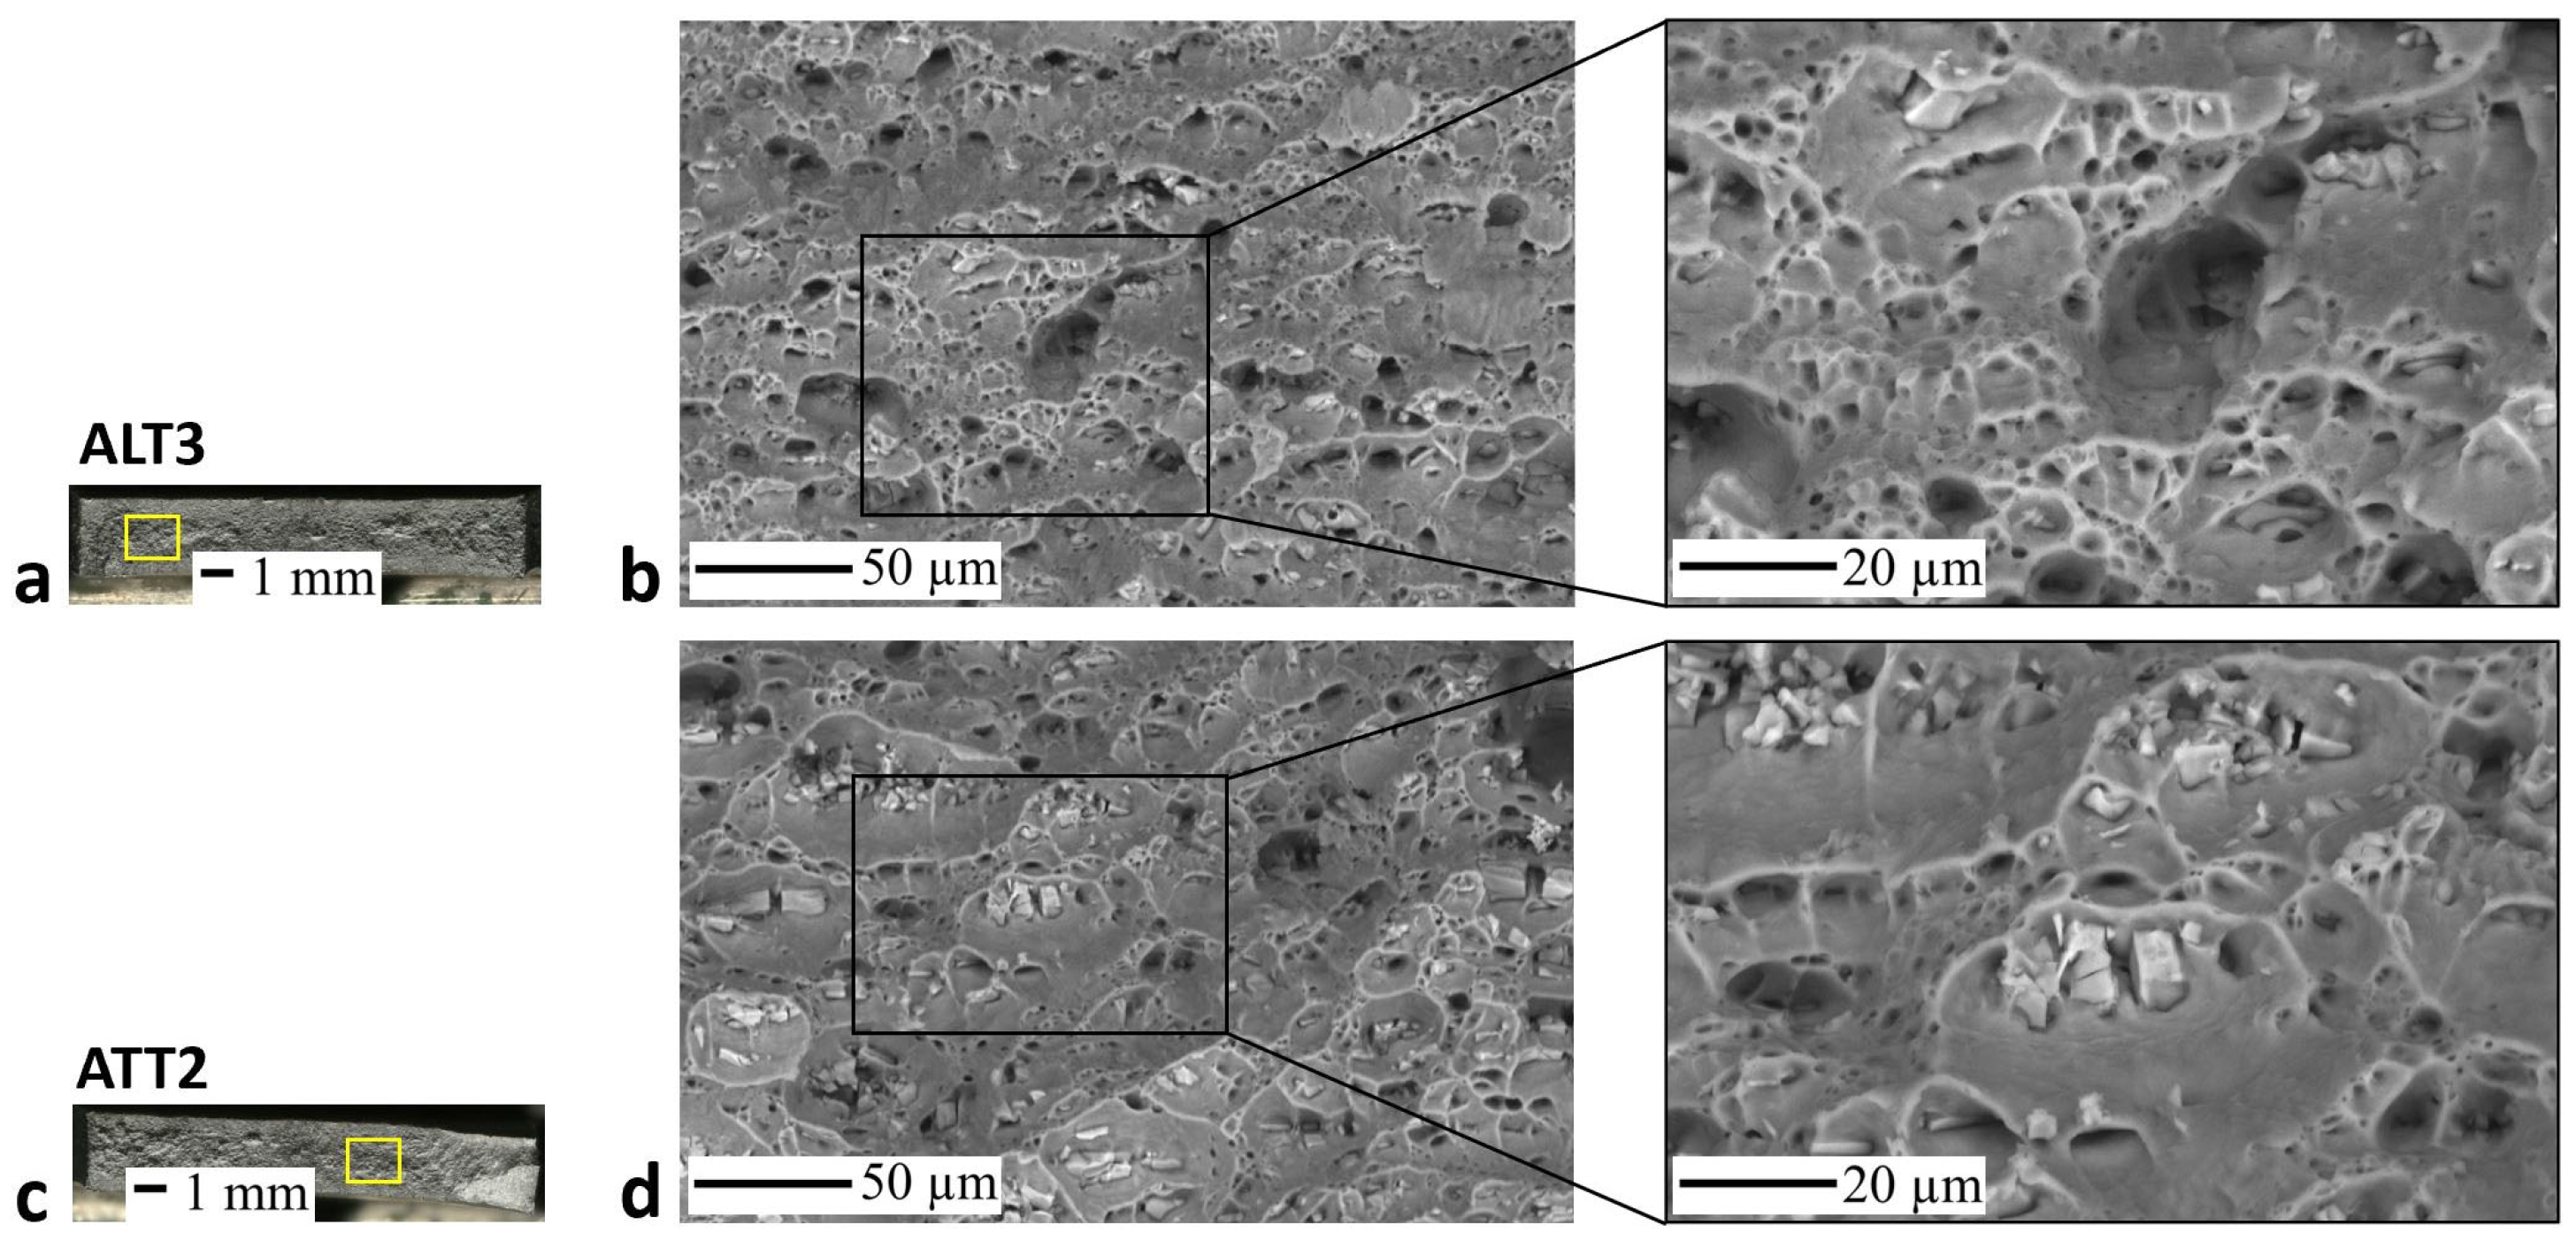
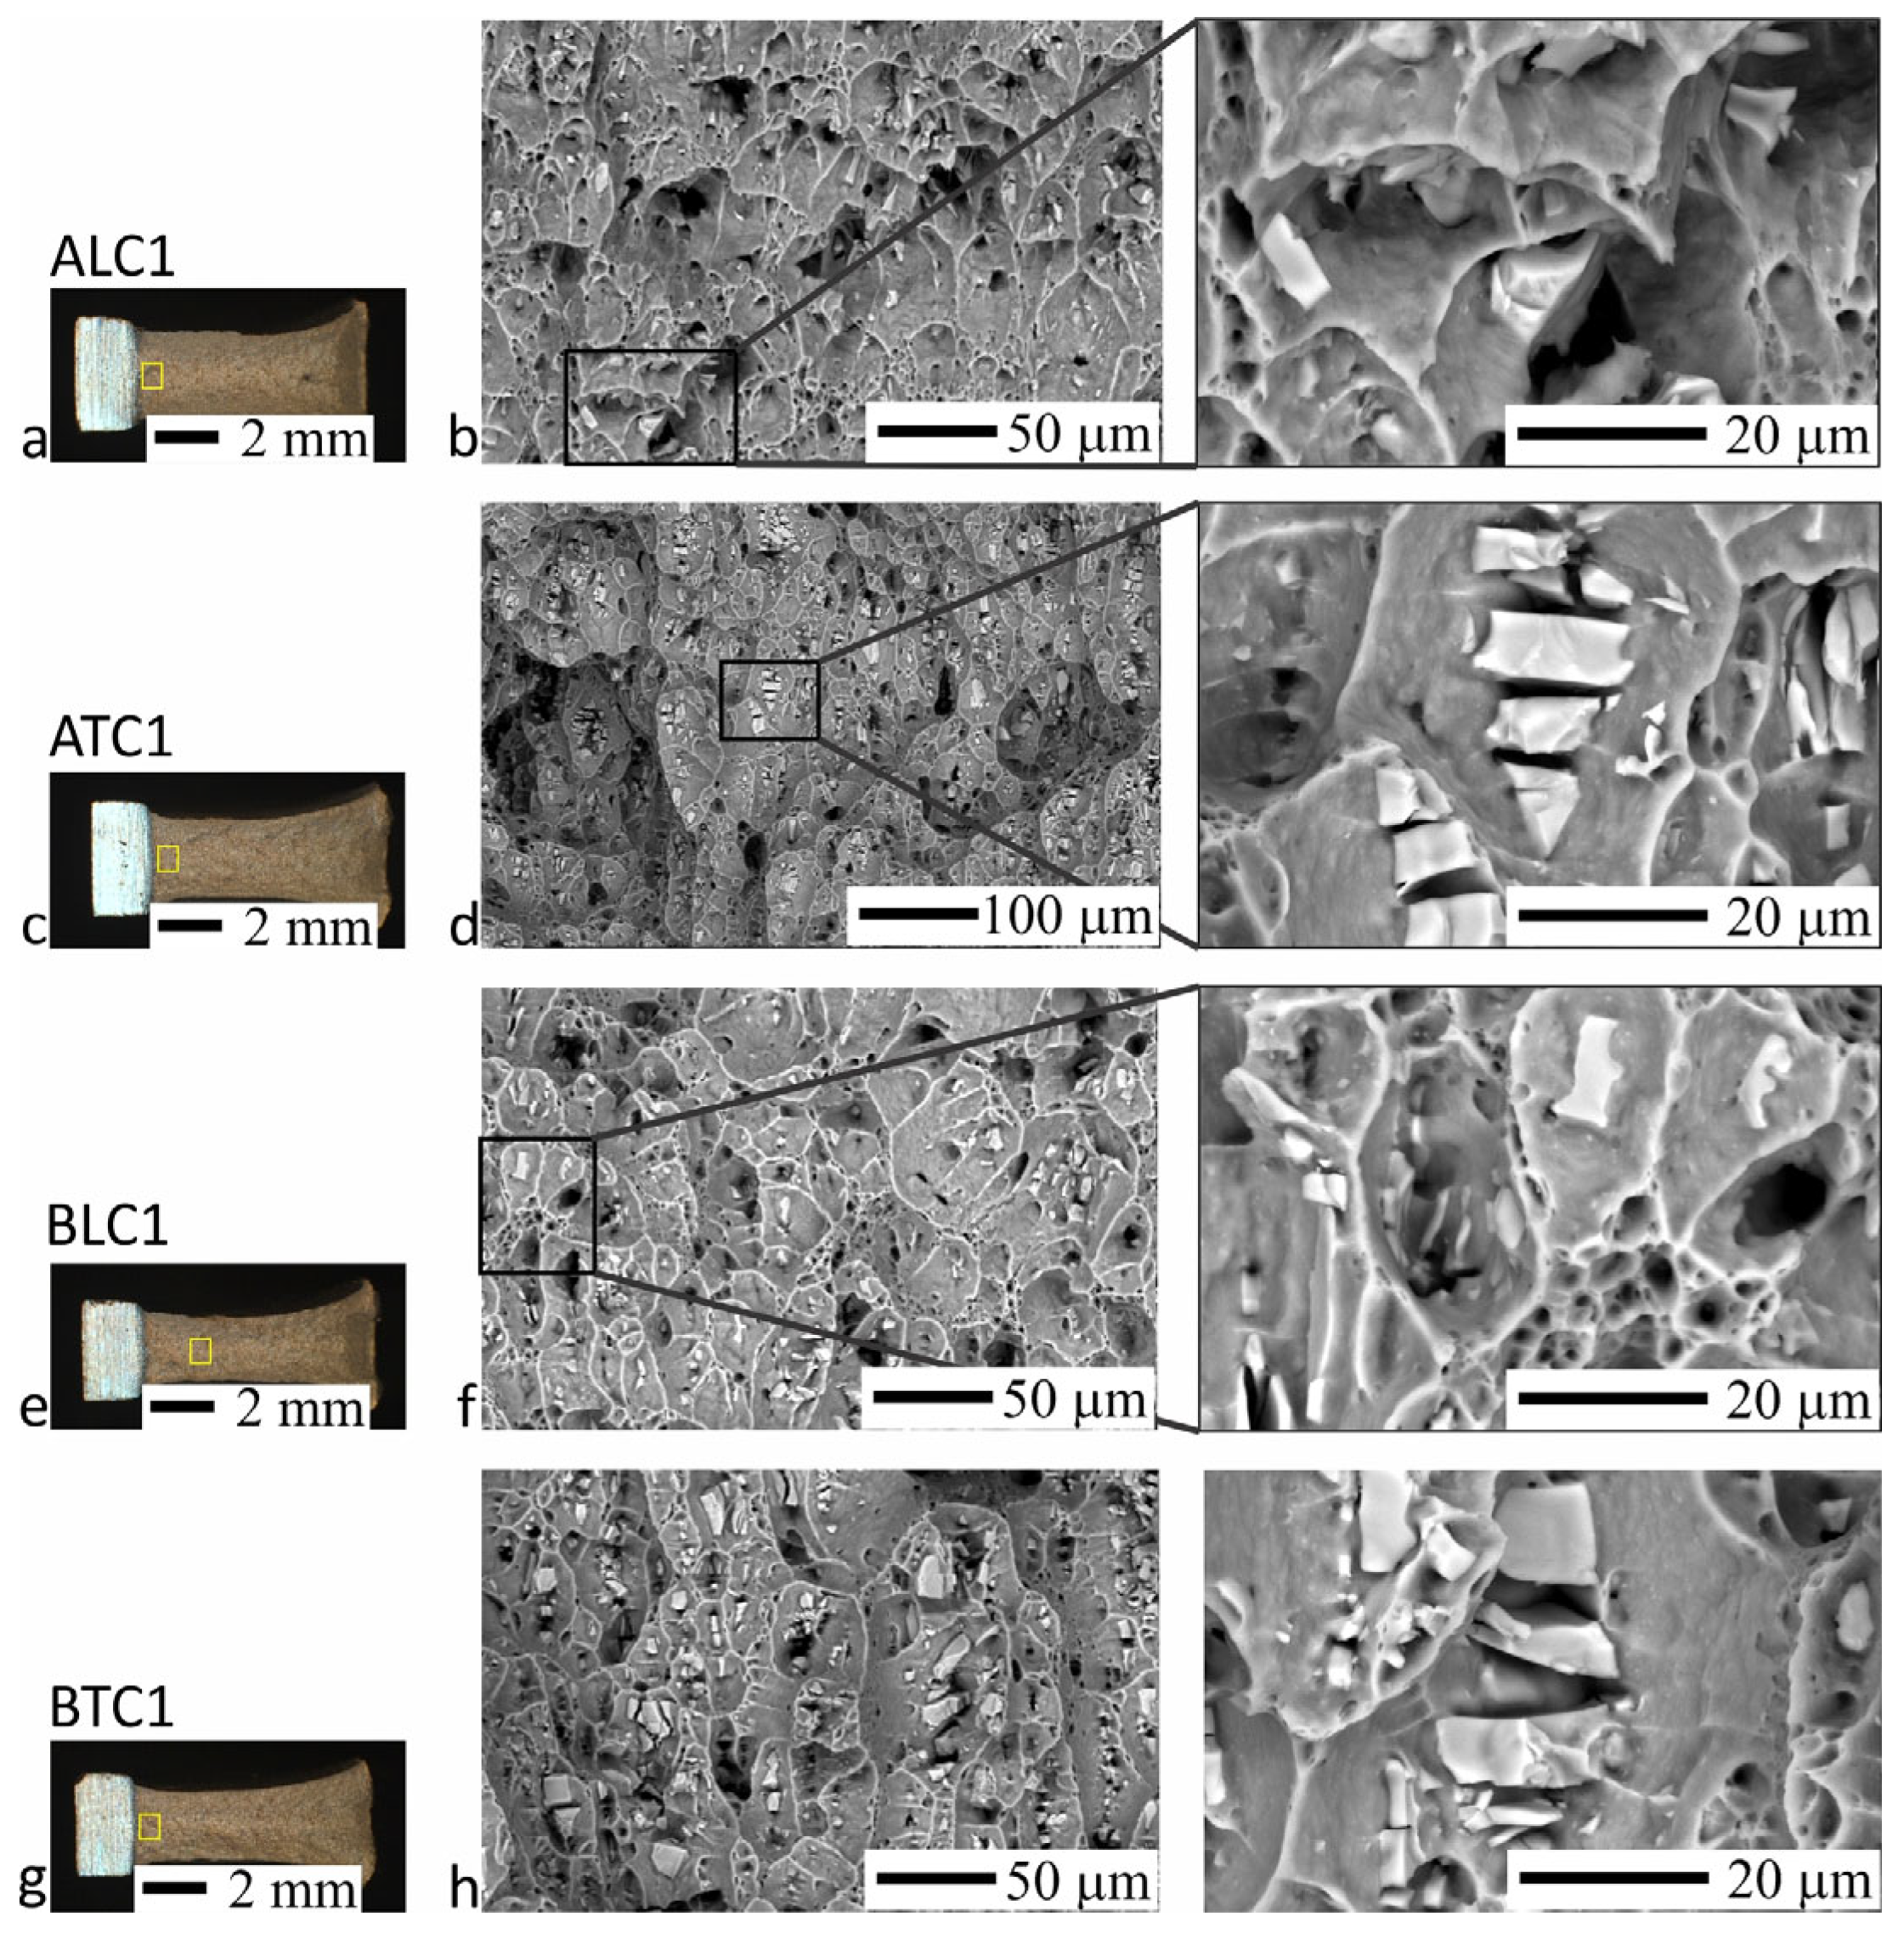
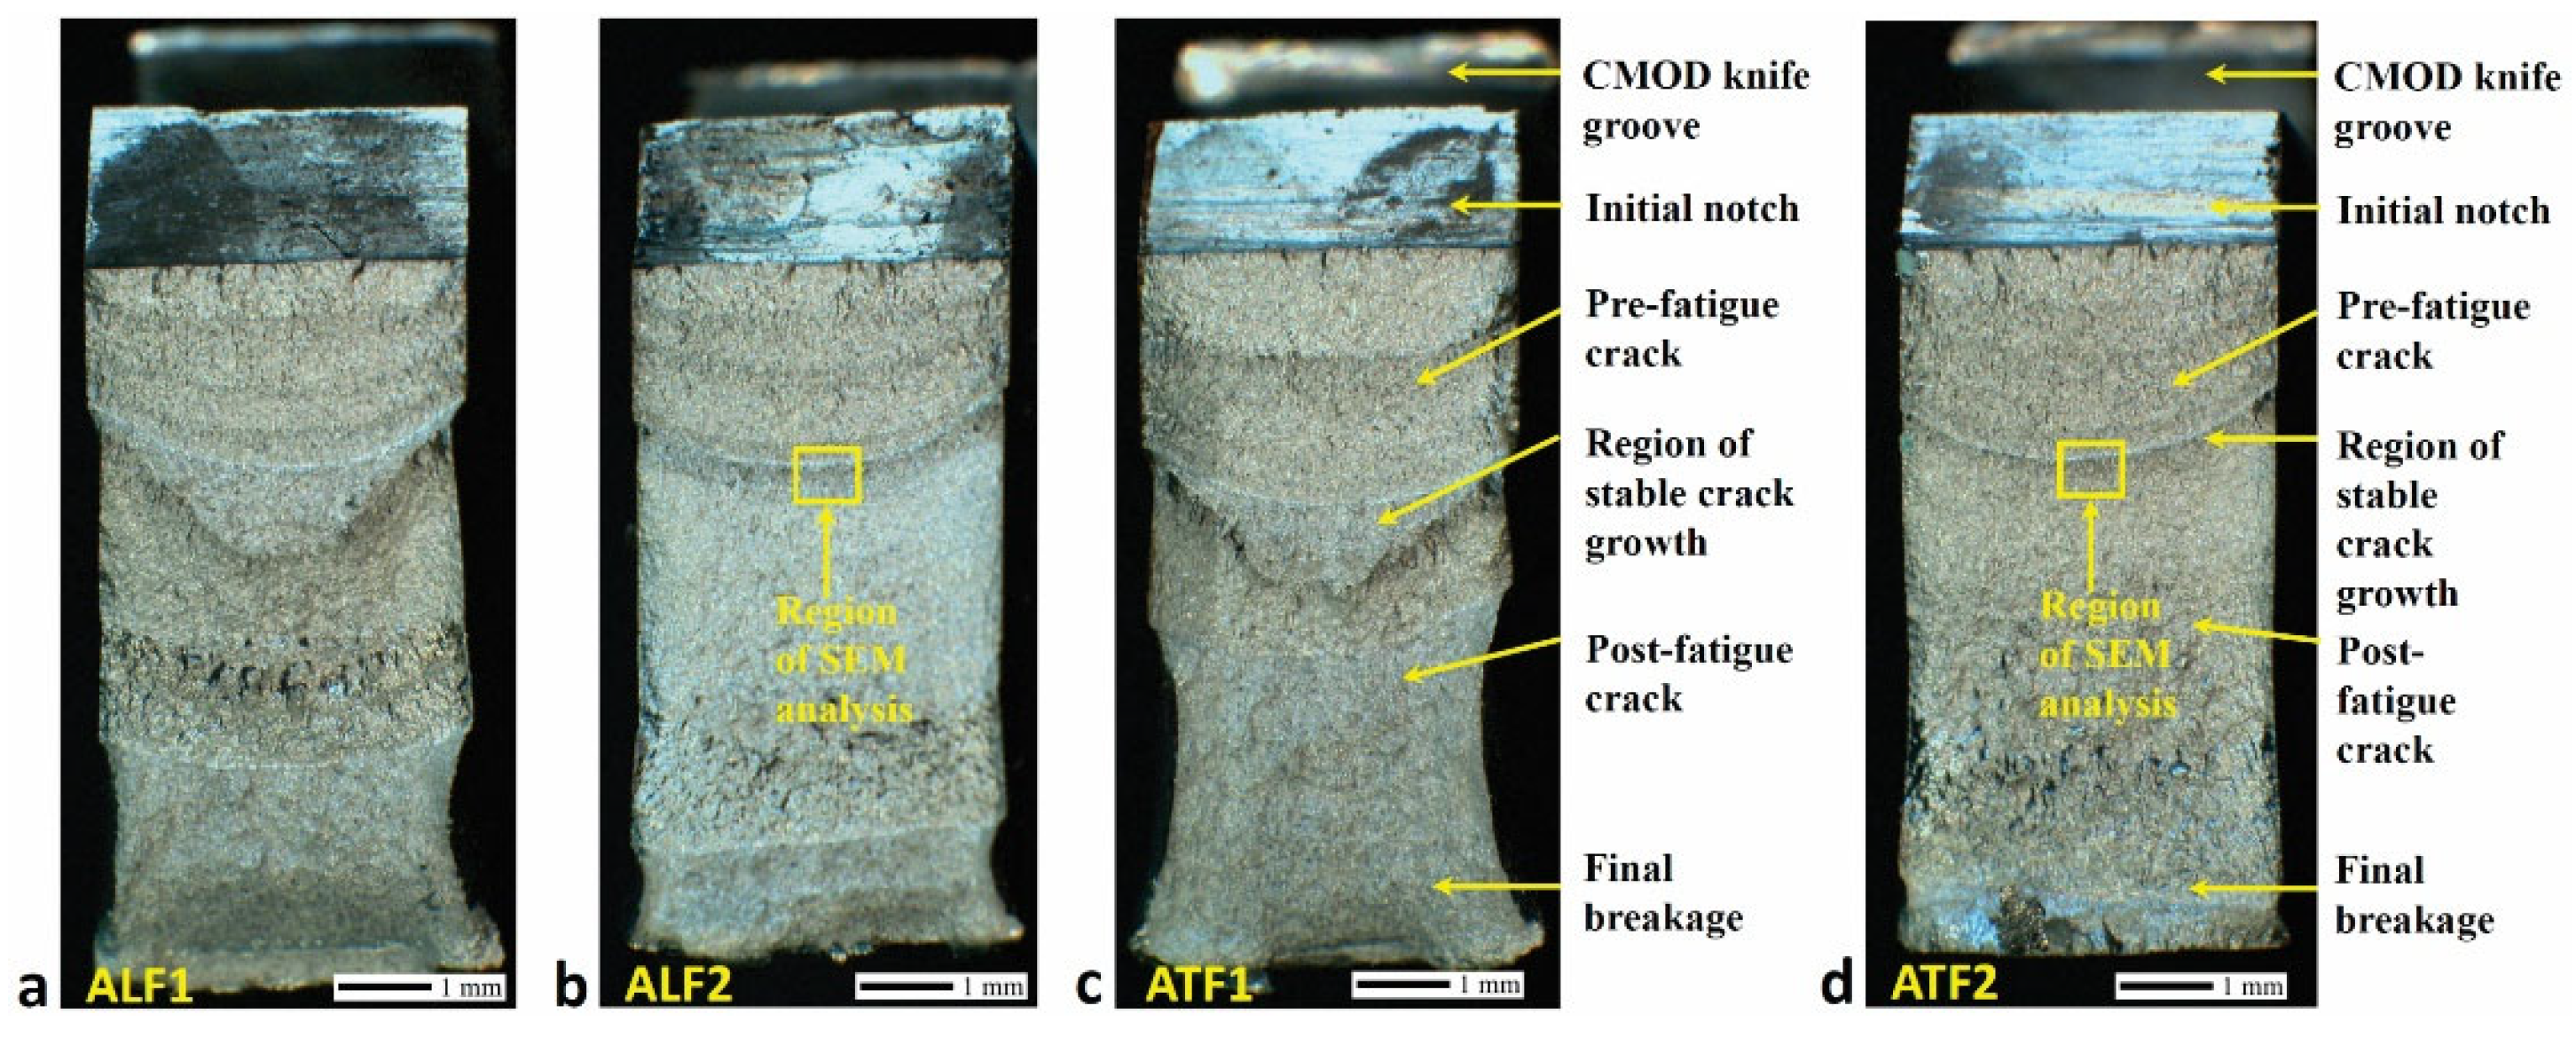
2.7. Analysis of the Fracture Surfaces
- Tensile testing: ALT3, ATT2, BLT2, and BTT1;
- Charpy testing with labels: ALC1, ATC1, BLC1, and BTC1;
- Fracture mechanics with labels: ALF1, ALF2, ATF1, and ATF2, at the sites where the crack was initiated from the notch, and at fractures that were about 1 mm away from the notch.
3. Results and Discussion
3.1. Microstructure
3.2. Hardness Measurements
3.3. Tensile Testing
3.4. Charpy Testing Results
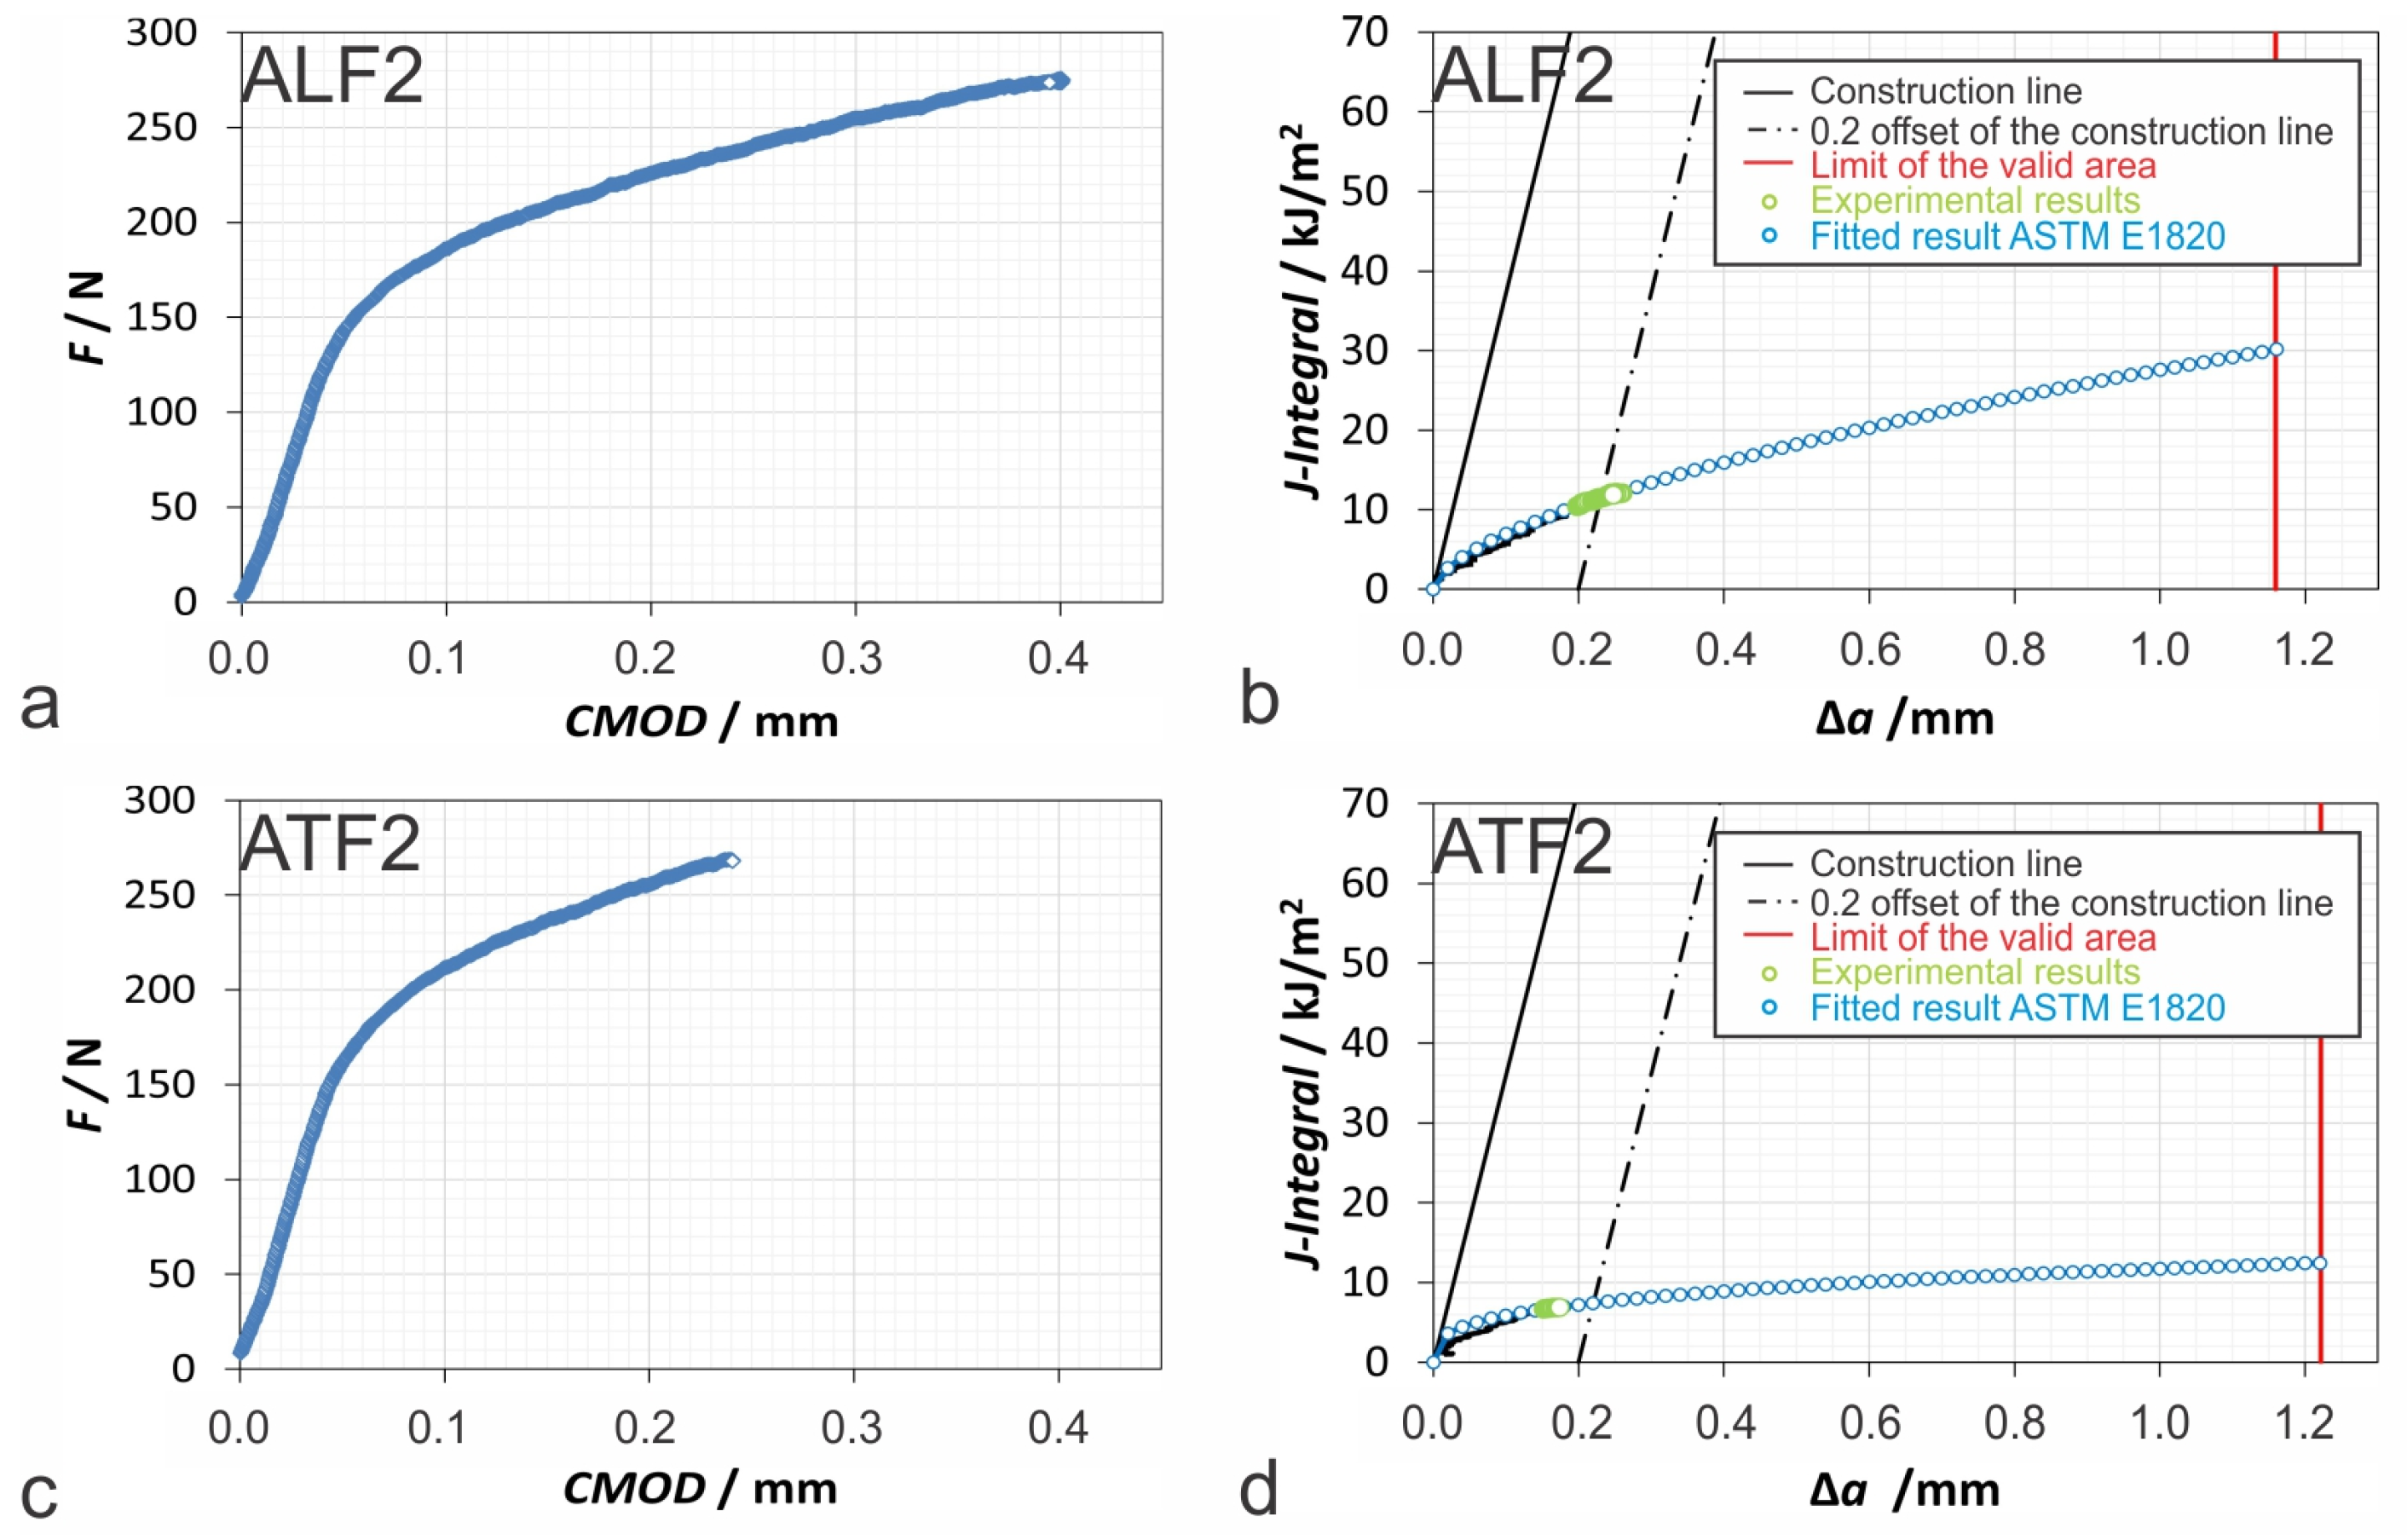
3.5. Results of the Fracture Mechanics
3.6. EDX Analysis of Sample Fracture Surfaces for Fracture Mechanics
4. Summary and Conclusions
- On average, the measured hardness on the thinner sheet was 5% higher than the measured hardness on the thicker sheet.
- In the tensile testing, the longitudinal elongation of the thicker sheet was 11.5% greater than the transverse, and the longitudinal elongation of the thinner sheet was 0.7% greater than the transverse.
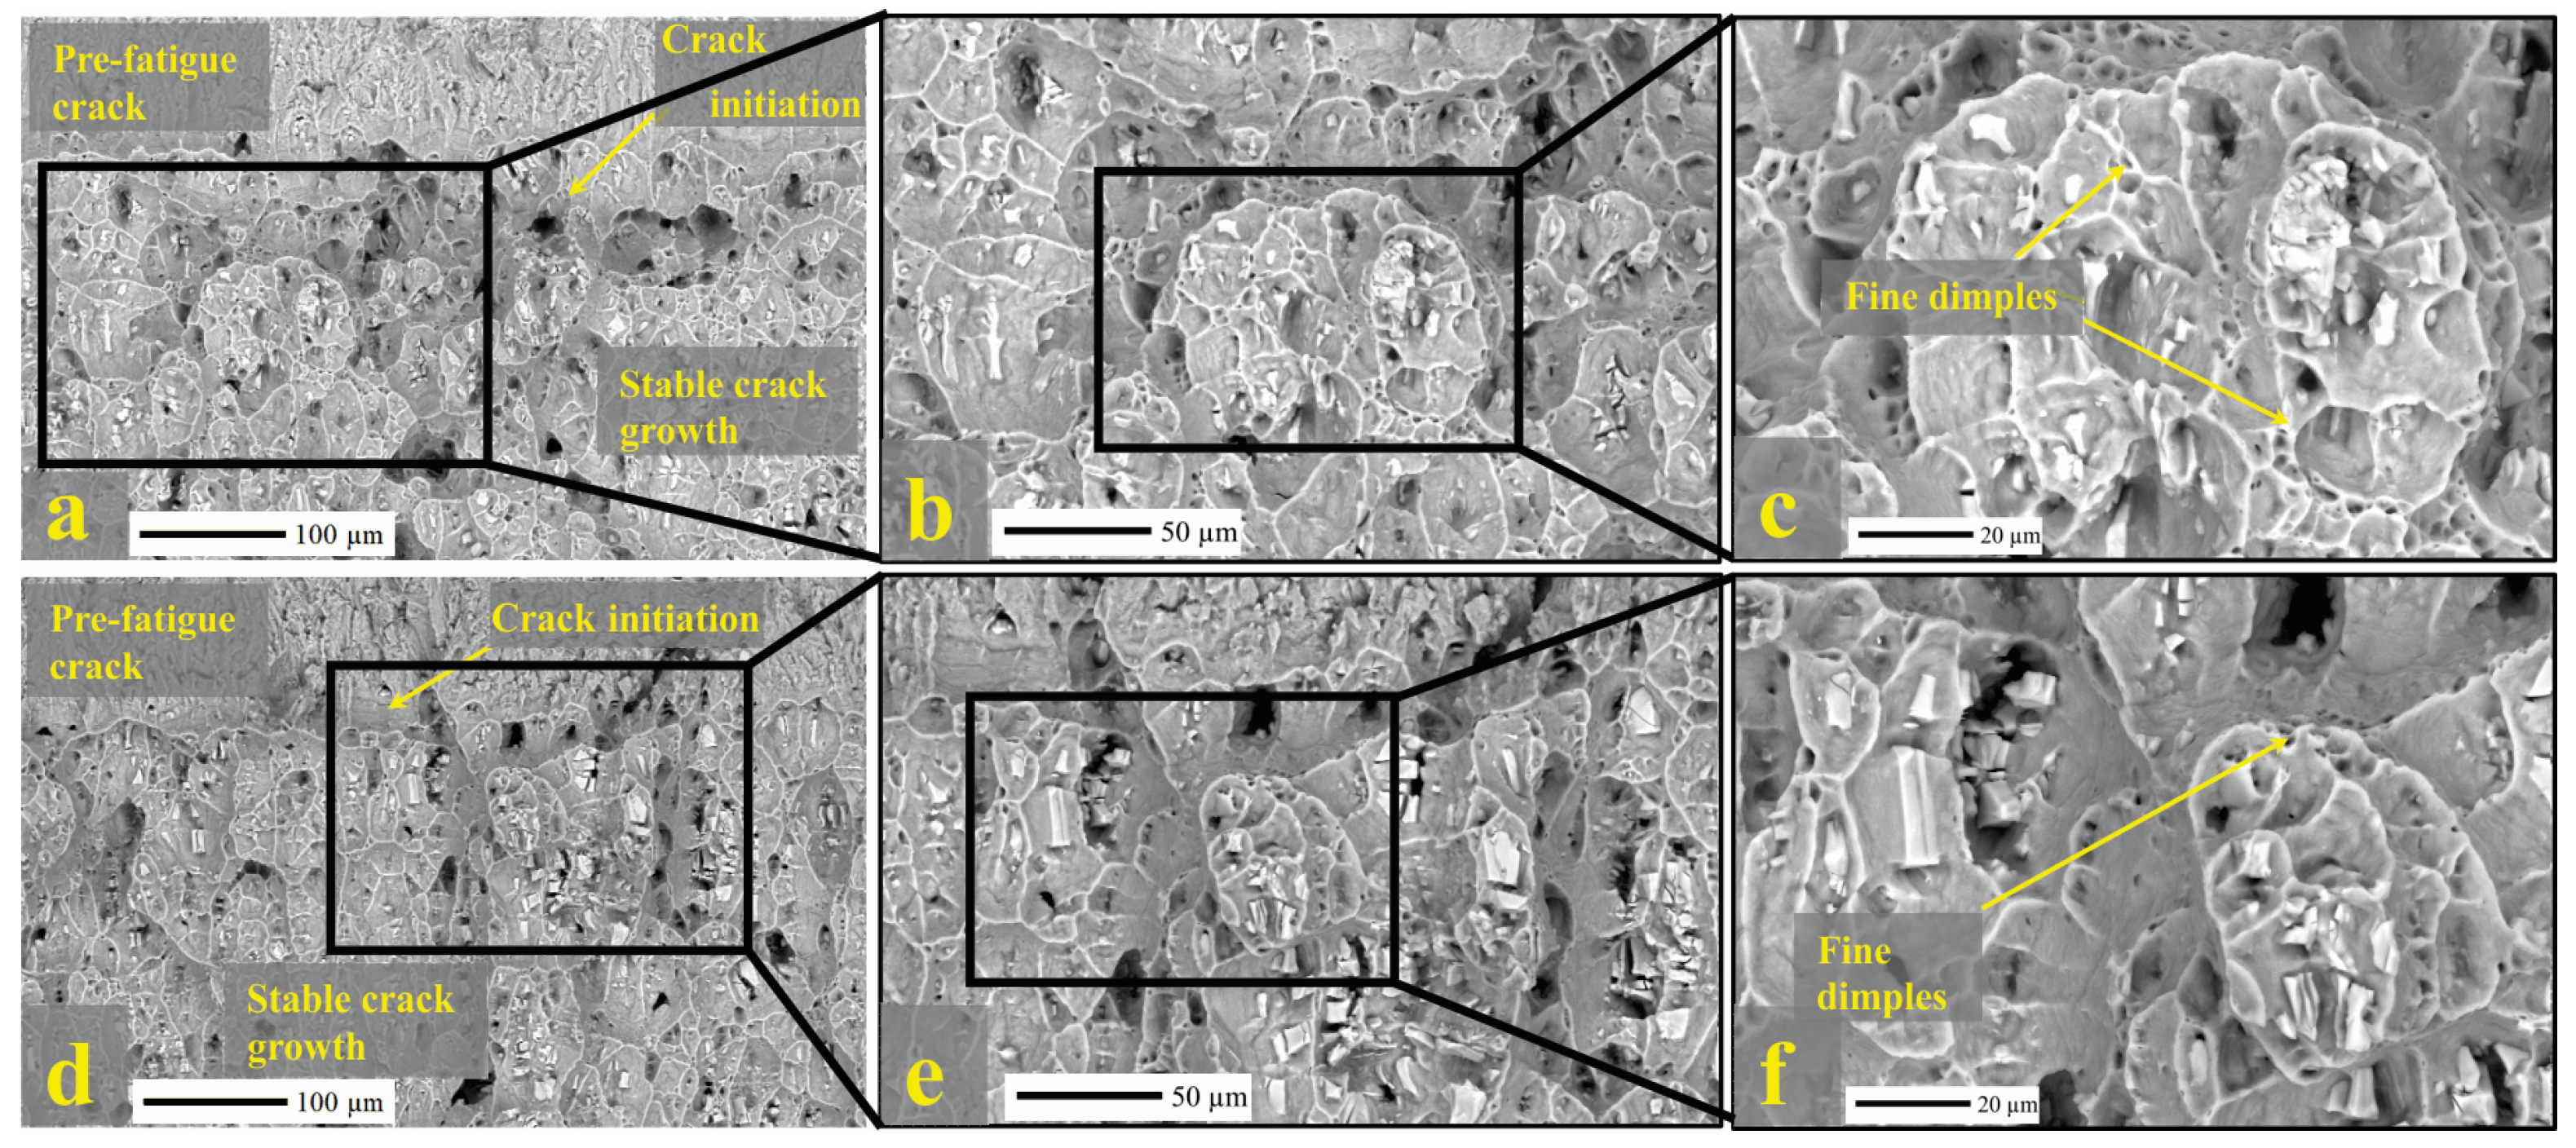
- Examined fracture surfaces show that the fractures are predominantly ductile but include some small local brittle zones.
- In the Charpy tests, the average work needed to break a thicker plate in the longitudinal direction was more than 20% greater than the work needed to break it in the transverse direction. In the case of the thinner sheet metal, the work required to break the specimen in the longitudinal direction was more than 40% greater than the work required to break the specimen in the transverse direction.
- In the Charpy tests, the intermetallic particles in the longitudinal samples were mostly intact, their distribution appeared random, and the upper part of the fracture showed tough areas along the edges of the pits, which indicates a better toughness than the tests in the transverse direction. More crushed intermetallic particles were observed at the fractures of the transverse samples, and their distribution appeared to be more oriented in the direction of rolling. This is reflected in the higher energy required for fracturing, which will be used in the future by the appropriate orientation of the sheet metal according to the direction of rolling in laser hybrid welding of subassemblies.
- The critical size of the JIC integral, as well as the fracture toughness of the longitudinally rolled SENB specimen, was about 50% greater than that of the transverse specimen. This was also confirmed by the higher resistance curve J–∆a.
- The state of the intermetallic particles on the mechanical SENB fractured surfaces was different from the intermetallic particles in the Charpy hammer fractures. On the longitudinal samples, the particles of the second phase were crushed, while the particles of the second phase on the samples in the transverse direction were mostly whole. The texture on the thinner sheet was stretched and oriented with more compressed intermetallic particles, which were smaller than on the thicker sheet.
- Particle resistance to crack growth in the longitudinal SENB specimen contributed to the energy that inhibited the crack. We will try to take advantage of this by properly orienting the sheet metal according to the direction of rolling in the preparation of welded joints.
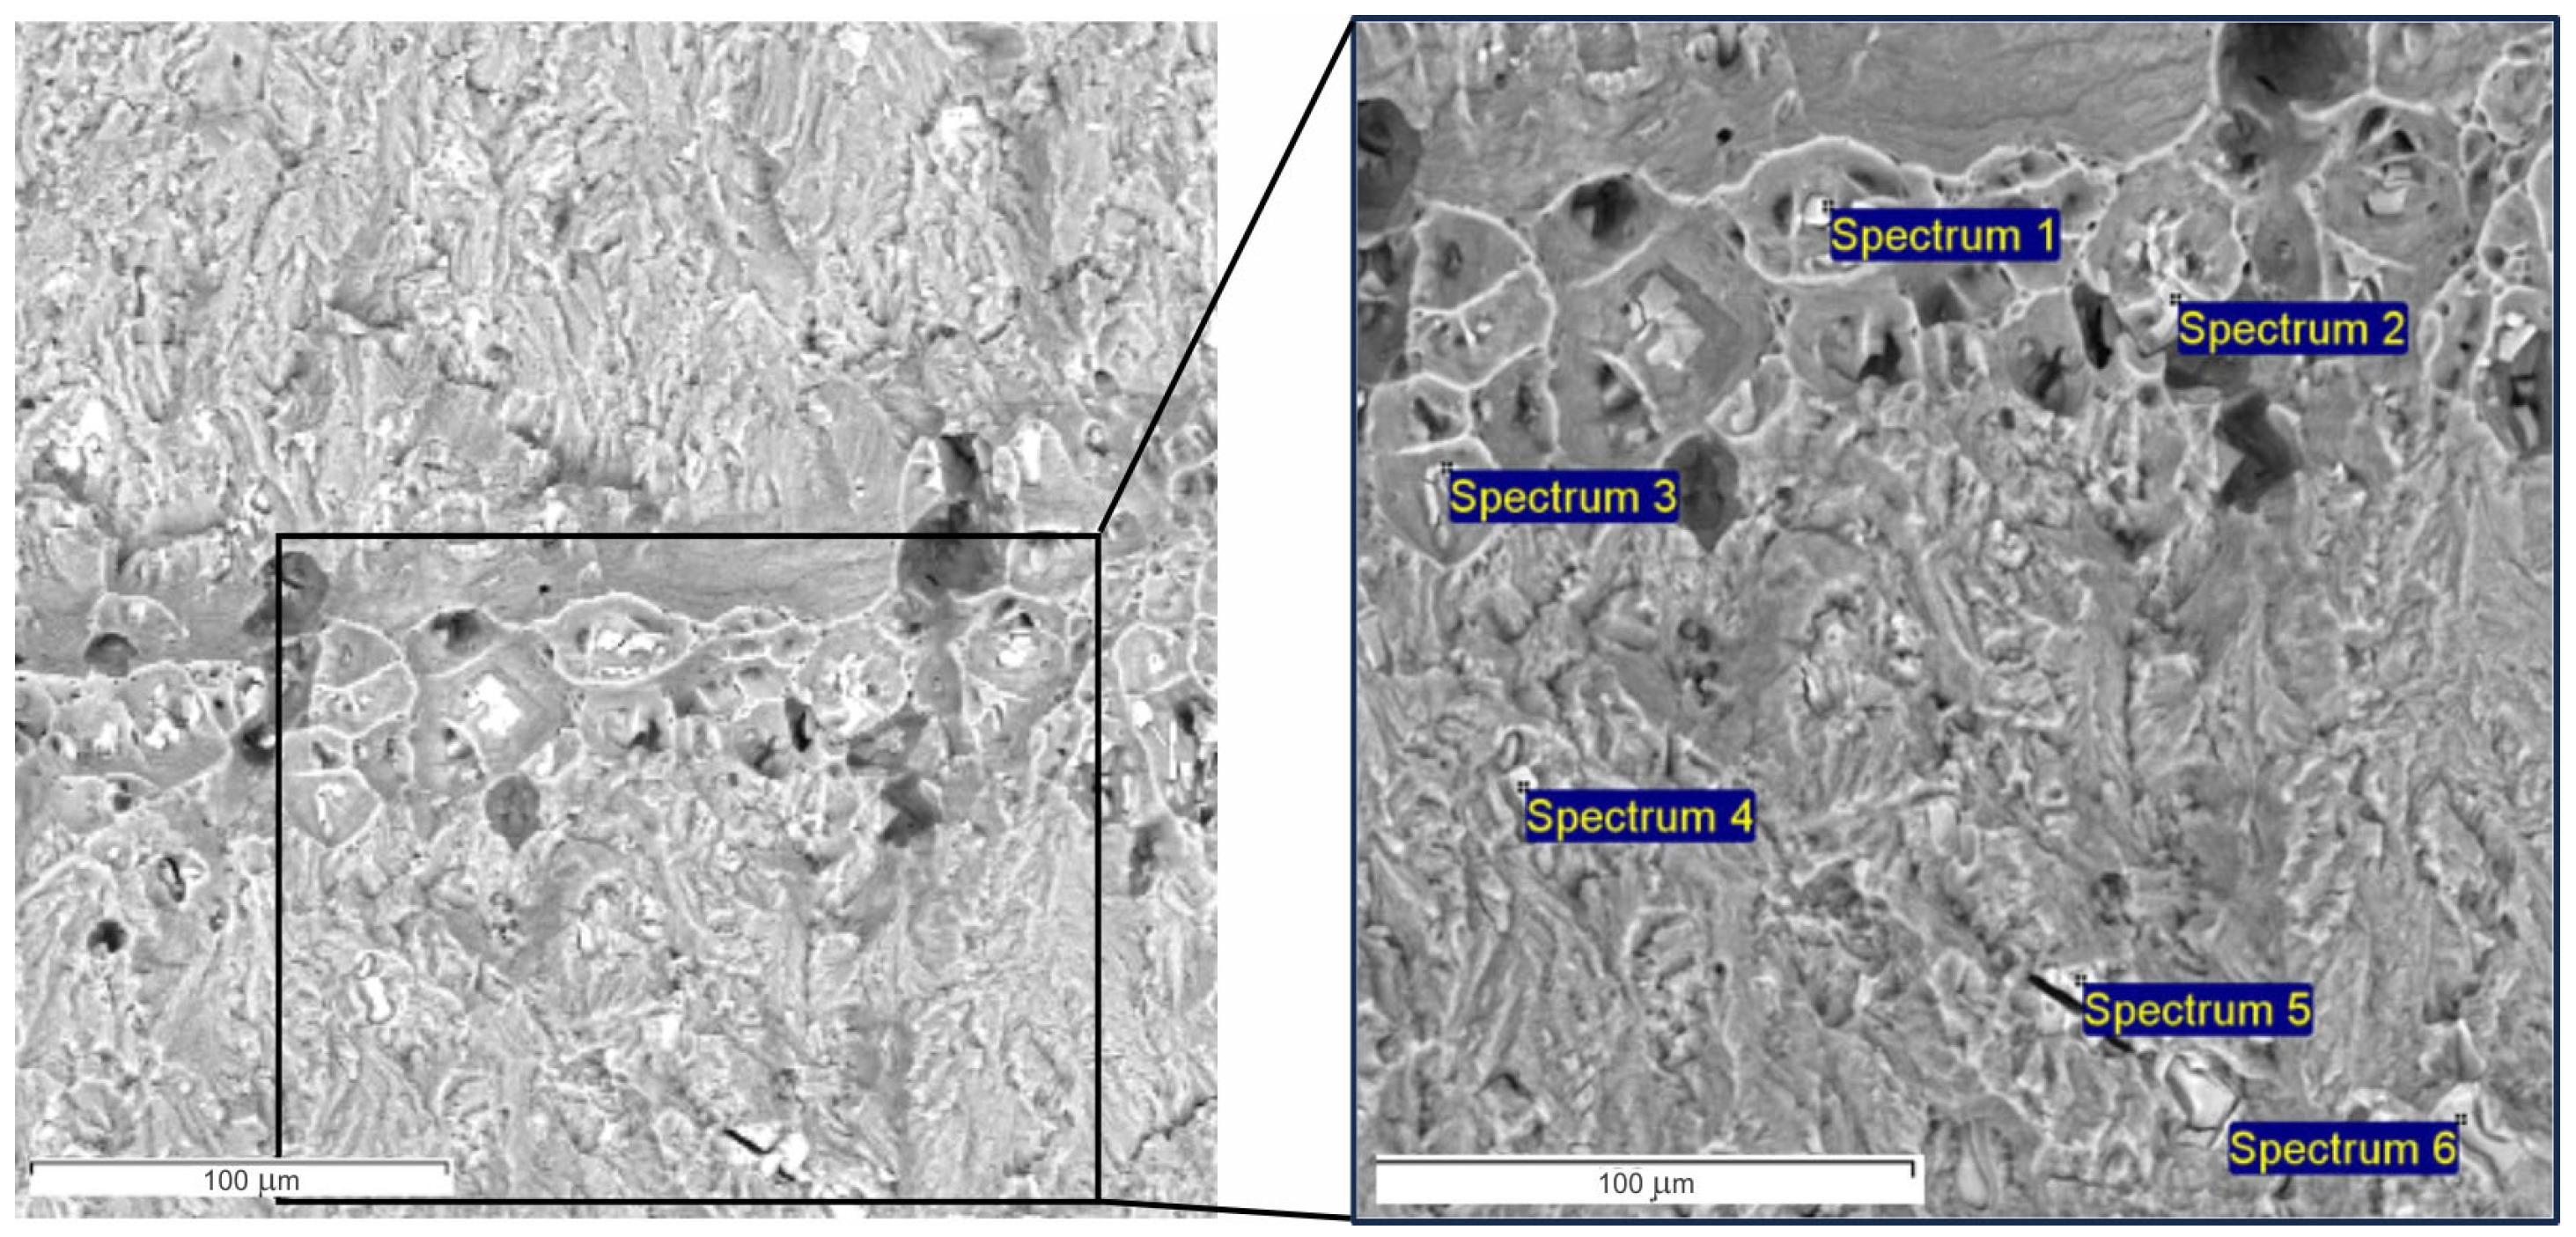
- The performed EDX analysis showed an increased content of Mn and Fe at all the analysed points of the sample fracture surfaces, indicative of the intermetallic phase particles Al6(Mn,Fe). The analysed microstructure was a single-phase α-alumina with present phases of Al6(Mn, Fe) and Mg2Si.
Author Contributions
Funding
Data Availability Statements
Conflicts of Interest
References
- Salej Lah, A.; Vončina, M.; Paulin, I.; Medved, J.; Fajfar, P.; Volšak, D. The influence of chemical composition and heat treatment on the mechanical properties and workability of the aluminium alloy EN AW 5454. Mater. Tehnol. 2021, 55, 709–716. [Google Scholar] [CrossRef]
- Volpone, L.M.; Mueller, S. Joints in light alloys today: The boundaries of possibility. Weld. Int. 2008, 22, 597–609. [Google Scholar] [CrossRef]
- Sheng, K.; Lu, L.; Xiang, Y.; Ma, M.; Wu, Z. Crack behavior in Mg/Al alloy thin sheet during hot compound extrusion. J. Magnes. Alloys 2019, 7, 717–724. [Google Scholar] [CrossRef]
- Mikhaylovskaya, A.V.; Portnoy, V.K.; Mochugovskiy, A.G.; Zadorozhnyy, M.Y.; Tabachkova, N.Y.; Golovin, I.S. Effect of homogenisation treatment on precipitation, recrystallisation and properties of Al–3% Mg–TM alloys (TM = Mn, Cr, Zr). Mater. Des. 2016, 109, 197–208. [Google Scholar] [CrossRef]
- Engler, O.; Kuhnke, K.; Hasenclever, J. Development of intermetallic particles during solidification and homogenization of two AA 5xxx series Al-Mg alloys with different Mg contents. J. Alloys Compd. 2017, 728, 669–681. [Google Scholar] [CrossRef]
- Hirsch, J. Aluminium Alloys for Automotive Application. Mater. Sci. Forum 1997, 242, 33–50. [Google Scholar] [CrossRef]
- Engler, O.; Liu, Z.; Kuhnke, K. Impact of homogenization on particles in the Al–Mg–Mn alloy AA 5454—Experiment and simulation. J. Alloys Compd. 2013, 560, 111–122. [Google Scholar] [CrossRef]
- Hirsch, J.; Al-Samman, T. Superior light metals by texture engineering: Optimized aluminum and magnesium alloys for automotive applications. Acta Mater. 2013, 61, 818–843. [Google Scholar] [CrossRef]
- García Gutiérrez, I.; Elduque, D.; Pina, C.; Tobajas, R.; Javierre, C. Influence of the Composition on the Environmental Impact of a Casting Magnesium Alloy. Sustainability 2020, 12, 10494. [Google Scholar] [CrossRef]
- Kotsikos, G.; Robinson, M.; Zangani, D.; Roberts, J. Investigation of the Weld Unzipping Failure Mode during Collisions of Welded Aluminium Rail Vehicles. Proc. Inst. Mech. Eng. Part F J. Rail Rapid Transit 2008, 222, 59–68. [Google Scholar] [CrossRef]
- Parente, M.; Safdarian, R.; Santos, A.D.; Loureiro, A.; Vilaca, P.; Jorge, R.M.N. A Study on the Formability of Aluminum Tailor Welded Blanks Produced by Friction Stir Welding. Int. J. Adv. Manuf. Technol. 2016, 83, 2129–2141. [Google Scholar] [CrossRef]
- Leitao, C.; Zhang, B.K.; Padmanabhan, R.; Rodrigues, D.M. Influence of Weld Geometry and Mismatch on Formability of Aluminium Tailor Welded Blanks: Numerical and Experimental Analysis. Sci. Technol. Weld. Join. 2011, 16, 662–668. [Google Scholar] [CrossRef]
- Xiao, J.; Wang, G.; Xuan, F.; Tu, S. Correlation between Fracture Toughness and Constraint of Bi-material Interfaces with Different Mechanical Mismatches. Fatigue Fract. Eng. Mater. Struct. 2023, 46, 452–470. [Google Scholar] [CrossRef]
- Lin, G.; Meng, X.G.; Cornec, A.; Schwalbe, K.H. The Effect of Strength Mis-Match on Mechanical Performance of Weld Joints. Int. J. Fract. 1999, 96, 37–54. [Google Scholar] [CrossRef]
- Casalino, G.; Maso, U.; Angelastro, A.; Campanelli, S.L. Hybrid Laser Welding: A Review. In DAAAM International Scientific Book; Katalinic, B., Ed.; DAAAM International Vienna: Vienna, Austria, 2010; pp. 413–430. [Google Scholar] [CrossRef]
- Paul, C.; Nicolae, J. Industrial applications for MSG—Laserhybrid welding process. Rev. Tehnol. Neconv. 2011, 15, 63. [Google Scholar]
- Staufer, H. LaserHybrid welding for industrial applications. In Proceedings of the SPIE—The International Society for Optical Engineering, Let. 6346 PART, Gmunden, Austria, 4–8 September 2006. [Google Scholar]
- ISO/TR 18491:2015 (E); Welding and Allied Processes—Guidelines for Measurement of Welding Energies. ISO—International Organization for Standardization: Geneva, Switzerland, 2015; pp. 1–7.
- Deutsche Fassung EN 1011-1; Schweißen–Empfehlungen zum Schweißen Metallischer Werkstoffe—Teil 1: Allgemeine Anleitungen für das Lichtbogenschweißen. European Committee for Standardization (CEN): Brussels, Belgium, 2009; pp. 1–18.
- Leo, P.; Renna, G.; Casalino, G.; Olabi, A.G. Effect of power distribution on the weld quality during hybrid laser welding of an Al–Mg alloy. Opt. Laser Technol. 2015, 73, 118–126. [Google Scholar] [CrossRef]
- Kostrivas, A.; Lippold, J.C. Fusion boundary microstructure evolution in aluminium alloys. Weld. World 2006, 50, 24–34. [Google Scholar] [CrossRef]
- Leo, P.; D’Ostuni, S.; Casalino, G. Hybrid welding of AA5754 annealed alloy: Role of post weld heat treatment on microstructure and mechanical properties. Mater. Des. 2016, 90, 777–786. [Google Scholar] [CrossRef]
- Aleo, V. Effect of Welding on the Width of the Heat-Affected Zone of Aluminum Alloys; ProQuest Dissertations Publishing: Ann Arbor, MI, USA, 2004. [Google Scholar]
- Çevik, B.; Gülenç, B. The effect of welding speed on mechanical and microstructural properties of 5754 Al (AlMg3) alloy joined by laser welding. Mater. Res. Express 2018, 5, 86520. [Google Scholar] [CrossRef]
- Courbière, M. Welding Aluminum Alloys. V Metallurgy and Mechanics of Welding: Processes and Industrial Applications; Elsevier Scopus: Amsterdam, The Netherlands, 2010; pp. 433–471. ISBN 9781848210387. [Google Scholar]
- Aalderink, B.J.; Pathiraj, B.; Aarts, R.G.K.M. Seam Gap Bridging of Laser Based Processes for the Welding of Aluminium Sheets for Industrial Applications. Int. J. Adv. Manuf. Technol. 2010, 48, 143–154. [Google Scholar] [CrossRef]
- Katayama, S. Fundamentals and Details of Laser Welding; Springer: Singapore, 2020. [Google Scholar]
- Ma, Y.R.; Cai, C.; Liu, Z.J.; Xie, J.; Yang, C. Plasma Monitoring during Laser-MIG Hybrid Welding Process Based on LabVIEW. Chin. J. Lasers-Zhongguo Jiguang 2022, 49, 0202014. [Google Scholar] [CrossRef]
- Balant, M.; Rudolf, R. Microstructure Characterization of Al-Alloy AW 5454 Intended for Ecological Laser Hybrid Welding. Metall. Mater. Data 2024, 2, 59–64. [Google Scholar] [CrossRef]
- Vuherer, T.; Kramberger, J.; Milčić, D.; Milčić, M.; Glodež, S. Fatigue Behaviour of Friction Stir Welded AA-2024 Aluminium Alloy Sheets. IOP Conf. Ser. Mater. Sci. Eng. 2019, 659, 12032–12040. [Google Scholar] [CrossRef]
- Sorochak, A.P.; Maruschak, P.O.; Yasniy, O.P.; Vuherer, T.; Panin, S. V Evaluation of Dynamic Fracture Toughness Parameters of Locomotive Axle Steel by Instrumented Charpy Impact Test. Fatigue Fract. Eng. Mater. Struct. 2017, 40, 512–522. [Google Scholar] [CrossRef]
- EN 515:2017; Aluminium and Aluminium Alloys—Wrought Products—Temper Designations. European Committee for Standardization (CEN): Brussels, Belgium, 2017; pp. 1–25.
- EN ISO 6507 1:2023; Metallic Materials—Vickers Hardness Test—Part 1: Test Method. European Committee for Standardization (CEN): Brussels, Belgium, 2023; pp. 1–39.
- EN ISO 6892 1:2019 (E); Metallic Materials—Tensile Testing—Part 1: Method of Test at Room Temperature. European Committee for Standardization (CEN): Brussels, Belgium, 2019; pp. 1–84.
- EN ISO 148-1; Metallic Materials—Charpy Pendulum Impact Test—Part 1: Test Method. European Committee for Standardization (CEN): Brussels, Belgium, 2016; pp. 1–33.
- EN ISO 14556:2023; Metallic Materials—Charpy V Notch Pendulum Impact Test—Instrumented Test Method. European Committee for Standardization (CEN): Brussels, Belgium, 2023; pp. 1–28.
- ASTM E1820; Standard Test Method for Measurement of Fracture Toughness. ASTM: West Conshohocken, PA, USA, 2015; pp. 1–54.
- Broitman, E. Indentation Hardness Measurements at Macro-, Micro-, and Nanoscale: A Critical Overview. Tribol. Lett. 2016, 65, 23. [Google Scholar] [CrossRef]
- Mohammed, A.-J.; Maher, I.; Nakai, M.; Gepreel, M.A.H. Effects of cold rolling and heat treatment on the microstructure and hardness of pure aluminium. Mater. Today Proc. 2023; in press. [Google Scholar] [CrossRef]
- Conserva, M.; Donzelli, G.; Trippodo, R. Aluminium and Its Applications; University of Pennsylvania State-Edimet: Edimet, PA, USA, 1992; p. 408. ISBN 9788886259019. [Google Scholar]
- Davis, J.R. Alloying: Understanding the Basics; ASM international: Tokyo, Japan, 2001; ISBN 1615030638. [Google Scholar]
- Curtin, W.A.; Olmsted, D.L.; Hector Jr, L.G. A predictive mechanism for dynamic strain ageing in aluminium–magnesium alloys. Nat. Mater. 2006, 5, 875–880. [Google Scholar] [CrossRef] [PubMed]
- Louat, N. On the theory of the Portevin-Le Chatelier effect. Scr. Metall. 1981, 15, 1167–1170. [Google Scholar] [CrossRef]
- McCormigk, P.G. A model for the Portevin-Le Chatelier effect in substitutional alloys. Acta Metall. 1972, 20, 351–354. [Google Scholar] [CrossRef]
- Estrin, Y.; Kubin, L.P. Collective dislocation behaviour in dilute alloys and the Portevin—Le Chatelier effect. J. Mech. Behav. Mater. 1989, 2, 255–292. [Google Scholar] [CrossRef]
- Kubin, L.P.; Estrin, Y. Evolution of dislocation densities and the critical conditions for the Portevin-Le Chatelier effect. Acta Metall. Mater. 1990, 38, 697–708. [Google Scholar] [CrossRef]
- Klose, F.B.; Ziegenbein, A.; Hagemann, F.; Neuhäuser, H.; Hähner, P.; Abbadi, M.; Zeghloul, A. Analysis of portevin-le chatelier serrations of type bin Al–Mg. Mater. Sci. Eng. A 2004, 369, 76–81. [Google Scholar] [CrossRef]
- Uscinowicz, R. The Effect of Rolling Direction on the Creep Process of Al–Cu Bimetallic Sheet. Mater. Des. 2013, 49, 693–700. [Google Scholar] [CrossRef]
- Medjahed, A.; Moula, H.; Zegaoui, A.; Derradji, M.; Henniche, A.; Wu, R.; Hou, L.; Zhang, J.; Zhang, M. Influence of the Rolling Direction on the Microstructure, Mechanical, Anisotropy and Gamma Rays Shielding Properties of an Al-Cu-Li-Mg-X Alloy. Mater. Sci. Eng. A. Struct. Mater. 2018, 732, 129–137. [Google Scholar] [CrossRef]
- İriç, S.; Ayhan, A.O. Dependence of Fracture Toughness on Rolling Direction in Aluminium 7075 Alloys. Acta Phys. Pol. A 2017, 132, 892–895. [Google Scholar] [CrossRef]
- Sakin, R. Investigation of bending fatigue-life of aluminum sheets based on rolling direction. Alex. Eng. J. 2018, 57, 35–47. [Google Scholar] [CrossRef]
- Wang, H. Effect of Rolling Direction to Texture Evolution in an Aluminium Single Crystal (011)[100]: A Crystal Plasticity FEM Investigation. Mater. Res. Express 2019, 6, 1265k8. [Google Scholar] [CrossRef]
- Lv, F.; Yang, F.; Duan, Q.Q.; Luo, T.J.; Yang, Y.S.; Li, S.X.; Zhang, Z.F. Tensile and Low-Cycle Fatigue Properties of Mg–2.8% Al–1.1% Zn–0.4% Mn Alloy along the Transverse and Rolling Directions. Scr. Mater. 2009, 61, 887–890. [Google Scholar] [CrossRef]
- Topic, I.; Höppel, H.W.; Göken, M. Influence of Rolling Direction on Strength and Ductility of Aluminium and Aluminium Alloys Produced by Accumulative Roll Bonding. J. Mater. Sci. 2008, 43, 7320–7325. [Google Scholar] [CrossRef]
- Kazemi-Navaee, A.; Jamaati, R.; Aval, H.J. Asymmetric Cold Rolling of AA7075 Alloy: The Evolution of Microstructure, Crystallographic Texture, and Mechanical Properties. Mater. Sci. Eng. A Struct. Mater. 2021, 824, 141801. [Google Scholar] [CrossRef]
- Alves, L.M. Fracture Mechanics. In Properties, Patterns and Behaviours; Alves, L.M., Ed.; IntechOpen: London, UK, 2016; pp. 1–332. [Google Scholar]
- Anderson, T.L.; Anderson, T.L. Fracture Mechanics: Fundamentals and Applications; CRC Press: Boca Raton, FL, USA, 2005; ISBN 0429125674. [Google Scholar]
- Jones, R.; Singh Raman, R.K.; McMillan, A.J. Crack growth: Does microstructure play a role? Eng. Fract. Mech. 2018, 187, 190–210. [Google Scholar] [CrossRef]
- Skallerud, B.; Iveland, T.; Härkegård, G. Fatigue life assessment of aluminum alloys with casting defects. Eng. Fract. Mech. 1993, 44, 857–874. [Google Scholar] [CrossRef]
- Zhu, X.-K.; Joyce, J.A. Review of fracture toughness (G, K, J, CTOD, CTOA) testing and standardization. Eng. Fract. Mech. 2012, 85, 1–46. [Google Scholar] [CrossRef]
- Zhu, X.; Blake, P. The formation mechanism of Al6(Fe, Mn) phase in die-cast Al-Mg alloys. CrystEngComm 2018, 20, 3839–3848. [Google Scholar] [CrossRef]
- Abu bakar, I. The Effect of Rolling Direction to the Tensile Properties of AA5083 Specimen. V; Springer: Singapore, 2015; pp. 779–787. ISBN 978-981-287-289-0. [Google Scholar]
- Nazemi, N. Identification of the Mechanical Properties in the Heat-Affected Zone of Aluminum Welded Structures; ProQuest Dissertations Publishing: Ann Arbor, MI, USA, 2015. [Google Scholar]




| Thickness [mm] | Element | Si | Fe | Cu | Mn | Mg | Cr | Zn | Ti | Al |
|---|---|---|---|---|---|---|---|---|---|---|
| Minimum | - | - | - | 0.5 | 2.6 | 0.05 | - | - | Rest | |
| Maximum | 0.25 | 0.4 | 0.1 | 1.0 | 3.0 | 0.2 | 0.2 | 0.05 | ||
| 3.5 | 0.16 | 0.31 | 0.06 | 0.79 | 2.86 | 0.07 | 0.03 | 0.02 | 95.70 | |
| 4.0 | 0.18 | 0.32 | 0.05 | 0.76 | 2.85 | 0.05 | 0.04 | 0.02 | 95.73 |
| Test | Thickness [mm] | Direction | Specimen | Thickness [mm] | Direction | Specimen |
|---|---|---|---|---|---|---|
| Hardness testing | 4.0 | AH1, AH2, AH3 | 3.5 | BH1, BH2, BH3 | ||
| Tensile testing | 4.0 | L | ALT1, ALT2, ALT3 | 3.5 | L | BLT1, BLT2, BLT3 |
| 4.0 | T | ATT1, ATT2, ATT2 | 3.5 | T | BTT1, BTT2, BTT3 | |
| Charpy | 4.0 | L | ALC1, ALC2, ALC3 | 3.5 | L | BLC1, BLC2, BLC3 |
| 4.0 | T | ATC1, ATC2, ATC3 | 3.5 | T | BTC1, BTC2, BTC3 | |
| Fracture mechanics | 4.0 | L | ALF1, ALF2, ALF3 | 3.5 | L | BLF1, BLF2, BLF3 |
| 4.0 | T | ATF1, ATF2, ATF3 | 3.5 | T | BTF1, BTF2, BTF3 |
| Polishing Agent | Load [N] | Rotational Speed [rpm] | Direction of Rotation | Time [min:s] |
|---|---|---|---|---|
| P600 sandpaper | 20 | 300/30 | Same direction | 5:00 |
| 9 μm diamond suspension + lubricant | 20 | 150/30 | Opposite direction | 5:00 |
| 3 μm diamond suspension + lubricant | 20 | 150/30 | Same direction | 4:00 |
| 1 μm diamond suspension + lubricant | 20 | 150/30 | Same direction | 2:30 |
| 0.06 μm colloidal silica + lubricant | 20 | 150/30 | Opposite direction | 2:00 |
| Specimen Thickness [mm] | Specimen | No. of Measurements | Average Sample Hardness | Std. Deviation |
|---|---|---|---|---|
| 4.0 | ALH1 | 14 | 81.4 | 5.9 |
| ALH2 | 13 | 84.0 | 5.1 | |
| ALH3 | 10 | 85.2 | 3.3 | |
| Average of all AH samples | 37 | 83.3 | 5.2 | |
| 3.5 | BLH1 | 12 | 87.6 | 5.6 |
| BLH2 | 16 | 85.9 | 5.9 | |
| BLH3 | 16 | 88.4 | 5.9 | |
| Average of all BH samples | 37 | 87.2 | 5.9 | |
| Nominal Thickness [mm] | Thickness [mm] | Rm [MPa] | Rp0.2 [MPa] | A80 [%] | |
|---|---|---|---|---|---|
| 4.0 | Min. Max. | 3.94.1 | 220 260 | 90 130 | 18 |
| Meas. | 3.96 | 240 | 105 | 20.3 | |
| 3.5 | Min. Max. | 3.4 3.6 | 220 260 | 90 130 | 18 |
| Meas. | 3.47 | 240 | 105 | 20.2 |
| Specimen Thickness [mm] | Direction | Specimen | E [GPa] | Rm [MPa] | Rp0.2 [MPa] | Ag [%] |
|---|---|---|---|---|---|---|
| 4.0 | L | ALT1 | 70.42 | 250.2 | 118.6 | 16.26 |
| ALT2 | 71.99 | 250.5 | 117.9 | 17.02 | ||
| ALT3 | 71.22 | 249.6 | 117.8 | 19.02 | ||
| Average | 71.21 | 250.1 | 118.1 | 17.43 | ||
| STD | 0.64 | 0.37 | 0.36 | 1.16 | ||
| T | ATT1 | 70.01 | 243.6 | 116.9 | 14.73 | |
| ATT2 | 70.99 | 243.5 | 116.7 | 15.89 | ||
| ATT3 | 70.01 | 243.2 | 115.3 | 15.97 | ||
| Average | 70.34 | 243.4 | 116.3 | 15.53 | ||
| STD | 0.46 | 0.17 | 0.71 | 0.57 | ||
| 3.5 | L | BLT1 | 71.91 | 251.2 | 118.1 | 16.06 |
| BLT2 | 69.66 | 252.9 | 118.6 | 18.02 | ||
| BLT3 | 70.15 | 254.7 | 118.5 | 17.64 | ||
| Average | 70.57 | 252.9 | 118.4 | 17.59 | ||
| STD | 0.97 | 1.43 | 0.22 | 0.85 | ||
| T | BTT1 | 70.02 | 244.2 | 116,9 | 16.27 | |
| BTT2 | 68.36 | 245.8 | 115.7 | 15.03 | ||
| BTT3 | 68.85 | 245.0 | 115.6 | 15.25 | ||
| Average | 69.08 | 245.0 | 116.1 | 15.52 | ||
| STD | 0.70 | 0.65 | 0.59 | 0.54 |
| Specimen Thickness [mm] | Direction | Sample | Impact Energy E [J] | Ei [J] | Ep [J] | KVpov [J/cm2] |
|---|---|---|---|---|---|---|
| 4.0 | L | ALC1 | 11.10 | 5.07 | 6.03 | 36.22 |
| ALC2 | 11.66 | 5.29 | 6.37 | |||
| T | ATC1 | 9.37 | 3.88 | 5.49 | 30.16 | |
| ATC2 | 9.51 | 3.24 | 6.27 | |||
| 3.5 | L | BLC1 | 10.66 | 3.87 | 6.79 | 38.73 |
| BLC2 | 10.54 | 4.46 | 6.08 | |||
| T | BTC1 | 7.68 | 3.06 | 4.62 | 27.64 | |
| BTC2 | 7.38 | 2.24 | 5.14 |
| Spectrum | Mg | Al | Mn | Fe | Total |
|---|---|---|---|---|---|
| Spectrum 1 | 1.37 | 81.29 | 6.86 | 10.48 | 100 |
| Spectrum 2 | 0.98 | 79.90 | 9.94 | 9.18 | 100 |
| Spectrum 3 | 1.45 | 79.82 | 7.16 | 11.57 | 100 |
| Spectrum 4 | 0.29 | 76.31 | 10.47 | 12.93 | 100 |
| Spectrum 5 | 0.36 | 77.91 | 9.18 | 12.55 | 100 |
| Spectrum 6 | 0.43 | 79.07 | 8.06 | 12.44 | 100 |
| Mean | 0.81 | 79.06 | 8.61 | 11.52 | 100 |
| Std. Dev. | 0.52 | 1.74 | 1.49 | 1.44 | |
| Max. | 1.45 | 81.29 | 10.47 | 12.93 | |
| Min. | 0.29 | 76.31 | 6.86 | 9.18 |
| Spectrum | Mg | Al | Mn | Fe | Total |
|---|---|---|---|---|---|
| Spectrum 1 | 0.61 | 77.90 | 8.70 | 12.79 | 100 |
| Spectrum 2 | 0.49 | 73.62 | 9.32 | 16.57 | 100 |
| Spectrum 3 | 0.30 | 79.15 | 7.93 | 12.62 | 100 |
| Spectrum 4 | 0.33 | 68.63 | 13.92 | 17.12 | 100 |
| Spectrum 5 | 0.66 | 74.52 | 9.54 | 15.28 | 100 |
| Spectrum 6 | 1.45 | 53.54 | 18.10 | 26.91 | 100 |
| Mean | 0.64 | 71.23 | 11.25 | 16.88 | 100 |
| Std. Dev. | 0.42 | 9.41 | 3.95 | 5.26 | |
| Max. | 1.45 | 79.15 | 18.10 | 26.91 | |
| Min. | 0.64 | 71.23 | 11.25 | 16.88 |
Disclaimer/Publisher’s Note: The statements, opinions and data contained in all publications are solely those of the individual author(s) and contributor(s) and not of MDPI and/or the editor(s). MDPI and/or the editor(s) disclaim responsibility for any injury to people or property resulting from any ideas, methods, instructions or products referred to in the content. |
© 2024 by the authors. Licensee MDPI, Basel, Switzerland. This article is an open access article distributed under the terms and conditions of the Creative Commons Attribution (CC BY) license (https://creativecommons.org/licenses/by/4.0/).
Share and Cite
Balant, M.; Vuherer, T.; Majerič, P.; Rudolf, R. The Influence of the Rolling Direction on the Mechanical Properties of the Al-Alloy EN AW-5454-D. J. Manuf. Mater. Process. 2024, 8, 217. https://doi.org/10.3390/jmmp8050217
Balant M, Vuherer T, Majerič P, Rudolf R. The Influence of the Rolling Direction on the Mechanical Properties of the Al-Alloy EN AW-5454-D. Journal of Manufacturing and Materials Processing. 2024; 8(5):217. https://doi.org/10.3390/jmmp8050217
Chicago/Turabian StyleBalant, Matjaž, Tomaž Vuherer, Peter Majerič, and Rebeka Rudolf. 2024. "The Influence of the Rolling Direction on the Mechanical Properties of the Al-Alloy EN AW-5454-D" Journal of Manufacturing and Materials Processing 8, no. 5: 217. https://doi.org/10.3390/jmmp8050217
APA StyleBalant, M., Vuherer, T., Majerič, P., & Rudolf, R. (2024). The Influence of the Rolling Direction on the Mechanical Properties of the Al-Alloy EN AW-5454-D. Journal of Manufacturing and Materials Processing, 8(5), 217. https://doi.org/10.3390/jmmp8050217


