Proceeding Paper

Some Studies on the Mechanism of Chip Formation during Machining of Chromium Manganese Austenitic Stainless Steel †

Department of Mechanical Engineering, National Institute of Technology, Silchar 788010, Assam, India
*
Author to whom correspondence should be addressed.
Presented at the 5th International Conference on Innovative Product Design and Intelligent Manufacturing Systems (IPDIMS 2023), Rourkela, India, 6–7 December 2023.
Eng. Proc. 2024, 66(1), 32; https://doi.org/10.3390/engproc2024066032
Published: 18 July 2024

Abstract

:
The mechanism of chip formation during machining depends on the type of (i) work material, (ii) tool material, (iii) machining parameters, (iv) tool geometry, etc. It is difficult to understand the mechanism of chip formation without performing experimentation. The present effort has been made to know the mechanism of chip formation during the machining of chromium–manganese austenitic stainless (AST) steel. The chip formation mechanism study for the present steel has been conducted by performing (i) mechanical testing for the work material, (ii) chip type study, (iii) optical microstructural study of the chip surface, and (iv) SEM observation for the chip surfaces. The present chromium–manganese stainless steel (austenitic) was dry-turned in a lathe. Three different experiments were conducted. The input process parameters were v (speed), f (feed), and DOC (depth of cut). The chip reduction coefficient (CRC) and the von Mises stress (VMS) were the output response parameters. The chip thicknesses were measured. The steel specimen was tested on the universal tensile testing machine. The chip reduction coefficients (CRCs) and the von Mises stress were experimentally determined. The undersides of the chips were examined under a light microscope. The chip’s top and bottom surfaces were viewed by scanning electron microscopy (SEM). The strain-induced martensite (SIM) formed at the chip surface (under) during the machining at the lower experimental parameters. The surface (underside) of the chip was influenced by the dynamic recrystallization (DRX) and the dynamic precipitation (DP) during the machining at the higher experimental parameters.

1. Introduction

The machinability of austenitic stainless steel is poor. However, its corrosion resistance is better. This steel cannot be hardened by heat treatment because of its austenite retention ability. The austenite matrix is an FCC crystal structure. Strain hardening and solid solution hardening can strengthen this steel. Austenitic stainless steel is used for corrosion resistance applications. The weight percentages of chromium and manganese are higher in 202 austenitic stainless steel. The nickel content is low. Some nitrogen addition is also made in the present steel. The strain-induced martensite (SIM) forms during the deformation of the 202 steel (AST). The SIM formation causes hardening in the steel. The austenite phase is also strain-hardened due to a dislocation interaction during the deformation. The stacking fault energy is reduced due to the lower nickel content in the 202 austenitic stainless steel. The strain hardening is higher due to the lower stacking fault energy. A coated tool was used for turning (wet) 316L steel. The optimization method was applied to select the proper parameters. The surface finish and material removal rate were improved by setting high-level input parameters [1]. The surface quality of 202 steel (AST) was studied by using PVD- and CVD-coated carbide inserts. The machining was conducted by using a CNC lathe. The effects of the coating and process parameters were investigated. The influences of the process parameters were analyzed by using the Taguchi design plan. The optimal parameters were also obtained. The CVD-coated tool was useful due to the better surface quality [2]. A carbide tool was used to machine the stainless steel at high speed. The cutting force and the surface finish were optimized by using the Taguchi methodology [3]. The cutting tool wear during machining (austenitic stainless steel) was studied by cooling the tool internally. The tool temperature and wear increased with the higher heat generation and higher machining forces. The lesser tool wear was due to the internal and external cooling together [4]. The sticky behavior of the austenitic stainless steel was observed during the machining. MQL can be preferred during machining to address this difficulty. The use of the coated carbide tool was favorable [5]. The austenitic stainless steel was machined to analyze various machining responses. Different lubrication techniques were also applied. Different machining parameters were selected for the machining. Environmental and health problems can be reduced due to the use of MQL [6]. The PVD AITIN and the CVD TICN + Al2O3 coatings were applied separately on two different carbide substrates. The tool performance was assessed for the cutting of the austenitic stainless steel by using these coated tool inserts. The better selection of the coating and substrate properties was found to improve the tool’s life [7]. The precipitation hardening semi-AST (Cr12Mn5Ni4Mo3Al) was dry-turned by using the two different carbide tools. The machining responses were the tool wear, the cutting force, and the tool temperature. Elemental diffusion was observed from the tool face to the chip and from the chip to the tool. The carbide tool was worn away by the abrasive, adhesive, and diffusion wear mechanisms [8]. The machining parameter optimization was performed to minimize the surface roughness and power consumption for the turning of the AISI 1045 steel. Better machining results were obtained. The machining environment should be dry [9]. The high-speed machining of the austenitic stainless steel (304 grades) was performed. The AlCrN/TiAlN coating was applied to the tool insert using a cathodic arc evaporation technique. During the dry turning, the coating performed better in terms of temperature resistance. The coating reduced the cutting forces [10]. A milling machine was used to machine the 303 austenitic stainless steel. The cutting parameters were optimized to obtain the minimum surface roughness and energy consumption. Dry machining was discovered to be superior in terms of the surface finish and cutting forces [11]. The high-speed finishing turning of the austenitic stainless steel (304 grades) was performed. The AlTiN PVD coatings were applied to the carbide tool inserts for different Ai/Ti atomic ratios. The machining was performed for different cooling conditions (dry and wet). All the coatings exhibited a better tool life compared to dry machining [12]. The stainless steel (super-duplex) was machined on the CNC lathe. The machining was performed with a PVD-coated tool insert. A high-pressure cooling environment was used. The result was better [13]. The experiments were performed to find out the cutting forces, temperature, and residual stresses of the machined surface during the machining of the 316L steel (AST). The Johnson–Cook (JC) equation was applied in a numerical model to explain the behavior of the 316L austenitic stainless steel. All the machining responses were very sensitive to the JC model constants [14]. The cutting forces were analyzed during the drilling of the heat-resistant austenitic stainless steel. The work hardening behavior of the material was studied. The drilling with the quick-stop device was referred to in [15]. The present aim is to establish the chip formation mechanism during the turning of chromium–manganese austenitic stainless steel. The correlation of von Mises stresses with the experimental parameters and the study of the chip formation mechanism of a newer grade of Cr-Mn steel (AST) emphasizes the novelty of the work.

2. Experimental Procedure

The cylindrical work piece was collected for machining. The composition of the work piece is shown in Table 1.
The rake angle of the carbide tool was 4°, and the main cutting edge angle was 46° (INDOLOY). The machining was performed for the parameters that are shown in Table 2. Subsequently, the chip specimens were obtained from the experiments. The following are the processing steps to prepare the optical microstructures for the surface (underside) of the chips.
(i)
Plastic mounting of the formed chips;
(ii)
Polishing;
(iii)
Etching.
The chips were viewed by scanning electron microscopy. The engineering stress (σ) and the engineering strain (ε) data were collected from the engineering stress–strain curve. These data were used to find out the corresponding true stress (σT) and the true strain (εT). The relationship between the yield and ultimate tensile strength was considered. The relationship between σT and εT was obtained graphically. The following power law Equation (1) [16] was obtained graphically by using the graph.
σT = K (εT)n,
where K represents the strength coefficient and n represents the strain hardening exponent.
Thereafter, the VMS (S) [17] was determined by using Equation (2):
S = 1.74 K (ln ζ)n,
where ζ is the CRC.

3. Results and Discussion

The Rockwell hardness of the as-received work piece was 59.74. The toughness property of the material was 271 J. The power law equation was established as Equation (3). The experimental response parameters are shown in Table 3. The variations in the VMS with respect to the experiment number are shown (Figure 1).
σ = 2800 ε0.4452,
The higher VMS was caused by machining at lower parameter levels. This is due to the SIM for these cutting parameters. The VMS decreases with the increase in the speed, feed, and DOC. This indicates that the material recrystallizes dynamically because of the machining at higher levels. The chip macrographs are shown in Figure 2a (experiment number 1), Figure 2b (experiment number 2), and Figure 2c (experiment number 3). The broken chips are seen (Figure 2a) and the long tubular chips are seen (Figure 2b). The long tubular chips are also seen in Figure 2c. The broken chips are due to the lower heat generation during cutting at the lower parameter levels. The long tubular chips are due to the higher heat generation during the machining due to the high and moderate speed, feed, and DOC. The austenite matrix with the dispersed carbide precipitates is seen in the microstructure (Figure 3).
The microstructure (optical) of the chip’s surface (under) for the first machining condition is shown in Figure 4a. The fracture in the chip was due to SIM formation in the present machining condition. The chips were catastrophically broken. The surface (under) of the chip remains unetched due to the adiabatic shear at the chip’s surface (under). The microstructure (optical) of the chip’s surface (under) for the second machining condition is shown in Figure 4b. The dynamic recrystallization (DRX) took place at the chip’s surface (under). The DRX precedes the DP for the present machining condition. The DRX is seen in austenitic stainless steel due to the low stacking fault energy (SFE). For the moderate cutting parameter levels, the present alloy’s high carbon and chromium content favors the formation of chromium carbides in the chip. This made the austenitic stainless steel amenable to DP. The chromium carbide particles decorated the recrystallized grain boundaries. The massive carbides are also observed inside the grain. These massive carbides are the carbides of the prior austenite grain boundaries. The DRX is preferred as the larger-sized carbide particles (>1 µm) cannot pin the grain boundaries. The larger carbide particles influenced the DRX and DP. The formation of the secondary saw tooth at the free edge of the chip is shown in Figure 4c. The secondary saw tooth cannot form at the constrained edge of the chip.
The microstructure (optical) of the chip’s surface (under) for the third machining condition is shown in Figure 4d. The chromium carbide size is smaller due to the higher deformation energy. The DRX is higher for the machining at higher parameter levels. The finer DRX grains are observed in the chip’s microstructure. This is due to the higher temperature generation in the present machining condition. The chromium carbide particles are seen along the finer DRX grain boundaries. A few carbide particles are also observed inside the grain. The DRX proceeds and the DP lags behind the DRX. The details of SIM formation, dynamic recrystallization, and dynamic precipitation have been represented schematically [18].
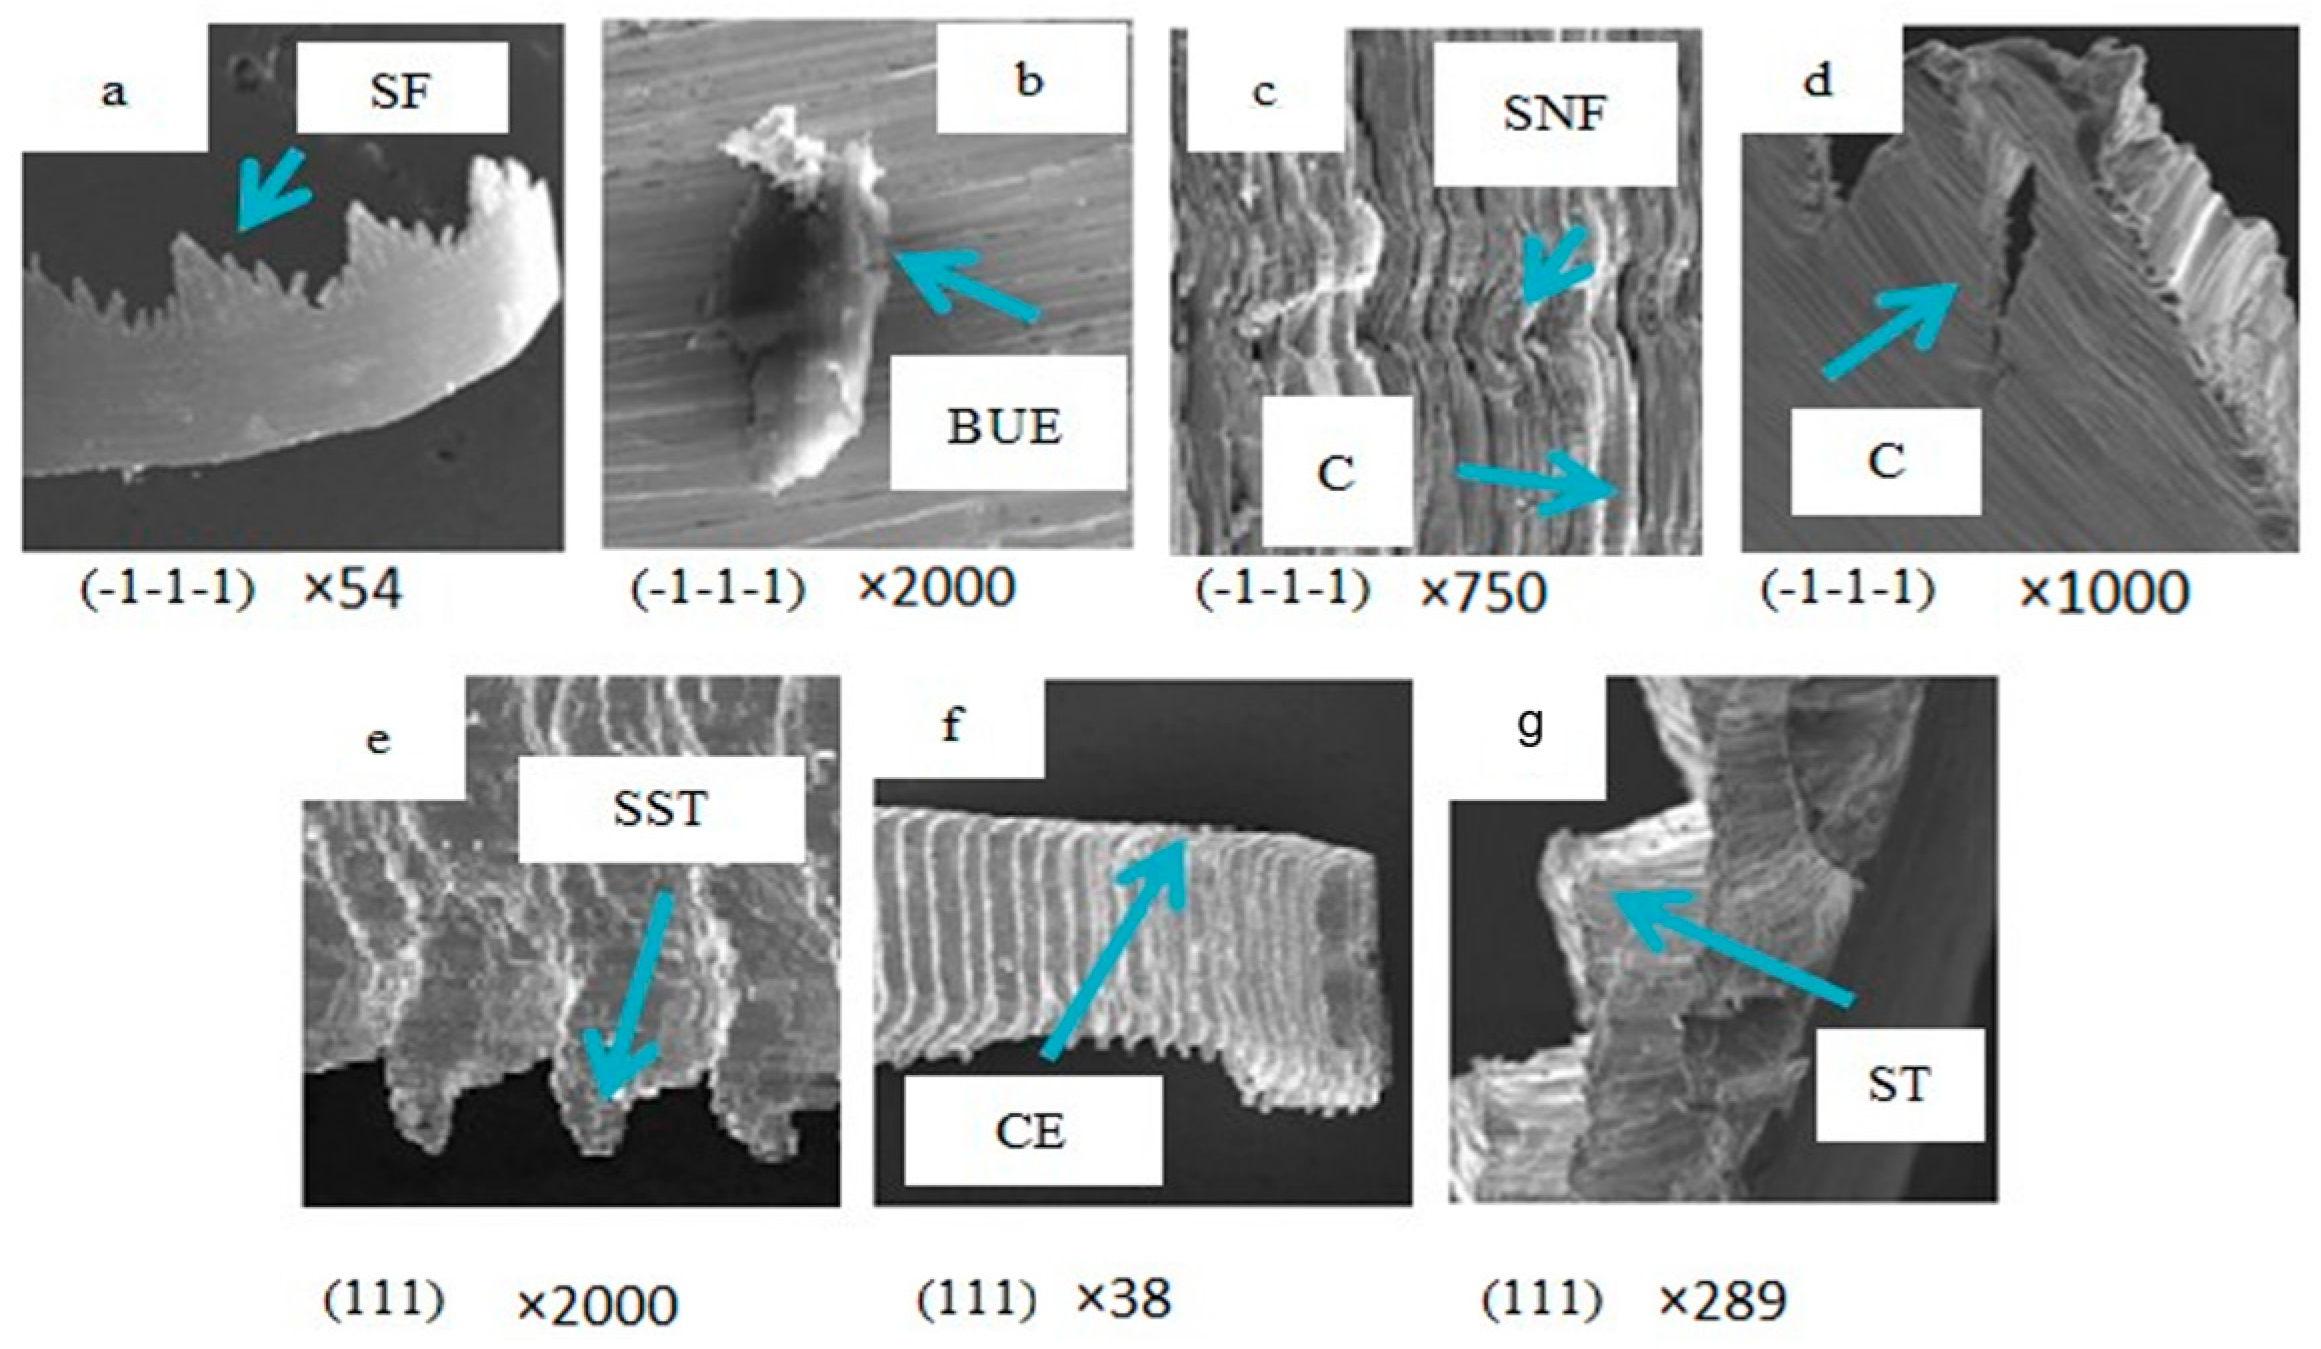
The side flow at the free edge of the chip for the low speed, low feed, and low DOC is seen. The side flow was not observed at the constrained edge of the chip (Figure 5a). The fragment of the built-up edge was seen (Figure 5b). The sinuous flow and the cracking were observed at the chip’s top surface (Figure 5c). The cracks were also observed at the chip’s surface (under) (Figure 5d). This indicated that the chip was formed in the hardened state (SIM) during the machining at lower parameter levels. The DRX is higher for the machining at higher parameter levels. The secondary saw tooth was observed at the free edge of the chip (Figure 5e) during the machining at the higher parameter levels. The secondary saw teeth were not seen at the constrained edge (Figure 5f). The lamellar flow appearance of the steel was noted at the chip’s top surface (Figure 5f). The saw-tooth chip was observed at a high speed, feed, and DOC (Figure 5g). For this condition, a higher temperature developed at the primary deformation zone (PDZ) of the austenitic stainless steel. The heat that has developed in the PDZ cannot dissipate due to the poorer conductivity of the material. Because of the adiabatic shear instability condition, the entire heat is trapped in the PDZ, and saw teeth form.
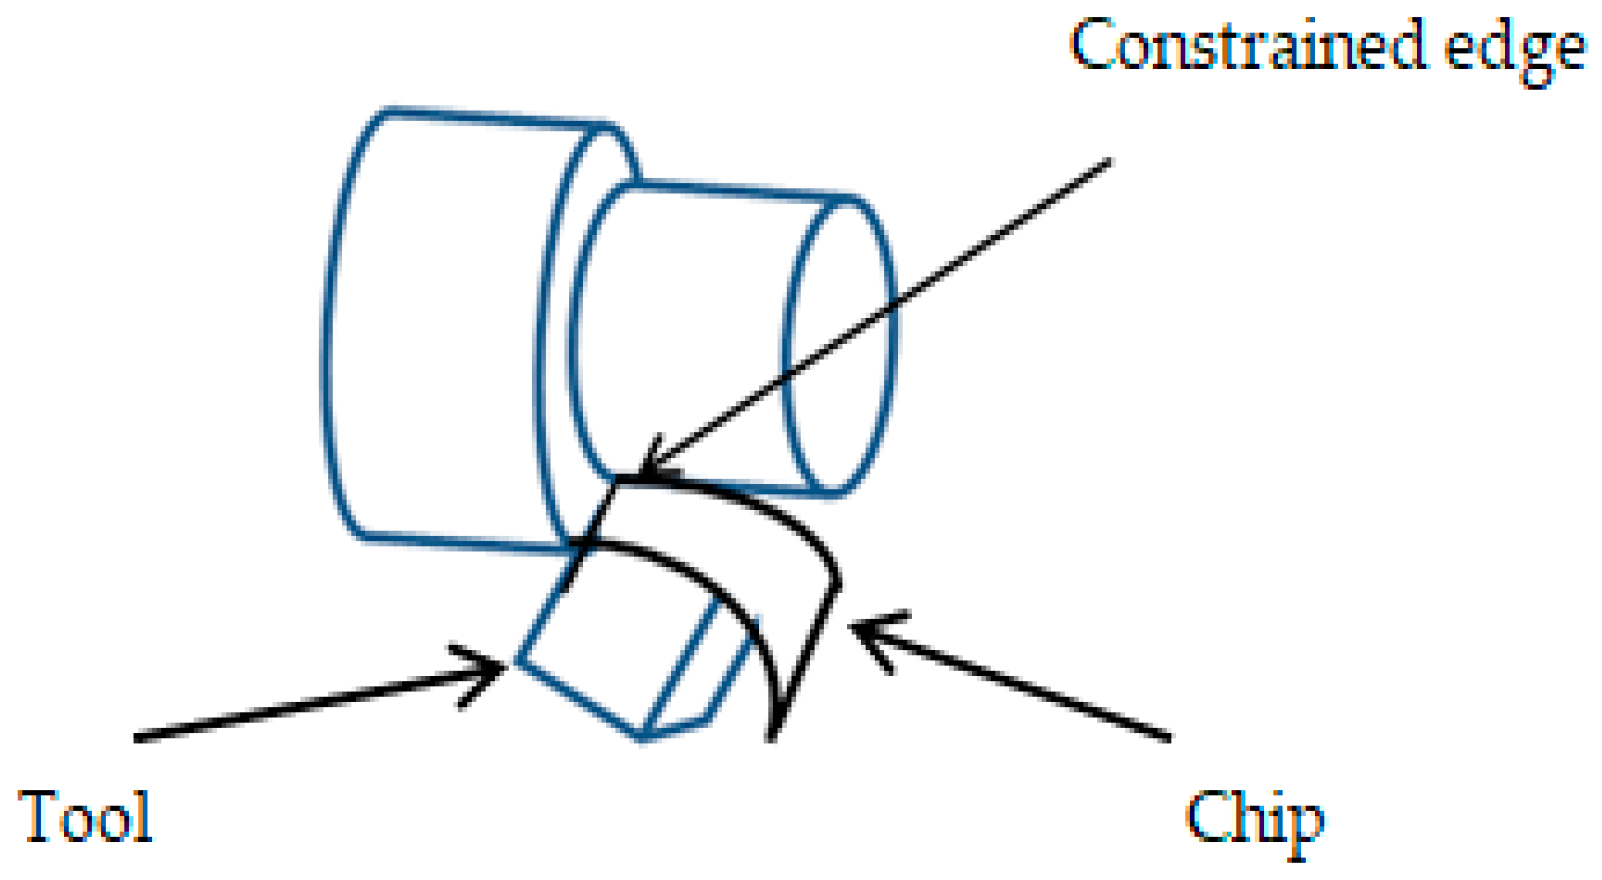
The concept of a constrained edge is schematically shown in Figure 6.

4. Conclusions

At lower parameter levels, the chip was formed for the SIM formation and adiabatic shear instability state of the current steel. The chip formation was for the DRX, followed by DP for the higher parameter levels. The built-up edge formation was for machining at the lower parameter levels. The chip formation was due to the restoration of the hardening behavior of the material. The saw-tooth chip formed due to the high-speed cutting at the high feed and high DOC.

Author Contributions

Conceptualization, K.C.; methodology, K.C.; validation, K.C. investigation, S.D.; resources, S.D.; data curation, S.D.; writing—original draft preparation, S.D.; writing—review and editing, S.D.; supervision, K.C. All authors have read and agreed to the published version of the manuscript.

Funding

This research received no external funding.

Institutional Review Board Statement

Not applicable.

Informed Consent Statement

Not applicable.

Data Availability Statement

All the data used are made available in the present work.

Conflicts of Interest

The authors declare no conflicts of interest.

References

  1. Suman, K.; Bikash, C. CNC Machinability study of AISI 316L & Optimization of Machining parameters using TLBO algorithm. Mater. Today Proc. 2022, 62, 1218–1225. [Google Scholar]
  2. Kaladhar, M. Process parameters optimisation and coatings influence on the surface quality during turning of AISI 202 austenitic stainless steel. Int. J. Mach. Mach. Mater. 2012, 11, 371. [Google Scholar] [CrossRef]
  3. Ahmad, H.; Ahmed, A.B. An optimization method of the machining parameters in high-speed machining of stainless steel using coated carbide tool for best surface finish. Int. J. Adv. Manuf. Technol. 2012, 58, 81–91. [Google Scholar]
  4. Friedrich, B.; Daniel, F.; Anton, S. Machining of difficult to cut materials. In Proceedings of the 27th DAAM International Symposium on Intelligent Manufacturing and Automation, Mostar, Bosnia and Herzegovina, 26–29 October 2016. [Google Scholar]
  5. Dureja, J.; Ranjit, S.; Talwinder, S. Performance Evaluation of Coated Carbide Tool in Machining of Stainless Steel (AISI 202) under Minimum Quantity Lubrication (MQL). Int. J. Precis. Eng. Manuf. Green Technol. 2015, 2, 123–129. [Google Scholar] [CrossRef]
  6. Smita, P.; Anshuman, D.; Aniket, S.; Thakkar, R. Level of Thesis, Sustainability Assessment and Machinability Investigation of Austenitic Stainless Steel in Finish Turning with Advanced Ultra-Hard SiAlON Ceramic Tool under Different Cutting Environments. Silicon 2021, 13, 119–147. [Google Scholar]
  7. Hea, Q.; Paivaa, J.M.; Kohlscheenc, J.; Beaked, B.D.; Veldhuisa, S.C. An integrative approach to coating/carbide substrate design of CVD and PVD coated cutting tools during the machining of austenitic stainless steel. Ceram. Int. 2020, 46, 5149–5158. [Google Scholar] [CrossRef]
  8. Deng, J.; Zhou, J.; Zhang, H.; Yan, P. Wear mechanisms of cemented carbide tools in dry cutting of precipitation hardening semi-austenitic stainless steels. Wear 2011, 270, 520–527. [Google Scholar]
  9. Girish, K.; Kuldip, S.S. Prediction and optimization of machining parameters for minimizing power consumption and surface roughness in machining. J. Clean. Prod. 2014, 36, 151–164. [Google Scholar]
  10. Wagh, S.S.; Kulkarni, A.P.; Sargade, V.G. Machinability studies of austenitic stainless steel (AISI 304) using PVD cathodic arc evaporation (CAE) system deposited AlCrN/TiAlN coated carbide inserts. Procedia Eng. 2013, 64, 907–914. [Google Scholar] [CrossRef]
  11. Munoz, E.; Shokrani, P.A.; Newman, S.T. Influence of cutting environments on surface integrity and power consumption of austenitic stainless steel. Integr. Manuf. 2015, 36, 60–69. [Google Scholar] [CrossRef]
  12. He, Q.; DePaiva, J.M.; Kohlscheen, J.; Veldhuis, S.C. Analysis of the performance of PVD AlTiN coating with five different Al/Ti ratios during the high-speed turning of stainless steel 304 under dry and wet cooling conditions. Wear 2022, 492–493, 204213. [Google Scholar] [CrossRef]
  13. De Oliveira Junior, C.A.; Diniz, A.E.; Bertazzoli, R. Correlating tool wear, surface roughness and corrosion resistance in the turning process of super duplex stainless steel. J. Braz. Soc. Mech. Sci. Eng. 2014, 36, 775–785. [Google Scholar] [CrossRef]
  14. Umbrello, D.; Saoubt, R.M.; Outeiro, J.C. The influence of Johnson–Cook material constants on finite element simulation of machining of AISI 316L steel. Int. J. Mach. Tools Manuf. 2007, 47, 462–470. [Google Scholar] [CrossRef]
  15. Rabiae, A.; Guillaume, F.; Frederic, R. Mechanical study in drilling of heat resistant austenitic stainless steel. Procedia CIRP 2018, 77, 425–428. [Google Scholar]
  16. Jastrzebski, Z.D. The Nature and Properties of Engineering Materials, 3rd ed.; John Willey and Sons: Hoboken, NJ, USA, 1987. [Google Scholar]
  17. Astakhov, V.P. Tribology of Metal Cutting; Briscoe, B.J., Ed.; Tribology and Interface Engineering Series; Elsevier: Amsterdam, The Netherlands, 2006; No. 52. [Google Scholar]
  18. De, S.; Chakraborty, K. The machining parameter optimisation during the machining of the Cr-Mn austenitic stainless steel by the topsis method. Mater. Today Proc. 2023; in press. [Google Scholar] [CrossRef]
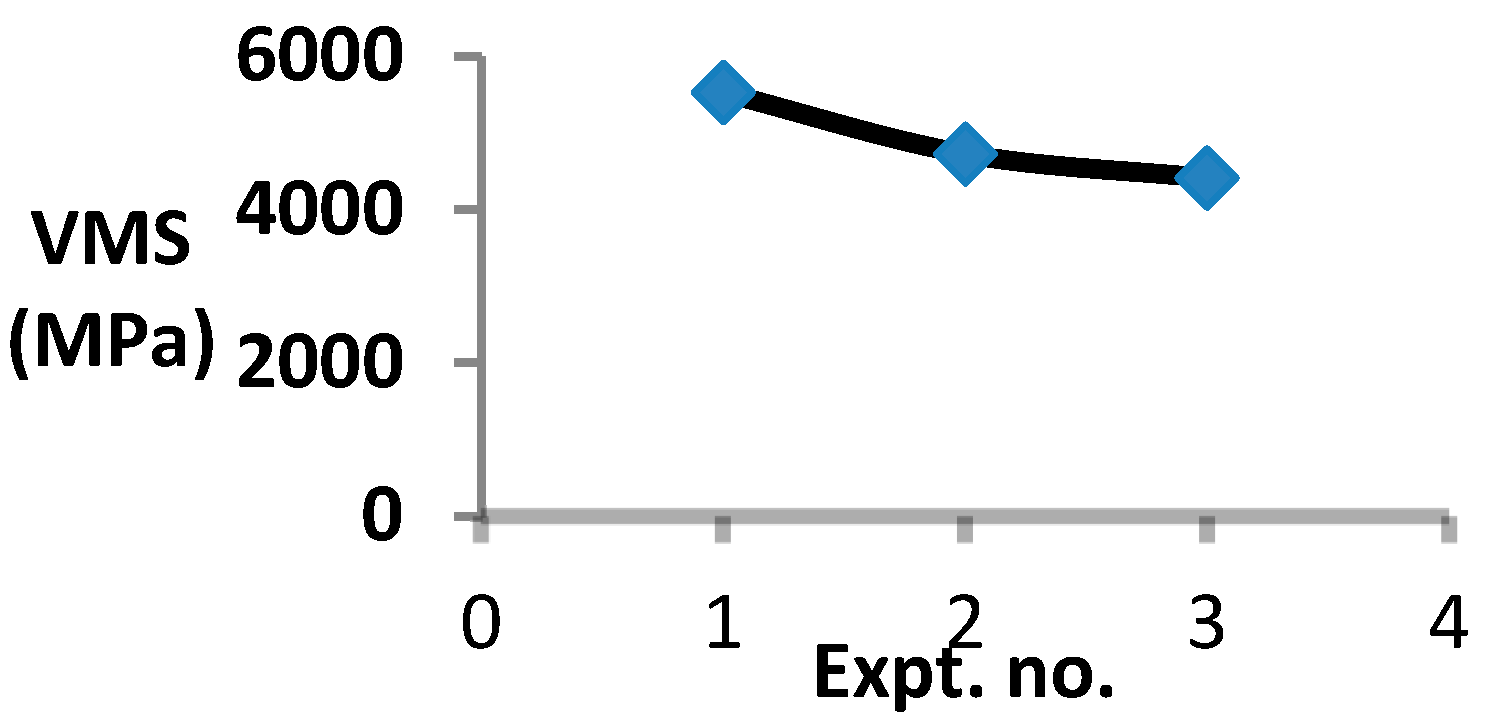
Figure 1. Variation in VMS with respect to expt. No.
Engproc 66 00032 g001
Figure 2. Chip macrographs (a) expt. no. 1, (b) expt. no. 2, (c) expt. no. 3.
Engproc 66 00032 g002
Figure 3. Microstructure (optical) of the as-received work piece.
Engproc 66 00032 g003
Figure 4. Optical microstructure of surfaces (under) of chips (a) expt. no. 1, (b) expt. no. 2, (c) expt. no. 2 (SST: secondary saw tooth), and (d) expt. no. 3.
Engproc 66 00032 g004
Figure 5. SEM images of (a) chip (under–surface) (SF: side flow), (b) BUE at the chip (under surface), (c) chip top–surface (C: crack, SNF: sinuous flow), (d) chip surface (under) (C: crack) (e) free edge of chip (SST: secondary saw tooth), (f) chip topsurface (CE: constrained edge), (g) saw-type tooth (ST: saw tooth).
Engproc 66 00032 g005
Figure 6. The location of the constrained edge.
Engproc 66 00032 g006
Table 1. Weight percent chemical elements.
%C%Si%Mn%S%P%Ni%Cr%Cu
0.2250.4657.480.00980.0240.8713.641.15
Table 2. Experimental parameters and levels.
Parameter LevelsExpt. No. (Levels)
1 (Low)2 (Medium)3 (High)
Speed, m/min4070100
Feed, mm/rev.0.060.100.16
DOC, mm0.511.5
Table 3. The CRC and the VMS.
Expt. No.CRCVMS
13.7845532.84
22.5494729.83
32.2304416.21
Disclaimer/Publisher’s Note: The statements, opinions and data contained in all publications are solely those of the individual author(s) and contributor(s) and not of MDPI and/or the editor(s). MDPI and/or the editor(s) disclaim responsibility for any injury to people or property resulting from any ideas, methods, instructions or products referred to in the content.