Proceeding Paper

Performance Evaluation of Ti and SS Dissimilar GTAW Joints via Non-Destructive Testing Methods †

Department of Industrial Engineering, University of Engineering and Technology, Taxila 47050, Punjab, Pakistan
*
Author to whom correspondence should be addressed.
Presented at the 4th International Conference on Advances in Mechanical Engineering (ICAME-24), Islamabad, Pakistan, 8 August 2024.
Eng. Proc. 2024, 75(1), 36; https://doi.org/10.3390/engproc2024075036
Published: 9 October 2024

Abstract

:
This study aims to analyze the performance of dissimilar titanium alloy Ti-5Al-2.5 Sn and stainless-steel SS 304 joints using three non-destructive testing (NDT) methods such as radiographic testing, visual and microstructural evaluation. Gas tungsten arc welding (GTAW) was performed to join the base metals by incorporating the multi-interlayer of Cu-Nb. The performance of dissimilar joints was evaluated in terms of quality and strength at a welding current of 40 and 60 amperes, and a fixed gas flow rate and welding speed of 20 lit/min and 150 mm/min, respectively. Radiography and visual results indicated severe cracks, voids and incomplete fusion in the specimen welded at a higher current and no such flaws in the specimen welded at a low current. Microstructural results revealed that a dendritic structure was achieved in the fusion zone at a low current that enhanced the ultimate tensile strength (UTS) to 248 MPa while brittle cracks were observed at the Ti-Cu side at higher currents, which reduced the strength to 160 MPa.

1. Introduction

The aerospace and nuclear industrial sectors are highly interested in products manufactured by joining stainless steel and titanium due to their numerous advantages, such as cost-effectiveness, corrosion resistance, high strength, affordability, and functional capabilities [1]. Welded joints of these alloys are utilized in aviation engine blades with discs, electric heaters not subjected to high loads, cryogenic piping, and oil rig components. Joining these materials is challenging due to significant disparities in their chemical and mechanical properties [2,3].
The successful joining of steel and titanium alloys has been accomplished by employing several welding methods, such as gas tungsten arc welding (GTAW), diffusion welding, friction stir welding, electron beam welding and laser beam welding [4]. Among them, the GTAW process offers various benefits, including cost efficiency, user-friendliness, and the possibility to automate manufacturing [5,6,7]. When the GTAW process is automated and the tools and parameters are properly designed, faults should not arise. Nevertheless, if the procedure is inadequately regulated, the resultant strength of the weld may be compromised. No joining procedure is flawless, and flaws have the potential to arise in any process [8]. These flaws or defects can vary in size, type, and position and fall into several categories, such as fractures, incomplete penetration, incomplete fusion, porosity, inclusions, etc. These flaws pose a risk while used in service [9,10]. Therefore, it is necessary to perform non-destructive testing (NDT) techniques to ensure sufficient quality control, especially for applications that are crucial for safety. Different types of NDT techniques have been employed to analyze the strength of weld joints such as visual inspections, X-ray radiography, microstructural evaluation, thermography, ultrasonic testing, eddy current, magnetic particle test, and dye penetrant [8]. However, it should be noted that the dye penetrant method is only capable of detecting faults on the surface. Furthermore, ultrasonic testing, eddy current, and magnetic particle test methods are expensive and ineffective in evaluating the defects in the weld quality [11]. At the industrial scale, mostly visual inspections, X-ray radiography and microstructural evaluation are used due to these being low-cost and highly efficient and effective methods to access various defects. In this regard, Ranganayakulu et al. [12] evaluated the defects in the GTAW-welded region, such as cracks, hooking bonds, lack of penetration, wormholes and partial holes, and kissing bonds, using NDT. Frasco-García et al. [13] conducted radiography testing to detect the internal defects in TWIP/SS 304L dissimilar GTAW-welded joints. The authors concluded that underfilling in the weld zone has been identified due to differences in optical density. A linear discontinuity was seen in the radiography test close to the TWIP steel bevel. A lack of fusion was shown to be the cause of this discontinuity and led to a reduction in joint strength. Vempati et al. [14] conducted three types of NDT, i.e., radiography, dye penetrant, and ultrasonic tests, to investigate the weld quality and strength of Ti-6Al-4V joined through the GTAW process. By using a radiography test, it was found that the welded seam had a lack of penetration and needed repair. During the dye penetration test on the welded region, no detectable indicators or cracks were seen. The specimen was broken at the ultimate point of 890 MPa during the tensile test. Deepak et al. [15] analyzed and compared the welding defects during the joining of low-carbon steel through GTAW, laser, and gas metal arc welding (GMAW). Various types of NDT such as visual inspection, radiography, ultrasonic and magnetic particle tests have been employed. Through visual inspection, a 0 to 5 mm visual crack in GTAW, a 0 to 10 mm visual crack, and no defects were observed in laser-welded joints. Similarly, from a radiography test, flaws were observed in GTAW- and GMAW-welded joints while no flaws were observed in laser-welded joints. Transverse cracks and slag defects were observed in GTAW- and GMAW-welded joints whereas lack of fusion was found during laser welding through magnetic particle tests.
From the literature review, it was observed that non-destructive testing (NDT) methods such as radiographic testing, visual analysis and microstructural analysis are essential for checking the quality of dissimilar welds because they allow for the detection of internal and surface defects without damaging the welded structure. This research aims to evaluate the performance of Ti and SS GTAW-welded joints in terms of quality and strength. Three NDT techniques such as radiographic testing, visual testing and microstructural evaluation were employed to investigate weld quality and strength. The α-Ti alloy (Ti-5Al-2.5Sn) and stainless steel SS 304 were joined by multi-interlayer of Cu and Nb in the form of foils having a thickness of 0.2 mm each through gas tungsten arc welding. The two samples were welded at welding currents of 40 and 60 amperes, and mechanical and microstructural properties were evaluated. The welding flaws, including porosities, voids, cracks, and incomplete fusion, were analyzed through NDT techniques to evaluate the quality, whereas the mechanical characteristics of dissimilar joints were accessed by evaluating ultimate tensile strength.

2. Materials and Methods

The weld coupon had dimensions of 100 mm × 100 mm × 3 mm, and a butt joint design was used for comparative analysis of non-destructive testing (NDT) methods. Before the welding process, the plates were cleaned through grit papers and then treated with kerosene oil to eliminate the surface oxides. The base metals were joined using a multi-interlayer consisting of pure Cu (99.99%) and Nb (99.99%) foils having thicknesses of 0.2 mm each. The interlayers of niobium (Nb) and Copper (Cu) were used in this welding process to enhance the strength and quality of the welded joints. The metallurgical compatibility between Ti and Nb was evident, as was the case for copper and stainless-steel [2,16]. Cu foil was located adjacent to the SS layer, while the Nb foil was located adjacent to the Ti layer. Before the welding process, the joining materials were subjected to grinding to properly prepare their surfaces. The spark emission spectroscopy method [17] was used to confirm the chemical compositions of the basic components of the joining materials.
The GTAW machine (Lincoln Invertec Tig V-270T, Cleveland, OH, USA) was used to conduct the welding process, which has a current range of 5 to 270 amperes. The welding setup consisted of a vertical milling machine that has a self-design clamping system that held the GTAW torch as depicted in Figure 1a. The milling bed slid in a linear manner, and its speed was controlled through a microcontroller. This setup ensured accurate and consistent creation of the welding bead, as demonstrated in Figure 1b. Titanium, a highly reactive metal, undergoes a process of collecting O2 and N2 gases from the surrounding environment when exposed to a welding temperature exceeding 300 °C. This absorption negatively impacts the quality of welded joints, leading to reduced ductility [2,18]. Consequently, during the welding process, shielding was implemented both behind the weld (trailing) and underneath the weld (bottom) to safeguard the weld from the oxide layer. This shielding was achieved by employing pure argon (Ar) gas with a composition of 99%.
Following the preparation of materials and experimental setup, the process parameters and their ranges were chosen based on a thorough review of the literature and trial runs. The current study is not a statistical study that focuses on analyzing large data to understand relationships or trends, but it is a comparative study in which experiments were performed under two conditions. Therefore, two specimens (A1 and A2) were prepared at welding currents of 40 and 60 amperes, respectively. The gas flow rate was considered to be 20 lit/min, and the welding speed was taken as 150 mm/min for both specimens. After the completion of the welding process, specimens were cut cross-sectionally from the welded plate and mounted in conductive resin for microstructure observations. The specimen was ground through sandpapers of grit sizes 300–3000 and then polished using a diamond-pasted micro-cloth. Finally, etching was performed by applying Kroll solution for Ti-5Al-2.5Sn, FeCl3 solution (5 g in water) for copper, Glycerin solution for SS 304 and 20 mL H2O + 20 mL HNO3 + 10 mL HF solution for niobium. The microstructure observations were carried out on an optical microscope (Olympus, model = CX33, Tokyo, Japan) with a magnification range of 50–1000 X. For tensile testing, the tensile specimen was extracted from the welded plate using a wire electrical discharge machine as per the ASTM standard E8M-04 [19]. Three samples were extracted from base plates and their mean was taken as the final value for accuracy. The standard deviation (SD) for each sample was calculated to check the consistency of the data. The mean and standard deviation values of both samples have been written in Table 1. The UTS was measured by conducting a tensile test on Instron UTM, Norwood, MA, USA of a 30 kN capacity using a 0.5 mm/min strain rate.

3. Results and Discussion

Digital radiographic testing was performed using conventional mobile film-based X-ray equipment. From the X-ray radiographs, it was observed that A1 specimen welding flaws such as incomplete fusion and wormhole defect led to form voids at a welding current of 60 amperes, as shown in Figure 2a. These defects appeared due to differences in the weld thermal cycles and dilution of dissimilar joints [13]. On the other hand, there were no such flaws that appeared in the welded region of the A2 specimen weld, as shown in Figure 2b. This was due to the reduction in void frequency with the decrement in the welding current from 60 to 40 amperes [1].
The visual testing method was performed at the external surface of welded joints using magnifying lenses of a digital microscope to analyze the distribution of the weld and slag at the interface region of the welded joints. This is a method of examining a material, either with or without the use of tools, to identify any flaws or imperfections [12]. The digital microscope has been widely used to analyze the surface defects of aerospace parts at the industrial level, and measurements of defects such as excessive bead absorption, single pore, and excessive penetration have been carried out through calipers and measuring scales [20]. Upon visual examination of the different GTAW joints between titanium (Ti) and stainless steel (SS), it was observed that specimen A1 exhibited excess bead absorption ranging from 5 to 30 mm. Additionally, a single spattered pore measuring 50 mm was absorbed, along with flaws in the form of a single pore ranging from 0 to 5 mm. These observations are depicted in Figure 3a. On the other hand, it was noted that there was excessive penetration of 10 to 40 mm at the root site, faults at a single pore of 120 to 140 mm, and visual cracks of 5 to 10 mm at specimen A2, as depicted in Figure 3b.
Microstructural evaluation was performed using an optical microscope. It was observed that proper fusion was achieved on the Cu/SS side whereas a brazed type of joint was obtained at the Nb/Cu side for both specimens. The specimen A1 welded joint at a 40-ampere current was free from defects due to the formation of a recrystallized and dendritic structure at the welded region and the appropriate fusion of Cu filler with SS and Nb with Ti, as shown in Figure 3c. However, a large crack was observed on the Ti-Cu side at a higher current of 60 amperes (specimen A2). Moreover, high current resulted in an excessive dilution of filler metal and caused brittle cracks due to differences in thermal coefficients and the incompatibility of base metals.
Lastly, tensile tests were conducted using a universal testing machine for both specimens. Results indicated that a UTS of 248 MPa was obtained for the A1 joint welded at a current of 40 amperes whereas the A2 specimen welded at a current of 60 amperes had a UTS of 160 MPa. Jawad et al. [1] reported that a ductile fracture surface formed at a welding current of 40 amperes, which allowed the appropriate mixing of the SS and Ti solid solution. Resultantly, higher tensile strength of the specimen was achieved in the welded region. Conversely, brittle fracture surface was found at a 60-amperewelding current due to the higher Cu content and formation of a TiCu compound, which resulted in the low UTS of SS and Ti welded joints.

4. Conclusions

In this research work, the performance of Ti and SS GTAW-welded joints was analyzed through three non-destructive testing methods via X-ray radiography, visual analysis, and microstructural analysis methods. The mechanical and microstructural properties of joints were evaluated at the two different welding currents of 40 and 60 amperes. It can be concluded that incomplete fusion and voids were observed at a low current through radiography testing, whereas no such flaws were detected at a higher current. From the visual method, excess bead absorption ranging from 5 to 30 mm was observed in the specimen welded at a lower current, while an excessive penetration of 10 to 40 mm at the root site, faults at a single pore of 120 to 140 mm, and a visual crack of 5 to 10 mm were found at a high current. Microstructure results revealed that a dendritic structure was achieved at the fusion zone at a low current, which improved the joining, whereas brittle cracks were observed on the Ti-Cu side at higher currents. Tensile test results depict that UTSs of 248 MPa and 160 MPa were achieved at 40- and 60-ampere of welding currents, respectively, because at a 40-ampere welding current, defect-free welded joints led to the good metallurgical bonding of dissimilar metals.
The utilization of non-destructive techniques in this study will benefit researchers who wish to guarantee material quality during the fabrication, in-service, and raw material phases. It guarantees that the material will not degrade before the anticipated amount of time. Moreover, hybrid joining of Ti-SS enables professionals in the oil and gas, petrochemical, and aerospace industries to collaborate to create affordable, high-quality hybrid Ti and SS products.

Author Contributions

Conceptualization, A.A. and M.J. (Mirza Jahanzaib); methodology, A.A. and M.J. (Muhammad Jawad); formal analysis, A.A. and M.J. (Muhammad Jawad); investigation, A.A., M.J. (Muhammad Jawad) and M.J. (Mirza Jahanzaib); data curation, A.A. and M.J. (Muhammad Jawad); writing—original draft preparation, A.A. and M.J. (Muhammad Jawad); review and editing, M.J. (Muhammad Jawad) and M.J. (Mirza Jahanzaib); supervision, M.J. (Mirza Jahanzaib). All authors have read and agreed to the published version of the manuscript.

Funding

This research received no external funding.

Institutional Review Board Statement

Not applicable.

Informed Consent Statement

Informed consent was obtained from all subjects involved in the study.

Data Availability Statement

Data are available in this manuscript.

Conflicts of Interest

The authors declare no conflicts of interest.

References

  1. Jawad, M.; Jahanzaib, M.; Ilyas, M. Evaluation of welded joints of dissimilar titanium alloy Ti-5Al-2.5 Sn and stainless-steel 304 at different multi-interlayer modes. Mater. Res. Express 2022, 9, 106501. [Google Scholar] [CrossRef]
  2. Giri, S.R.; Khamari, B.K.; Moharana, B.R. Joining of titanium and stainless steel by using different welding processes: A review. Mater. Today Proc. 2022, 66, 505–508. [Google Scholar] [CrossRef]
  3. Jawad, M.; Jahanzaib, M.; Ali, M.A.; Hussain, S.; Ahmad, W.; Ahmed, N. Improvement in mechanical and microstructural properties of novel TA7/Nb/Cu/SS304 composite joints by reducing intermetallic compounds. Int. J. Adv. Manuf. Technol. 2024, 130, 3257–3274. [Google Scholar] [CrossRef]
  4. Haider, F.; Jahanzaib, M.; Hanif, M.W. Optimizing the process parameters of Fiction Stir Welded dissimilar 2024Al-5754Al Joint using the Taguchi Method. MATEC Web Conf. 2023, 381, 02006. [Google Scholar] [CrossRef]
  5. Mehdi, H.; Batra, L.; Singh, A.P.; Malla, C. Multi-response optimization of FSW process parameters of dissimilar aluminum alloys of AA2014 and AA6061 by response surface methodology (RSM). Int. J. Interact. Des. Manuf. (IJIDeM) 2024, 18, 1507–1522. [Google Scholar] [CrossRef]
  6. Jawad, M.; Jahanzaib, M.; Ali, M.A.; Farooq, M.U.; Mufti, N.A.; Pruncu, C.I.; Hussain, S.; Wasim, A. Revealing the microstructure and mechanical attributes of pre-heated conditions for gas tungsten arc welded AISI 1045 steel joints. Int. J. Press. Vessel. Pip. 2021, 192, 104440. [Google Scholar] [CrossRef]
  7. Hanif, M.W.; Wasim, A.; Sajid, M. Evaluating the Effect of Process Parameters on the Mechanical Properties of an AA7075-Cu Overcast Joint Using the Taguchi Method. Eng. Proc. 2022, 23, 3. [Google Scholar] [CrossRef]
  8. Subramaniam, S.; Ozevin, D.; Indacochea, E. Characterization of GMAW (Gas Metal Arc Welding) Penetration Using Ultrasonics. Materials 2020, 13, 2307. [Google Scholar] [CrossRef]
  9. Chassignole, B.; El Guerjouma, R.; Ploix, M.-A.; Fouquet, T. Ultrasonic and structural characterization of anisotropic austenitic stainless steel welds: Towards a higher reliability in ultrasonic non-destructive testing. NDT E Int. 2010, 43, 273–282. [Google Scholar] [CrossRef]
  10. Deepak, J.; Raja, V.B.; Kaliaraj, G.S. Mechanical and corrosion behavior of Cu, Cr, Ni and Zn electroplating on corten A588 steel for scope for betterment in ambient construction applications. Results Phys. 2019, 14, 102437. [Google Scholar] [CrossRef]
  11. Taheri, H.; Kilpatrick, M.; Norvalls, M.; Harper, W.J.; Koester, L.W.; Bigelow, T.; Bond, L.J. Investigation of nondestructive testing methods for friction stir welding. Metals 2019, 9, 624. [Google Scholar] [CrossRef]
  12. Ranganayakulu, S.; Burra, S.G.; Ravi, S. Characterization of Weldments Defects through Non Destructive Evaluation Techniques. Indian J. Sci. Technol. 2017, 10, 1–9. [Google Scholar] [CrossRef]
  13. Frasco-García, O.D.; García-García, V.; Reyes-Calderón, F.; Hernández-Cristóbal, O.; Garnica-González, P. Investigation of weld defects, microstructural, and mechanical features of TWIP and austenitic stainless steel dissimilar joints by pulsed GTAW process. Int. J. Adv. Manuf. Technol. 2022, 119, 6371–6392. [Google Scholar] [CrossRef]
  14. Vempati, S.; Gopinath, V.; Srinivasulu, M.; Babu, U.H.; Chandrasekhar, K. Experimental investigation on heat treated TI-6AL-4V welded joints based on tribological and non destructive techniques. Int. J. Mech. Eng. 2022, 7, 183–194. [Google Scholar]
  15. Deepak, J.; Raja, V.B.; Srikanth, D.; Surendran, H.; Nickolas, M. Non-destructive testing (NDT) techniques for low carbon steel welded joints: A review and experimental study. Mater. Today Proc. 2021, 44, 3732–3737. [Google Scholar] [CrossRef]
  16. Jawad, M.; Jahanzaib, M.; Ali, M.A.; Sajid, M.; Hussain, S. Evaluation of Residual Stresses and Distortion of Ti-5Al-2.5 Sn and SS 304 Gas Tungsten Arc Welded Joints under Hybrid Thermal Tensioning Technique: Transient Thermal Tensioning and Trailing Intensive Cooling. J. Mater. Eng. Perform. 2024, 33, 7564–7576. [Google Scholar] [CrossRef]
  17. Hanif, M.W.; Wasim, A.; Sajid, M.; Hussain, S.; Jawad, M.; Jahanzaib, M. Evaluation of microstructure and mechanical properties of squeeze overcast Al7075−Cu composite joints. China Foundry 2023, 20, 29–39. [Google Scholar] [CrossRef]
  18. Hao, X.; Wei, X.; Li, S.; Cui, Z.; Wang, W.; Dong, H.; Li, W. Joining mechanism evolution of fusion welded TC4 titanium alloy/304 stainless steel dissimilar joint by GTAW. Sci. Technol. Weld. Join. 2023, 28, 1031–1040. [Google Scholar] [CrossRef]
  19. ASTM. Standard test methods for tension testing of metallic materials. In Annual Book of ASTM Standards; ASTM: West Conshohocken, PA, USA, 2001. [Google Scholar]
  20. Rajeswari, S.; Lakshmi, M.V.; Shubhanjali, M.; Mathew, J.; Raghu, K.; Sreedhar, S. Applications of visual inspection in NDE of aero engine components—Case studies. In Proceedings of the Indian National Seminar & Exhibition on Non-Destructive Evaluation NDE, Virtual, 10–12 December 2020. [Google Scholar]
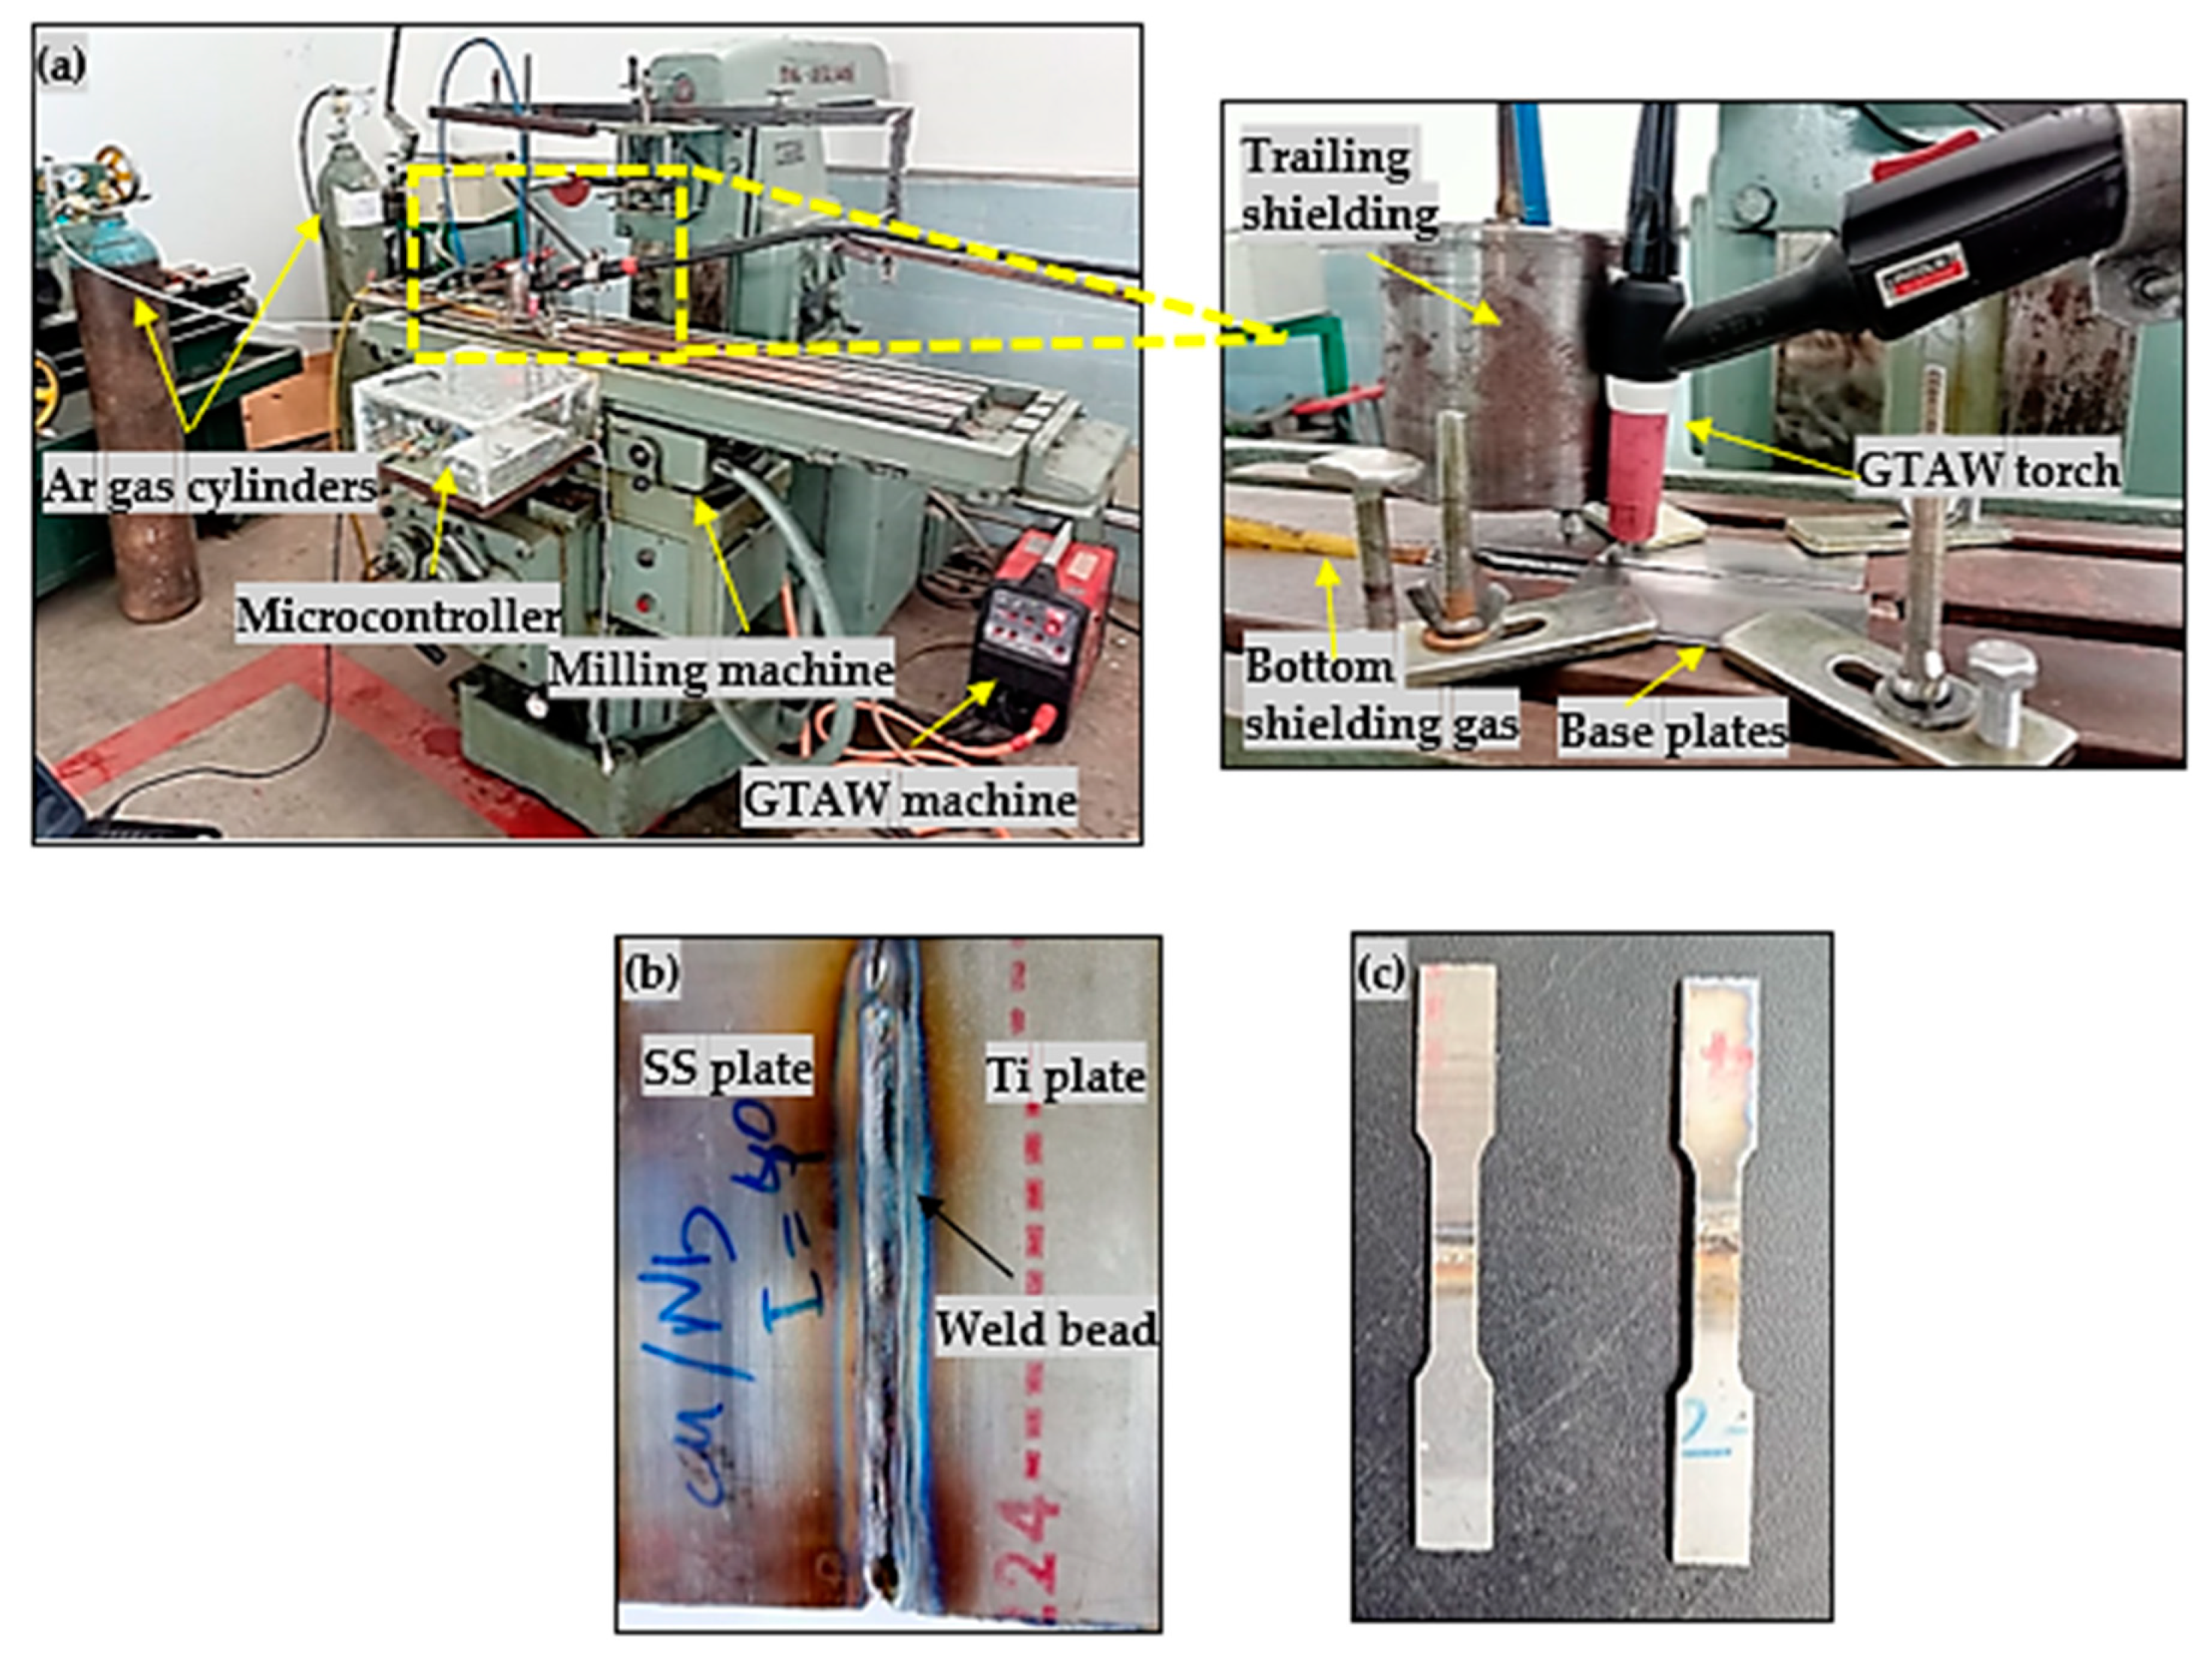
Figure 1. (a) GTAW setup; (b) specimen welded using GTAW; (c) tensile specimen for UTS.
Engproc 75 00036 g001
Figure 2. Radiographic testing at (a) 60-ampere welding current (A2) and (b) 40-ampere welding current (A1).
Engproc 75 00036 g002
Figure 3. (a) Visual testing at a 40-ampere welding current (A1); (b) visual testing at 60-ampere welding current (A2); (c) microstructural evaluation at 40-ampere welding current (A1); (d) microstructural evaluation at 60-ampere welding current (A2).
Engproc 75 00036 g003
Table 1. Mean and SD of UTS.
Welded SamplesUTS (Value 1)UTS
(Value 2)
UTS (Value 3)MeanSD
Sample A1249253243248.29924.109609
Sample A2158162161160.32431.699673
Disclaimer/Publisher’s Note: The statements, opinions and data contained in all publications are solely those of the individual author(s) and contributor(s) and not of MDPI and/or the editor(s). MDPI and/or the editor(s) disclaim responsibility for any injury to people or property resulting from any ideas, methods, instructions or products referred to in the content.