
Decentralized Identity Authentication Mechanism: Integrating FIDO and Blockchain for Enhanced Security


1
Master Program of International Sport Affairs, National Taiwan Sport University, Taoyuan City 333325, Taiwan
2
Graduate Institute of Technology Management, National Chung Hsing University, Taichung City 402202, Taiwan
3
Department of Management Information Systems, National Chung Hsing University, Taichung City 402202, Taiwan
*
Author to whom correspondence should be addressed.
Appl. Sci. 2024, 14(9), 3551; https://doi.org/10.3390/app14093551
Submission received: 4 March 2024
/
Revised: 17 April 2024
/
Accepted: 19 April 2024
/
Published: 23 April 2024
Abstract
:FIDO (Fast Identity Online) is a set of network identity standards established by the FIDO Alliance. It employs a framework based on public key cryptography to facilitate multi-factor authentication (MFA) and biometric login, ensuring the robust protection of personal data associated with cloud accounts and ensuring the security of server-to-terminal device protocols during the login process. The FIDO Alliance has established three standards: FIDO Universal Second Factor (FIDO U2F), FIDO Universal Authentication Framework (FIDO UAF), and the Client to Authenticator Protocols (CTAP). The newer CTAP, also known as FIDO2, integrates passwordless login and two-factor authentication. Importantly, FIDO2’s support for major browsers enables users to authenticate their identities via FIDO2 across a broader range of platforms and devices, ushering in the era of passwordless authentication. In the FIDO2 framework, if a user’s device is stolen or compromised, then the private key may be compromised, and the public key stored on the FIDO2 server may be tampered with by attackers attempting to impersonate the user for identity authentication, posing a high risk to information security. Recognizing this, this study aims to propose a solution based on the FIDO2 framework, combined with blockchain technology and access control, called the FIDO2 blockchain architecture, to address existing security vulnerabilities in FIDO2. By leveraging the decentralized nature of the blockchain, the study addresses potential single points of failure in FIDO2 server centralized identity management systems, thereby enhancing system security and availability. Furthermore, the immutability of the blockchain ensures the integrity of public keys once securely stored on the chain, effectively reducing the risk of attackers impersonating user identities. Additionally, the study implements an access control mechanism to manage user permissions effectively, ensuring that only authorized users can access corresponding permissions and preventing unauthorized modifications and abuse. In addition to proposing practical solutions and steps, the study explains and addresses security concerns and conducts performance evaluations. Overall, this study brings higher levels of security and trustworthiness to FIDO2, providing a robust identity authentication solution.
1. Introduction
With the rapid development of information and internet technologies, most information systems are facing significant security challenges. For instance, in industrial control systems, identity verification is crucial to prevent unauthorized access and potential security issues. Due to the unique nature of the industrial control environment, cybersecurity incidents can have severe consequences, including production downtime, equipment damage, and even harm to personnel [1]. However, the risks faced by information systems extend beyond industrial control systems. Essentially, most information systems require user authentication for identity verification, which in turn introduces the risk of system attacks.
Currently, using account passwords and Public Key Infrastructure (PKI) for user identity verification is a common practice. However, a study titled “Brute-force and dictionary attack on hashed real-world passwords” demonstrated that it is relatively easy to crack most user-created passwords using simple and predictable patterns [2].
As a result, other forms of passwordless authentication technologies have emerged, such as biometric technologies and PKI, among others. However, biometric technologies also face many challenges and threats, such as biometric feature theft and forgery, leading to authentication failures and security vulnerabilities [3]. The passwordless authentication technology is now widely regarded as a more usable and secure alternative to traditional password-based methods [4].
The FIDO (Fast Identity Online) [5] Alliance provides a more secure and reliable identity authentication solution, with a robust passwordless login standard that enables safer and more convenient identity verification. Chadwick et al. [6] proposes a method for solving existing identity management system issues using FIDO and W3C VC. It details the conceptual model, architecture, and protocols used. By extending FIDO’s UAF, it achieves robust identity authentication and authorization. The paper establishes a pilot implementation for NHS patients in the UK, allowing them to access restricted NHS websites for appointment scheduling, cancellation, and prescription ordering using biometric authentication on mobile devices. Initial user trials with 10 UK NHS patients found the system easy to use, with biometric authentication preferred over usernames and passwords. The advantages of FIDO lie in its high security, effective phishing attack prevention, and convenient user authentication experience, significantly enhancing system security and usability.
The FIDO Alliance has issued three sets of specifications aiming to enhance user authentication by providing simpler yet more robust mechanisms: FIDO Universal Second Factor (FIDO U2F), FIDO Universal Authentication Framework (FIDO UAF), and the Client to Authenticator Protocols (CTAP). CTAP complements the Web Authentication (WebAuthn) specification by the World Wide Web Consortium (W3C), together forming the FIDO2 standard. In short, FIDO2 provides passwordless login and two-factor authentication, integrating browser support through WebAuthn. This means users can log in without passwords using biometric authentication via their browsers, or they can use their own devices, such as USB drives or smartphones with built-in authentication capabilities, in conjunction with the CTAP protocol as authentication devices during login. Additionally, FIDO2 adopts public key cryptography, and the FIDO2 authentication server only stores the public key/verification, avoiding the upload of users’ personal data and better safeguarding user privacy [7].
However, it should not be assumed that FIDO2 technology is entirely secure [8], as it may still face potential risks. For instance, if a user’s device is stolen or subjected to other attacks, the private key could be compromised, thereby jeopardizing the authentication process. Moreover, as the public key is stored on the FIDO2 server, attackers might attempt to tamper with the public key and impersonate the user for authentication, posing high risks to information security.
Based on the above, with the development of information systems applications, identity authentication and access management have become essential tasks. Identity authentication and access control are two commonly integrated security mechanisms that, when combined, can provide comprehensive protection and management capabilities. The identity authentication mechanism ensures that only legitimate users can access the system, while access control further restricts users’ access rights to specific sensitive data or functions.
Therefore, this study will integrate the FIDO2 identity authentication standard with blockchain technology and enhance access control mechanisms. Utilizing the immutability and decentralized nature of the blockchain, the tamper-proof characteristics effectively ensure the integrity of identities. The decentralization aspect ensures the system can continue to operate even if certain nodes are attacked or experience failures. By storing identity and permission mappings on the blockchain, permission administrators can easily modify identity privileges without the need to individually adjust settings for each machine or site. This approach offers a more efficient and precise permission management method while ensuring the security of identities and permissions, leading to a more secure identity and access management system.
2. Related Work
2.1. The FIDO2 Architecture
FIDO2 is a standardized identity authentication framework that offers efficient, secure, and convenient methods of authentication. Users can utilize the same authentication method across different websites and applications, reducing the burden of remembering and managing multiple accounts and passwords. FIDO2 provides various authentication methods, including various biometric technologies and USB security keys, to offer a more convenient user experience. Additionally, FIDO2 supports multi-factor authentication, allowing users to use multiple authentication methods simultaneously, thereby enhancing the security of identity authentication. Its goal is to establish a unified identity authentication standard, enabling users to use the same authentication method on any website or application, thereby reducing the hassle of remembering different passwords for different websites or applications and mitigating risks such as phishing attacks.
2.2. The FIDO2 Registration and Login Process
In the FIDO2 system, FIDO2 WebAuthn is a modern identity verification technology that offers users a more secure and convenient authentication experience. It utilizes asymmetric encryption techniques to achieve identity authentication, allowing the client and server to provide identity verification services while ensuring the confidentiality and integrity of the identity. The WebAuthn identity authentication process consists of two stages: registration and authentication [9,10].
2.2.1. Registration Phase
As shown in Figure 1, FIDO2’s registration process involves the user sending a registration request to the RP Server, which then sends a challenge to the authenticator. After biometric verification, the authenticator generates a new key pair and signs the challenge using the private key. The signed challenge and public key are then returned to the RP Server for verification and storage. Authenticators can be biometric devices, smart cards, USB keys, or mobile devices used for identity verification, while the RP Server is responsible for registering and authenticating user identities. ECDSA is used in this process, providing efficient and secure digital signatures based on elliptic curve cryptography [11,12,13]. Below is a description of the eight steps based on the registration process diagram.
Step 1. Registration request:
When a user wants to register an authenticator, the browser initiates a registration request and sends the UserAccount to the RP Server. During this process, it is recommended to collect aliases for the authenticators. Aliases can help users easily identify them when multiple authenticators are registered.
Step 2. Generating PublicKeyCredentialCreationOptions:
Upon receiving the registration request from the browser, the RP Server generates a challenge and creates an empty object called PublicKeyCredentialCreationOptions. This object contains information related to User Info, RP Info, and the required credential types.
User Info includes relevant data about the user account, where the userAccount can be associated with the credential by the authenticator. This association enables the verification of the user’s identity when using the same userAccount and authenticator for future authentication purposes. RP Info refers to the organization or service responsible for registering and authenticating users.
Step 3. Generating clientData:
When the browser receives the relevant information, it verifies whether the rpId in RP Info matches the origin (original URL). If the verification is successful, then the browser generates clientData, which is a piece of data generated by the browser, as shown in Table 1. It includes the origin, challenge, and type. Its significance lies in preventing phishing attempts and replay attacks. After generating clientData, it is hashed, and then the RP Info, User Info, and clientDataHash are passed to the authenticator.
Step 4. Verifying user identity:
After receiving the RP Info, User Info, and clientDataHash, the authenticator performs biometric authentication on the user. Once the authentication is successful, the authenticator creates a new pair of asymmetric keys and stores the private key within the authenticator. The public key becomes part of the attestation. The private key is then used to sign the clientDataHash and attestation.
Step 5. Returning attestationObject and clientData to the browser:
After generating the PublicKey, CredentialID, and other attestation data, they are combined to form the attestationObject, which is then sent to the browser along with the clientDataHash. The contents of the attestationObject are shown in Table 2.
Step 6. Generating PublicKeyCredential:
The browser parses the clientDataHash and attestationObject, and generates the PublicKeyCredential, which is then returned to the RP Server for verification. During the registration phase, the PublicKeyCredential is created using the “publicKey” option, allowing for the creation of a new Credential. The structure of the PublicKeyCredential is shown in Table 3.
Step 7. Verification:
The RP Server extracts the public key from the authData field of the PublicKeyCredential and verifies the correctness of the signature in the attStmt of the attestationObject. It also validates the integrity of the clientDataHash.
After validating the signature, the RP Server will further verify if the challenge in the clientData matches the original request, if the origin is correct, and if the type is set to “create” These validations ensure that the registration process is authentic. Once the validation is complete, the RP Server will store the PublicKey, CredentialID, and aaguid in the database, associating them with the user’s account.
Step 8. Returning registration result:
Finally, the RP Server will return the registration result to the browser, completing this registration process.
2.2.2. Login Phase
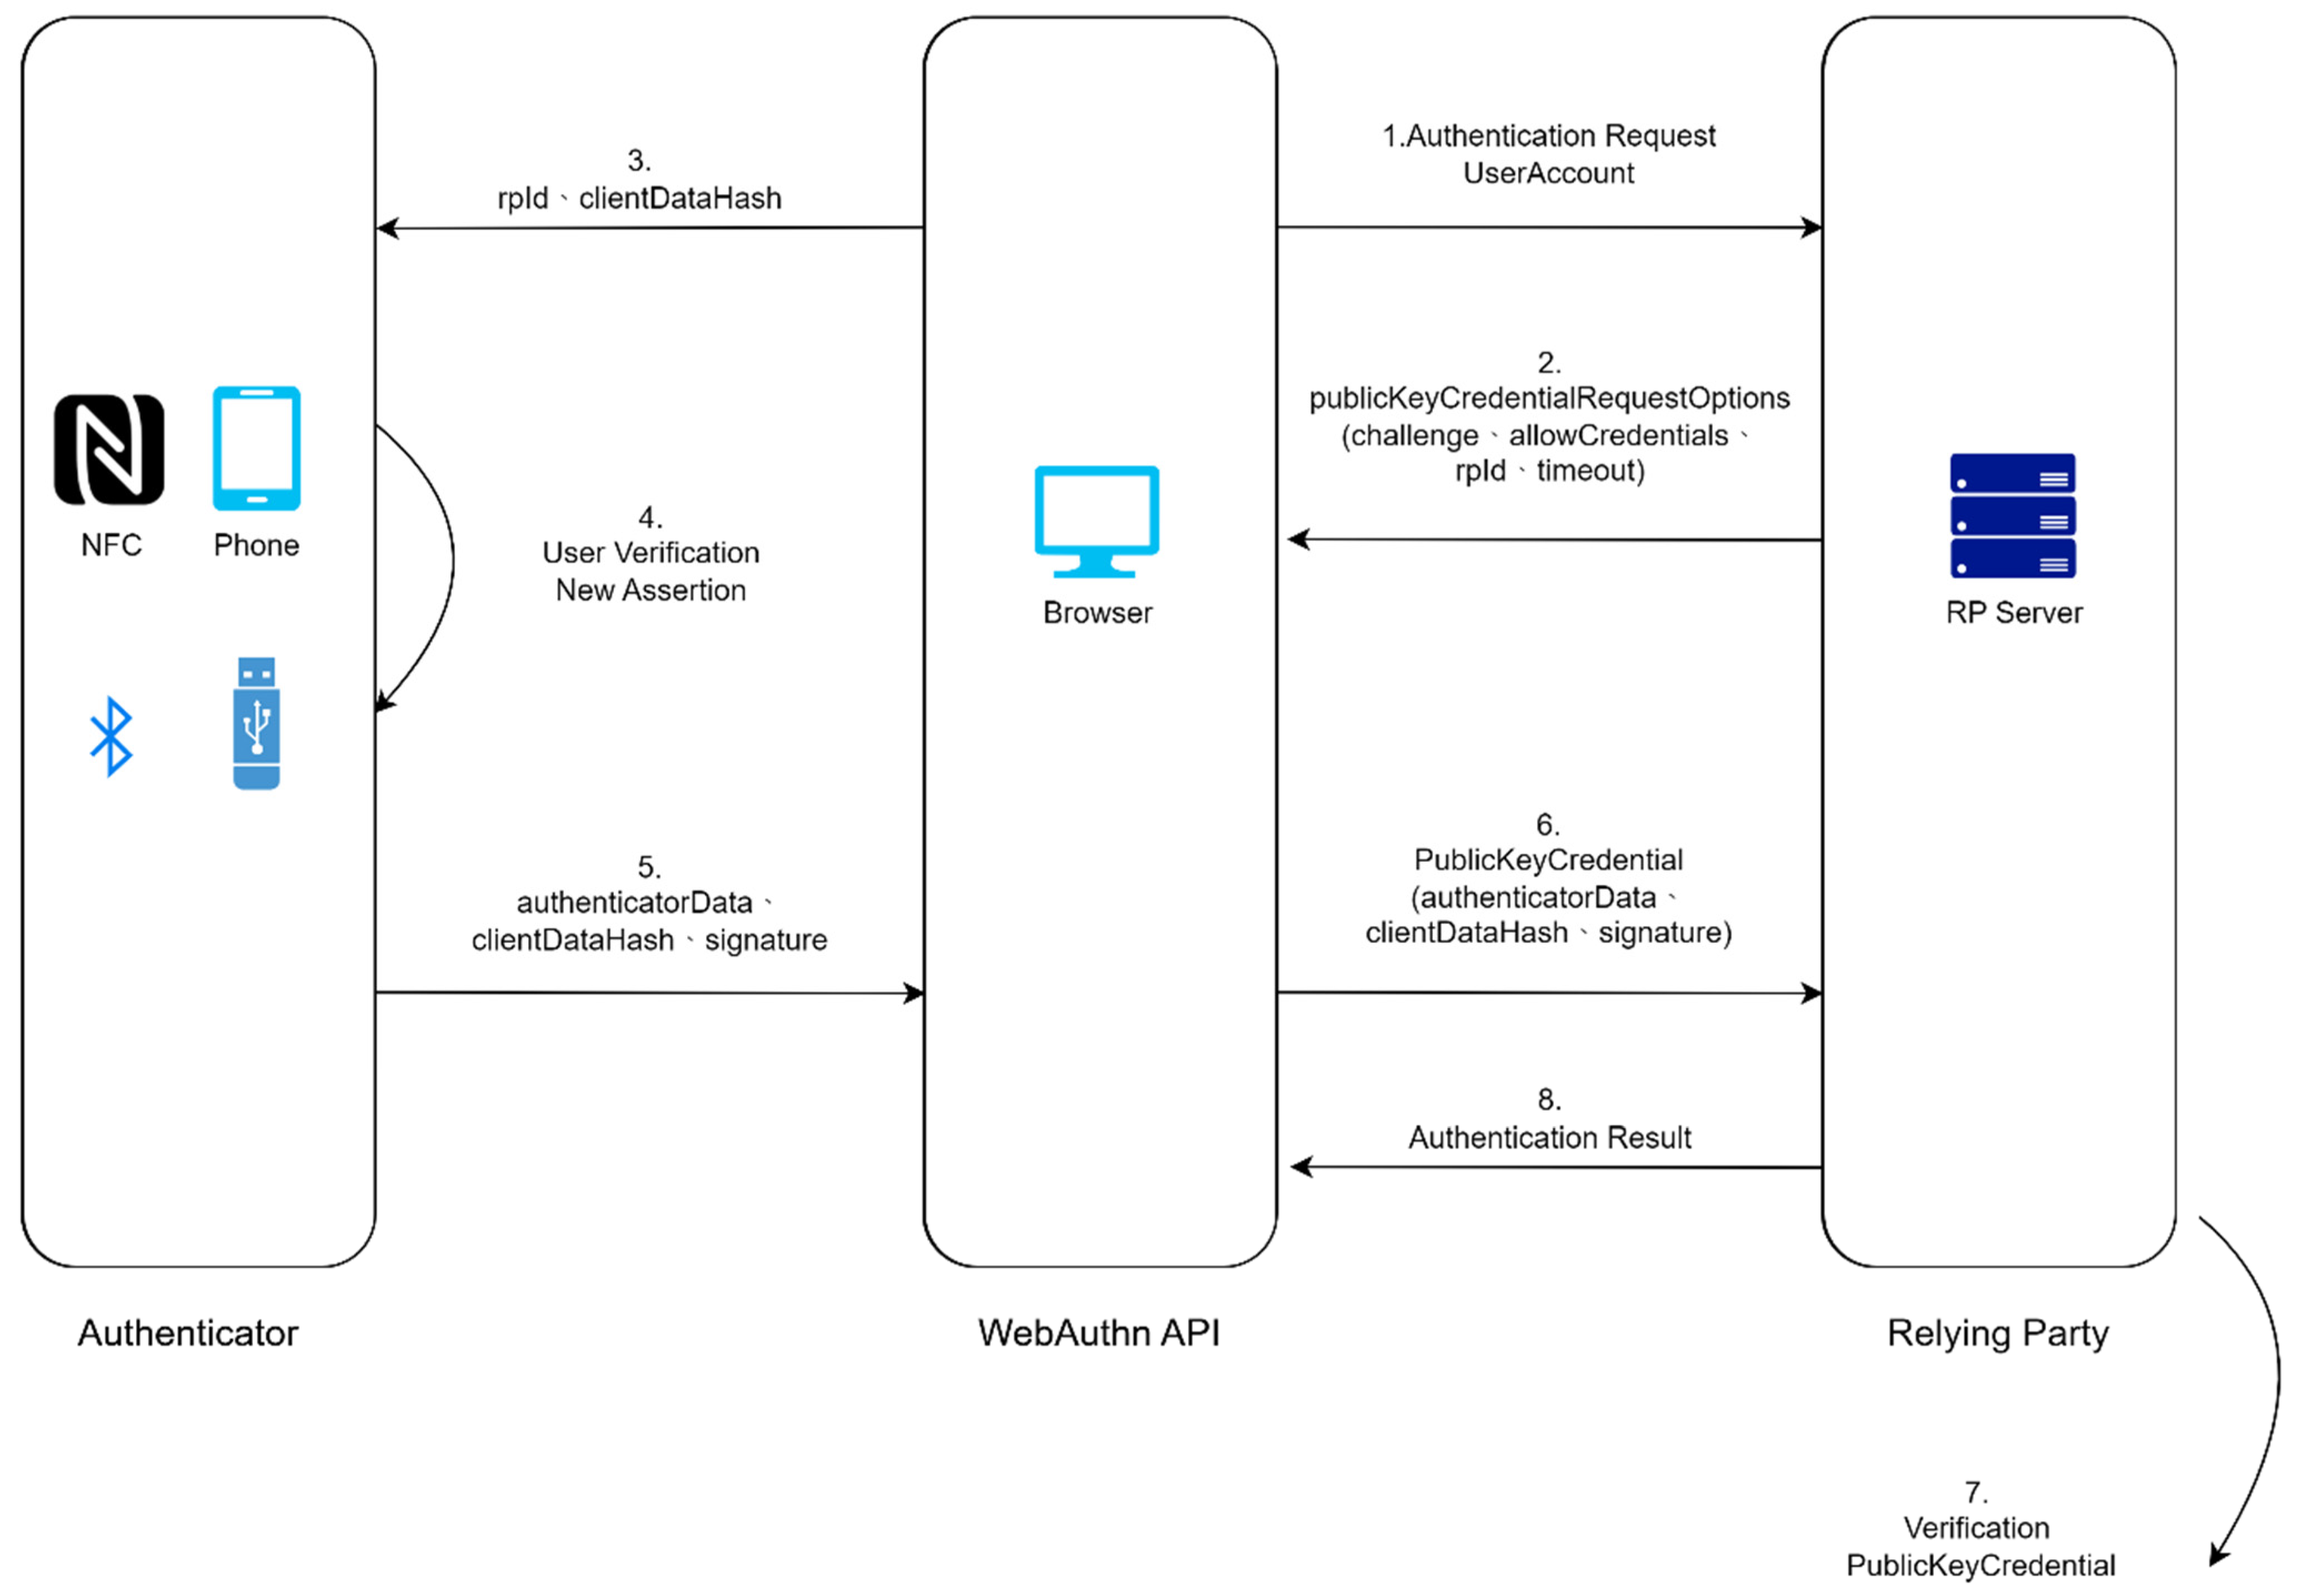
Figure 2 depicts the authentication architecture of FIDO2. During the authentication process, the user selects a previously registered security key for identity verification. When the user wants to log in using the FIDO2 security key, the RP Server generates a challenge and sends it to the authenticator device. The authenticator device verifies the user’s identity using methods such as biometrics or a PIN. Upon successful authentication, the device uses its private key to sign the challenge and sends it back to the RP Server. The RP Server then verifies the signature using the corresponding public key and checks if the request is from an authorized user. Below is a description of the eight steps based on the login process diagram.
Step 1. Login request:
When a user requests to log in, the browser initiates a login request and sends the UserAccount to the RP Server.
Step 2. PublicKeyCredentialRequestOptions:
The RP Server creates a PublicKeyCredentialRequestOptions and returns it to the browser, which includes the challenge, allowCredentials, and other parameters. Among them, allowCredentials lists the previously registered credential list to perform the authentication process, as shown in Table 4.
Step 3. Verifying origin:
When the browser receives the relevant information, it verifies whether the rpId in RP Info matches the origin. If the verification is successful, then the browser generates clientData, which is data generated by the browser and has the same content as the one generated during registration. clientData includes origin, challenge, and type. After generating clientData, it is hashed, and then rpId and clientDataHash, along with other information, are passed to the authenticator.
Step 4. Verifying user identity:
During the identity verification process, the authenticator searches for a Credential that matches the rpId and performs user authentication through methods such as biometric verification. Once the authentication is successful, the authenticator creates a new assertion. The authenticator uses the private key generated during registration for this account to sign the clientDataHash and authenticatorData.
Step 5. Returning the signed information to the browser:
The authenticator sends the authenticatorData, clientDataHash, and the signature to the browser. The signature is generated by signing the concatenation of the authenticatorData and clientDataHash.
Step 6. Generating PublicKeyCredential:
The browser parses the authenticatorData, clientDataHash, and signature and constructs a PublicKeyCredential object. This object is then returned to the RP Server for verification. The PublicKeyCredential differs from the one used during registration in that it includes the signature but does not include the public key. Refer to Table 5 for the structure of the PublicKeyCredential.
Step 7. Parsing and verification:
The RP Server retrieves the public key from its database and performs signature verification.
Also, it confirms whether the challenge signed by the authenticator matches the challenge generated by the RP Server, and verifies whether the rpId matches the expected value.
Step 8. Returning result:
Finally, the RP Server will return the verification result to the browser to complete the authentication process.
2.3. Blockchain
The blockchain is composed of cryptographic algorithms, consensus mechanisms, distributed data storage, and peer-to-peer communication. It possesses characteristics such as transparency, immutability, anonymity, and high security. Transactions are stored in blocks, and cryptography is used to ensure the security, reliability, and transparency of transactions [14]. These blocks are linked together in a chain. This is illustrated in Figure 3. The core feature of the blockchain is decentralization, which means there is no single central authority or administrator. Instead, it is operated by multiple nodes. Each node maintains a complete copy of the blockchain database and can verify and record transactions. When a transaction is initiated, the node broadcasts it to the entire network for validation. Validated transactions are included in a block, which is then broadcast to the entire network. When a block accumulates a certain number of transactions, it is added to the blockchain and permanently recorded, becoming unchangeable [15]. The blockchain has the following characteristics [16,17]:
- Decentralization: The blockchain system operates without a central authority, and all nodes have equal power. Nodes can communicate and transact with each other. This decentralized feature makes the system more democratic and open, reducing the risk of a single point of failure.
- Immutability: Transactions recorded in the blockchain are packaged into blocks and linked together. Each block contains validation information from the previous block, forming an expanding chain. Any modification to the content of a block would affect the entire blockchain and require changing the content of all subsequent blocks. This immutability ensures that data in the blockchain have a high level of trustworthiness and security.
- Openness: On a fully public blockchain, anyone can access and query the records on the chain. Although the data are anonymous, transaction records and balances of users are publicly transparent.
- Non-repudiation: The data structure of the blockchain is permanent and immutable. Once data are recorded on the blockchain, they cannot be deleted or modified; only new additions are possible. When a transaction is confirmed, its record is broadcast to all nodes in the blockchain network, ensuring that all nodes have the same information.
Blockchain technology solves the problems of traditional identity verification, and the thesis [18] proposes a smart contract-based identity management and authentication model with several advantages. It provides higher security as identity information is stored on a decentralized blockchain network, making it difficult to be attacked or tampered with. It also eliminates the need for intermediaries, allowing users to directly perform identity verification, thereby improving efficiency and convenience. This demonstrates the potential and future applications of the blockchain in the field of identity verification. With the continuous development and maturity of blockchain technology, we can anticipate seeing more innovative applications in various identity verification scenarios in the future.
3. Materials and Methods
3.1. The FIDO2 Blockchain Framework
This section will introduce the architecture of the FIDO2 integrated blockchain technology proposed in this study, which we refer to as the FIDO2 blockchain. This system combines the FIDO2 identity verification standard with blockchain technology, leveraging the characteristics of the blockchain to enhance the FIDO2 identity verification standard and achieve trustless identity authentication. It eliminates reliance on a single authentication authority and provides a more secure, reliable, and decentralized identity verification solution. The system can be divided into two main stages.
3.1.1. FIDO2 Blockchain Register Phase
Figure 4 depicts the registration architecture of the FIDO2 blockchain. During the registration process, the user sends a registration request to the smart contract. The smart contract sends a challenge to the authenticator. Upon receiving the challenge, the authenticator prompts the user for biometric verification and generates a new pair of keys. The authenticator signs the challenge using the private key and returns the signed challenge and public key to the smart contract for verification and storage.
In this study, the ECDSA based on elliptic curve cryptography is utilized for generating new asymmetric keys. This key consists of a private key and its corresponding public key, which can be used for performing digital signatures and other related operations.
Step 1. Registration request:
When a user wants to register with the validator, the client-side initiates a registration request. During the registration process, the user’s wallet address (userWalletAddress) is passed to the smart contract.
Step 2. Generating PublicKeyCredentialCreationOptions:
Upon receiving the registration request from the client-side, the smart contract generates a challenge and creates an empty object called PublicKeyCredentialCreationOptions. This object is then returned to the browser. PublicKeyCredentialCreationOptions contains information about the user, contract, and the required credential type. The User Info section contains relevant data about the user’s account. The UserAccount within User Info can be associated with the credential by the verifier, allowing for the verification of the user’s identity in future authentication attempts using the same UserAccount and verifier. The Contract Info section contains information about the organization or service responsible for registering and authenticating users.
Step 3. Generating clientData:
When the browser receives the relevant information, it verifies whether the Contract Address in the Contract Info matches the origin. If the verification is successful, then the browser generates clientData, which is a data structure containing the origin, challenge, and type, as shown in Table 6. After generating the clientData, it is hashed. The Contract Info, User Info, and clientDataHash are then passed to the verifier.
Step 4. Verifying user identity:
The authenticator will perform biometric authentication or other verification methods on the user. Once the verification is successful, the authenticator will generate a new pair of asymmetric keys. The private key is stored within the authenticator, while the public key becomes part of the attestation. The private key is then used to sign the clientDataHash and attestation.
Step 5. Returning attestationObject and clientData to the browser and parsing attestationObject:
After the PublicKey, CredentialID, aaguid, and signature are generated, they are combined to form the attestationObject. The clientDataHash and attestationObject are then sent to the browser. The attestationObject is structured according to the information provided in Table 7.
Step 6. Generating PublicKeyCredential:
The browser parses the attestationObject received, extracting attStmt and authData. It then generates the PublicKeyCredential object and returns it to the smart contract for verification. During the registration phase, PublicKeyCredential is created using the “publicKey” option, allowing for the creation of a new Credential.
Step 7. Verification:
The smart contract verifies the signature of the attStmt within the clientDataHash and the attestationObject and using the public key.
Afterwards, the smart contract will parse the challenge within the clientData to ensure it matches the original request. It will also verify if the origin is correct and if the type is set to “create,” indicating a user registration. Once the verification is completed, the smart contract will store the PublicKey, CredentialID, and aaguid on the blockchain and associate them with the user.
Step 8. Returning result:
Finally, the smart contract will return the registration result to the browser to complete the registration process.
3.1.2. FIDO2 Blockchain Login Phase
In Figure 5, the authentication architecture of the FIDO2 blockchain is depicted. During the verification process, the user selects a previously registered security key or device for identity authentication. If the user chooses to log in using a security key, then the smart contract generates a challenge and sends it to the authenticator device. The authenticator device verifies the user’s identity using biometric authentication. Once the verification is successful, the authenticator device signs the challenge using its private key and sends it back to the smart contract. The smart contract then uses the corresponding public key to verify the signature and determine if the requesting user is an authorized user for the desired service. After successful verification, the smart contract checks the user’s permission records on the blockchain to confirm the user’s authorization for accessing the system.
Step 1. Login request:
The browser initiates a verification request to the smart contract for login. During the login process, the user’s wallet address (userWalletAddress) is passed to the smart contract.
Step 2. PublicKeyCredentialRequestOptions:
The smart contract creates PublicKeyCredentialRequestOptions and returns it to the browser, which includes information such as the challenge and allowCredentials. The allowCredentials field contains a list of previously registered credentials for the user, which is used for the verification process as shown in Table 8.
Step 3. Verifying origin:
When the browser receives the relevant information, it verifies whether the Contract Address in Contract Info matches the origin. If the verification is successful, then the browser generates clientData, which is a data segment generated by the browser and has the same format as the content generated during registration. clientData includes origin, challenge, and type. Once clientData is generated, it is hashed, and the information, including Contract Info and clientDataHash, is passed to the authenticator for further validation.
Step 4. Verifying user identity:
During the identity verification process, the authenticator searches for a credential that matches the Contract Address. The authenticator then verifies the user’s identity through biometric authentication or other verification methods. Once the verification is successful, a new assertion is created. The authenticator uses the private key generated during registration for this account to sign the clientDataHash and authenticatorData.
Step 5. Returning the signed information to the browser:
The verifier sends the authenticatorData, clientDataHash, and signature to the browser. The signature is generated by signing the concatenation of authenticatorData and clientDataHash using the private key associated with the authenticator.
Step 6. Generating PublicKeyCredential:
The browser parses the authenticatorData, clientDataHash, and signature and generates a PublicKeyCredential object. This object is then returned to the smart contract for verification. The PublicKeyCredential object differs from the one used during registration in that it includes the signature but does not include the public key. The structure of the PublicKeyCredential object is shown in Table 9.
Step 7. Parsing and verification:
To verify the signature, the smart contract retrieves the stored PublicKey from the blockchain and performs signature verification.
After successful verification, the relevant information will be passed to the smart contract through the getPermission function. The required information for the getPermission function is shown in Table 10.
Step 8. Returning verification result and permissions:
Finally, the smart contract will return the registration result and the corresponding permissions to the browser, completing the verification process.
3.2. The FIDO2 Blockchain Permission Management
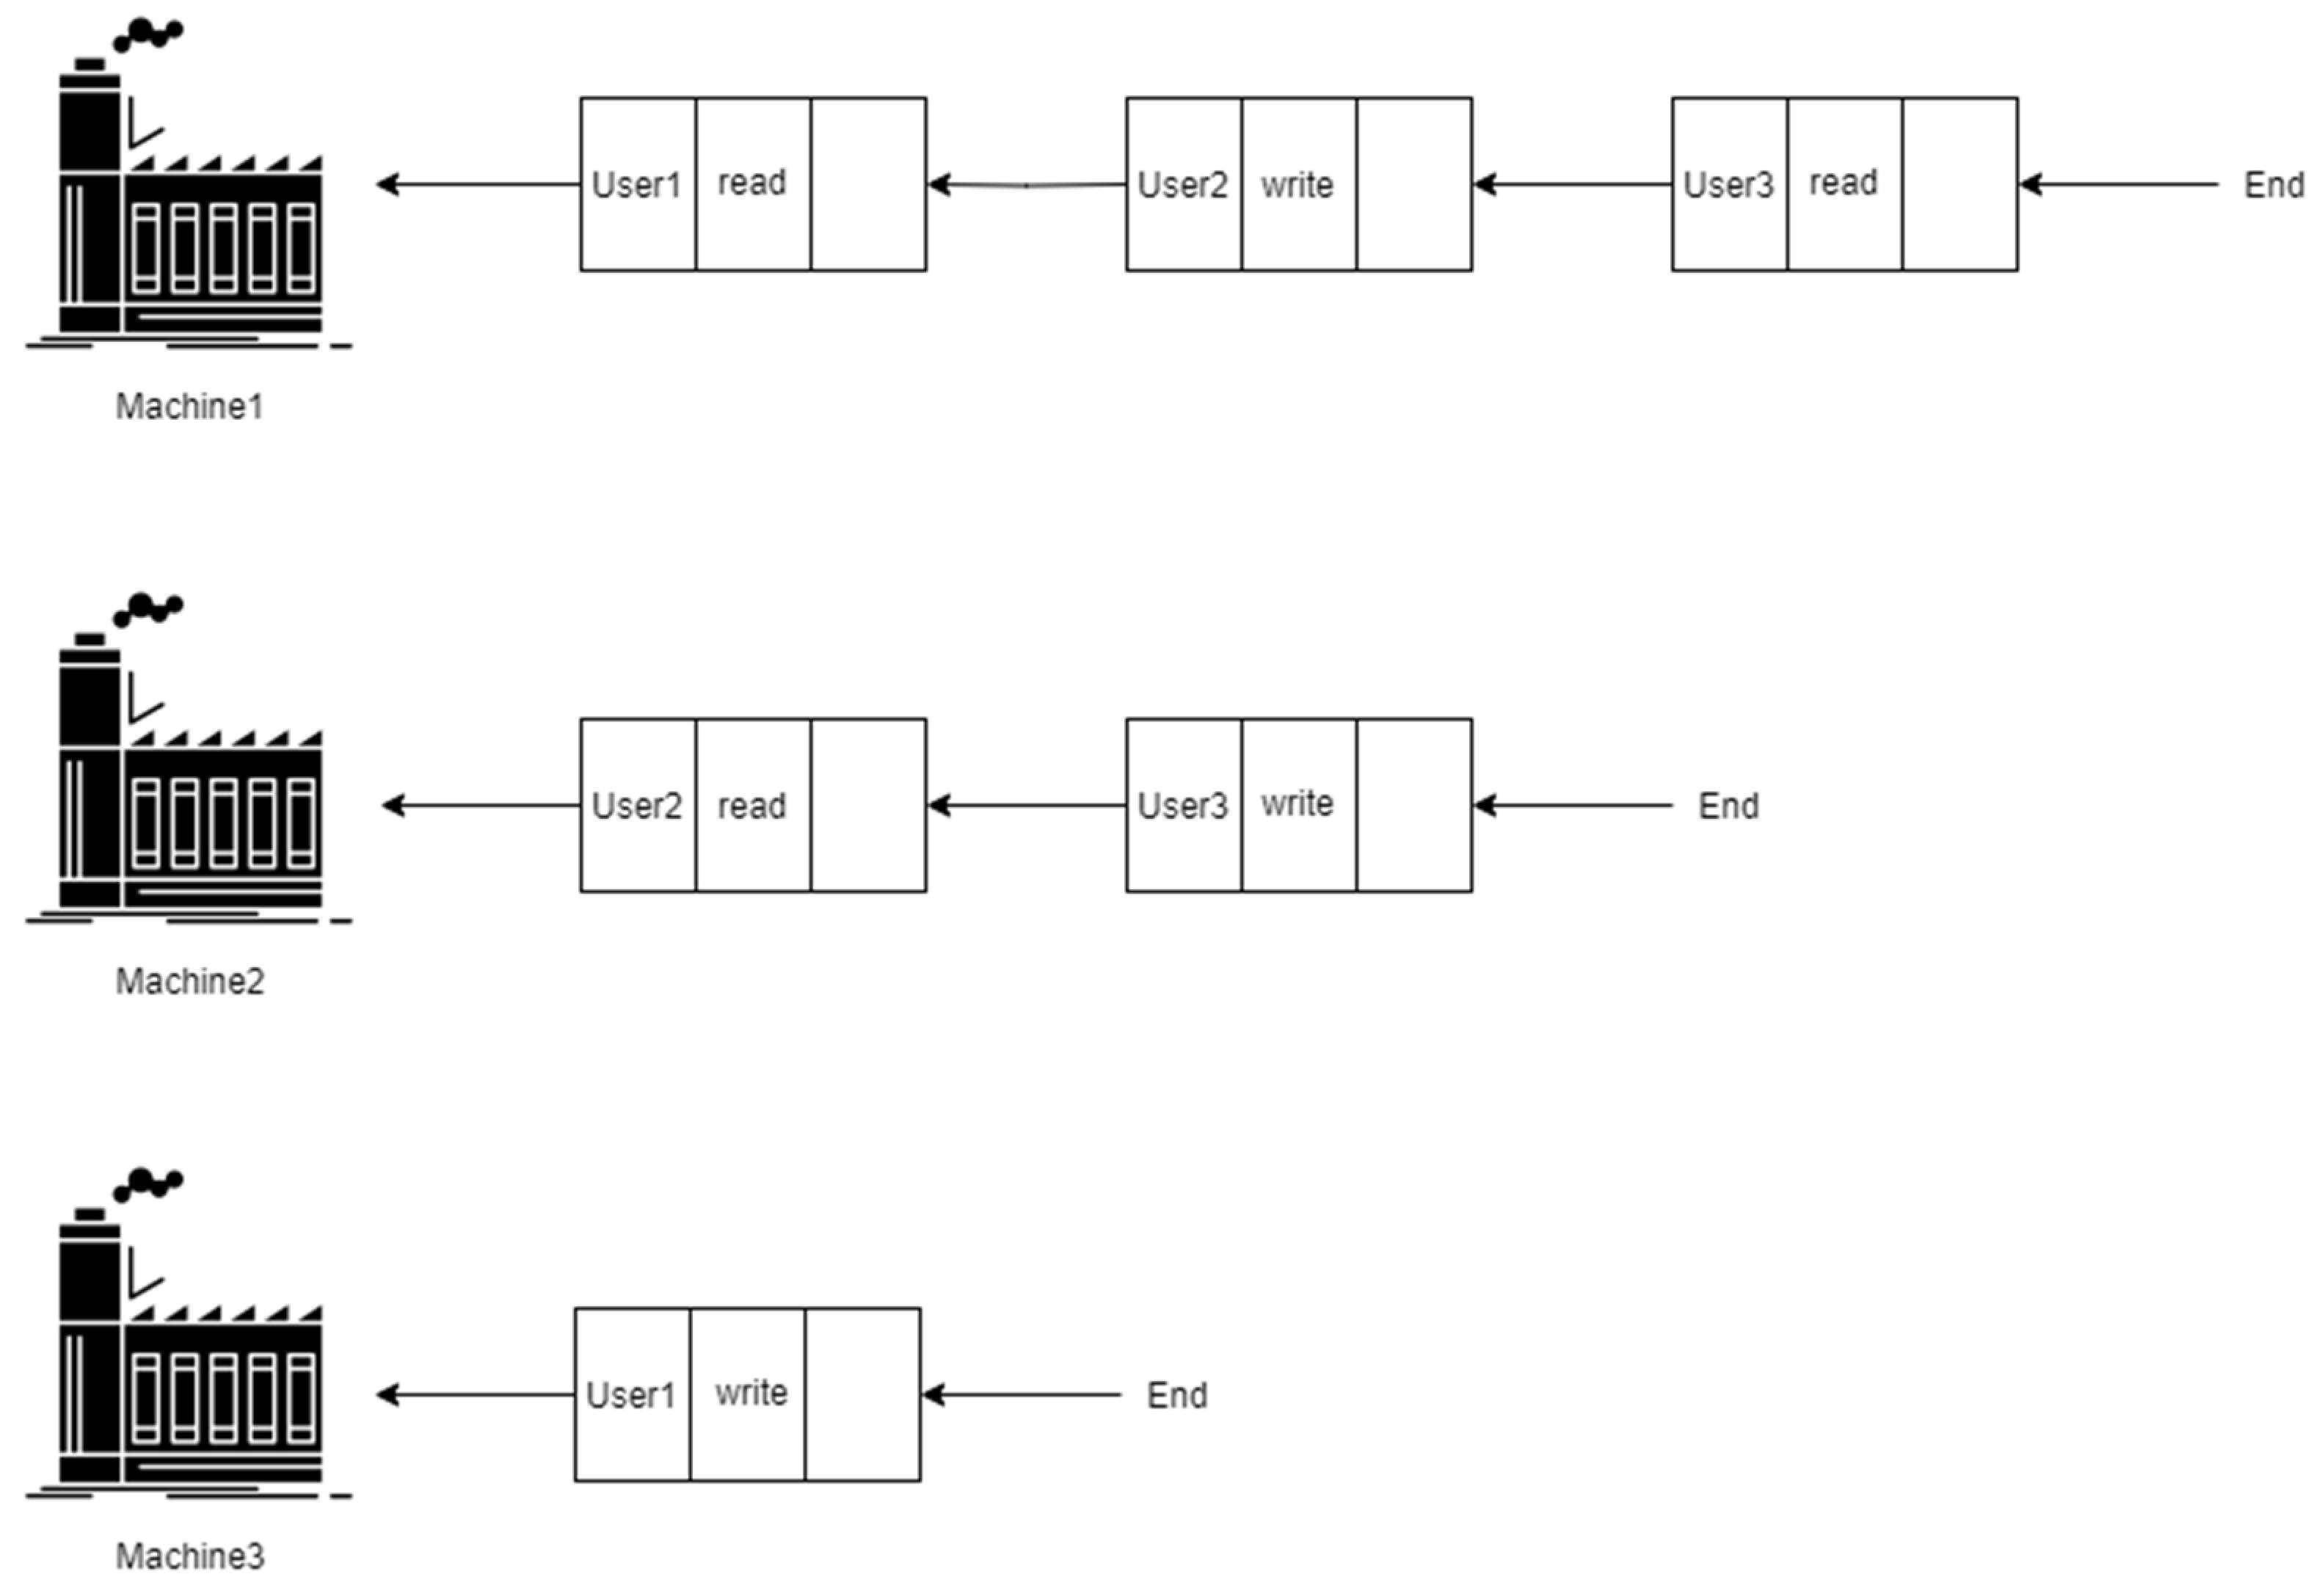
The permission management approach adopted in this research is the Access Control List (ACL) method [19,20]. ACL is a method of assigning access permissions to subjects for operating on objects. Each ACL corresponds to an object and can omit empty elements in a sparse matrix, thereby addressing the sparse matrix problem. Each ACL element consists of two parts: the subject and the access rights. These elements are represented as ordered pairs, such as [subject, right]. Each ordered pair defines a specific object that a subject can access, and each subject corresponds to a non-empty set of rights. Through ACL, rights can be configured for different subjects on different objects, enabling fine-grained access control. Each subject is assigned the rights it possesses, allowing effective management and control of the access behavior of subjects to objects. The representation method of the access control list is shown in Figure 6.
The blockchain has great potential in access control. Identity verification and permission management solutions based on the blockchain have attracted widespread attention and research. By leveraging the immutability and decentralization of the blockchain, more secure and efficient identity verification and permission management can be achieved. In fields with high security requirements, the application of blockchain technology can provide more reliable security control solutions. It is expected that the blockchain will continue to play an important role in the field of access control, bringing more innovative applications and improvements [21].
4. Results
4.1. Security Analysis
The purpose of this study is to address the security vulnerabilities inherent in the FIDO architecture and bolster security by integrating blockchain technology. The blockchain, being decentralized and distributed, offers the potential to mitigate the expenses associated with implementing a decentralized authentication framework within the FIDO architecture. Storing public keys on the blockchain can significantly enhance security, decentralization, transparency, and resistance to tampering. Consequently, blockchain technology holds promise for fortifying the security of the FIDO architecture. Below, we will outline several security attacks that are particularly difficult to defend against on the internet and explain how our architecture is designed to withstand these attacks [22,23].
4.1.1. Brute Force Attack
The architecture of passwordless authentication relies on hardware keys or bio-metric identification devices owned by users. These authentication factors offer high levels of security, making it challenging for attackers to obtain users’ identity information through brute force attacks. This architecture significantly enhances system security. This study adopts the characteristics of a passwordless authentication architecture, eliminating the need for traditional password login methods. This approach effectively mitigates brute force attacks, as attackers cannot infiltrate the system by guessing or cracking passwords.
4.1.2. Phishing Attack
In this study, we employ public key encryption technology for identity verification, thereby reducing the risk associated with entering passwords on untrusted websites. User passwords are never transmitted, so even if users enter their passwords on a phishing website, attackers cannot obtain the actual password information. Additionally, we introduce indicators such as lights or touch sensors on hardware keys or biometric recognition devices to help users identify trusted identity verification operations, thus avoiding interaction with potential phishing websites or malicious software.
Furthermore, our Contract Address in Contract Info serves as a crucial element in the authentication process. The Contract Address, generated by the service provider (smart contract), is linked to the user’s account during registration. During authentication, the verifier checks if the registered Contract Address matches the current service provider’s Contract Address. This verification mechanism ensures that the verifier authenticates only against the specific service provider and prevents attackers from using forged verifiers for phishing attacks. By validating the Contract Address, we ensure that users interact only with the correct service provider, effectively thwarting phishing attacks.
Lastly, we implement a challenge response mechanism. During each authentication, a challenge is generated, and the user must provide the corresponding signature response. This mechanism complicates phishing attacks because attackers cannot predict previous challenges. Even if attackers deceive users into providing a response, the response will be invalid without the correct challenge. Therefore, the challenge response mechanism serves as an effective solution to prevent phishing attacks.
4.1.3. Replay Attack
In this study, the challenge response mechanism is implemented to ensure communication integrity. During authentication, a random challenge is generated by the smart contract and sent to the user. The user must generate the corresponding response using their registered security key or device. Since the challenge is random and used for one-time verification only, attackers cannot intercept and replay the communication, thus enhancing system security.
Similarly, public key encryption is utilized for secure communication and identity verification. The user’s security key or device stores a private key, while the server holds the corresponding public key. During verification, the security key or device encrypts the challenge using the private key and sends the encrypted result to the server. Since the private key is only stored in the security key or device, attackers cannot reuse the same encrypted result in a replay attack, further enhancing security.
Additionally, a one-time verification mechanism is supported, where each identity verification utilizes a different authentication credential that becomes invalid after successful use. Even if attackers intercept previous communications, they cannot replay the same authentication credential in subsequent verifications.
Lastly, to safeguard private keys and sensitive data, secure elements within the device are employed. These secure elements, such as hardware security modules or trusted execution environments, offer robust protection mechanisms to prevent attackers from directly accessing or copying the private keys stored within the security key or device, thereby reducing the risk of replay attacks.
4.1.4. Man-in-the-Middle Attack
To mitigate the threat of man-in-the-middle (MITM) attacks, this research implements several methods and measures. Public key encryption is utilized to safeguard sensitive information during the authentication process. Encryption and decryption using a pair of public and private keys ensure that attackers cannot access or modify transmitted data. The challenge response verification mechanism is employed, where the smart contract sends a unique challenge to the client, and the client generates a response by encrypting the challenge with their private key. Even if attackers intercept the communication, they cannot replay the same response due to the uniqueness of the challenge.
Moreover, Public Key Infrastructure (PKI) is employed to verify identities and establish trust. Through digital certificates, signatures, and verification, the system prevents attackers from executing MITM attacks using forged certificates. Additionally, biometric features are stored on the device itself rather than being transmitted to the smart contract for verification. This prevents attackers from intercepting biometric information during transmission. These mechanisms effectively mitigate the risk of MITM attacks.
4.1.5. Distributed Denial of Service (DDoS)
In this study, FIDO2 is integrated with the decentralized characteristics of the blockchain to ensure the authenticity and legitimacy of identity verification information. Each participant’s identity verification data are recorded on the blockchain, preventing attackers from impersonating legitimate users for distributed denial of service (DDoS) attacks. Additionally, the distributed nature of the blockchain aids in distributing network traffic and load, thereby mitigating the attack pressure on a single target. Since identity verification and authorization information are stored on multiple nodes, attackers would need to simultaneously attack multiple nodes to disrupt the system’s availability. Thanks to the decentralization of the blockchain, the failure of a single node does not result in the entire system becoming unavailable. Even if certain nodes are under attack or experience failures, other nodes can continue to provide identity verification services, thereby reducing the impact of DDoS attacks on the system.
4.1.6. Architecture Analysis
The solution proposed in this study is based on the FIDO standard, which offers several advantages. As shown in Table 11, both FIDO2 and this study demonstrate excellent performance in many aspects. They both support the convenience of two-factor authentication and can be applied to various platforms and devices. Additionally, they can withstand a brute force attack, phishing attack, and man-in-the-middle attack. However, they differ in their ability to defend against DDoS attacks. The FIDO standard itself does not provide a specific solution for DDoS defense. Nevertheless, when the FIDO standard is combined with blockchain technology, it can offer a certain level of defense capability, along with the advantages of decentralized identity verification and traceability. This combination significantly enhances the security resilience of FIDO. Furthermore, this study goes beyond identity verification and provides access control mechanisms, allowing only authenticated users with appropriate permissions to access specific resources.
4.2. Performance Analysis
4.2.1. Registration and Verification Execution Time
As shown in Figure 7, the time required for the identity authentication scheme designed in the thesis is plotted. The Y-axis represents the average execution time in milliseconds for ten registers and logins. The identity authentication process consists of registration and login phases. During the registration phase, operations such as certificate generation, key generation, signature generation, and signature verification are performed. On average, the registration process takes 3506.2 ms. In the login phase, operations such as searching for previously registered certificates, signature generation, and signature verification are performed. On average, the login process takes 3513.5 ms.
4.2.2. Access Control Execution Time
The execution time for access control is presented in Figure 8. The Y-axis represents the average execution time in milliseconds for ten permission operations. The permission operations are divided into five different functionalities: adding permission managers, removing permission managers, adding permissions, removing permissions, and updating permissions.
For the operation of adding permission managers, the average execution time is 289.2 ms. On the other hand, the average time for removing permission managers is 313.7 ms. Adding permissions takes an average time of 315.4 ms, while removing permissions requires an average time of 437 ms. Lastly, updating permissions has an average execution time of 410.7 ms.
5. Conclusions
5.1. Conclusions
This study has provided a robust identity authentication framework by combining FIDO2, the blockchain, and access control. The framework offers a secure, efficient, and trusted solution for identity authentication. The advantages of this framework include reduced system setup costs, ensuring the trustworthiness and verifiability of public keys, and employing permission management on the blockchain, allowing for convenient and easy maintenance of permissions by making a single change on the blockchain instead of individually modifying each machine. These features collectively contribute to a reliable and scalable identity authentication framework, providing excellent security and performance for various application scenarios.
This study integrates the existing FIDO2 architecture with blockchain technology and cleverly utilizes Access Control List (ACL) methods to enhance its control capabilities. In addition to improving the security and functionality of the original FIDO2 framework, the simulation implementation has also been confirmed to operate effectively within a reasonable timeframe. Therefore, the outcomes of this study hold significant value in enhancing the reliability of identity authentication and protecting systems from unauthorized identity breaches.
5.2. Future Research
Recently, the FIDO Alliance introduced Passkey [5], which eliminates the limitation of registering a set of keys on each device in FIDO2, thus significantly relaxing the strict requirement of binding private keys to specific hardware devices. Passkey, while making some compromises in terms of technology, offers substantial advantages and convenience in multi-device logins, eliminating cumbersome registration processes and facilitating user account recovery. This positions Passkey as an exciting and forward-looking solution that provides users with greater autonomy and flexibility in control.
Therefore, a promising future research direction would be to explore the adoption of the Passkey architecture in this study, which can enhance users’ login experiences and account management capabilities. However, before implementation, thorough evaluation and testing should be conducted to ensure its suitability and security.
Author Contributions
Conceptualization, H.-H.O.; methodology, I.-C.L.; software, Y.-M.T.; validation, C.-H.P.; formal analysis, Y.-M.T.; writing—original draft preparation, Y.-M.T.; writing—review and editing, H.-H.O.; project administration, I.-C.L. All authors have read and agreed to the published version of the manuscript.
Funding
This research received no external funding.
Institutional Review Board Statement
Not applicable.
Informed Consent Statement
Not applicable.
Data Availability Statement
The original contributions presented in the study are included in the article, further inquiries can be directed to the corresponding author.
Conflicts of Interest
The authors declare no conflict of interest.
References
- Tsou, C.-W.; Ma, Y.-W.; Tu, Y.-H.; Chen, J.-L. Security Assist Mechanisms for Industrial Control Systems with Authentication. In Proceedings of the 2023 25th International Conference on Advanced Communication Technology (ICACT), Pyeongchang, Republic of Korea, 19–22 February 2023; pp. 186–188. [Google Scholar]
- Bošnjak, L.; Sreš, J.; Brumen, B. Brute-force and dictionary attack on hashed real-world passwords. In Proceedings of the 2018 41st International Convention on Information and Communication Technology, Electronics and Microelectronics (MIPRO), Opatija, Croatia, 21–25 May 2018; pp. 1161–1166. [Google Scholar]
- Uludag, U.; Jain, A.K. Attacks on biometric systems: A case study in fingerprints. In Proceedings of the Security, Steganography, and Watermarking of Multimedia Contents VI, San Jose, CA, USA, 19–22 January 2004; Volume 5306, pp. 622–633. [Google Scholar]
- Ghorbani Lyastani, S.; Schilling, M.; Neumayr, M.; Backes, M.; Bugiel, S. Is FIDO2 the Kingslayer of User Authentication? A Comparative Usability Study of FIDO2 Passwordless Authentication. In Proceedings of the 2020 IEEE Symposium on Security and Privacy (SP), San Francisco, CA, USA, 18–20 May 2020; pp. 268–285. [Google Scholar] [CrossRef]
- FIDO Alliance. How FIDO Addresses a Full Range of Use Cases; FIDO Alliance: Mountain View, CA, USA, 2022. [Google Scholar]
- Chadwick, D.W.; Laborde, R.; Oglaza, A.; Venant, R.; Wazan, S.; Nijjar, M. Improved Identity Management with Verifiable Credentials and FIDO. IEEE Commun. Stand. Mag. 2019, 3, 14–20. [Google Scholar] [CrossRef]
- Barbosa, M.; Boldyreva, A.; Chen, S.; Warinschi, B. Provable security analysis of FIDO2. In Advances in Cryptology—CRYPTO 2021; Springer International Publishing: Cham, Switzerland, 2021; pp. 125–156. [Google Scholar]
- Huseynov, E. PIN Theft attack against FIDO2 Security keys. In Proceedings of the 3rd IFSA Winter Conference on Automation, Robotics & Communications for Industry 4.0/5.0 (ARCI’ 2023), Chamonix-Mont-Blanc, France, 22–24 February 2023. [Google Scholar]
- Machani, S.; Weeden, S.B.; Field, N. FIDO Alliance White Paper: Considerations for Deploying FIDO2 Servers in the Enterprise. 2020. Available online: https://fidoalliance.org/wp-content/uploads/2020/10/Considerations-for-Deploying-FIDO-Servers-in-the-Enterprise.pdf (accessed on 21 April 2024).
- Chang, K.C. FIDO Alliance and Asia PKI Consortium White Paper: FIDO UAF and PKI in Asia FIDO2 UAF and PKI in Asia—Case Study and Recommendations. 2018. Available online: https://fidoalliance.org/wp-content/uploads/FIDO-UAF-and-PKI-in-Asia-White-Paper.pdf (accessed on 21 April 2024).
- Koblitz, N.; Menezes, A.; Vanstone, S. The state of elliptic curve cryptography. Des. Codes Cryptogr. 2000, 19, 173–193. [Google Scholar] [CrossRef]
- Johnson, D.; Menezes, A.; Vanstone, S. The elliptic curve digital signature algorithm (ECDSA). Int. J. Inf. Secur. 2014, 1, 36–63. [Google Scholar] [CrossRef]
- Xiong, H.; Jin, C.; Alazab, M.; Yeh, K.-H.; Wang, H.; Gadekallu, T.R.; Wang, W.; Su, C. On the Design of Blockchain-Based ECDSA with Fault-Tolerant Batch Verification Protocol for Blockchain-Enabled IoMT. IEEE J. Biomed. Health Inform. 2022, 26, 1977–1986. [Google Scholar] [CrossRef] [PubMed]
- Birje, M.; Goudar, R.H.; Rakshitha, C.M.; Tapale, M. Blockchain Technology Review: Consensus Mechanisms and Applications. Int. J. Eng. Trends Technol. 2023, 71, 27–39. [Google Scholar] [CrossRef]
- Di Pierro, M. What Is the Blockchain? Comput. Sci. Eng. 2017, 19, 92–95. [Google Scholar] [CrossRef]
- Fang, W.; Chen, W.; Zhang, W.; Pei, J.; Gao, W.; Wang, G. Digital signature scheme for information non-repudiation in blockchain: A state of the art review. EURASIP J. Wirel. Commun. Netw. 2020, 2020, 56. [Google Scholar] [CrossRef]
- Tripathi, G.; Ahad, M.A.; Casalino, G. A comprehensive review of blockchain technology: Underlying principles and historical background with future challenges. Decis. Anal. J. 2023, 9, 100344. [Google Scholar] [CrossRef]
- Wang, S.; Ouyang, L.; Yuan, Y.; Ni, X.; Han, X.; Wang, F.-Y. Blockchain-Enabled Smart Contracts: Architecture, Applications, and Future Trends. IEEE Trans. Syst. Man Cybern. Syst. 2019, 49, 2266–2277. [Google Scholar] [CrossRef]
- Jang, D.; Shin, M.; Pathirage, D. Security Fault Tolerance for Access Control. In Proceedings of the 2020 IEEE International Conference on Autonomic Computing and Self-Organizing Systems Companion, Washington, DC, USA, 17–21 August 2020; pp. 212–217. [Google Scholar]
- Gavrila, S.; Kühn, D.R.; Ferraiolo, D.F.; Sandhu, R.; Chan-dramouli, R. Proposed NIST standard for role-based access control. ACM Trans. Inf. Syst. Secur. 2001, 4, 224–274. [Google Scholar]
- Es-Samaali, H.; Outchakoucht, A.; Leroy, J.P. A blockchain-based access control for big data. Int. J. Comput. Netw. Commun. Secur. 2017, 5, 137–147. [Google Scholar]
- Ahmad, K.; Verma, S.; Kumar, N.; Shekhar, J. Classification of Internet Security Attacks. In Proceedings of the 5th National Conference, INDIACom-2011 Computing For Nation Development, New Delhi, India, 10–11 March 2011. [Google Scholar]
- Chen, F.; Tang, Y.; Cheng, X.; Xie, D.; Wang, T.; Zhao, C. Blockchain-Based Efficient Device Authentication Protocol for Medical Cyber-Physical Systems. Secur. Commun. Netw. 2021, 2021, 5580939. [Google Scholar] [CrossRef]
Figure 1.
FIDO2 registration architecture diagram.

Figure 2.
FIDO2 authentication architecture diagram.

Figure 3.
Blockchain.

Figure 4.
Proposed FIDO2 blockchain register architecture diagram.

Figure 5.
Proposed FIDO2 blockchain login architecture diagram.

Figure 6.
Access Control List.

Figure 7.
The duration of identity registration and verification.

Figure 8.
Average execution time for permission operations.


Table 1.
The parameter list for clientData in FIDO2 registration.
| challenge | Randomly generated random value. |
| origin | The origin string must be verified to match the origin of the application. |
| type | Verify if the string matches “webauthn.create”. |
Table 2.
The parameter list for attestationObject in FIDO2 registration.
| fmt | indicates how attestation data should be parsed and verified. |
| authData | contains information about the created credential, including CredentialID and PublicKey. |
| attStmt | contains the signature data related to the public key credential itself and the creation of the authenticator. |
Table 3.
The parameter list for PublicKeyCredential in FIDO2 registration.
| id | Credential ID. |
| response | attestationObject: It contains the authenticator data and attestation statement. clientData: Data transmitted from the client to the authenticator for generating the credential. |
| type | Type is public key. |
Table 4.
The parameter list for allowCredentials in FIDO2 login.
| id | The CredentialID is obtained during registration. |
| type | The type of the credential, which is public key. |
| transports | Specifies the transport methods to be used, such as USB, Bluetooth, or NFC. |
Table 5.
The parameter list for PublicKeyCredential in FIDO2 login.
| id | CredentialID. |
| response | authenticatorData: Data related to the authenticator device during the verification process. clientData: Data provided by the client to the authenticator device for generating the credential. signature: The signature generated by the private key associated with the credential. |
| type | The type of the credential, which is public key. |
Table 6.
The parameter list for clientData in FIDO2 blockchain register.
| challenge | A random value passed from the browser. |
| origin | Verification of whether the origin string matches the Contract Address. |
| type | Verification of whether the string matches “webauthn.create”. |
Table 7.
The parameter list for attestationObject in FIDO2 blockchain register.
| fmt | Indicates how to parse and verify the attestation data. |
| authData | Information about the created credential, including CredentialID and PublicKey. |
| attStmt | Signature data related to the public key credential itself and the creation of the authenticator. |
Table 8.
The parameter list for allowCredentials in FIDO2 blockchain login.
| id | The CredentialID obtained during registration. |
| type | The type of credential, which is public key. |
| transports | Specifies the transport methods to be used, such as USB, Bluetooth, or NFC. |
Table 9.
The parameter list for PublicKeyCredential in FIDO2 blockchain login.
| id | CredentialID |
| response | authenticatorData: Data related to the authenticator device. clientData: Data provided by the client to the authenticator, used for generating the credential. signature: The signature generated by the private key associated with the credential. |
| type | The credential type, which is public key. |
Table 10.
The information required for the getPermission function in FIDO2 blockchain login.
| subject | The user’s blockchain wallet address (userWalletAddress). |
| object | The machine that can be operated. |
Table 11.
Item Comparison.
| Item Comparison | FIDO2 | Our Method |
| The convenience of two-factor authentication | ✔ | ✔ |
| Applicable to multiple platforms and devices | ✔ | ✔ |
| Resistance against brute force attack | ✔ | ✔ |
| Resistance against phishing attack | ✔ | ✔ |
| Resistance against replay attack | ✔ | ✔ |
| Resistance against man-in-the-middle attack | ✔ | ✔ |
| Resistance against DDoS attack | ✔ | |
| Decentralized identity verification | ✔ | |
| Verification traceability | ✔ | |
| Access control | ✔ |
Disclaimer/Publisher’s Note: The statements, opinions and data contained in all publications are solely those of the individual author(s) and contributor(s) and not of MDPI and/or the editor(s). MDPI and/or the editor(s) disclaim responsibility for any injury to people or property resulting from any ideas, methods, instructions or products referred to in the content. |
© 2024 by the authors. Licensee MDPI, Basel, Switzerland. This article is an open access article distributed under the terms and conditions of the Creative Commons Attribution (CC BY) license (https://creativecommons.org/licenses/by/4.0/).
Share and Cite
MDPI and ACS Style
Ou, H.-H.; Pan, C.-H.; Tseng, Y.-M.; Lin, I.-C. Decentralized Identity Authentication Mechanism: Integrating FIDO and Blockchain for Enhanced Security. Appl. Sci. 2024, 14, 3551. https://doi.org/10.3390/app14093551
AMA Style
Ou H-H, Pan C-H, Tseng Y-M, Lin I-C. Decentralized Identity Authentication Mechanism: Integrating FIDO and Blockchain for Enhanced Security. Applied Sciences. 2024; 14(9):3551. https://doi.org/10.3390/app14093551
Chicago/Turabian StyleOu, Hsia-Hung, Chien-Hsiu Pan, Yang-Ming Tseng, and Iuon-Chang Lin. 2024. "Decentralized Identity Authentication Mechanism: Integrating FIDO and Blockchain for Enhanced Security" Applied Sciences 14, no. 9: 3551. https://doi.org/10.3390/app14093551
Note that from the first issue of 2016, this journal uses article numbers instead of page numbers. See further details here.