Article

Fe-Mn-Al-Ni Shape Memory Alloy Additively Manufactured via Laser Powder Bed Fusion

1
Department of Mechanical, Industrial, and Manufacturing Engineering, The University of Toledo, Toledo, OH 43606, USA
2
Toyota Motor North America, Ann Arbor, MI 48105, USA
*
Author to whom correspondence should be addressed.
Crystals 2023, 13(10), 1505; https://doi.org/10.3390/cryst13101505
Submission received: 13 September 2023 / Revised: 10 October 2023 / Accepted: 13 October 2023 / Published: 17 October 2023
(This article belongs to the Special Issue Microstructure and Properties of Steels and Other Structural Alloys)

Abstract

:
Fe-Mn-Al-Ni is an Fe-based shape memory alloy (SMA) featuring higher stability and low temperature dependency of superelasticity stress over a wide range of temperatures. Additive manufacturing (AM) is a promising technique for fabricating Fe-SMA with enhanced properties, which can eliminate the limitations associated with conventional fabrication and allow for the manufacture of complicated shapes with only a single-step fabrication. The current work investigates the densification behavior and fabrication window of an Fe-Mn-Al-Ni SMA using laser powder bed fusion (LPBF). Experimental optimization was performed to identify the optimum processing window parameters in terms of laser power and scanning speed to fabricate Fe-Mn-Al-Ni SMA samples. Laser remelting was also employed to improve the characteristics of Fe-Mn-Al-Ni-fabricated samples. Characterization and testing techniques were carried out to assess the densification behavior of Fe-Mn-Al-Ni to study surface roughness, density, porosity, and hardness. The findings indicated that using a laser power range of 175–200 W combined with a scanning speed of 800 mm/s within the defined processing window parameters can minimize the defects with the material and lead to decreased surface roughness, lower porosity, and higher densification.

1. Introduction

Shape memory alloys (SMAs) are one category of smart materials that have recently gained high interest in a wide range of industrial applications across many different fields due to their distinctive properties, including workability, weldability, superelasticity (SE), and shape memory effect (SME). SME and SE are the two main properties that set them apart from other metallic materials [1]. The shape memory effect is their ability to undergo a reversible, non-diffusive martensitic solid-to-solid phase transformation, allowing them to return to their original shape after being triggered by some type of stimulus [2]. SMAs’ key features are induced by the martensitic transformation, which is defined by the two phases’ critical temperatures including austenite start temperature (As), austenite finish temperature (Af), martensite start temperature (Ms), and martensite finish temperature (Mf) [3,4]. The four temperatures are crucial in the design of those smart metallic materials [5]. SMAs either exhibit one-way SME, which can be observed when heating the material above the austenite finish temperature, or two-way SME, which can be explored either at temperatures above the austenite finish temperature or below the martensite finish temperature [6]. Active biomedical devices [7], compact actuators [8], adaptive couplings [9], and seismic damping structural components [10] are only a few of the significant innovations made possible by the ability to utilize these transformations. SE is the property that allows for a significant recovery of a nonlinear elastic strain under unloading [11]. SMAs have gained a lot of interest due to many applications that can benefit from such a property. Nickel titanium is the most popular SMA used mainly in aerospace and biomedical applications [12]. The high cost of a NiTi SMA limited its use in other less-sensitive industries’ applications, such as structural and automotive [13]. Thus, there is a huge need for cheaper, more affordable options. Fe-based [14] and Cu-based [15] SMAs have the potential to fill this need; they provide a cheaper, more feasible alternative for large-scale production [16].
Fe-SMAs have been known for a long time; however, the development of FeNiCoAlTaB [17] and FeMnAlNi [18] alloys marked an abrupt change in the field of alloy design. FeNiCoAlTaB alloys have been shown to exhibit noticeably more superelastic strain in their polycrystalline state than NiTi alloys [19]. Fe-SMAs are substantially stronger than NiTi and Cu-based SMAs and have a higher capacity for energy absorption [20]. Fe-SMAs can produce a superelastic strain greater than 13% and an ultimate strength of more than 1 GPa compared to Ni-Ti SMAs [17]. The exceptional characteristics of these Fe-SMAs make them suitable for energy-damping and strain-sensing applications [21]. However, they did not display these amazing qualities until they were precipitation-hardened, cold-rolled to impart the orientation of miller indices of [100], and embedded with boron elements for grain refining [17].
The presence of shape memory characteristics in Fe-Mn-Al-Ni SMA was first identified in 2011 [18]. Fe-Mn-Al-Ni exhibited minimal temperature dependence across an extensive temperature range (−263 °C to 240 °C) concerning the SE stress [22]. It was illustrated that Fe-Mn-Al-Ni SMA has a very low temperature dependence of the critical stress for the martensitic transformation of about 0.5 MPa/°C due to its minimal entropy difference between the (BCC) parent phase and the (FCC) martensite phase [23]. This system is usually conventionally manufactured via casting after using a vacuum induction furnace for melting under an argon environment, highlighting that this system also had the advantage of good cold workability [22]. On the other hand, the formation of cracks during water quenching is a problem with this alloy [24]. However, by increasing the quenching temperature while slowing the quenching rate, a ductile second phase can emerge at the grain boundary, which significantly mitigates this problem [24].
Additive manufacturing (AM) technologies have shown great promise for the manufacturing of metals [25,26]. AM offers several advantages that can advance the manufacturing industries, such as the ability to produce complex geometries [27], cost- and waste savings [28], accelerated manufacturing [29], and enhanced overall qualities and efficiency of produced components [30]. These advantages can get beyond the geometric complexity restrictions and reduce the formation of stable secondary phases associated with conventional manufacturing methods [31]. The research in additive processing mainly concentrated on process optimization [32], examining the influence of post-process treatments on the microstructural evolution and mechanical performance of different alloying compositions [33]. The main interest is to fabricate a defect-free Fe-based SMA part. However, it is challenging due to the many factors involved, starting with the selection of fabrication process parameters and ending with the alloying elements in the material.
Laser powder bed fusion (LPBF) has been extensively used in the production of SMAs. These published papers provide recent research and findings about the additive manufacturing of SMAs [34,35,36]. The research that has been described indicates that NiTi LPBF processing is somewhat challenging. Shape memory behavior can be affected by changes in the alloy’s chemistry brought on by the heating and cooling cycle that occurs during LPBF [37], as well as by the development of particular or distinctive microstructures [38]. The most critical step in the fabrication using LPBF is to identify the right window of process parameters that produce defect-free or minimally defective parts [39], thus yielding better a microstructure and mechanical properties [40]. Laser power, scanning speed, layer thickness, hatching space, build orientation, and scanning patterns are among the primary process factors in LPBF [41,42] that can be quantified by the volumetric energy density (VED) [43]. Higher VED selection will result in various defects such as keyholes, hot spatters, loss of alloying elements, gaseous pores, and more [44], showing that applying a lower VED, on the other hand, will lead to other defects such as a lack of fusion, balling, powder sputtering, and others [40].
Laser remelting (LR) is an innovative and efficient technique of in situ heat treatment to enhance surface properties and limit defects in LPBF materials [45]. The solidified layer is subjected to a laser pass so that the defects in LPBF parts can be reduced and the characteristics of the part can be improved [46]. Moreover, [47] explained that the higher cooling rate after LR results in refined grains, causing higher hardness and leading to better resistance to corrosion. Thus, fewer cracks and porous formations are yielded via the remelting of each layer [48]. LR has also been shown as an effective way to reduce surface roughness, enhance surface qualities [49], decrease porosity, and increase the relative density and yield strength of the LPBF fabricated parts [50,51]. It can be concluded that LPBF is a promising technique that can overcome the limitations of conventional manufacturing such as TiC formation during vacuum induction melting and oxygen/carbon absorption during arc melting processing and can ease the Fe-SMA production with improved properties. LPBF has the advantage of applying different in situ processing such as the remelting treatment to improve the fabrication quality. Investigations on the LPBF of Fe-Mn-Al-based SMA are still limited. There is still a lack of systematic research regarding how the process parameters affect the densification and characteristics of the as-built LPBF Fe-Mn-Al-based SMAs. In current research, the LPBF processing window and LR techniques are investigated for fabricating Fe-Mn-Al-Ni SMAs. This study explores the impact of those processing parameters on surface quality and densification behavior in terms of surface roughness, density, porosity, and hardness.

2. Experimental

2.1. Material

An Fe-based SMA with the composition of Fe-34Mn-15Al-7.5Ni (at. %) was used in this work. The powder was prepared using a gas atomization process under an argon environment. The chemical composition was evaluated using energy dispersive X-ray (EDX) analysis shown in Table 1. The EDX analysis confirmed the powder as a good match with the nominal composition of the Fe-Mn-Al-Ni SMA. The majority of the powder’s particles have been identified to be spherical using scanning electron microscopy (SEM), as shown in Figure 1, with a d50 of 33.8 m and a size distribution ranging from 15 to 53 μm. The powder had a uniform distribution, and the spherical shape of the particles improved flowability.

2.2. Fabrication and Optimization

The first step in fabricating this system was to determine an optimal window to produce Fe-Mn-Al-Ni SMA samples with minimal defects. Therefore, the design of the experiment was conducted to cover all possible combinations of the significant procession parameters. The processing parameters design also depended on investigating the processing window of various alloys fabricated using LPBF including Cu-Al-Ni SMAs [52], Fe-Mn-Si SMAs [53], and NiTi SMAs [39].
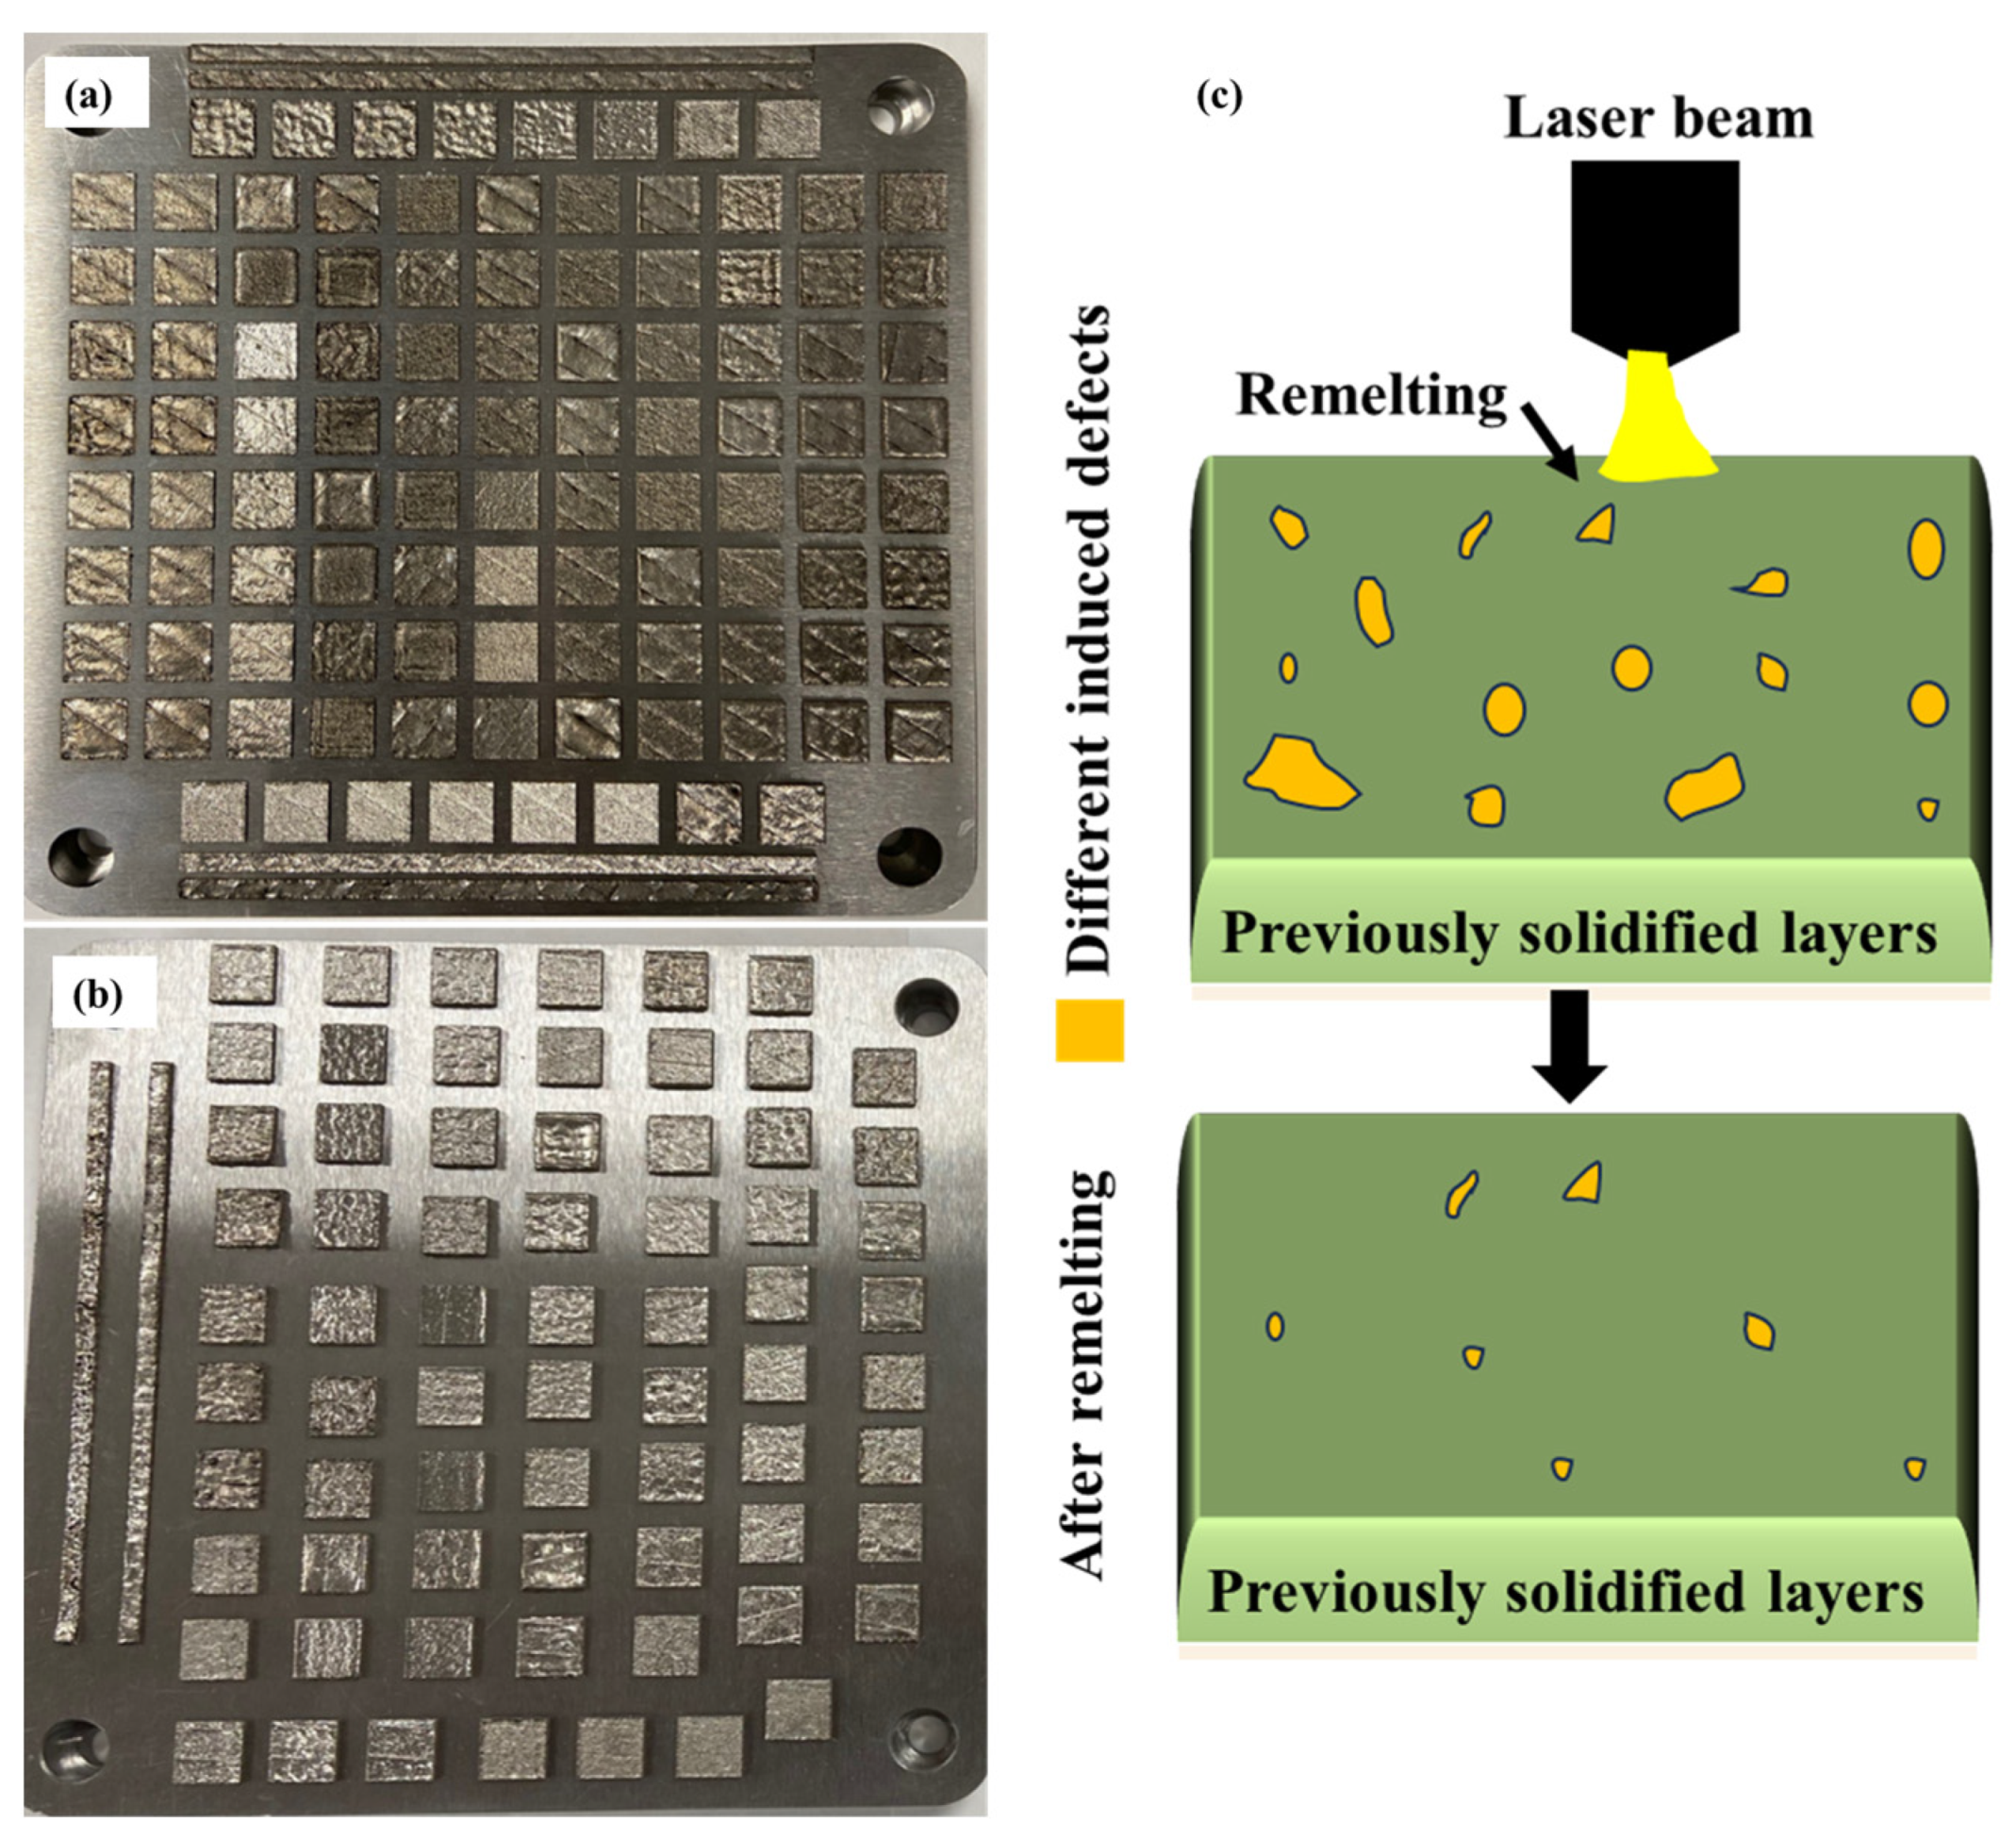
Three alternative scanning patterns (stripes, checkerboard, and lines) with a laser power range of 150–400 W, scanning speed of 600–1200 mm/s, and hatching space ranging from 0.05 to 0.13 mm were used in the fabrication process. The layer thickness (t) was maintained at 30 μm. These parameters resulted in a VED range of 46.3 to 291.7 J/mm3. Remelting was also applied with a laser power of 100–263 W and scanning speeds of 800 mm/s and 1600 mm/s to minimize the induced defects in the normal fabrication and enhance the properties of the Fe-SMA as shown in Figure 2b,c. This complete process has created 173 cubic samples as shown in Figure 2a,b. These sets of samples were allocated to define the processing window parameters that can be used to produce parts with high dimensional accuracy and minimal macro-sized cracks. Optimal laser power and scanning speed ranges were investigated to be 150–250 W and 800–1200 mm/s, respectively. A stripes scanning strategy with a hatching space of 0.09 mm, remelting at a power of 100 W, and a scanning speed of 800 m/s were also visualized to produce parts with minimal defects. These processing parameters were used to manufacture fifteen cubic samples with dimensions of 10 mm × 10 mm × 4 mm. Five laser power levels and three laser speeds were employed in the experiment’s design (DOE), as shown in Table 2. A wire electric discharge machine was performed to remove the samples from the building plate.

2.3. Characterization

The samples’ surface area roughness values (Sa) were measured using a digital microscope. The magnification of the microscope’s lens is set at X200 to obtain a focused view of the surface finish of each sample. Sa values for each sample were recorded over a specified 2.37 mm2 area. Ten readings were taken for each sample and averaged. The ten measured spots were taken from different places on the surface such as the middle, diagonal, corners, and edges to ensure capturing surface variation.
A micromeritics pycnometer with high accuracy was used to find the true volume of each sample to measure the density of the fabricated samples. This method is a non-destructive technique that employs the volume–pressure relationships based on Boyle–Mariotte’s law [54]. It uses the deviation of the inert gas (helium) pressure in a calibrated volume to determine the sample volume [55,56]. Since the helium can penetrate most of the pores in Fe-34Mn-15Al-7.5Ni samples, the measured volume will be much more accurate than using other techniques such as Archimedes, which is sensitive to many factors such as bubble surface tension, chemical changes, calibration of fluid density, and limitation on accuracy [55]. Overall porosity can be directly measured from the relative density as they have a negative correlation [56].
The surface porosity was inspected using a digital microscope. The mounted samples were ground with multiple grit sandpapers from coarse to fine grits (up to 1200 grids) for a metallographic finish. To polish and remove most surface scratches, alumina oxide polishing solution suspensions (0.3 and 0.05 microns) were used. The average surface porosity area ratio (%) was calculated by taking the average of three readings along the diagonal at X200 magnification.
The metallographic-finished mounted samples were then measured for microhardness. A digital microhardness tester was used to find Vickers hardness (HV). The instrument uses a microscopic indenter of a diamond pyramid shape and conforms to ASTM (E-384), ISO/DIS 6507-2, and JIS B-7734/B-7725 standards [57]. The parameters set for the test are 1 kg for applied load, 50 µm/s for applying load speed, and 15 s dwell time. Five measurements from different regions on each metallographic-finished mounted Fe-34Mn-15Al-7.5Ni sample were taken to find the average Vickers hardness.

3. Result and Discussion

3.1. LPBF Processing Parameters Window

The optimum LPBF processing window parameters for Fe-34Mn-15Al-7.5Ni SMA, which yielded high dimensional accuracy and minimal macro defect (macro cracks and irregular voids) materials in terms of laser power and scanning speed, were determined and mapped in Figure 3. The optimum processing parameters were found to be in the range of 150–250 W power and 600–1200 mm/s scanning speed as shown in Figure 3. Micro-sized free cracks were less affected with different scanning strategies, although a modest increase in macro-sized fractures was seen when utilizing a line scanning strategy. The investigation demonstrated that LR significantly improves the build, and it was determined that the ideal LR settings were a laser power of 100 W and a scanning speed of 800 mm/s. Additionally, the hatching space that is associated with the most non-macro-sized cracked parts was 0.09 mm.
A crucial element that needs to be investigated is surface roughness (SR), as AM of metallic alloys can produce intricately shaped components with interior surfaces that are difficult to post-machine [58]. SR flaws in metals produced using additive manufacturing could promote the beginning of cracks and result in decreased fatigue performance [59]. SR is a common indicator of product quality and, for the most part, a prerequisite for mechanical products on a technical level. For a part to work as intended, the proper surface quality must be reached [60]. Therefore, SR has been investigated for Fe-Mn-Al-Ni SMA samples using the digital microscope as illustrated earlier in the characterization section. The measurements were obtained by creating various 3D topographic images of the fabricated samples as illustrated in Figure 4. The averaged surface roughness values of the fabricated samples are represented in Figure 5. The highest average surface roughness Sa was achieved at 250 W and 1000 mm/s with a VED of 92.59 J/mm3, while the lowest value was produced at 200 W and 1000 mm/s with a VED of 74.07 J/mm3. Higher roughness can be explained by the existence of irregular structures in low VED cases and the emergence of essentially flat regions in higher VED cases due to neighboring melt pools that can fuse together at various locations in the case of higher VED [61]. Applying the so-called “laser polishing method” is one other procedure that can be utilized to reduce surface roughness in addition to optimizing the fabrication’s processing parameters, as highlighted in [62].
A regression analysis was then performed on the data to check which independent variable had a statistically significant impact on the averaged Sa values using a 95% confidence interval. The fitting plots were developed to visualize the independent variables and VED correlation with the average Sa value, as displayed in Figure S1. The results showed a moderate positive correlation with a correlation coefficient of 0.677 between laser power and the area surface roughness value of Fe-34Mn-15Al-7.5Ni SMA [63]. The impact of the laser power on the average Sa value was found to be statistically significant with a 95% confidence interval. The correlation suggests that the lower the laser power used within the defined processing window, the better the surface property.
Almost all mechanical properties are directly correlated with the density. Tensile strength, hardness, and other mechanical properties would all be enhanced by the higher density. Controlling density is essential in LPBF due to several parameters involved during the fabrication [64]. A gas pycnometer using an ultra-high purity helium gas was performed to evaluate the density of Fe-Mn-Al-Ni-fabricated specimens. Considering the theoretical density of the Fe-Mn-Al-Ni alloy, the relative density of the samples can be calculated using the following equation.
R e l a t i v e   d e n s i t y   ( % ) = ρ V a r i a b l e ρ F i x e d × 100
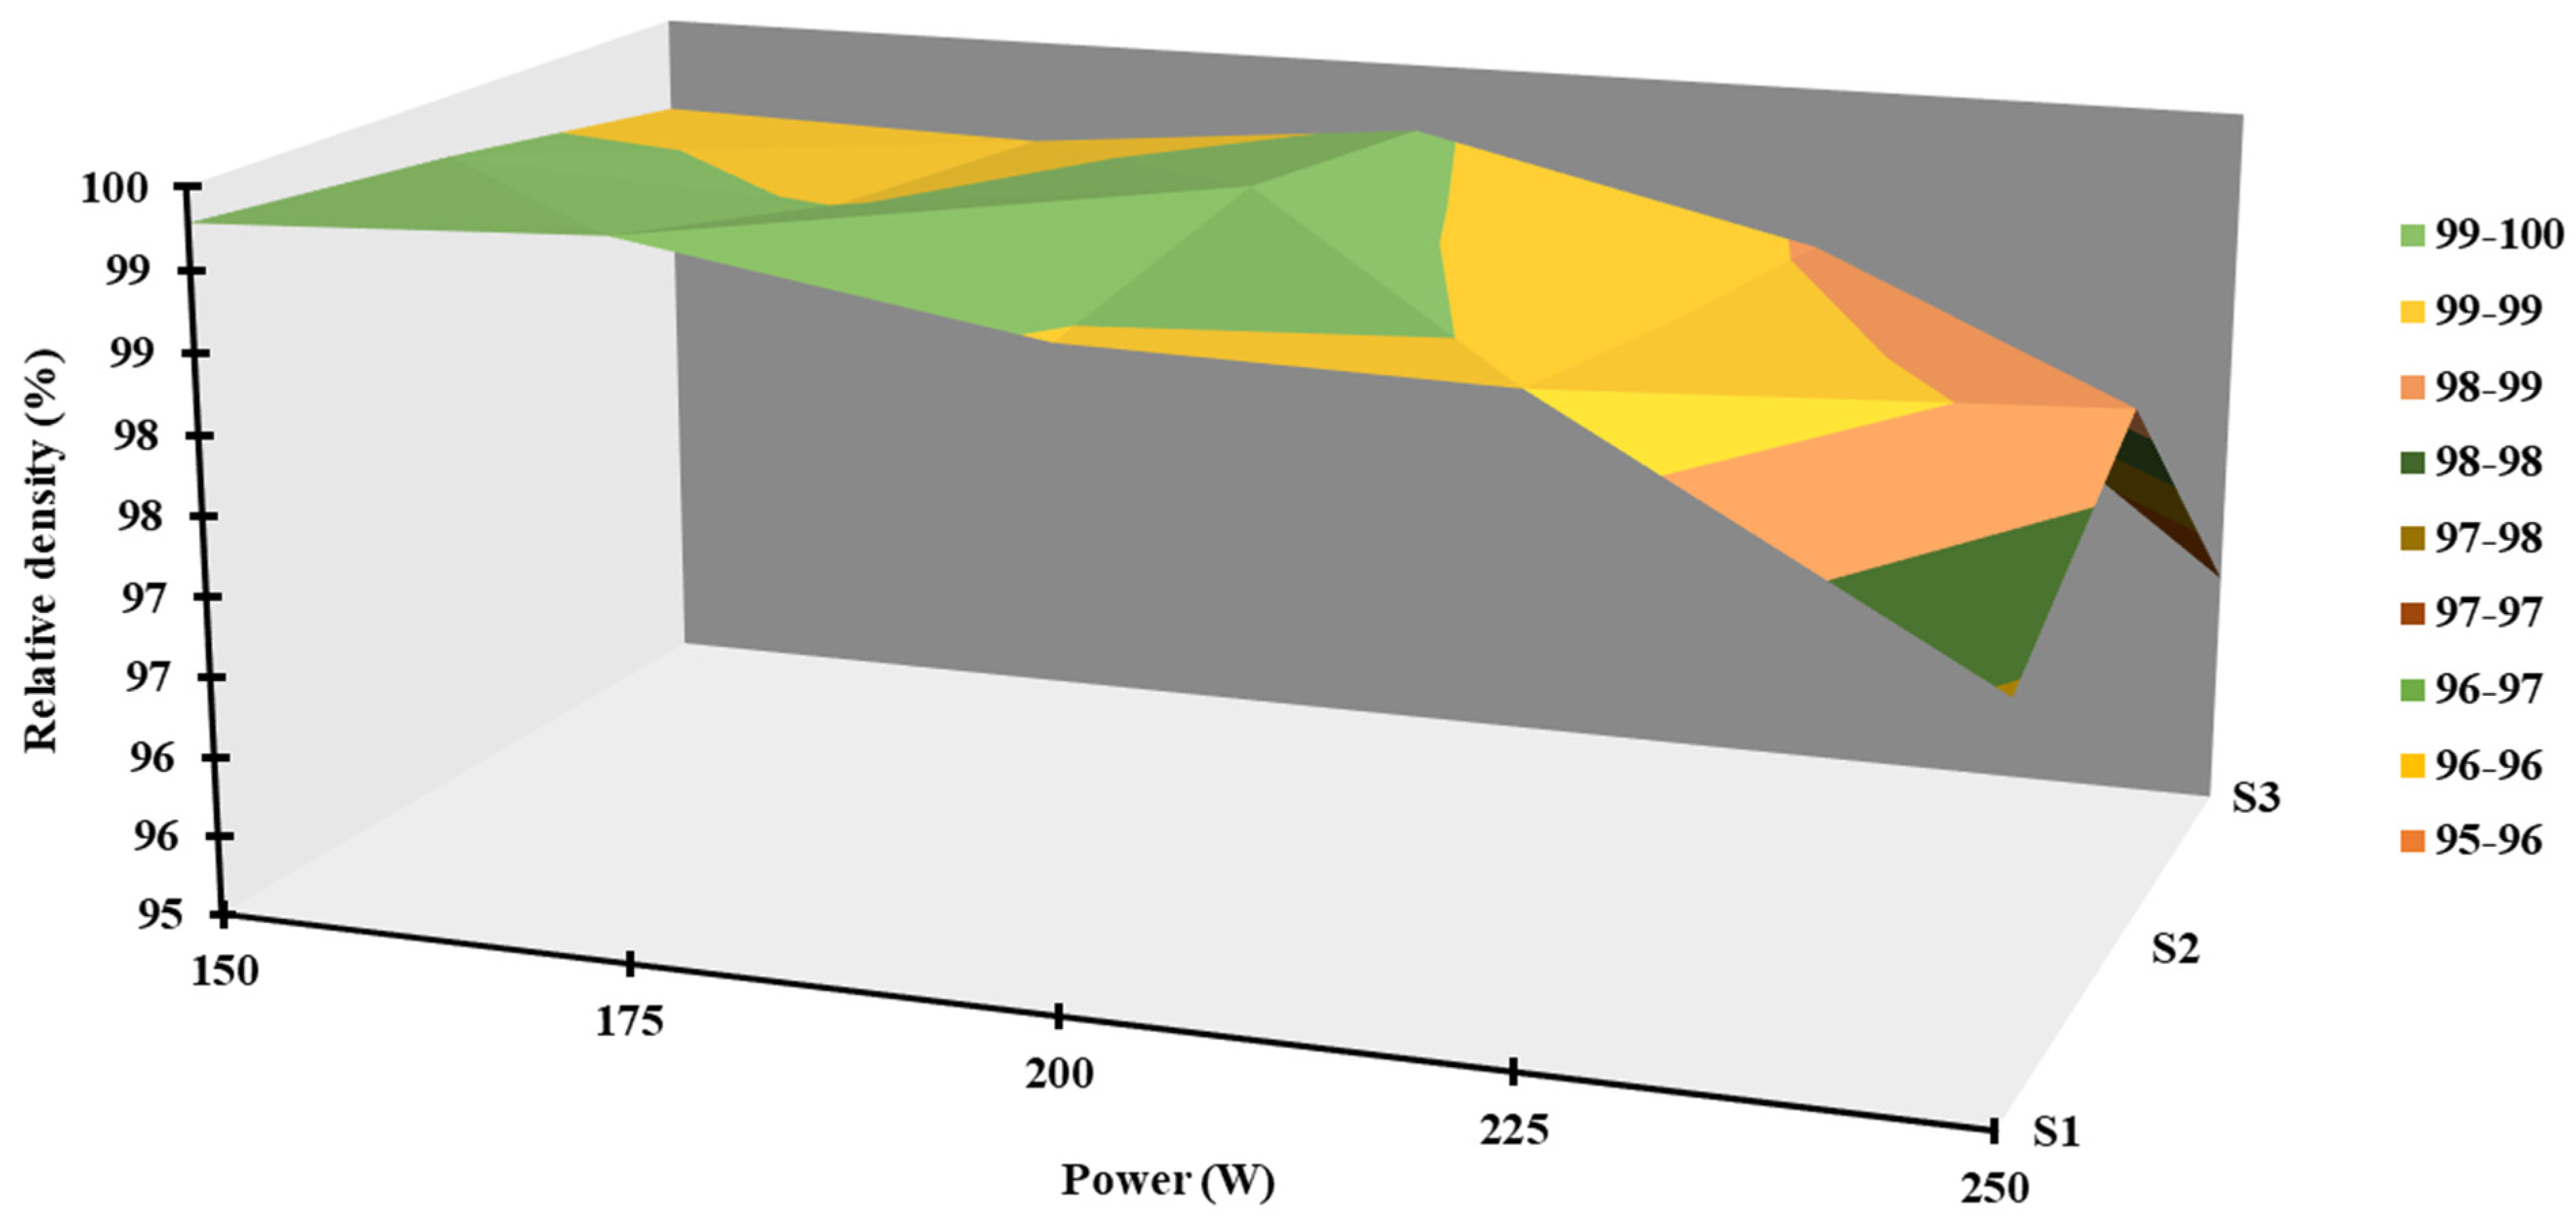
where ρVariable is the measured density of the fabricated parts, and ρFixed is the theoretical density of the alloy. The relative density was evaluated and represented in Figure 6. The results showed fluctuations over the used processing parameters. Lower densities were observed at the highest and lowest energy input, which confirms the hypothesis of the high presence of porosity defects in those VEDs. A relative density of around 99% was investigated at a laser power of 150–175 W and a scanning speed of 800 mm/s. These processing parameters yielded a VED of 81.02 J/mm3. On the other side, the sample with the lowest relative density was produced using 250 W and 1200 mm/s with a VED of 77.16 J/mm3. The regression analysis was then performed to check the statistical significance of the independent variables. There was a strong negative correlation between laser power and relative densities [63]. The impact of the laser power on the relative density value was found to be statistically significant as shown in Figure S2. Thus, the correlation suggests that the lower the laser power used, the better densification the samples undergo during fabrication. This correlation is suggested within the optimum processing window parameters, as it is well known that lower and higher VEDs will cause much more defects [40], which will result in a lower relative density with higher overall porosity. The development of parts with enhanced characteristics, such as high density, lower porosity, and higher strength, is ensured by determining the optimal window. Analysis revealed that the material can be generated with increased densification due to the energy input being roughly 81 J/mm3, which contributes to improved mechanical and thermomechanical performance.

3.2. Porosity Evaluation

Surface and overall porosities of Fe-Mn-Al-Ni-SMA-manufactured samples were evaluated. The overall porosity can be directly calculated from the density using the following equation. Overall porosity = 100 − Pr, where Pr is the relative density.
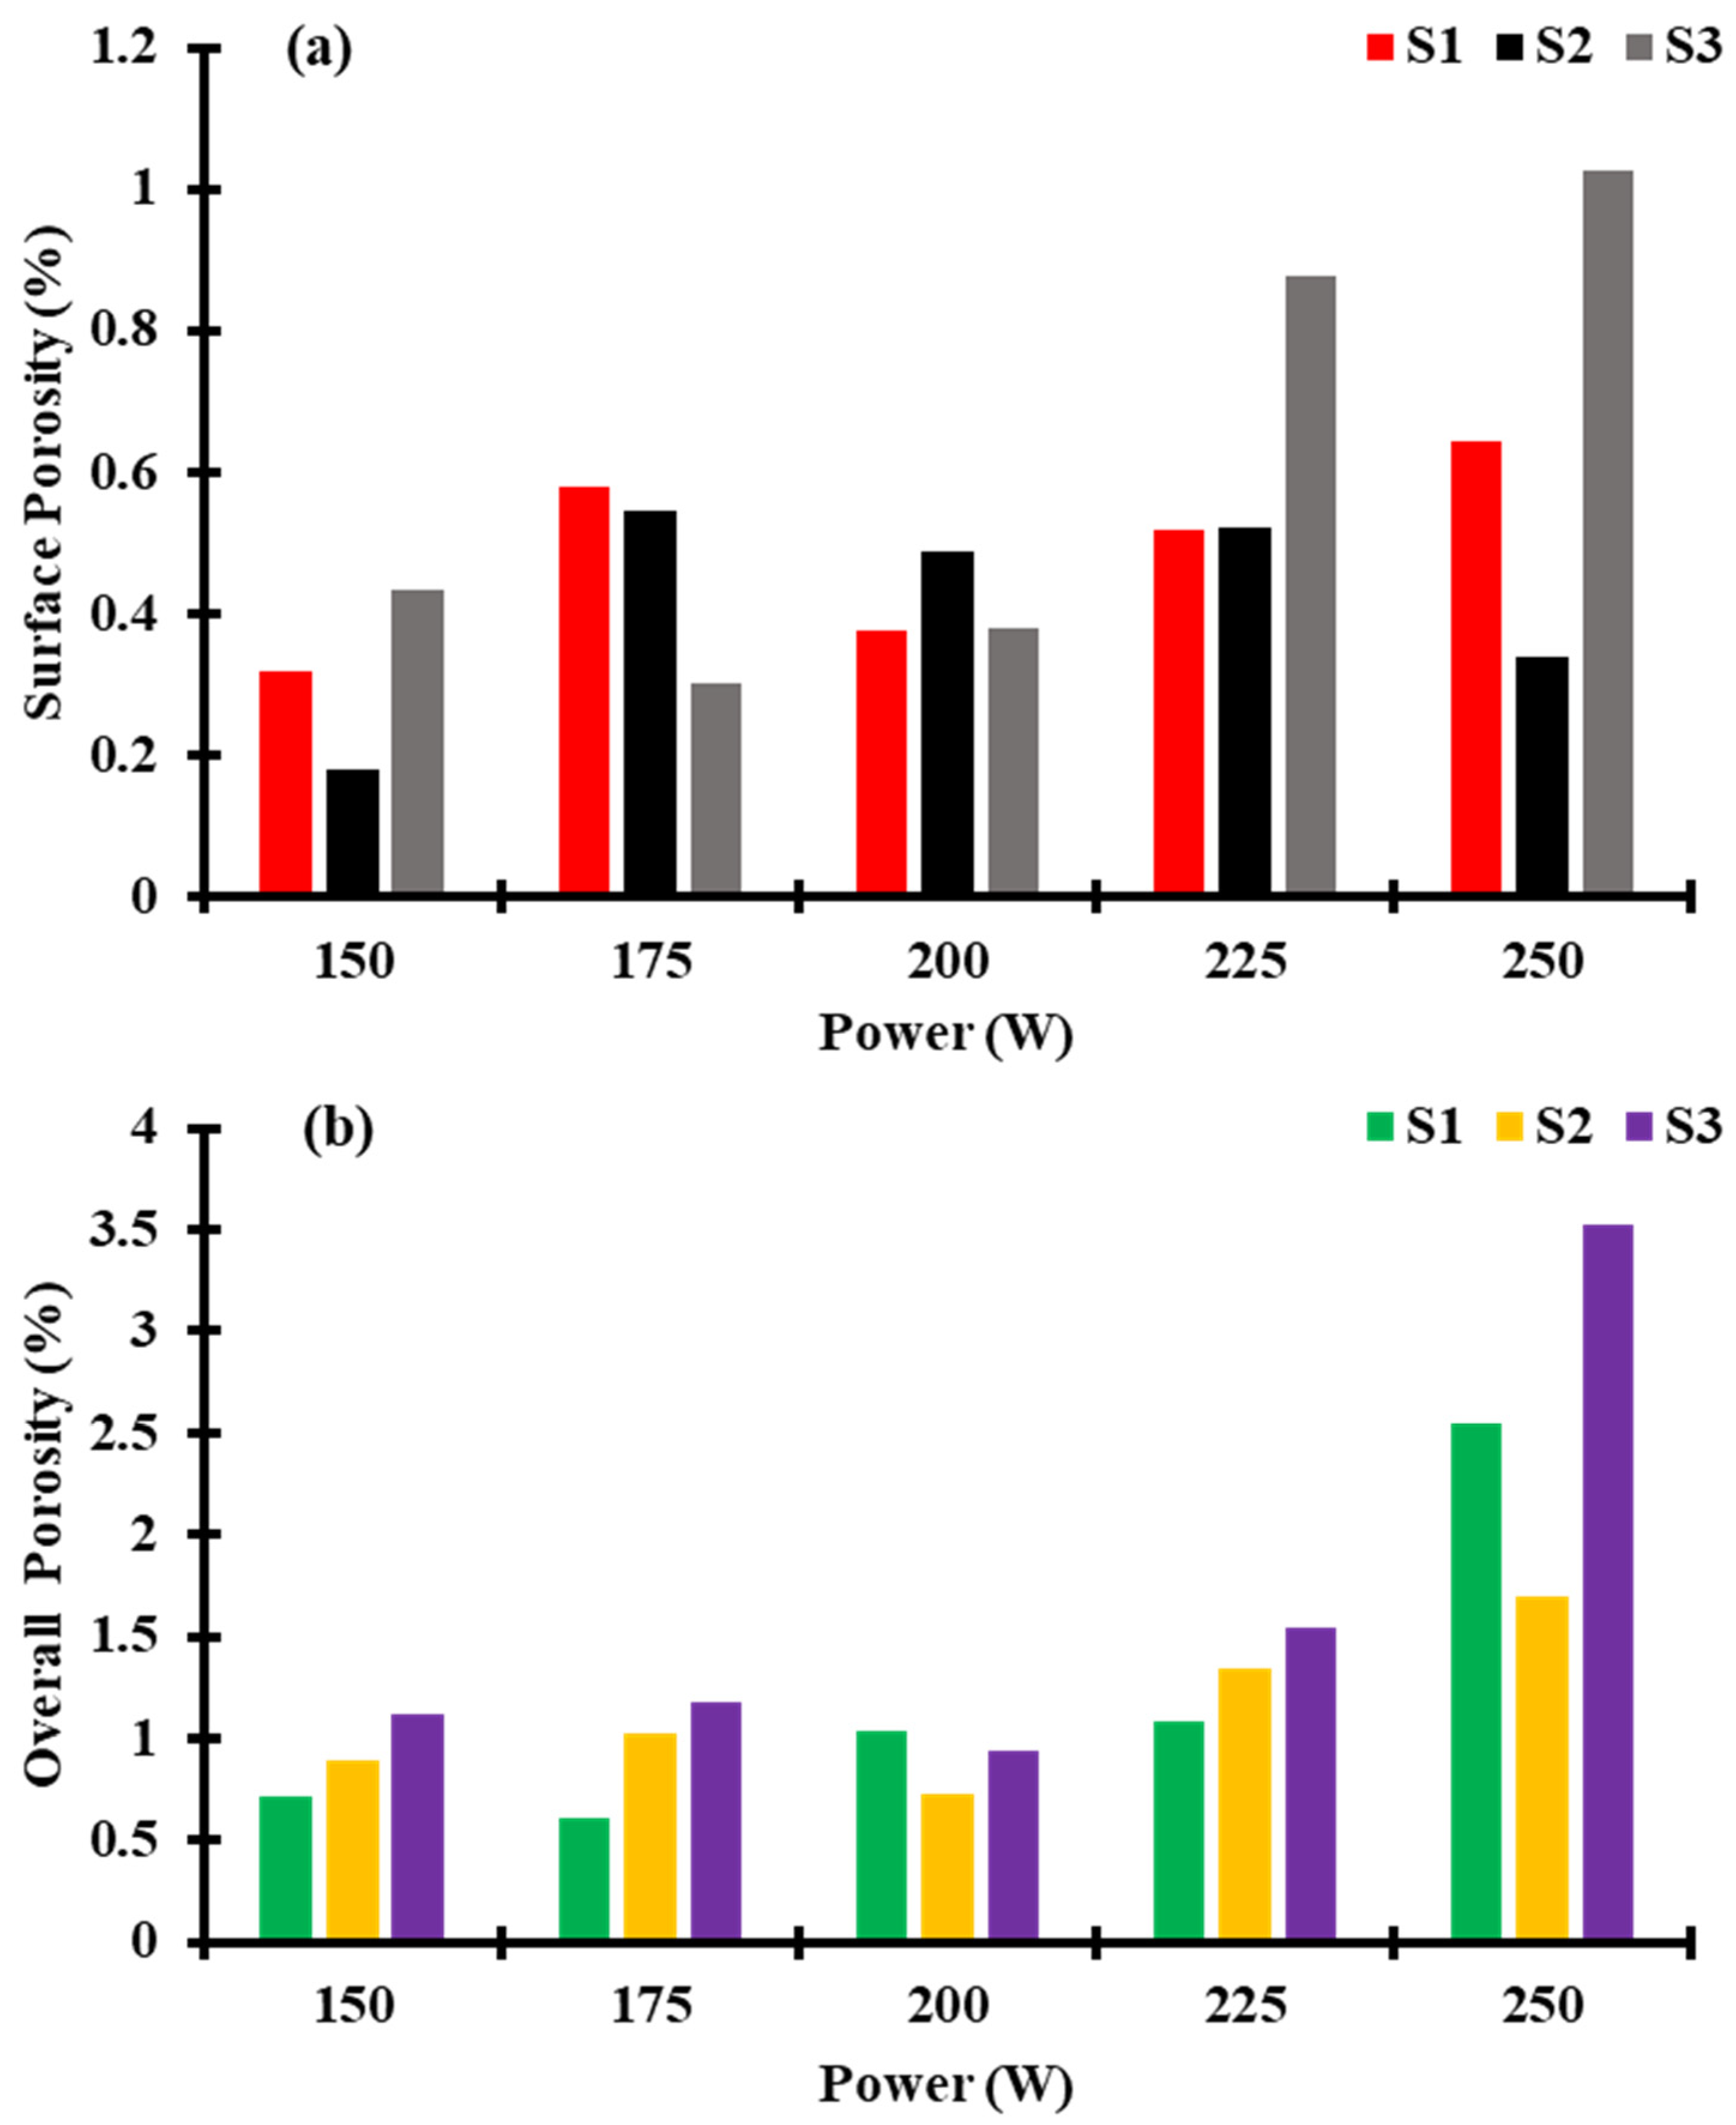
Surface porosity results stood consistent with the overall porosity. The porosity exhibited a significant dependence on the laser power and energy input used for producing the samples. The lowest and highest porosities were visualized at 1000 mm/s at a power of 150 W and 250 W, respectively, which yielded a VED of 55.56 J/mm3 and 77.16 J/mm3, respectively, as illustrated in Figure 7. The higher porosity percentage can be attributed to entrapped gases, gas reactions, unstable moving keyhole tips in higher VEDs, and insufficient energy input in lower VEDs [65]. The results showed a moderate positive correlation between laser power and the average surface porosity area ratio. The impact of laser power on the average surface porosity area ratio is found to be statistically significant as shown in Figure S3. The correlation indicates that the lower the laser power, the better the densification of the part fabricated. It is important to state that this correlation is suggested within the optimum processing window parameters defined, as it is well known that lower and higher VEDs will cause much more defects [66]; therefore, a higher relative density results in a highly densified part. Investigating porosity and defects in the LPBF process is crucial since porosity can severely impact the part’s structural integrity and functional qualities, such as its fatigue life. The analysis showed that a low or high energy input can lead to an increased porosity and induction of various defects.

3.3. Microhardness Testing

Vickers hardness tests were conducted on five different regions of each sample as shown in Figure 8. The samples had average hardness values ranging from ∼360 HV to ∼450 HV. The results showed that the processing parameters that yielded the coupon with the highest averaged HV hardness value were 225 W and 800 mm/s with a VED of 104.17 J/mm3; whereas those that yielded the coupon with the lowest HV hardness value were 150 W and 1200 mm/s with VED of 46.30 J/mm3. A strong positive correlation was observed between laser power and average hardness [67]; however, there was a stronger positive correlation with a correlation coefficient of 0.915 between average hardness and VED as shown in Figure 8 and Figure S4. The impact of the VED on the average HV hardness is found to be statistically significant as shown in Figure 8 and Figure S4. The correlation indicates that the higher the VED, the harder the part is fabricated. It is important to note that VED is a quantity that depends directly on both laser power and scanning speed. The HV hardness is noticeably improved compared to conventionally produced Fe-34Mn-15Al-7.5Ni SMA [68]. The analysis confirmed that there is a strong correlation between the surface nature and characteristics of the material with its hardness. Increasing the laser power can significantly improve the hardness of the material.

3.4. Interaction Effect

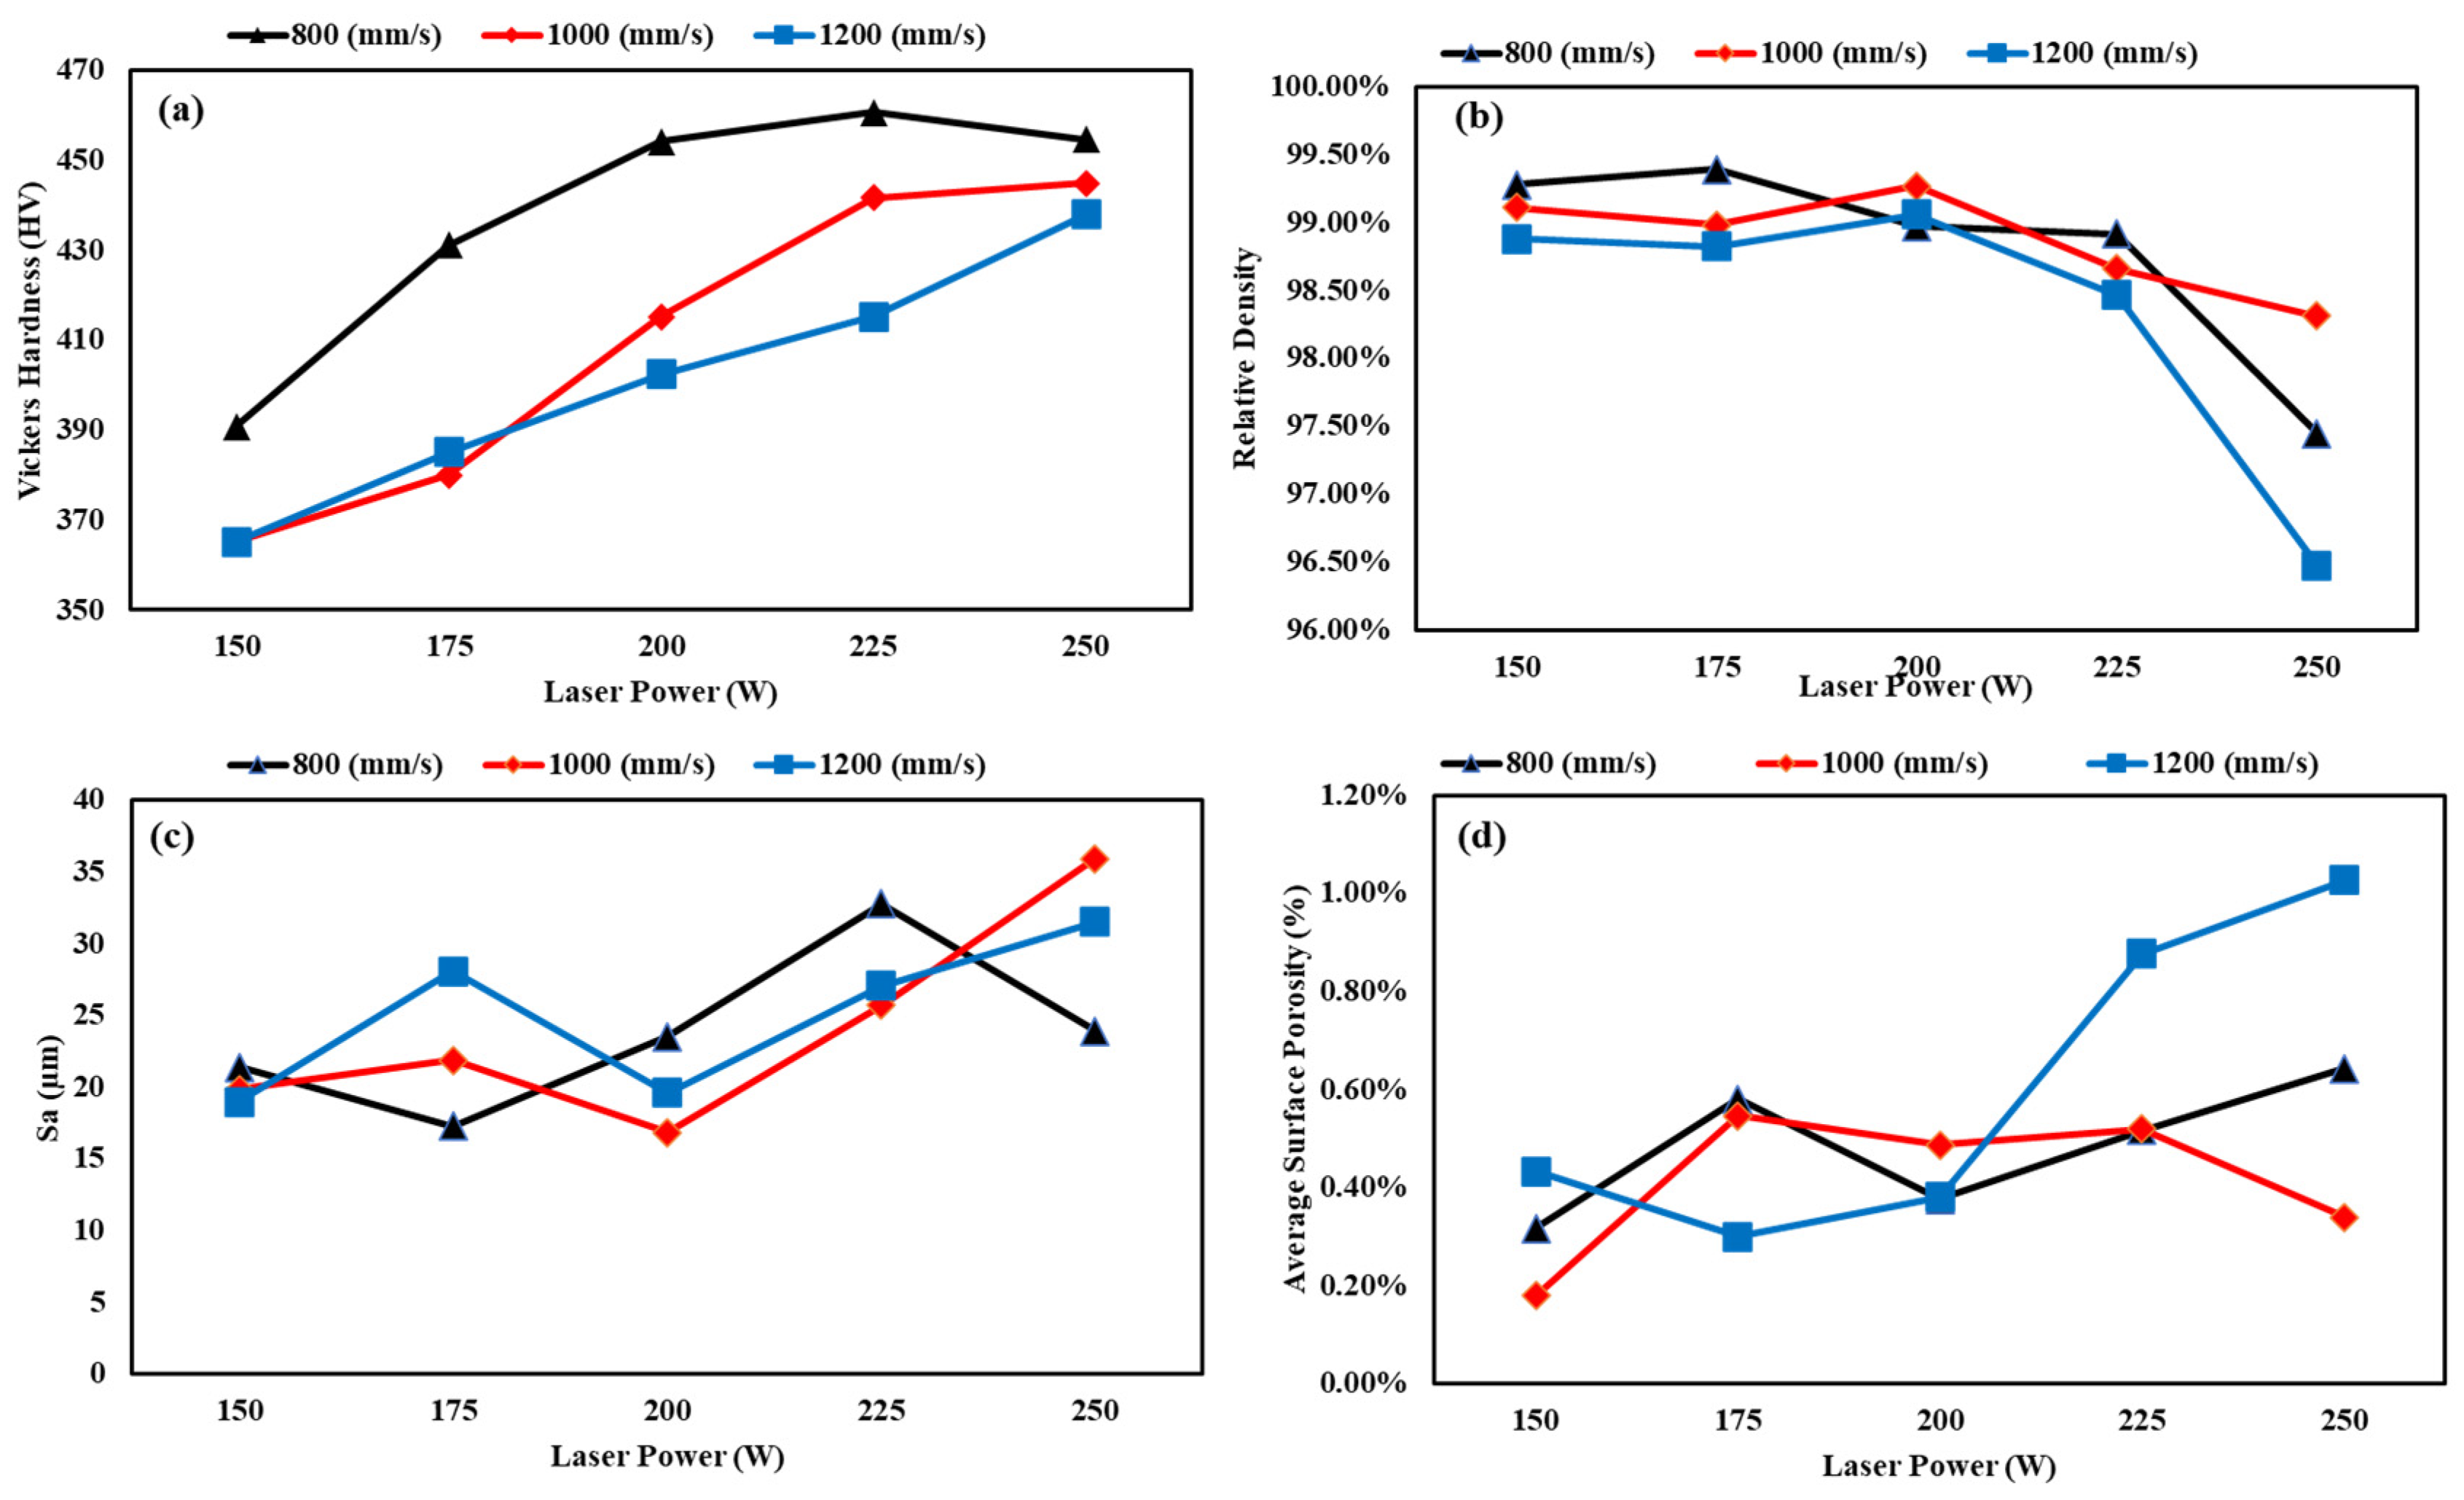
To get better visualization of the results, interaction plots for the effect of both laser power and scanning speed on the hardness, relative density, surface roughness, and average surface porosity area ratio were developed and are shown in Figure 9. From interaction plot (a), it can be concluded that a scanning speed of 800 mm/s improved the hardness significantly and showed the highest HV values between 200 W and 250 W, decreasing beyond 225 W. From interaction plot (b), it can be inferred that a scanning speed of 1200 mm/s yields the worst relative density, and the relative density beyond 200 W decreases noticeably. From interaction plot (c), despite the general trend of increasing surface roughness as laser power increases, at a laser power of 200 W, there are low values of Sa and low variation associated with different scanning speeds. From interaction plot (d), it can be observed that at 200 W, there is the lowest variation and relatively low values of the average surface porosity area ratio.

4. Conclusions

This study investigates the densification of the Fe-Mn-Al-Ni SMA system using LPBF. The study focuses on the correlation between laser power and laser speed on the material’s density, surface roughness, porosity, and microhardness. The optimal LPBF processing parameters for fabricating Fe-34Mn-15Al-7.5Ni SMAs were determined based on dimensional accuracy and the minimization of macro defects, including cracks and voids.
Laser remelting was employed to enhance sample densification, reducing macro-sized cracks and improving dimensional accuracy. The densification of the samples was assessed through surface roughness, density, porosity, and Vickers hardness measurements. Within the optimal processing window (laser power: 175–225 W, scanning speed: 800–1000 mm/s, hatching spacing: 0.09 mm, and layer thickness: 0.03 mm) combined with laser remelting at 100 W power and 800 mm/s scanning speed, the best combination of properties was achieved, with a VED of 92.59 J/mm3.
Notably, the study found that the impact on material properties was not solely due to individual processing parameters, and a linear regression model might not be the ideal choice. Laser power, however, demonstrated a significant influence on the evaluated properties. Regression modeling suggested potential interactions between multiple parameters, affecting the resulting properties.

Supplementary Materials

The following supporting information can be downloaded at: https://www.mdpi.com/article/10.3390/cryst13101505/s1, Figure S1: Regression fitting plots for the effects of (a) laser power, (b) scanning speed, and (c) VED on the average Sa of LPBF of Fe-34Mn-15Al-7.5Ni SMA. Sa is the average surface roughness; Figure S2: Regression fitting plots for the effects of (a) laser power, (b) scanning speed, and (c) VED on the relative density of Fe-34Mn-15Al-7.5Ni SMA fabricated samples. Rd stands for the relative density; Figure S3: Regression fitting plots for the effects of (a) laser power, (b) scanning speed, and (c) VED on the average surface porosity area ratio of Fe-Mn-Al-Ni SMA samples. SP stands for the average surface porosity; Figure S4: Regression fitting plots for the effects of (a) laser power, (b) scanning speed, and (c) VED on the average HV hardness of Fe-Mn-Al-Ni SMA.

Author Contributions

Conceptualization, I.A., A.A. (Anwar Algamal) and A.Q.; methodology, I.A. and M.A.; software, I.A. and A.A. (Anwar Algamal); validation, A.A. (Anwar Algamal), M.A., U.G. and A.Q.; formal analysis, I.A., A.A. (Anwar Algamal) and A.A. (Abdalmageed Almotari); investigation, A.Q.; resources, A.Q.; data curation, I.A.; writing—original draft preparation, I.A. and A.A. (Anwar Algamal); writing—review and editing, A.A. (Abdalmageed Almotari), M.A., U.G. and A.Q.; visualization, A.A. (Abdalmageed Almotari); supervision, A.Q.; project administration, U.G. and A.Q.; funding acquisition, A.Q. All authors have read and agreed to the published version of the manuscript.

Funding

This research has received funding from Toyota Motor North America.

Data Availability Statement

The data presented in this study are available upon request from the corresponding author. They are not publicly available as they are being used in ongoing research.

Conflicts of Interest

The authors declare that they have no known competing financial interest or personal relationship that could have appeared to influence the work reported in this paper.

Nomenclature

AfAustenite finish temperature
AsAustenite start temperature
AMAdditive manufacturing
DOEDesign of experiment
EDMElectric Discharge Machining
EDXEnergy-dispersive X-ray spectroscopy
HVVicker hardness
LPBFLaser powder bed fusion
LRLaser remelting
MfMartensite finish temperature
MsMartensite start temperature
SaSurface roughness
SESuperelasticity
SEMScanning electron microscopy
SMAShape memory alloy
SME Shape memory effect
VEDVolumetric energy density

References

  1. Jani, J.M.; Leary, M.; Subic, A.; Gibson, M.A. A review of shape memory alloy research, applications and opportunities. Mater. Des. 2014, 56, 1078–1113. [Google Scholar] [CrossRef]
  2. Pan, M.-M.; Zhang, X.-M.; Zhou, D.; Misra, R.; Chen, P. Fe–Mn–Si–Cr–Ni based shape memory alloy: Thermal and stress-induced martensite. Mater. Sci. Eng. A 2020, 797, 140107. [Google Scholar] [CrossRef]
  3. Tanaka, Y.; Himuro, Y.; Omori, T.; Sutou, Y.; Kainuma, R.; Ishida, K. Martensitic transformation and shape memory effect in ausaged Fe–Ni–Si–Co alloys. Mater. Sci. Eng. A 2006, 438, 1030–1035. [Google Scholar] [CrossRef]
  4. Abedi, H.; Baghbaderani, K.S.; Alafaghani, A.; Nematollahi, M.; Kordizadeh, F.; Attallah, M.M.; Qattawi, A.; Elahinia, M. Neural network modeling of NiTiHf shape memory alloy transformation temperatures. J. Mater. Eng. Perform. 2022, 31, 10258–10270. [Google Scholar] [CrossRef]
  5. Ghosh, P.; Rao, A.; Srinivasa, A.R. Design of multi-state and smart-bias components using shape memory alloy and shape memory polymer composites. Mater. Des. 2013, 44, 164–171. [Google Scholar] [CrossRef]
  6. Ryklina, E.; Prokoshkin, S.; Khmelevskaya, I.; Shakhmina, A. One-way and two-way shape memory effect in thermomechanically treated TiNi-based alloys. Mater. Sci. Eng. A 2008, 481, 134–137. [Google Scholar] [CrossRef]
  7. Li, H.F.; Qiu, K.J.; Zhou, F.Y.; Li, L.; Zheng, Y.F. Design and development of novel antibacterial Ti-Ni-Cu shape memory alloys for biomedical application. Sci. Rep. 2016, 6, 37475. [Google Scholar] [CrossRef]
  8. Song, S.-H.; Lee, J.-Y.; Rodrigue, H.; Choi, I.-S.; Kang, Y.J.; Ahn, S.-H. 35 Hz shape memory alloy actuator with bending-twisting mode. Sci. Rep. 2016, 6, 21118. [Google Scholar] [CrossRef]
  9. Druker, A.V.; Perotti, A.; Esquivel, I.; Malarría, J. A manufacturing process for shaft and pipe couplings of Fe–Mn–Si–Ni–Cr shape memory alloys. Mater. Des. 2014, 56, 878–888. [Google Scholar] [CrossRef]
  10. Huang, H.; Mosalam, K.M.; Chang, W.-S. Adaptive tuned mass damper with shape memory alloy for seismic application. Eng. Struct. 2020, 223, 111171. [Google Scholar] [CrossRef]
  11. Huang, X.; Liu, Y. Effect of annealing on the transformation behavior and superelasticity of NiTi shape memory alloy. Scr. Mater. 2001, 45, 153–160. [Google Scholar] [CrossRef]
  12. Niendorf, T.; Brenne, F.; Krooß, P.; Vollmer, M.; Günther, J.; Schwarze, D.; Biermann, H. Microstructural evolution and functional properties of Fe-Mn-Al-Ni shape memory alloy processed by selective laser melting. Met. Mater. Trans. A 2016, 47, 2569–2573. [Google Scholar] [CrossRef]
  13. Alaneme, K.K.; Okotete, E.A. Reconciling viability and cost-effective shape memory alloy options—A review of copper and iron based shape memory metallic systems. Eng. Sci. Technol. Int. J. 2016, 19, 1582–1592. [Google Scholar] [CrossRef]
  14. Tseng, L.; Ma, J.; Wang, S.; Karaman, I.; Chumlyakov, Y. Effects of crystallographic orientation on the superelastic response of FeMnAlNi single crystals. Scr. Mater. 2016, 116, 147–151. [Google Scholar] [CrossRef]
  15. Mazzer, E.M.; da Silva, M.R.; Gargarella, P. Revisiting Cu-based shape memory alloys: Recent developments and new perspectives. J. Mater. Res. 2022, 37, 162–182. [Google Scholar] [CrossRef]
  16. Zareie, S.; Issa, A.S.; Seethaler, R.J.; Zabihollah, A. Recent advances in the applications of shape memory alloys in civil infrastructures: A review. Structures 2020, 27, 1535–1550. [Google Scholar] [CrossRef]
  17. Tanaka, Y.; Himuro, Y.; Kainuma, R.; Sutou, Y.; Omori, T.; Ishida, K. Ferrous polycrystalline shape-memory alloy showing huge superelasticity. Science 2010, 327, 1488–1490. [Google Scholar] [CrossRef]
  18. Omori, T.; Ando, K.; Okano, M.; Xu, X.; Tanaka, Y.; Ohnuma, I.; Kainuma, R.; Ishida, K. Superelastic effect in polycrystalline ferrous alloys. Science 2011, 333, 68–71. [Google Scholar] [CrossRef]
  19. Choi, W.S.; Pang, E.L.; Choi, P.-P.; Schuh, C.A. FeNiCoAlTaB superelastic and shape-memory wires with oligocrystalline grain structure. Scr. Mater. 2020, 188, 1–5. [Google Scholar] [CrossRef]
  20. Zhang, C.; Zhu, C.; Harrington, T.; Casalena, L.; Wang, H.; Shin, S.; Vecchio, K.S. Multifunctional non-equiatomic high entropy alloys with superelastic, high damping, and excellent cryogenic properties. Adv. Eng. Mater. 2019, 21, 1800941. [Google Scholar] [CrossRef]
  21. Alaneme, K.K.; Okotete, E.A.; Anaele, J.U. Structural vibration mitigation—A concise review of the capabilities and applications of Cu and Fe based shape memory alloys in civil structures. J. Build. Eng. 2019, 22, 22–32. [Google Scholar] [CrossRef]
  22. Omori, T.; Kainuma, R. Martensitic transformation and superelasticity in Fe–Mn–Al-based shape memory alloys. Shape Mem. Superelast. 2017, 3, 322–334. [Google Scholar] [CrossRef]
  23. Vollmer, M.; Segel, C.; Krooß, P.; Günther, J.; Tseng, L.W.; Karaman, I.; Weidner, A.; Biermann, H.; Niendorf, T. On the effect of gamma phase formation on the pseudoelastic performance of polycrystalline Fe–Mn–Al–Ni shape memory alloys. Scr. Mater. 2015, 108, 23–26. [Google Scholar] [CrossRef]
  24. Xia, J.; Omori, T.; Kainuma, R. Abnormal grain growth in Fe–Mn–Al–Ni shape memory alloy with higher Al content. Scr. Mater. 2020, 187, 355–359. [Google Scholar] [CrossRef]
  25. DebRoy, T.; Wei, H.L.; Zuback, J.S.; Mukherjee, T.; Elmer, J.W.; Milewski, J.O.; Beese, A.M.; Wilson-Heid, A.; De, A.; Zhang, W. Additive manufacturing of metallic components–process, structure and properties. Prog. Mater. Sci. 2018, 92, 112–224. [Google Scholar] [CrossRef]
  26. Abedi, H.; Javan, R.; Nematollahi, M.R.; Safaei, K.; Al-Gamal, A.; Elahinia, M.; Qattawi, A. A Physics-Based Model of Laser Powder Bed Fusion of NiTi Shape Memory Alloy: Laser Single Track and Melt Pool Dimension Prediction. In Proceedings of the ASME International Mechanical Engineering Congress and Exposition, American Society of Mechanical Engineers, Columbus, OH, USA, 30 October–3 November 2022; p. V02AT02A030. [Google Scholar]
  27. Druzgalski, C.; Ashby, A.; Guss, G.; King, W.; Roehling, T.; Matthews, M. Process optimization of complex geometries using feed forward control for laser powder bed fusion additive manufacturing. Addit. Manuf. 2020, 34, 101169. [Google Scholar] [CrossRef]
  28. Ford, S.; Despeisse, M. Additive manufacturing and sustainability: An exploratory study of the advantages and challenges. J. Clean. Prod. 2016, 137, 1573–1587. [Google Scholar] [CrossRef]
  29. Shao, S.; Khonsari, M.; Guo, S.; Meng, W.; Li, N. Overview: Additive manufacturing enabled accelerated design of ni-based alloys for improved fatigue life. Addit. Manuf. 2019, 29, 100779. [Google Scholar] [CrossRef]
  30. Alafaghani, A.A.; Qattawi, A. Investigating the effect of fused deposition modeling processing parameters using Taguchi design of experiment method. J. Manuf. Process. 2018, 36, 164–174. [Google Scholar] [CrossRef]
  31. Shiva, S.; Palani, I.A.; Mishra, S.K.; Paul, C.P.; Kukreja, L.M. Investigations on the influence of composition in the development of Ni–Ti shape memory alloy using laser based additive manufacturing. Opt. Laser Technol. 2015, 69, 44–51. [Google Scholar] [CrossRef]
  32. Dada, M.; Popoola, P.; Mathe, N.; Pityana, S.; Adeosun, S.; Aramide, O.; Lengopeng, T. Process optimization of high entropy alloys by laser additive manufacturing. Eng. Rep. 2020, 2, e12252. [Google Scholar] [CrossRef]
  33. Alafaghani, A.; Ablat, M.A.; Abedi, H.; Al Gamal, A.; Qattawi, A. Homogenization and Solution Annealing Heat Treatments of Powder Bed Fused Inconel 718. JOM 2022, 74, 4772–4786. [Google Scholar] [CrossRef]
  34. Alagha, A.N.; Hussain, S.; Zaki, W. Additive manufacturing of shape memory alloys: A review with emphasis on powder bed systems. Mater. Des. 2021, 204, 109654. [Google Scholar] [CrossRef]
  35. Ryan, K.R.; Down, M.P.; Banks, C.E. Future of additive manufacturing: Overview of 4D and 3D printed smart and advanced materials and their applications. Chem. Eng. J. 2021, 403, 126162. [Google Scholar] [CrossRef]
  36. Abedi, H.; Algamal, A.; Abdollahzadeh, M.; Nematollahi, M.; Alafaghani, A.; Bayati, P.; Elahinia, M.; Qattawi, A. Predicting Transformation Temperatures of Additively Manufactured NiTiHf Shape Memory Alloy Using Neural Network Modeling. JOM 2023, 75, 4515–4525. [Google Scholar] [CrossRef]
  37. Xue, L.; Atli, K.; Picak, S.; Zhang, C.; Zhang, B.; Elwany, A.; Arroyave, R.; Karaman, I. Controlling martensitic transformation characteristics in defect-free NiTi shape memory alloys fabricated using laser powder bed fusion and a process optimization framework. Acta Mater. 2021, 215, 117017. [Google Scholar] [CrossRef]
  38. Zhu, J.-N.; Borisov, E.; Liang, X.; Huizenga, R.; Popovich, A.; Bliznuk, V.; Petrov, R.; Hermans, M.; Popovich, V. Controlling microstructure evolution and phase transformation behavior in additive manufacturing of nitinol shape memory alloys by tuning hatch distance. J. Mater. Sci. 2022, 57, 6066–6084. [Google Scholar] [CrossRef]
  39. Xue, L.; Atli, K.; Zhang, C.; Hite, N.; Srivastava, A.; Leff, A.; Wilson, A.; Sharar, D.; Elwany, A.; Arroyave, R.; et al. laser powder bed fusion of defect-free NiTi shape memory alloy parts with superior tensile superelasticity. Acta Mater. 2022, 229, 117781. [Google Scholar] [CrossRef]
  40. Narasimharaju, S.R.; Zeng, W.; See, T.L.; Zhu, Z.; Scott, P.; Jiang, X.; Lou, S. A comprehensive review on laser powder bed fusion of steels: Processing, microstructure, defects and control methods, mechanical properties, current challenges and future trends. J. Manuf. Process. 2022, 75, 375–414. [Google Scholar] [CrossRef]
  41. Oliveira, J.P.; LaLonde, A.D.; Ma, J. Processing parameters in laser powder bed fusion metal additive manufacturing. Mater. Des. 2020, 193, 108762. [Google Scholar] [CrossRef]
  42. Almotari, A.; Alafaghani, A.; Ali, M.; Al Gamal, A.; Abedi, H.; Qattawi, A. Influence of Modified Heat Treatments and Build Orientations on the Microstructure of Additively Manufactured IN718. In Proceedings of the International Manufacturing Science and Engineering Conference, American Society of Mechanical Engineers, New Brunswick, NJ, USA, 12–16 June 2023; p. V001T01A028. [Google Scholar] [CrossRef]
  43. Zhang, Y.; Xu, L.; Zhao, L.; Lin, D.; Liu, M.; Qi, X.; Han, Y. Process-microstructure-properties of CuAlNi shape memory alloys fabricated by laser powder bed fusion. J. Mater. Sci. Technol. 2023, 152, 1–15. [Google Scholar] [CrossRef]
  44. Huang, Y.; Fleming, T.G.; Clark, S.J.; Marussi, S.; Fezzaa, K.; Thiyagalingam, J.; Leung, C.L.A.; Lee, P.D. Keyhole fluctuation and pore formation mechanisms during laser powder bed fusion additive manufacturing. Nat. Commun. 2022, 13, 1170. [Google Scholar] [CrossRef] [PubMed]
  45. Yang, X.; Liu, J.; Cui, X.; Jin, G.; Liu, Z.; Chen, Y.; Feng, X. Effect of remelting on microstructure and magnetic properties of Fe-Co-based alloys produced by laser additive manufacturing. J. Phys. Chem. Solids 2019, 130, 210–216. [Google Scholar] [CrossRef]
  46. Zhou, J.; Han, X.; Li, H.; Liu, S.; Yi, J. Investigation of layer-by-layer laser remelting to improve surface quality, microstructure, and mechanical properties of laser powder bed fused AlSi10Mg alloy. Mater. Des. 2021, 210, 110092. [Google Scholar] [CrossRef]
  47. Li, Z.; He, J.; Ding, X.; Lian, G.; Liu, M.; Chen, J.; Dai, P. Tailoring the surface microstructures and enhancing wear performance of Al0.5CoCrFeNiSi0.25 high-entropy alloys via laser remelting. Surf. Coat. Technol. 2023, 452, 129129. [Google Scholar] [CrossRef]
  48. Yu, W.; Sing, S.L.; Chua, C.K.; Tian, X. Influence of re-melting on surface roughness and porosity of AlSi10Mg parts fabricated by selective laser melting. J. Alloys Compd. 2019, 792, 574–581. [Google Scholar] [CrossRef]
  49. Liu, D.; Yue, W.; Kang, J.; Wang, C. Effect of Laser Remelting Strategy on the Forming Ability of Cemented Carbide Fabricated by Laser Powder Bed Fusion (L-PBF). Materials 2022, 15, 2380. [Google Scholar] [CrossRef]
  50. Brodie, E.G.; Medvedev, A.E.; Frith, J.E.; Dargusch, M.S.; Fraser, H.L.; Molotnikov, A. Remelt processing and microstructure of selective laser melted Ti25Ta. J. Alloys Compd. 2020, 820, 153082. [Google Scholar] [CrossRef]
  51. Ali, M.; Almotari, A.; Al Gamal, A.; Alafaghani, A.; Abedi, H.; Qattawi, A. Effect of in-situ laser polishing on microstructure, surface characteristics, and phase transformation of lpbf martensitic stainless steel. In Proceedings of the International Manufacturing Science and Engineering Conference, American Society of Mechanical Engineers, New Brunswick, NJ, USA, 12–16 June 2023; p. V001T01A027. [Google Scholar] [CrossRef]
  52. Pérez-Cerrato, M.; Fraile, I.; Gómez-Cortés, J.F.; Urionabarrenetxea, E.; Ruiz-Larrea, I.; González, I.; Nó, M.L.; Burgos, N.; Juan, J.M.S. Designing for Shape Memory in Additive Manufacturing of Cu–Al–Ni Shape Memory Alloy Processed by Laser Powder Bed Fusion. Materials 2022, 15, 6284. [Google Scholar] [CrossRef]
  53. Ferretto, I.; Kim, D.; Della Ventura, N.M.; Shahverdi, M.; Lee, W.; Leinenbach, C. Laser powder bed fusion of a Fe–Mn–Si shape memory alloy. Addit. Manuf. 2021, 46, 102071. [Google Scholar] [CrossRef]
  54. Tamari, S. Optimum design of the constant-volume gas pycnometer for determining the volume of solid particles. Meas. Sci. Technol. 2004, 15, 549–558. [Google Scholar] [CrossRef]
  55. Ast, O.; Perez, M.; Carlet, S. PuAl alloys density measurements using gas pycnometer: First results. J. Alloys Compd. 2007, 444, 226–229. [Google Scholar] [CrossRef]
  56. Wits, W.W.; Carmignato, S.; Zanini, F.; Vaneker, T.H. Porosity testing methods for the quality assessment of selective laser melted parts. CIRP Ann. 2016, 65, 201–204. [Google Scholar] [CrossRef]
  57. ASTM E384-22; Standard Test Method for Microindentation Hardness of Materials. ASTM: West Conshohocken, PA, USA, 2017.
  58. Gockel, J.; Sheridan, L.; Koerper, B.; Whip, B. The influence of additive manufacturing processing parameters on surface roughness and fatigue life. Int. J. Fatigue 2019, 124, 380–388. [Google Scholar] [CrossRef]
  59. Pegues, J.; Roach, M.; Williamson, R.S.; Shamsaei, N. Surface roughness effects on the fatigue strength of additively manufactured Ti-6Al-4V. Int. J. Fatigue 2018, 116, 543–552. [Google Scholar] [CrossRef]
  60. Benardos, P.G.; Vosniakos, G.-C. Predicting surface roughness in machining: A review. Int. J. Mach. Tools Manuf. 2003, 43, 833–844. [Google Scholar] [CrossRef]
  61. Charles, A.; Elkaseer, A.; Paggi, U.; Thijs, L.; Hagenmeyer, V.; Scholz, S. Down-facing surfaces in laser powder bed fusion of Ti6Al4V: Effect of dross formation on dimensional accuracy and surface texture. Addit. Manuf. 2021, 46, 102148. [Google Scholar] [CrossRef]
  62. Ali, M.; Almotari, A.; Algamal, A.; Qattawi, A. Recent Advancements in Post Processing of Additively Manufactured Metals Using Laser Polishing. J. Manuf. Mater. Process. 2023, 7, 115. [Google Scholar] [CrossRef]
  63. Obeidi, M.A.; Mussatto, A.; Dogu, M.N.; Sreenilayam, S.P.; McCarthy, E.; Ahad, I.U.; Keaveney, S.; Brabazon, D. Laser surface polishing of Ti-6Al-4V parts manufactured by laser powder bed fusion. Surf. Coat. Technol. 2022, 434, 128179. [Google Scholar] [CrossRef]
  64. Gor, M.; Dobriyal, A.; Wankhede, V.; Sahlot, P.; Grzelak, K.; Kluczyński, J.; Łuszczek, J. Density prediction in powder bed fusion additive manufacturing: Machine learning-based techniques. Appl. Sci. 2022, 12, 7271. [Google Scholar] [CrossRef]
  65. Wang, S.; Ning, J.; Zhu, L.; Yang, Z.; Yan, W.; Dun, Y.; Xue, P.; Xu, P.; Bose, S.; Bandyopadhyay, A. Role of porosity defects in metal 3D printing: Formation mechanisms, impacts on properties and mitigation strategies. Mater. Today 2022, 59, 133–160. [Google Scholar] [CrossRef]
  66. Bakhshivash, S.; Asgari, H.; Russo, P.; Dibia, C.F.; Ansari, M.; Gerlich, A.P.; Toyserkani, E. Printability and microstructural evolution of Ti-5553 alloy fabricated by modulated laser powder bed fusion. Int. J. Adv. Manuf. Technol. 2019, 103, 4399–4409. [Google Scholar] [CrossRef]
  67. Eliasu, A.; Czekanski, A.; Boakye-Yiadom, S. Effect of laser powder bed fusion parameters on the microstructural evolution and hardness of 316L stainless steel. Int. J. Adv. Manuf. Technol. 2021, 113, 2651–2669. [Google Scholar] [CrossRef]
  68. Tseng, L.; Ma, J.; Hornbuckle, B.; Karaman, I.; Thompson, G.; Luo, Z.; Chumlyakov, Y. The effect of precipitates on the superelastic response of [1 0 0] oriented FeMnAlNi single crystals under compression. Acta Mater. 2015, 97, 234–244. [Google Scholar] [CrossRef]
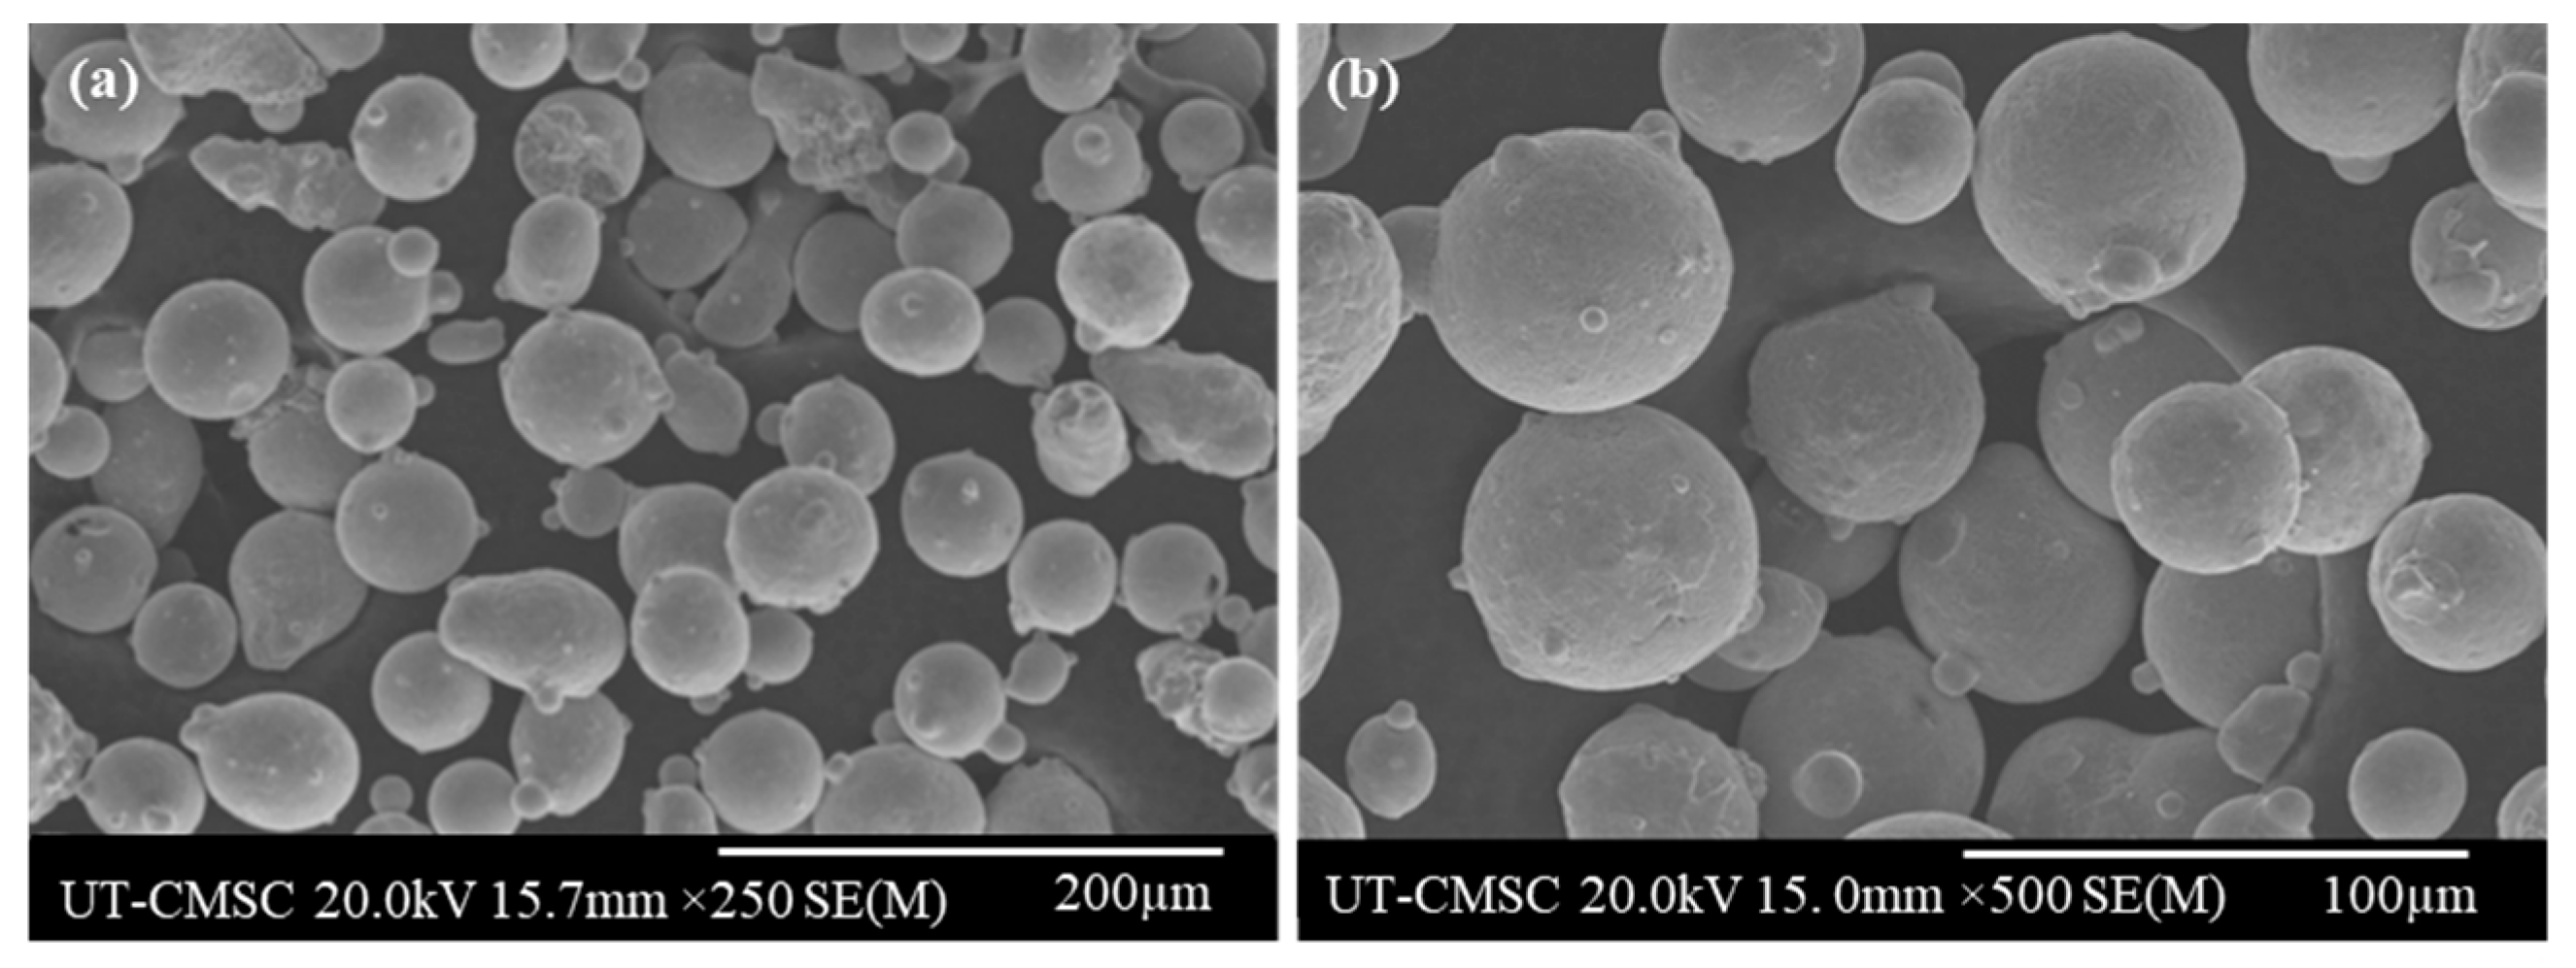
Figure 1. SEM images (a) at 250X magnification and (b) a close-up view of 500X of Fe-Mn-Al-Ni SMA powder.
Crystals 13 01505 g001
Figure 2. Fe-34Mn-15Al-7.5Ni samples fabricated to define the optimum processing window for this system (a) without laser remelting and (b) with laser remelting and (c) schematic showing the mechanism of laser remelting and how the induced defects are minimized after remelting.
Crystals 13 01505 g002
Figure 3. Laser power vs. scanning speed manufacturability map.
Crystals 13 01505 g003
Figure 4. 3D topographic images of Fe-34Mn-15Al-7.5Ni SMA samples: (a) sample with the highest Sa fabricated at a power of 250 W and a scanning speed of 1000 mm/s and (b) sample with the lowest Sa fabricated at a power of 200 W and a scanning speed of 1000 mm/s.
Crystals 13 01505 g004
Figure 5. Average surface roughness (Sa) analysis of the LPBF Fe-34Mn-15Al-7.5Ni SMA fabricated at 150–250 W with corresponding scanning speeds of 800 mm/s (S1), 1000 mm/s (S2), and 1200 mm/s (S3).
Crystals 13 01505 g005
Figure 6. The relative density of Fe-34Mn-15Al-7.5Ni-SMA-fabricated samples.
Crystals 13 01505 g006
Figure 7. Results of the manufactured Fe-Mn-Al-Ni SMA’s average surface porosity (a) and overall porosity (b) measurements. S1, S2, and S3 stand for the corresponding scanning speeds of 800 mm/s, 1000 mm/s, and 1200 mm/s.
Crystals 13 01505 g007
Figure 8. Hardness results of Fe-Mn-Al-Ni SMA samples fabricated at a power of 150–250 W with three different scanning speeds including 800 mm/s (S1), 1000 mm/s (S2), and 1200 mm/s (S3).
Crystals 13 01505 g008
Figure 9. Interaction plots for the effects of both laser power and scanning speed on (a) Vickers hardness, (b) relative density, (c) averaged surface roughness, and (d) average surface porosity area ratio of Fe-34Mn-15Al-7.5Ni SMA.
Crystals 13 01505 g009
Table 1. Chemical composition of Fe-Mn-Al-Ni SMA.
ElementFeMnAlNi
(at. %)Balance34.0414.876.98
Table 2. DOE of processing parameters used to fabricate the Fe-Mn-Al-Ni SMA samples. Layer thickness, t (mm), is set for 0.03 mm, and the scanning pattern is set as stripes for all samples.
Process TypeLaser Power, P
(W)
Scanning Speed,
v (mm/s)
Hatching Space, h (mm)Volumetric Energy Density, VED (J/mm3)
Fabrication1508000.0969.44
1000 55.56
1200 46.30
1758000.0981.02
1000 64.81
1200 54.01
2008000.0992.59
1000 74.07
1200 61.73
2258000.09104.17
1000 83.33
1200 69.44
2508000.09115.74
1000 92.59
1200 77.16
Remelting1008000.0946.30
Disclaimer/Publisher’s Note: The statements, opinions and data contained in all publications are solely those of the individual author(s) and contributor(s) and not of MDPI and/or the editor(s). MDPI and/or the editor(s) disclaim responsibility for any injury to people or property resulting from any ideas, methods, instructions or products referred to in the content.