Article

Effect of Surface Texture on the Sliding Pair Lubrication Efficiency

Laser Research Centre, Faculty of Mechatronics and Mechanical Engineering, Kielce University of Technology, Al. Tysiąclecia P.P. 7, 25-314 Kielce, Poland
*
Author to whom correspondence should be addressed.
Lubricants 2022, 10(5), 80; https://doi.org/10.3390/lubricants10050080
Submission received: 27 March 2022 / Revised: 26 April 2022 / Accepted: 29 April 2022 / Published: 2 May 2022
(This article belongs to the Special Issue Surface Engineering for Wear Protection and Friction Reduction)

Abstract

:
The paper presents certain problems related to the lubrication of textured surfaces. It was noted that for a specific load, the lubrication effectiveness will depend on the shape, size and mutual distribution of the texture’s elements. Proposals for determining the lubrication irregularity parameters were presented for textures with a rectangular mesh and round recesses. The experimental part presents the laser texturing methodology, tribological testing methodology and preliminary test results where the significant role of the relationship between the trajectory of motion and the texture mesh was demonstrated.

1. Introduction

State-of-the-art technology sets increasingly higher requirements on the durability and reliability of machinery. Friction pairs in a machine belong to the most important structural elements that are decisive in terms of the machine’s quality. The requirements of high durability and reliability must be met despite the all-encompassing strive for production of the highest quantity of goods, but at the lowest energy and material consumption, i.e., practical continuous reduction in the production costs. Due to the above, design engineers are faced with the difficult challenge of developing the perfect friction pair with a low production cost. The potential contained in the used materials is quickly exhausted, and it is necessary to take action consisting of using state-of-the-art technologies that provide the expected advantageous economic and utility effects. In the above terms, this paper constitutes a part of elaborations concerning the notions of surface engineering [1,2,3].
On one hand, the offered action enables providing machine parts with features characteristic to certain specific materials. These effects are achieved through, among others, applying various types of coatings, thereby allowing cheap materials to have specific, expected surface features. This is of significance when the material’s core has sufficient durability and it is important to improve the properties on the element’s surface, e.g., hardness, abrasion resistance and scuffing load capacity. On the other hand, the utility of machine parts can be improved by suitable surface processing aimed at extracting and providing the material surface with properties important for the given application [1,2,3,4]. The ability to use this as of yet unexploited potential emerges along with the development of state-of-the-art technologies that can affect the material with a concentrated energy flux [5,6]. Although laser texturing is already used in the industry, the texturing idea is still the subject of many research works. Modern research concerns:
  • Application of new laser techniques [7,8,9,10,11,12];
  • New materials texturing [2,13,14,15,16,17];
  • Textured friction pairs tribological properties [6,18,19,20,21,22,23,24];
  • Physical properties changes after surface texturing [9,24,25,26,27,28];
  • Texturing for sliding bearings and technical seals industries [29,30,31,32,33,34,35,36].
The issues of distribution, compaction and geometric texture parameters are discussed in many publications, including [6,28,37]. However, this research lacks an account of the relationship between the motion trajectory and the texture mesh. This paper attempts to show that the analysis of the motion trajectory during friction against the texture mesh can lead to useful effects.
An innovative approach to the lubrication of textured sliding pairs based on trajectory analysis and calculation of “dry” and “wet” friction paths was presented in this paper. The main aim is to show that the lubrication processes can be improved by the method of trajectory analysis.

2. Textured Surface Lubrication—Theoretical Analysis

The lubrication of textured flat surfaces features various mechanisms of lifting force generation. This depends on many factors, but the most important are the sliding pair operating parameters (travel velocity and carried load) [4,20,37,38].
In the general case, we are dealing with hydrostatic, hydrodynamic and elastohydrodynamic lubrication—the differences concern the sources of hydrodynamic effects, hydrostatic pressure distributions in the gap and the formation of the lubricant’s boundary layer. In the case of boundary layer formation, the lubricant extracted from the surface roughness recesses is distributed and lubricates the mating surface. When considering a shoe travelling along a flat surface, it is possible to imagine in a situation of the shoe’s one-time lubrication that there will not be enough lubricant to produce a boundary layer. However, if we assume that the surface features regular recesses that can accumulate the lubricant, they should be distributed at distances correlated with the capacity of the lubricant containers.
A lubrication process that takes into account both the distribution and capacity of lubricant micro-containers (texture elements) is referred to as lubrication with accumulation effect. Lubricant present in a gap lubricated one time is distributed across the entire surface and fills all irregularities. During operation, it is subject to destruction, burning or is moved outside the friction zone and does not take part in lubrication. Such a process course makes it necessary to supplement the lubricant. This can be performed by using the lubricant accumulated in micro-recesses forming the surface texture.
It is also necessary to note that even lubrication of mating surfaces, understood as the lubricant layer evenness, is of substantial importance. Especially, it is necessary to distinguish the spots in the gaps between mating parts that feature the lubricant, i.e., lubricated areas, from the spots that do not feature the lubricant, i.e., non-lubricated areas. In the case of uneven lubrication due to load action, it is possible for local deformations to occur, leading to direct contact between the mating surfaces of solids in non-lubricated areas. This may result in the occurrence of disadvantageous friction and wear processes in these spots (Figure 1b). Unevenly lubricated surfaces also contribute to the interception of entire loads by the lubricated area, which may lead to the interruption of the boundary lubrication layers and result in the direct contact between the mating surfaces with all of its negative consequences (Figure 1c). The situation also occurs in case of insufficient lubricant quantities. Therefore, an important problem is the adequate distribution of the lubricant’s micro-containers that takes into account the trajectory of particular mating surface points [18].
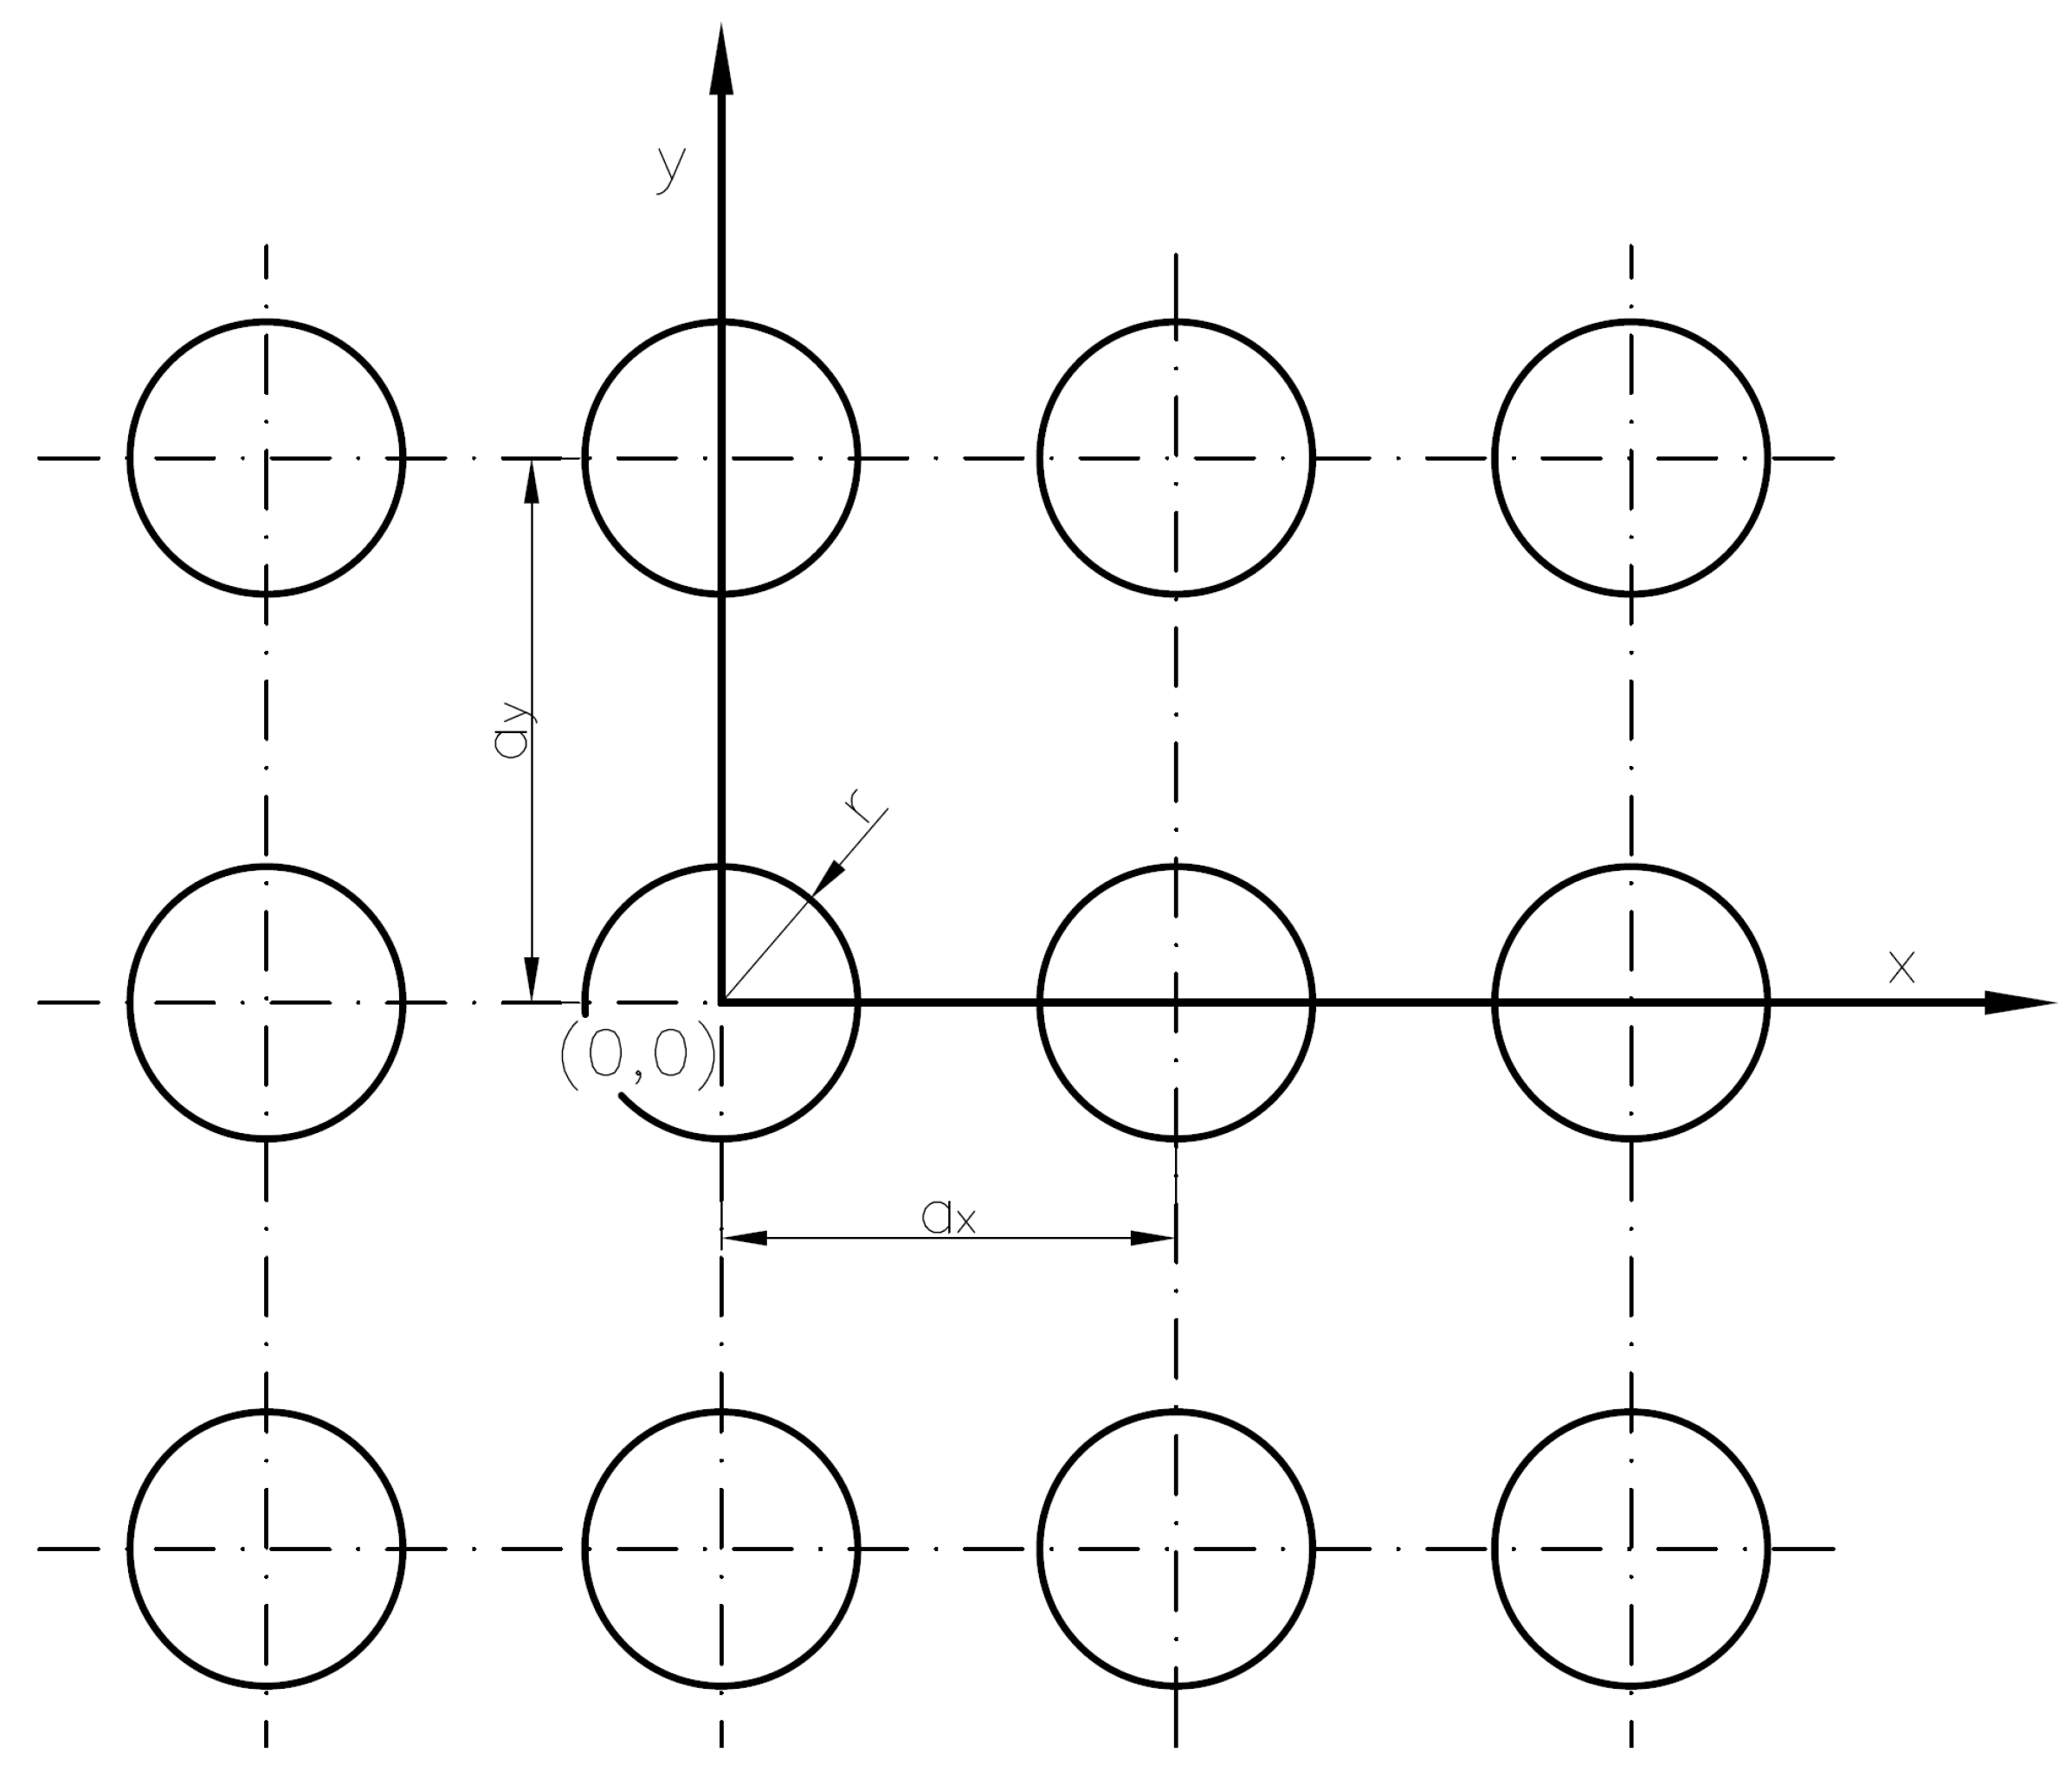
Let us assume that we are dealing with a surface texture with a rectangular mesh of recesses (Figure 2). The intersections between the recesses and the plain are circles with the radius r the column distances in the mesh amount to ax and ay. In view of the above, each recess is identified by the number pair (k, m) corresponding to the intersection between the k-th column and the m-th row. The recess center coordinates will be as follows [39]:
x k , m = k a x , y k , m = m a y ,
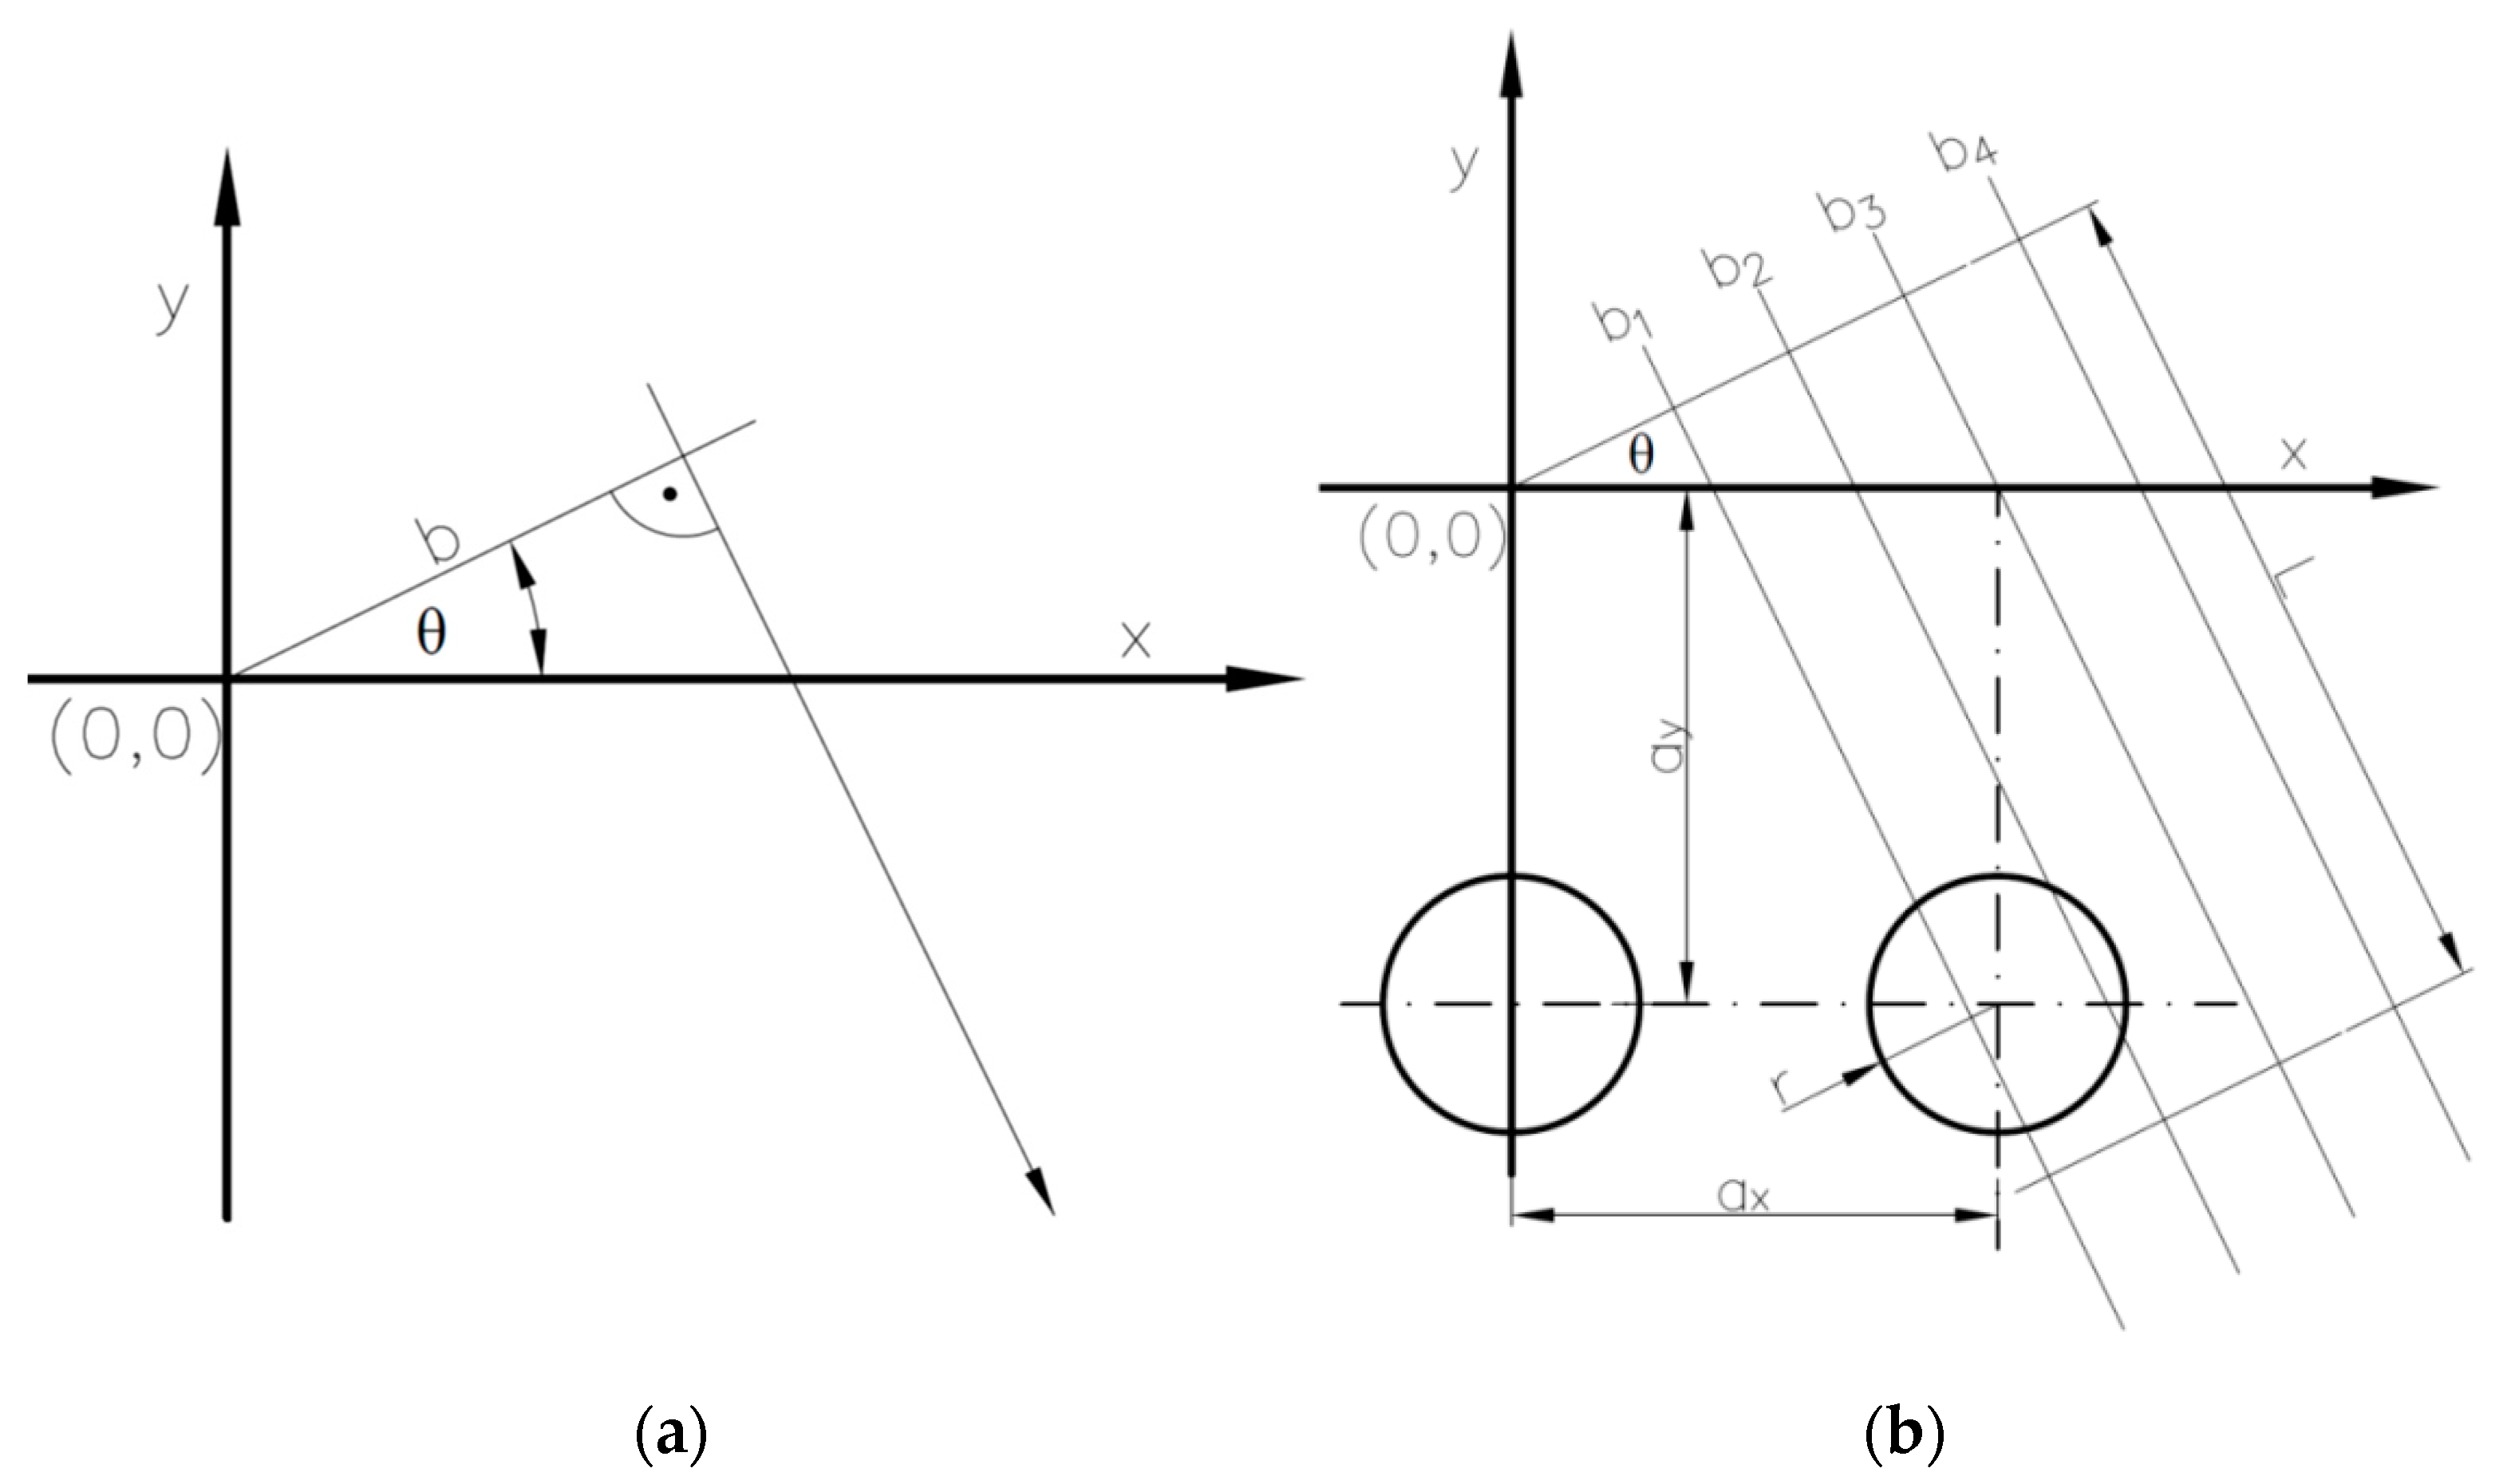
If we further assume that a smooth surface is travelling along the textured surface, then each of its points is travelling on a certain trajectory. We are only considering a case in which the trajectories are straight lines, which occurs, e.g., in the case of a piston and cylinder in a reciprocating engine. In terms of lubrication, we are interested in the mutual positioning of the surface texture’s recesses and trajectories. We assume that recesses are spots abundant in lubricant, and, therefore, if the trajectory travels through such a recess, the situation is classified as advantageous for the lubrication. Trajectories that do not travel through recesses do not take part in the lubricant’s distribution and such a situation is classified as disadvantageous for the lubrication. It is therefore necessary to plan the texture mesh positioning for the trajectories to travel through the largest number of recesses. Notice that by changing the inclination angle θ of the velocity vector in relation to the texture mesh’s axis y, it is possible to ensure that particular trajectories will travel more often through recesses. By determining the texture mesh parameters and adopting a certain trajectory length L, it is possible to calculate the number of recesses through which the given trajectory travels for a specific angle θ and for a bundle of trajectories at the distance ∆b (Figure 3b). Let us write the trajectory equation in the following normal form:
x cos θ + y sin θ b = 0 ,
where: b is the straight line’s distance from point (0,0), while θ is the inclination angle in relation to axis y (Figure 3a). The distance dk between the straight line and any point (xk, yk) is expressed by the following equation:
d k = | x k cos θ + y k sin θ b | ,
A single trajectory travels through a recess (k, m) if its distance from point (k · ax, m · ay) is lower than r (r—recess radius), i.e., when:
| k a x cos θ + m a y sin θ b | r ,
When analyzing the lubrication of a surface lying on a specific trajectory, it is necessary to check all pairs (k, m) and count the ones for which the inequality (4) is met. The number of intersections between trajectories and all pairs is designated as N.
Such analyses make sense for specific data concerning the area in which the lubrication evenness is of interest. An example of a bundle of trajectories is presented in Figure 3b. Let us consider a bundle of trajectories B = 200 positioned at a distance of ∆b = 0,2 and a length of L = 30, which travels through a surface with a rectangular texture mesh of ax =1 and ay =5 as well as recesses with a radius r = 1. It was assumed that for a the mesh pairs’ diagonal is representative for a rectangular mesh, which is why lengths L (5) were defined as multiplicity M of the recess mesh diagonal’s lengths (M < 10 was assumed in the considered example).
L = M a x 2 + a y 2 ,
In the case of angle θ = 0°, we will obtain a result according to which among 200 considered trajectories, only 80 travel through the recesses, 36 times each, whereas 120 trajectories do not travel through recesses and these are “dry” (non-lubricated) trajectories. In the case of angle θ = 10°, we obtain a result that each trajectory is lubricated and 13 times at the least. Some trajectories travel through recesses 15 times.
It would be perfect if all trajectories had the same number of evenly distributed intersections with lubricating recesses. However, in the case of all angles θ there are differences between trajectories and the numbers Ni vary. The numbers of intersections are distributed very irregularly. It is possible to propose the following measure of the lubrication unevenness S2:
S 2 = b = 1 B ( N b + 1 N b ) 2 ,
Then, in the case of [N1 = 1, N2 = 1, N3 = 3] we obtain S2 = 4, while for [N1 = 1, N2 = 2, N3 = 3] we obtain S2 = 2, which is better at reflecting the facts. The greater the unevenness, the worse the lubrication, which is reflected in the situation presented above. It is possible to adopt other unevenness measures, but measure (6) has many advantages due to its simplicity.
The value S2 depends on length L which is used to test the trajectories. The length was expressed as the multiplicity of the recess mesh diagonal’s lengths (5).
In approximation, S2 is proportional to M2. In order to standardize the unevenness measure, we divide S2 by M2 and obtain the standardized unevenness DB(7), which is an average number of intersections per single diagonal’s length.
D B = 1 M 2 b = 1 B ( N b + 1 N b ) 2 ,
For M = 30 and the aforementioned data, we obtain the following table of values for the standardized unevenness DB.
The lower the unevenness DB, the better the surface lubrication. For θ = 0° to θ = 90°, we are dealing with the highest DB values and this is exceptionally disadvantageous. The highest lubrication quality is achieved for angles θ equal to 15, 30, 37, … degrees, in the case of which the unevenness is lower than 0.1. In the case of these angles, the trajectories encounter nearly the same number of recesses. For several directions, DB achieves very high values, which means that the lubrication is not sufficient. An exceptionally advantageous layout is obtained for angles θ = 36.1° to θ = 37° not presented here, for which the unevenness DB amounts from DB = 0.04 to DB = 0.16. It is necessary to note that the values specified in Table 1 strongly fluctuate when the measuring length L and texture mesh parameters change.
The problems of uneven lubrication during lubrication with an accumulation effect differ completely if we consider a texture with single elements in the form of grooves positioned perpendicularly and alternately to the trajectories of the mating surfaces’ travelling points (Figure 4).
In this case, the value of angle θ will have a decidedly lower impact on the lubrication unevenness. This feature is decisive in terms of this type of texture’s popularity. The shape of the texture’s single element is chosen on the basis of technological, strength and durability aspects. The impact of the texture’s type on the sliding pair’s strength and durability has not been extensively studied yet. Currently, the applied technical solutions (automotive technology) features a consumption of the effect of “additional” service life resulting from the improvement in the conditions of textured surface lubrication [25].

3. Laser Production of Textured Surface

Laser texturing belongs to a group of technologies referred to as laser microprocessing [10,40]. It includes cavity processing, in which the removed material areas have dimensions of micrometers or millimeters and which utilizes laser beam energy to remove the material. Laser microprocessing is a method used with success when high dimensional accuracy is required and in the case of materials troublesome for mechanical technologies. Laser texturing is based on giving the processed material surface the desired geometrical structure and/or distribution of properties [8,41].
A laser beam, as an electromagnetic wave demonstrating coherence, i.e., consistency over time and in space, is a carrier that allows for obtaining high energy concentration in terms of the area and time of impact on the processed material. In laser microprocessing, the area of current impact on material is determined by the size of the laser spot or mask that permeates only the desired part of the beam. If the processing requires high energy surface density, beam focusing is applied by using optical elements. A laser beam with diameter D and wave length λ can theoretically be focused in a region, the minimum diameter d of which depends on the occurrence of diffraction and is expressed with the following formula:
d = 2.44 f D λ ,
where: f—focal length of the applied focusing element (lens or speculum).
The length λ of the radiation wave is important not only due to the ability of achieving high focus of the beam, but also due to the ability of absorbing radiation energy by the material. In laser microprocessing, the beam’s impulse duration is especially important, because various mechanisms of affecting material can be used depending on the radiation intensity and time of exposure. This results from the finite reaction times of the material’s electrons and atomic lattice on photons. Impulses with lengths greater than 1 ns are referred to long impulses. In the case of durations from 1 ps to 1 ns, impulses are referred to as short, while for durations lower than 1 ps, impulses are referred to as ultra-short. In the case of high radiation intensity, short duration and high energy impulses, there is a phenomenon referred to as the multi-photon absorption, i.e., simultaneous transmission of energy from multiple photons to a single electron. The removal of material from the area of the beam’s impact takes place prior to its thermal melting and vaporization. The process is referred to as non-thermal melting or ablation. In order to achieve it, it is required to ensure sufficient surface density of the laser beam’s energy, referred to in literature as the ablation threshold energy density. In the case of insufficient energy surface density, there is a relatively lower increase in the material’s temperature and weakening of bonds due to thermal vibrations, which may lead to the material’s thermal melting and vaporization. The size of the thermal impact zones depends on the duration of laser impulses [10].
Processing with the use of long impulses leaves clear signs of melting and changes due to the impact of heat. On the other hand, ablation invoked by picoseconds and femtoseconds impulses is referred to as cold ablation, because no heat affected zone is observed in the material in its traditional sense. In terms of the use of surface texturing, it is important to clearly identify the generated textures and their basic physical properties. The subject of the testing was surface textures made using laser technology on surfaces of samples in the form of SiC rings. The rings’ surface texturing was executed by using the ESI Model 5200 μVIA DRILL laser. It is a Nd:YAG laser with diode pumping and maximum beam power of 2 W, emitting ultraviolet radiation with a wavelength of 355 nm. Other important laser operating parameters include the impulse duration of 30 ns for 3 kHz and frequency 100 Hz ÷ 20 kHz. The laser is equipped with scanning optics with a working field of 533 mm × 635 mm. The recesses were made by using the scanner’s standard software. The texturing procedure included two stages, spot erosion on a spiral trajectory and cavity profiling using a beam with a diameter corresponding to the set recess diameter. Micro-recesses with the depth of 13 μm and various diameters were obtained as result of these operations.
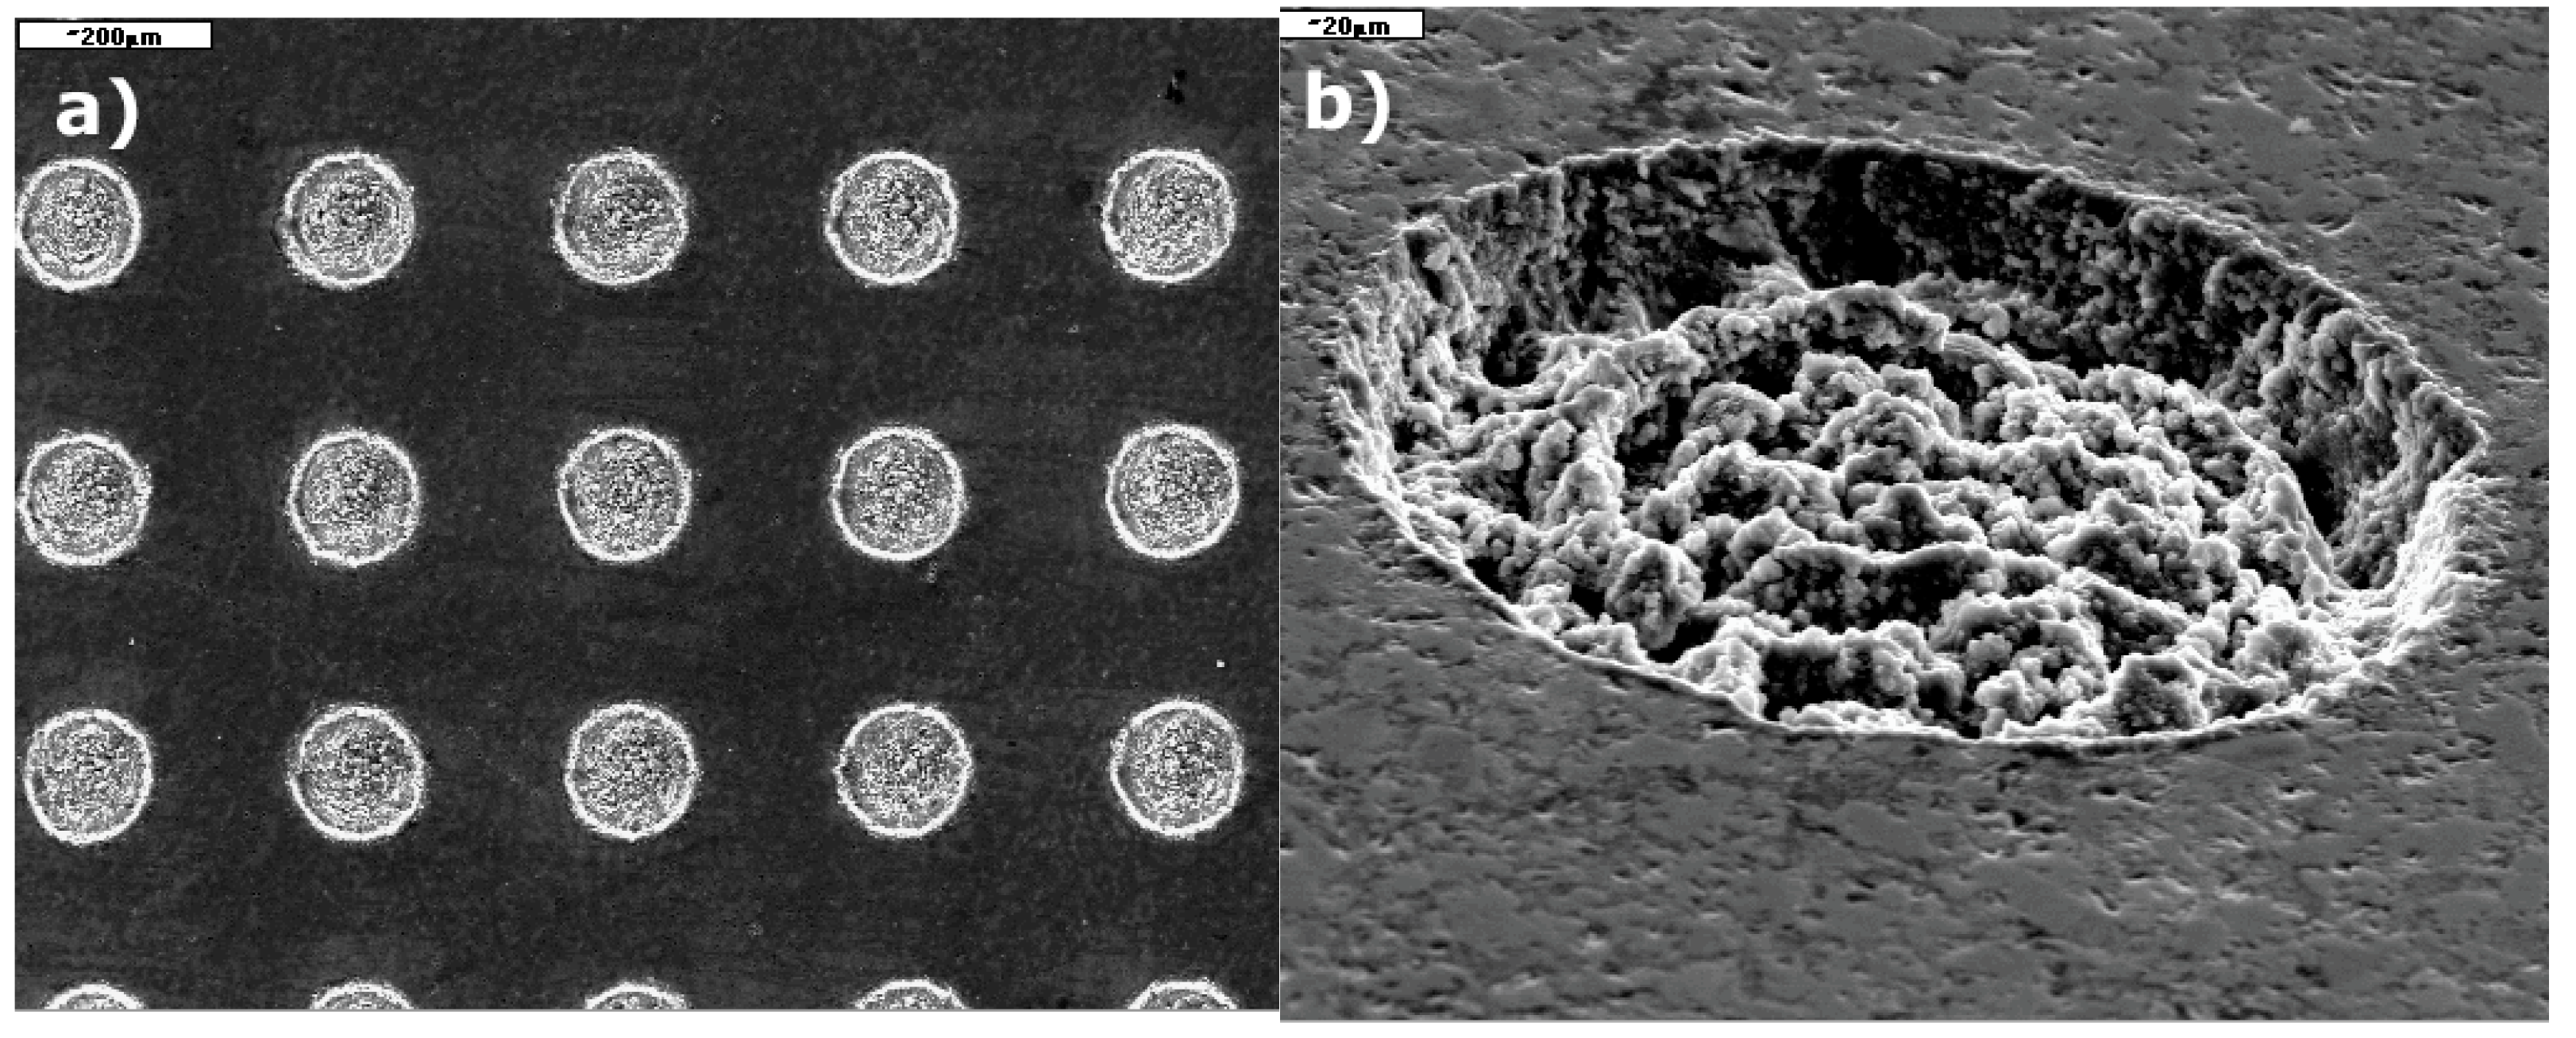
Table 2 presents the parameters of the obtained textures, while Figure 5 presents an example of their view obtained via a scanning microscope. In addition, Table 2 presents the values of surface free energy that were calculated based on the Owens–Wendt method [42].
The surface roughness at the bottom of texture pit as well as the ring surface roughness were measured. Measurements were take with Hirox KH-8700 confocal microscope. The surface roughness values at the bottom of texture pit are in the range of Ra = 0.7 ÷ 1.4 µm (avg. Ra = 0.99 µm). Whereas the untreated ring surface roughness values are in the range of Ra = 0.086 ÷ 0.098 (avg. Ra = 0.092 μm). The view of the measurement paths and texture isometry is shown in Figure 6.
For this kind of surface texture preparation, the tribological tests were carried out onto two tester types. The research methodology and test results are presented in the chapter below.

4. Tribological Testing

The lubrication unevenness indices calculated earlier can also be determined for other trajectories, including for circular trajectories. The details of the lubrication unevenness index calculations for such trajectories exceed the framework of this elaboration. The experimental testing was conducted on a longitudinal bearing’s model, in the case of which we are dealing with a circular trajectory.
Nevertheless, the most convincing are the results of the research on rectilinear trajectories, therefore the experimental tests were carried out on two tribological testers:
  • Anton Paar TRB3 Tribometer with reciprocating motion;
  • Modified T-01M Ball-on-Ring Tester.
The main aim of TRB3 Tribometer research was to determine the influence of the inclination (orientation) of the friction path trajectory according to the texture mesh on the value of the friction coefficient and sample wear. Whereas, the aim of the T-01M tests was to determine the influence of texture parameters on changes in the value of the friction coefficient at different sliding speeds and friction junction loads.Authors made every effort to ensure that the tests were performed in identical conditions. The cavitation phenomenon was not taken into account by the authors during the data analysis. The cavitation phenomenon was neglected due to the inability to investigate it during the tests. All tests parameters were selected due to the actual, real operating conditions of this rings type and according to similar tests described in literature [27,38,41].

4.1. Anton Paar TRB3 Tribometer Tests

In this part of the experimental research, the reciprocating motion TRB3 Tribometer was used (Figure 7). The tester made it possible to assess both the degree of wear and frictional resistance according to load changes of the friction junction, the friction path as well as the number of cycles during the test run.
A truncated ball slider was used for the tests. The sample was a SiC textured ring with parameters (acc. to Table 2) d = 102 µm, Ca = 128 µm andSp = 49.9%, made according to the previously described laser textured technology. The study also used a reference specimen without texture—flat polished surface. Specimen preparation consisted of single lubrication of the friction surface with paraffin oil. The cavities in the specimen after 24-h stabilization were filled with oil and then oil remnant was mechanically removed from the flat surfaces. Thus, during the test, only oil stored in the texture cavities was used for lubrication.
Test runs were conducted with two texture orientations. In the first test (Test 0°), the reciprocating trajectories were parallel to the texture mesh and in the second (Test 37°) they were inclined by an angle of 37° (angles selected acc. to Table 1 data). In such a planned experiment, in the first case, about 50% of the trajectories were “dry” along the entire friction path. In the second case, however, all trajectories were lubricated. For comparison, a test run was carried out under identical conditions for the reference specimen (Test-ref).
Test parameters were as follows:
  • Load—30 N;
  • Sliding distance—40 m;
  • Number of cycles—4000;
  • Sliding frequency—1 Hz.
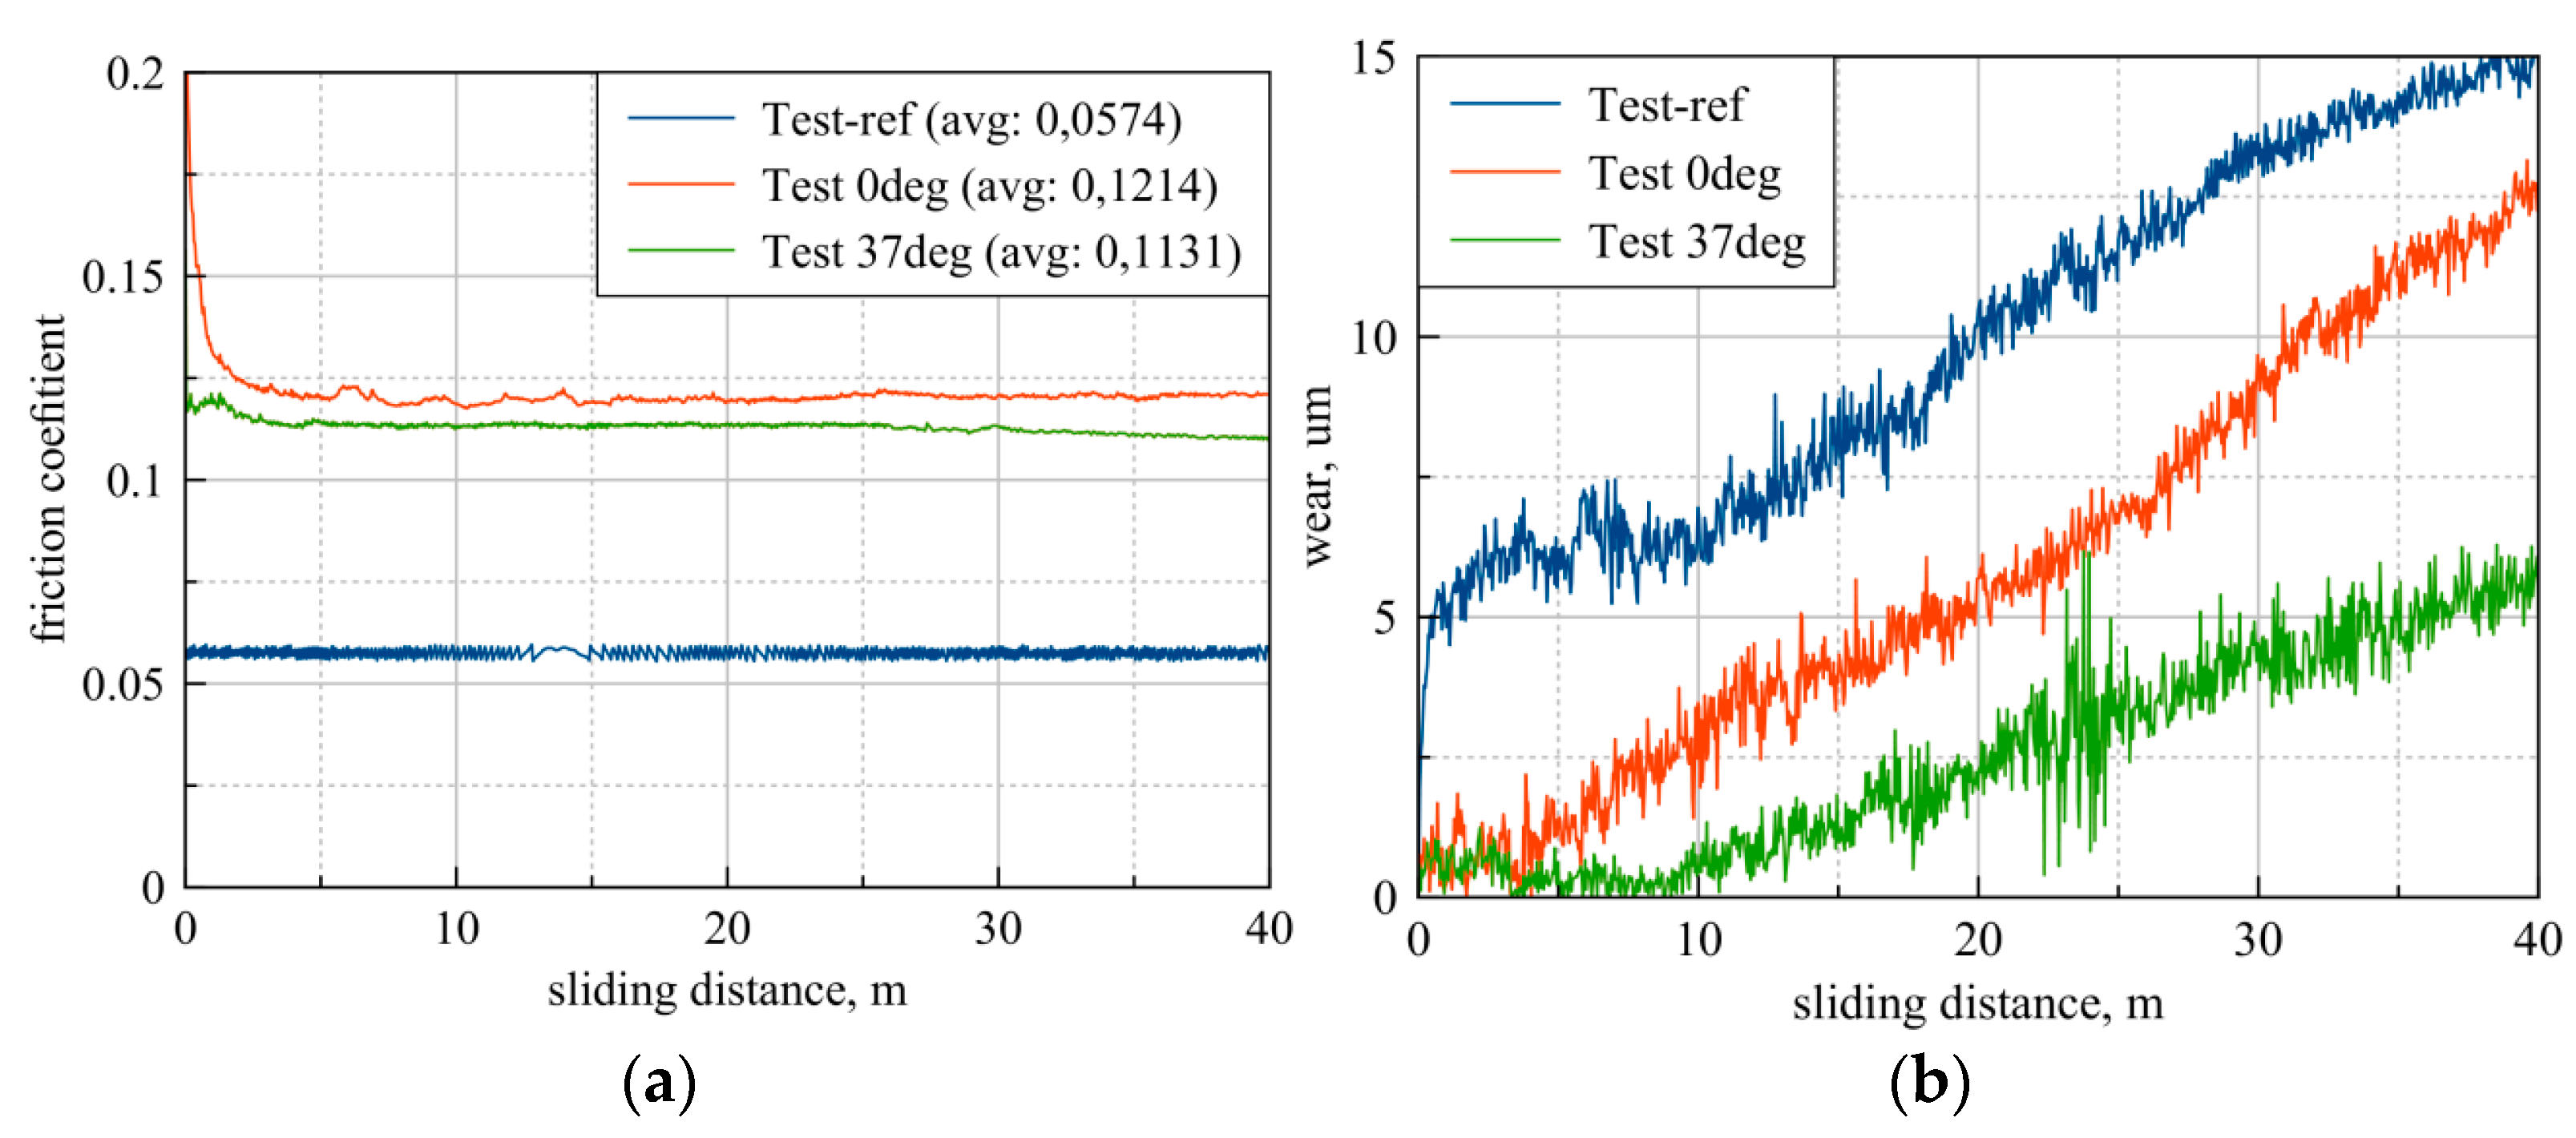
According to Figure 8a, the lowest values of the friction coefficient were observed for the reference specimen without texture (Test-ref). This can be explained by the fact that, for the applied load and the sliding speed on the flat surface specimen, it is not possible to produce a hydrodynamic oil film which provides additional resistance. This result is consistent with the observations of other authors in their publications [11,37,38].
Whereas for specimens with laser texture, lower values of friction coefficient occurred as expected when all trajectories were lubricated (Test 37°). The friction coefficient reduction values in relation to the tests with trajectories parallel to the texture mesh (Test 0°) was ~7%.
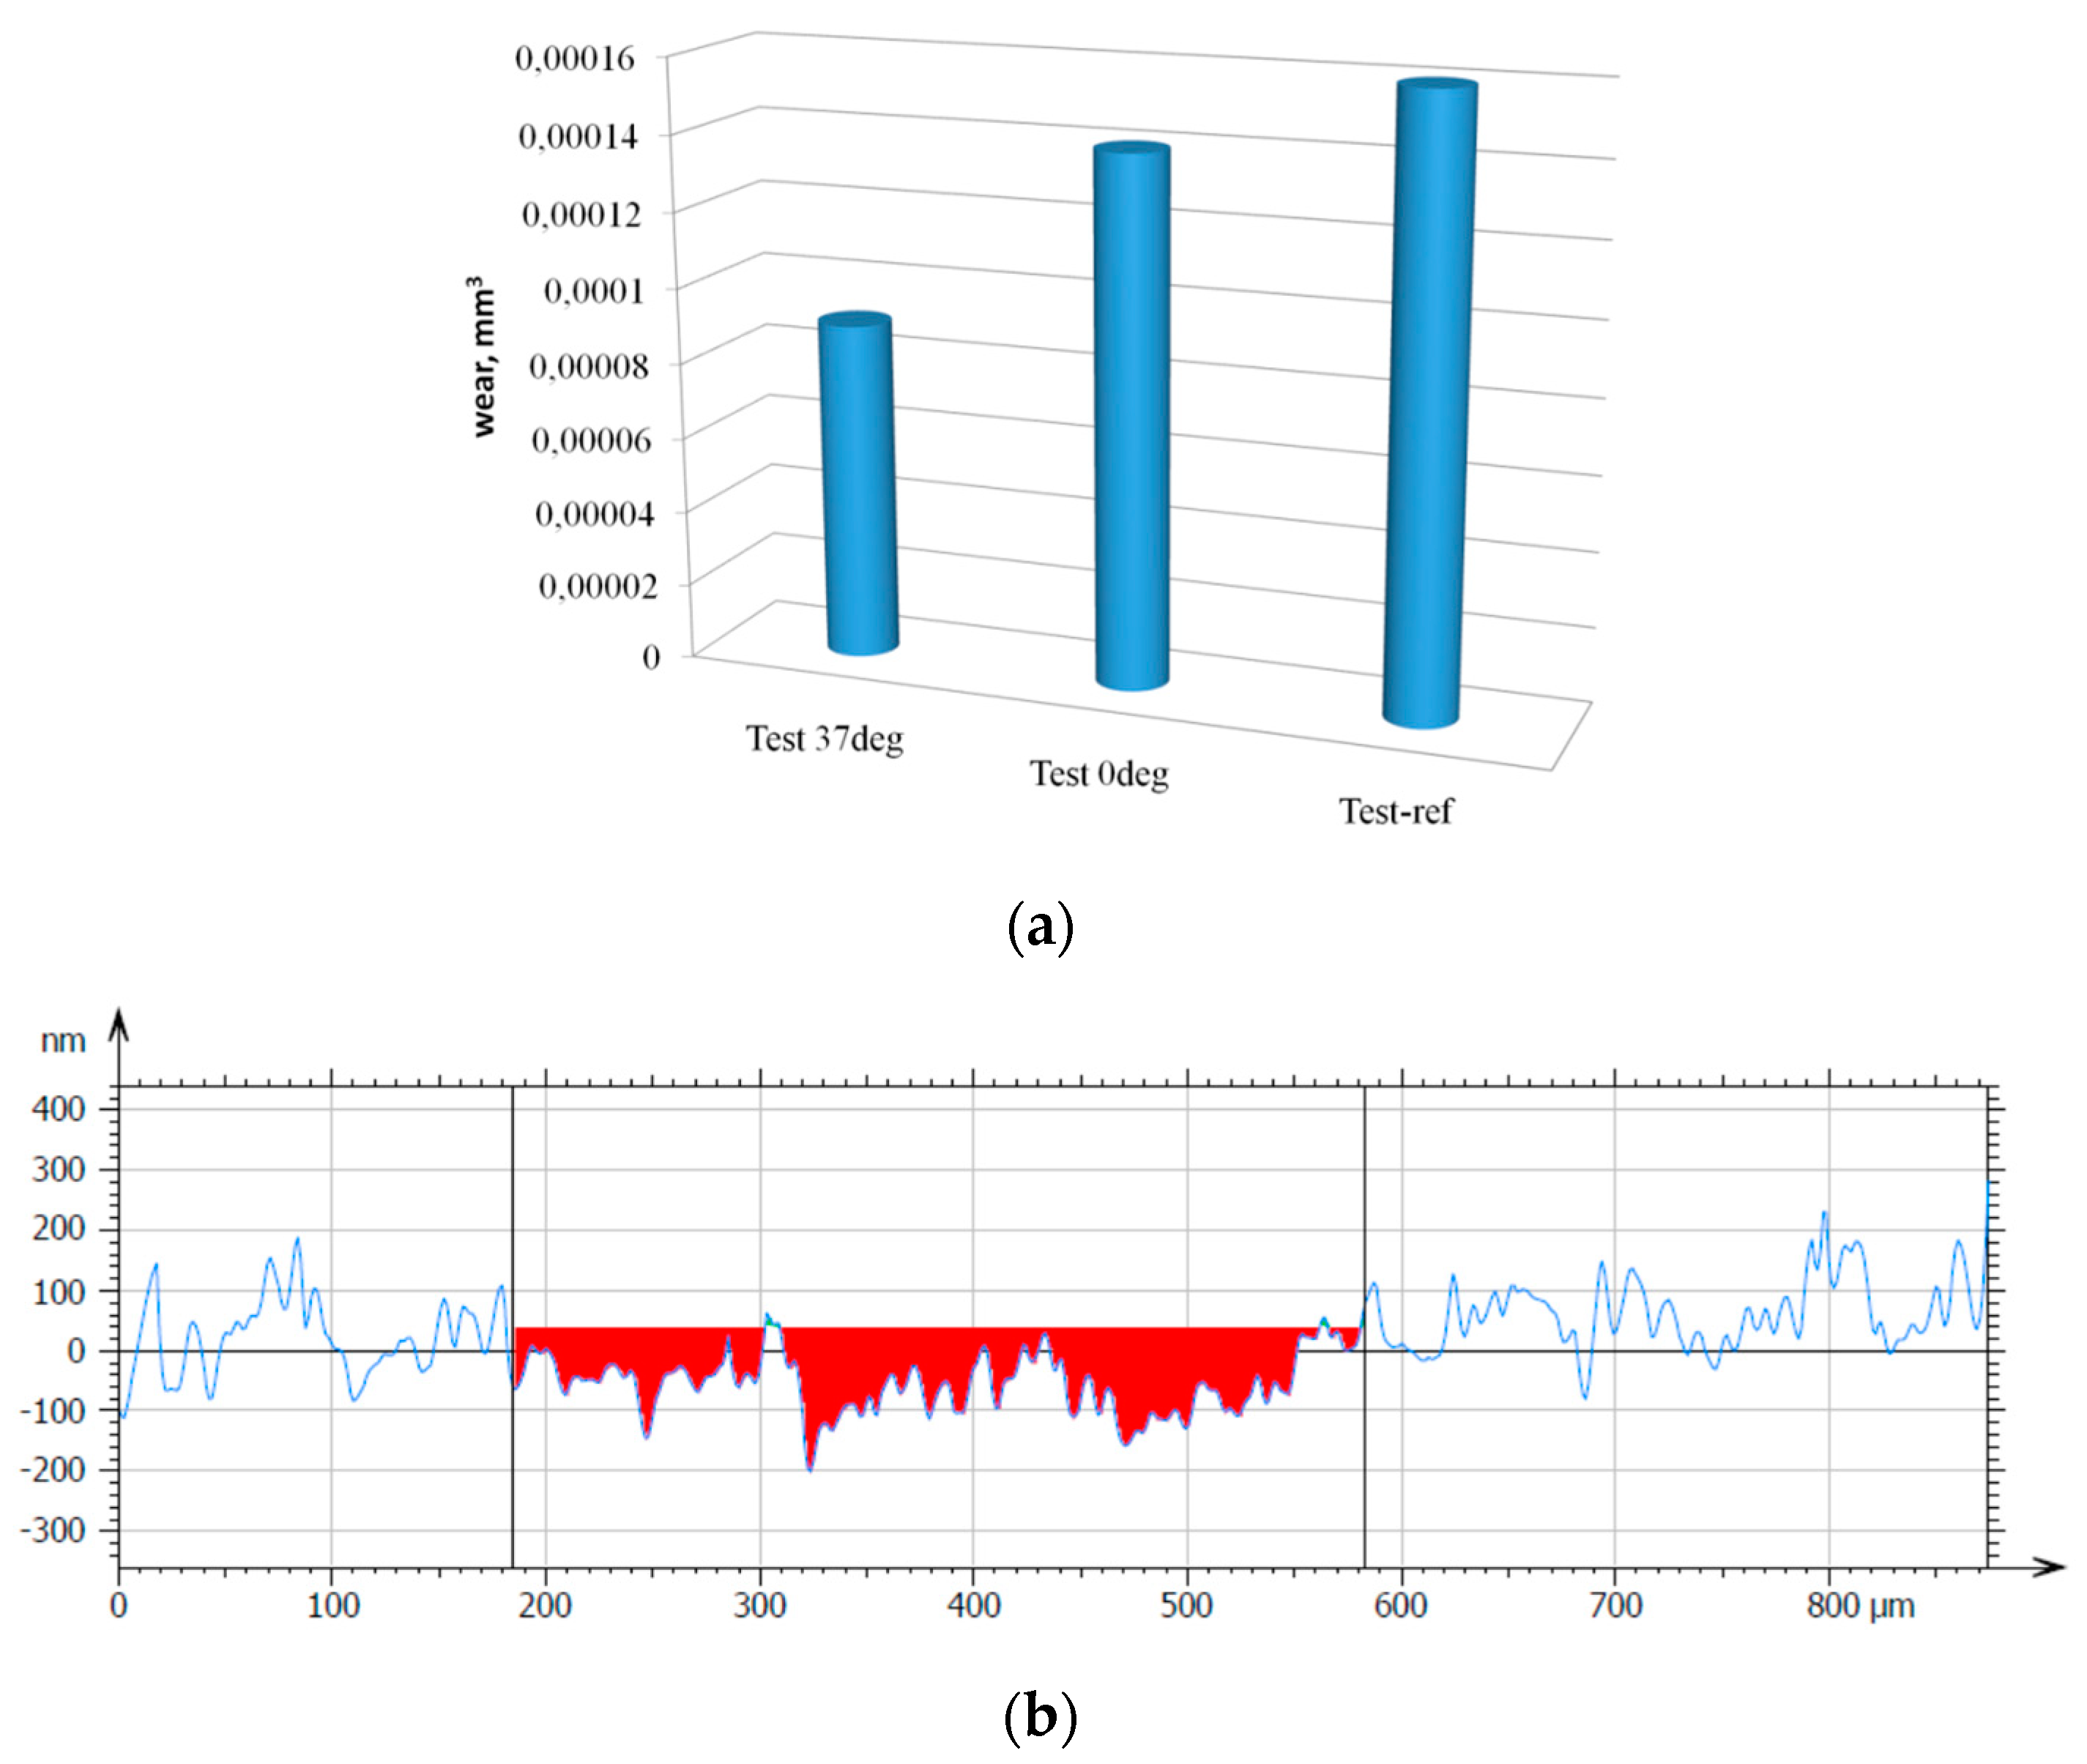
When analyzing specimens wear, the role of lubrication is evidently revealed—Figure 8a,b. The global consumption values recorded during the trial were the highest for (Test-ref) specimen and the lowest for the (Test 37°) specimen. This result can be commented on as follows. The reference specimen (Test-ref) had only a supply of lubricant accumulated in the surface roughness micro-irregularities at its disposal, which was quickly exhausted. More oil was available in the specimen (Test 0°), and the most in specimen (Test 37°).
After the end of the tests, wear traces microgeometry measurements were carried out to confirm the obtained result of specimen wear. On this basis, the specimens wear in terms of the material’s volume removed can be determined. The results presented in Figure 8 show that the obtained relation of the wear values from individual test runs remained the same as with the continuous monitoring of global wear. The volumetric wear during Test 37° was ~44% less than reference specimen Test-ref wear and ~36% less than Test 0° specimen wear (Figure 9).

4.2. T-01M Ball-on-Ring (Modified) Tests

The testing was conducted with the use of a modified T-01M tribological test machine fitted with a suitably prepared ring, constituting the test specimen, instead of a typical mandrel—Figure 10. The ring is pressed by a ball (thrust bearing) against a second identical ring constituting the counter sample and fitted into a rotating casing. The variation in friction forces was registered using a force sensor fitted onto the jaw clutch’s arm. The applied solution broadens the test machine’s testing capabilities by providing the ability to test the friction at the rings’ contact occurring in many real layouts (longitudinal bearing, head seal). It is also important that this layout enables continuous wetting of the ring contact’s internal edge with a lubricating agent.
The tester operating parameters scope was customized according to face seal working conditions:
  • Rotation speed changed gradually from 100 to 500 rpm;
  • Friction pair load with normal force from 4.9 to 39.2 N.
The test samples (samples with textured surfaces, counter samples) were rings with the dimensions of ø37 × ø26.5 × 8 mm made from sintered SiC—these were original, commercial, certified rings used for head sealing.
Firstly, the testing featured an experiment consisting of the identification of the differences in the friction force for the textured and non-textured samples. The lubrication included paraffin oil used to fill the space created by the rings’ inner walls. Further testing of rings with the geometrical parameters presented in Table 1 featured an experiment planned based on a static, determined, multi-factor, rotatable program with PS/DS-λ repetitions, which enabled the determination of the relations between the texture’s parameters, load and the friction force (type of friction). The test according to the above program was conducted for a constant load and two rotation speeds of 200 and 600 rpm.
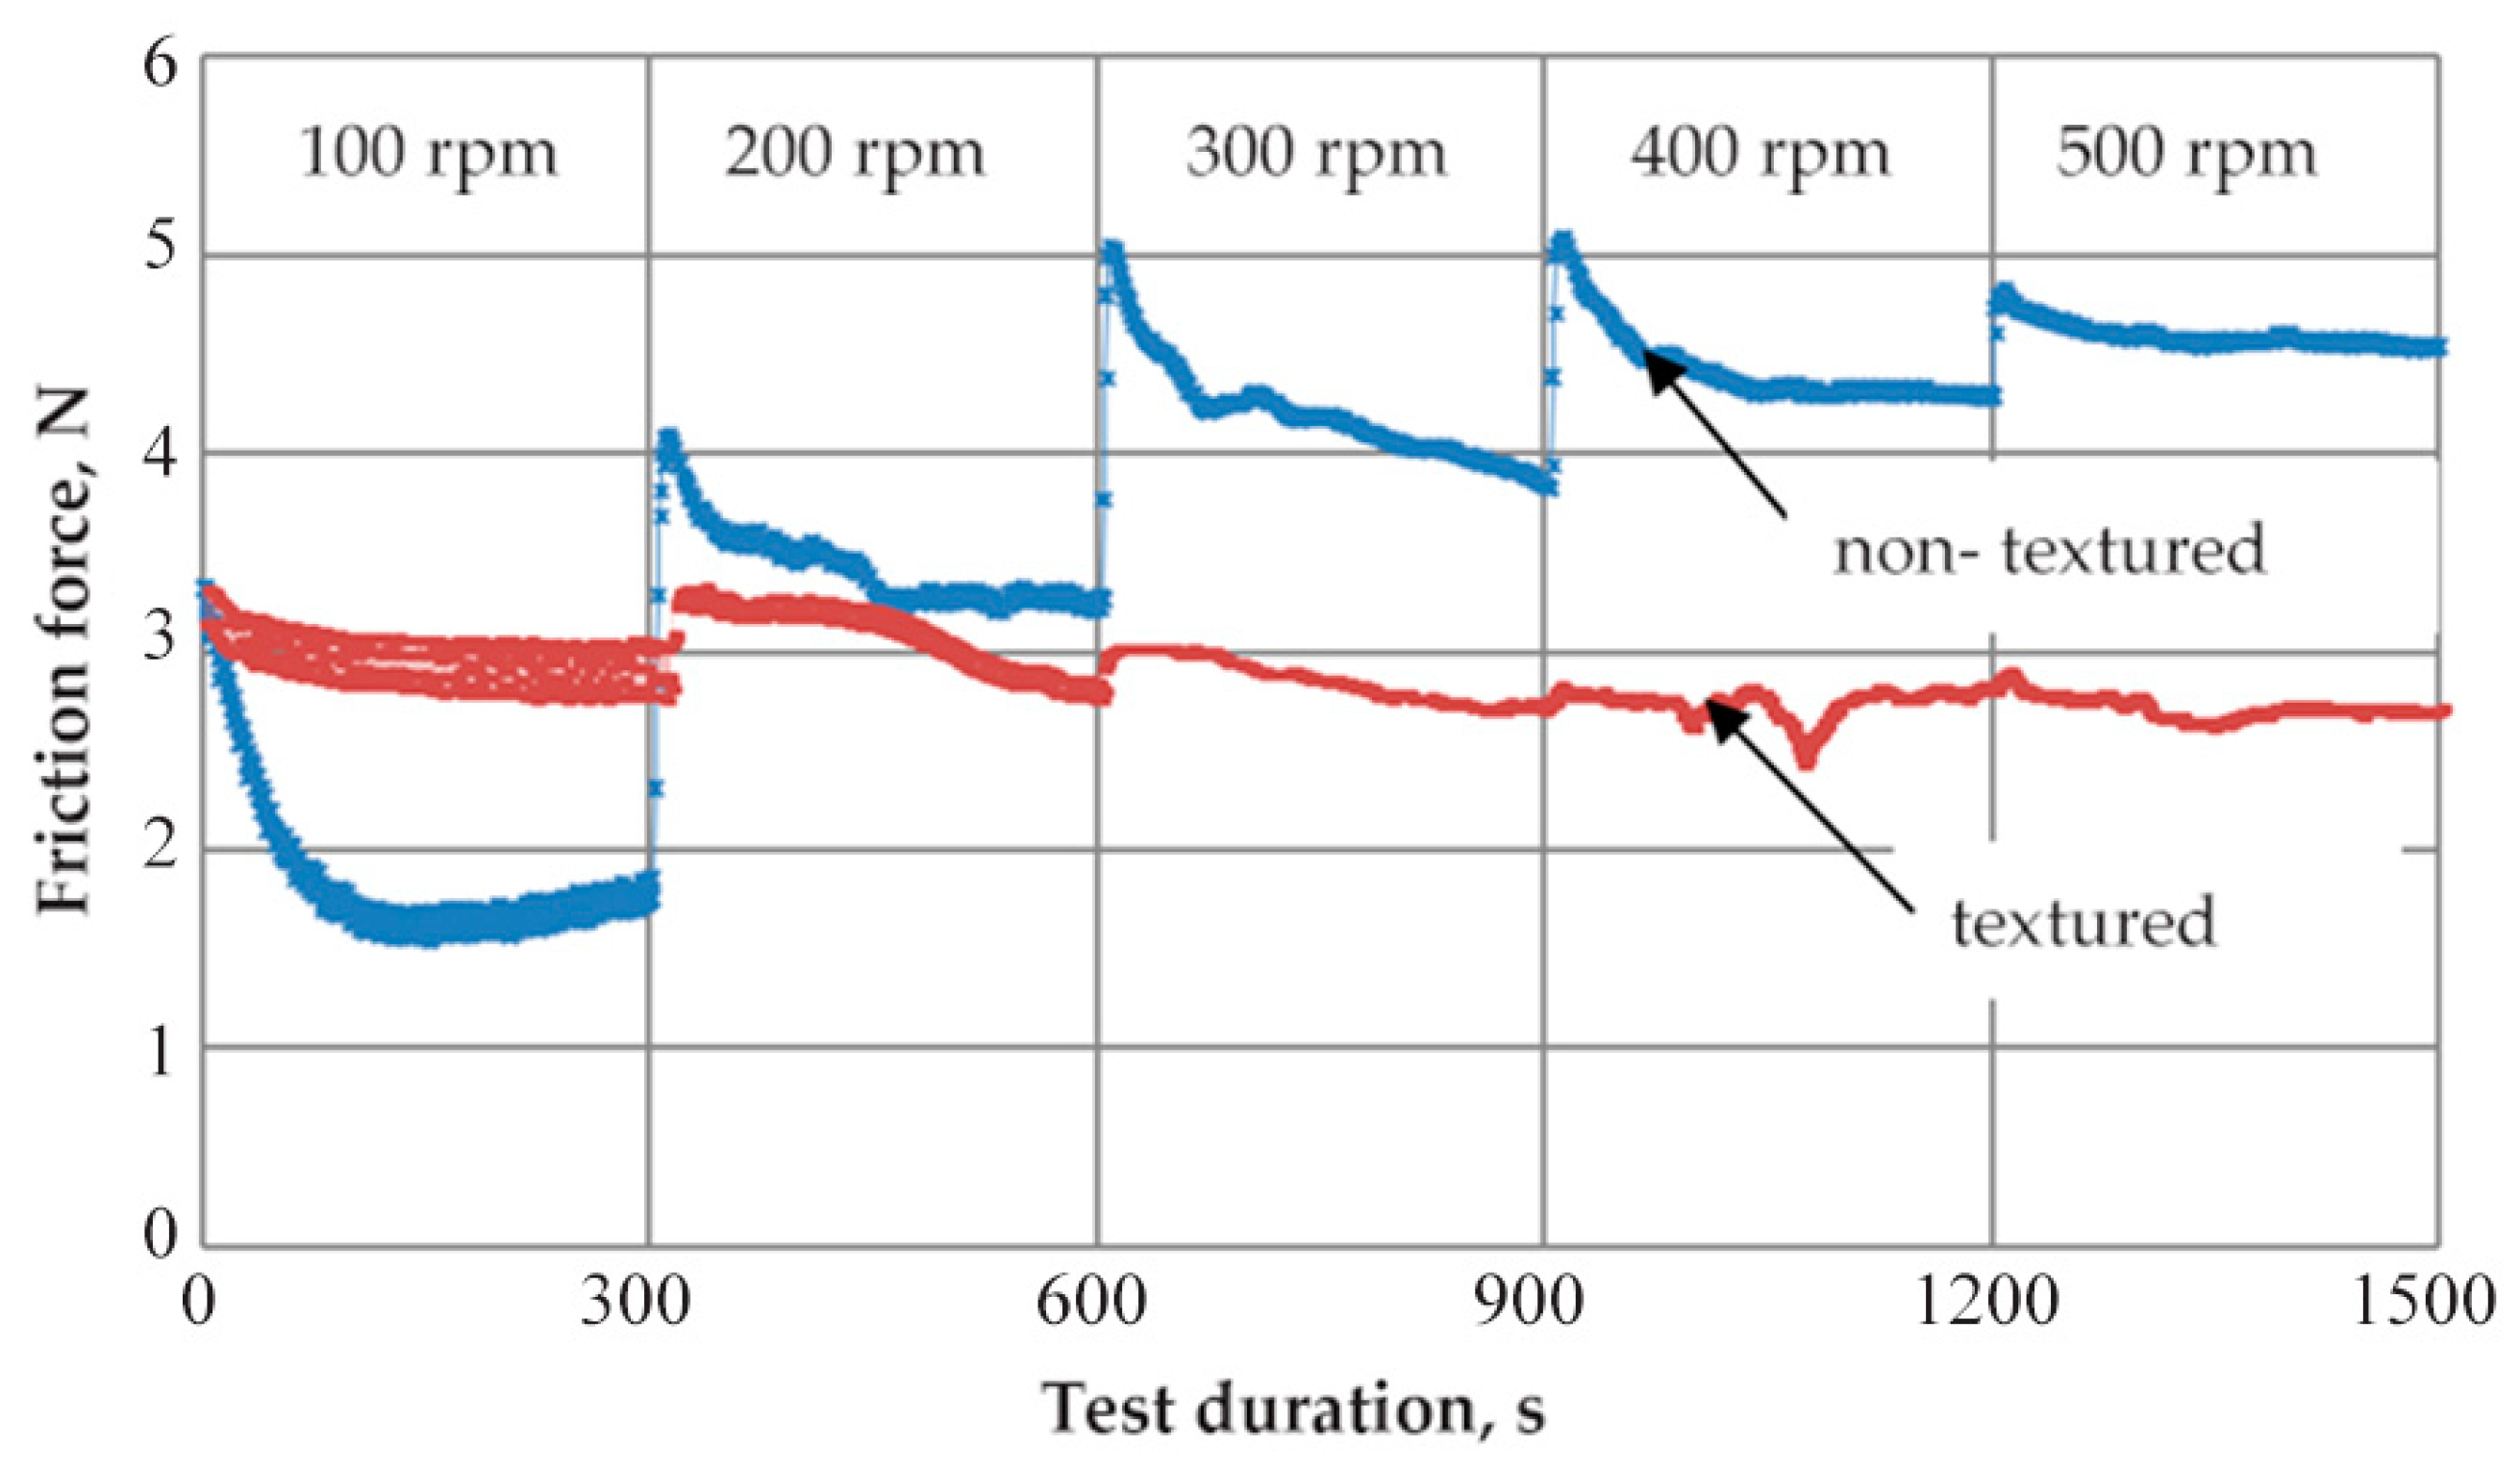
The waveforms presented in Figure 11 point to the fact that for textured samples, the increasing sliding rate initially causes (for the speed of 200 rpm) a slight increase in friction force and then for higher rates, the friction force declines systematically. Similar relations were observed for higher loads, however the tendency to reduce the friction force was observed at higher rotation speeds. Regardless of the load, the non-textured samples’ waveforms are the same, i.e., the friction force increases along with the increasing rotation speed. The above observations prove that the presence of texture improves the lubrication effectiveness, and the sliding pair is able to carry larger loads at lower friction forces. This effect becomes clearer at increased sliding rates. This dependency indicates that we are dealing with hydrodynamic phenomena that become more apparent at higher sliding rates.
Table 3 presents the results of the multiple regression analysis conducted using the Statistica program. The regression equation determining the friction coefficient μ has the following form:
μ = c 0 + c 1 d + c 2 γ + c 3 ( C a d ) + c 4 S p ,
As can be seen, the friction coefficient is mostly affected by the following factors: mutual distance between micro-recess edges, surface free energy, recess diameter and rate of blackening. The correlation coefficient has a higher value for tests conducted at the speed of 600 rpm, thereby pointing to a stabilizing effect of the dynamic phenomena developing at higher speeds. It is necessary to note that at low rotation speeds, the rate of blackening and the distance between micro-recess edges contribute to the increase in the friction coefficient. On the other hand, at higher speeds, the friction coefficient is increasing along with the increase in surface energy. Therefore, for high-rate friction pairs, it is possible to recommend textured surfaces with low rates of blackening and, thus, greater distances between micro-recess edges.

5. Conclusions

The presented analyses and tests demonstrated that surface texture improves the lubrication effectiveness, especially at greater loads and higher sliding rates. The end result depends on the types, shape and mutual positioning of particular texture elements as well as on the sliding pair’s load parameters. The observed nature of the friction force’s variation along with the increasing sliding rate points to the development of hydrodynamic phenomena resulting in improved lubrication conditions and reduced friction forces. The relations between the texture’s parameters and the trajectory of particular mating surface spots can be characterized by the proposed lubrication unevenness indices. An analysis of the indices indicates that for the considered texture example, the highest lubrication quality is achieved for angles θ equal to 15, 30 and 37 degrees, in the case of which the unevenness is lower than 0,1. The conducted tribological testing demonstrates that for the tested texture (texture no. 3 acc. to Table 2) a reduced friction force was observed at loads from 4.9 to 19.6 N and after exceeding the speed of 200 rpm when compared to the non-textured ring. At higher loads, this was occurring after exceeding the speed of 300 rpm. The reduction in friction force in relation to the non-textured ring amounts from 12 to 40% and reached its maximum value for the speed of 500 rpm. The experimental confirmation of the relations between the friction resistances and the proposed lubrication unevenness indices will be possible after further testing. In terms of the texture’s geometrical parameters.
The experimental results about influence of the relationship between the motion trajectory and the texture mesh confirmed theoretical analyzes and showed that there is a clear relationship between examined parameters. If “dry” trajectories occur during friction, the value of the friction coefficient and the wear intensity increase. In the tested case where trajectory inclined towards the texture mesh by an angle of 37°, a reduction in wear (volume loss) by ~44% in relation to the specimen without texture and by ~36% in relation to the test with a trajectory parallel to the texture mesh was achieved. It was also shown that in the case of the trajectory parallel to the texture mesh, the value of the friction coefficient is higher by 7% than in the case of the trajectory inclined in relation to the mesh by 37°.
The presented research, both theoretical and experimental, has shown that the analysis of the movement trajectory during friction in terms of depending on the distribution of texture elements has a significant impact on operating parameters such as the friction coefficient and wear, therefore it should be taken into account in practical solutions.
The major conclusions are as follows:
  • The presented findings, both theoretical and experimental, proved that the motion trajectory analysis during friction depending on texture distribution of elements has a significant impact on exploitation parameters, such as the friction coefficient and wear;
  • The experimental results concerning relationship influence between the motion trajectory and texture mesh confirmed theoretical analyzes and proved that there is a clear dependence between studied parameters. If “dry” trajectories occur during friction, the value of the friction coefficient and the intensity of wear increase;
  • Presented analyzes and tests herein have proved that the surface texture improves lubrication efficiency, especially at higher loads and higher sliding speeds. The final effect depends on the type, size and mutual arrangement of the individual texture elements and the sliding pair load parameters.

Author Contributions

Conceptualization, B.A.; methodology, B.A. and P.K.; software, P.K.; validation, B.A. and P.K.; formal analysis, B.A.; investigation, P.K.; resources, B.A. and P.K.; data curation, B.A. and P.K.; writing—original draft preparation, B.A. and P.K.; writing—review and editing, B.A. and P.K.; visualization, P.K.; supervision, B.A.; project administration, B.A.; funding acquisition, B.A. and P.K. All authors have read and agreed to the published version of the manuscript.

Funding

This research received no external funding.

Institutional Review Board Statement

Not applicable.

Informed Consent Statement

Not applicable.

Data Availability Statement

The data presented in this study are available on request from the corresponding author. The data are not publicly available due to no technical possibilities.

Conflicts of Interest

The authors declare no conflict of interest.

References

  1. Ma, C.; Bai, S.; Peng, X.; Meng, Y. Improving hydrophobicity of laser textured SiC surface with micro-square convexes. Appl. Surf. Sci. 2013, 266, 51–56. [Google Scholar] [CrossRef]
  2. Erdemir, A. Review of engineered tribological interfaces for improved boundary lubrication. Tribol. Int. 2005, 38, 249–256. [Google Scholar] [CrossRef]
  3. Kovaci, H.; Secer, Y. Improved tribological performance of AISI 316L stainless steel by a combined surface treatment: Surface texturing by selective laser melting and plasma nitriding. Surf. Coat. Technol. 2020, 400, 126178. [Google Scholar] [CrossRef]
  4. McGeough, J.A.; Rasmussen, H. A theoretical model of electrodischarge texturing. J. Mater. Processing Technol. 1997, 68, 172–178. [Google Scholar] [CrossRef]
  5. Tarelnyk, V.; Konoplianchenko, I.; Martsynkovskyy, V.; Zhukov, A.; Kurp, P. Comparative tribological tests for face impulse seals sliding surfaces formed by various methods. In Advances in Design, Simulation and Manufacturing; DSMIE 2018; Springer: Berlin/Heidelberg, Germany, 2018; pp. 1–10. [Google Scholar]
  6. Kovalchenko, A.; Ajayi, A.; Erdemir, A.; Fenske, G.; Etison, I. The effect of laser surface texturing on transitions in lubrication regimes during unidirectional sliding contact. Tribol. Int. 2005, 38, 219–225. [Google Scholar] [CrossRef]
  7. Antoszewski, B.; Sęk, P. Influence of laser beam intensity on geometry parameters of a single surface texture element. Arch. Metall. Mater. 2015, 60, 2215–2219. [Google Scholar] [CrossRef] [Green Version]
  8. Sęk, P. The use of statistical functions for the selection of laser texturing parameters. Open Eng. 2020, 10, 454–461. [Google Scholar] [CrossRef]
  9. Powell, P.M. Laser-Based Micromachining Gets Practical. In Photonics Spectra; Photonics Media: Pittsfield, MA, USA, 2003; p. 70. [Google Scholar]
  10. Steen, W.M.; Mazumder, J. Laser Material Processing; Springer: Berlin/Heidelberg, Germany, 2010. [Google Scholar]
  11. Xue, X.; Li, Y.; Guan, Y. Improving tribological behavior of laser textured Ti-20Zr-10Nb-4Ta alloy with dimple surface. Mater. Lett. 2021, 305, 130876. [Google Scholar] [CrossRef]
  12. Lu, Y.; Deng, J.; Wang, R.; Wu, J.; Meng, Y. Tribological performance of micro textured surface machined by Nd:YAG laser with different incident angle. Opt. Laser Technol. 2022, 148, 107768. [Google Scholar] [CrossRef]
  13. Wang, X.; Kato, K.; Adachi, K.; Aizawa, K. The effect of laser texturing of SiC surface on the critical load for transition of water lubrication mode from hydrodynamic to mixed. Tribol. Int. 2001, 34, 703–711. [Google Scholar] [CrossRef]
  14. Sani, E. Tailoring optical properties of surfaces in wide spectral ranges by multi-scale femtosecond-laser texturing: A case-study for TaB2 ceramics. Opt. Mater. 2020, 109, 110347. [Google Scholar] [CrossRef]
  15. Xing, Y.; Deng, J.; Feng, X.; Yu, S. Effect of laser surface texturing on Si3N4/TiC ceramic sliding against steel under dry friction. Mater. Des. 2013, 52, 234–245. [Google Scholar] [CrossRef]
  16. Hsu, S.; Jing, Y.; Zhao, F. Self-adaptive surface texture design for friction reduction across the lubrication regimes. Surf. Topogr. Metrol. Prop. 2015, 4, 014004. [Google Scholar] [CrossRef] [Green Version]
  17. Zhang, Q.; Wang, Q.; Zhang, Z.; Fu, Y.; Xu, J. Surface micro-texture on sapphire fabricated by laser ablation trajectory regulation. Chin. J. Aeronaut. 2022, 35, 525–536. [Google Scholar] [CrossRef]
  18. Volchok, A.; Halperin, G.; Etsion, I. The effect of surface regular microtopography on fretting fatigue life. Wear 2002, 235, 509–515. [Google Scholar] [CrossRef]
  19. Pakuła, D.; Staszuk, M.; Dziekońska, M.; Kožmín, P.; Čermák, A. Laser micro-texturing of sintered tool materials surface. Materials 2019, 12, 3152. [Google Scholar] [CrossRef] [Green Version]
  20. Liu, Y.; Li, J.; Yi, S.; Ge, X.; Chen, X.; Luo, J. Enhancement of friction performance of fluorinated graphene and molybdenum disulfide coating by microdimple arrays. Carbon 2020, 167, 122–131. [Google Scholar] [CrossRef]
  21. Yan, H.; Chen, Z.; Zhao, J.; Zhang, P.; Yu, Z.; Lu, Q. Enhancing tribological properties of WS2/NbC/Co-based self-lubricating coating via laser texturing and laser cladding two-step process. J. Mater. Res. Technol. 2020, 9, 9907–9919. [Google Scholar] [CrossRef]
  22. Murzin, S.P.; Balyakin, V.B. Microstructuring the surface of silicon carbide ceramic by laser action for reducing friction losses in rolling bearings. Opt. Laser Technol. 2017, 88, 96–98. [Google Scholar] [CrossRef]
  23. Schille, J. High-rate laser surface texturing for advanced tribological functionalit. Lubricants 2020, 8, 33. [Google Scholar] [CrossRef] [Green Version]
  24. Wang, H.; Sun, A.; Qi, X.; Fan, Y.D.B. Wear properties of textured lubricant films filled with graphite and polytetrafluoroethylene (PTFE) via laser surface texturing (LST). Tribol. Int. 2022, 167, 107414. [Google Scholar] [CrossRef]
  25. Ryk, G.; Klingerman, Y.; Etison, I. Experimental investigation of laser surface texturing for reciprocating automotive components. Tribol. Trans. 2002, 45, 444–449. [Google Scholar] [CrossRef]
  26. Behera, R.; Das, A.; Hasan, A.; Pamu, D.; Pandey, L.; Sankar, M. Deposition of biphasic calcium phosphate film on laser surface textured Ti-6Al-4V and its effect on different biological properties for orthopedic applications. J. Alloys Compd. 2020, 842, 155683. [Google Scholar] [CrossRef]
  27. Yu, X.Q.; He, S.; Cai, R.L. Frictional characteristics of mechanical seals with a laser textured seal face. J. Mater. Processing Technol. 2002, 129, 463–466. [Google Scholar] [CrossRef]
  28. Wang, X.; Adachi, K.; Otsuka, K.; Kato, K. Optimization of the surface texture for silicon carbide sliding in water. Appl. Surf. Sci. 2006, 253, 1282–1286. [Google Scholar] [CrossRef]
  29. Maldonado-Cortés, D.; Peña-Parás, L.; Rodríguez, N.; Marcelo, M.; Leal, O.; Iván, D.; Correa, Q. Tribological characterization of different geometries generated with laser surface texturing for tooling applications. Wear 2021, 477, 203856. [Google Scholar] [CrossRef]
  30. Sharma, S.C.; Tomar, A.K. Study on MR fluid hybrid hole-entry spherical journal bearing with micro-grooves. Int. J. Mech. Sci. 2021, 202–203, 106504. [Google Scholar] [CrossRef]
  31. Tomar, A.K.; Sharma, S.C. An investigation into surface texture effect on hole-entry hybrid spherical journal bearing performance. Tribol. Int. 2020, 151, 106417. [Google Scholar] [CrossRef]
  32. Antoszewski, B.; Tarelnyk, V. Laser texturing of sliding surfaces of bearings and pump seals. Appl. Mech. Mater. 2014, 630, 301–307. [Google Scholar] [CrossRef]
  33. Kumar, V.; Sharma, S.C. Influence of dimple geometry and micro-roughness orientation on performance of textured hybrid thrust pad bearing. Meccanica 2018, 53, 3579–3606. [Google Scholar] [CrossRef]
  34. Mishra, S.; Choudhury, A.; Sahu, S. CFD investigation of influences of reverse textures on bearing surface of a journal bearing. J. Appl. Fluid Mech. 2014, 7, 395–399. [Google Scholar]
  35. Khatri, C.B.; Sharma, S.C. Influence of textured surface on the performance of non-recessed hybrid journal bearing operating with non-Newtonian lubricant. Tribol. Int. 2016, 95, 221–235. [Google Scholar] [CrossRef]
  36. Antoszewski, B. Mechanical seals with sliding surface texture—model fluid flow and some aspects of the laser forming of the texture. Procedia Eng. 2012, 39, 51–62. [Google Scholar] [CrossRef] [Green Version]
  37. Etison, I. State of the art in laser surface texturing. J. Tribol. 2005, 127, 248–253. [Google Scholar] [CrossRef]
  38. Etison, I. A laser surface textured hydrostatic mechanical seal. Tribol. Trans. 2002, 45, 430–434. [Google Scholar] [CrossRef]
  39. Bronsztejn, I.N.; Muhlig, H.; Musiol, G.; Siemiendiajew, K.A. Nowoczesne Kompendium Matematyki; Wydawnictwo Naukowe PWN: Warszawa, Poland, 2022. (In Polish) [Google Scholar]
  40. da Silva, W.M.; Suarez, M.P.; Machado, A.R.; Costa, H.L. Effect of laser surface modification on the micro-abrasive wear resistance of coated cemented carbide tools. Wear 2013, 302, 1230–1240. [Google Scholar] [CrossRef]
  41. Antoszewski, B. Properties of Laser and Plasma Modified Sliding Nodes of Friction on the Example of Face Seals; Kielce University of Technology: Kielce, Poland, 1999. (In Polish) [Google Scholar]
  42. Eberhart, J.G.; Horner, S. Bond-energy and surface-energy calculations in metals. J. Chem. Educ. 2010, 87, 608–612. [Google Scholar] [CrossRef]
Figure 1. Lubrication unevenness and its effects: (a) ideal lubrication between mating surfaces, (b) deformation and contact in a non-lubricated spot and (c) insufficient quantity of lubricant for the given load. Where: Q—load, Qg—boundary load on account of the deformation, Wn—lubricating film’s carrying capacity and u—mating surfaces’ travel velocity.
Lubricants 10 00080 g001
Figure 2. Surface texture with a rectangular mesh of recesses.
Lubricants 10 00080 g002
Figure 3. (a) Trajectory of a single point’s travel on a stationary surface and (b) bundle of trajectories.
Lubricants 10 00080 g003
Figure 4. Surface texture with its elements in the shape of grooves.
Lubricants 10 00080 g004
Figure 5. View of textured surface on a SiC ring: (a) group of texture recesses on the ring (degree of blackening 42%, area of 100×), and (b) single recesses on the ring’s surface (area of 500×).
Lubricants 10 00080 g005
Figure 6. View of 3D textured surface on a SiC ring with roughness path measurements.
Lubricants 10 00080 g006
Figure 7. (a) Anton Paar TRB3 Tribometer. Equipment view with SiC textured ring and (b) samples surfaces after TRB3 testing—upper (Test 0°), lower (Test 37°), and vertical test path.
Lubricants 10 00080 g007
Figure 8. Test graphs: (a) friction coefficient values, and (b) wear values.
Lubricants 10 00080 g008
Figure 9. Specimens wear levels after test runs. (a) volumetric ring wear, and (b) exemplary microgeometry of wear trace cross section from Figure 7b.
Lubricants 10 00080 g009
Figure 10. (a)Scheme of a modified T-01M tribological test machine’s friction pair. Q—load, 1—pivot base of the lower head yoke, 2—pivot base, 3—specimen (without texture), 4—counterspecimen, 5—counterspecimen fastening, 6—ball and 7—friction force sensor bumper. (b) T-01M ball-on-ring (modified) view.
Lubricants 10 00080 g010
Figure 11. Variation of the friction force in the test duration function at variable rotation speeds, load of 19.6N for a textured and non-textured SiC sample 3 (Table 3).
Lubricants 10 00080 g011
Table 1. Unevenness DB for angles from θ = 0° to θ = 90°.
θ+0°+1°+2°+3°+4°+5°+6°+7°+8°+9°
18.20.130.280.140.100.400.510.060.060.21
10°0.110.470.141.104.550.090.150.610.400.27
20°1.220.370.100.100.130.290.260.770.420.11
30°0.052.441.700.210.132.600.170.080.130.12
40°0.200.122.430.070.189.290.170.600.320.12
50°0.040.210.230.112.590.130.360.280.780.80
60°0.240.250.950.090.080.530.070.130.091.22
70°1.180.230.110.461.310.064.230.210.130.40
80°0.070.110.130.210.360.070.180.110.140.30
90°18.75---------
Table 2. Ring surface texture parameters.
Recess
Diameter
d [μm]
Distance between the
Recess Symmetry Axles’ Centers
Ca [μm]
Degree of
Blackening Sp [%]
Mutual Distance
between the Recess’ Edges
Ca—d [μm]
Total
Surface Energy
Ep [mJ/m2]
7816218.28460.6
13427917.914563.4
7810642.52856.2
13418341.84955.9
15025627.410656.7
7011927.14955.9
10212849.92658.8
10223315.113160.9
10217426.97256.5
Table 3. Summary of results of the multiple regression analysis for rings with the geometrical parameters specified in Table 1.
Load [N]Sliding Velocity [rpm]Friction TypeAverageFriction Coefficient
f
c0c1
(d)
c2
(γ)
c3
(Ca-d)
c4
(Sp)
Correlation Coefficient Cc
24.5(200)fluid0.120.4439−0.0017−0.0072+0.0013+0.00390.5795
29.4(200)fluid0.100.8588−0.0031−0.0171+0.034+0.00930.8544
24.5(600)mixed0.14−0.543+0.0001+0.0157−0.0018−0.00530.8572
29.4(600)mixed0.12−0.448−0.0010+0.0118−0.0003−0.00020.9062
Publisher’s Note: MDPI stays neutral with regard to jurisdictional claims in published maps and institutional affiliations.