Article

Estimation of Mechanical Properties of Aluminum Alloy Based on Indentation Curve and Projection Area of Contact Zone

College of Materials Science and Engineering, Jilin University, Changchun 130022, China
*
Author to whom correspondence should be addressed.
Metals 2024, 14(5), 576; https://doi.org/10.3390/met14050576
Submission received: 11 April 2024 / Revised: 5 May 2024 / Accepted: 11 May 2024 / Published: 13 May 2024

Abstract

:
This study proposes a method for determining aluminum alloys’ yield stress and hardening index based on indentation experiments and finite element simulations. Firstly, the dimensionless analysis of indentation variables was performed on three different aluminum alloys using the same maximum indentation depth to obtain load-displacement curves. Then, laser confocal microscopy was used to observe the residual indentation morphology. And four dimensionless parameters were derived from the load-displacement curves while another dimensionless parameter was obtained from the projection area of the contact zone. Subsequently, a genetic algorithm was employed to solve these five dimensionless parameters and estimate the yield stress and hardening index. Finally, the predicted results are compared with uniaxial tensile experiments and the results obtained are essentially the same. The yield stress and hardening index can be predicted using this method. And an example is used to verify that this method enables predictions for unidentified “mysterious material” and the expected results agree with the experiments.

1. Introduction

The indentation technique has been developed and widely employed as one of the most universal and practical methods for extracting the mechanical properties of materials. This method can be traced back to 1951 when Tabor [1] used indentation experiments to determine the stress–strain curve of metallic materials. Subsequently, Johnson [2] developed an alternative approach known as the expanding cavity model (ECM). This opened up new possibilities in the field of indentation techniques. With the continuous advancement of technology, there is a growing demand for understanding the mechanical properties of materials, such as hardness [3,4,5,6,7], Young’s modulus [8,9,10,11,12], residual stress [13,14,15,16,17], and plasticity [18,19,20,21,22]. These studies have demonstrated that the mechanical properties of materials can be extracted by comparing the load-displacement curves obtained from finite element simulations with those obtained from experimental measurements when the data are in good agreement.
In recent years, research has focused on accurately obtaining the plastic parameters of materials, particularly the yield strength (σy) and hardening index (n). For example, iterative finite element methods have been used to extract plastic parameters from instrumented indentation data, yielding consistent results with uniaxial testing [23]. Furthermore, with the continuous development of computer processing power, combining optimization algorithms with analysis can provide more accurate results. Mahmoudi et al. [24] employed a genetic algorithm to determine the mechanical properties of yield stress and the work hardening index for various types of steel. They investigated all parameters affecting the indentation test and proposed an equation to obtain material properties accurately without direct observation. Good consistency was observed between the experimental and finite element results. Mohamed Abd Elaziz et al. [25] proposed a method based on micromechanical modeling, finite element simulation, and machine learning to predict the elastic–plastic behavior of Cu-Al2O3 nanocomposite materials. They extensively simulated the finite element model and extracted parameters such as the load-displacement response. Using these parameters, they trained a Random Vector Functional Link (RVFL) machine learning model to predict the yield strength and tangent modulus of the nanocomposite material. Xu et al. [26] used LSTM deep learning to predict the relationship between the P-h curve and the stress–strain response of metal coating materials. Wang et al. [27] used an artificial neural network (ANN) model with adjustable hyperparameters to establish a forward relationship between the plasticity parameters and indentation load-displacement snapshots. The parameter identification problem was solved using an “interior point” constraint optimization algorithm. The sensitivity of the numerical results to experimental uncertainty was analyzed, and the error range of the experimental data was determined. A portable indentation device was investigated by A. H. Mahmoudi for extracting the p-h curve. [28] Subsequently, a fuzzy neural network was employed to determine the residual stress and plastic mechanical properties of the material. The performance accuracy of machine learning and Kriging models were compared. It was validated that the supervised machine learning algorithm, kNN, slightly outperformed the general Kriging model. Guan et al. [29] conducted an investigation into the mechanical properties of steel using an instrumented indentation test with simulated annealing particle swarm optimization. Nima Noii et al. [30] combined nonlinear optimization formulas with finite element analysis to characterize the properties of elastoplastic coating materials. They employed a global optimization approach by perturbing the first-best solution to achieve the desired tolerance value. Sun et al. [31] utilized different optimization techniques to extract elastic–plastic material properties from experimental indentation tests. Three numerical optimization techniques were applied with finite element analysis (FEA) and the optimization solutions were compared with corresponding experimental test data. The applicability and limitations of the finite element (FE) and optimization techniques were evaluated. However, in indentation techniques, the existence of a solution requires a unique indentation response for a given material. In other words, a one-to-one correspondence between the load-displacement curve and the elastic–plastic behavior. However, the study by [32] demonstrated that materials with different plastic properties could have identical load-displacement curves when the indenter tip angle is fixed. This indicates that the uniqueness cannot be determined solely based on the load-displacement curve. Therefore, it is necessary to introduce a new parameter independent of the load-displacement curve.
After unloading in indentation experiments, the residual indentation imprint is considered an important parameter. Wu et al. [33] proposed a novel inverse calculation method to estimate the elastic–plastic properties of metallic materials using only the residual imprint from a spherical indentation. This method does not require the knowledge of the entire loading history, and the experiment can be performed on a hardness tester. At the same time, the residual imprint can be measured using a three-dimensionless laser microscope. Kalidindi et al. [34] addressed the inverse problem of measuring intrinsic material properties from spherical indentations. They employed finite element simulations of spherical indentations using a spherical indenter and developed efficient surrogate models. Bayesian frameworks were used to extract constitutive parameters. Moreover, considering both the load-displacement curve and residual indentation imprint leads to more accurate results. For instance, Wang [35] proposed an inversion method for measuring the elastic–plastic properties of metallic materials using spherical indentation experiments. The elastic–plastic parameters are correlated with the subspace coordinates of the indentation imprint through proper orthogonal decomposition (POD). A statistical Bayesian framework was utilized to address the inverse identification problem of material properties. Trevor William Clyne [36] conducted research where the profile of an indentation made by a spherical indenter is used as the target result for inverse finite element method (FEM) modeling tests. This approach involves iteratively adjusting the parameters of the constitutive plasticity law in the model until the simulated indentation profile best fits the experimental profile. Through this iterative process, a set of parameter values that provide the best fit to the measured indentation profile is converged upon, thereby characterizing the material’s plastic behavior. This technique is a powerful tool for determining the mechanical properties of materials without requiring extensive material testing, as it relies on computational modeling to extract material properties from an indentation experiment. Kim et al. [37] proposed a method for assessing the elastic limit and strain hardening exponent through a single spherical indentation test. This method relies on finite element (FE) analysis and regression analysis to associate indentation data with plastic properties, extracting plastic properties from the radial displacement field and the vertical profile of residual indentations. Ohmura et al. [38] used the load-displacement curve and pile-up topography of a single Berkovich indentation. By applying the principle of equivalent energy, they derived the relationship between the load-displacement curve and the stress–strain curve. They determined an approximate pile-up height equation using the elastic and plastic limits. Based on these fundamental equations, the yield stress and strain hardening index were estimated from the hardness and pile-up height obtained from a single indentation. Sun et al. [39] proposed a reverse analysis method based on a multi-objective function (MOF) optimization model. This model seeks the combination of material properties (the Young’s modulus, yield stress, and strain hardening index) that best fit the experimental load-displacement (P-h) curve and the residual indentation pile-up profile measured using atomic force microscopy. Therefore, in indentation experiments, the influence of the load-displacement curve on plastic properties and the residual indentation imprint are considered to determine the uniqueness of the material.
In the previous studies conducted so far, most research on residual indentation morphology has required complex methods and formulas. Furthermore, there is a lack of reported methods for conducting dimensionless analysis using the parameters of the load-displacement curve and the projection area of the contact zone. Therefore, a method based on the indentation curve and the projection area of the contact zone is proposed to determine the yield stress and hardening exponent: (1) Analyze the intrinsic relationship between aluminum alloy plastic parameters and the nanoscale indentation mechanical response. (2) Investigate the influence of the yield stress and hardening exponent on the parameters of the load-displacement curve and the contact area projection through experimental and finite element simulation studies. (3) Establish a dimensionless equation between the indentation mechanical response and aluminum alloy plastic parameters using dimensional analysis and solve it using a genetic algorithm. (4) Finally, apply this program to identify random materials and “mystery materials” to validate the accuracy of the program.

2. Materials and Methods

2.1. Projection Methodology

The program flow is illustrated in Figure 1. Five parameters were extracted from the P-h curve using fitting, differentiation, and integration methods. The contact area of the contact region was characterized using the field variable CSTATUS in ABAQUS. These parameters were then subjected to dimensionless analysis to obtain five corresponding equations. The plastic parameters of the respective materials can be obtained by solving these equations. In addition to using conventional methods, optimization algorithms can also be employed for more convenient parameter estimation.

2.2. Experiment Process

The present study investigates three commonly used aluminum alloys in engineering: 5052, 6061, and 7075. The material compositions are listed in Table 1. The selection of 7075, 6061, and 5052 aluminum alloys stems from their significant differences in chemical composition and their common usage in engineering. Consequently, these three aluminum alloys are chosen as the experimental group to validate the accuracy of the simulation program.
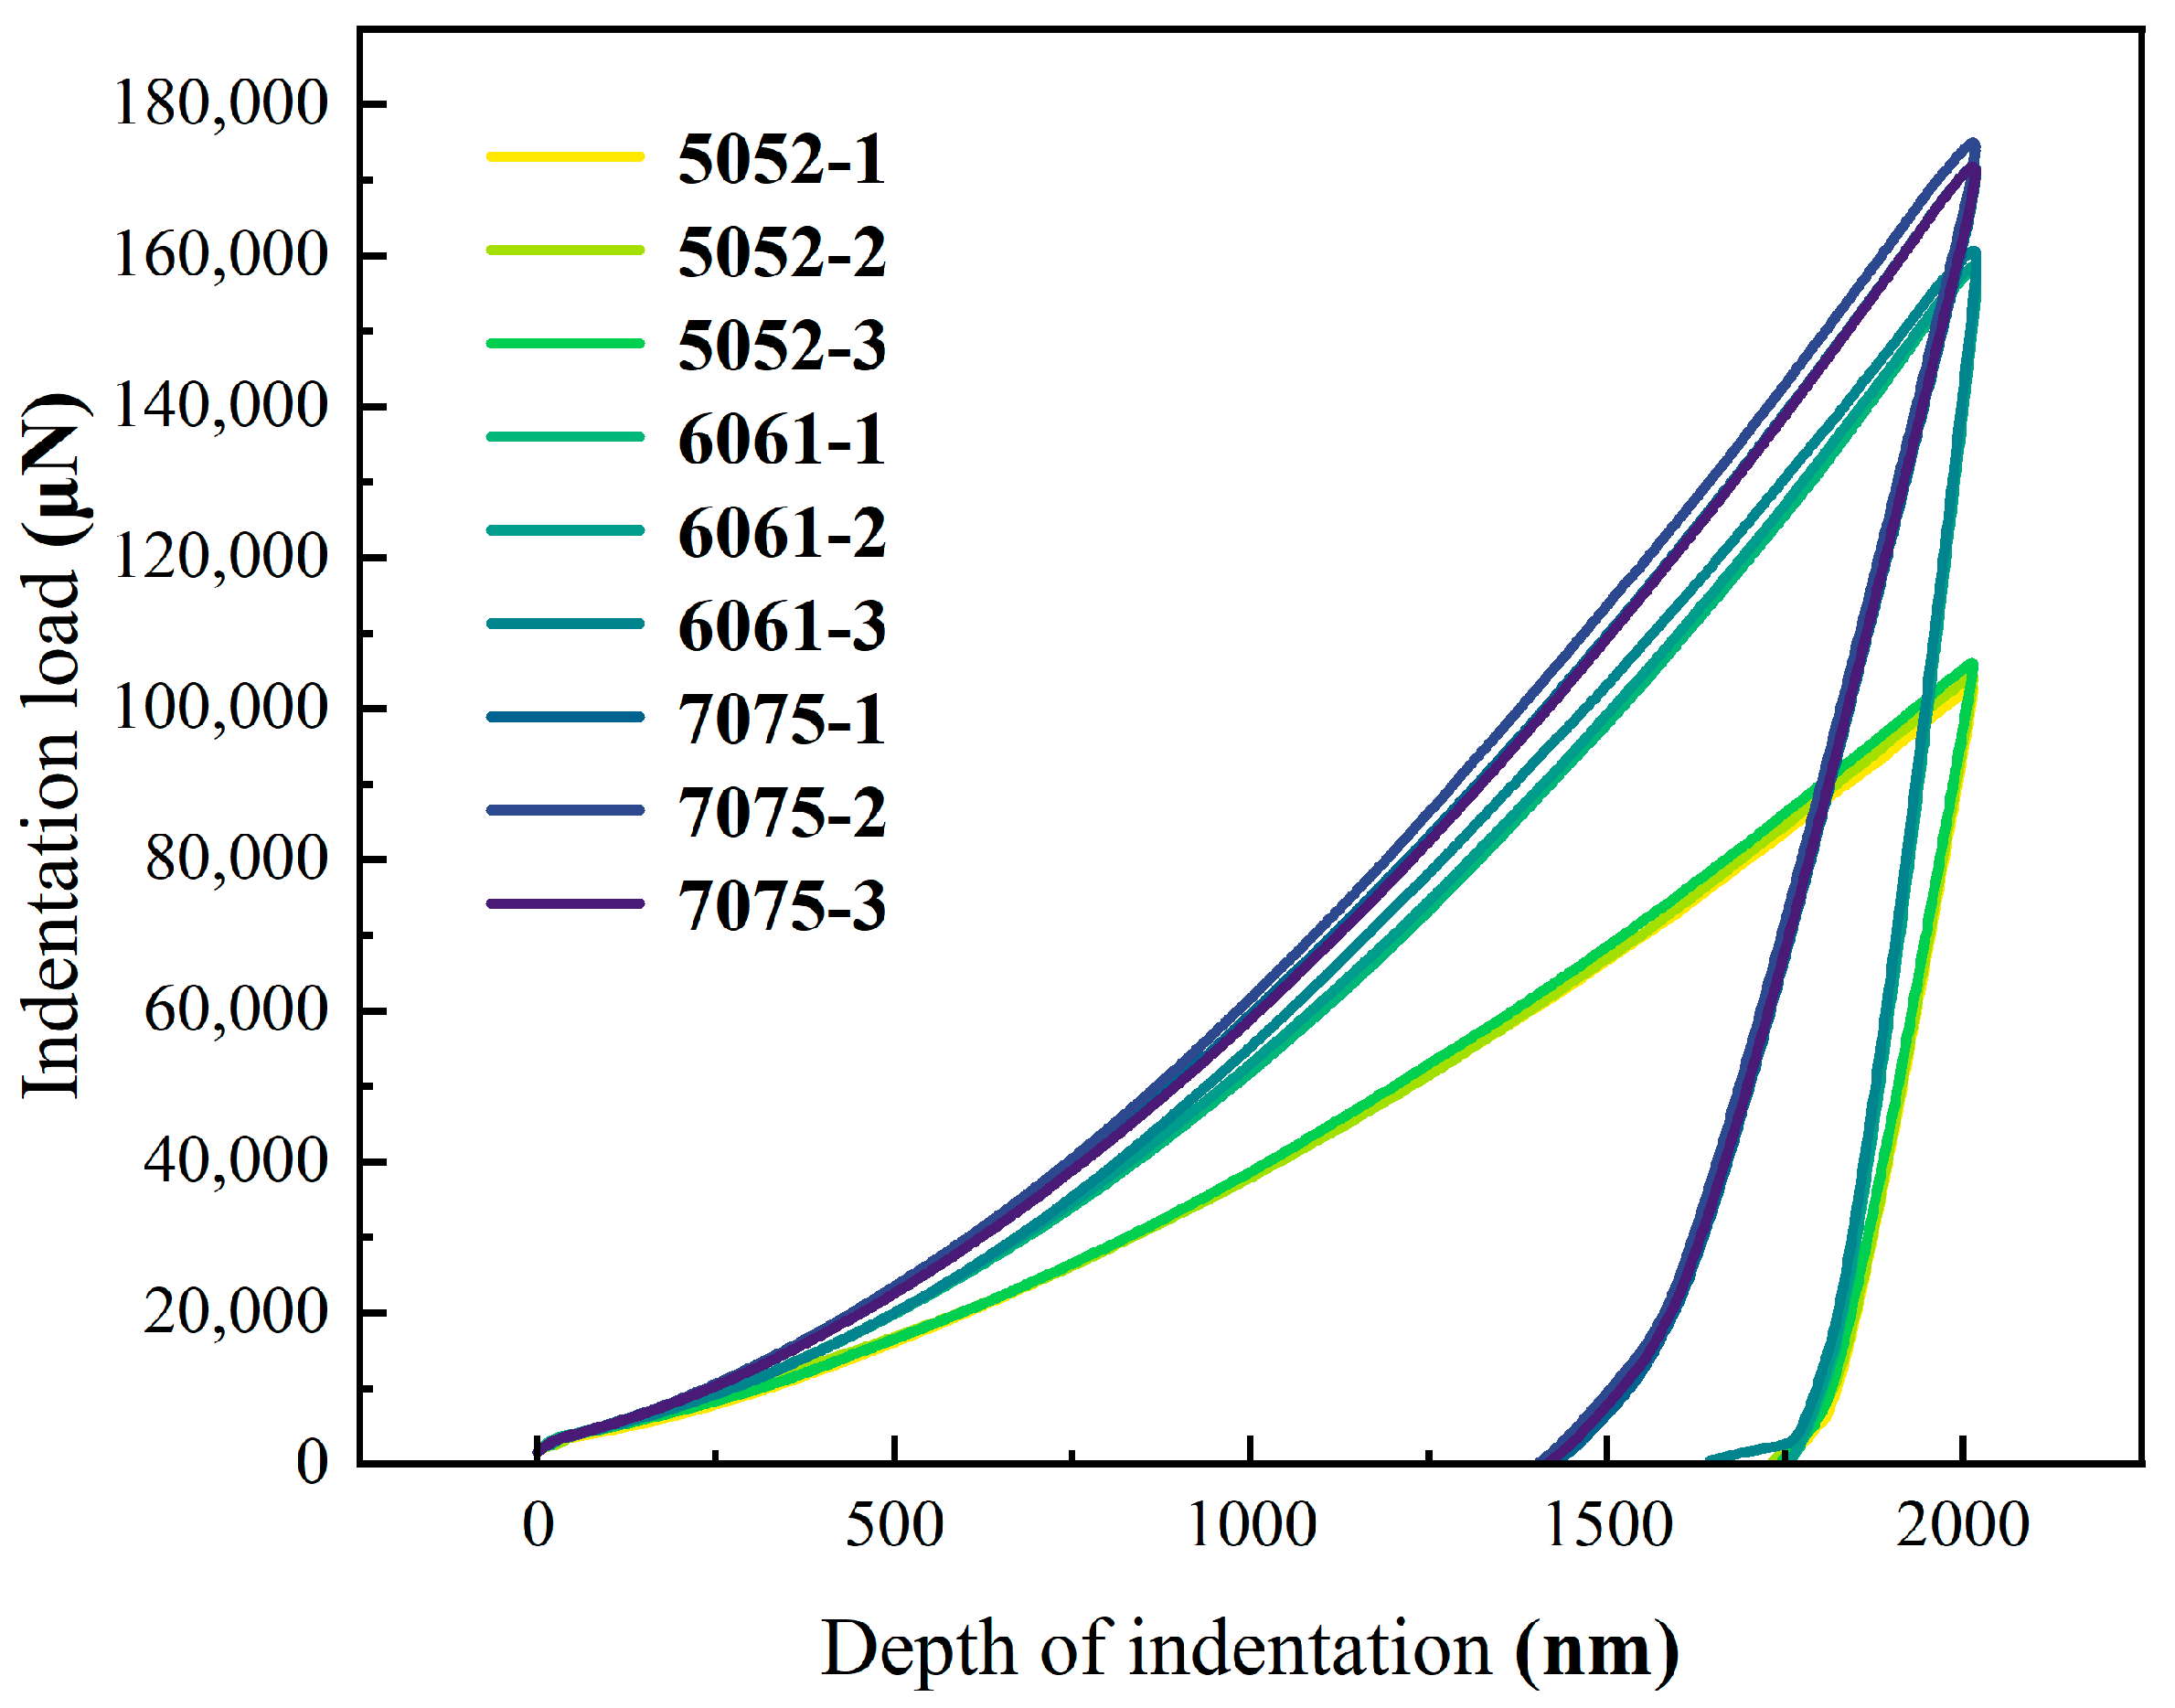
Nanoscale indentation tests were conducted on three aluminum alloys, namely 5052 aluminum alloy, 6061 aluminum alloy, and 7075 aluminum alloy, using a Berkovich indenter at room temperature. The specimens used for the tests had dimensions of 10 mm × 10 mm × 5 mm (length × width × height). Prior to the indentation experiments, the surfaces were polished to ensure smoothness. The maximum indentation depth was set at 2 μm. Each specimen underwent three indentation tests to obtain accurate P-h curves, as shown in Figure 2.
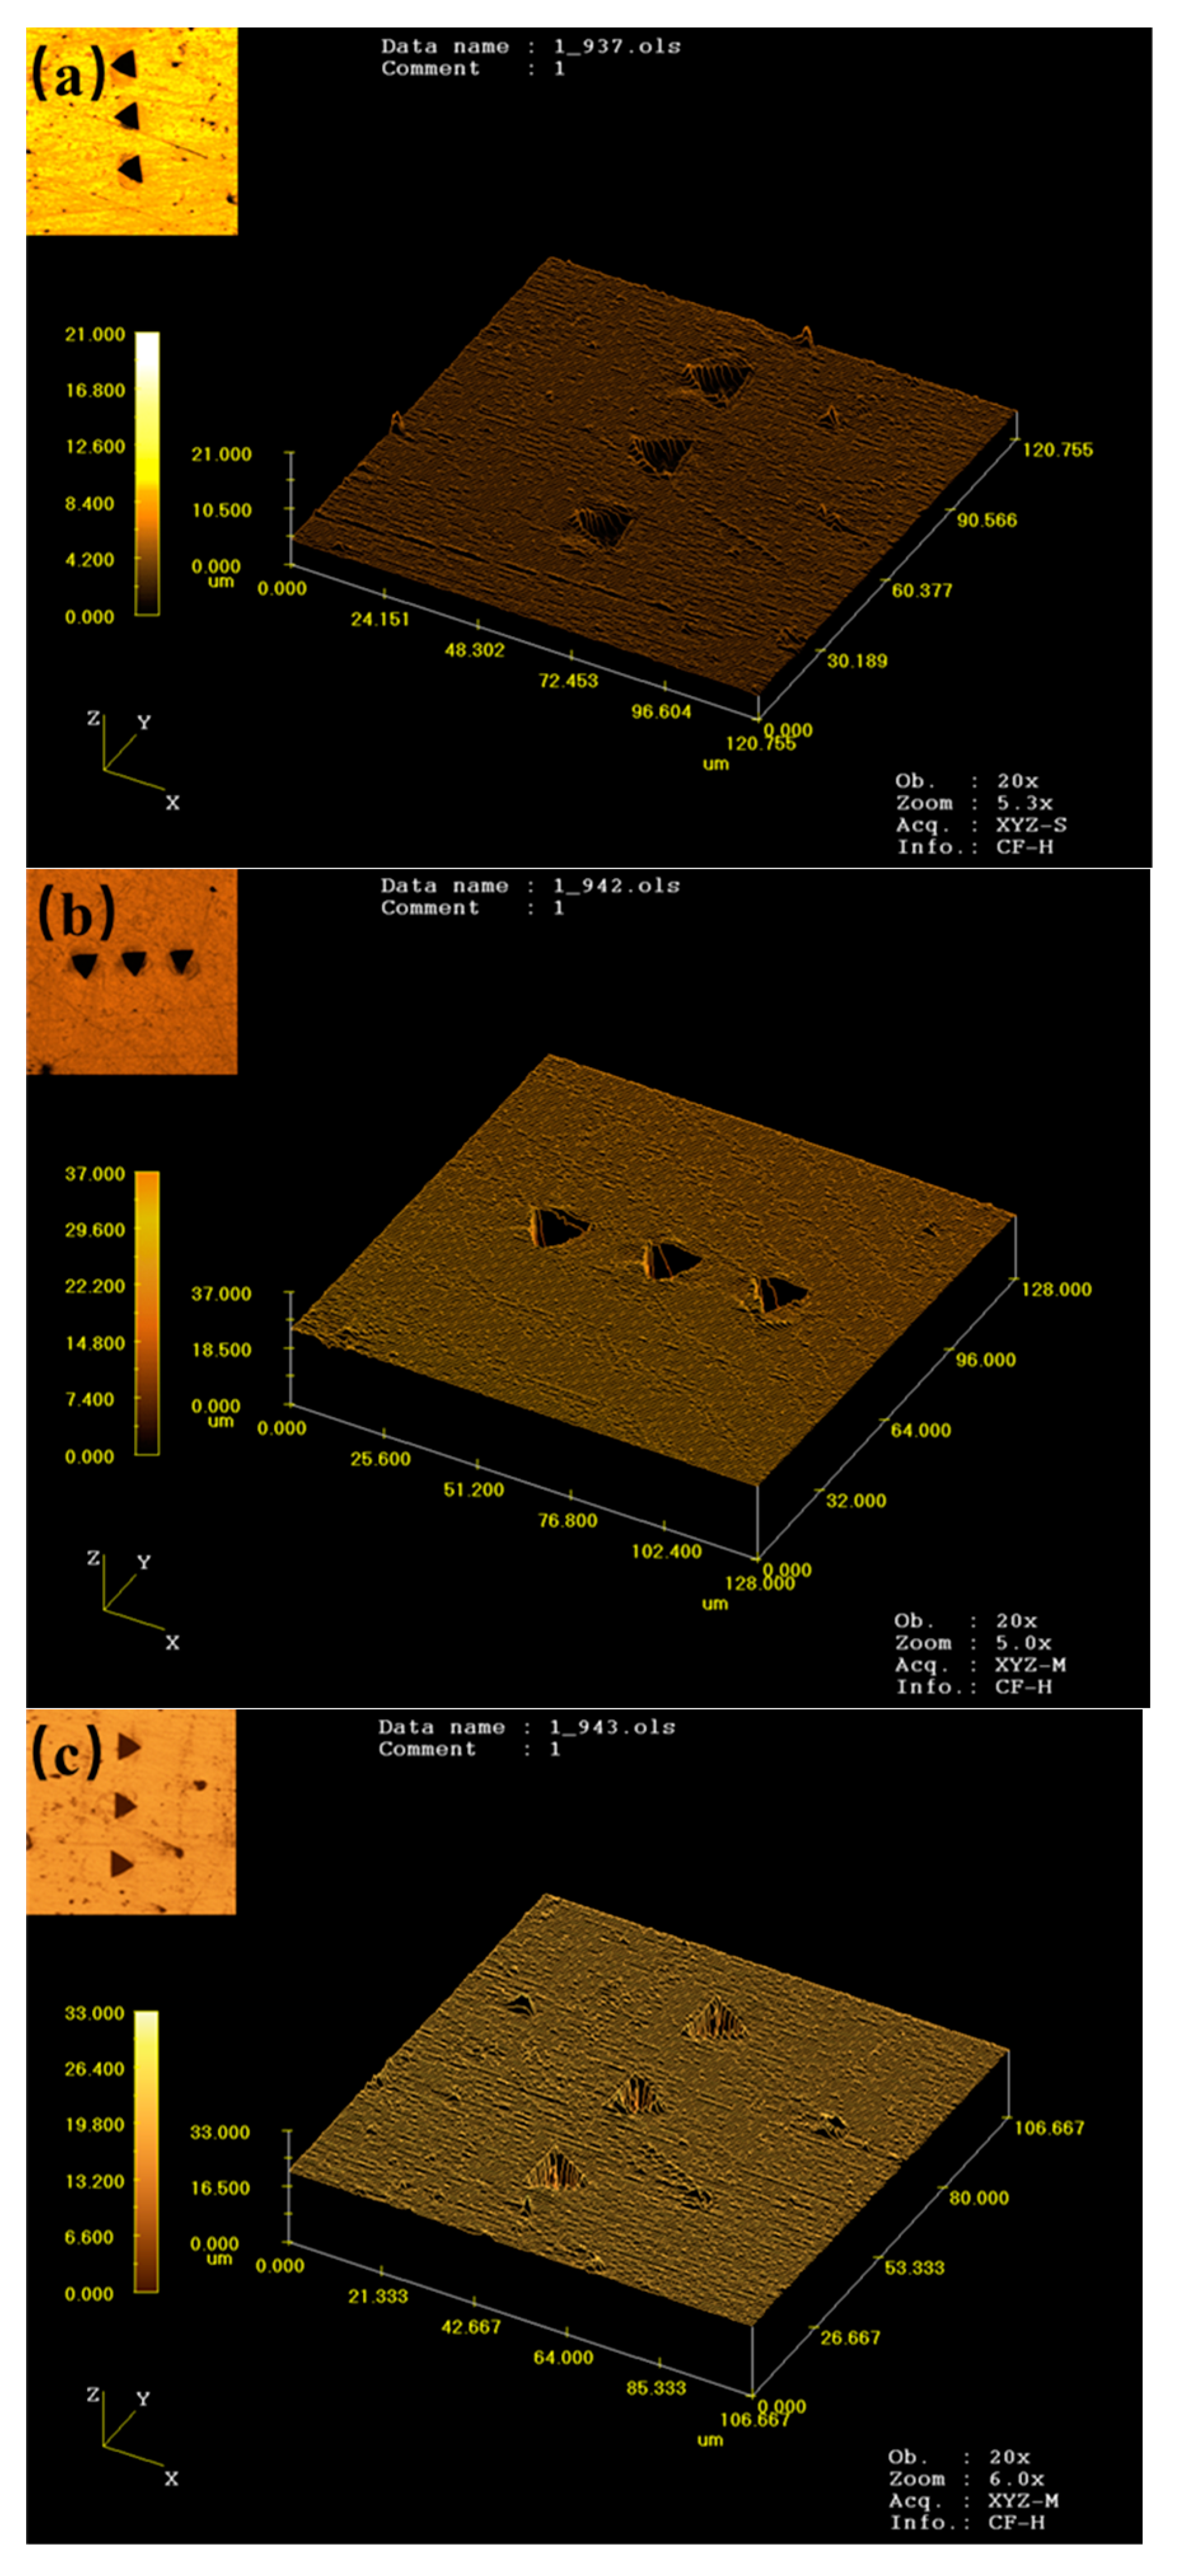
Figure 3 displays the residual imprints of the three aluminum alloys obtained through laser confocal microscopy measurements.
Uniaxial tensile tests were also conducted on the 5052 aluminum alloy, 6061 aluminum alloy, and 7075 aluminum alloy at room temperature to obtain stress–strain data. Three standard flat tensile test specimens were manufactured for each material using wire cutting (wire electrical discharge machining). The stress–strain curves obtained from the uniaxial experiments were fitted using Hooke’s hardening law. The results are presented in Table 2.

2.3. Finite Element Simulation

The stress–strain curves of aluminum alloy can generally be fitted using Hollomon’s power hardening law, as shown in Equation (1).
σ = E ε , ε σ y E K ε n , ε > σ y E
where σy is the yield stress, n is the work hardening index, and K = Enσy1−n.
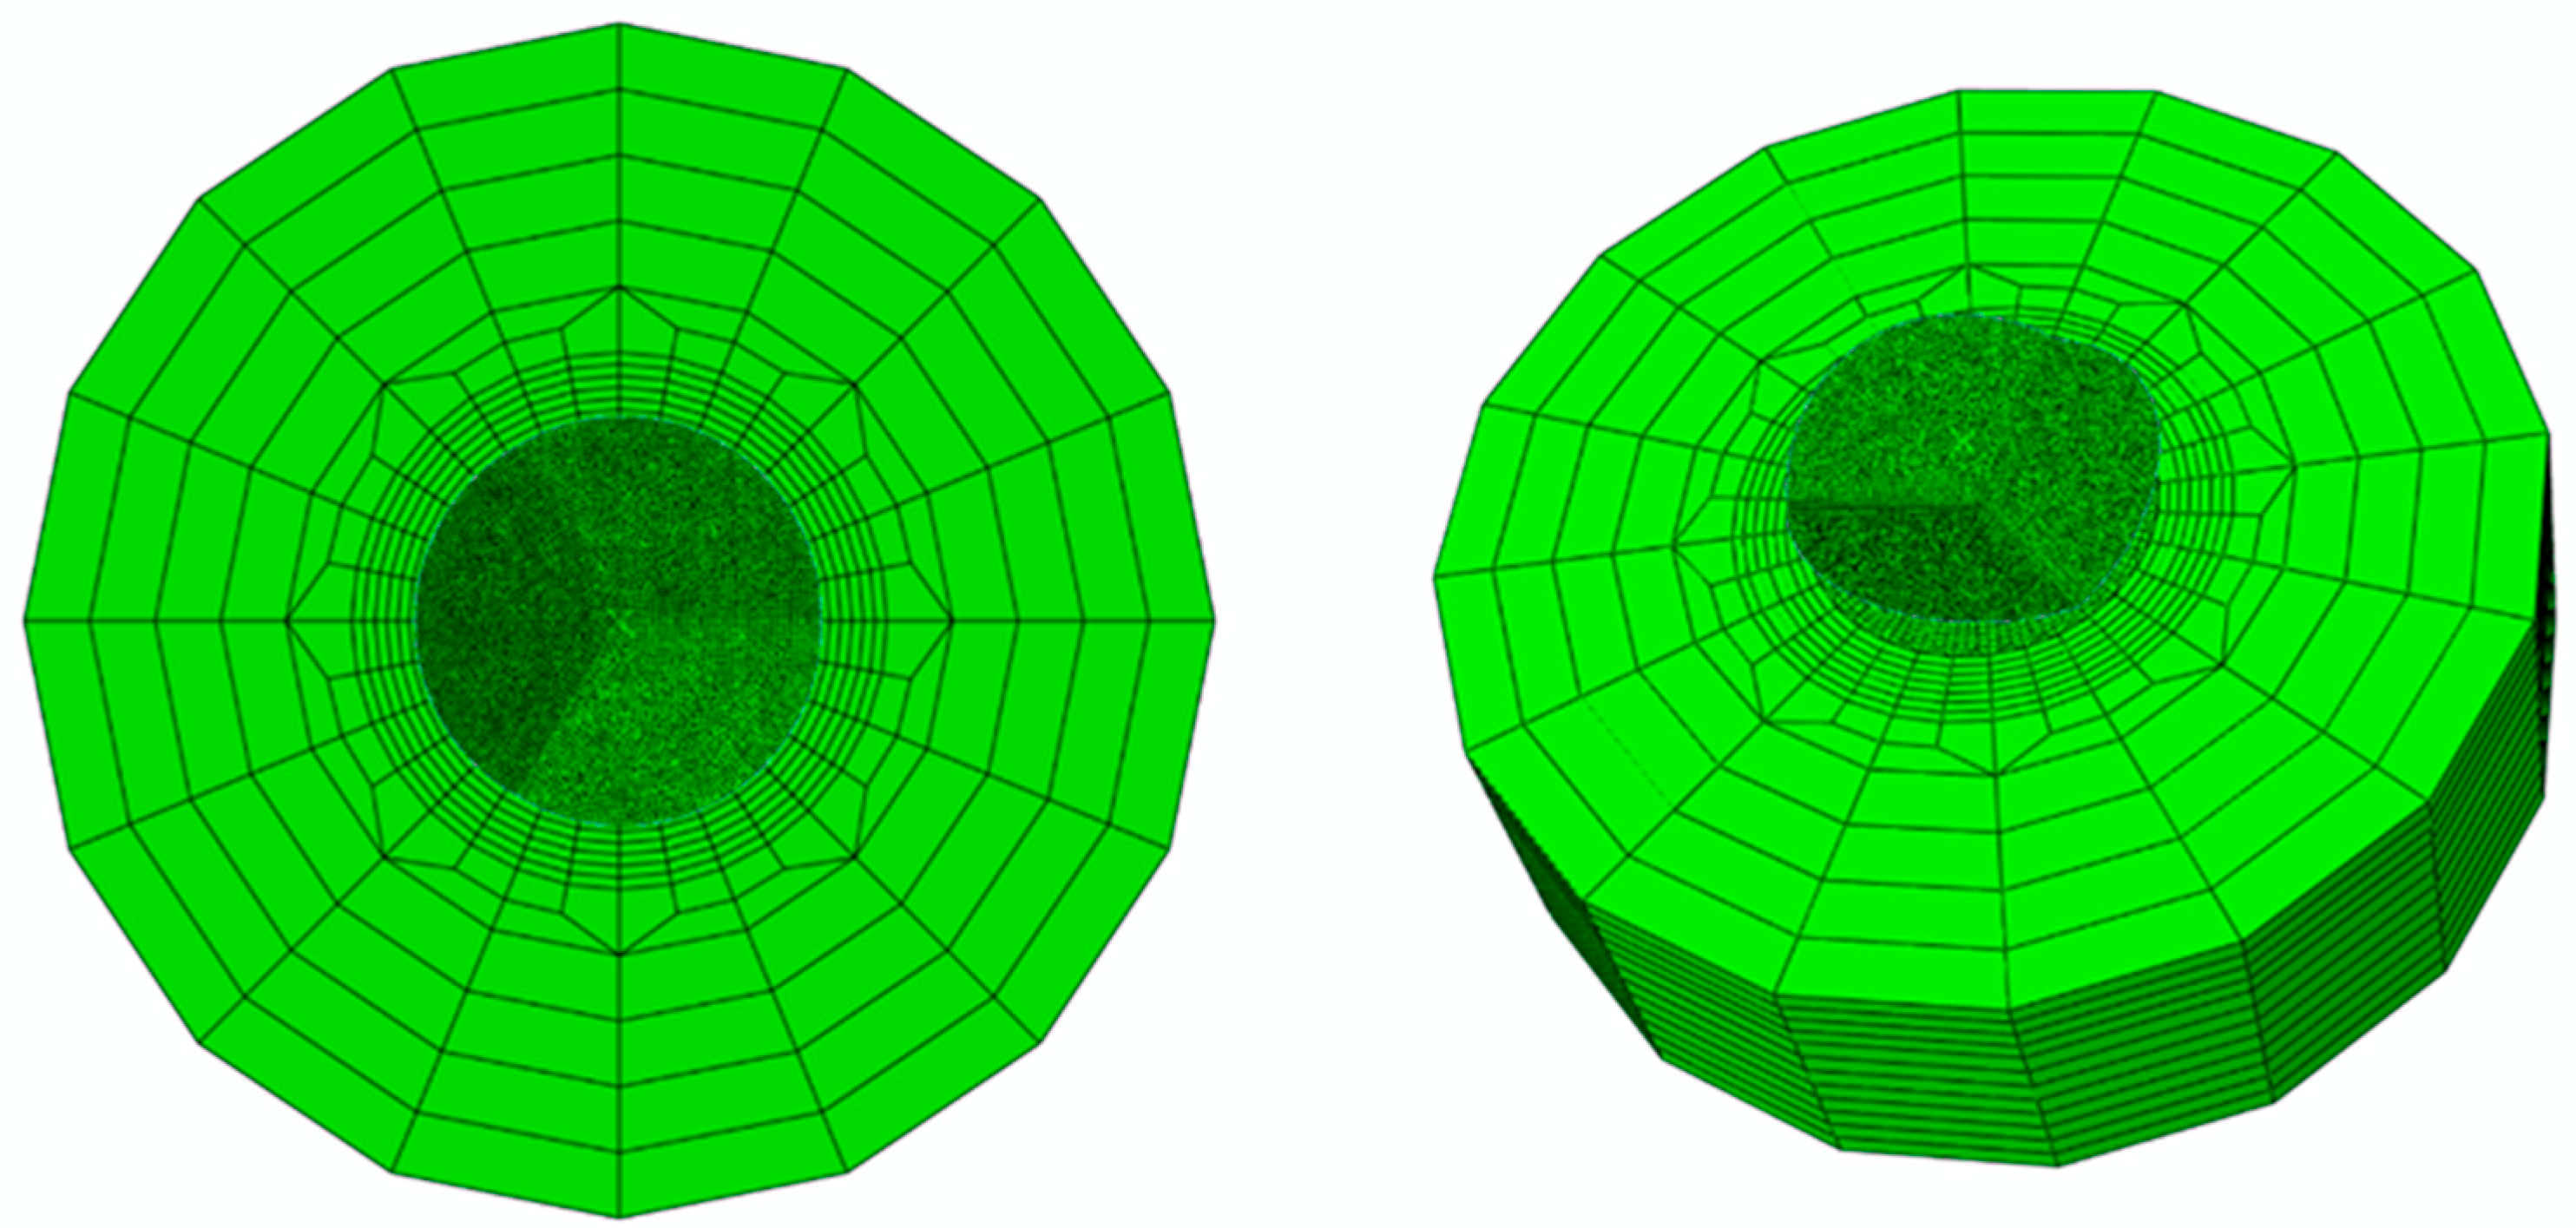
Finite element simulations of the indentation tests were performed using the commercial software ABAQUS (6.14). Figure 4 illustrates the finite element model of the indentation test. A three-dimensionless rigid indenter and a three-dimensionless deformable sample were modeled. The contact region below the indenter was meshed with a fine mesh with a minimum element size of 0.03 μm. The model was divided into 34,464 C3D8 elements.
The bottom surface of the specimen was fully fixed, and the maximum indentation depth was set to 2 μm to match the experimental conditions. Loading and unloading processes were simulated using static general analysis steps, approximating a quasi-static behavior. Isotropic hardening was assumed and a Poisson’s ratio of 0.3, a typical value for most metals, was assigned. Additionally, a node set was created on the surface of the specimen to utilize the contact area characterization through the field variable CSTATUS in Abaqus. The CSTATUS field variable in Abaqus/Standard represents the contact area between the indenter and the material. With the assistance of image analysis software, the projected area can be easily calculated.
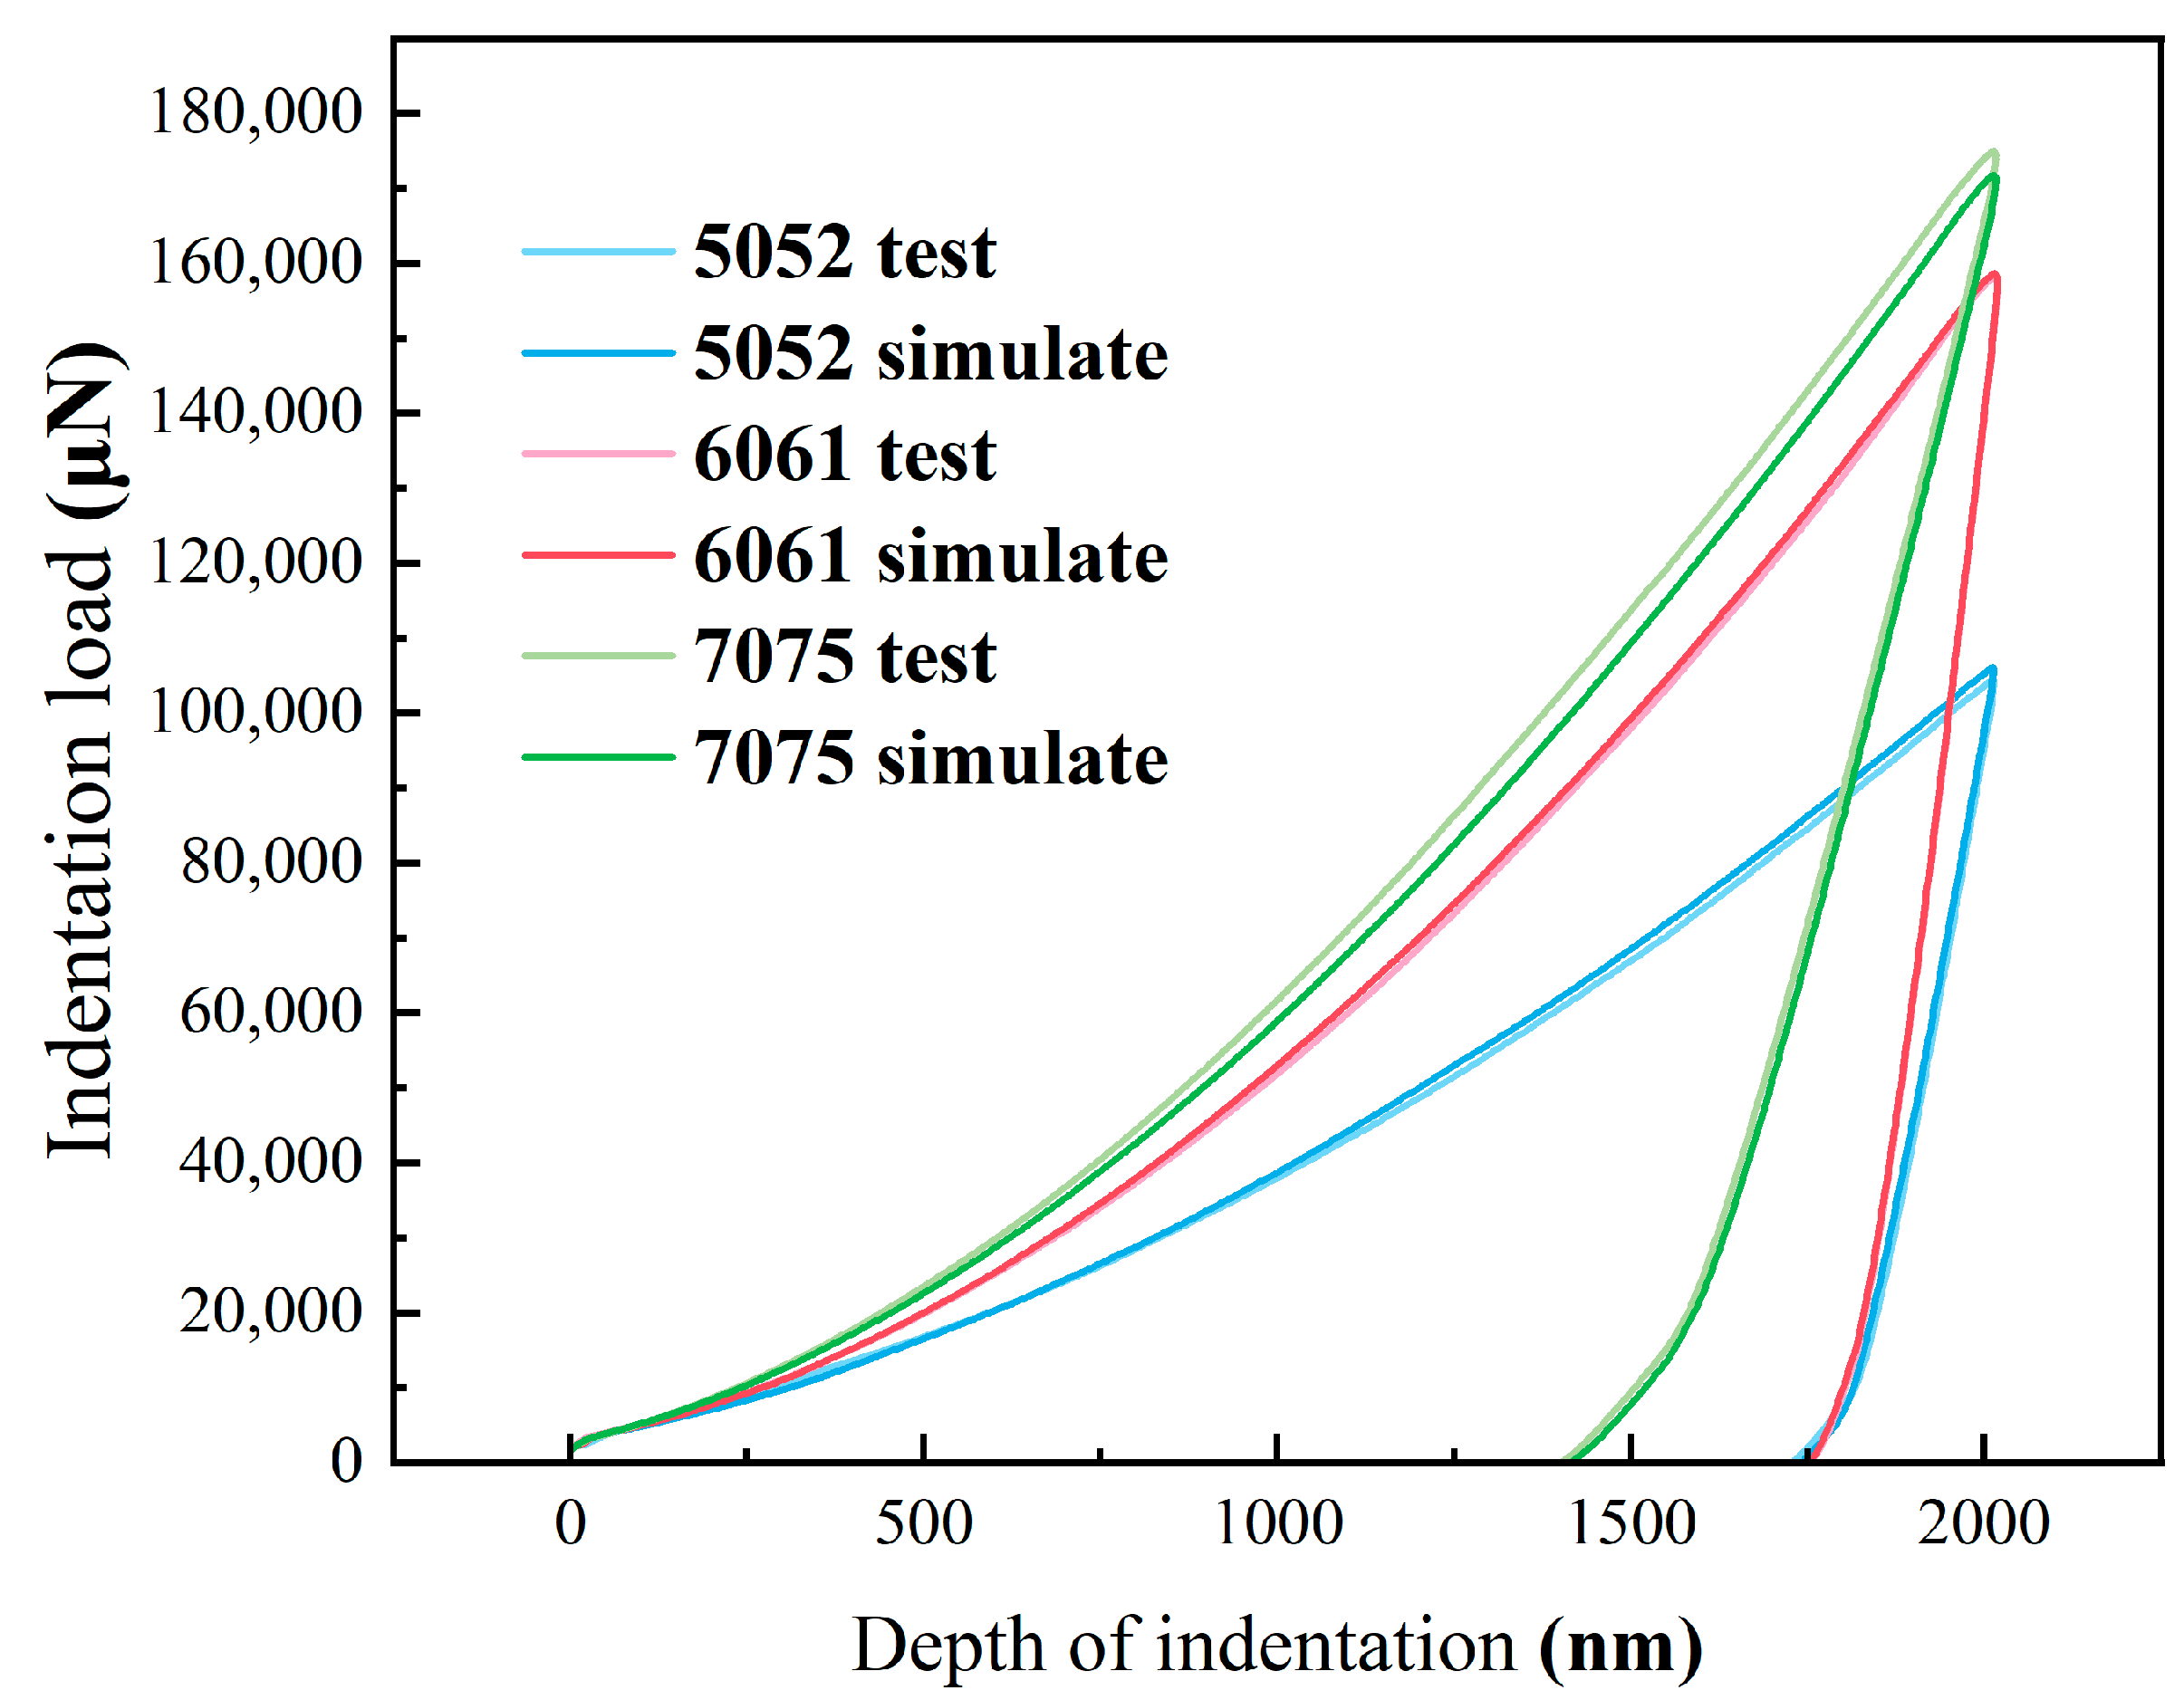
To obtain the yield stress σy and hardening index n, 84 finite element simulations were performed. Most aluminum alloys have an elastic modulus of 70 GPa, a hardening index ranging from 0 to 0.5, and a yield strength generally below 1000 MPa. Therefore, in the simulation, we fixed the elastic modulus at 70 GPa and considered hardening indices of 0, 0.1, 0.2, 0.3, 0.4, and 0.5, as well as yield strengths of 10, 30, 50, 70, 100, 200, 300, 400, 500, 600, 700, 800, 900, and 1000 MPa. To validate the accuracy of the finite element simulation results, the simulated P-h curves for the three aluminum alloys were compared with the experimental results obtained based on the yield stress and hardening index from Table 1, as shown in Figure 5. It can be observed that the experimental and simulated results exhibit good agreement, confirming the accuracy of the finite element simulation.

3. Results and Discussion

3.1. Indentation Mechanical Response

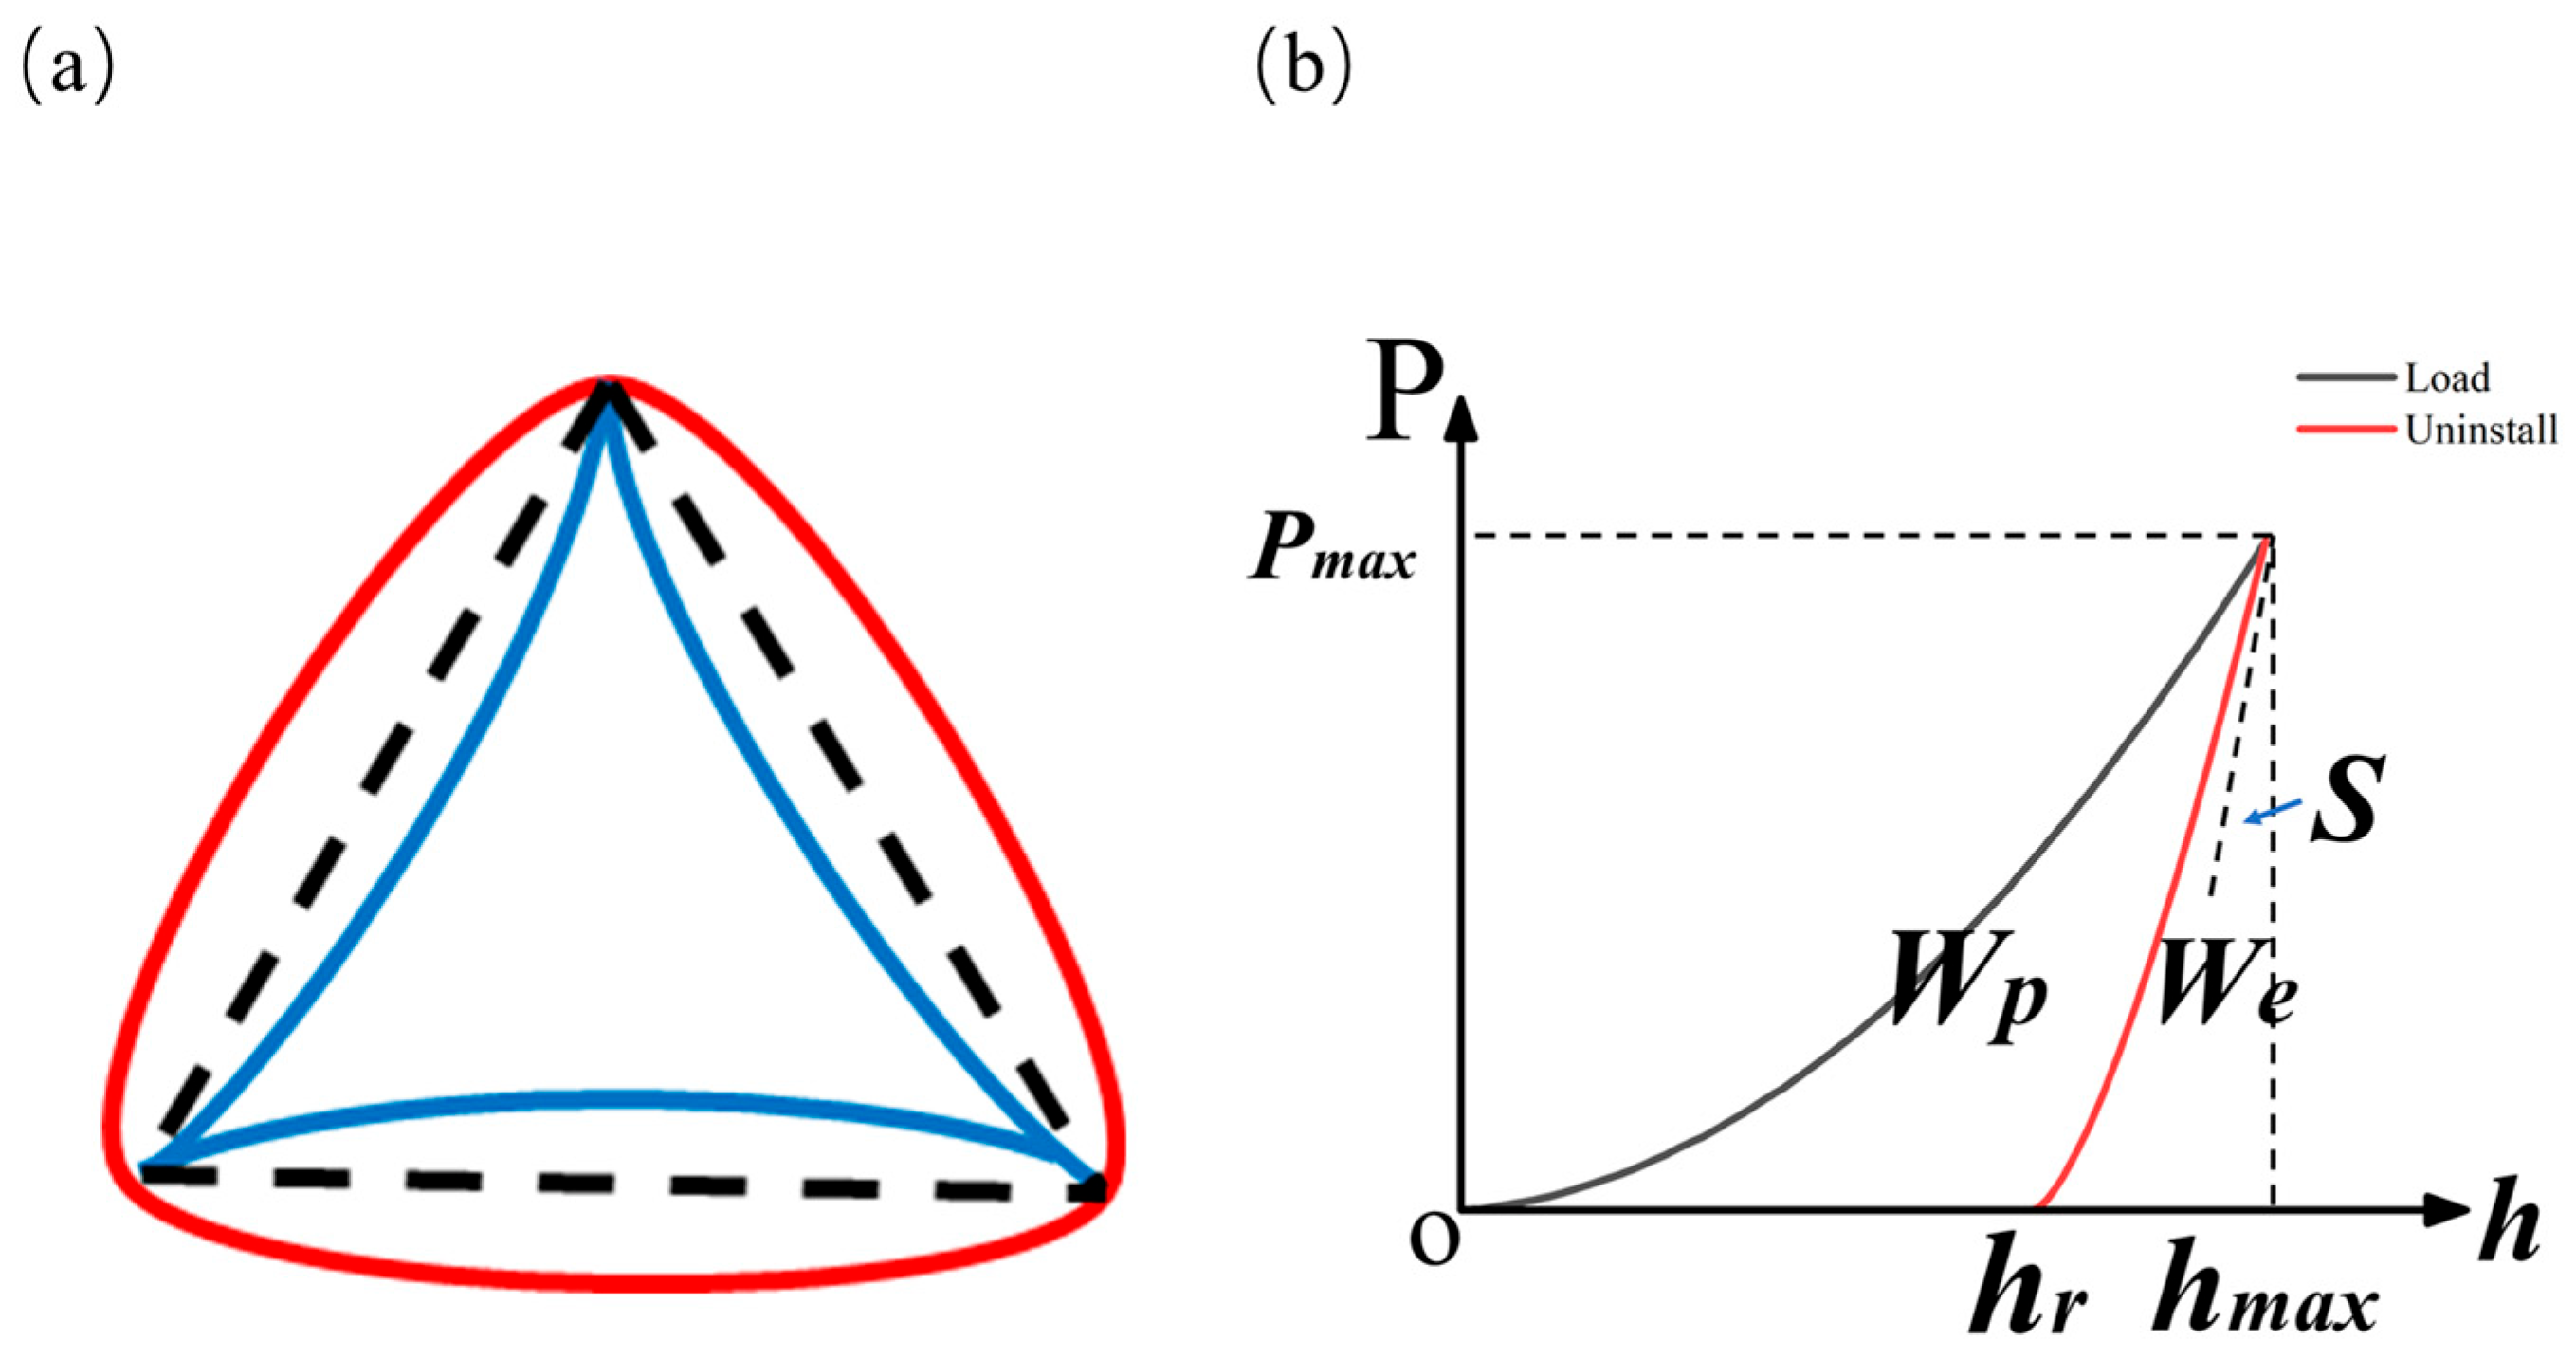
Here, we study the parameters obtained from the P-h curve and the parameters of the projection area of the contact area and make a dimensionless analysis. For materials exhibiting elastic–plastic behavior, such as metals and alloys, the residual indentation shapes produced by Berkovich indentation are distinctive, as illustrated in Figure 6a. Figure 6b illustrates the parameters that can be analyzed from the P-h curve. Pmax represents the maximum indentation load, hmax represents the maximum indentation depth, hr represents the residual indentation depth, Wt = We + Wp represents the total work done by the indenter, We represents the elastic work, Wp represents the plastic work, and S represents the contact stiffness of the indenter S = dP/dh.

3.2. Extraction of Parameters from P-h Curves for Dimensionless Analysis

3.2.1. Parameters Obtained from the Load-Displacement Curve

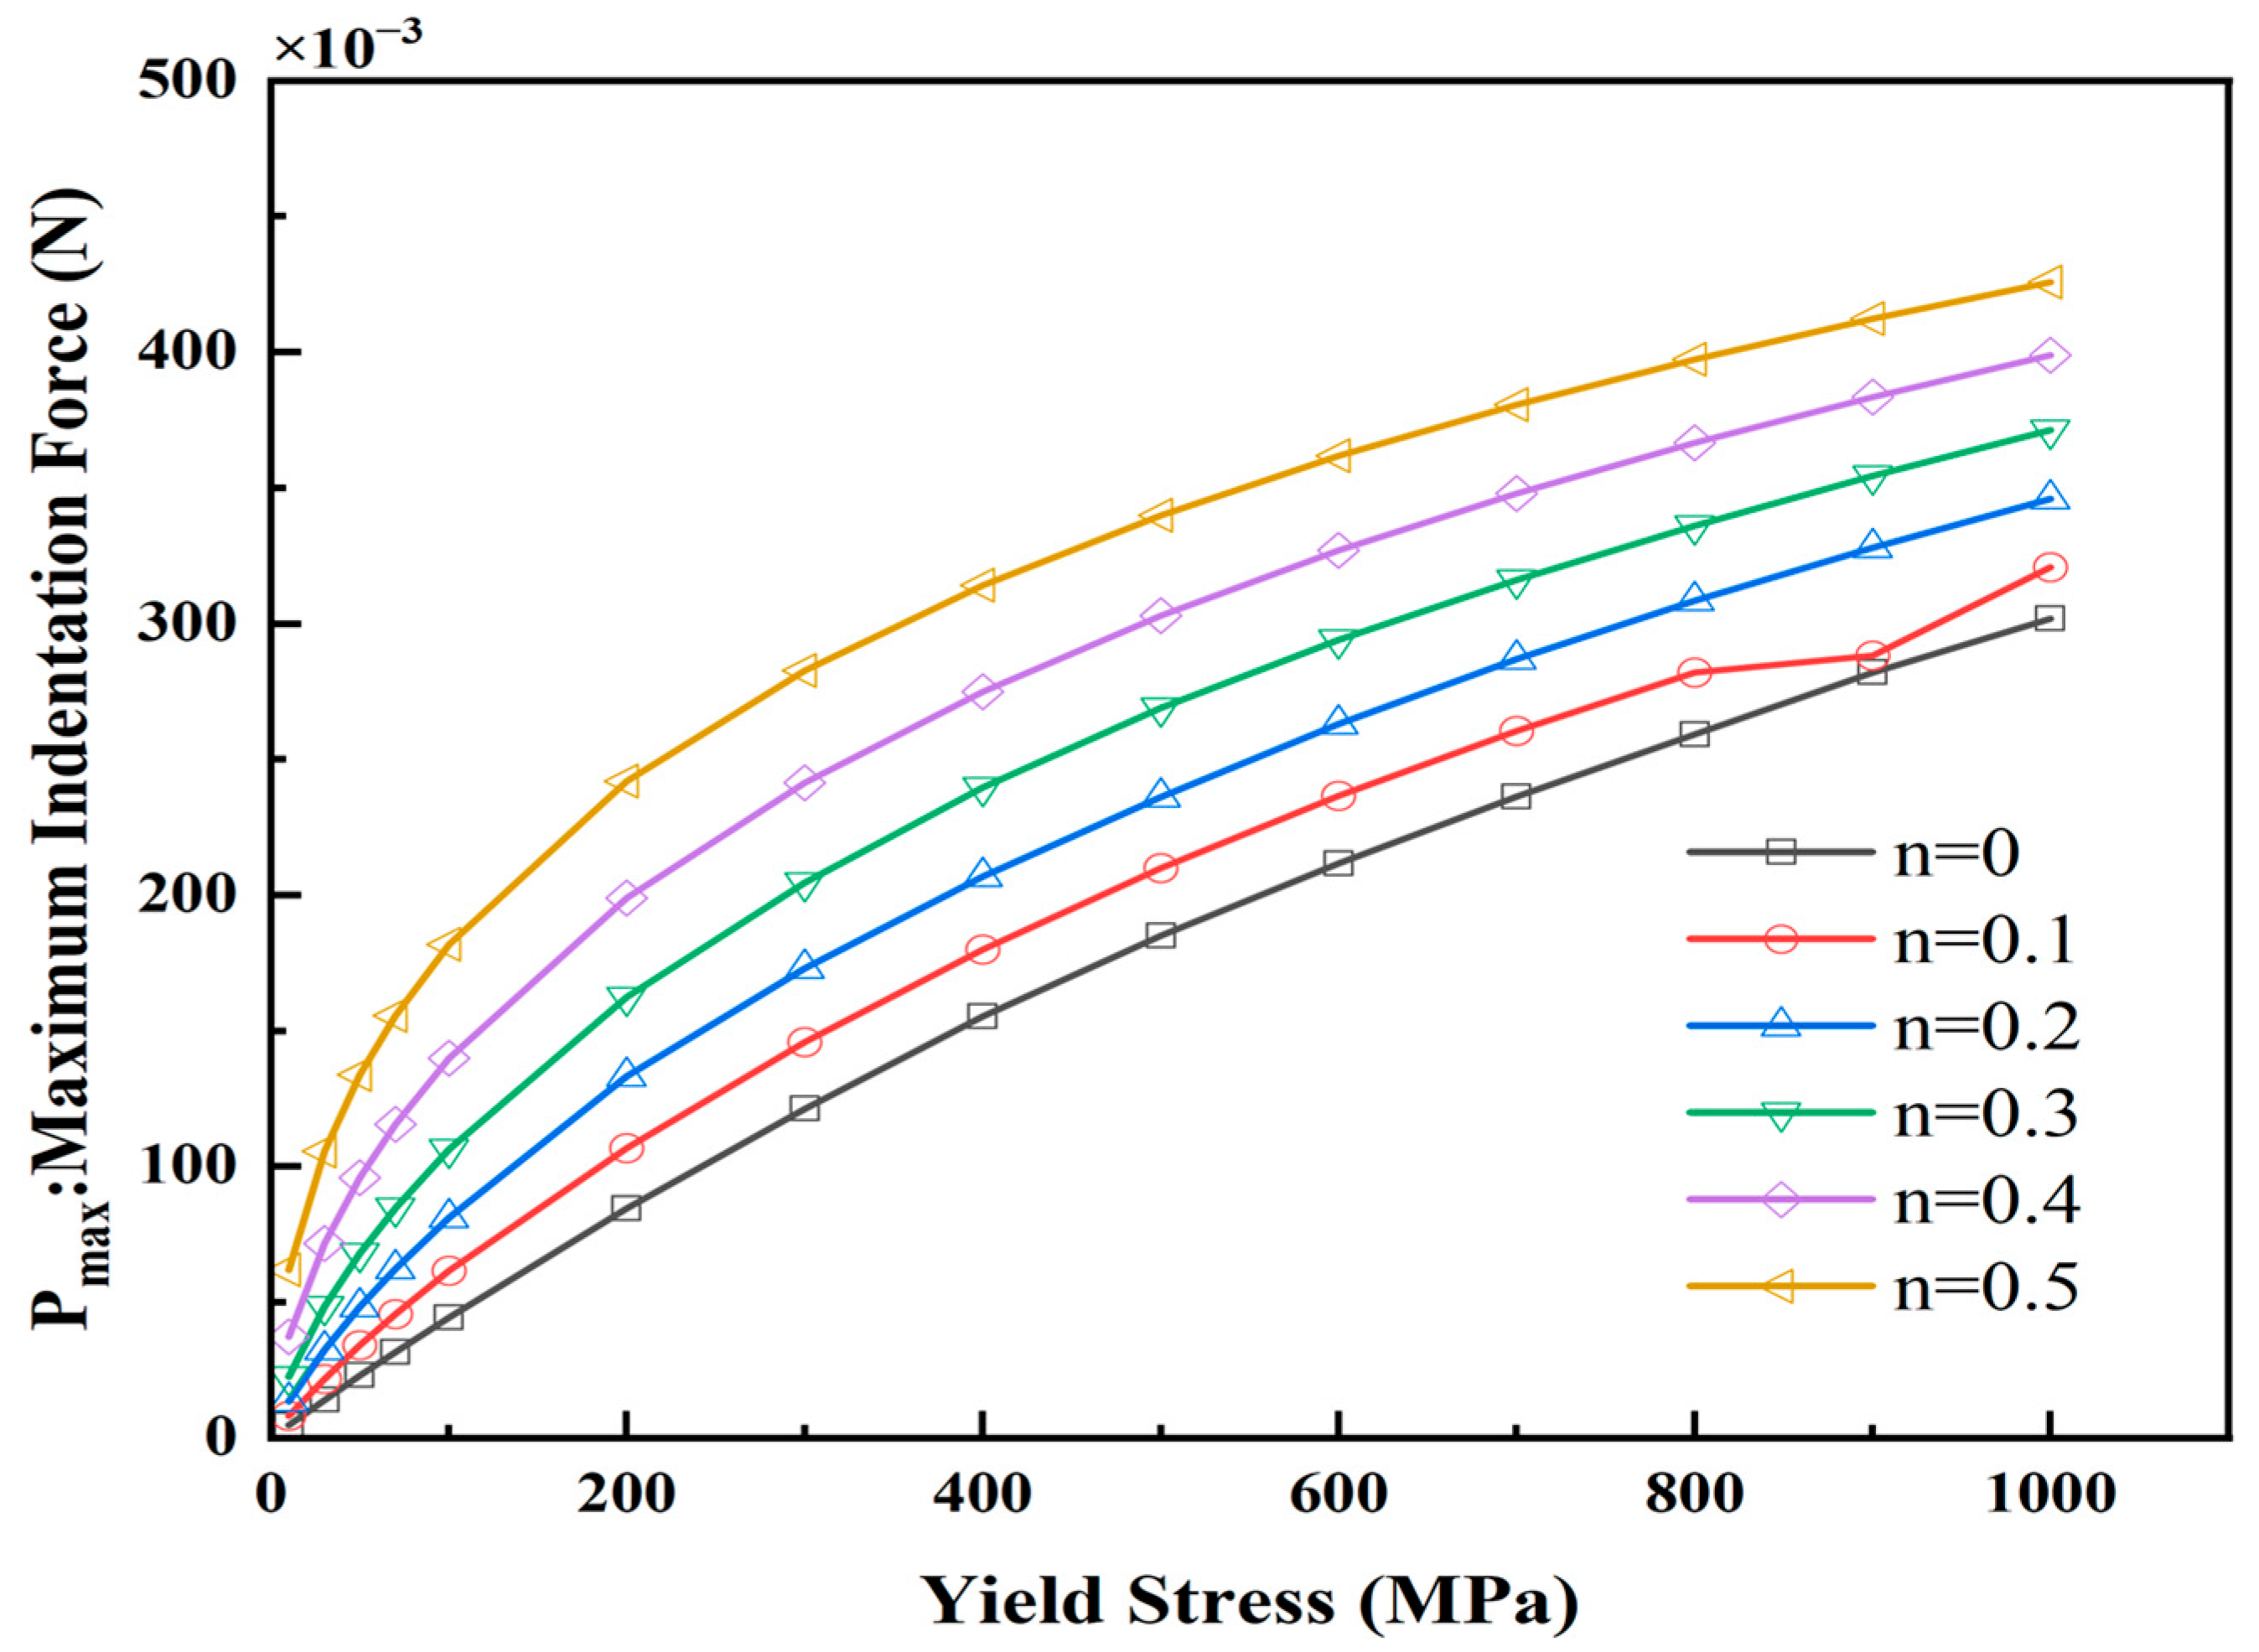
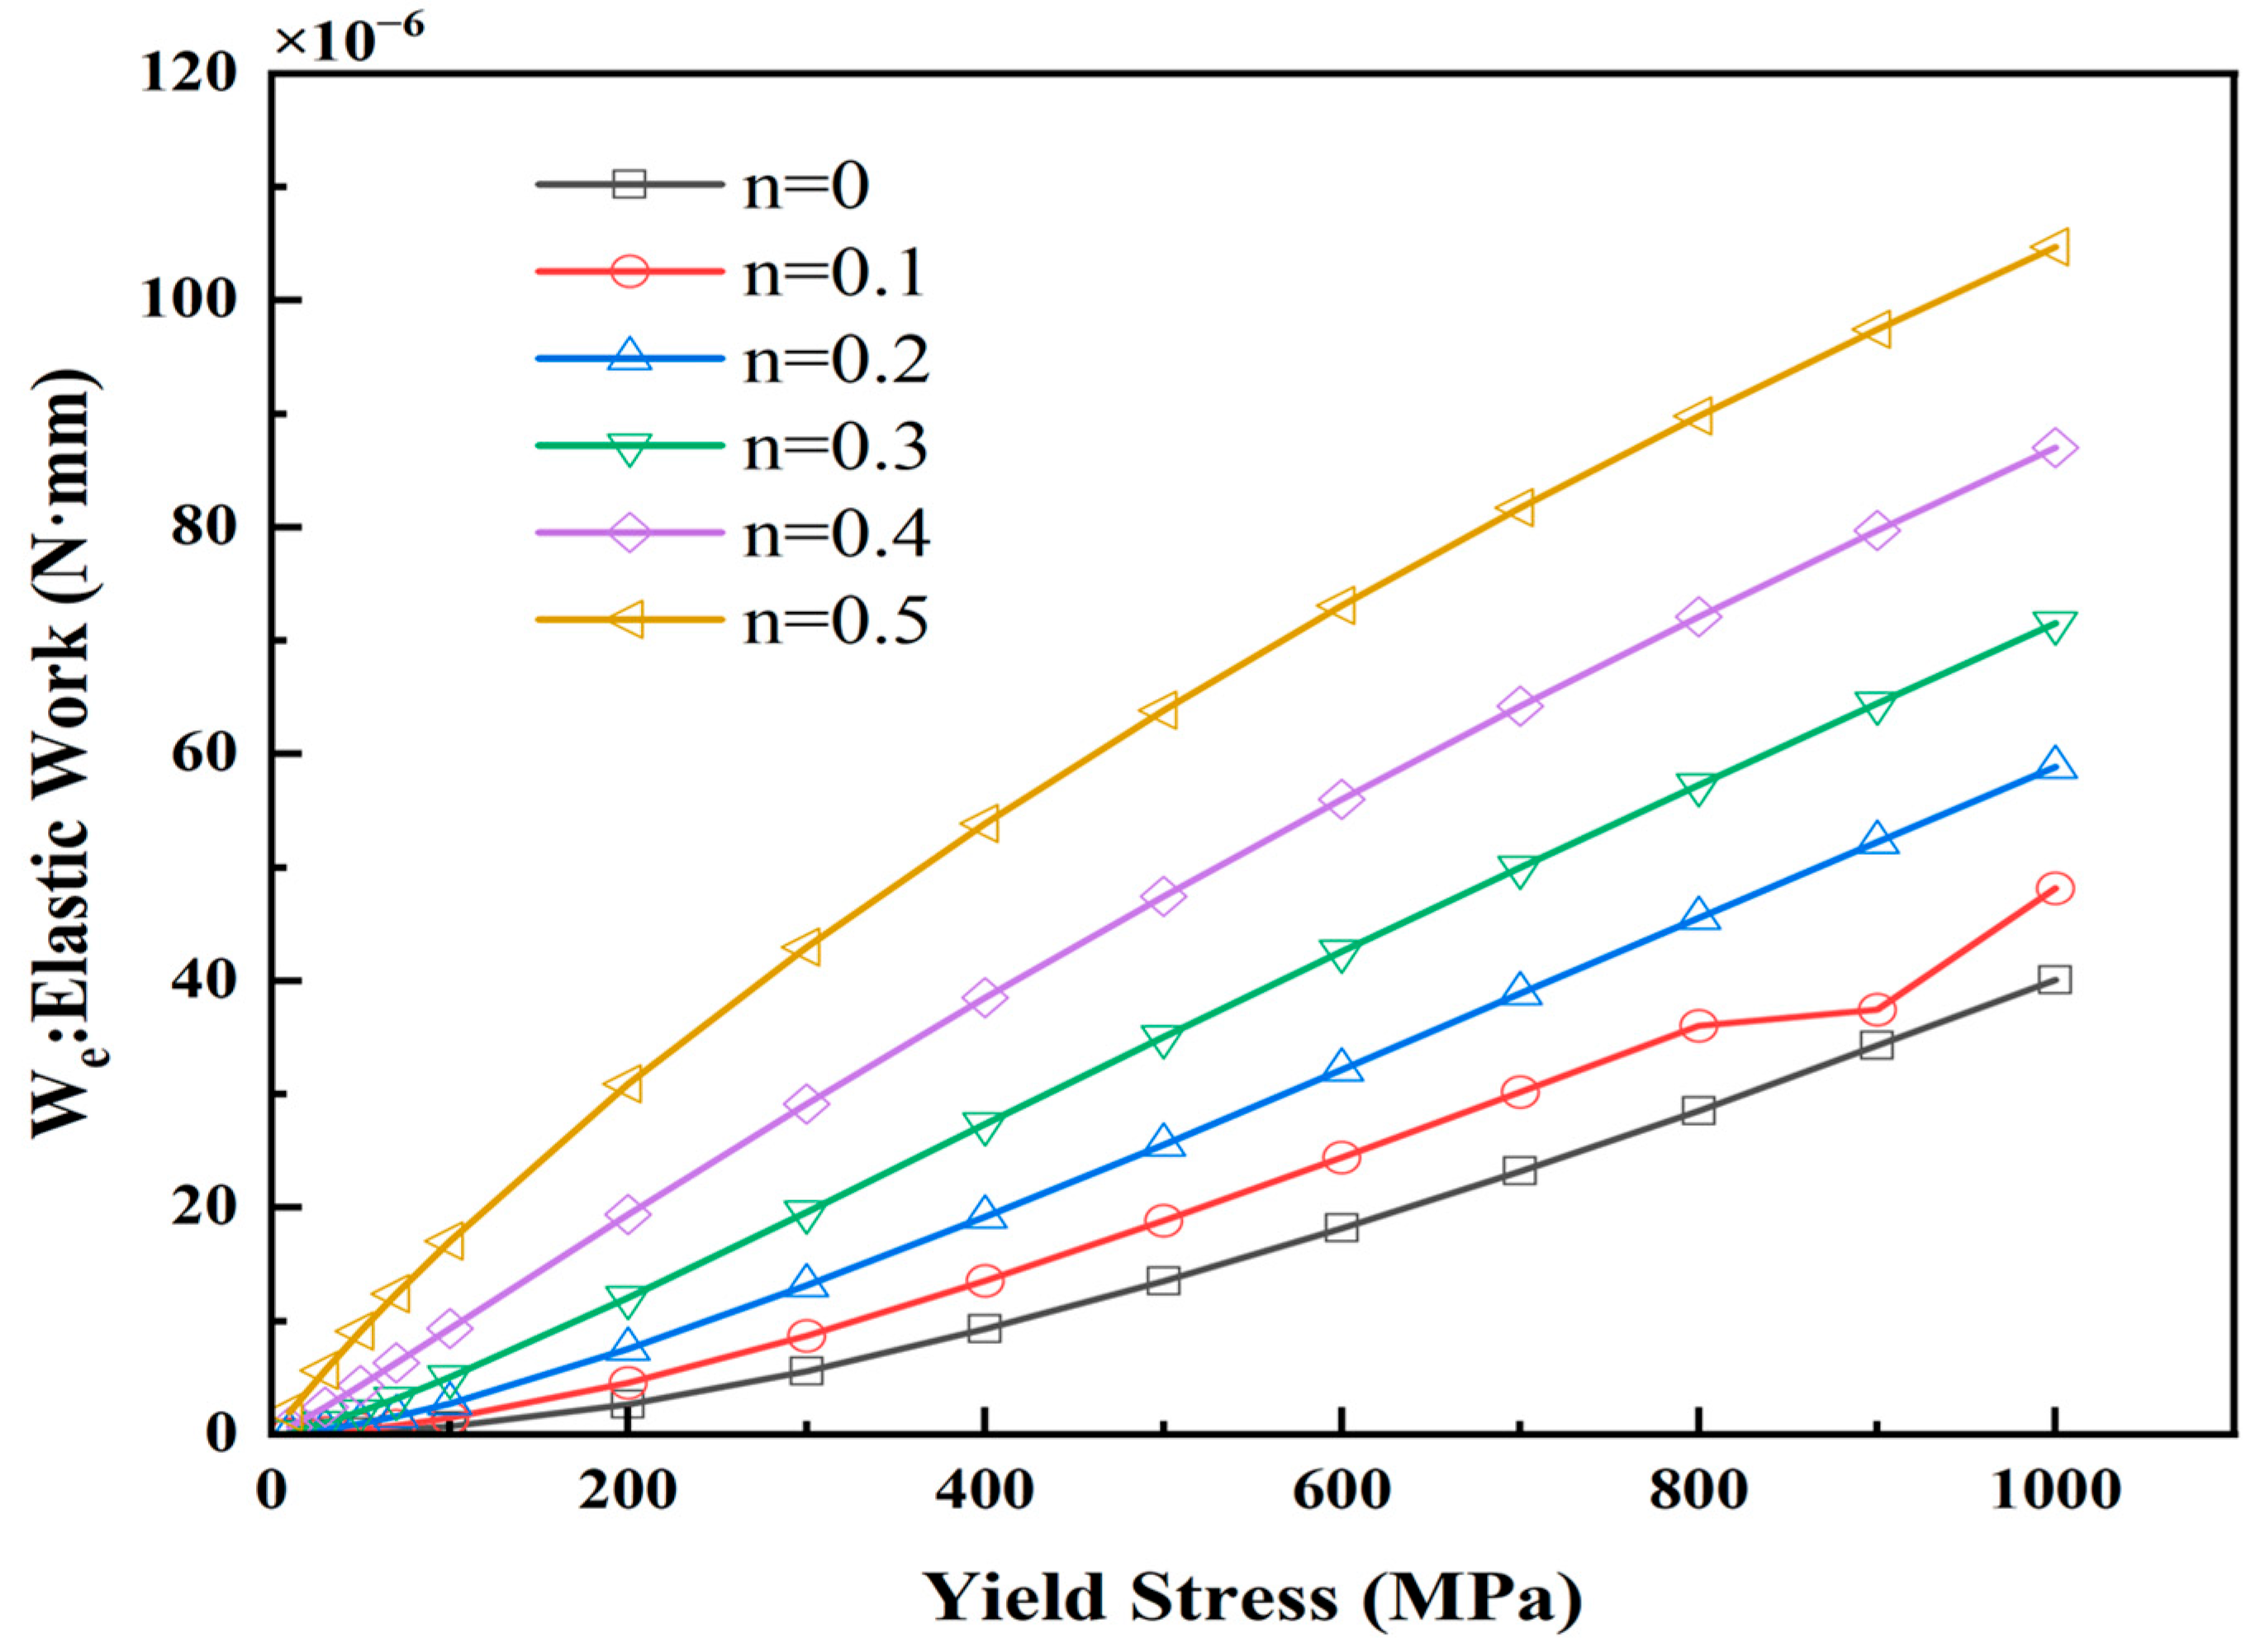
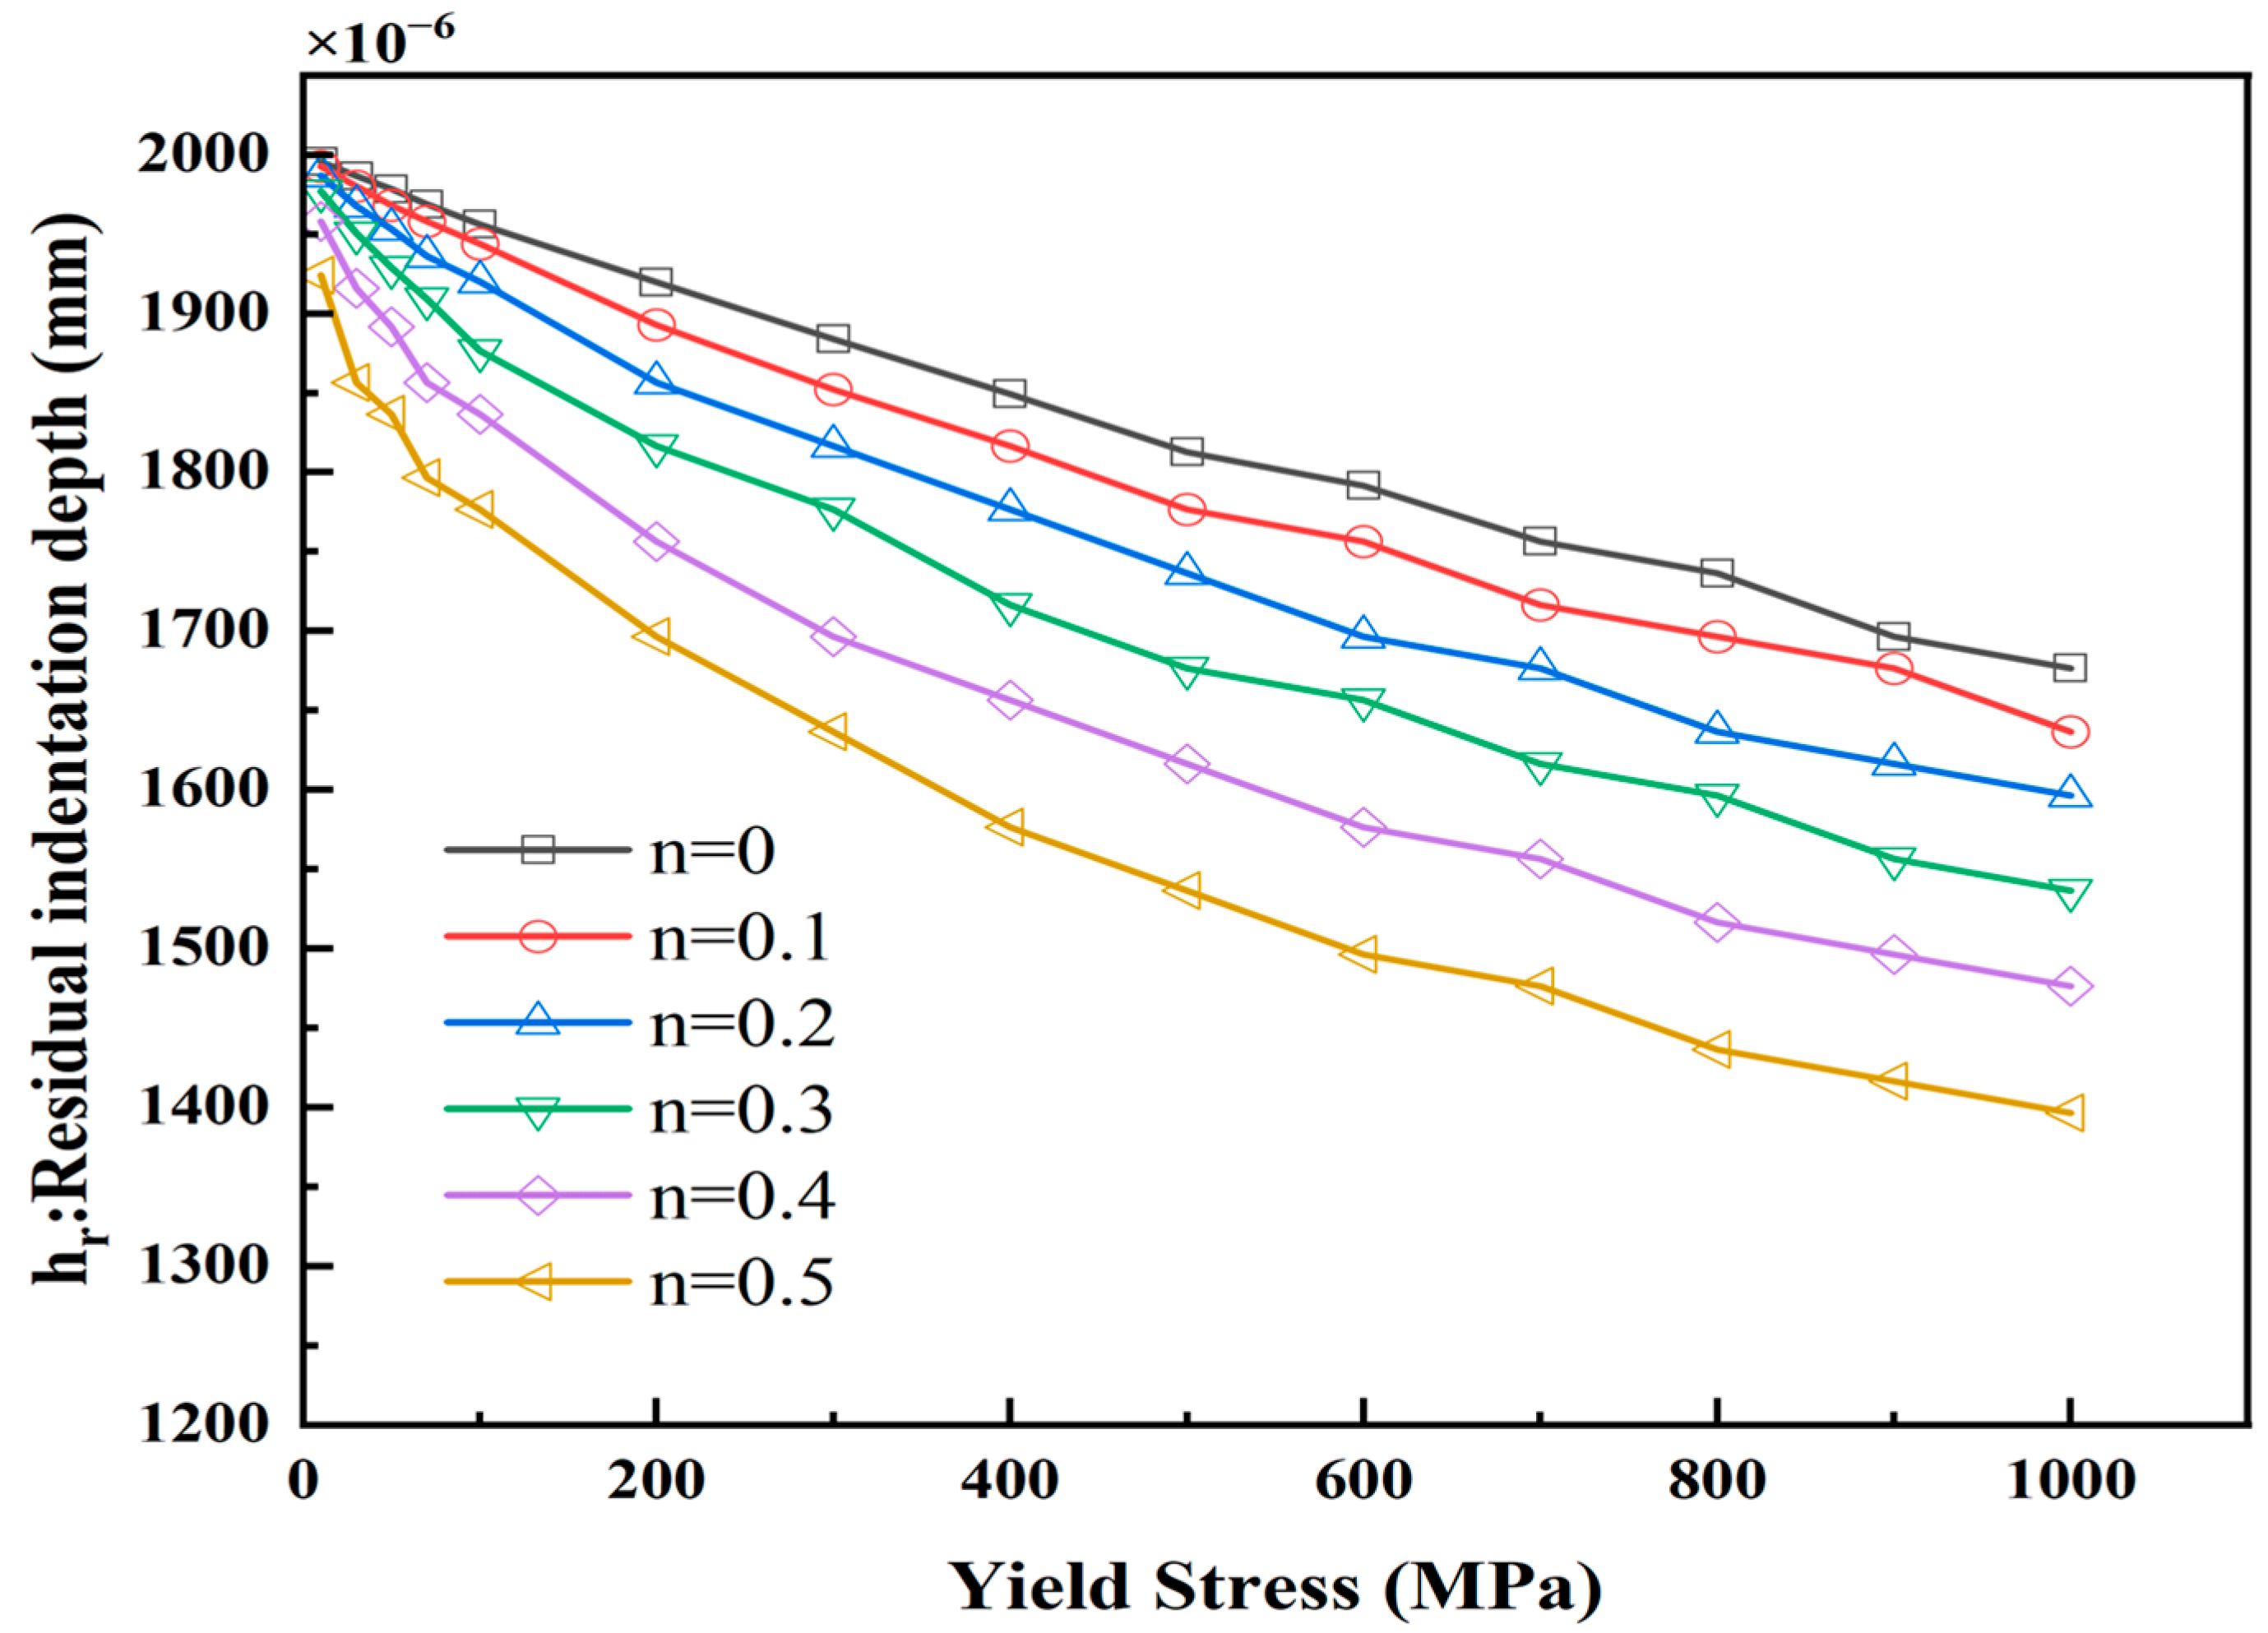
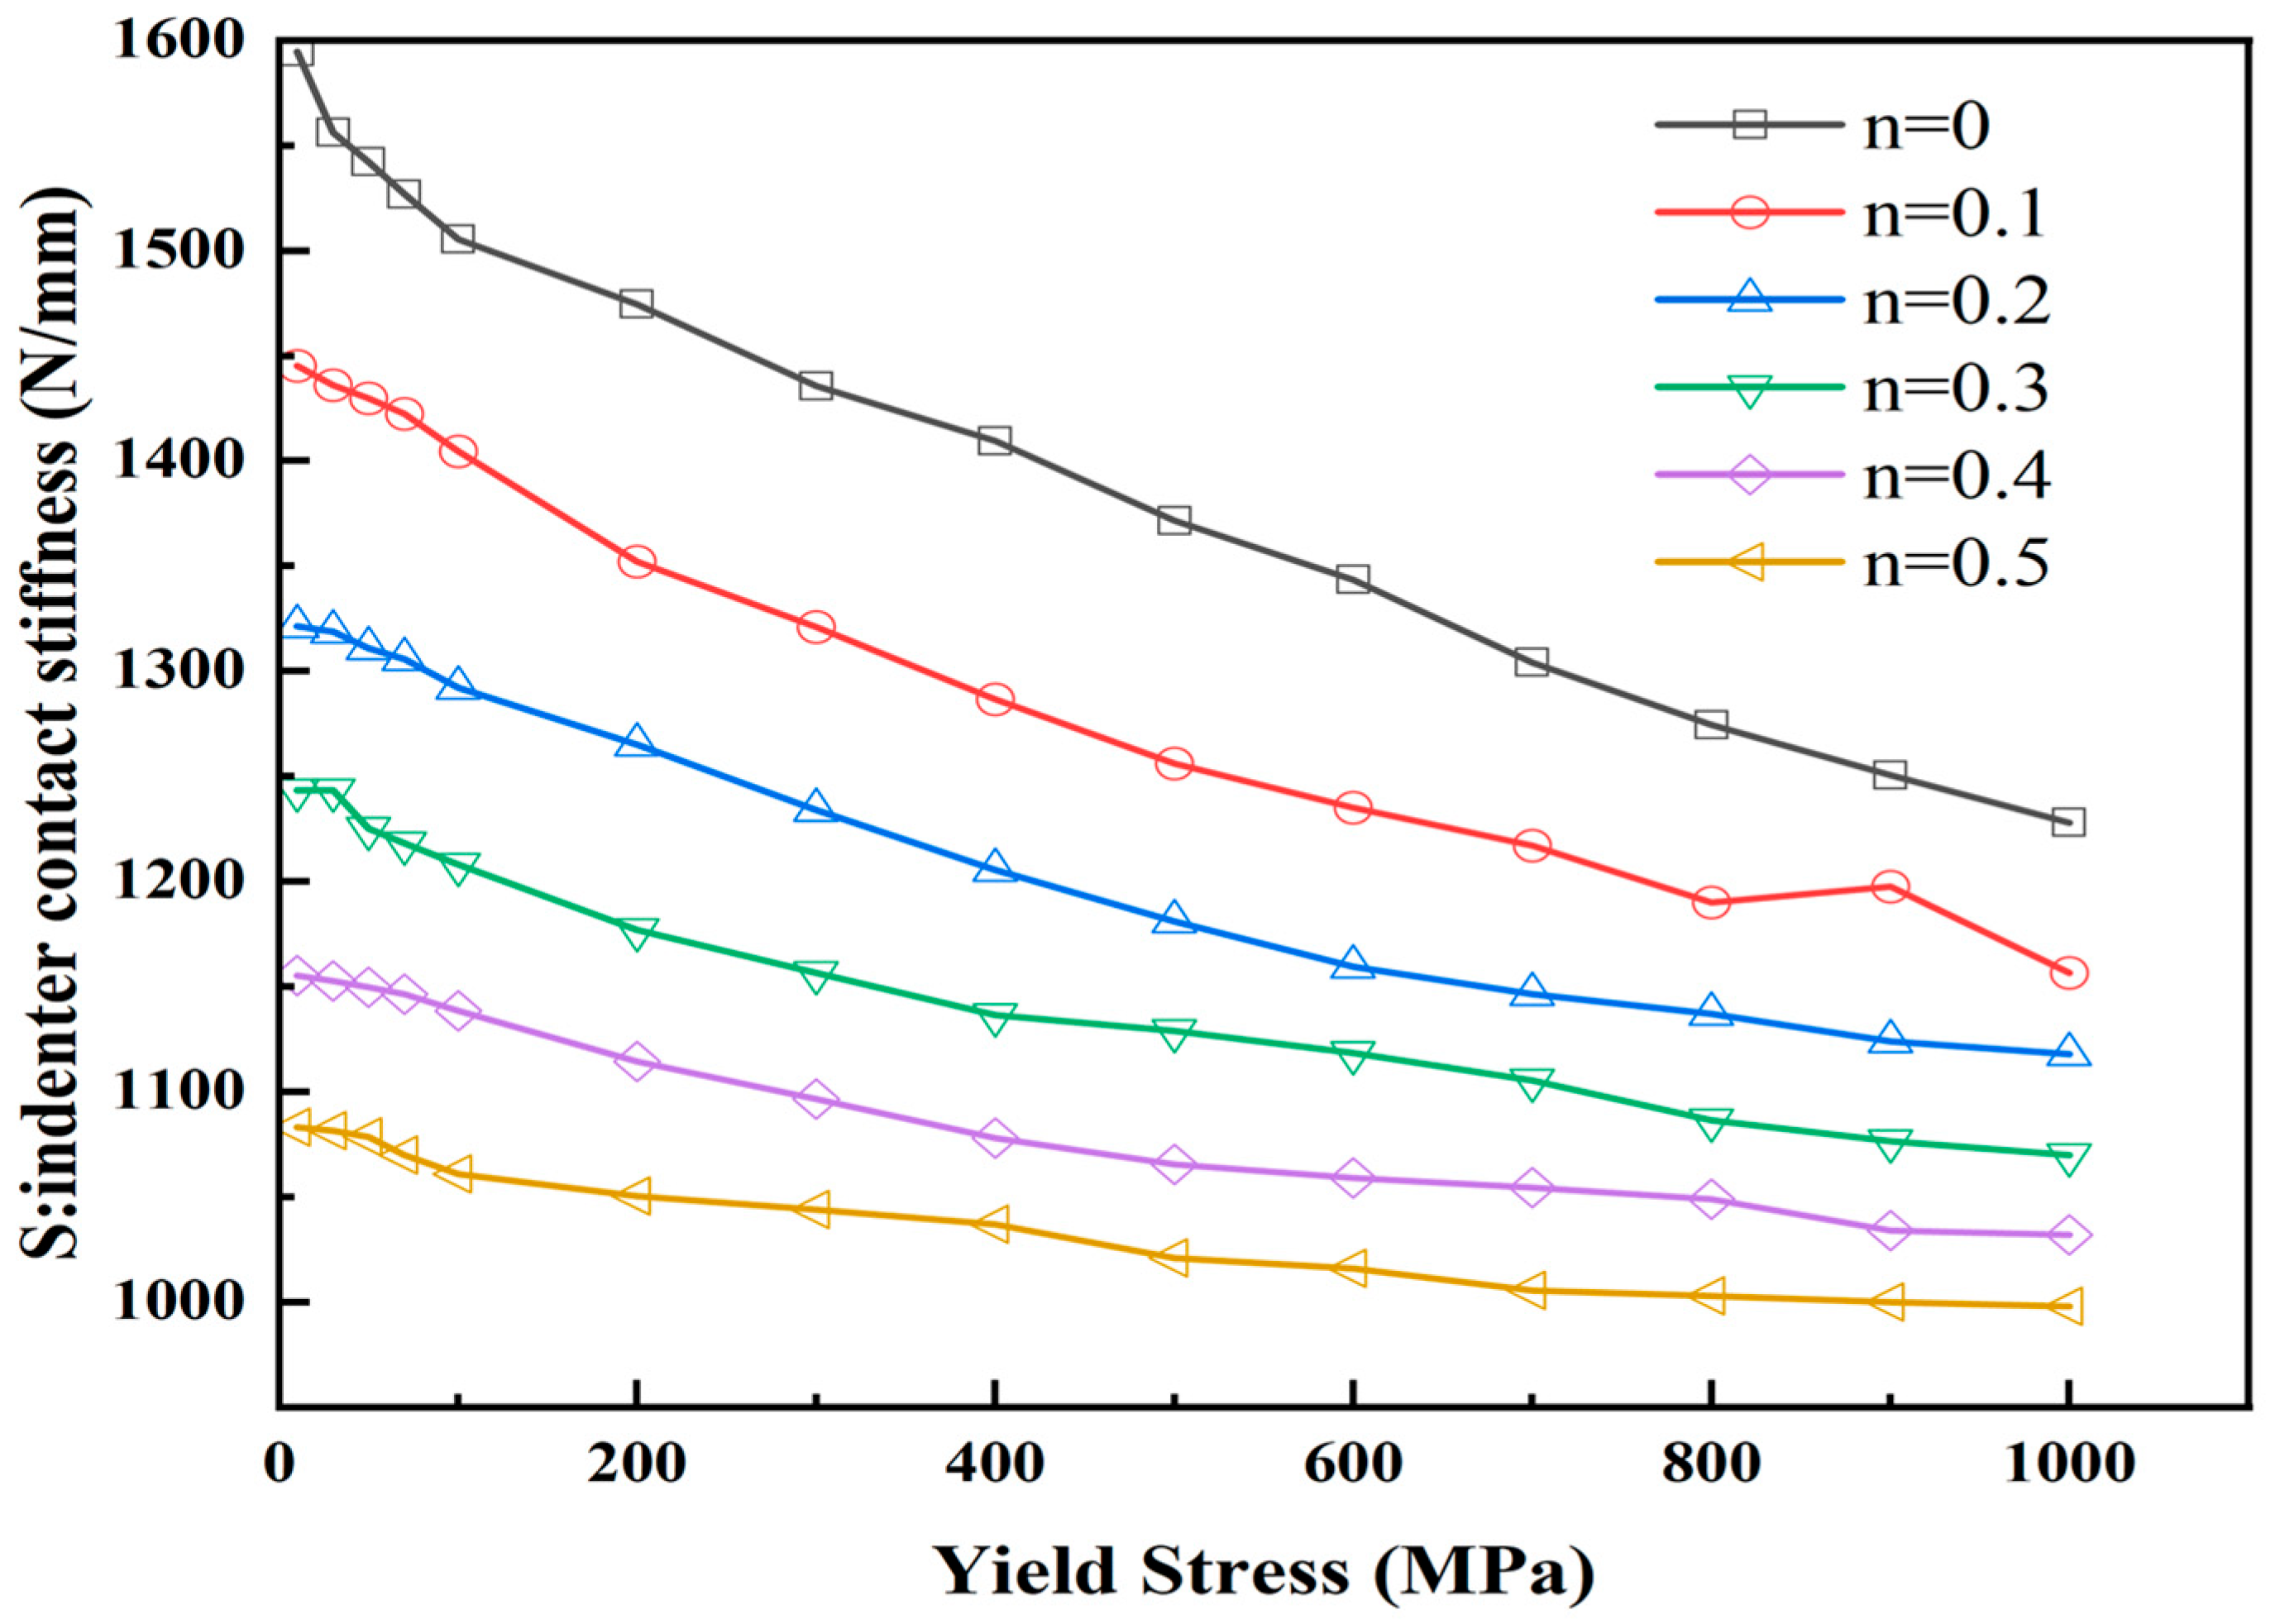
As analyzed in Section 2.2, several parameters are obtained from the load-displacement curve, including the maximum load, maximum indentation depth, residual indentation depth, total work done by the indenter, elastic work, plastic work, and contact stiffness. The variations of these parameters concerning the plastic properties (σy and n) are shown in Figure 7, Figure 8, Figure 9, Figure 10 and Figure 11.
The maximum load ranges from 4.74098 mN to 425.757 mN, the total work done by the indenter ranges from 3.401946447 mN·μm to 296.396 mN·μm, the elastic work ranges from 0.0080242 mN·μm to 104.677 mN·μm, the residual indentation depth ranges from 1396.44 nm to 1995.45 nm, and the contact stiffness ranges from 998 N/mm to 1594.5 N/mm. Some parameters exhibit similar trends, such as the maximum load, total work done, and elastic work, which increase with increasing σy and n, while the residual indentation depth and contact stiffness decrease with increasing σy and n. Therefore, different materials can have different parameter values, reasonably explaining the dimensionless analysis.

3.2.2. Dimensionless Analysis

Figure 2 shows that when the indentation load is unloaded to zero, the indenter does not return to its initial position. Consequently, a residual indentation mark is left on the surface of the tested material. Therefore, the residual indentation depth hr, hardness S, maximum load P, total work done by the indenter Wt, and plastic work We depend on hmax and the elastic–plastic mechanical properties of the tested material. Hence, the dimensionless analysis of the parameters leads to the following equations (Equations (2)–(5)).
h r = f 1 σ , n , h max , E
S = d P d h = f 2 σ , n , h max , E
P = f 3 σ , n , h max , E
W t = 0 h max P d h = f 4 σ , n , h max , E
According to the π theorem, the dimensionless form of the equation (Equations (2)–(5)) can be written as
h r h max = 1 σ E , n = y 1
S E h max = 2 σ E , n = y 2
P E h max 2 = 3 σ E , n = y 3
W e W t = 4 σ E , n = y 4

3.3. Extraction of Parameters from Projection area of contact zone for Dimensionless Analysis

3.3.1. Projection Area of Contact Zone

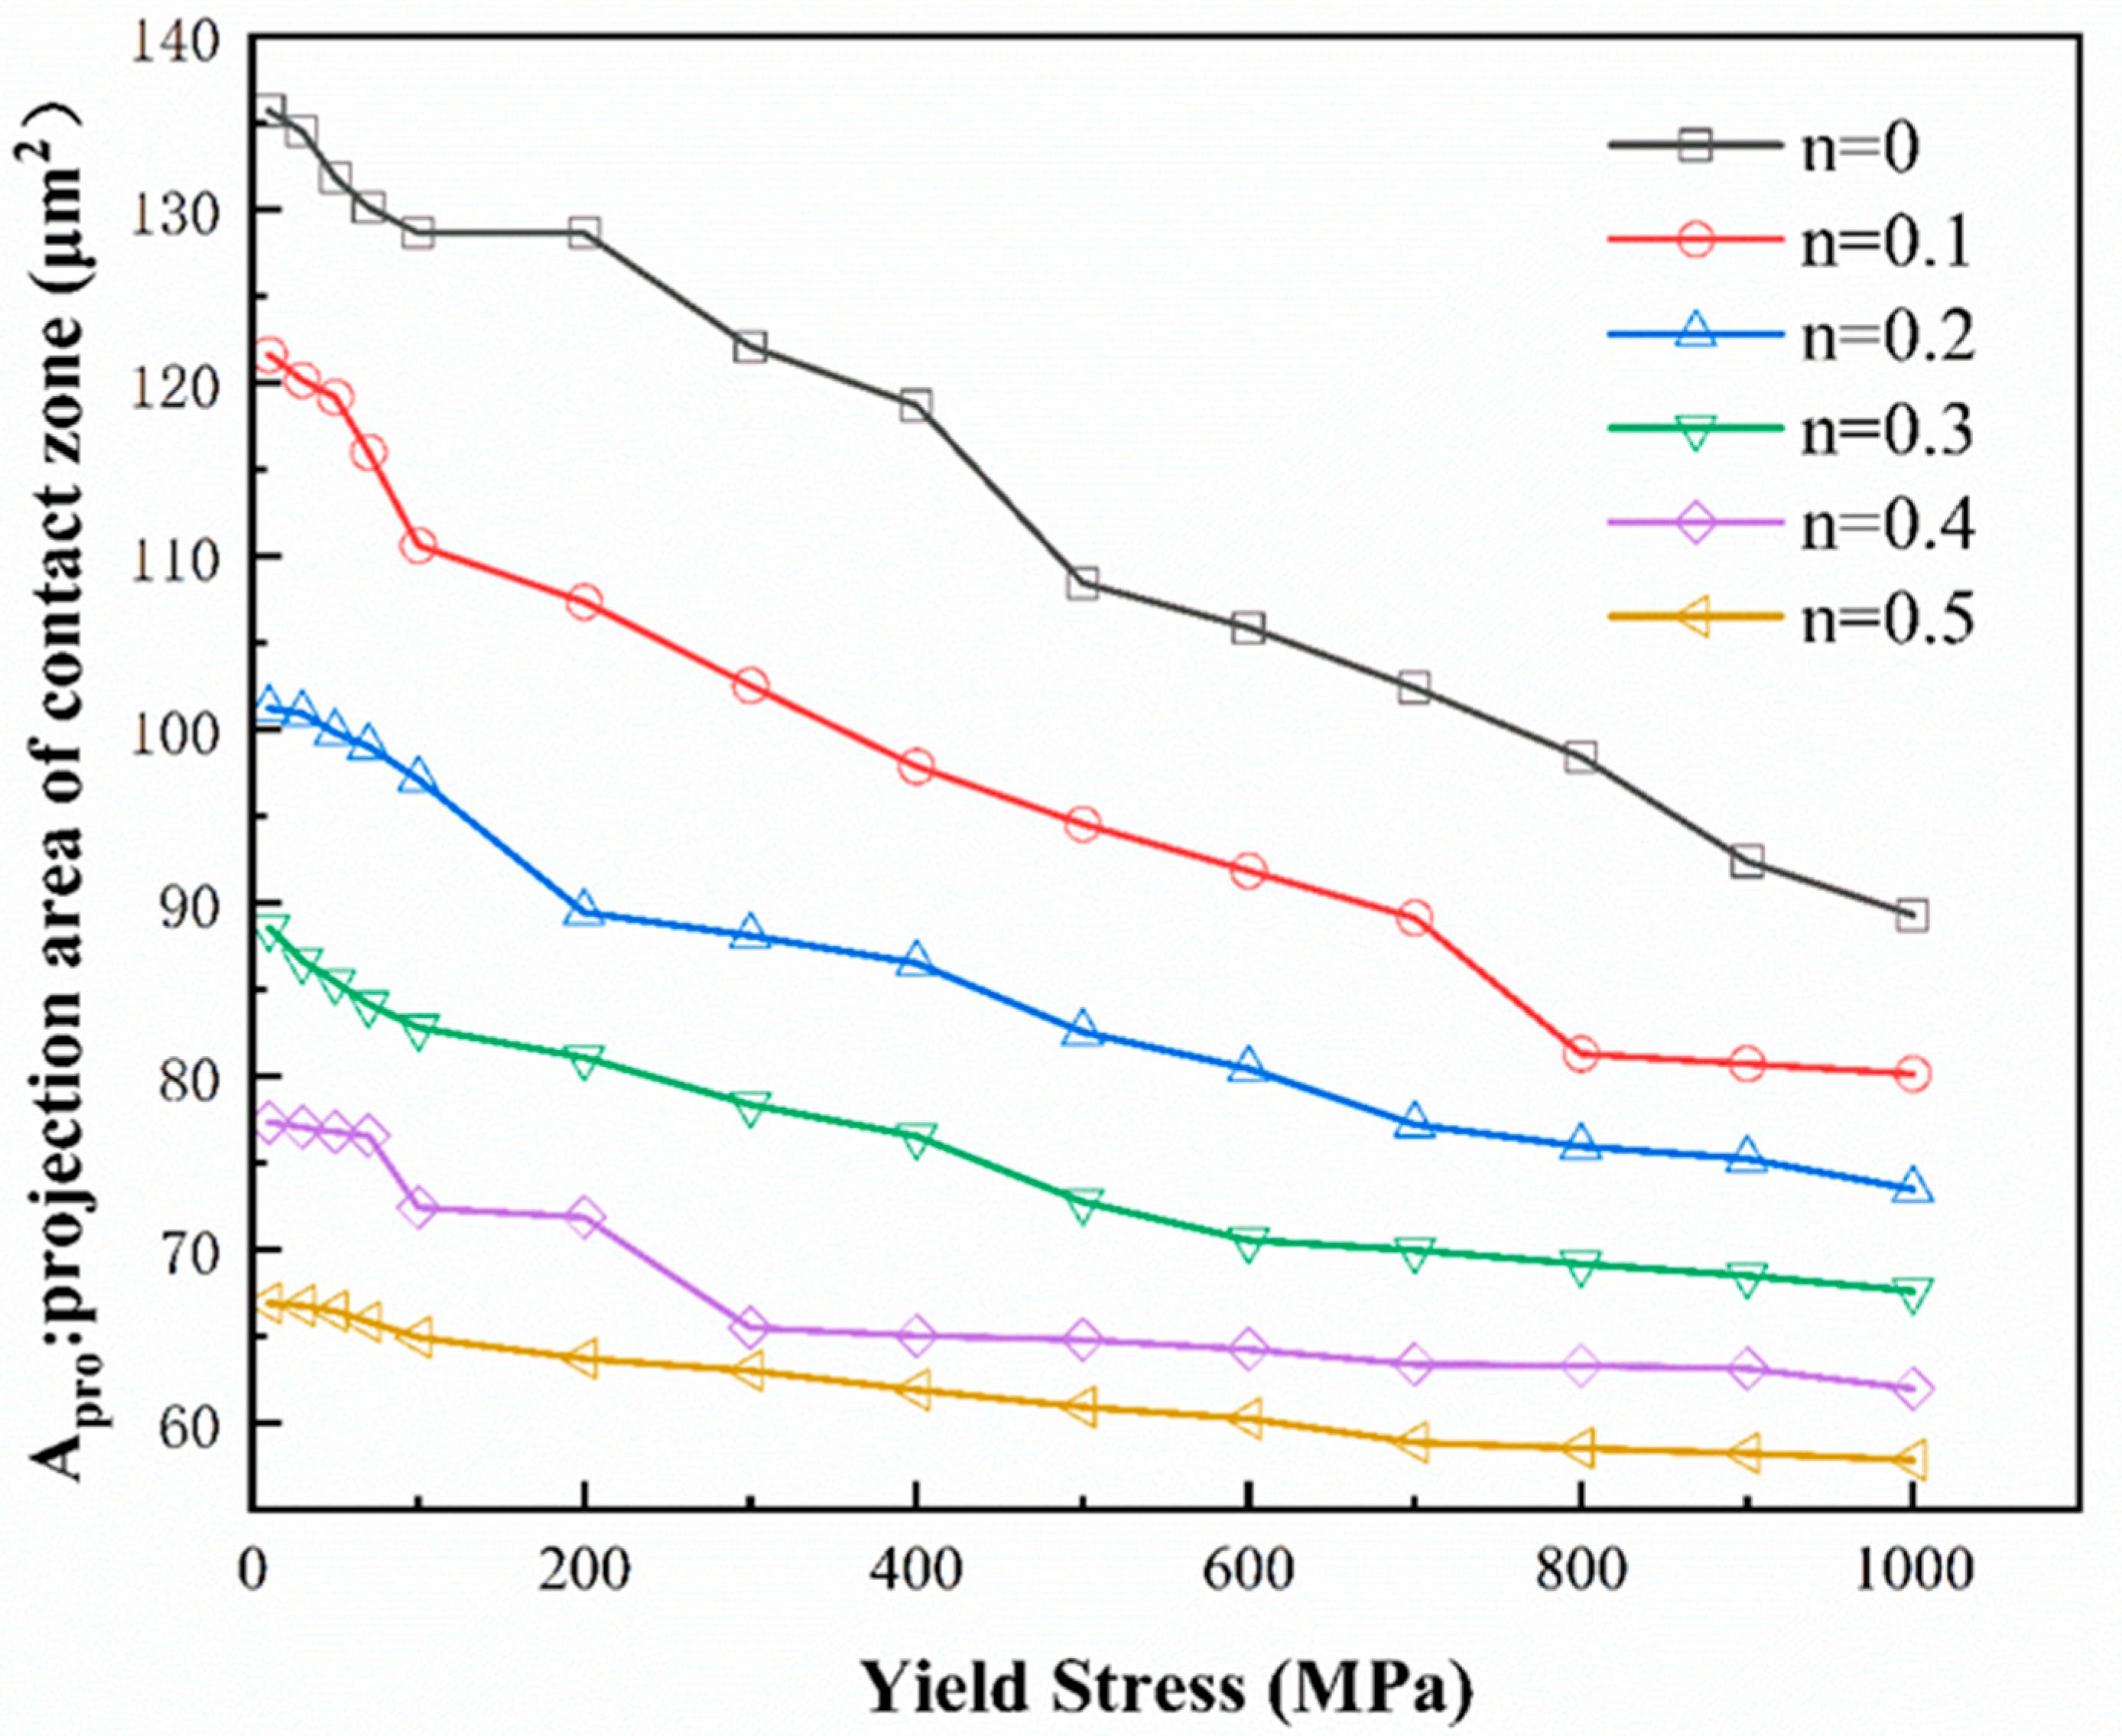
The variation of the projection area of the contact zone concerning σy and n is shown in Figure 12. The projection area of the contact zone ranges from 57.88237 μm2 to 135.6985 μm2. As σy and n increase, the projection area of the contact zone tends to decrease gradually. This is primarily due to the different shapes of residual indentations after unloading.
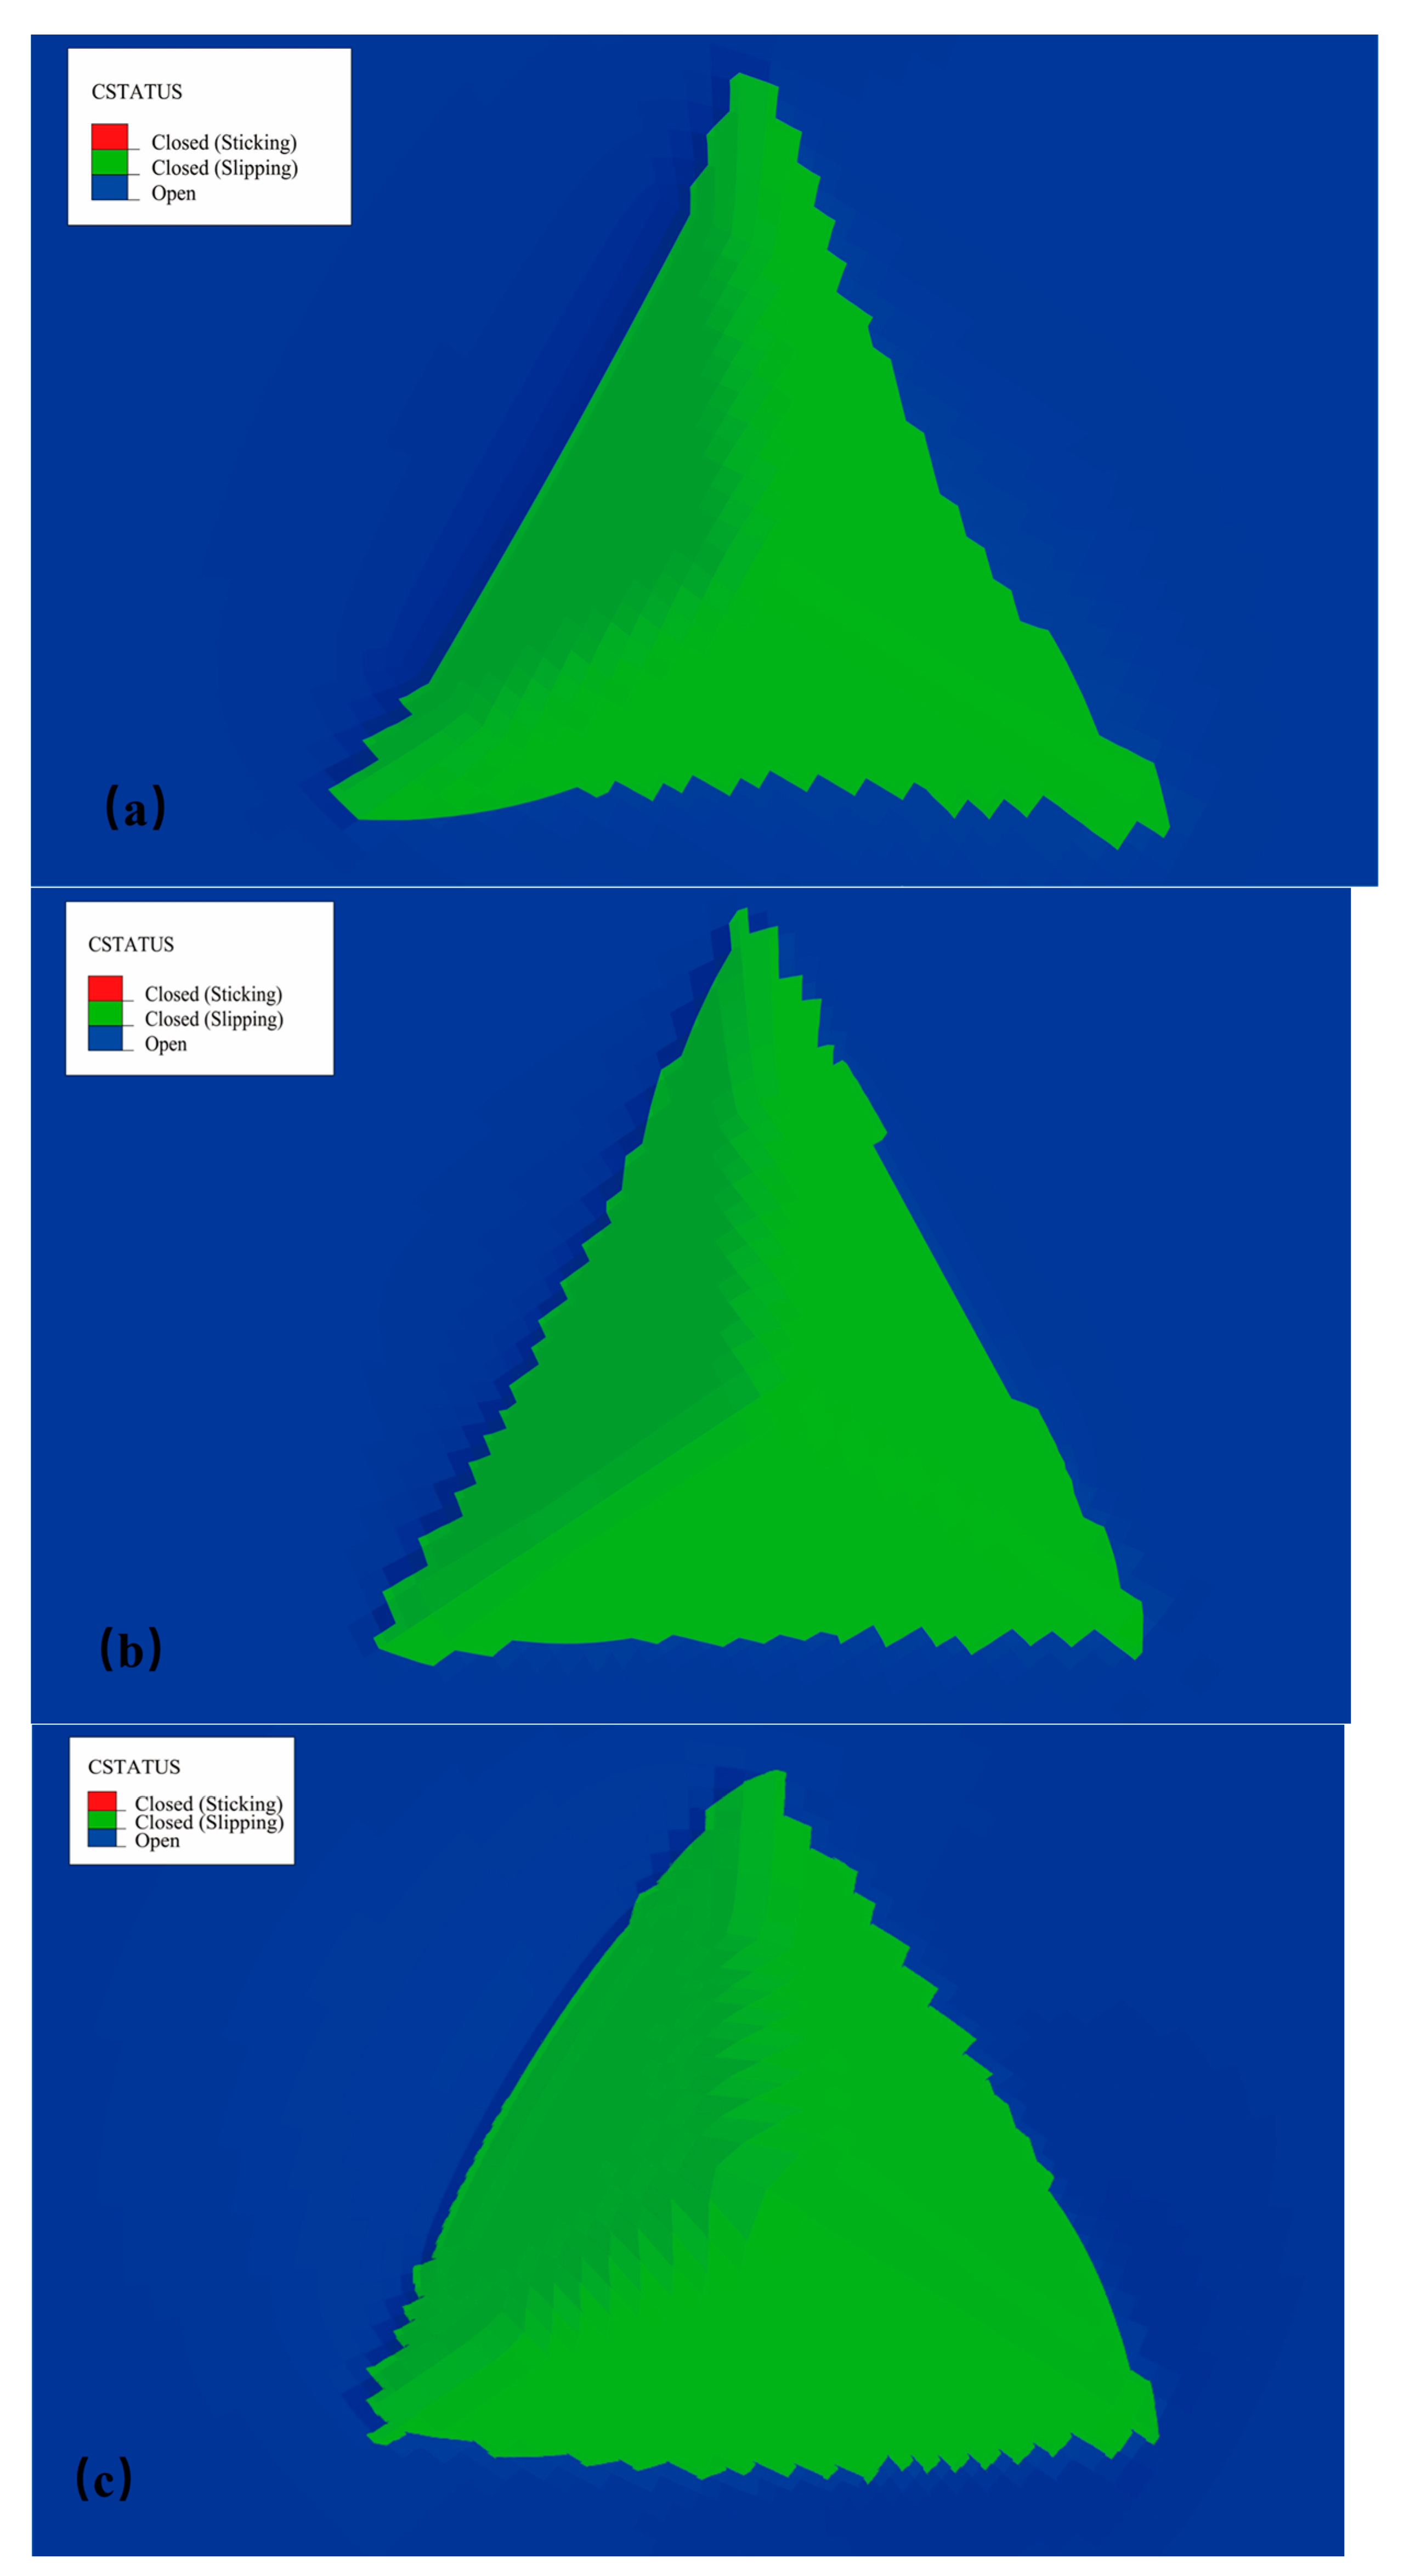
Three exemplary contact regions are chosen from the “virtual materials”, corresponding to n = 0.1 and σy = 50 MPa, n = 0.3 and σy = 100 MP, and n = 0.5 and σy = 500 MPa, respectively. The residual indentation shapes are depicted in Figure 13. It can be observed that the contact shapes exhibit three different patterns: convex, concave, and relatively flat. For materials with a smaller n and σy, i.e., relatively soft materials, the contact shape appears convex when viewed from the indentation direction. Conversely, for materials with a larger n and σy, i.e., relatively rigid materials, the contact shape appears concave when viewed from the indentation direction.
By extracting the coordinates of the contact area after complete unloading and establishing a three-dimensionless coordinate system, as shown in Figure 14, we observe the phenomena of pile-up and sink-in. Soft materials tend to exhibit pile-up, while hard materials tend to sink-in. Therefore, the projection area of the contact zone is also an important parameter influenced by plasticity and worthy of analysis.

3.3.2. Dimensionless Analysis

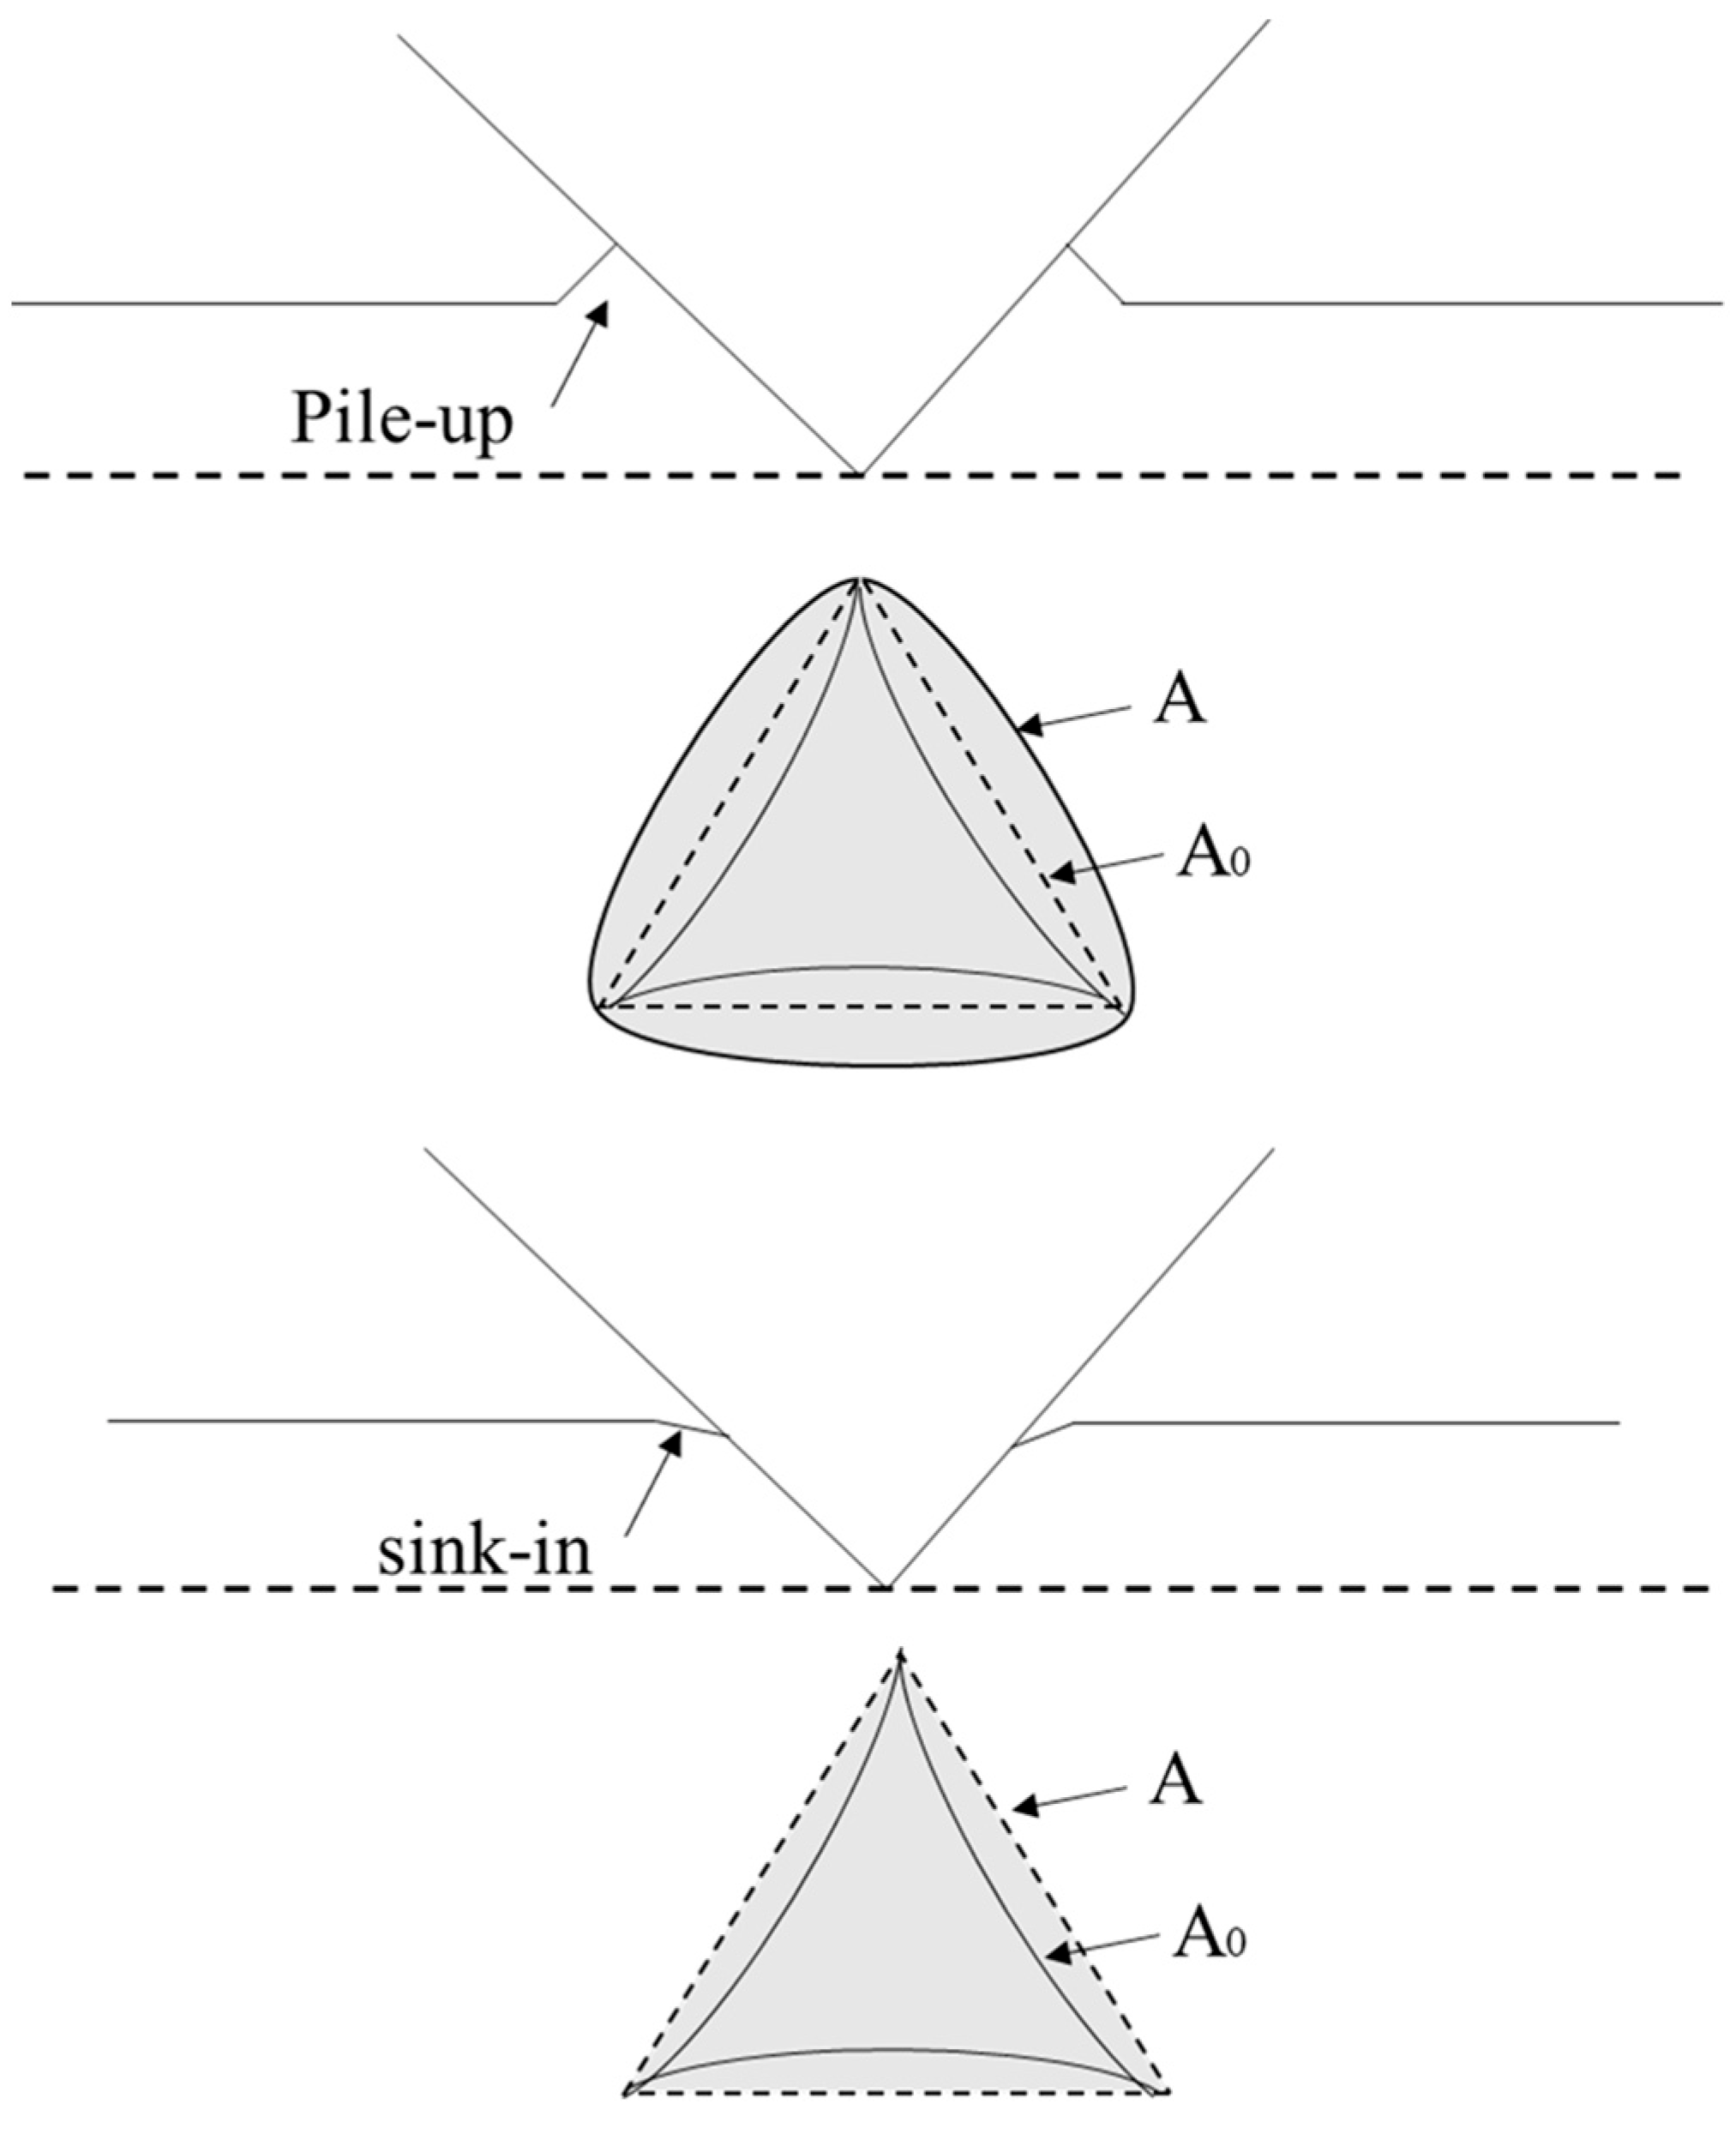
As the indenter is pressed, the material undergoes either pile-up or sink-in in the direction of indentation, as shown in Figure 15.
The projection area of the contact zone refers to the area projected in the direction of the indentation and is denoted as A. Conducting a dimensionless analysis on the parameters yields the following equation:
A = f 5 σ , n , h max , E
If no pile-up or sink-in occurs, the projection area of the contact zone is considered the ideal contact area and is denoted as A0. Specifically for the Berkovich indenter, A0 can be expressed as follows:
A 0 = 24.56 h 2
The level of accumulation or sinking is expressed quantitatively by α, and the dimensionless form of Equation (10) can be written according to the π theorem.
α = A A 0 = 5 σ E , n

3.4. Dimensionless Equation Solution

By fitting the five dimensionless equations obtained from Section 3.2.2 and Section 3.3.2, namely Equations (6)–(9) and (12), a sixth-order polynomial Equation (13) is derived.
Π k = C ij n i σ y E j
where K = 1 to 5, Cij represents the coefficients of the polynomial function, and i and j range from 0 to 6.
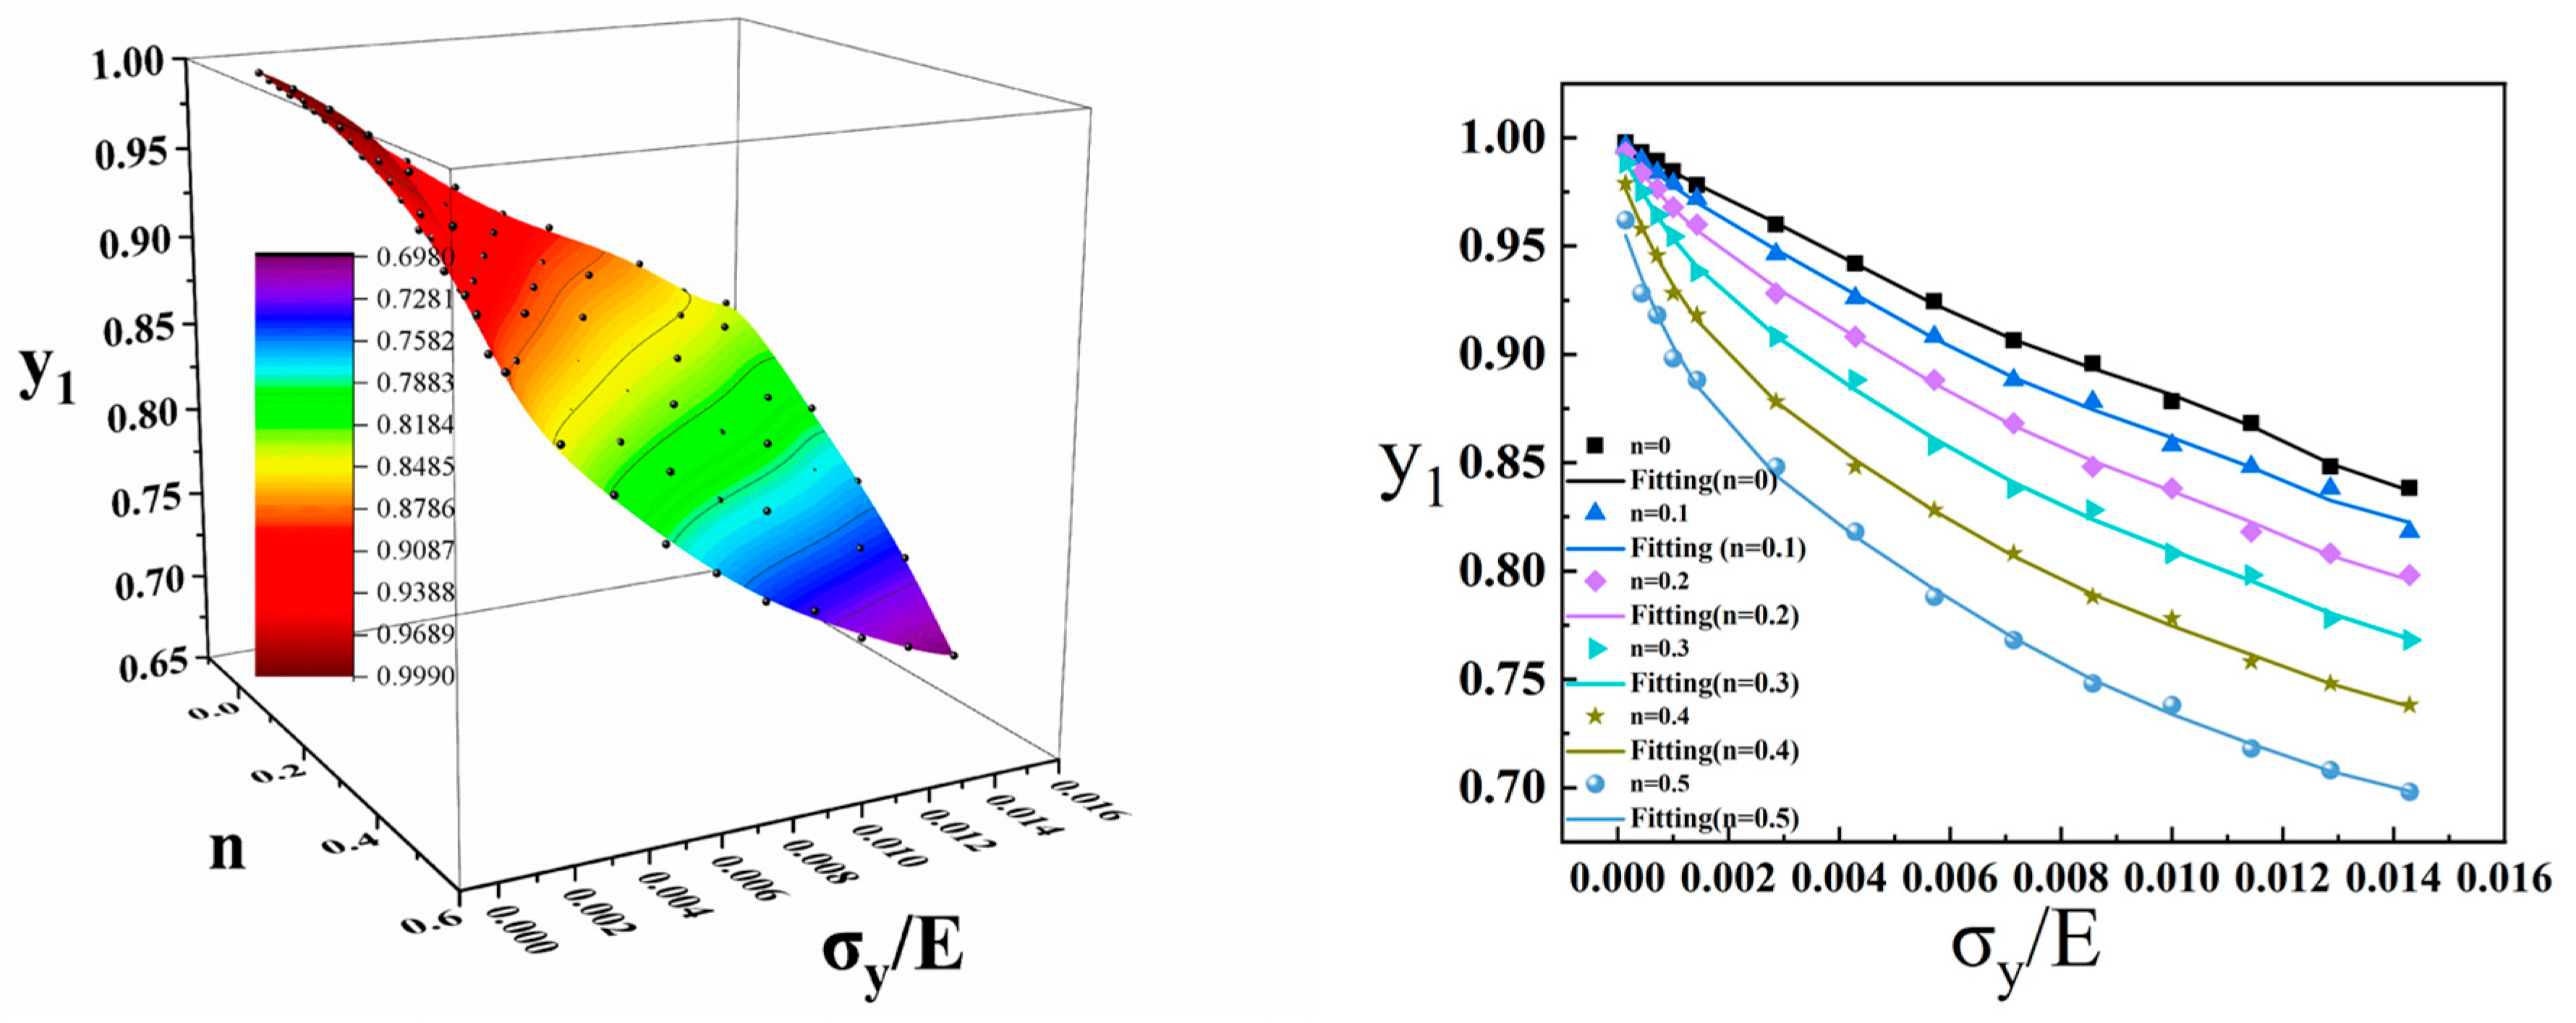
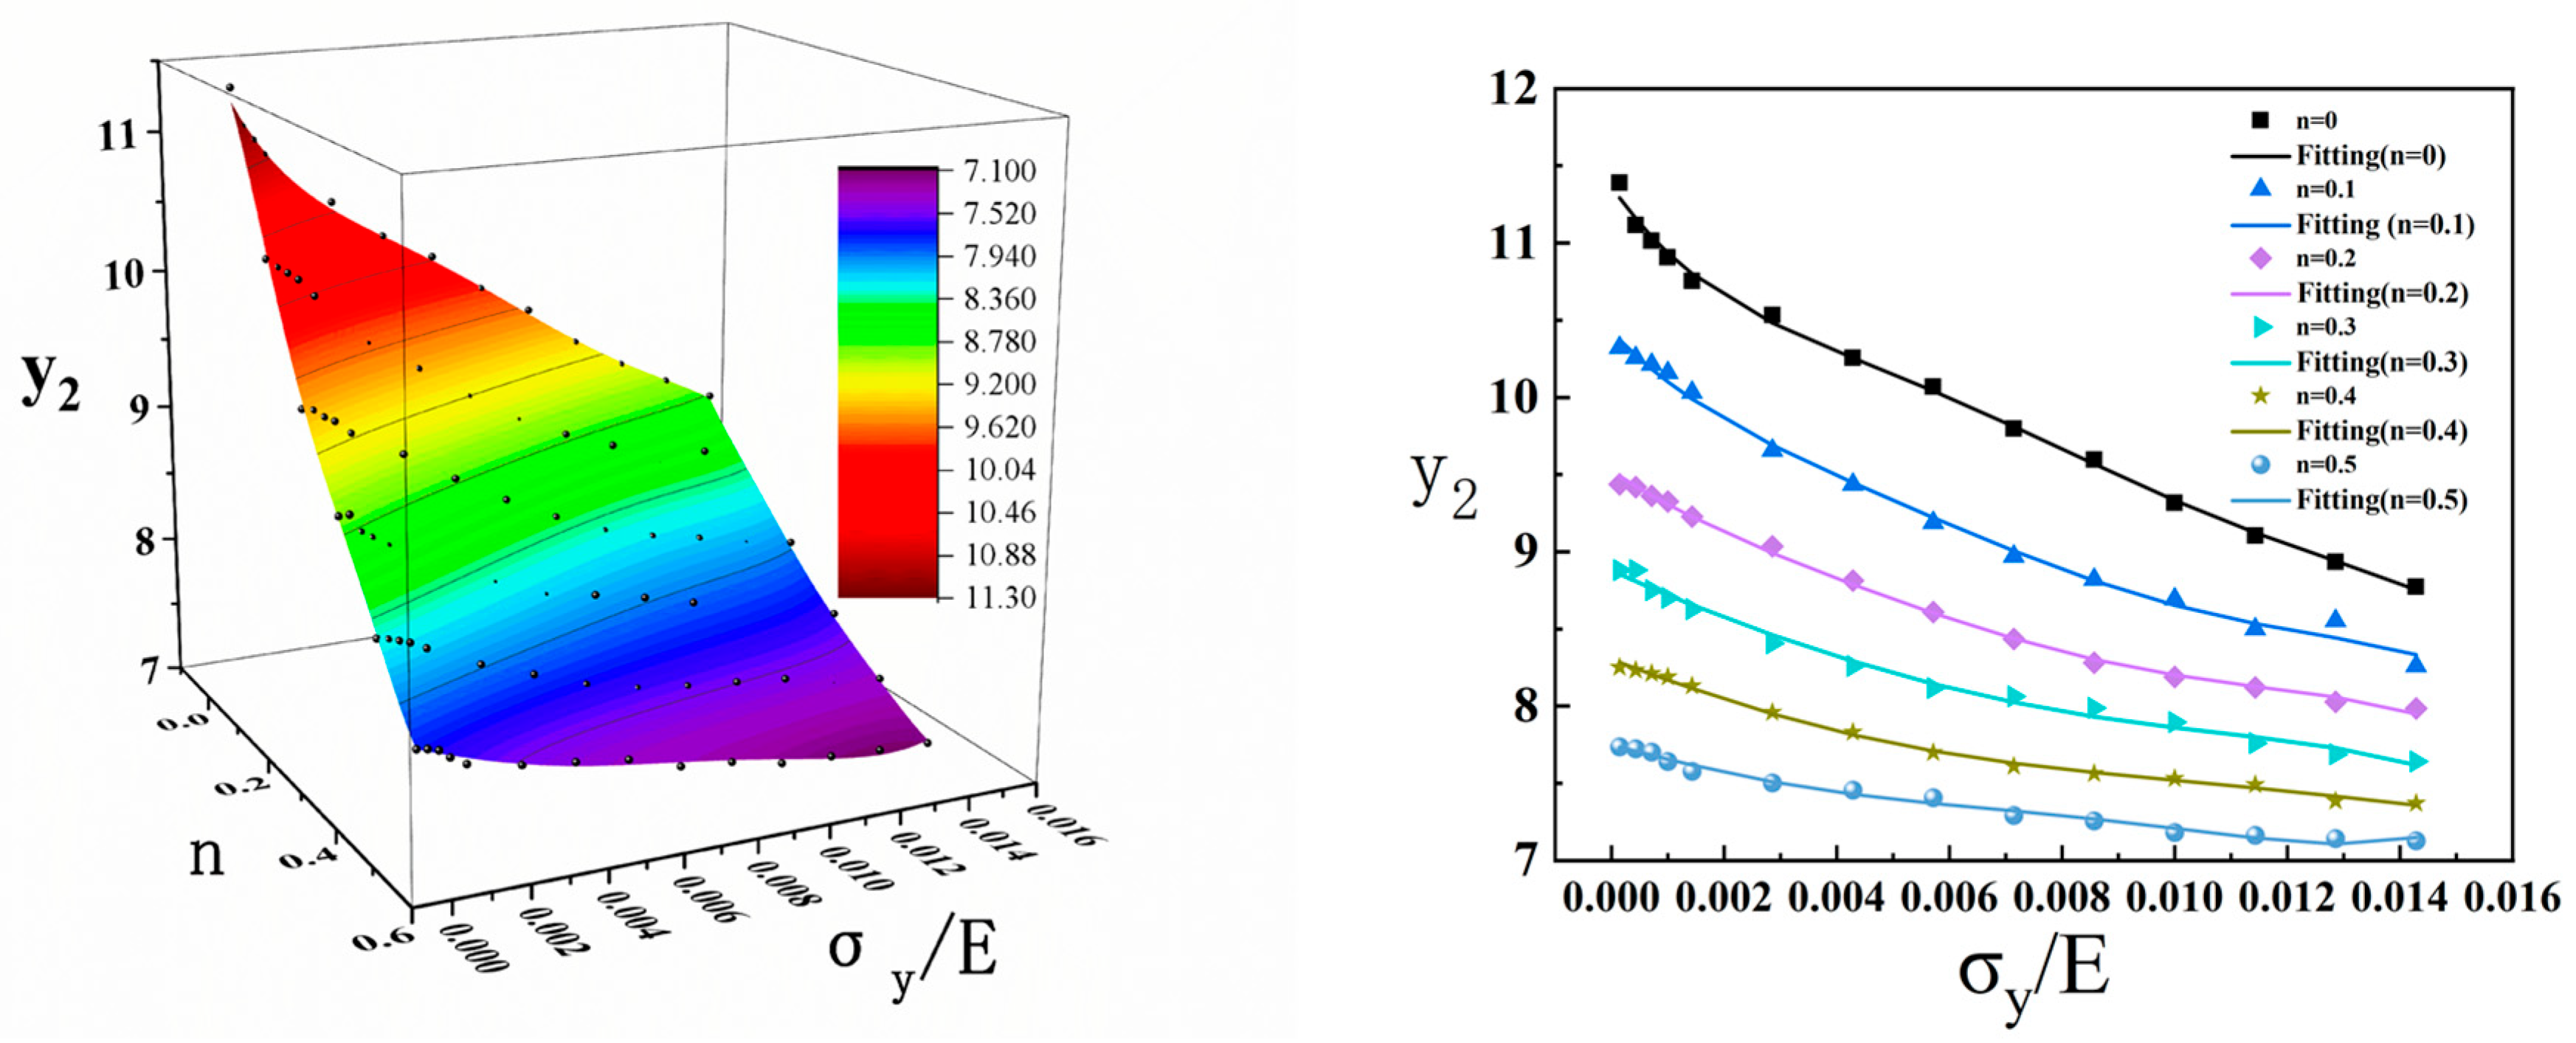
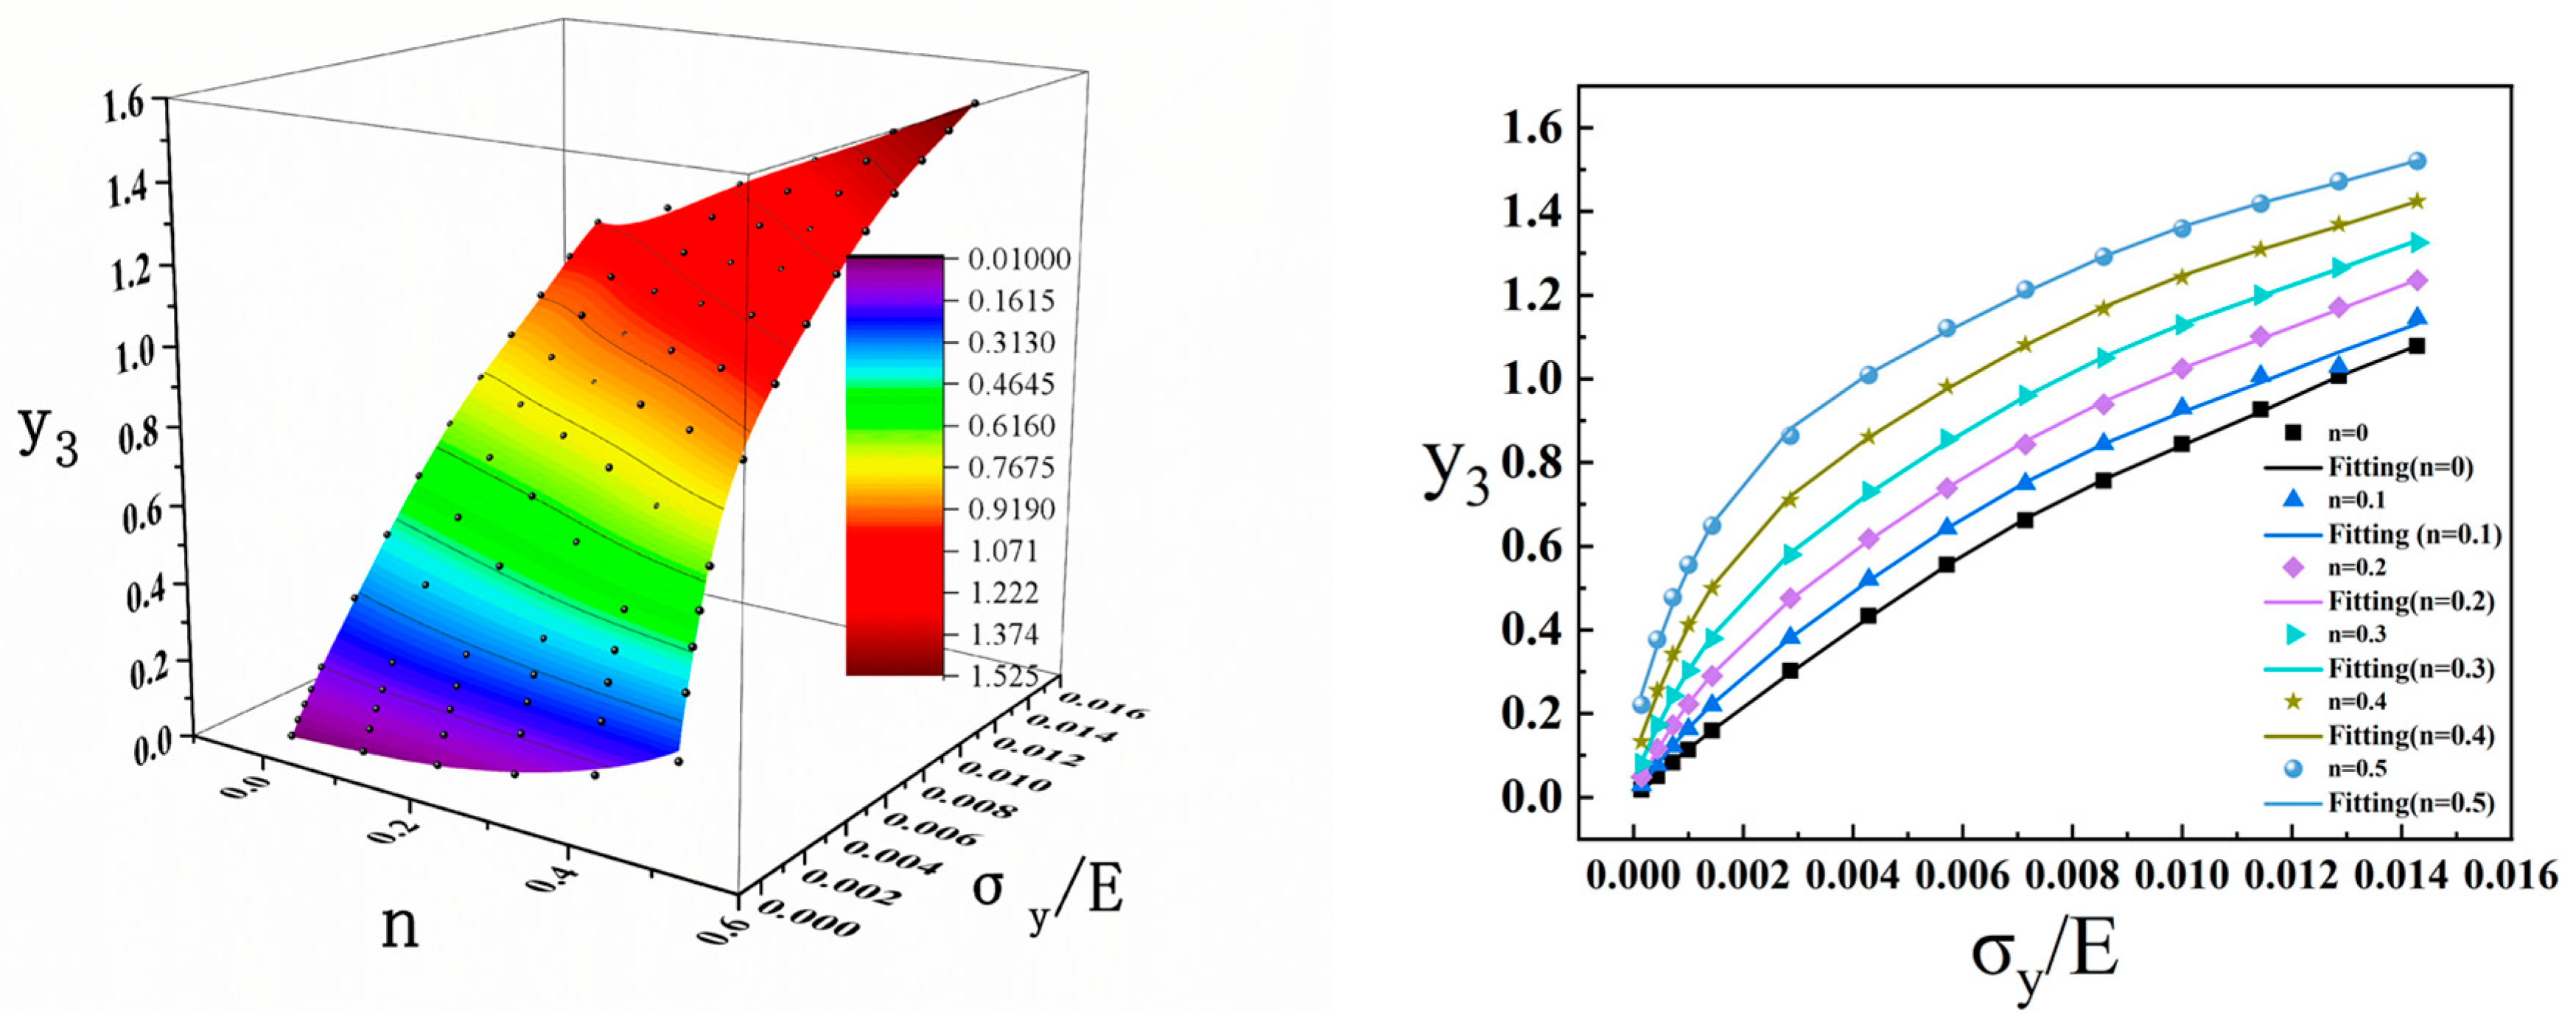
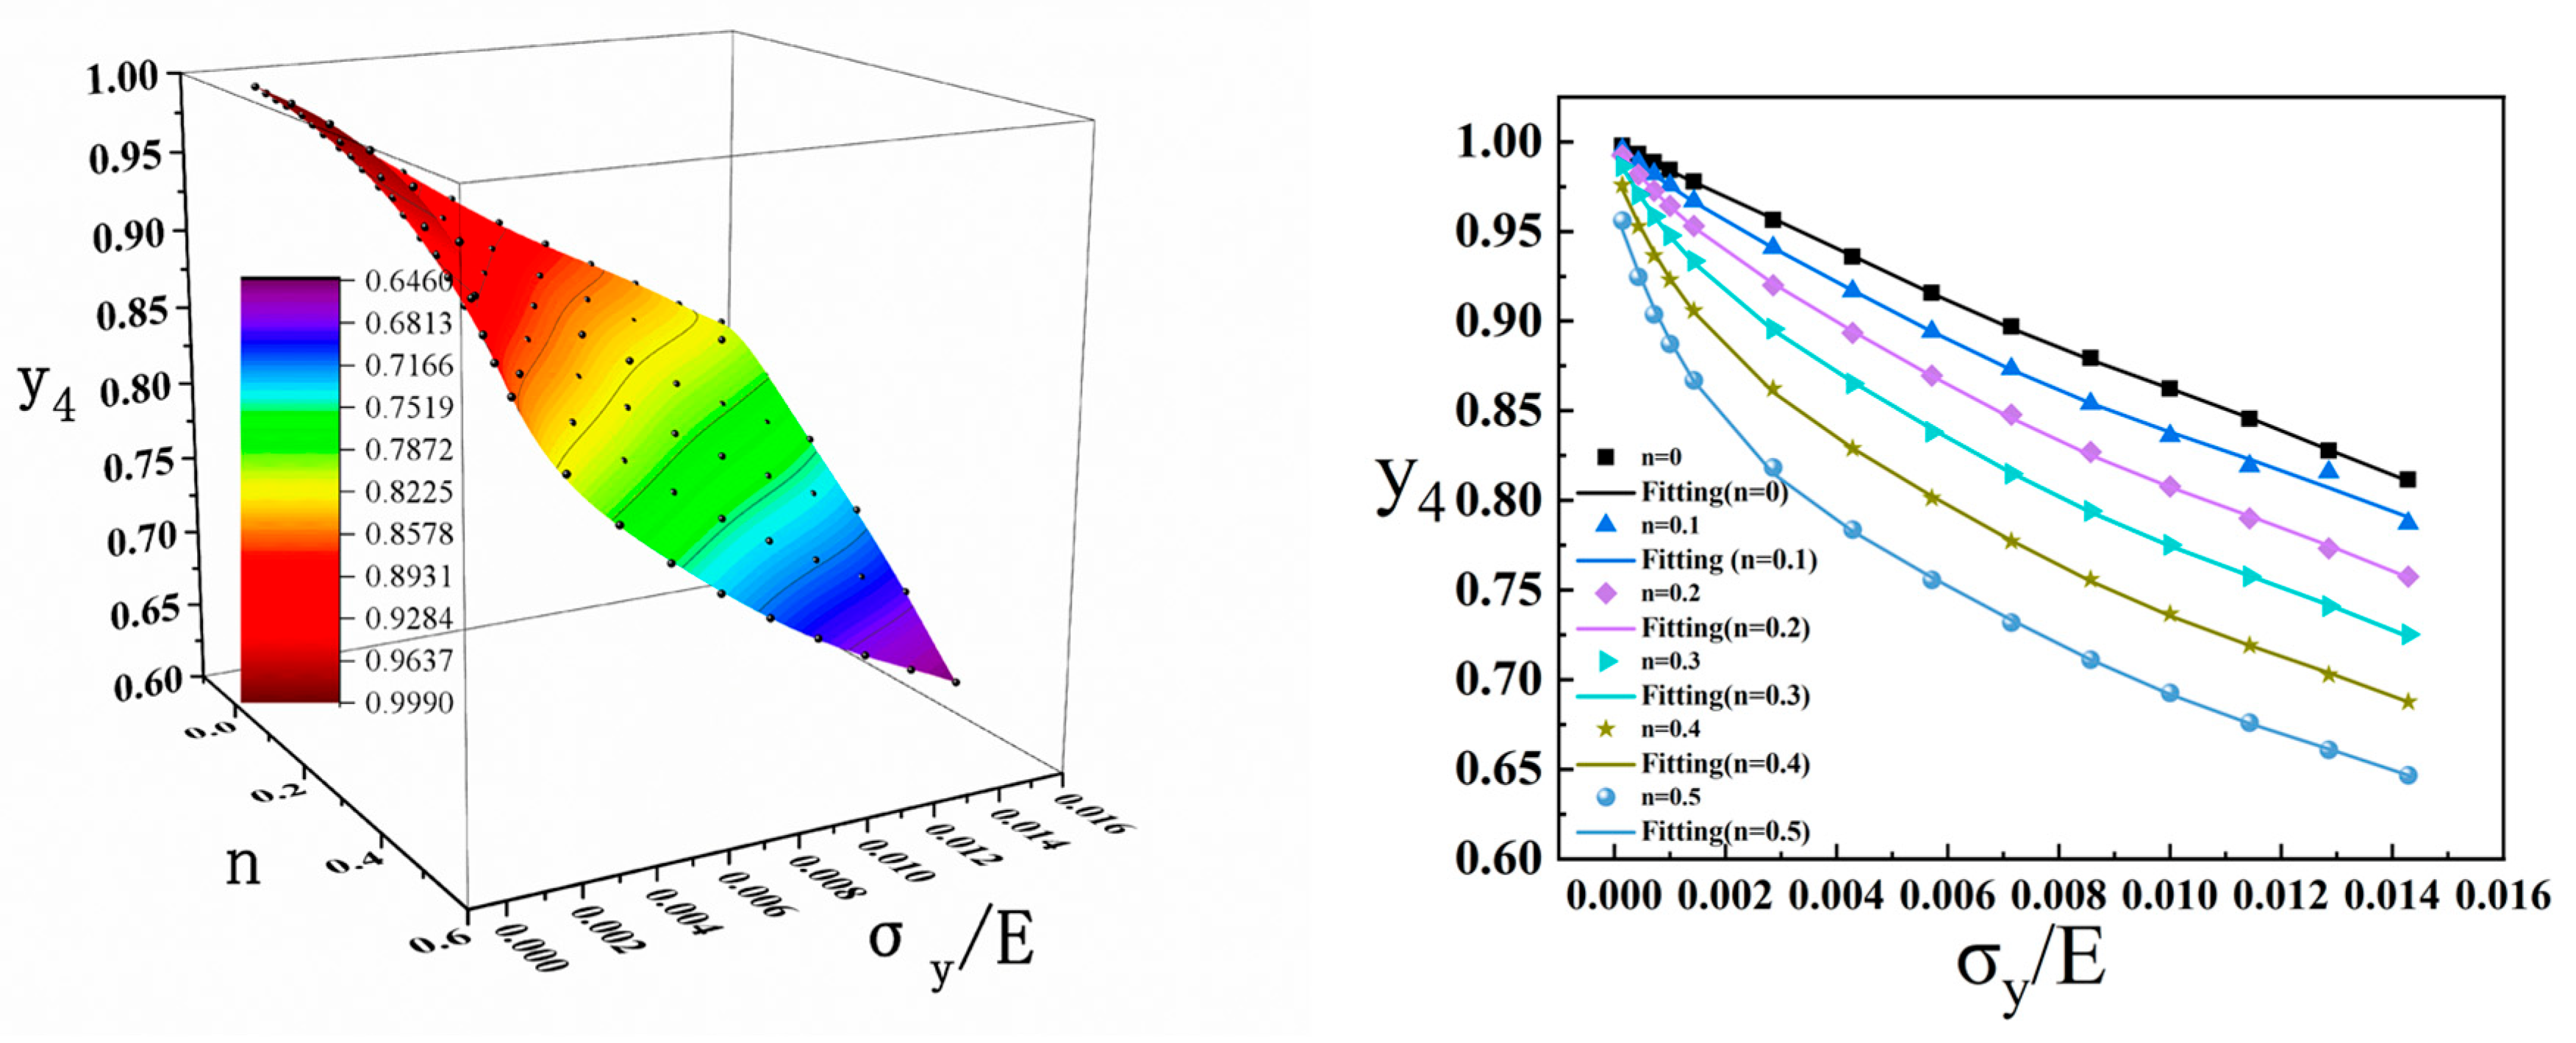
The fitting results are shown in Figure 16, Figure 17, Figure 18, Figure 19 and Figure 20. The black dots in the figures represent the values obtained from the finite element analysis, while the colored surfaces represent the fitted results. By obtaining the coefficients of the polynomial function through surface fitting, the plastic parameters corresponding to the material can be determined.

3.5. Optimization Algorithms

Engineering optimization problems are often complex, with objective functions that may exhibit multimodality, nonlinearity, non-continuity, and non-differentiability. The design variables and constraint functions can be linear, nonlinear, continuous, or discrete. These complexities render traditional numerical optimization and direct search methods incapable of finding global optimal solutions when no derivative or gradient information is available. Consequently, researchers have developed global exploration methods, which provide new approaches and tools for addressing such complex optimization problems.
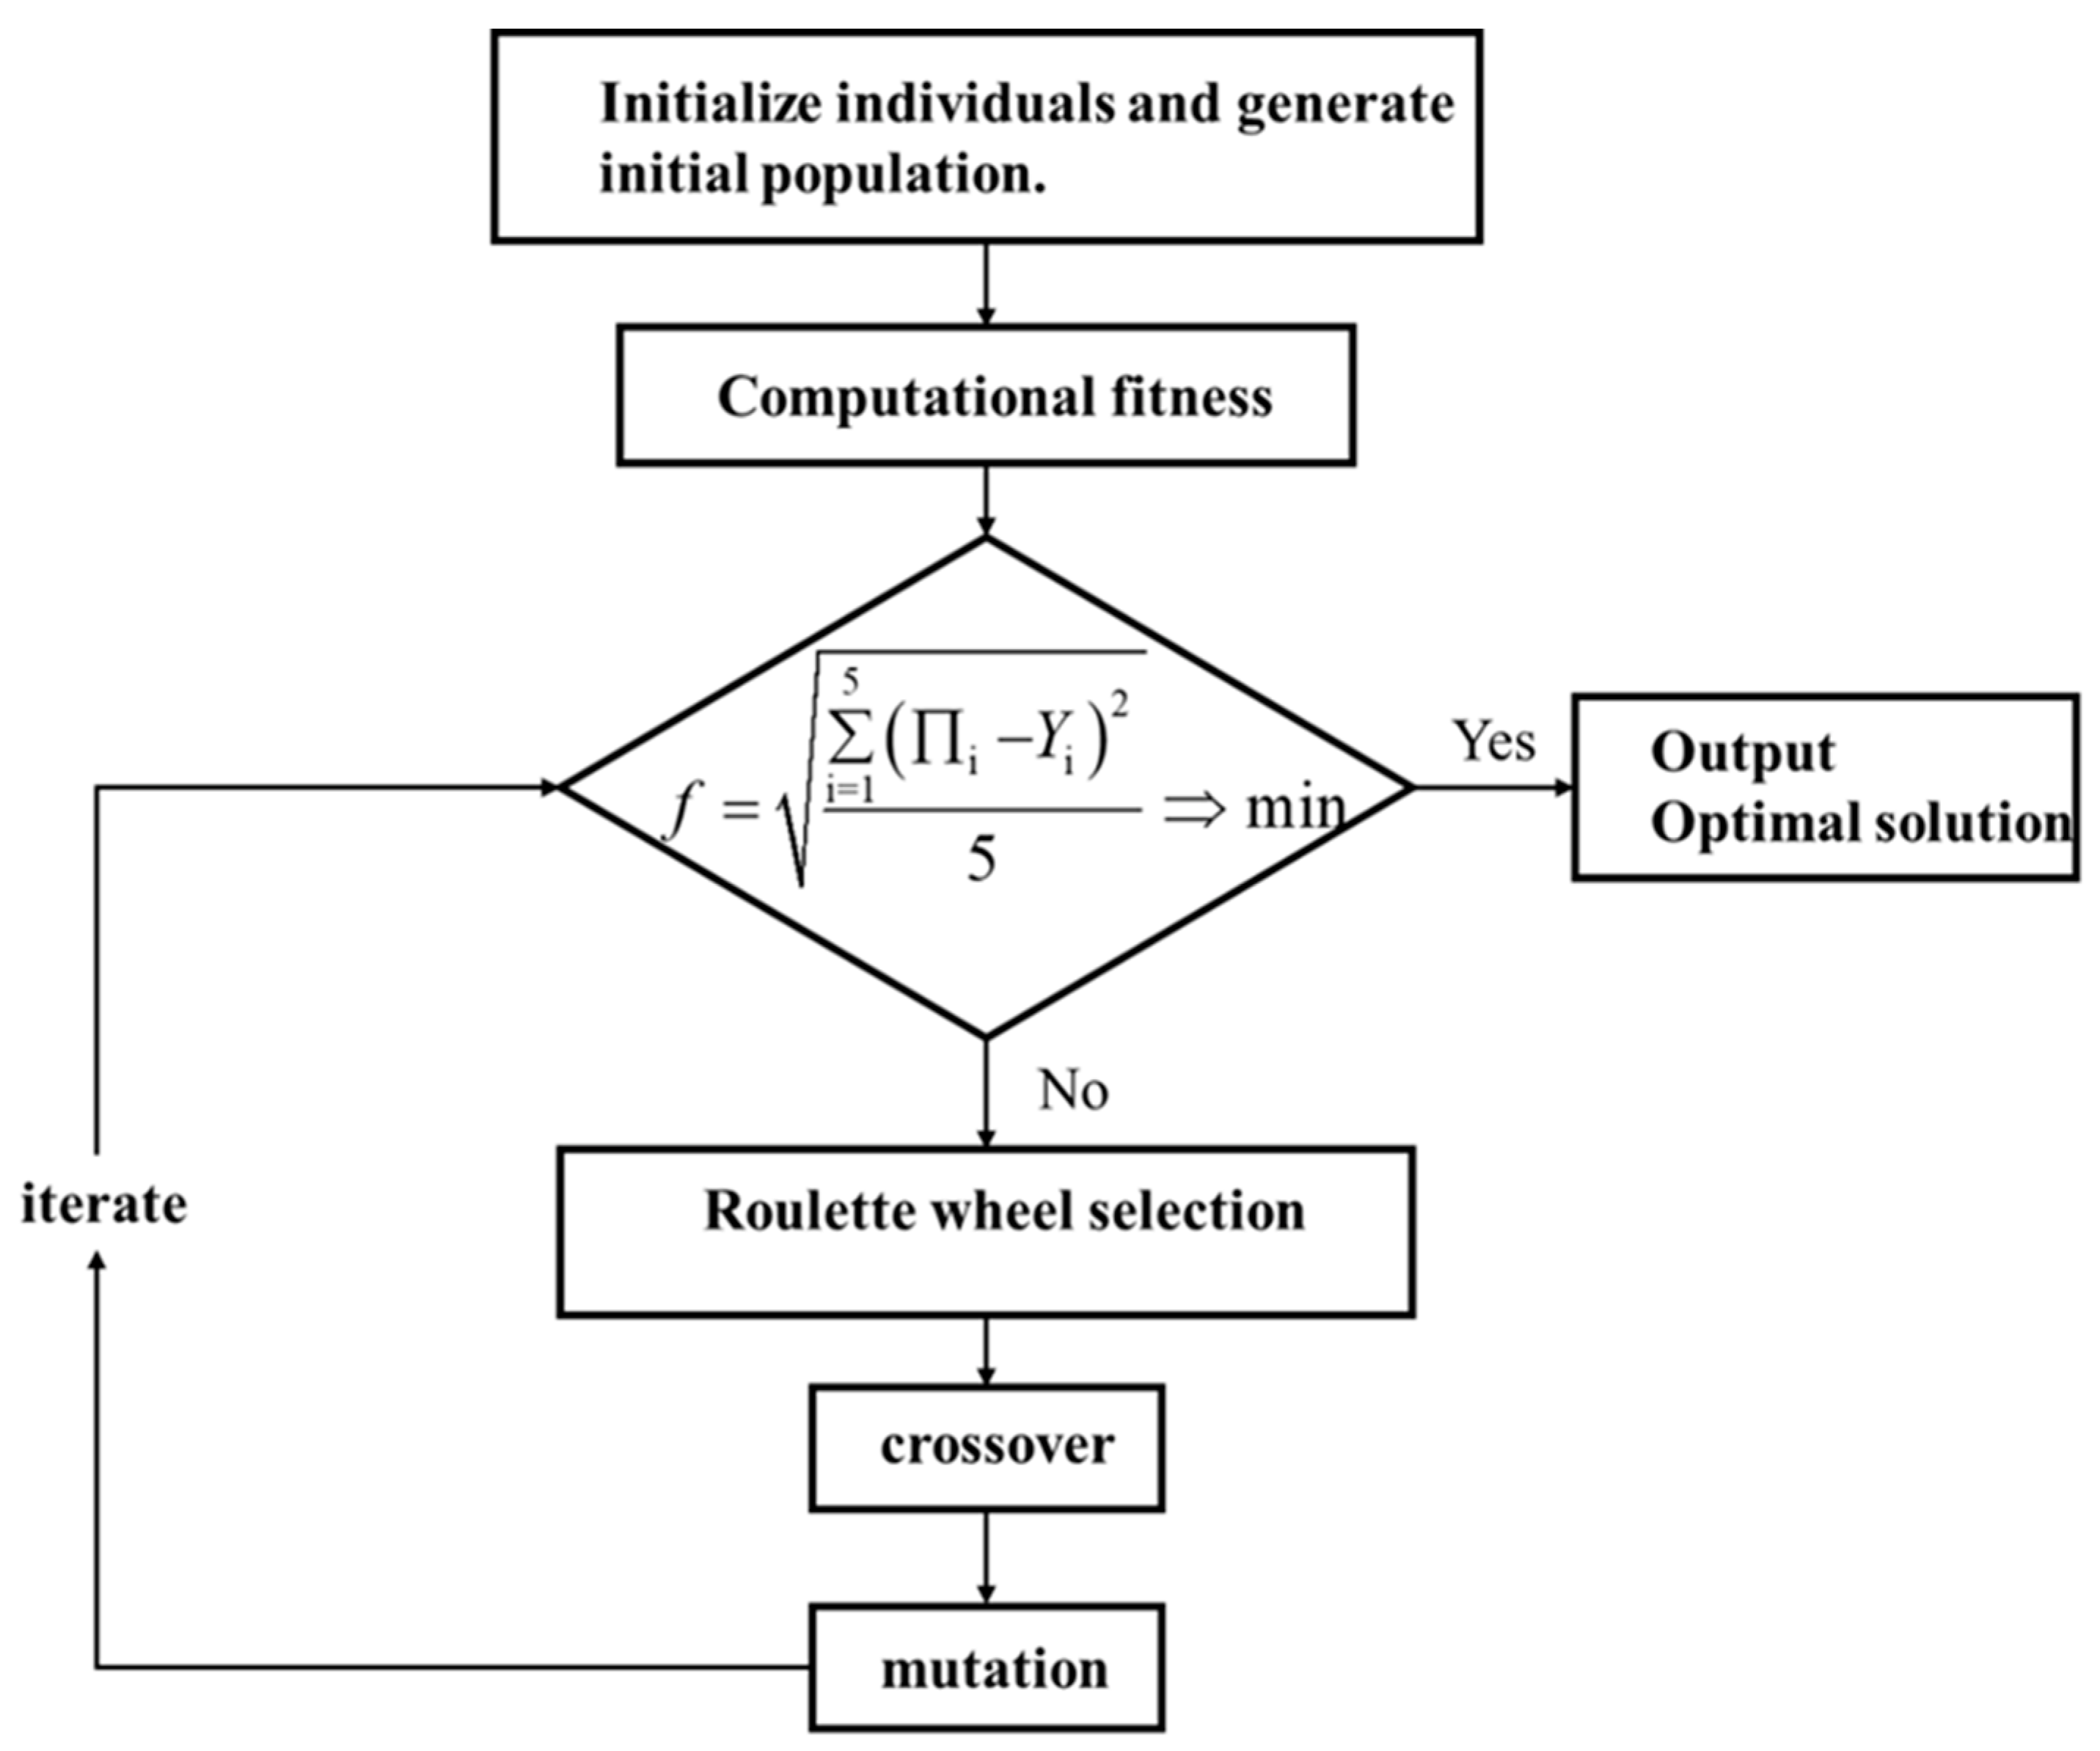
The Genetic Algorithm (GA) is a part of the evolutionary computation and is a computational model that simulates the biological evolutionary process of Darwinian natural selection and survival of the fittest. It is a method for searching for optimal solutions by mimicking the natural evolutionary process. The GA is simple, versatile, robust, and suitable for parallel processing. The process is illustrated in Figure 21.
To initiate the population, consider n and σy parameters within the search space defined by 0 < n < 0.5 and 10 < σy < 1000. Then, calculate the fitness of each individual in the population. The reproductive opportunities of individuals are determined based on their fitness values, where individuals with higher fitness levels have a greater chance of reproduction compared to those with lower fitness levels. This process ensures that the average fitness level of the new population is higher than that of the old population.
To efficiently and accurately solve the fitting function, Πk, we can minimize the error function using the GA algorithm. The error function is represented by Equation (14).
f = i = 1 5 i Y i 2 5
The selection method employed in the GA algorithm utilizes roulette wheel selection as it converges faster than other methods. After selection, crossover and mutation operations are performed, followed by iterative processes to obtain the optimal solution.
To validate the accuracy of the program, we compared the experimental data and GA-predicted data for the 5052 aluminum alloy, 6061 aluminum alloy, and 7075 aluminum alloy. The results are presented in Table 3. The results show that the maximum error of the n value is 5.56%, and the maximum error of σy is 4.17%.

3.6. Mysterious Materials

As shown in Figure 22, we selected two materials with different plastic properties, namely n = 0.5 and σy = 100 MPa and n = 0 and σy = 500 MPa. It can be observed that these materials exhibit nearly identical P-h curves. These materials have been referred to as “mysterious materials” by researchers [40]. These so-called “mysterious materials” are not necessarily materials with unique mechanical properties, but could be commonly used engineering materials. Therefore, extracting parameters solely from the P-h curves is insufficient to differentiate these “mysterious materials accurately”. Hence, we introduce the residual indentation shape after unloading and perform dimensionless analysis on the projected contact area to distinguish these “mysterious materials” and obtain more accurate predictive values.
The plastic parameters of the mysterious material were determined using an optimization algorithm and the results are presented in Table 4.
The plastic parameters of randomly selected materials were determined using an optimization algorithm and the corresponding results are presented in Table 5.
Upon comparing the predicted material parameters with the real material parameters, it can be observed that the maximum error of n is 7.69%, the average error is 4.628%, the maximum error of σy is 8.83%, and the average error is 6.696%. These findings indicate that the program exhibits favorable predictive capabilities for parameters within the specified range.

4. Conclusions

This study proposes a method for determining the yield stress and hardening exponent based on the extensive finite element analysis and dimensionless analysis of indentation variables. The material’s plastic properties can be derived by obtaining plasticity-related parameters from the P-h curve and the projection area of the contact zone.
The following conclusions are drawn from the analysis:
(1)
The proposed method effectively extracts plasticity-related parameters from the P-h curve and the projection area of the contact zone, allowing for the accurate characterization of the material’s plastic behavior.
(2)
The variations in the indentation parameters concerning the yield stress and hardening index were investigated. The maximum load, total work, and elastic work increase with the increase in σy and n, while the residual indentation depth, contact stiffness, and projection area of the contact zone decrease with the increase in σy and n.
(3)
The residual imprint after unloading the indenter is influenced by the material itself, with lower values of n and σy resulting in a more pronounced pile-up, whereas higher values of n and σy lead to sink-in.
(4)
Random materials within the specified range also yielded satisfactory results using the implemented program.
Subsequent work will build upon the existing foundation, extending the research to validate additional aluminum alloys and alloys under different conditions using the developed program. Concurrently, integrating this program with practical applications aims to fabricate more convenient handheld indentation instruments, thereby facilitating rapid measurements of yield stress and hardening exponents in aluminum alloys.

Author Contributions

Conceptualization, C.L.; Formal analysis, Y.B.; Data curation, Y.B.; Writing—original draft, Y.B.; Writing—review and editing, C.L. All authors have read and agreed to the published version of the manuscript.

Funding

This research received no external funding.

Data Availability Statement

The data presented in this study are available on request from the corresponding author. The data are not publicly available due to privacy.

Conflicts of Interest

There are no conflicts of interest.

References

  1. Tabor, D. The Hardness of Metals. In Monographs on the Physics and Chemistry of Materials; Clarendon Press: Oxford, UK; Oxford University Press: London, UK, 1951. [Google Scholar]
  2. Johnson, K.L. Correlation of indentation experiments. J. Mech. Phys. Solids 1970, 18, 115–126. [Google Scholar] [CrossRef]
  3. Zhang, X.; Zhang, C. Inconsistent nanoindentation test hardness using different Berkovich indenters. J. Mater. Res. Technol. 2023, 25, 6198–6208. [Google Scholar] [CrossRef]
  4. Niu, J.; Miao, B.; Guo, J.; Ding, Z.; He, Y.; Chi, Z.; Wang, F.; Ma, X. Leveraging Deep Neural Networks for Estimating Vickers Hardness from Nanoindentation Hardness. Materials 2024, 17, 148. [Google Scholar] [CrossRef]
  5. Chen, S.; Yuan, J.; Wang, S.; Mei, L.; Yan, J.; Li, L.; Zhang, Q.; Zhu, Z.; Lv, J.; Xue, Y.; et al. Towards a reliable nanohardness-dose correlation of ion-irradiated materials from nanoindentation tests: A case study in proton-irradiated vanadium. Int. J. Plast. 2023, 171, 103804. [Google Scholar] [CrossRef]
  6. Phani, P.S.; Hackett, B.; Walker, C.; Oliver, W.; Pharr, G. On the measurement of hardness at high strain rates by nanoindentation impact testing. J. Mech. Phys. Solids 2023, 170, 105105. [Google Scholar] [CrossRef]
  7. Sedlatschek, T.; Krämer, M.; Gibson, J.S.-L.; Korte-Kerzel, S.; Bezold, A.; Broeckmann, C. Mechanical properties of heterogeneous, porous LiFePO4 cathodes obtained using statistical nanoindentation and micromechanical simulations. J. Power Sources 2022, 539, 231565. [Google Scholar] [CrossRef]
  8. Zhang, H.; Stewart, M.; De Luca, F.; Smet, P.F.; Sousanis, A.; Poelman, D.; Rungger, I.; Gee, M. Young’s modulus of thin SmS films measured by nanoindentation and laser acoustic wave. Surf. Coat. Technol. 2021, 421, 127428. [Google Scholar] [CrossRef]
  9. Taniguchi, T. Exploration of elastic moduli of molecular crystals via database screening by pretrained neural network potential. CrystEngComm 2024, 26, 631–638. [Google Scholar] [CrossRef]
  10. Yang, Y.; Peng, R.; Li, J.; Chen, X.; Zhang, H.; Zhao, J.; He, Y.; Liu, Z. Elastic-plastic properties of ceramic matrix composites characterization by nanoindentation testing coupled with computer modeling. Ceram. Int. 2024, 50, 18540–18548. [Google Scholar] [CrossRef]
  11. Peng, G.; Liu, Y.; Xu, F.; Jiang, H.; Jiang, W.; Zhang, T. On determination of elastic modulus and indentation hardness by instrumented spherical indentation: Influence of surface roughness and correction method. Mater. Res. Express 2023, 10, 086503. [Google Scholar] [CrossRef]
  12. Ying, P.; Xia, Y. Elastic modulus identification of particles in particulate composite through nanoindentation. Int. J. Mech. Sci. 2023, 260, 108660. [Google Scholar] [CrossRef]
  13. Lee, J.; Marimuthu, K.P.; Han, G.; Lee, H. A dual indentation method for evaluating intrinsic material properties of metals under residual stress. J. Mater. Res. Technol. 2024, 30, 4181–4191. [Google Scholar] [CrossRef]
  14. Kong, D.; Yang, B.; Hu, P. Binary Newton Calculation Method of Residual Stress Based on the Indentation Energy Difference Theory. Metals 2022, 12, 1439. [Google Scholar] [CrossRef]
  15. Han, G.; Lee, B.; Lee, S.; Jeong, C.; Lee, H. Evaluation of plastic properties and equi-biaxial residual stress via indentation and ANN. Mater. Des. 2024, 239, 112745. [Google Scholar] [CrossRef]
  16. Liu, X.; Cai, L.; Chen, H. Residual stress indentation model based on material equivalence. Chin. J. Aeronaut. 2022, 35, 304–313. [Google Scholar] [CrossRef]
  17. Liu, Y.; Wang, Q.; Lu, C.; Xue, T.; Hu, B.; Zhang, C. Microscopic residual stress evolution at the SiC/Al interface during nanoindentation via molecular dynamics simulation. Surf. Interfaces 2022, 33, 102210. [Google Scholar] [CrossRef]
  18. Darnbrough, E.; Aspinall, J.; Pasta, M.; Armstrong, D.E. Elastic and plastic mechanical properties of lithium measured by nanoindentation. Mater. Des. 2023, 233, 112200. [Google Scholar] [CrossRef]
  19. Jiao, Q.; Chen, Y.; Kim, J.-H.; Han, C.-F.; Chang, C.-H.; Vlassak, J.J. A machine learning perspective on the inverse indentation problem: Uniqueness, surrogate modeling, and learning elasto-plastic properties from pile-up. J. Mech. Phys. Solids 2024, 185, 105557. [Google Scholar] [CrossRef]
  20. Jeong, K.; Lee, K.; Kwon, D.; Lee, M.-G.; Han, H.N. Parameter determination of anisotropic yield function using neural network-based indentation plastometry. Int. J. Mech. Sci. 2024, 263, 108776. [Google Scholar] [CrossRef]
  21. Gallardo-Basile, F.-J.; Roters, F.; Jentner, R.M.; Best, J.P.; Kirchlechner, C.; Srivastava, K.; Scholl, S.; Diehl, M. Application of a nanoindentation-based approach for parameter identification to a crystal plasticity model for bcc metals. Mater. Sci. Eng. A 2023, 881, 145373. [Google Scholar] [CrossRef]
  22. Yin, B.; Xue, X.; Zhang, M.; Deng, T.; Li, J.; Tang, B. Parameter identification and pileup behavior of TiAl alloy through nanoindentation and crystal plasticity simulation. J. Alloy. Compd. 2023, 948, 169743. [Google Scholar] [CrossRef]
  23. Campbell, J.E.; Thompson, R.P.; Dean, J.; Clyne, T.W. Experimental and computational issues for automated extraction of plasticity parameters from spherical indentation. Mech. Mater. 2018, 124, 118–131. [Google Scholar] [CrossRef]
  24. Hosseinzadeh, A.; Mahmoudi, A. Determination of mechanical properties using sharp macro-indentation method and genetic algorithm. Mech. Mater. 2017, 114, 57–68. [Google Scholar] [CrossRef]
  25. Najjar, I.; Sadoun, A.; Alsoruji, G.S.; Elaziz, M.A.; Wagih, A. Predicting the mechanical properties of Cu–Al2O3 nanocomposites using machine learning and finite element simulation of indentation experiments. Ceram. Int. 2021, 48, 7748–7758. [Google Scholar] [CrossRef]
  26. Long, X.; Ding, X.; Li, J.; Dong, R.; Su, Y.; Chang, C. Indentation Reverse Algorithm of Mechanical Response for Elastoplastic Coatings Based on LSTM Deep Learning. Materials 2023, 16, 2617. [Google Scholar] [CrossRef]
  27. Wang, M.; Zhang, G.; Liu, T.; Wang, W. Determination of Elastoplastic Properties of 2024 Aluminum Alloy Using Deep Learning and Instrumented Nanoindentation Experiment. Acta Mech. Solida Sin. 2023, 36, 327–339. [Google Scholar] [CrossRef]
  28. Ghanbari, S.S.; Mahmoudi, A. An improvement in data interpretation to estimate residual stresses and mechanical properties using instrumented indentation: A comparison between machine learning and Kriging model. Eng. Appl. Artif. Intell. 2022, 114, 105186. [Google Scholar] [CrossRef]
  29. Huang, L.Y.; Guan, K.S.; Xu, T.; Zhang, J.M.; Wang, Q.Q. Investigation of the mechanical properties of steel using instrumented indentation test with simulated annealing particle swarm optimization. Theor. Appl. Fract. Mech. 2019, 102, 116–121. [Google Scholar] [CrossRef]
  30. Noii, N.; Aghayan, I. Characterization of elastic-plastic coated material properties by indentation techniques using optimisation algorithms and finite element analysis. Int. J. Mech. Sci. 2019, 152, 465–480. [Google Scholar] [CrossRef]
  31. Kang, J.J.; Becker, A.A.; Wen, W.; Sun, W. Extracting elastic-plastic properties from experimental loading-unloading indentation curves using different optimization techniques. Int. J. Mech. Sci. 2018, 144, 102–109. [Google Scholar] [CrossRef]
  32. Wang, M.Z.; Wu, J.J.; Hui, Y.; Zhang, Z.K.; Zhan, X.F.; Guo, R.C. Identification of elastic-plastic properties of metal materials by using the residual imprint of spherical indentation. Mater. Sci. Eng. A 2017, 679, 143–154. [Google Scholar] [CrossRef]
  33. Fernandez-Zelaia, P.; Joseph, V.R.; Kalidindi, S.R.; Melkote, S.N. Estimating mechanical properties from spherical indentation using Bayesian approaches. Mater. Des. 2018, 147, 92–105. [Google Scholar] [CrossRef]
  34. Su, J.; He, Y.; Li, Y. An improved analytic model for extracting plastic mechanical property of matrix in hot-extruded in-situ TiB2/2024 composite based on Berkovich indentation experimental results. Mater. Sci. Eng. A 2023, 881, 145285. [Google Scholar] [CrossRef]
  35. Wang, M.; Wang, W. An Inverse Method for Measuring Elastoplastic Properties of Metallic Materials Using Bayesian Model and Residual Imprint from Spherical Indentation. Materials 2021, 14, 7105. [Google Scholar] [CrossRef]
  36. Clyne, T.W.; Campbell, J.E.; Burley, M.; Dean, J. Profilometry-Based Inverse Finite Element Method Indentation Plastometry. Adv. Eng. Mater. 2021, 23, 202100437. [Google Scholar] [CrossRef]
  37. Hwang, Y.; Marimuthu, K.P.; Kim, N.; Lee, C.; Lee, H. Extracting plastic properties from in-plane displacement data of spherical indentation imprint. Int. J. Mech. Sci. 2021, 197, 106291. [Google Scholar] [CrossRef]
  38. Goto, K.; Watanabe, I.; Ohmura, T. Inverse estimation approach for elastoplastic properties using the load-displacement curve and pile-up topography of a single Berkovich indentation. Mater. Des. 2020, 194, 108925. [Google Scholar] [CrossRef]
  39. Iracheta, O.; Bennett, C.J.; Sun, W. A holistic inverse approach based on a multi-objective function optimisation model to recover elastic-plastic properties of materials from the depth-sensing indentation test. J. Mech. Phys. Solids 2019, 128, 1–20. [Google Scholar] [CrossRef]
  40. Chen, X.; Ogasawara, N.; Zhao, M.; Chiba, N. On the uniqueness of measuring elastoplastic properties from in-dentation: The indistinguishable mystical materials. J. Mech. Phys. Solids 2007, 55, 1618–1660. [Google Scholar] [CrossRef]
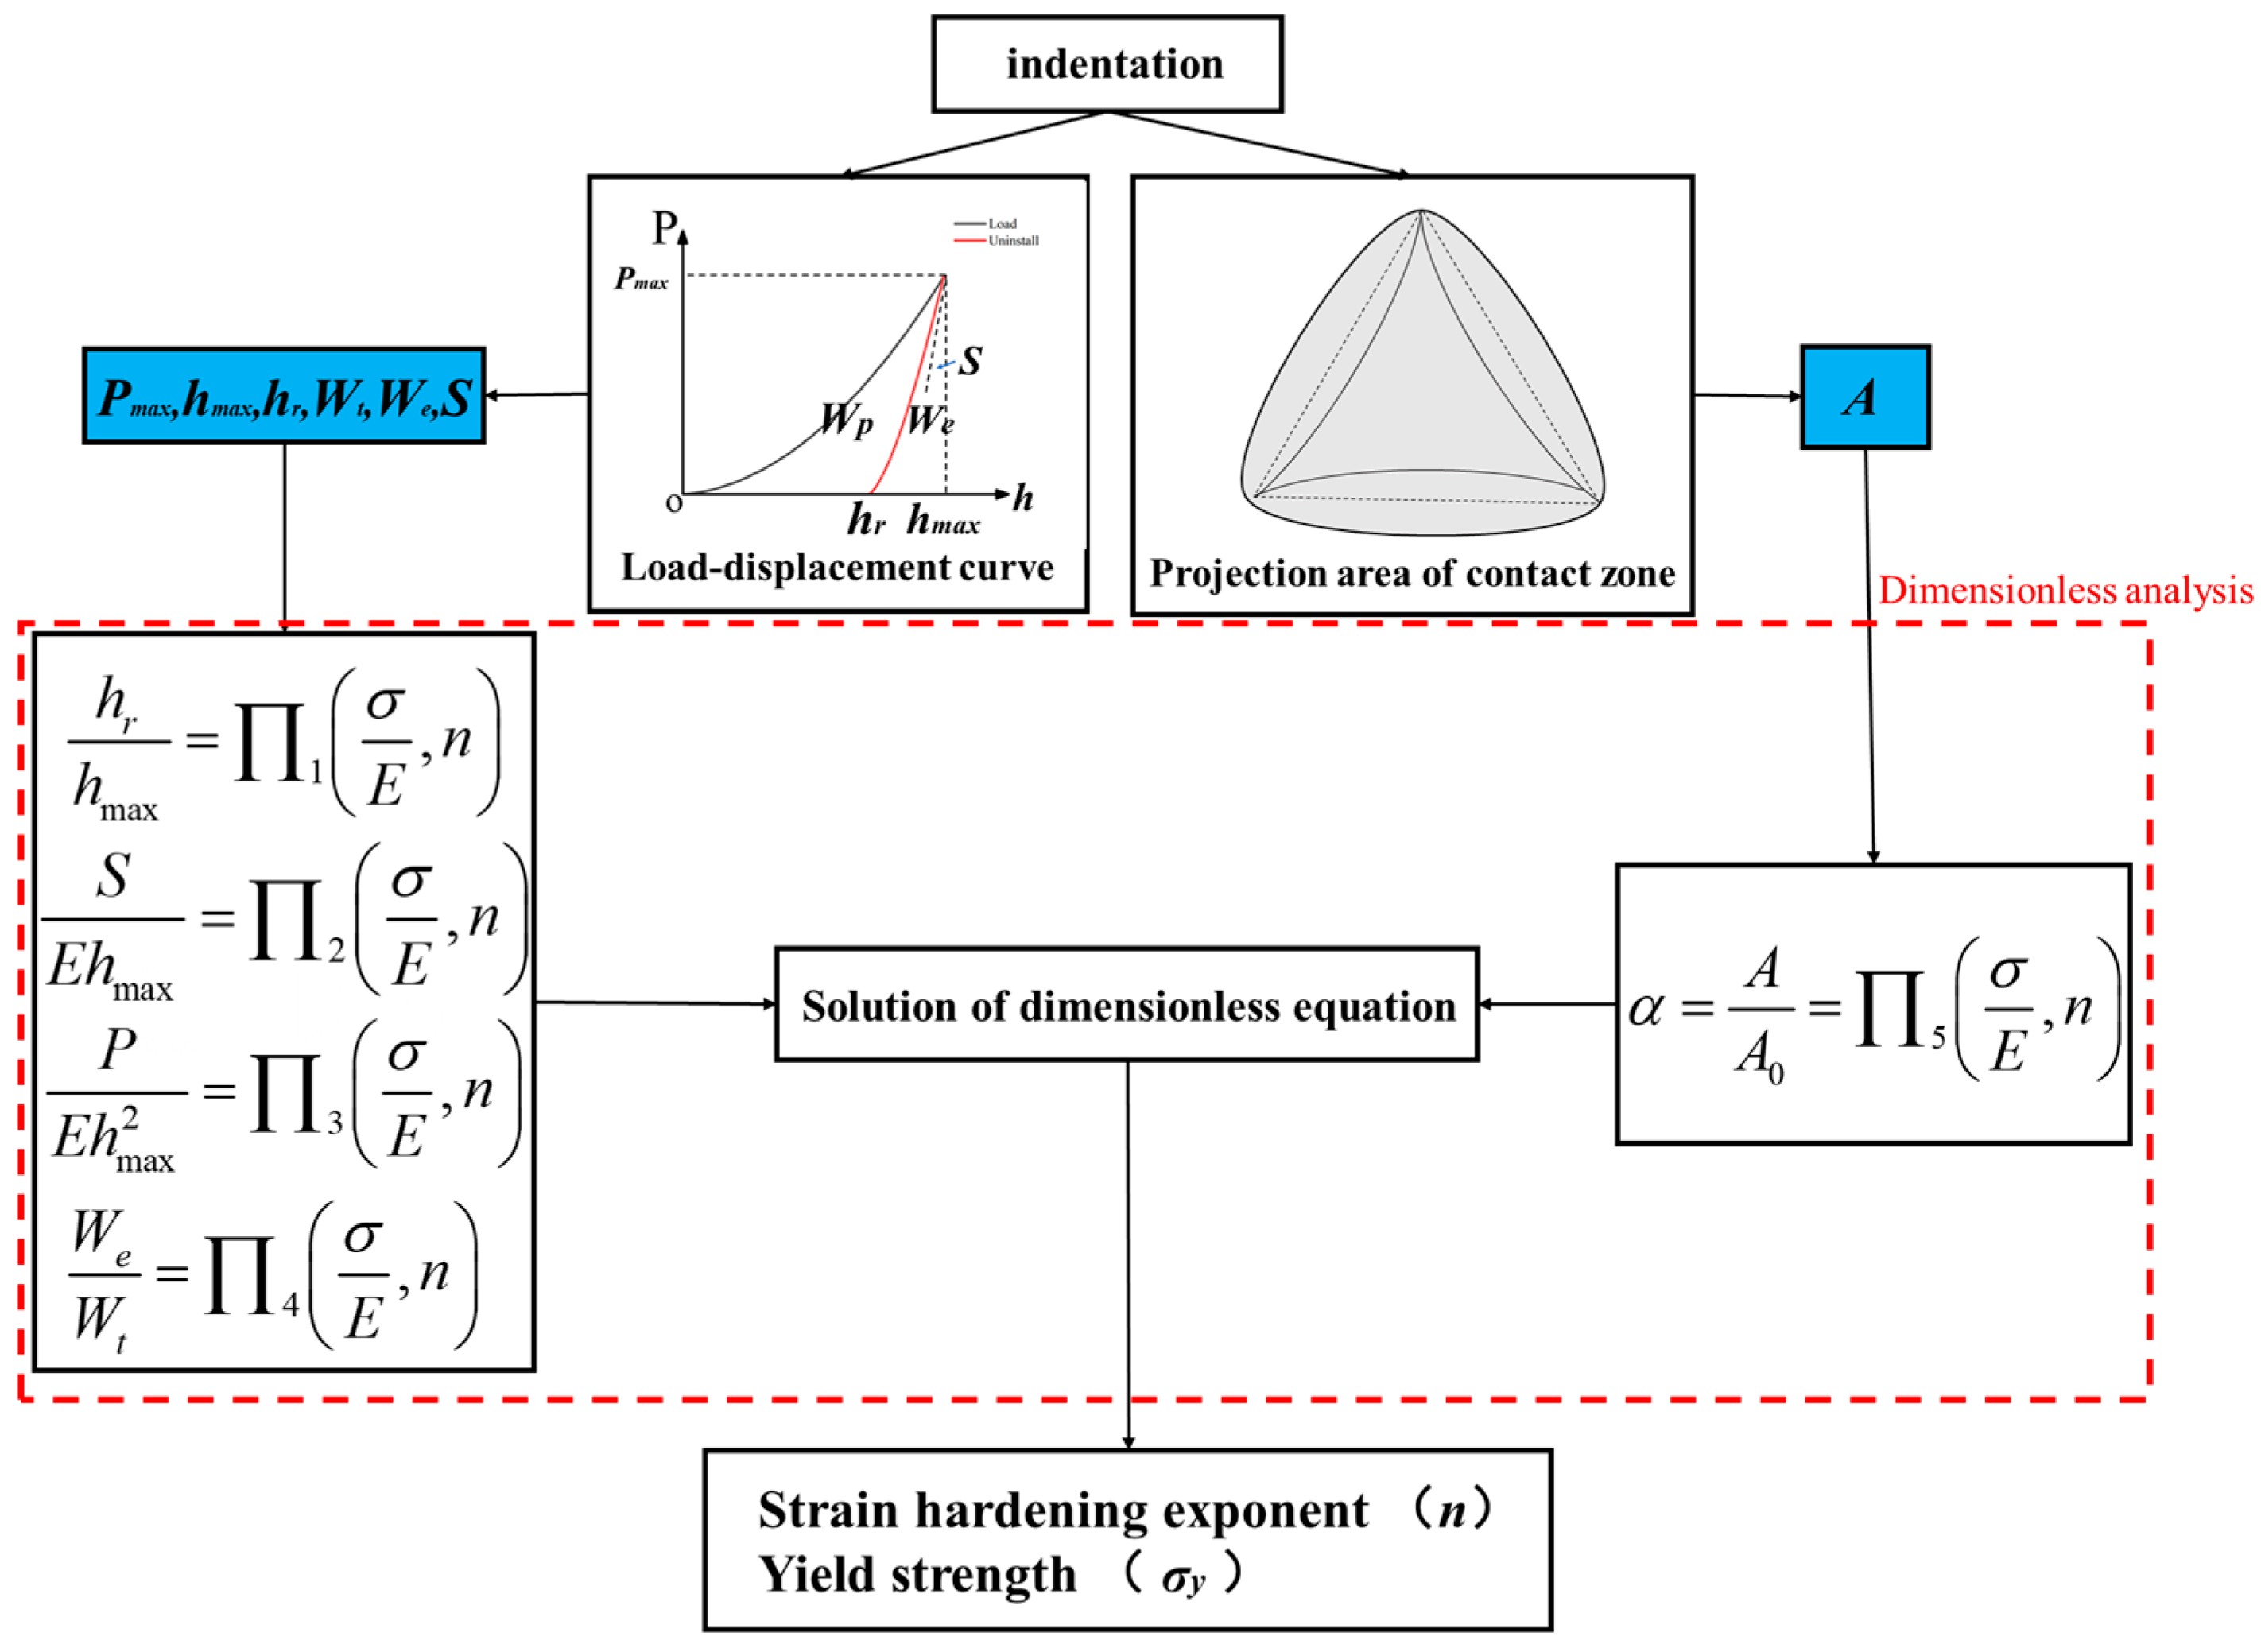
Figure 1. Flow chart of extracting plastic properties of materials.
Metals 14 00576 g001
Figure 2. Load-displacement curves of three different aluminum alloys obtained by nanoindentation experiment.
Metals 14 00576 g002
Figure 3. Residual imprint of three aluminum alloys obtained by laser confocal microscope: (a) 5052 aluminum; (b) 6061 aluminum; (c) 7075 aluminum.
Metals 14 00576 g003
Figure 4. Nanoindentation simulation of three-dimensionless model.
Metals 14 00576 g004
Figure 5. Comparison between the experiment’s P-h curve and the simulation’s P-h curve.
Metals 14 00576 g005
Figure 6. Schematic diagram of indentation mechanical response: (a) Three possible kinds of contact zone edges of indenter tip and measured material; (b) Load-displacement curve.
Metals 14 00576 g006
Figure 7. Parameters from P-h Curves: maximum indentation load.
Metals 14 00576 g007
Figure 8. Parameters from P-h Curves: elastic work.
Metals 14 00576 g008
Figure 9. Parameters from P-h Curves: total work done by the indenter.
Metals 14 00576 g009
Figure 10. Parameters from P-h Curves: residual indentation depth.
Metals 14 00576 g010
Figure 11. Parameters from P-h Curves: contact stiffness of the indenter.
Metals 14 00576 g011
Figure 12. Variation of the contact area of projection area with plasticity.
Metals 14 00576 g012
Figure 13. Contact area of three materials: (a) n = 0.1, σy = 50 MPa; (b) n = 0.3, σy = 100 MP; (c) n = 0.5, σy = 500 MPa.
Metals 14 00576 g013
Figure 14. Three-dimensionless coordinate diagram of the contact area of three kinds of material indenter: (a) n = 0.1, σy = 50 MPa; (b) n = 0.3, σy = 100 MP; (c) n = 0.5, σy = 500 MPa.
Metals 14 00576 g014
Figure 15. The phenomenon of accumulation and sinking after unloading the indenter.
Metals 14 00576 g015
Figure 16. Fitting surface and fitting effect: Residual indentation depth.
Metals 14 00576 g016
Figure 17. Fitting surface and fitting effect: Hardness.
Metals 14 00576 g017
Figure 18. Fitting surface and fitting effect: Indentation force.
Metals 14 00576 g018
Figure 19. Fitting surface and fitting effect: Indenter doing work.
Metals 14 00576 g019
Figure 20. Fitting surface and fitting effect: Projection area of contact zone.
Metals 14 00576 g020
Figure 21. Estimation of yield stress and hardening index by genetic algorithm.
Metals 14 00576 g021
Figure 22. Load-displacement curve of “mysterious materials”.
Metals 14 00576 g022
Table 1. Chemical composition of three aluminum alloys (wt%).
ElementMgSiFeCuZnTiMnCrAl
70752.520.090.211.45.40.020.040.2Bal.
60611.030.620.180.240.160.030.070.04Bal.
50522.40.050.260.060.080.010.060.16Bal.
Table 2. Tensile test results.
MaterialE (MPa)σy (MPa)n
707568,440480.220.09
606167,661263.470.08
505266,844132.590.18
Table 3. Comparison of test and prediction results.
MaterialTest nPredict nErrorTest σyPredict σyError
70750.090.0933.33%480.22 MPa500.23 MPa4.17%
60610.080.0845%263.47 MPa270.35 MPa2.61%
50520.180.175.56%132.59 MPa136.78 MPa3.16%
Table 4. Comparison of Inputs from “Mysterious Material” with Predicted Outcomes.
MaterialTest nPredict nErrorTest σyPredict σyError
10.10.0973%500 MPa488.85 MPa2.23%
20.50.492%100 MPa103.95 MPa3.95%
Table 5. Comparison of Inputs from Random Material with Predicted Outcomes.
MaterialTest nPredict nErrorTest σyPredict σyError
10.060.0623.3%120 MPa128.84 MPa7.37%
20.120.1254.16%240 MPa261.19 MPa8.83%
30.260.247.69%360 MPa343.43 MPa4.6%
40.340.325.88%480 MPa457.57 MPa4.57%
50.480.472.08%600 MPa648.69 MPa8.11%
Disclaimer/Publisher’s Note: The statements, opinions and data contained in all publications are solely those of the individual author(s) and contributor(s) and not of MDPI and/or the editor(s). MDPI and/or the editor(s) disclaim responsibility for any injury to people or property resulting from any ideas, methods, instructions or products referred to in the content.