Article

Analysis of a New Process for Forming Two Flanges Simultaneously in a Hollow Part by Extrusion with Two Moving Dies

1
Faculty of Mechanical Engineering, Lublin University of Technology, Nadbystrzycka 38D, 20-618 Lublin, Poland
2
Faculty of Mechanical Engineering and Aeronautics, Rzeszow University of Technology, Powstańców Warszawy 8, 35-959 Rzeszów, Poland
3
Faculty of Production Engineering and Materials Technology, Czestochowa University of Technology, J.H. Dąbrowskiego 69, 42-201 Częstochowa, Poland
*
Author to whom correspondence should be addressed.
Metals 2024, 14(6), 612; https://doi.org/10.3390/met14060612
Submission received: 13 March 2024 / Revised: 20 May 2024 / Accepted: 20 May 2024 / Published: 22 May 2024
(This article belongs to the Special Issue Advances in Modeling and Simulation in Metal Forming)

Abstract

:
This paper presents a new method for forming flanges in hollow parts. The process consists of an extrusion with two dies that move in an opposite direction to that of the punches. This particular kinematics of the tools makes it possible to form two flanges simultaneously in a single tool pass. The proposed method was investigated using a tube made of steel 42CrMo4. It was assumed that the extrusion would be conducted as a cold forming process at ambient temperature. Different diameters and heights of the impression made in the top and bottom dies were used. It was demonstrated that the main failure mode of the proposed technique was an unintended increase in the inside the diameter of the workpiece in the flange zone. The results showed that the above parameters had a key impact on the achievable maximum flange diameters and heights.

1. Introduction

Forming processes enable the efficient production of a wide range of hollow products that are used in almost all industries, including engineering, aerospace, food processing, and mining. This wide range of products makes it necessary to develop and design new processes that would make it possible to produce parts with increasingly better properties, while at the same time reduce production costs.
Hollow parts can be produced by cold forging. Ku et al. [1,2] conducted a study on forming inner races used in the automotive industry. Due to high unit loads, the split tool geometry had to be specially designed to provide the tools with the required mechanical strength. An equally important factor was heat treatment, the aim of which was to reduce the yield strength and hardness of the material in order to ensure lower forming forces. Similar studies were conducted on the forming of outer races [3,4]. The results confirmed that the hot forging technique could be replaced by cold forging. In addition, it was shown that the change resulted in an 81% reduction in machining time.
Chen et al. [5] proposed a new screw forging method aimed at reducing the number of steps in the forming process for automotive fasteners. These researchers replaced multi-step forging with the new injection forging method, thus reducing production time. Despite higher forming forces, the energy requirement of the new process was lower than that in the multi-step forging technique. In turn, Ku [6,7] investigated the cold forging process for producing a drive shaft. It was found that the use of two forming operations made it possible to obtain a product with the desired quality and geometry. Schiemann [8] et al. studied the phenomenon of fold formation in the flange upsetting of tubular cold forged parts. It was shown that, in addition to geometric parameters, the formation of the defect also depended on the local strengthening of material and hole surface quality.
Upsetting is another widely used method for forming hollow products. Pang et al. [9,10,11] proposed a novel method for forming a hollow flanged part from a tube. The process involved heating a tube section first and then deforming it into a rod by upsetting the workpiece wall. The obtained rod was then subjected to further upsetting operations until a flange with the assumed dimensions was obtained. The study showed that an increase in the inside diameter of the workpiece leading to reduced product weight resulted in an increase in the accumulated effective strain in the product. A completely different upsetting method for hollow products was presented in [12]. In this method, flanges were formed by the axial upsetting of the workpiece wall, which was made possible by the movement of either one or two tools that formed a closed or open impression. The failure modes in the process were buckling and the loss of material cohesion. The behaviour pattern of the forming force was similar to that observed in standard closed-impression upsetting operations, i.e., the force value significantly increased toward the end of the process.
Incremental forming is another method for forming hollow parts. This method was used for sheet metal forming [13] and flanging tube flanks [14] and ends [15], as well as sheets [16]. The tool has the form of a mandrel that moves along the selected trajectory, causing an increment in the local strain of the material. Studies investigating this process were primarily concerned with the effects of tool geometry and kinematics on the stability of the process. The failure modes of this technique included wall thinning, local buckling, and crack formation.
Alves et al. [17,18] proposed a new technique for joining tubes to sheets. The process was conducted in two stages. After reducing the thickness of the tube wall, a sheet flange was applied to the tube. After that, the two elements were fixed by the axial compression of the tube end protruding above the surface of the sheet. An advantage of the process was that it allowed the joining of parts made of different materials. One of the key parameters affecting the stability of the process was the corner radius of the working edge of the die. If the radius value was too low, this would induce local buckling of the tube wall; on the other hand, too large values of the radius would cause bending in the sheet to be joined to the tube.
A novel method for flanging hollow parts was proposed by Zhu et al. In this method, upsetting with a controllable deformation zone was conducted in a closed die impression, the volume of which was variable during the process as a result of the movement of the punch, mandrel, and counter punch relative to the die. The above-mentioned volume change resulted from different speeds of the punch and counter punch, which was made possible by the load from the counter punch. The main advantage of this method was that it made it possible to form relatively high flanges because of a reduced risk of workpiece wall buckling. The technique could be employed to forming flanges both on product end and in its centre [19]. It could also be used as a finishing operation in upsetting cups with increased wall thickness [20] or components with external gearing [21]. A study [22] showed that the forming force was nearly constant during the process. One of the failure modes was lap formation on the external surface of a flange. In this respect, the key parameters affecting this defect formation were the counter punch load as well as the die and counter punch geometry [23]. The die impression volume change could also be implemented by synchronizing the motion of the punch and sleeve, as was the case in an extrusion process conducted with the use of a moving sleeve in closed or semi-closed die impressions. For both cases, the sleeve moved in an opposite direction to that of the punch. The speed of the sleeve depended on the dimensions of the workpiece, extruded flange, and punch speed. On the one hand, the use of the sleeve prevented local buckling of the workpiece wall, and on the other, its movement helped increase the flange height. In closed-die extrusion, the flange height could be several times greater than the workpiece wall thickness, which allowed for multi-step flange forming [24,25]. In semi-open die extrusion, the achievable flange height was constrained by a potential loss of workpiece/mandrel contact in the zone outside the die impression as well as flank inclination [26,27].
A review of the literature has shown that new methods for forming hollow parts are constantly being developed by either modifying the existing processes or designing completely new techniques. Current research directions focus on ensuring the highest possible product quality in combination with the maximum efficiency and cost-effectiveness of production. In light of the above, this study investigates a new technique for forming hollow products with two flanges. The process involves extrusion using two dies that move in an opposite direction to that of the punches. The dies and the punches together with a split die form an impression which is closed at the beginning of the extrusion process but opens once the tools begin to move. The proposed technique makes it possible to produce complex parts in a single tool pass. As a result, the production time is reduced compared to that in other forming methods, e.g., multi-stage forging. This paper presents the results of a study investigating the relationship between the impression diameter and height in a moving die and the geometric parameters of a product. Numerical analyses have shown that tool geometry has the key impact on the achievable flange diameters and heights.

2. Materials and Methods

A schematic diagram of the process in which two flanges are simultaneously formed in hollow parts is shown in Figure 1. The billet in the form of a tube (tubes used for this process must be seamless) is put in the top and bottom dies that are separated by a split die. This tool does not move during the process and is removed from the forging when the process is complete. At the beginning of the process, the dies are in contact with the split die, thereby forming a closed impression with the split die, mandrel punch and hollow punch. As a result of the load exerted by the punches, the space between the tools is filled with the material being deformed. When the workpiece is in contact with the cylindrical zone of the top die impression described by a diameter Dit, the top die begins to move counter-clockwise in the direction of movement of the mandrel punch. The speed of the top die depends on the dimensions of its impression, the speed of the mandrel punch and the dimensions of the workpiece. The bottom die begins to move at the same point and in the same direction as the top die. Thanks to the kinematics of the process, the initially closed impression opens, making it possible for the flange height to increase. The impressions made in the top and bottom dies can be identical. As a result of using the same kinematics of the dies and the appropriate positioning of the billet, a part with two identical flanges is produced. It is also possible to use dies with different impressions, which will make it possible to form flanges of different geometries and dimensions.
This study investigates a case of the flanging process in which the top and bottom dies have the same impressions and both ends of the workpiece are equally distanced from the split die. The dimensions of the tools and the billet are given in Table 1. Two parameters were made variable: the cylindrical zone of the top and bottom die impression diameters Dit and Dib and the die impression heights Ht and Hb (see Table 2). An analysis of the effect of the above-mentioned parameters on the flanging process was based on numerical calculations. The analysis was performed using the finite element method-based Deform-2D/3D v11 software, assuming the axisymmetric state of strain and considering thermal effects. Axisymmetric geometries assume that the geometry of every plane radiating out from the centerline is identical.
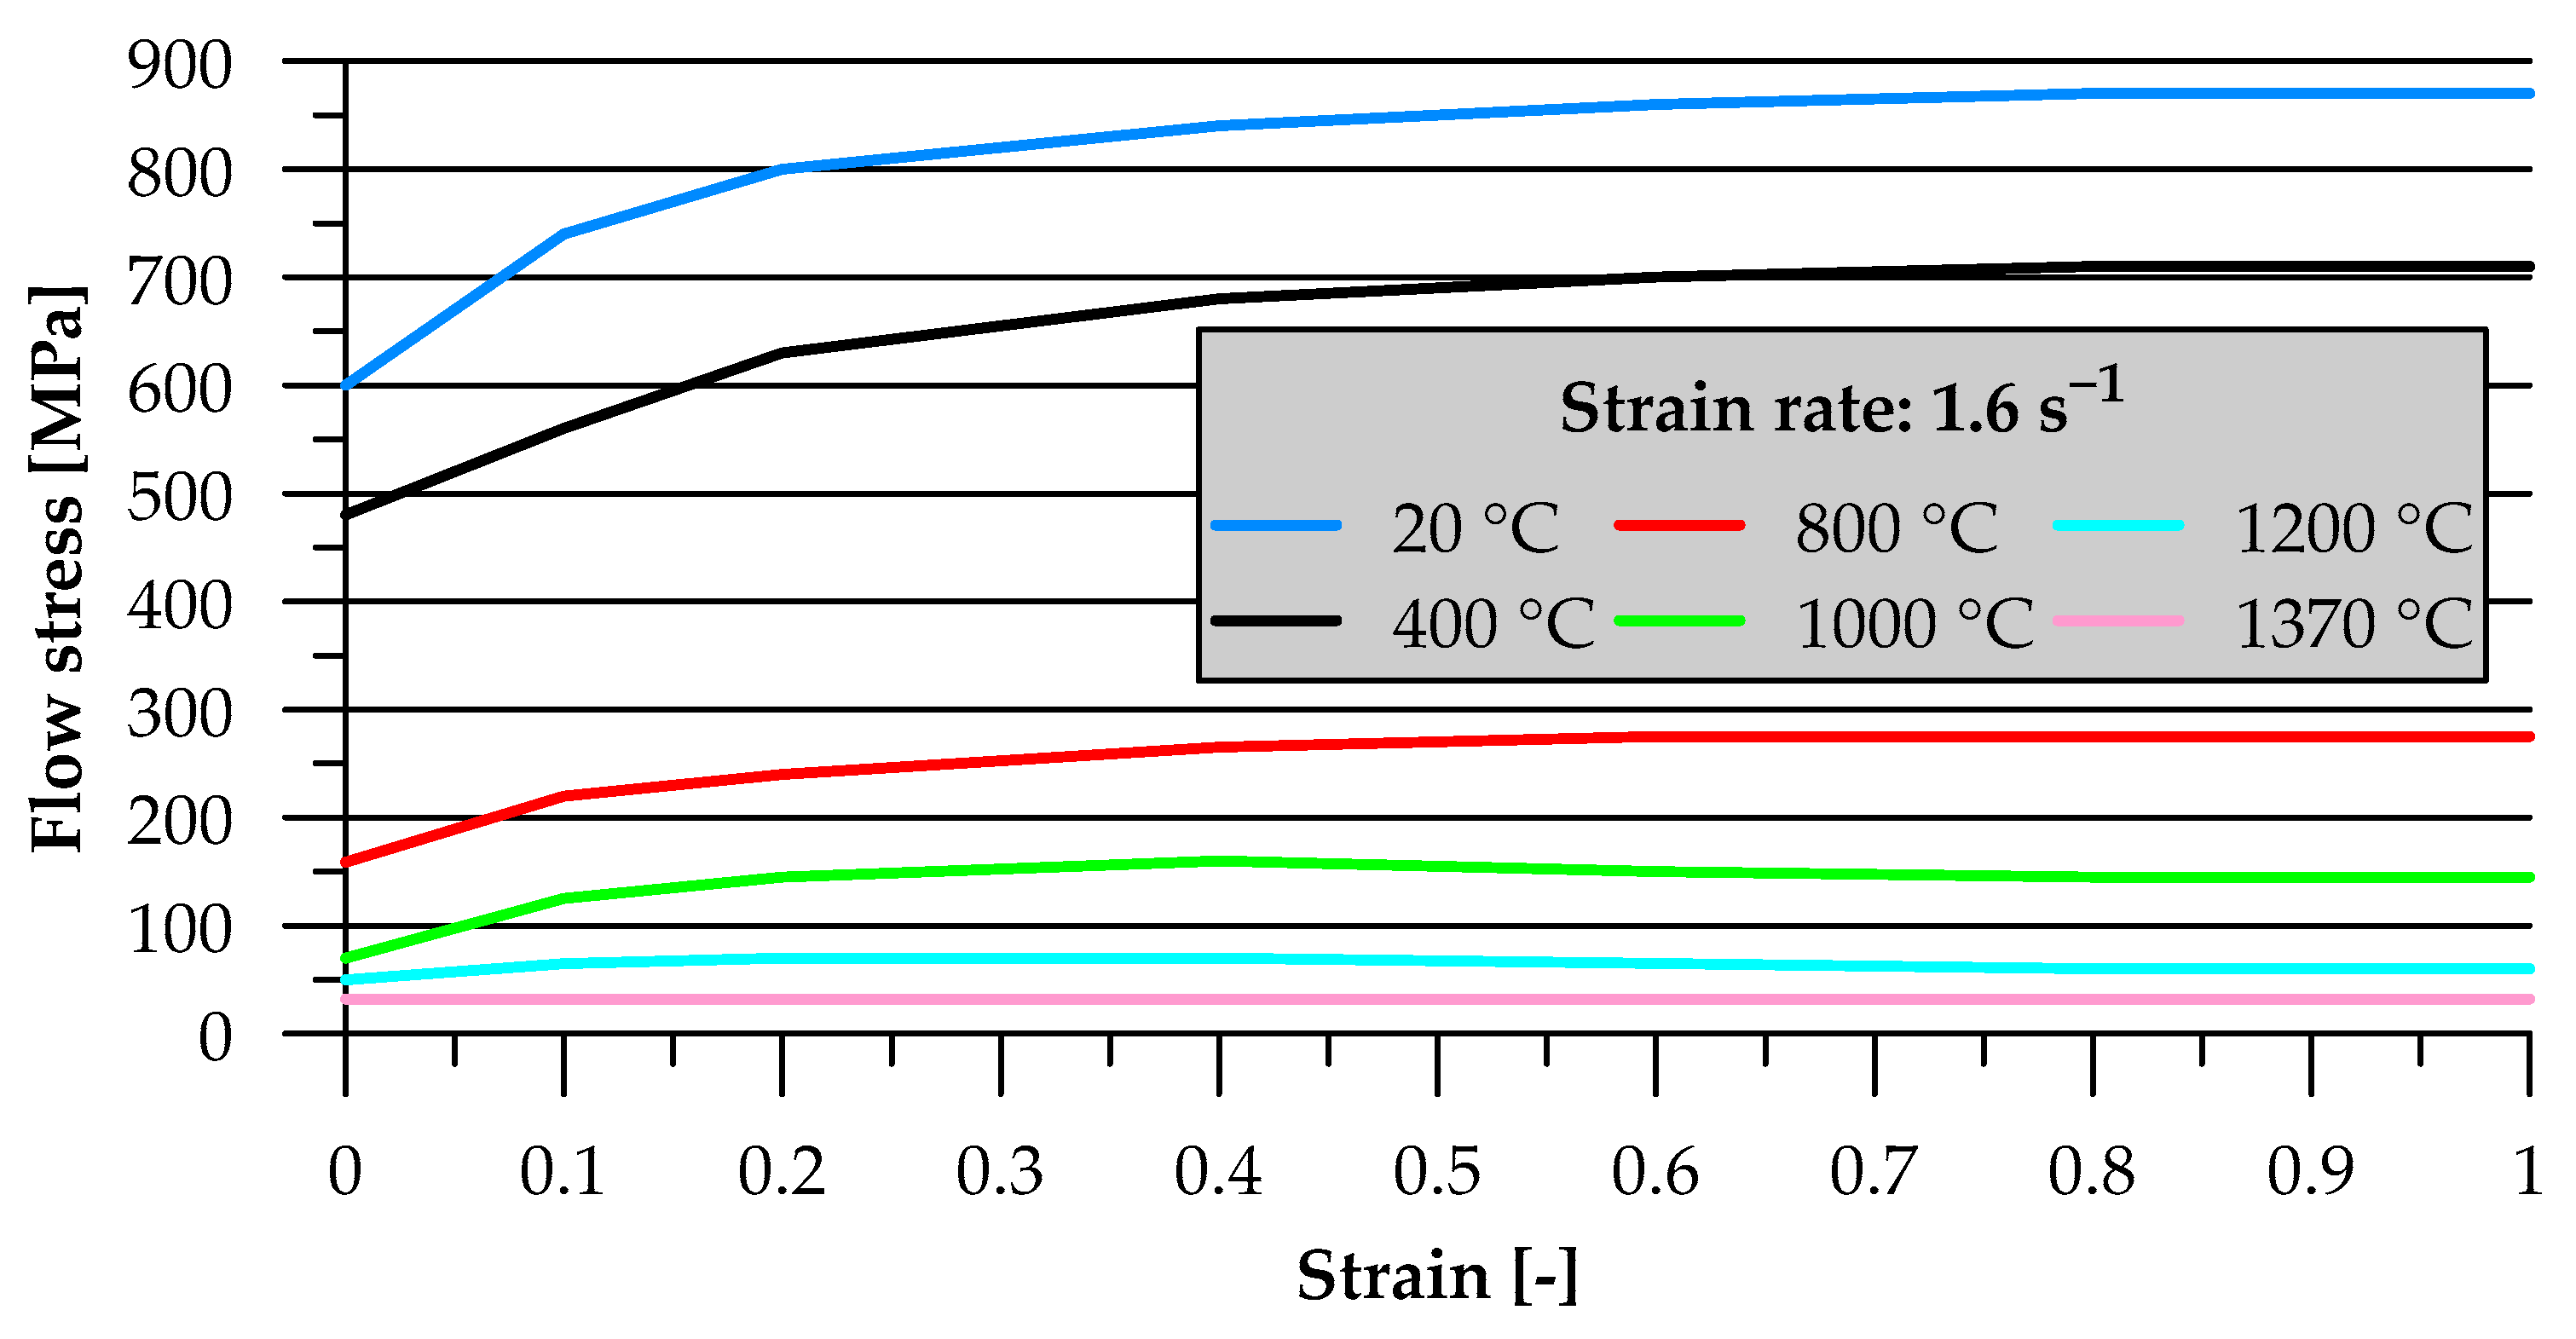
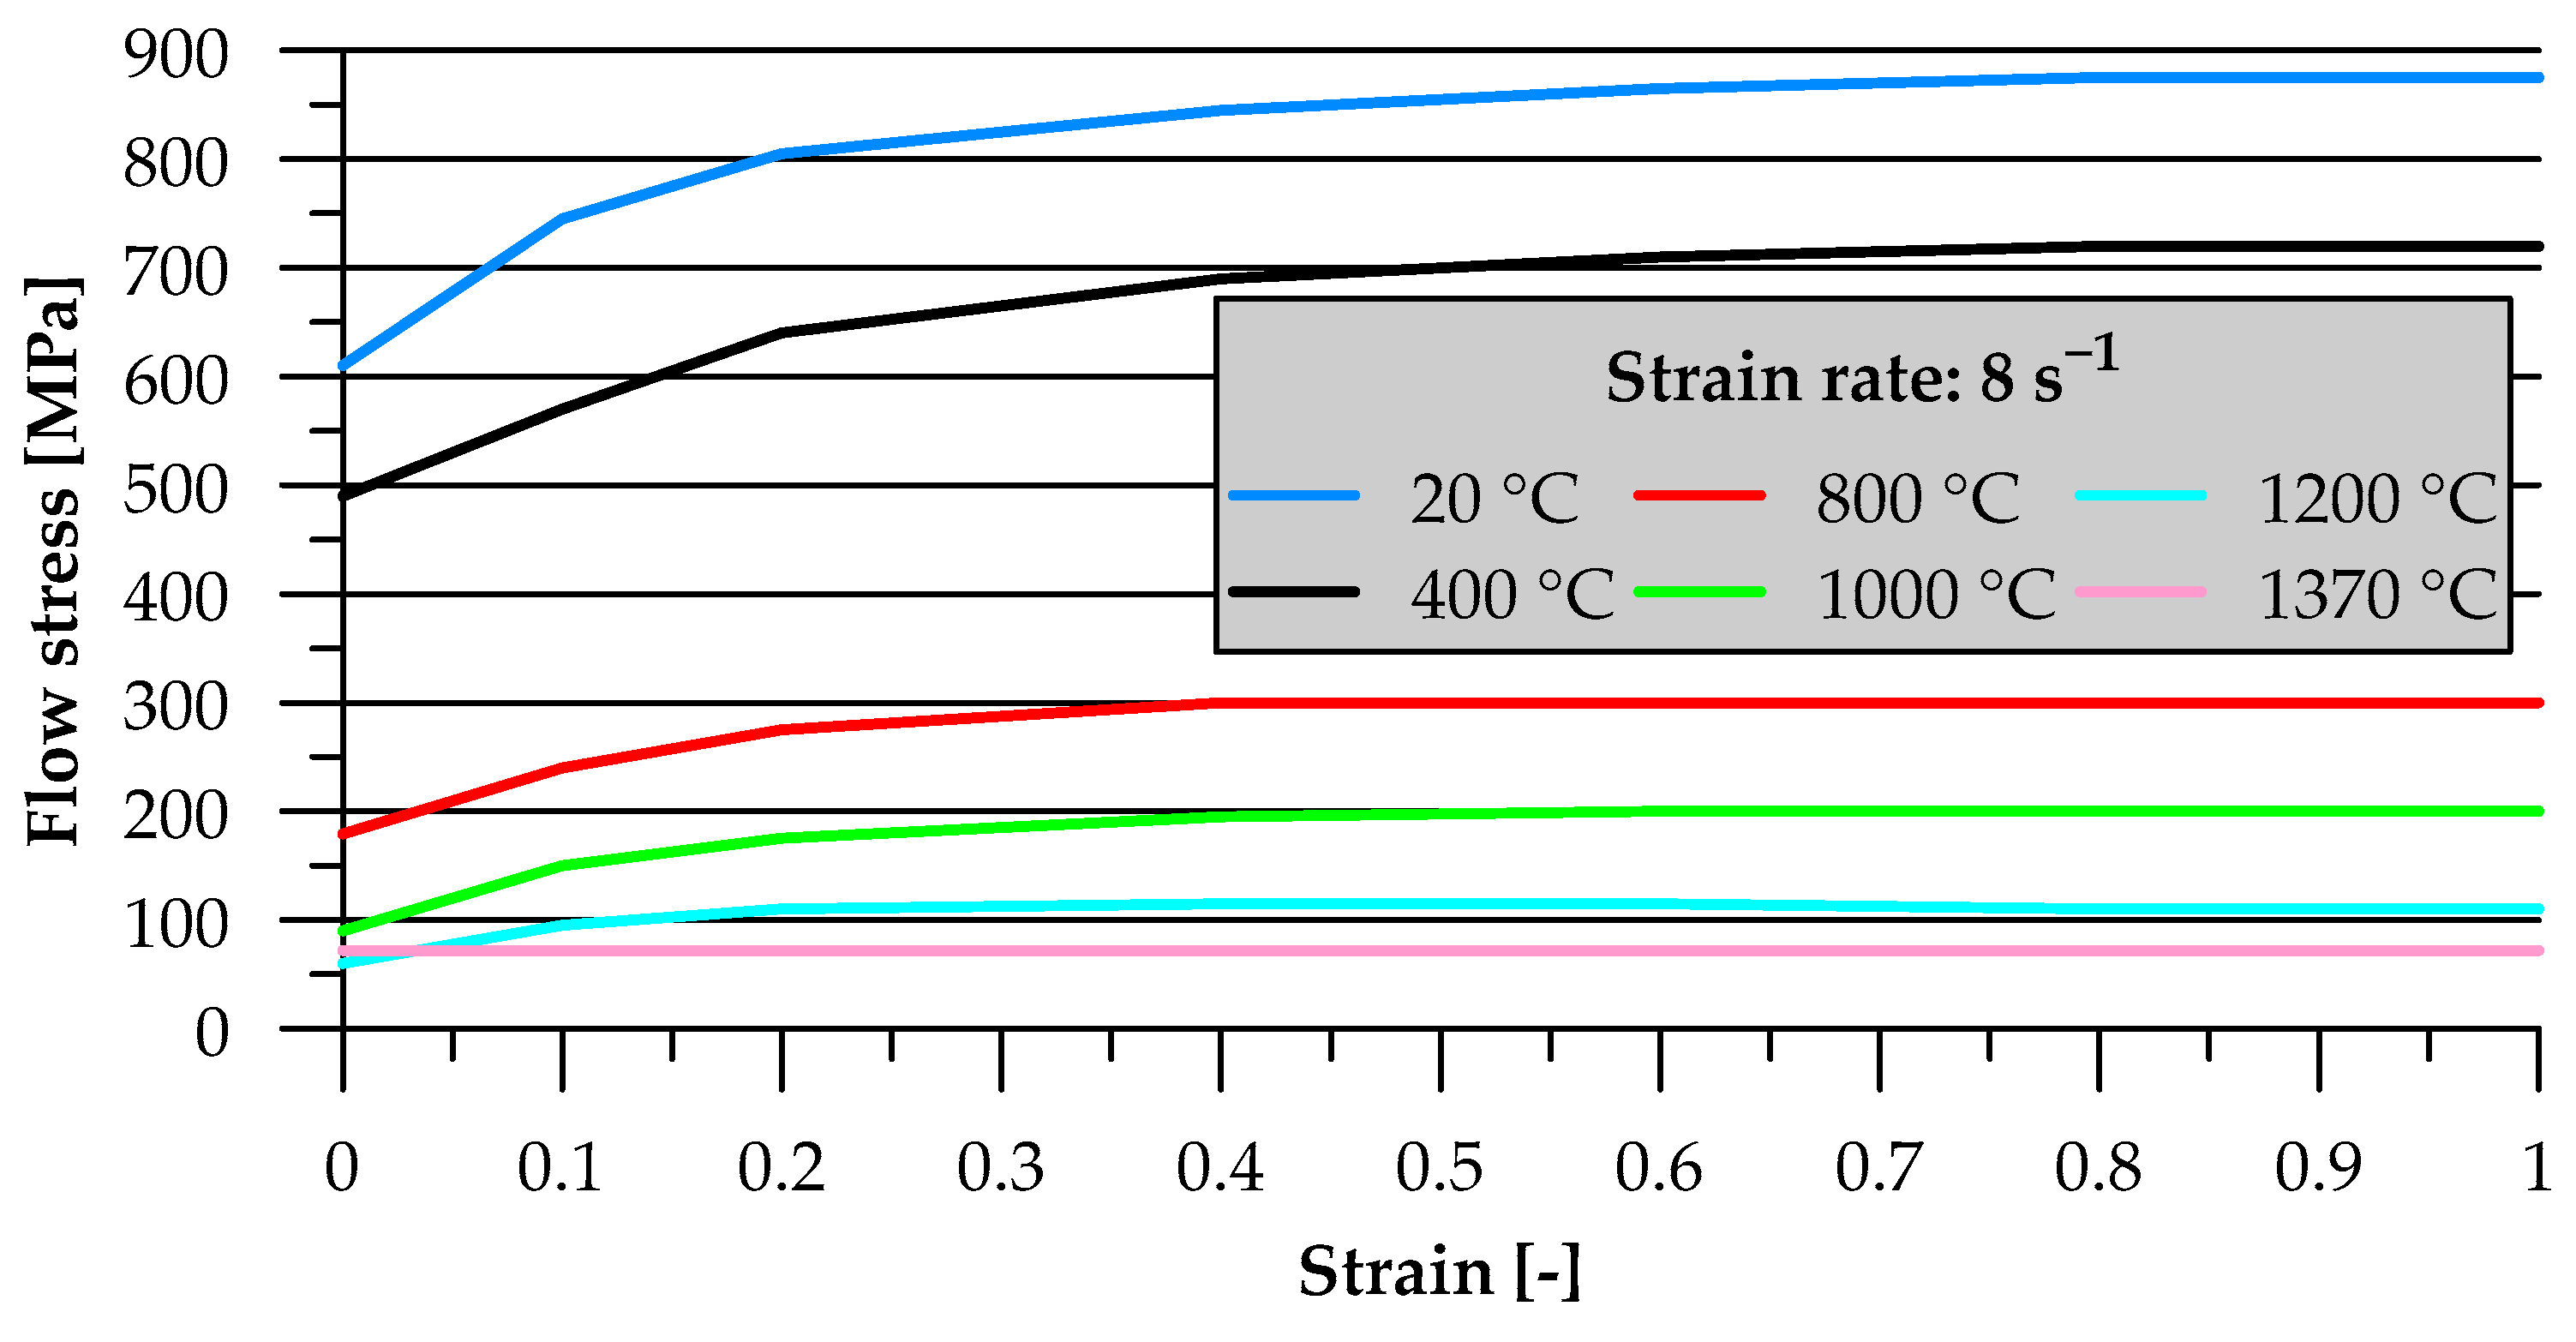
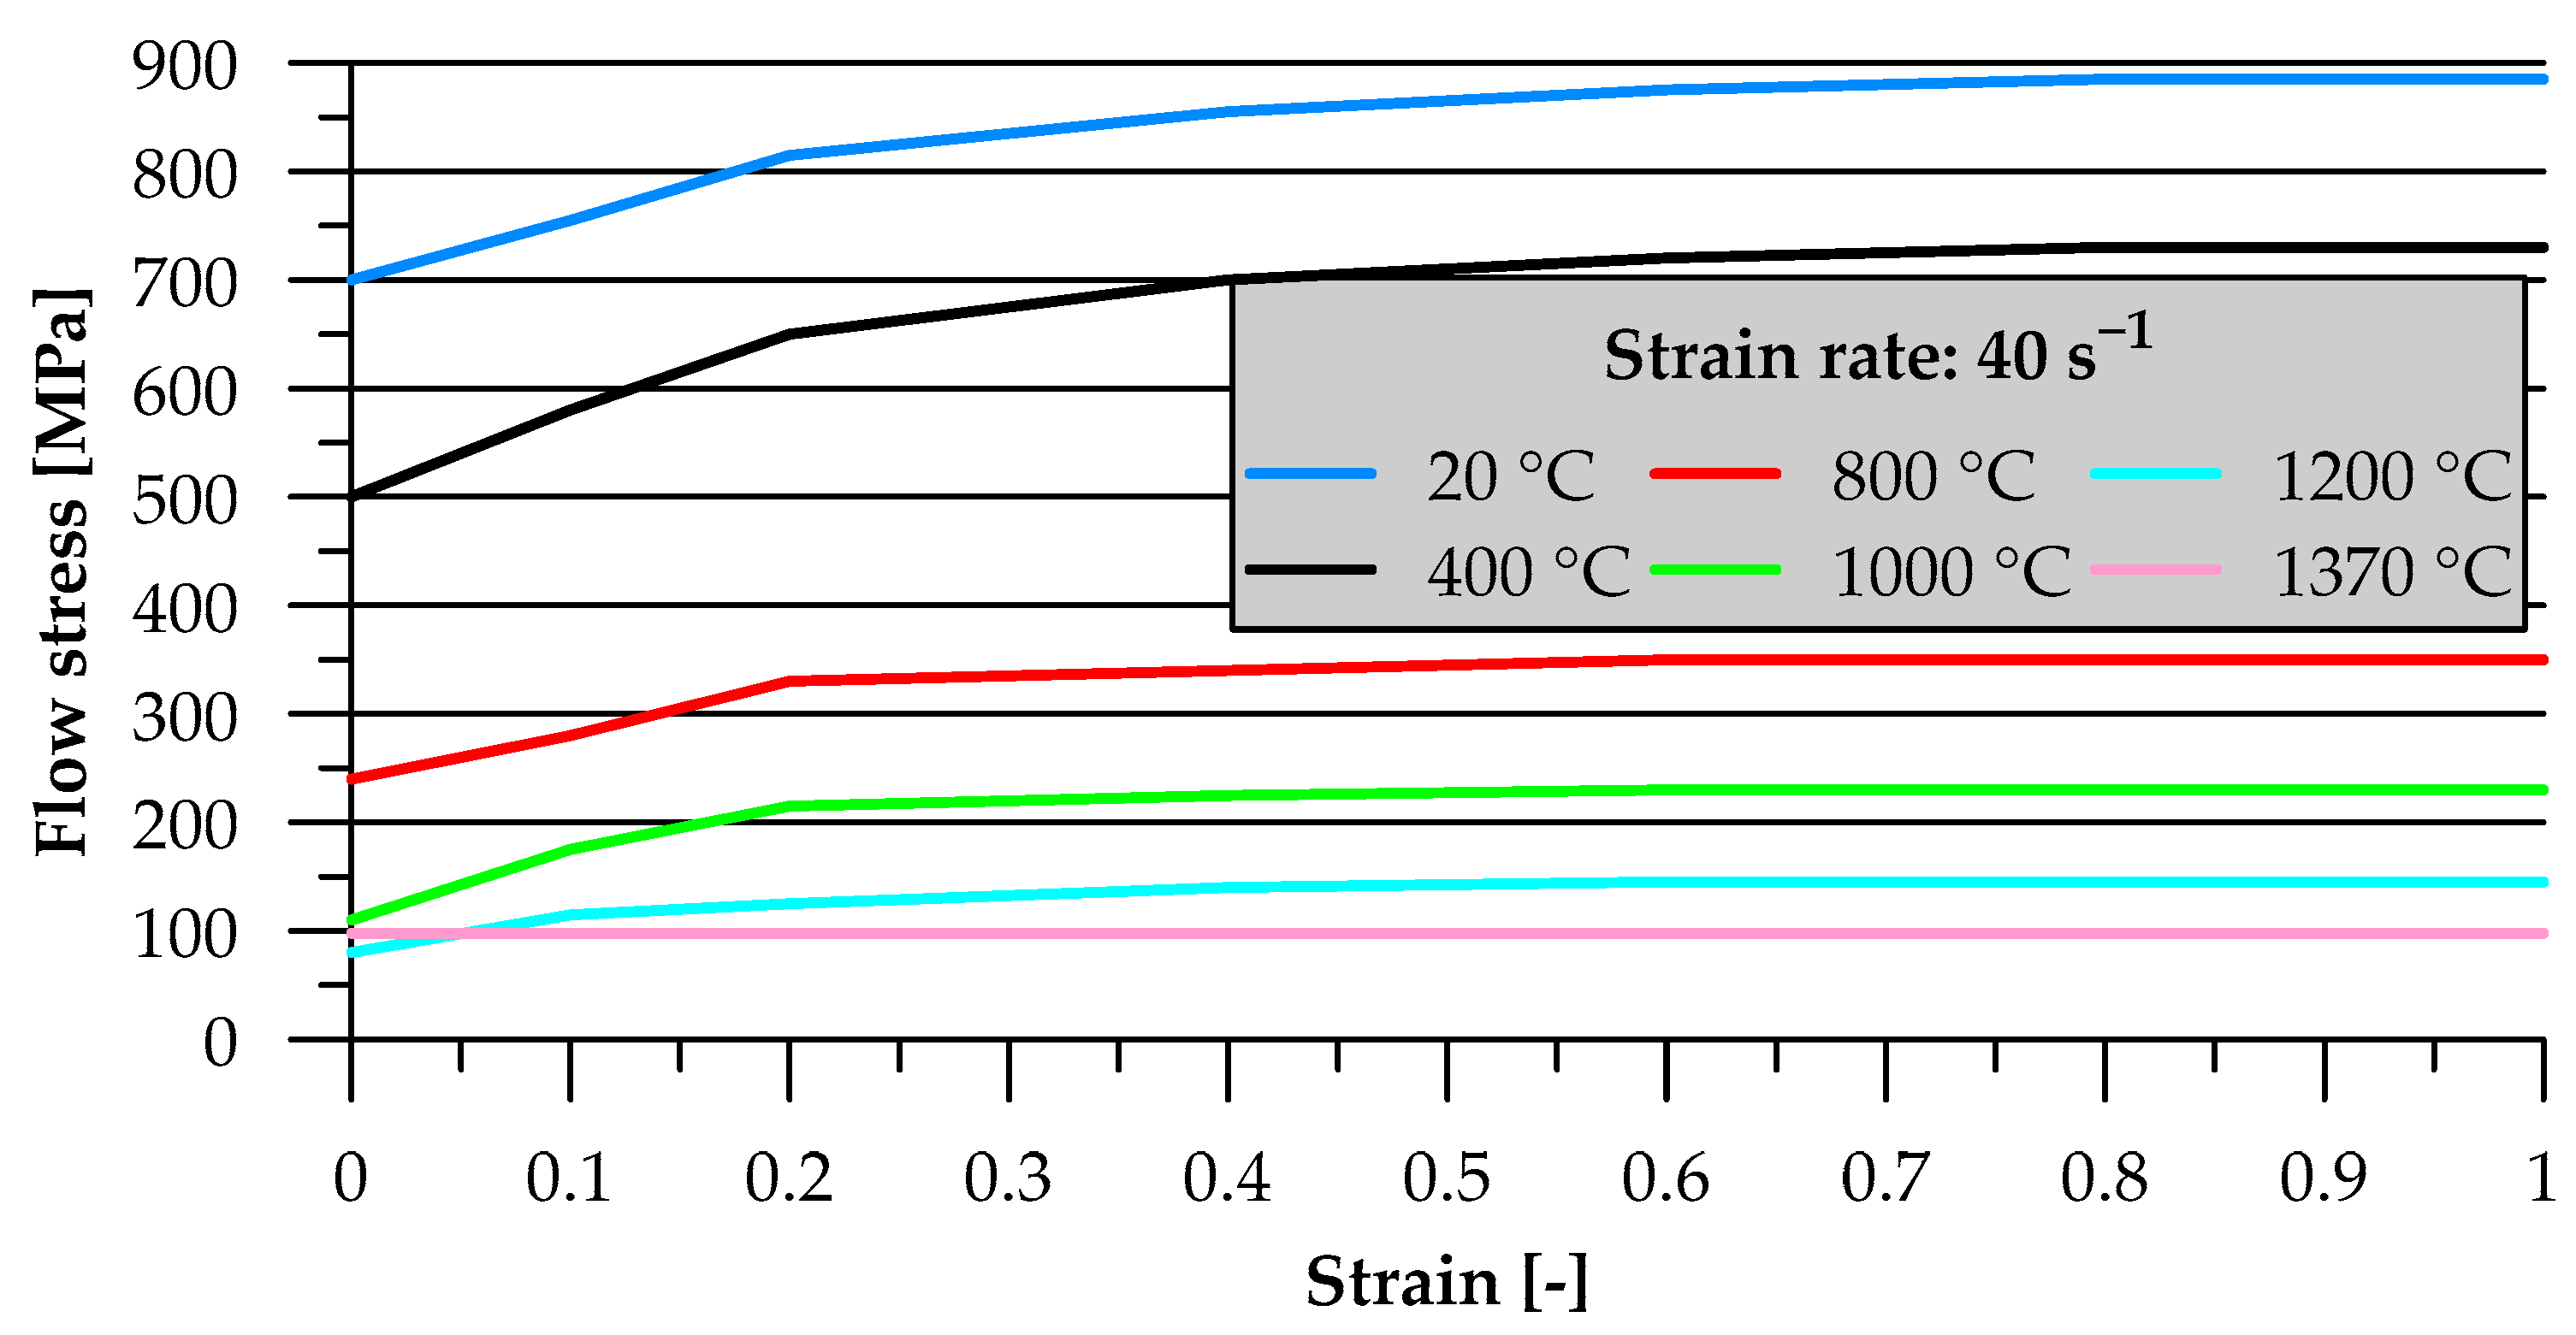
The billet was made of 42CrMo4-grade steel, the material model of which was taken from the material database library of the software. The flow curve is presented in Figure 2, Figure 3 and Figure 4. It was assumed that the process would be carried out under cold forming conditions, hence the initial temperature of the billet and tools was set at 20 °C. The geometric model of the process is the same as the scheme shown in Figure 1. The workpiece was defined as a rigid-plastic object, while the tools were defined as rigid objects. The workpiece was discretized using four-node quadrilateral elements. The numerical model of the process took into account the heat flow between objects and the increase in the temperature of the workpiece due to plastic deformation. The contact conditions between the rigid objects and the rigid-plastic object were described using a heat transfer coefficient of 10 kW/m2K and friction factor of 0.1 [3,6,7,28,29].
The velocities of the mandrel punch and the hollow punch were maintained at 10 mm/s. The velocities of the top and bottom dies applied in the different cases of the extrusion process were maintained the same, and their values were determined from Equations (1) and (2).
υ c t = υ p t · 4 · g · D g D i t 2 D 2
υ c b = υ p b · 4 · g · D g D i b 2 D 2

3. Results and Discussion

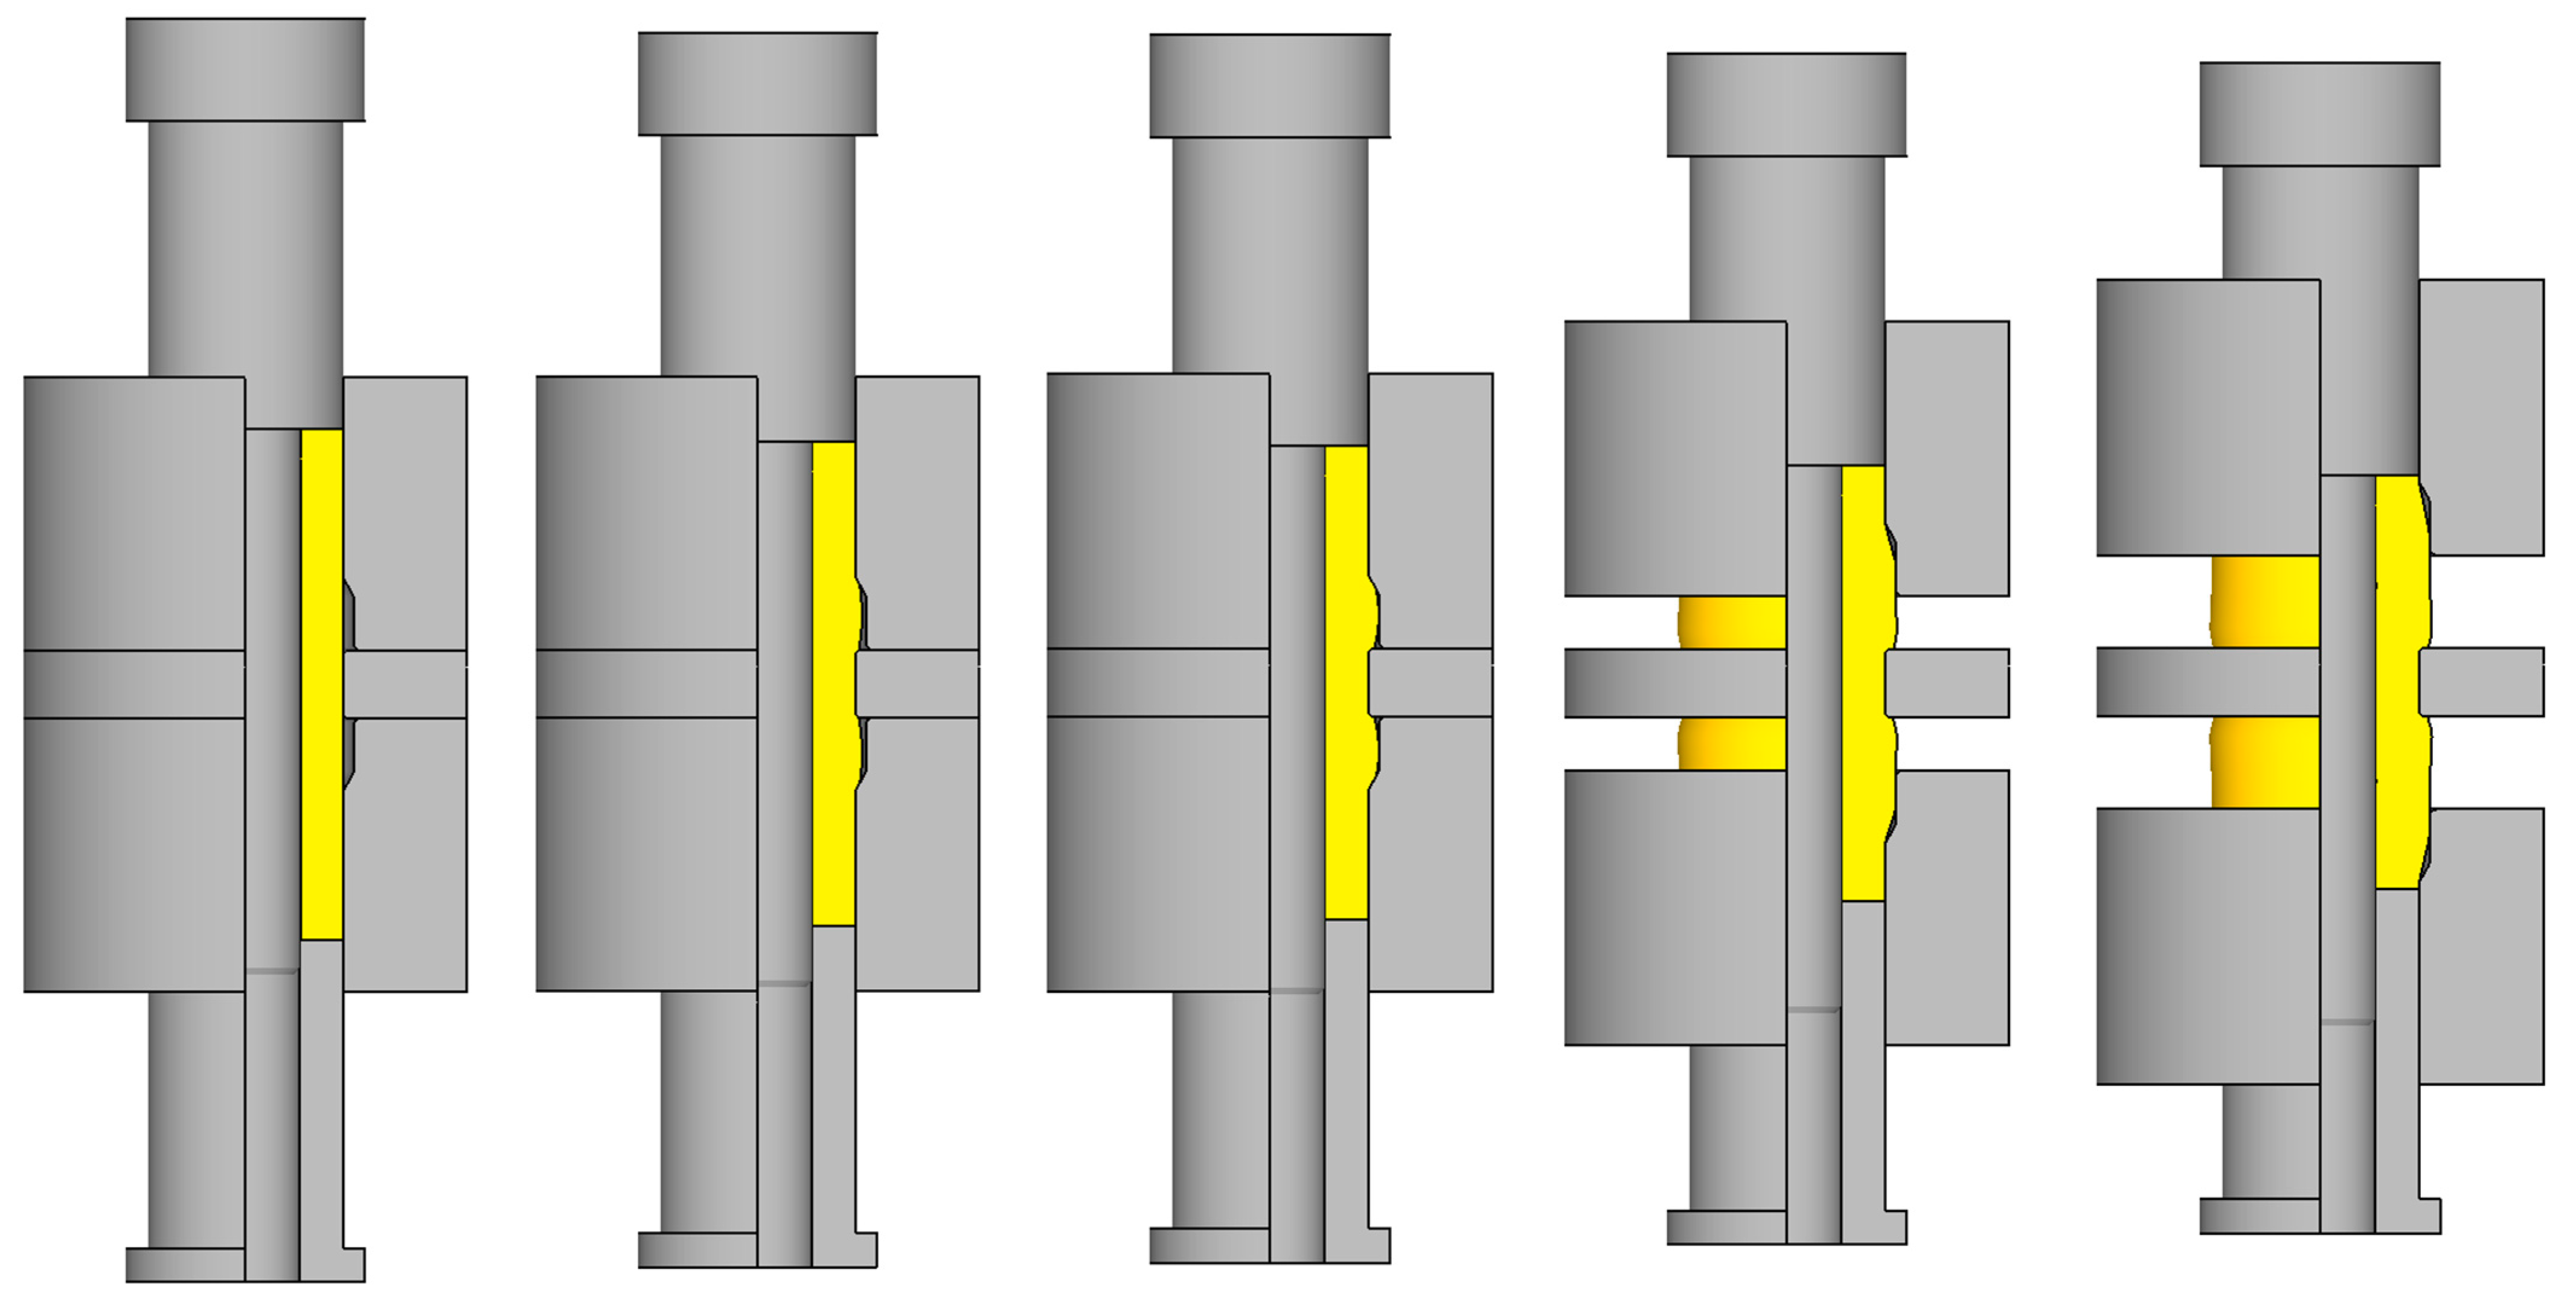
Figure 5 shows changes in the shape of a workpiece at different stages of the process. During extrusion with two moving dies, two flanges are simultaneously formed on both sides of the split die. Once the mandrel and hollow punch are set in motion, the impressions of the top and bottom dies are gradually filled with the material being deformed. This is possible due to the radial–axial flow of the material, leading to an increase in the thickness of the workpiece wall. Once the workpiece comes into contact with the surface of the top and bottom die impressions with the diameters Dit and Dib, the dies are set in motion. This causes the closed die to open, which makes it possible for the flange height to increase. The punches continue to move until the end of the workpiece remains in the top and bottom die impression zones described by heights Ht and Hb.
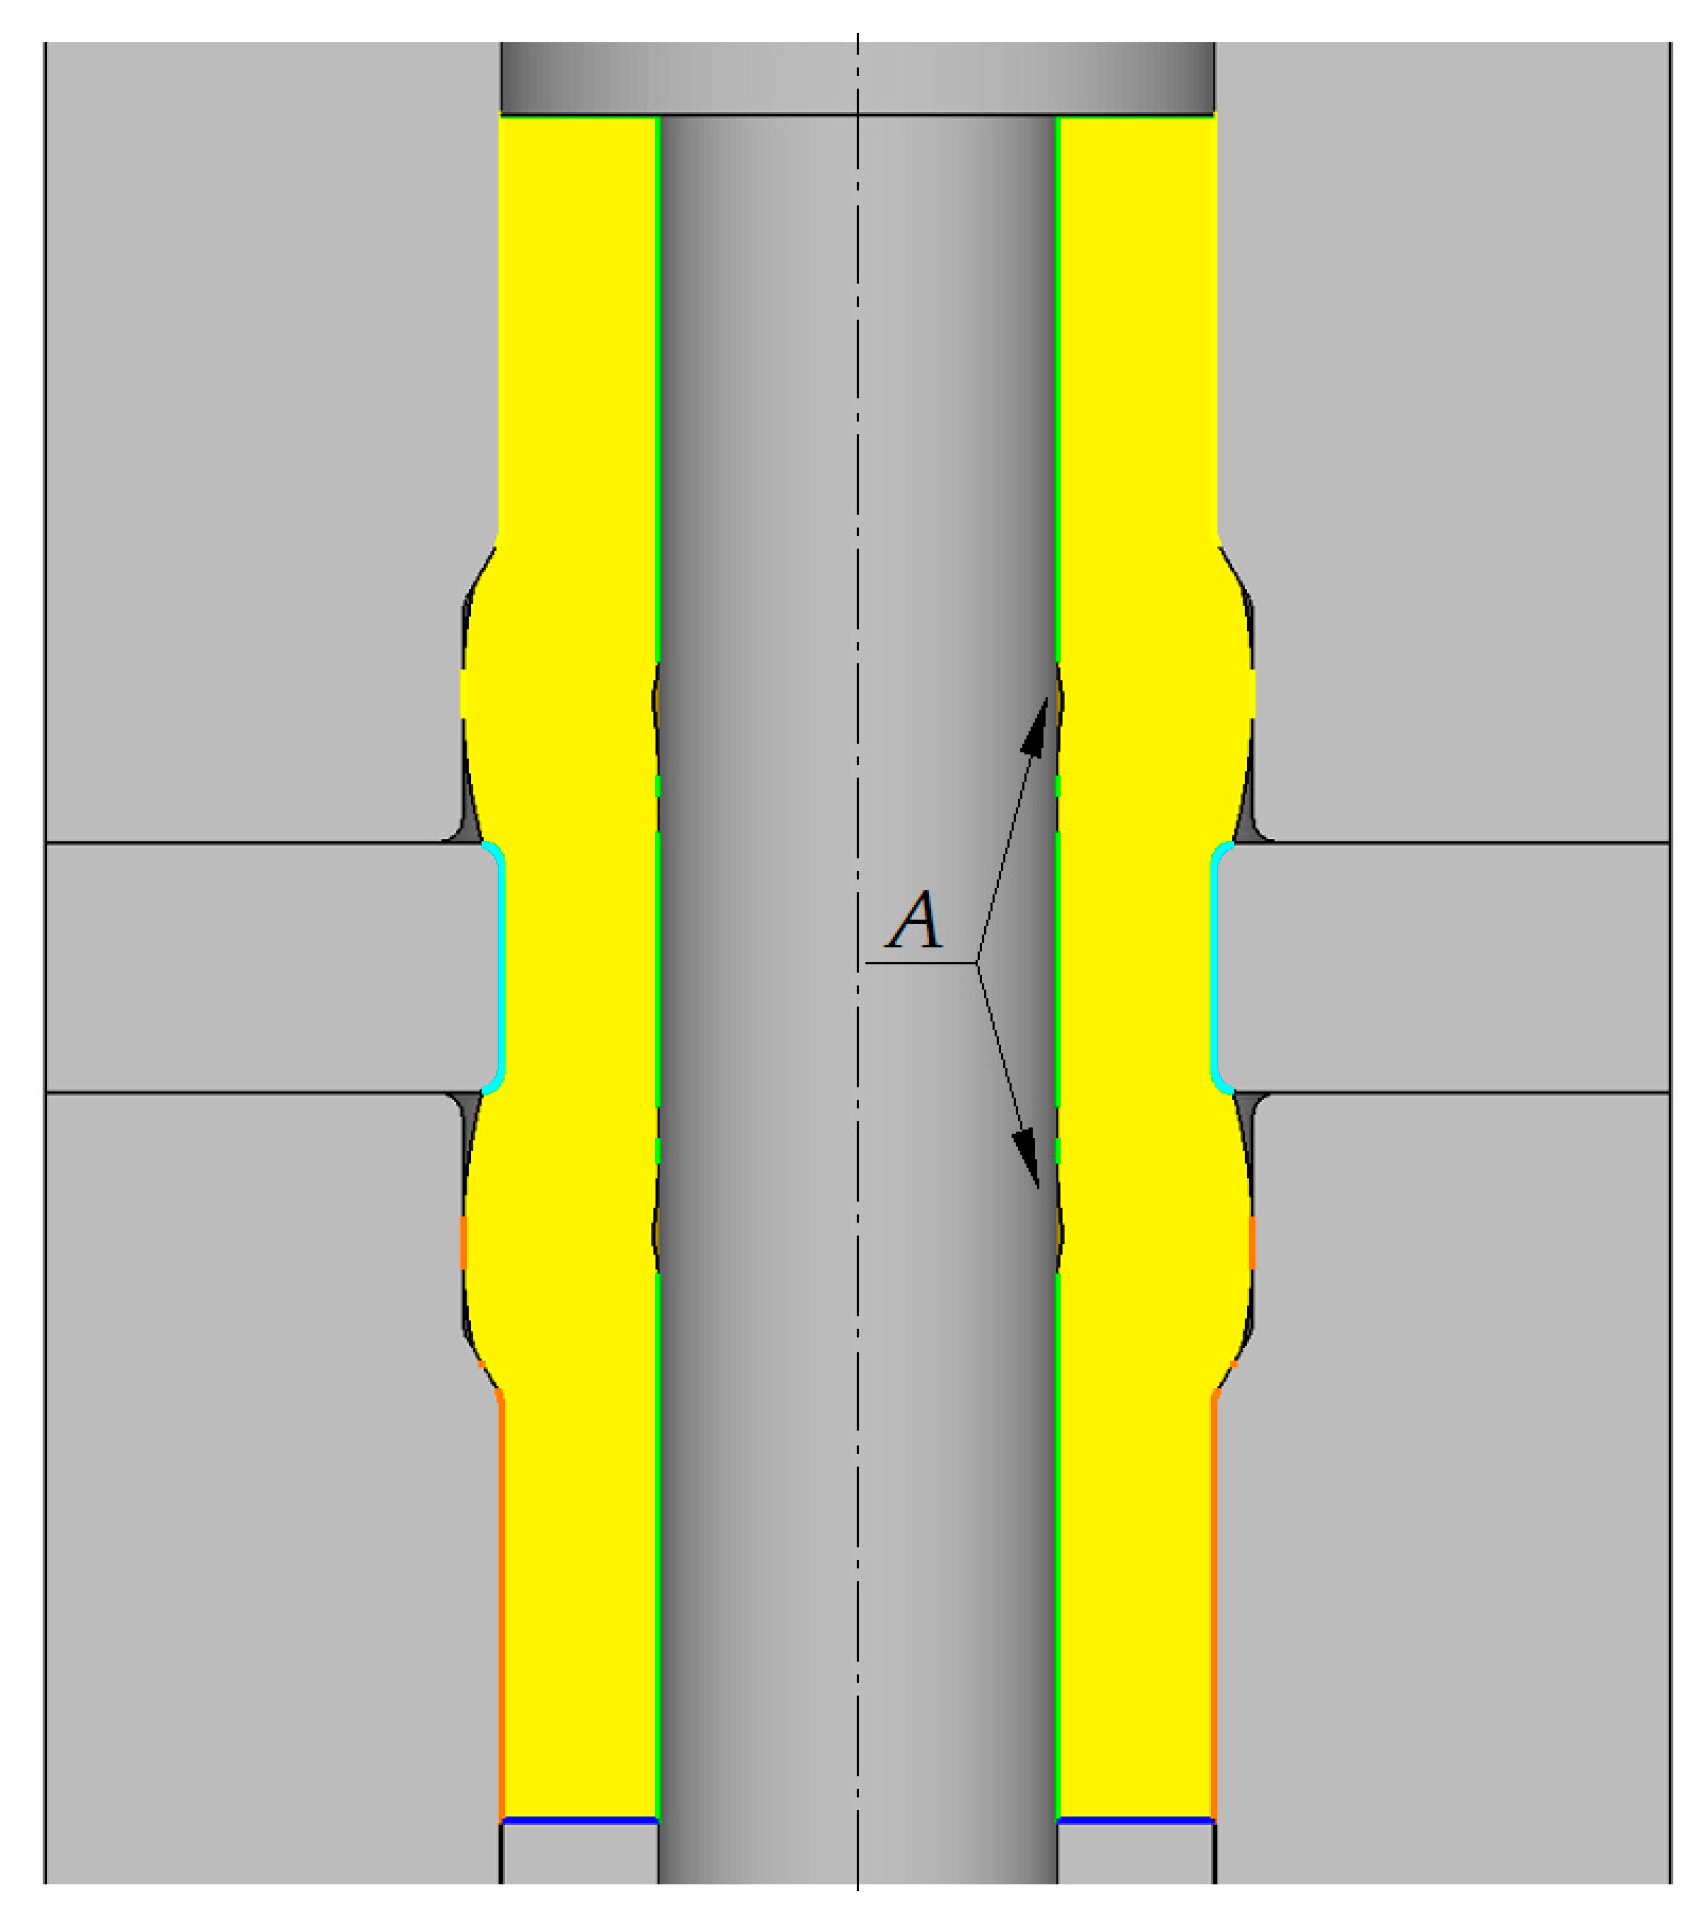
An analysis of the results shows that the maximum flange height is limited by the phenomenon of loss of contact between the workpiece and the mandrel. As a result, the inside diameter of the workpiece is increased in the flange zone but remains unchanged at the height of the split die. The lack of contact between the workpiece and the mandrel can occur during two stages of the process. Depending on the die impression dimensions, this phenomenon can occur either at the initial stage of the process before the dies are set in motion or as the flange height is being increased and the dies are moving. In the former case, when the flanges reach the assumed diameters Dit and Dib (which is equivalent to the occurrence of contact between the workpiece and the corresponding surfaces of the die impressions), there is no contact between the mandrel and the workpiece over its entire length. The no-contact zones are marked by A in Figure 6 and can be observed for Cases 4, 8, 12, and 15 in Table 2. These cases of the extrusion process were conducted using the dies with the maximum impression heights Ht and Hb. This therefore means that the above defect is caused by the excessive height of the die impression. This results in the local buckling of the workpiece wall, which is not compensated for as the process progresses. Given the presence of the defect, these cases will not be further investigated.
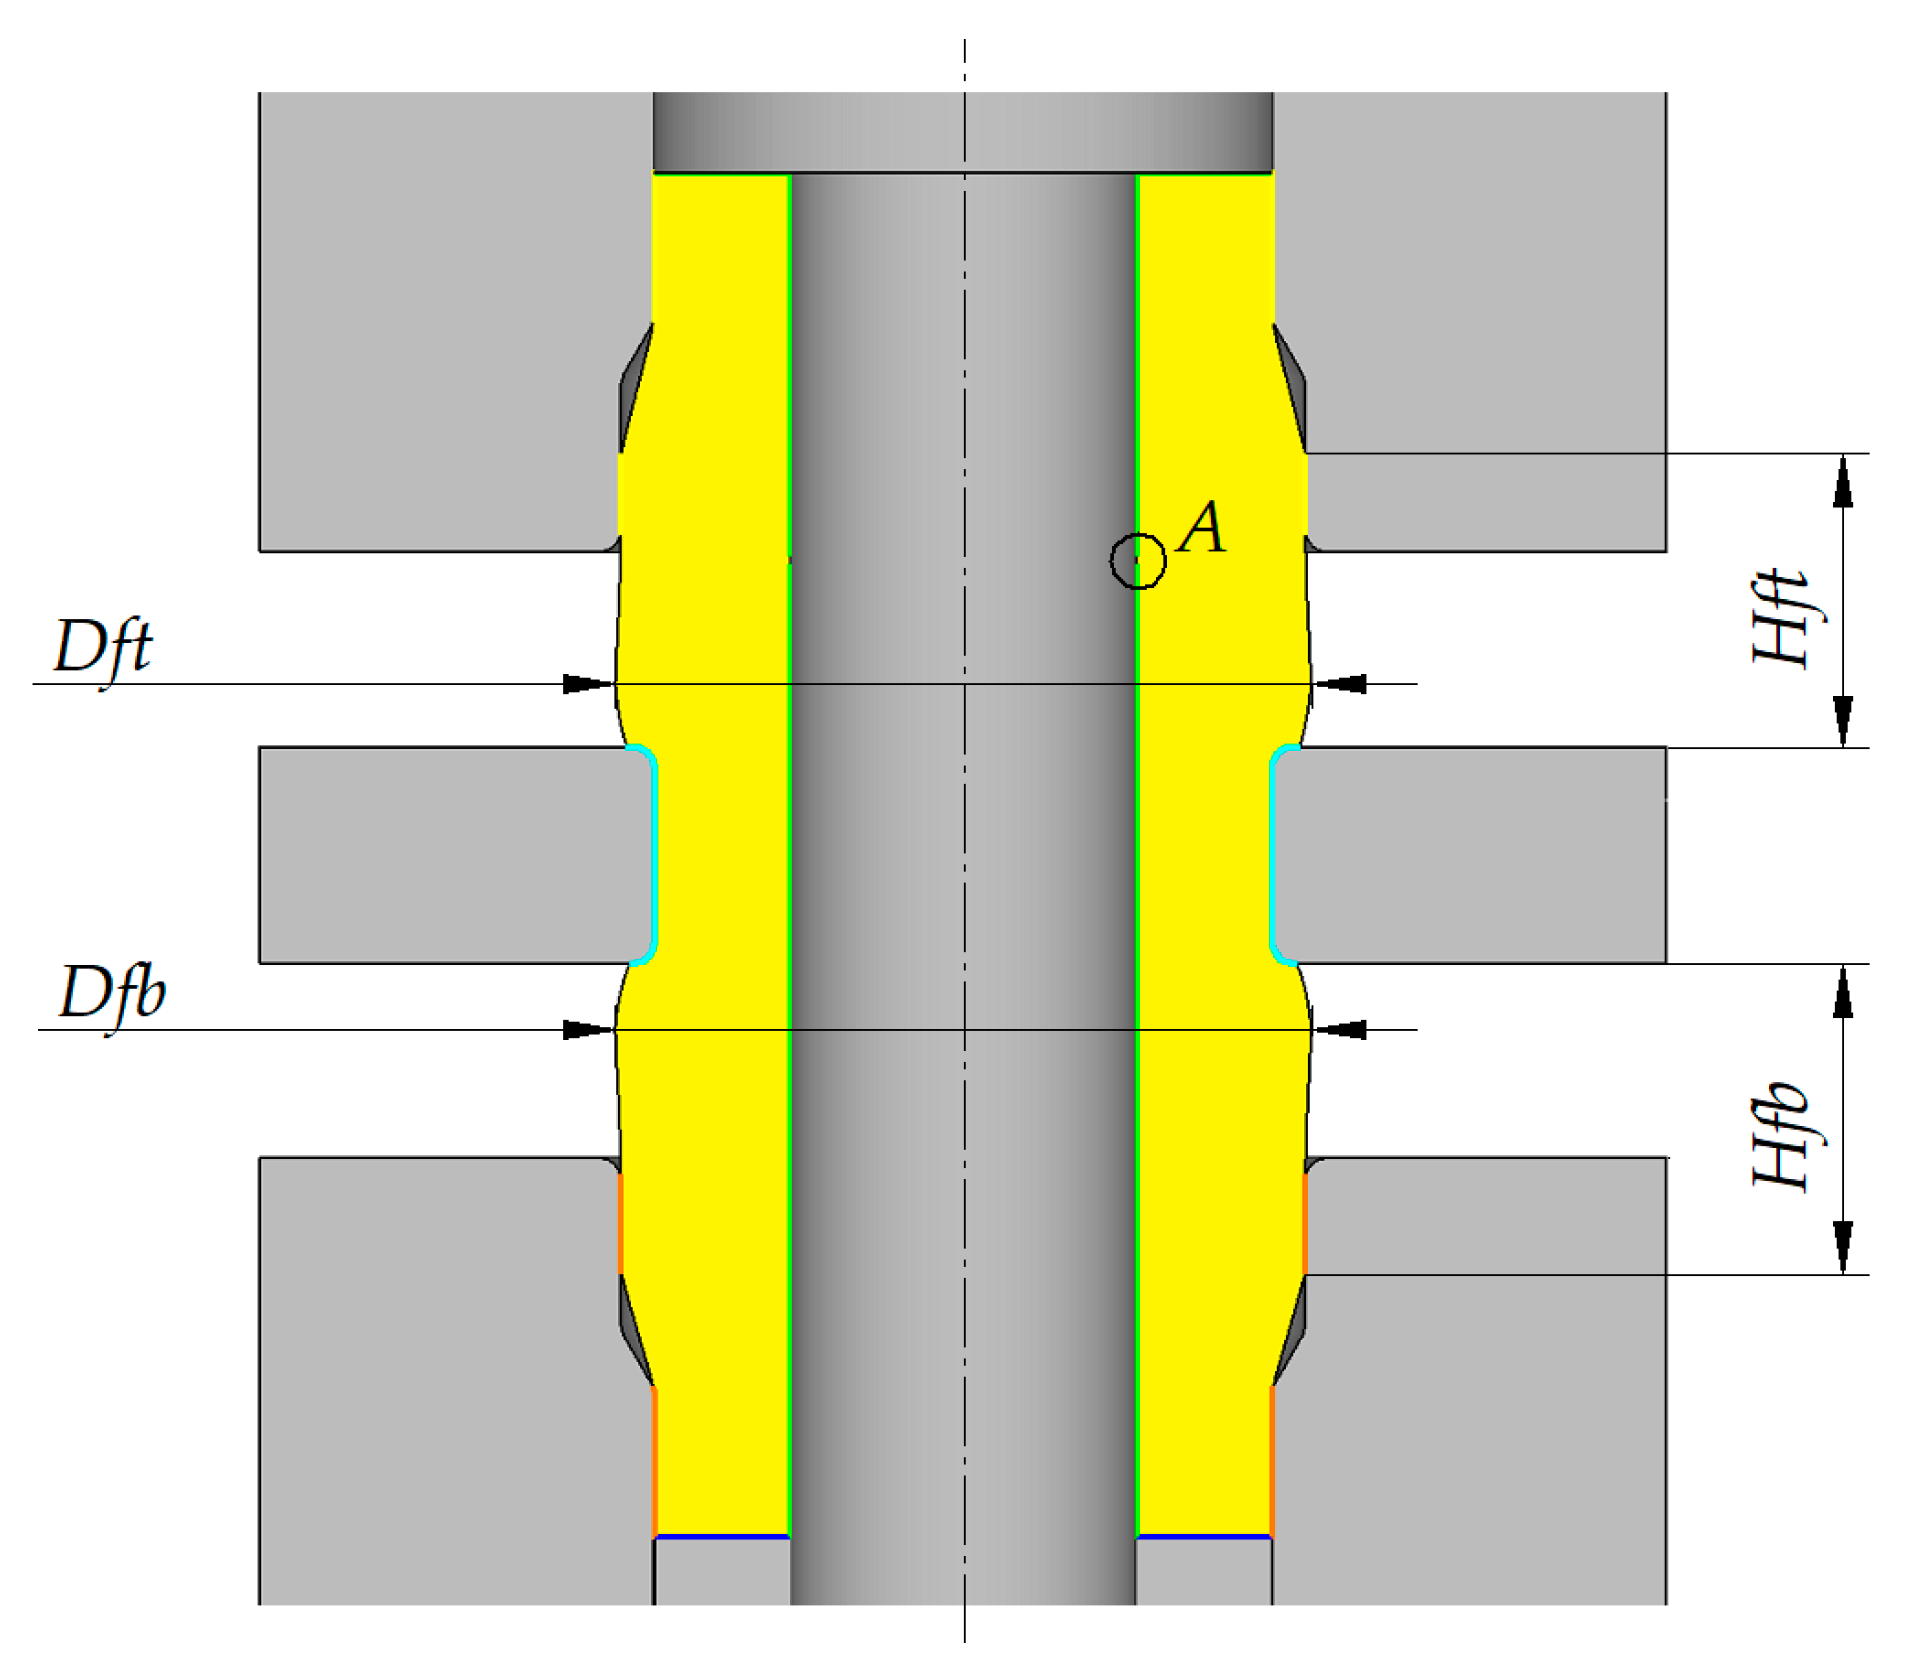
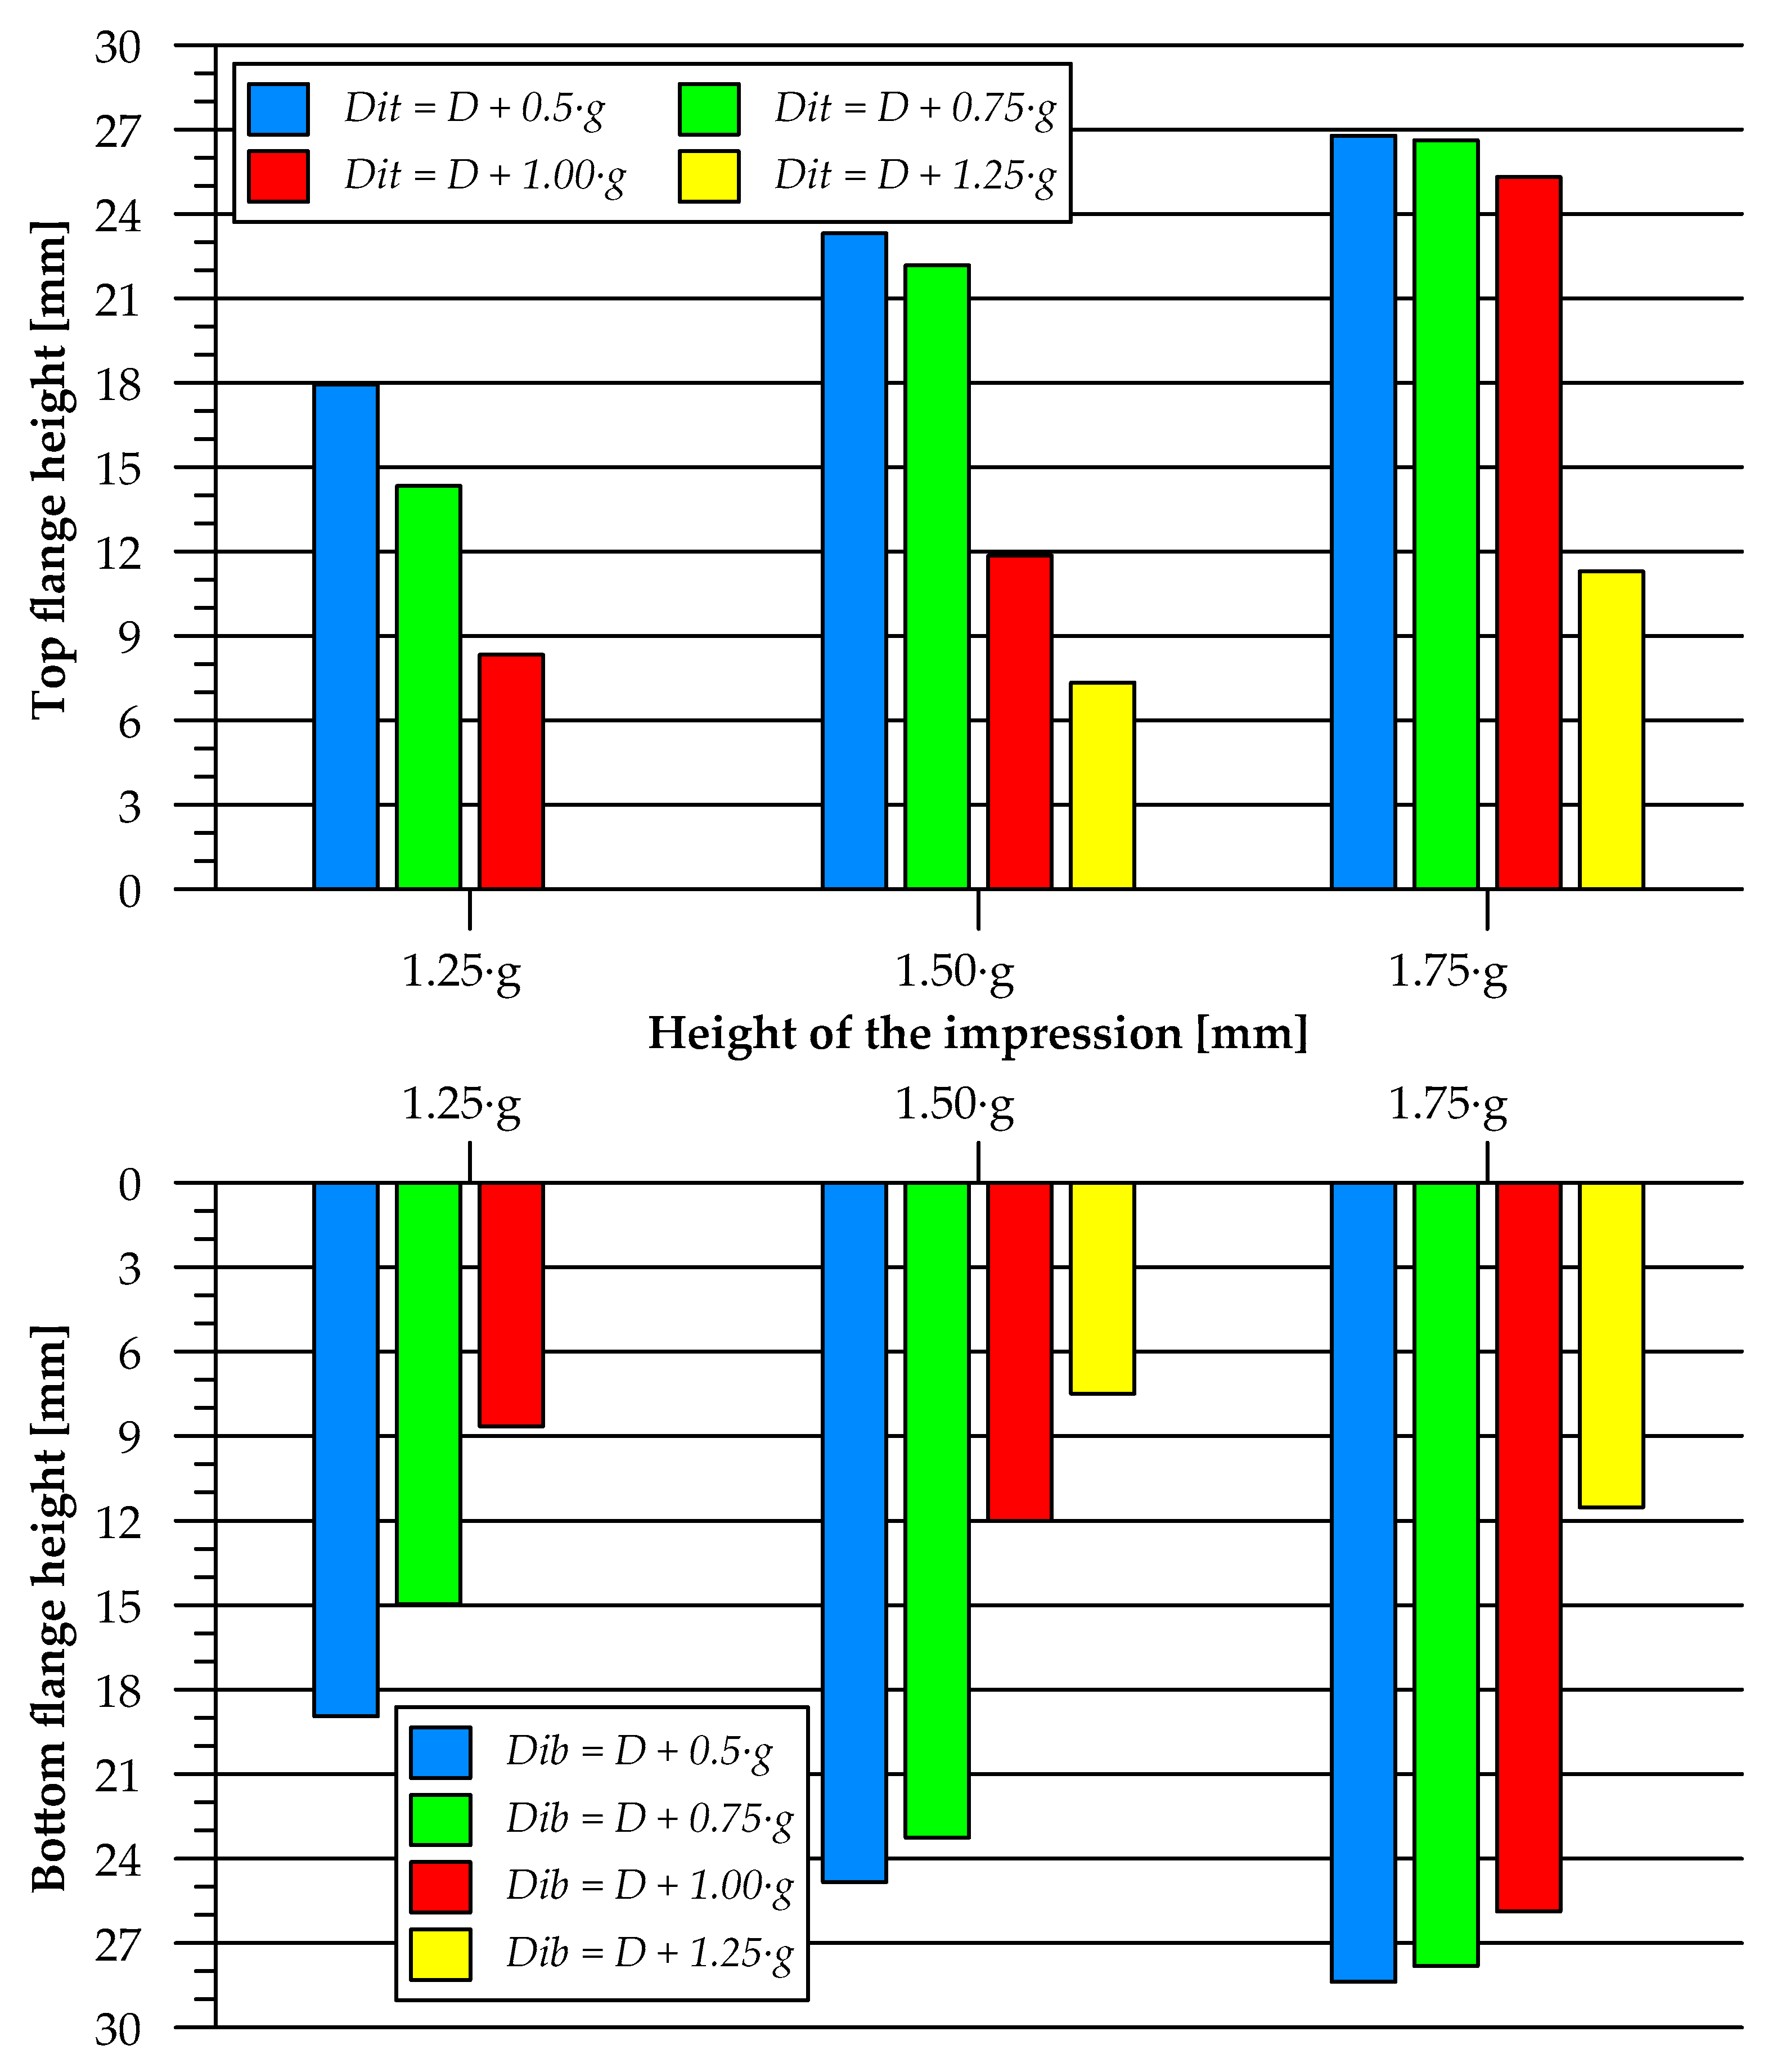
In other cases in this analysis, the workpiece did not lose contact with the mandrel before the dies start to move. However, the loss of contact occurs when the dies begin to move and the flange height is increased. Depending on the process parameters, this defect is formed at different flange heights. In light of the above, this value was measured at the moment when the material lost contact with the mandrel (detail A in Figure 7). The flange heights Hft and Hfb were measured in compliance with the scheme shown in Figure 7. They were measured from the split die surface to the place where the flanges would lose contact with the impression zones described by the diameters Dit and Dib. Obtained results are plotted in Figure 8. The highest flange heights were obtained for the cases where the die impression diameters Dit and Dib were higher than the outside diameter of the workpiece by 0.5 and 0.75 of its wall thickness (g), with the impression heights Ht and Hb equal to 1.75 g (Cases 3 and 7 in Table 2). It can be observed that for the die impression diameters Dit and Dib, an increase in the impression heights Ht and Hb leads to an increase in the maximum flange height. The increased impression height considerably constrains the radial flow of the material, thereby preventing the loss of contact between the workpiece and the mandrel. For the given impression heights Ht and Hb, an increase in the diameters Dit and Dib causes a decrease in the achievable flange height. The higher flange diameter results in a greater share of radial flow of the material, leading to the formation of the above defect.
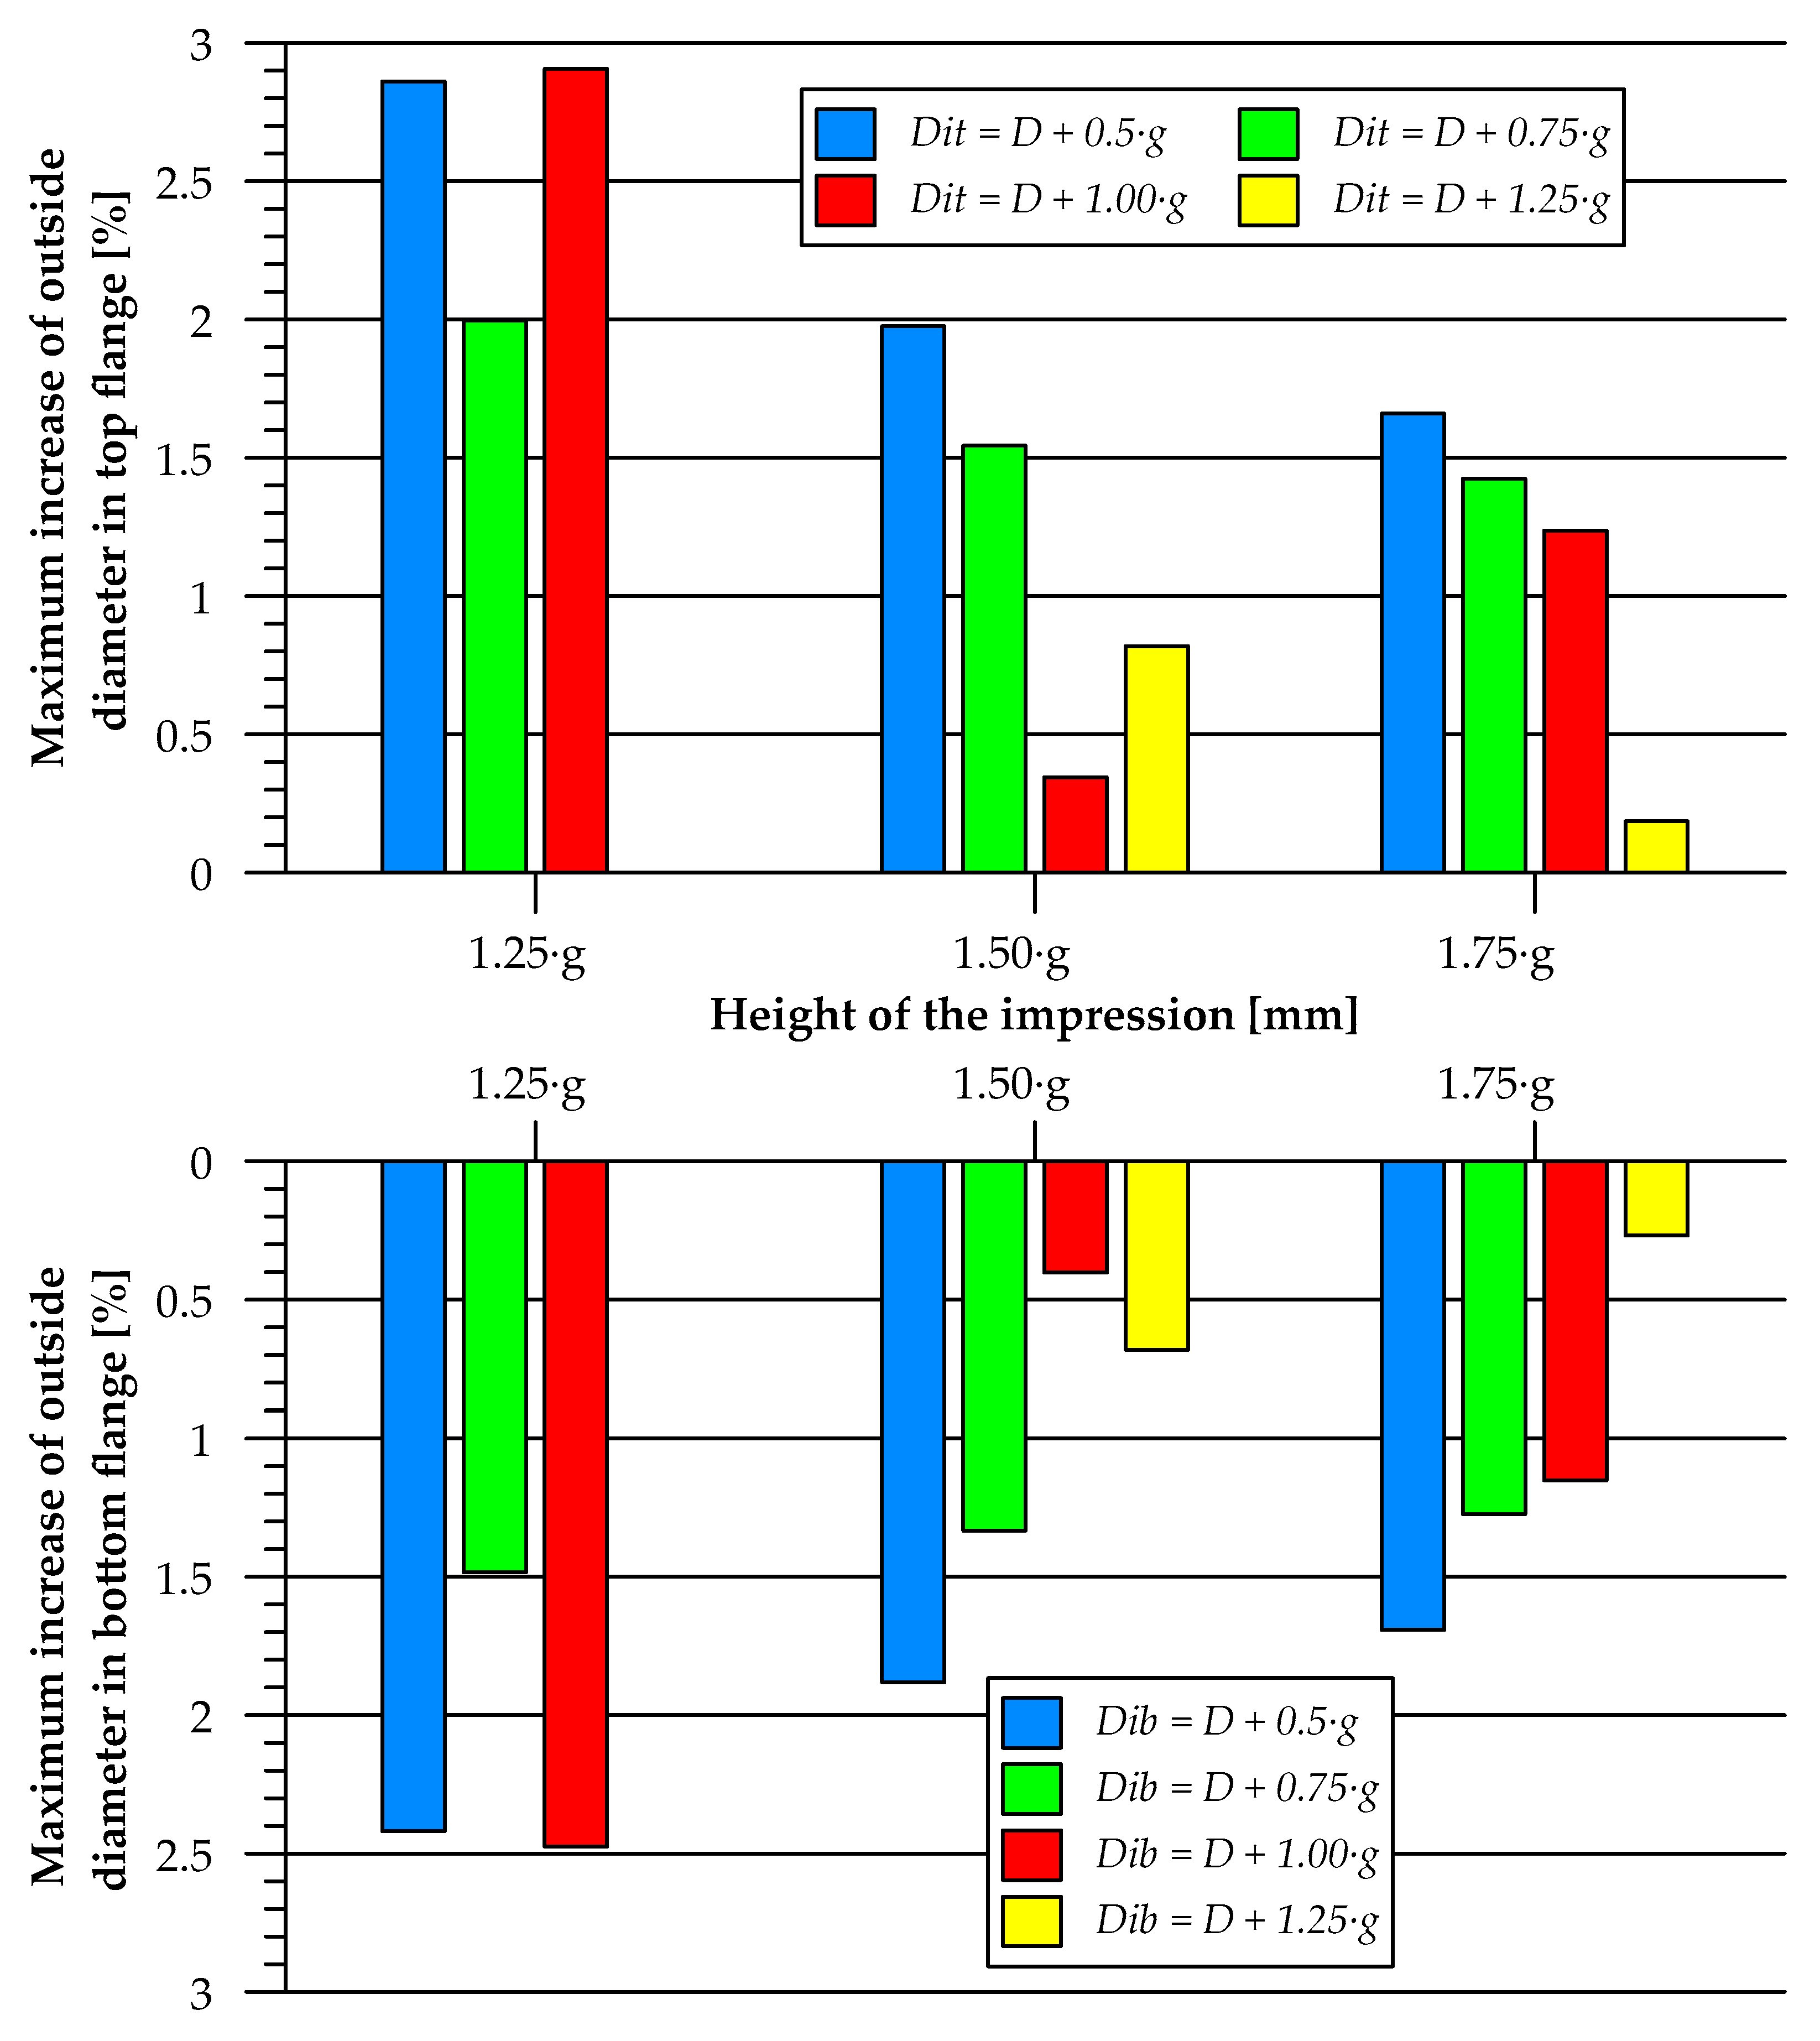
At the stage of the process when the flange height is increased (when both dies are moving), there occurs an unintended increase in the outside diameter of the flange. This phenomenon occurs in the flange zones located between the top die and the split die and between the bottom die and the split die. These zones lie outside the impression, where the flow of material is not constrained by the tool surface. Similarly to flange height, the maximum outside diameters Dft and Dfb were measured at the moment of the loss of contact between the material and the mandrel (according to the schematic shown in Figure 7). The measured values were related to the die impression diameter according to Equations (3) and (4), and the obtained results are given in Figure 9.
D f t = D f t D i t D i t · 100 %
D f b = D f b D i b D i b · 100 %
The largest increase in the outside diameter of the flange does not exceed 3%. It can be observed that the use of larger die impression diameters Dit and Dib results in smaller increments in the maximum flange diameter, which may be related to the lower flange height obtained with these parameters. On the other hand, as the die impression heights Ht and Hb are increased, a smaller increase in the outside diameter of the flanges can be observed. For all analysed cases, the maximum flange diameter value is definitely closer to that of the split die rather than to that of the die, as the die impression prevents this phenomenon from occurring. This means that the outside surface of the flange resembles a conical surface. This flange shape may prove advantageous in the further forming of the flange, e.g., by upsetting conducted using dies with conical impressions.
The loss of contact between the workpiece and the mandrel is due to the state of stress, which, in turn, depends on the technological parameters of the extrusion process.
Stress in the DEFORM programme (in which the calculations were made) is defined as the force acting on a unit area of material. Assuming a unit cube of material, forces (or stresses) acting on the faces of the cube can be resolved into normal (perpendicular to the face) and shear (along the face) stresses. Shear stresses can further be resolved into two components along arbitrary orthogonal axes. Thus, the complete stress state can be defined by three normal stress components, and six shear components.
Therefore, the distribution of radial, axial, and circumferential stresses was also analysed in this study. The stresses were analysed at the beginning of the process (before the dies were set in motion), before the material would come into contact with the cylindrical zone of the die impressions described by the diameters Dit and Dib. Figure 10 shows the stress state for Case 3 in Table 2, for which the highest flange heights were obtained. In the die impression zones where the material does not undergo deformation, there are insignificant changes in the values of the stresses. This is related to the fact that the material is located in the closed die where the compressive stresses prevail. On the other hand, in the flange-forming zones (described by the die impression heights Ht and Hb), the stress values vary to a greater extent. The radial stresses inside the workpiece that is in contact with the mandrel are compressive in nature and equal to about −200 MPa. In contrast, the stresses induced on the external surface of the flange are about 0 MPa. The axial stress on the internal and external surface of the flange is −1100 and −150 MPa, respectively. On the other hand, the circumferential stress on the surface adjacent to the mandrel is compressive in nature and equal to −600 MPa, while the circumferential stress on the external surface of the flange is tensile in nature and equal to 610 MPa.
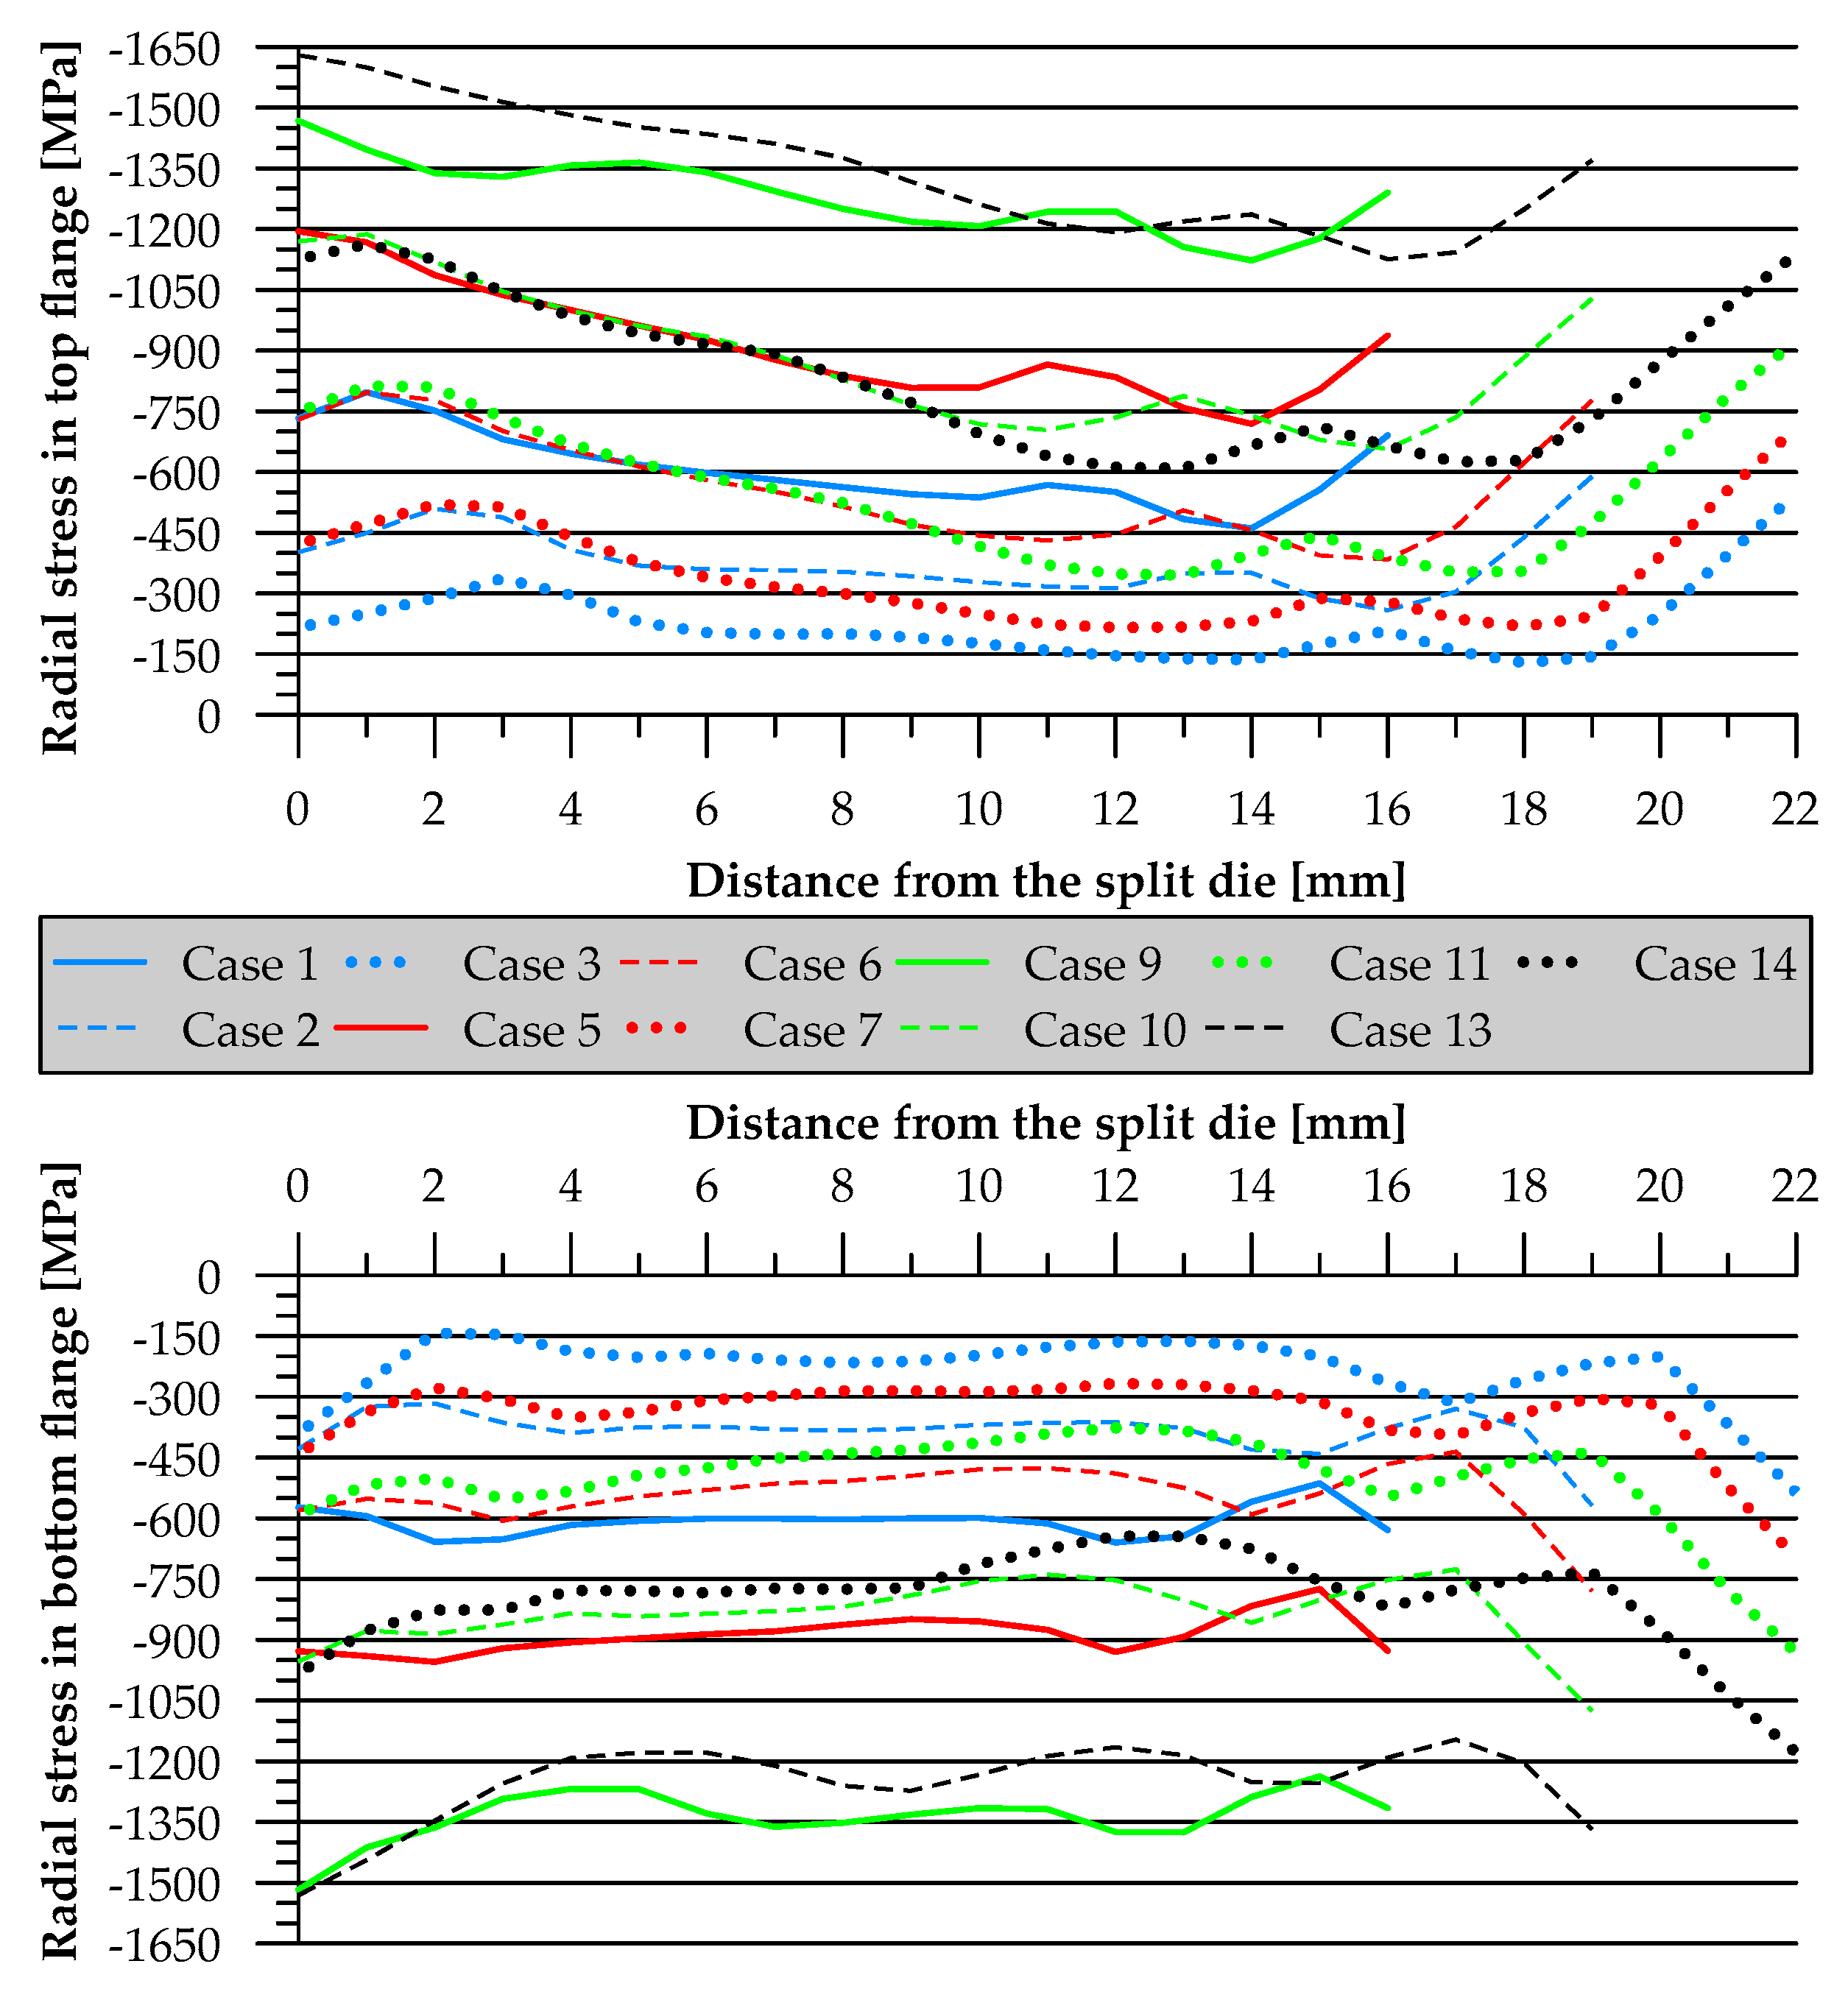
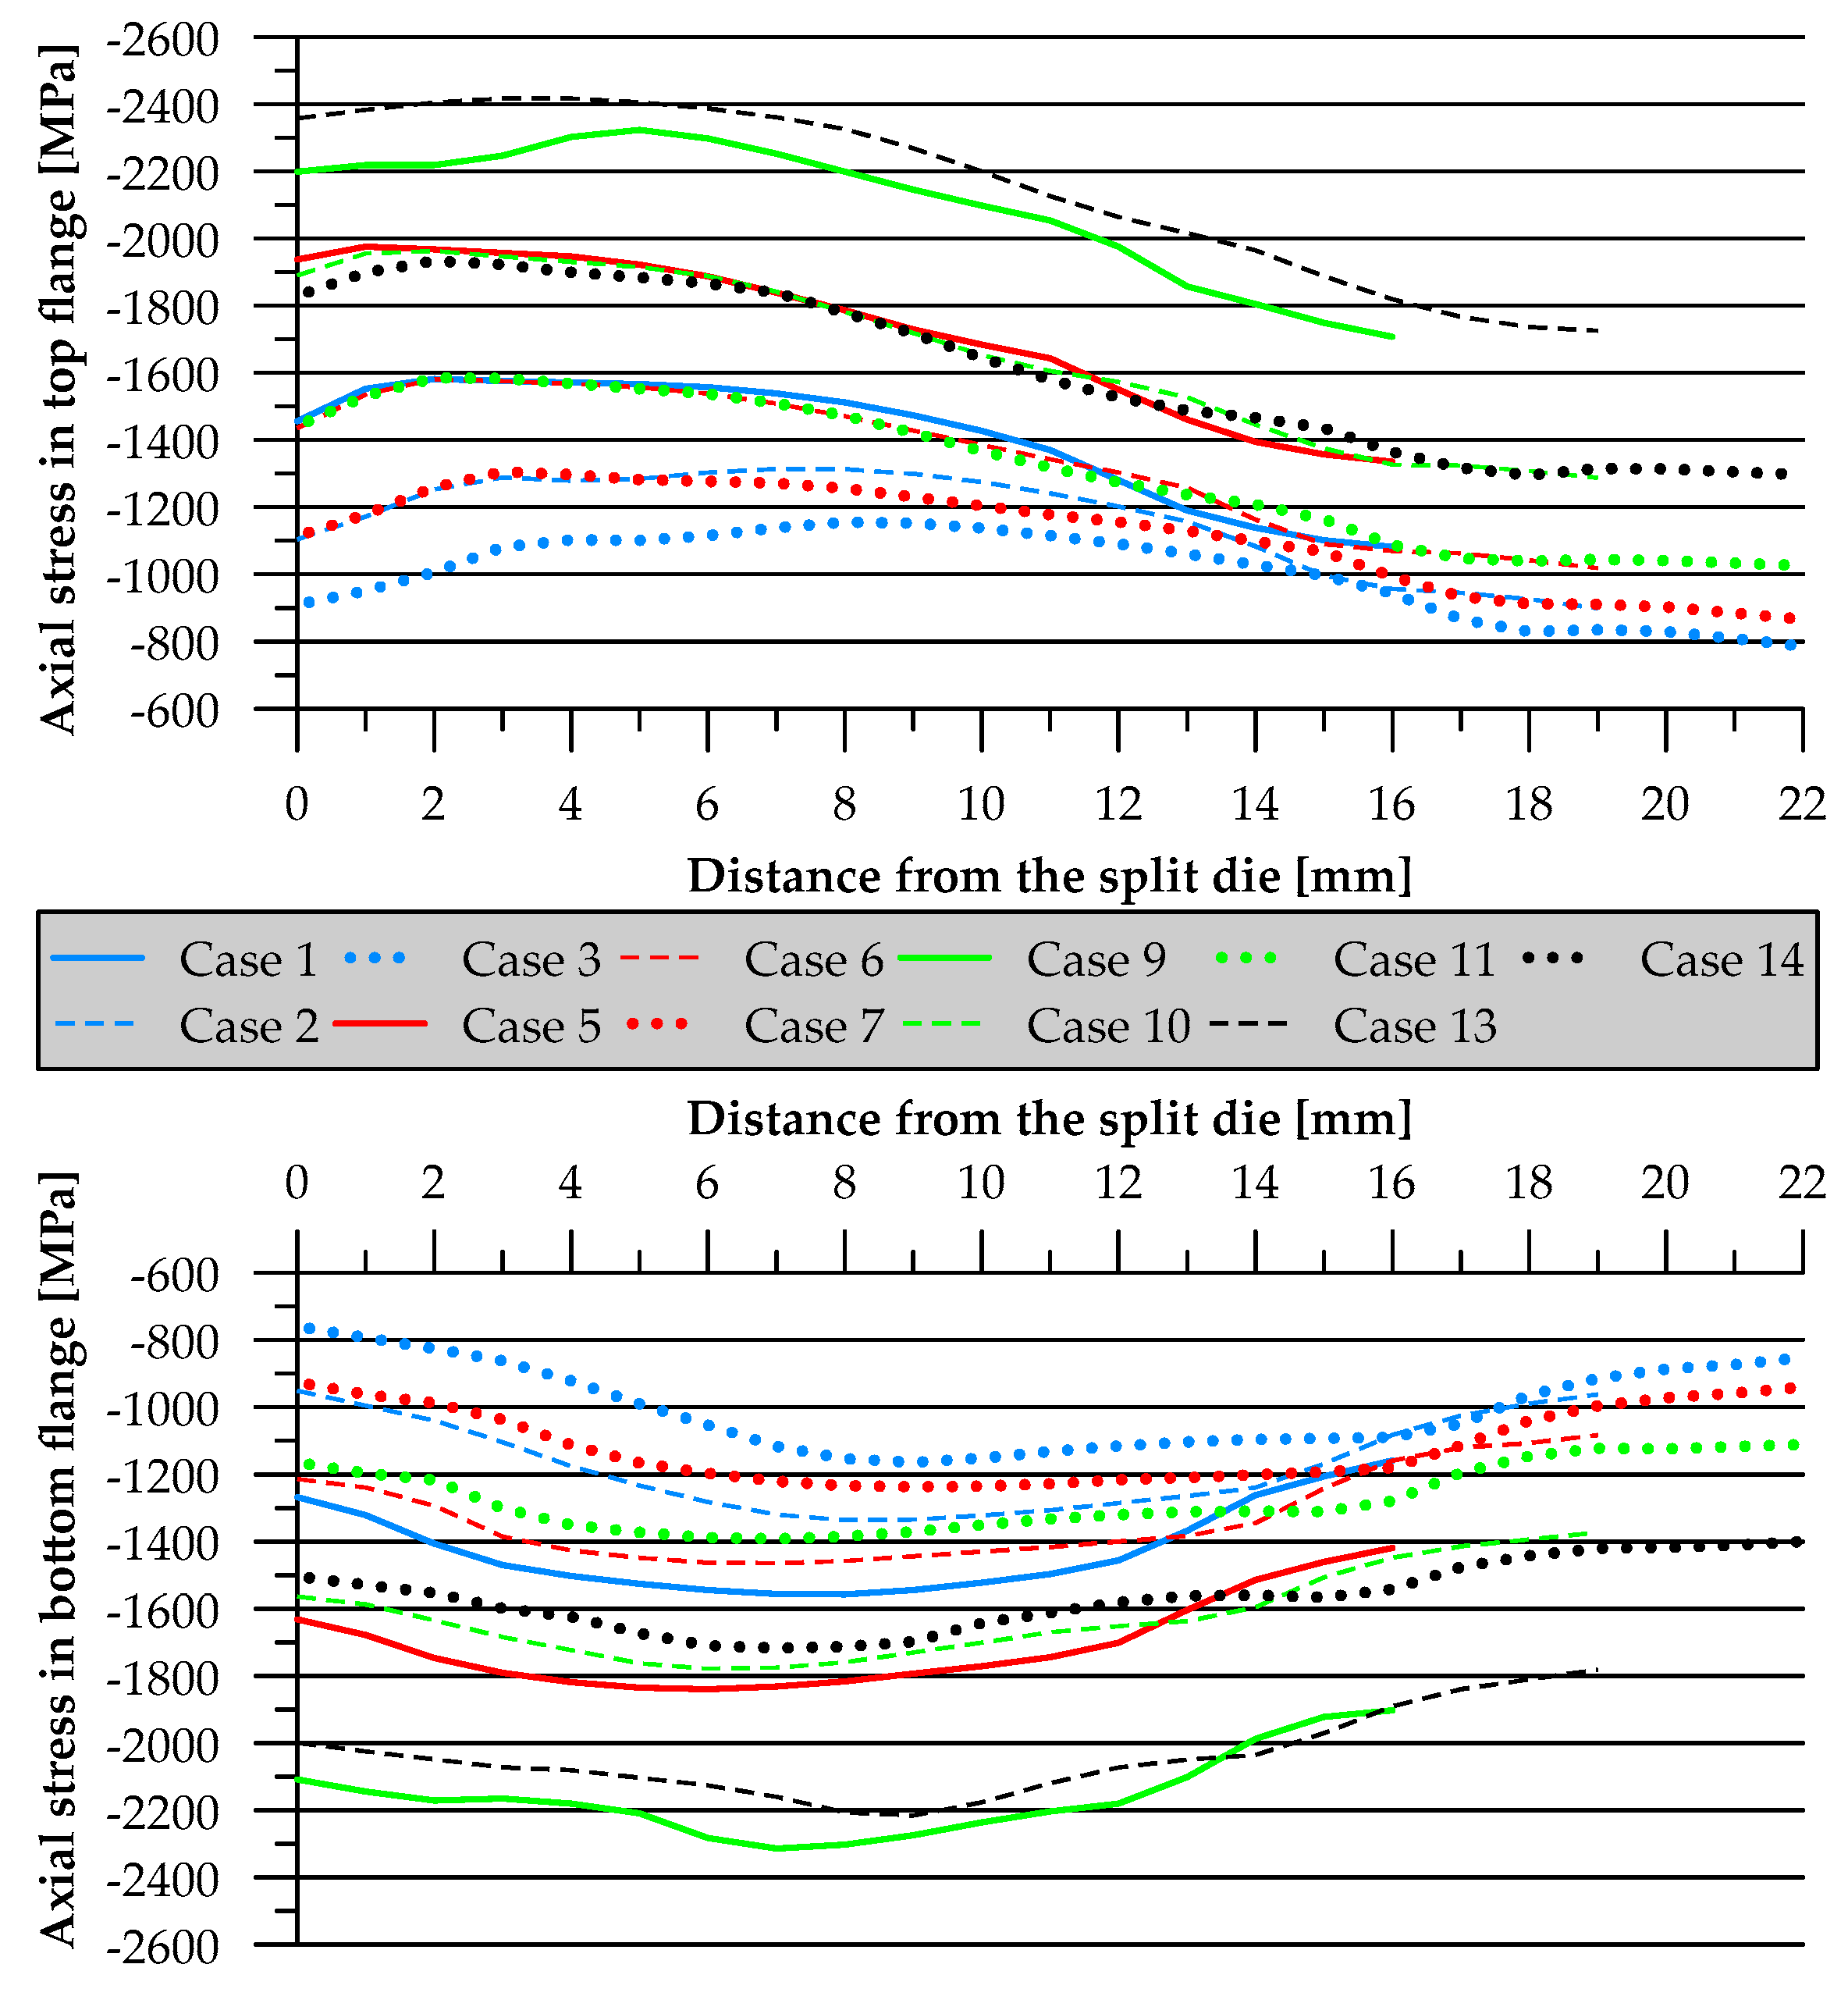
To determine the effect of die impression dimensions on the state of stress in a given flange zone, the values of radial, axial, and circumferential stresses induced on the inside surface of the workpiece (having contact with the mandrel), in the zone of the die impression heights Ht and Hb, were examined. In Figure 10, the dimensions mark the measuring range, with the dot indicating the beginning of measurement (zero value) and the arrow indicating the direction and sense of measurement of the distance from the split die. The stresses induced at the above-mentioned moment (just before the material comes into contact with the cylindrical zone of the die impressions with the diameters Dit and Dib) are shown in Figure 11, Figure 12 and Figure 13. They are all compressive stresses. Their values vary depending on the distance from the split die. Nevertheless, a relationship can be established between stress values and die impression dimensions. The absolute values of radial stress decrease with increasing the die impression heights Ht and Hb. On the other hand, as the die impression diameters Dit and Dib are increased, the absolute values of radial stress increase. The differences in individual values obtained for the analysed cases are noticeable and amount up to several tens of percent. In turn, the following trend can be observed with respect to axial stresses: an increase in the die impression height leads to a decrease in the absolute values of the axial stress. On the other hand, an increase in the die impression diameter causes the absolute axial stress values to increase. The same trend can also be observed for circumferential stresses. An increase in the die impression height causes the absolute values of circumferential stress to decrease, while an increase in the die impression diameter makes the absolute values of circumferential stress increase. These observed trends mean that the smaller the die impression height is, the lower is the risk of workpiece/mandrel contact loss at the beginning of extrusion. For a given impression height, an increase in the impression diameter induces increasing loads on the mandrel in the flange zone, which is desired as it helps prevent the aforementioned loss of contact between the material and the mandrel.
A detailed analysis of the variations in the values of the three stress components during the extrusion process was carried out for a case in which the maximum height flanges were obtained (Case 3 in Table 2). Two points were examined on the top and bottom flanges located inside the workpiece, where the workpiece/mandrel contact loss would initiate (Detail A in Figure 7). Based on the plots shown in Figure 14, it can be concluded that the stress values reflect individual stages of the process. Up to about 0.6 s of the process duration, the values of radial, axial, and circumferential stress do not change significantly, oscillating around −200, −900, and −500 MPa, respectively. In this stage, the outside diameter of the flange is increased and only the punches are moving. A sudden increase in the absolute values of stress at 0.6 s of the process is related to the occurrence of contact between the workpiece and the impressions with the diameters Dit and Dib of the moving dies. From this moment until about 1.2 s of the process duration, the absolute stress values decrease, which is related to an increase in the flange height. After that, the stress values remain almost constant, close to those observed at the beginning of the process. Also, from this moment on, the radial stress takes a value of zero. This is equivalent to the moment when the material loses contact with the mandrel. Thus, further implementation of the process—despite the fact that it is associated with an increase in the flange height—leads to an unintended increase in the inside diameter of the workpiece in the flange zone.

4. Conclusions

The results of this study investigating the new process of forming two flanges simultaneously lead to the following conclusions:
  • The extrusion process conducted with two moving dies makes it possible to form two flanges simultaneously in one tool pass.
  • The maximum achievable flange height is constrained by the possibility of contact loss between the workpiece and the mandrel; this can occur at the beginning of extrusion when only the punches are moving or when the dies are moving and flange height is increased.
  • An analysis of the state of stresses at the beginning of the extrusion process, i.e., before the dies began to move, showed that the smaller the die impression height was, the lower the risk of workpiece/mandrel contact loss became.
  • The highest flanges were obtained for the cases of the extrusion process where the die impression diameter was greater than the outside diameter of the billet by 0.5 and 0.75 of its wall thickness and the impression height was 1.75 times the billet wall thickness.
  • An increase in the die impression height led to an increase in the maximum flange height, while an increase in the die impression diameter caused a decrease in the maximum achievable flange height.
  • An increase in the flange height caused a slight (below 3%) increase in the outside diameter of the flange; for higher die impression diameters, the maximum flange diameter increase was smaller, while an increase in the die impression height resulted in a smaller increase in the outside diameter of the flange.

Author Contributions

Conceptualization, G.W.; methodology, G.W.; software, G.W., A.G., A.S., M.W. and S.W.; validation, G.W., A.G., A.S., M.W. and S.W.; formal analysis, G.W., A.G., A.S., M.W. and S.W.; investigation, G.W.; resources, G.W., A.G., A.S., M.W. and S.W.; data curation, G.W., A.G., A.S., M.W. and S.W.; writing—original draft preparation, G.W.; writing—review and editing, G.W., A.G., A.S., M.W. and S.W.; visualization, G.W., A.G., A.S., M.W. and S.W.; supervision, G.W., A.G., A.S., M.W. and S.W.; project administration, G.W.; funding acquisition, G.W. All authors have read and agreed to the published version of the manuscript.

Funding

The research was financed in the framework of the project “New metal forming technique for producing flanged hollow parts for the mining industry”, No. LIDER/1/0003/L-9/17/NCBR/2018. Total cost of the project: 1,197,000 PLN. The project is financed by the National Centre for Research and Development under the 9th edition of the LIDER Programme.

Data Availability Statement

The original contributions presented in the study are included in the article, further inquiries can be directed to the corresponding author.

Conflicts of Interest

The authors declare no conflicts of interest.

References

  1. Ku, T.W.; Kang, B.S. Tool design for inner race cold forging with skew-type cross ball grooves. J. Mater. Process. Technol. 2014, 214, 1482–1502. [Google Scholar] [CrossRef]
  2. Ku, T.W.; Kang, B.S. Hardness-controlled tool fabrication and application to cold forging of inner race with skewed ball grooves. Int. J. Adv. Manuf. Technol. 2014, 74, 1337–1354. [Google Scholar] [CrossRef]
  3. Ku, T.W.; Kim, L.H.; Kang, B.S. Multi-stage cold forging and experimental investigation for the outer race of constant velocity joints. Mater. Design 2013, 49, 368–385. [Google Scholar] [CrossRef]
  4. Ku, T.W.; Kang, B.S. Tool design and experimental verification for multi-stage cold forging process of the outer race. Int. J. Precis. Eng. Man. 2014, 15, 1995–2004. [Google Scholar] [CrossRef]
  5. Chen, S.; Qin, Y.; Chen, J.G.; Choy, C.M. A forging method for reducing process steps in the forming of automotive fasteners. Int. J. Mech. Sci. 2018, 137, 1–14. [Google Scholar] [CrossRef]
  6. Ku, T.W. A study on two-stage cold forging for a drive shaft with internal spline and spur gear geometries. Metals 2018, 8, 953. [Google Scholar] [CrossRef]
  7. Ku, T.W. A combined cold extrusion for a drive shaft: A parametric study on tool geometry. Materials 2020, 13, 2244. [Google Scholar] [CrossRef]
  8. Schiemann, T.; Liewald, M.; Beiermeister, C.; Till, M. Influence of process chain on fold formation during flange upsetting of tubular cold forged parts. Procedia Eng. 2014, 81, 352–357. [Google Scholar] [CrossRef]
  9. Pang, H.; Lowrie, J.; Ngaile, G. Development of a non-isothermal forging process for hollow axle shafts. Procedia Engineer. 2017, 207, 454–459. [Google Scholar] [CrossRef]
  10. Pang, H.; Ngaile, G. Development of a non-isothermal forging process for hollow power transmission shafts. Procedia Manuf. 2018, 26, 1509–1516. [Google Scholar] [CrossRef]
  11. Pang, H.; Ngaile, G. Development of a non-isothermal forging process for hollow power transmission shafts. J. Manuf. Process. 2019, 47, 22–31. [Google Scholar] [CrossRef]
  12. Alves, L.M.; Afonso, R.M.; Silva, C.M.A.; Martins, P.A.F. Boss forming of annular flanges in thin-walled tubes. J. Mater. Process. Technol. 2017, 250, 182–189. [Google Scholar] [CrossRef]
  13. Malhotra, R.; Xue, L.; Belytschko, T.; Cao, J. Mechanics of fracture in single point incremental forming. J. Mater. Process. Technol. 2012, 212, 1573–1590. [Google Scholar] [CrossRef]
  14. Yang, C.; Wen, T.; Liu, L.T.; Zhang, S.; Wang, H. Dieless incremental hole-flanging of thin-walled tube for producing branched tubing. J. Mater. Process. Technol. 2014, 214, 2461–2467. [Google Scholar] [CrossRef]
  15. Hou, X.; Li, Y.; Xiao, X.; Qiu, X.; Yang, M.; Gao, X. Modeling and analysis of multi-pass progressive flanging force of copper tube end. Int. J. Adv. Manuf. Technol. 2022, 121, 4703–4712. [Google Scholar] [CrossRef]
  16. Cao, T.; Lu, B.; Ou, H.; Long, H.; Chen, J. Investigation on a new hole-flanging approach by incremental sheet forming through a featured tool. Int. J. Mach. Tool. Manu. 2016, 110, 1–17. [Google Scholar] [CrossRef]
  17. Alves, L.M.; Gameiro, J.; Silva, C.M.A.; Martins, P.A.F. Sheet-bulk forming of tubes for joining applications. J. Mater. Process. Technol. 2017, 240, 154–161. [Google Scholar] [CrossRef]
  18. Alves, L.M.; Afonso, R.M.; Silva, C.M.A.; Martins, P.A.F. Joining tubes to sheets by boss forming and upsetting. J. Mater. Process. Technol. 2018, 252, 773–781. [Google Scholar] [CrossRef]
  19. Zhu, S.; Zhuang, X.; Xu, D.; Zhu, Y.; Zhao, Z. Flange forming at an arbitrary tube location through upsetting with a controllable deformation zone. J. Mater. Process. Technol. 2019, 273, 116230. [Google Scholar] [CrossRef]
  20. Zhu, S.; Zhuang, X.; Yang, Y.; Zhu, Y.; Zhao, Z. Investigation of a tailored blank for the elimination of forging laps during cup sidewall upsetting. Int. J. Adv. Manuf. Technol. 2020, 109, 2311–2324. [Google Scholar] [CrossRef]
  21. Zhuang, X.; Liang, M.; Zhu, S.; Zhu, Y.; Zhao, Z. Sheet bulk forming of thin-walled components with external gearing through upsetting using controllable deformation zone method. Chin. J. Mech. Eng. 2021, 34, 138. [Google Scholar] [CrossRef]
  22. Zhu, S.; Zhuang, X.; Zhu, Y.; Zhao, Z. Thickening of cup sidewall through sheet-bulk forming with controllable deformation zone. J. Mater. Process. Technol. 2018, 262, 597–604. [Google Scholar] [CrossRef]
  23. Zhu, Y.; Zhu, S.; Zhuang, X.; Zhao, Z. Die structure optimization for eliminating premature folding of sidewall upsetting with a controllable deformation zone. Int. J. Adv. Manuf. Technol. 2019, 105, 1411–1424. [Google Scholar] [CrossRef]
  24. Winiarski, G.; Gontarz, A. Numerical and experimental study of producing two-step flanges by extrusion with a movable sleeve. Arch. Metall. Mater. 2017, 62, 495–499. [Google Scholar] [CrossRef]
  25. Winiarski, G.; Bulzak, T.A.; Wójcik, Ł.; Szala, M. Effect of tool kinematics on tube flanging by extrusion with a moving sleeve. Adv. Sci. Technol. Res. J. 2019, 13, 210–216. [Google Scholar] [CrossRef] [PubMed]
  26. Winiarski, G.; Bulzak, T.A.; Wójcik, Ł.; Szala, M. A new method of flanges extrusion in hollow products—Analysis of the limiting phenomena. Adv. Sci. Technol. Res. J. 2020, 14, 78–85. [Google Scholar] [CrossRef]
  27. Winiarski, G. Theoretical and experimental study on the effect of selected parameters in a new method of extrusion with a movable sleeve. Materials 2022, 15, 4585. [Google Scholar] [CrossRef] [PubMed]
  28. Yang, C.C.; Liu, C.H. The study of multi-stage cold forming process for the manufacture of relief valve regulating nuts. Appl. Sci. 2023, 13, 6299. [Google Scholar] [CrossRef]
  29. Wan, N.; He, Q.; Jing, X.; Jiang, Y.; Zhou, H. Numerical and experimental investigation of the effect of cold extrusion process on residual stress and fatigue life of internal thread of high-strength steel. Int. J. Adv. Manuf. Technol. 2023, 127, 4713–4726. [Google Scholar] [CrossRef]
Figure 1. Schematic design of forming two flanges simultaneously in a hollow part by extrusion with two moving dies; 1—punch with mandrel; 2—top die; 3a—tube; 3b—forged part; 4—split die; 5—bottom die; 6—hollow punch.
Metals 14 00612 g001
Figure 2. Flow curve of 42CrMo4 steel for strain rate 1.6 s−1.
Metals 14 00612 g002
Figure 3. Flow curve of 42CrMo4 steel for strain rate 8 s−1.
Metals 14 00612 g003
Figure 4. Flow curve of 42CrMo4 steel for strain rate 40 s−1.
Metals 14 00612 g004
Figure 5. Changes in the shape of a workpiece during the forming of two flanges simultaneously in a hollow area.
Metals 14 00612 g005
Figure 6. Workpiece at the beginning of the flanging process.
Metals 14 00612 g006
Figure 7. Scheme illustrating the measurement of maximum flange height and diameter.
Metals 14 00612 g007
Figure 8. Top and bottom flange heights for different cases of the extrusion process.
Metals 14 00612 g008
Figure 9. Maximum increase in the outside diameter of top and bottom flanges, for different cases of the extrusion process.
Metals 14 00612 g009
Figure 10. Distribution of radial, axial, and circumferential stresses in a workpiece at the beginning of the extrusion process, for Case 3 in Table 2.
Metals 14 00612 g010
Figure 11. Radial stress on the inside surface of the workpiece at the beginning of flange formation for different cases of this forming process.
Metals 14 00612 g011
Figure 12. Axial stress on the inside surface of a workpiece at the beginning of flange formation for different cases of this forming process.
Metals 14 00612 g012
Figure 13. Circumferential stress on the inside surface of the workpiece at the beginning of flange formation, for different cases of this forming process.
Metals 14 00612 g013
Figure 14. Variations in radial, axial, and circumferential stresses at two points located inside the workpiece (in the flange zone), where the workpiece loses contact with the mandrel; Case 3 in Table 2.
Metals 14 00612 g014
Table 1. Dimensions of the billet and tools (denoted in accordance with Figure 1).
DimensionUnitValue
Lmm150
Ltmm65
Lbmm65
gmm12.5
Dmm57
Rtmm2
Rbmm2
αtdegree30
αbdegree30
υptmm/s10
υpbmm/s10
υctmm/saccording to Equation (1)
υcbmm/saccording to Equation (2)
Table 2. List of investigated cases of the flanging process (denoted in accordance with Figure 1).
Case
Number
Dit = Dib
Equation
Ht = Hb
Equation
Dit = Dib
Value [mm]
Ht = Hb
Value [mm]
Case 1D + 0.50∙g1.25∙g63.2515.63
Case 2D + 0.50∙g1.50∙g63.2518.75
Case 3D + 0.50∙g1.75∙g63.2521.88
Case 4D + 0.50∙g2.00∙g63.2525.00
Case 5D + 0.75∙g1.25∙g66.3815.63
Case 6D + 0.75∙g1.50∙g66.3818.75
Case 7D + 0.75∙g1.75∙g66.3821.88
Case 8D + 0.75∙g2.00∙g66.3825.00
Case 9D + 1.00∙g1.25∙g69.5015.63
Case 10D + 1.00∙g1.50∙g69.5018.75
Case 11D + 1.00∙g1.75∙g69.5021.88
Case 12D + 1.00∙g2.00∙g69.5025.00
Case 13D + 1.25∙g1.50∙g72.6318.75
Case 14D + 1.25∙g1.75∙g72.6321.88
Case 15D + 1.25∙g2.00∙g72.6325.00
Disclaimer/Publisher’s Note: The statements, opinions and data contained in all publications are solely those of the individual author(s) and contributor(s) and not of MDPI and/or the editor(s). MDPI and/or the editor(s) disclaim responsibility for any injury to people or property resulting from any ideas, methods, instructions or products referred to in the content.