Article

Computer Vision Observation for Progressive Failure Characteristics of a Moderately Weathered Red Mudstone Foundation: Design and Experiment

1
School of Mechatronic Engineering, Southwest Petroleum University, Chengdu 610500, China
2
China Southwest Geotechnical Investigation & Design Institute Co., Ltd., Chengdu 610051, China
3
School of Civil Engineering and Geomatics, Southwest Petroleum University, Chengdu 610500, China
4
China Railway 23rd Bureau Group Co., Ltd., Chengdu 610075, China
*
Author to whom correspondence should be addressed.
Buildings 2023, 13(4), 864; https://doi.org/10.3390/buildings13040864
Submission received: 11 February 2023 / Revised: 10 March 2023 / Accepted: 19 March 2023 / Published: 25 March 2023
(This article belongs to the Section Building Materials, and Repair & Renovation)

Abstract

:
The bearing stratum of high-rise and ultra-high-rise buildings in southwest China has inevitably faced moderately weathered red mudstone. It was a waste of the potential bearing stratum calculated according to the specification, as the bearing stratum obtained from laboratory and in situ tests was much higher than the values suggested by the specification. Rock mass surface deformation detection is of great significance in the safety management of a foundation project. Some correlation between surface deformation and failure characteristics may exist that could help to understand the bearing stratum of the moderately weathered red mudstone. This research was conducted to study the progressive failure characteristics of the moderately weathered red mudstone through surface deformation. In situ load, triaxial, and binocular visual technology were employed for data acquisition. The proposed conjecture was illustrated and verified by a group of experiments from three construction sites. Five stages could be described as the progressive failure of the moderately weathered red mudstone: compaction, elasticity, elastoplasticity, plasticity, and failure. Furthermore, the surface displacement increment fluctuates with the loading time and fades into the distance. Therefore, this research could provide a robust, practical application for analyzing the progressive failure of moderately weathered red mudstone.

1. Introduction

Red bedded mudstone is a typical soft rock widely distributed in southwest China [1,2,3]. With the development of the Chengyu economic circle, moderately weathered mudstone would inevitably be the foundation bearing layer for high-rise and ultra-high-rise buildings. Engineers usually reduce the characteristic value of the bearing capacity of the mudstone foundation to ensure engineering safety. The typical values of uniaxial compressive strength (4.0~6.0 MPa) and the characteristic value of bearing capacity (1.5~2.5 MPa) obtained from laboratory and field tests of moderately weathered red mudstone generally exceed the recommended values of 0.5~1.0 MPa in codes [4]. The characteristic value of the bearing capacity had to be calculated according to different foundation forms when an upper load is high [5,6,7]. That led to a substantial increase in engineering costs. Although the red bedded mudstone has some problems, such as softening by water [8,9,10], excessive reduction may seriously waste the bearing capacity of red mudstone. Therefore, researching the failure regularity and the failure mode of moderately weathered red-bedded mudstone foundations was necessary to establish a scientific method to determine the characteristic value of bearing capacity.
Many scholars have studied rock failure modes. Refs. [11,12] divided the failure modes of rock foundations caused by insufficient bearing capacity into shear failure, punching shear failure, elastic failure, splitting failure, and uniaxial compression failure. Ref. [13] proposed a modified formula for the Hoek–Brown rock foundation bearing capacity subjected to seepage forces. Ref. [14] proposed a new limit analysis solution for the bearing capacity of ring foundation on rock mass, with the Hoek–Brown yield criterion as the failure criterion of the rock mass. Ref. [15] discussed two main failure modes of the jointed rock foundation, including general shear failure and failure caused by excessive deformation. Ref. [16] described a geological framework for the pattern of granular rock failure, (1) which is similar to elastic crack models and (2) tabular structures resulting from strain localization into narrow bands. However, the rigid rock foundation failure model does not necessarily apply to red-bedded mudstone. Red-bedded mudstone would exhibit fragile fracture or strain-softening under low confining pressure [17]. The mudstone deformation and failure process have four stages: closing of the fracture, elastic deformation, crack spreading, and plastic deformation. With the increase in lateral pressure, the ultimate load increases and the failure mode changes from a fragile fracture to a plastic failure. Moreover, the volume expansion gradually disappears as the failure degree increases [18].
Surface deformation phenomenology often occurs with the foundation-bearing capacity test. Internal deformation of rock mass inevitably causes surface deformation. There may be some correlation between rock surface deformation and deep deformation. It seems that the deformation of the rock surface could also as an initial estimation of bearing capacity, which may be a new way of assisting design. It is commonplace to characterize rock mass surfaces through a geodetic survey [19], GPS [20], interferometric synthetic aperture radar (INSAR) interferometry [21], 3D laser scanning [22,23], and digital photogrammetry [24,25]. However, the deformation of rock and soil surface needs to be observed in a narrow space in the rock foundation load test, which limits the capabilities of many large devices in this scenery. Binocular vision technology is a method to obtain 3D geometric details of objects from multiple images based on the parallax principle [26,27]. The engineers could obtain the precursor information of internal failure by monitoring the ground surface deformation process. The accuracy of binocular vision technology in rock surface deformation detection could reach the millimetric level [28]. In the research [29], higher precision research of binocular vision systems in 3D object perimeter measurement with repetition error decreases to 0.6%. Binocular vision technology is also used to monitor rock and rock surface deformation [30,31,32,33].
Then, is there a correlation between the internal deformation and the surface deformation of red-bedded mudstone? This research revealed the dynamic deformation law of foundation surface under load in southwest China. We combined a static load test, a triaxial test, and binocular vision to obtain the mechanical behavior of red-bedded mudstone.

2. Test Method

2.1. Test Procedure

The proposed test procedure is shown in Figure 1.
(1) A circular rigid bearing plate with a diameter of 300 mm was used for the static load test. The precast concrete test blocks are for compaction.
(2) Binocular visual monitoring equipment and mark points are installed near the bearing plate. The binocular monitoring equipment automatically takes and records the image data of surface deformation every 3 min. Image acquisition was started before the loading of the static load test.
(3) We equipped 4 displacement gauges for displacement measurement. Before loading, the test should be started with readings every 10 min and unchanged readings for three consecutive times.
(4) Single-cycle loading is adopted and read once, immediately after each loading. When the difference between three consecutive readings is no more than 0.01 mm, it is regarded as reaching the standard of stability, and the next level of load can be applied. This is performed step by step until it breaks, and then it unloads in stages.
(5) After loading, the rock samples near the bearing plate were taken for the triaxial test.

2.2. Geological Condition

We set up three test fields, Chengdu SKP Project (Field 1), Chengdu Xinglong Lake (Field 2), and Chongqing RBC Future City (Field 3). The mudstone in Field 1 belongs to the Guankouzu in the Upper Cretaceous System, medium thick-bedded structure, joints, and fracture growth, and most cores are biscuit shaped. The mudstone in Field 2 also belongs to the Guankouzu in the Upper Cretaceous System, has a layer structure, gray bands, and fracture growth, and is partly filled with a black oxide film. The mudstone in Field 3 belongs to Shaximiao of the middle Jurassic, with a medium-fine grain structure, medium thick-bedded structure, and calcium argillaceous cement.

2.3. Rock Base Load Test

We arranged five test points, 1 in Field 1 (J-1#), 3 in Field 2 (X-1#, X-2#, and X-3#), and 1 in Field 3 (C-1#). According to the Code for Foundation Design of Buildings (GB 50007-2011) [4], the bearing plates adopt rigid circular plates with a diameter of 300 mm. Prefabricated concrete blocks pressuring four dial gauges were for displacement monitoring. Before pressurization, read the dial gauges once every 10 min. When three consecutive readings were the same, pressurization started. Then, load in stages of 300 kPa per stage. After loading, recorded the dial gauges’ readings once every 10 min. Load to failure when the difference between 3 consecutive readings was not more than 0.01 mm. At last, uninstall in stages.

2.4. Triaxial Test

All samples were within 3 m of the static load test point center.
The confining pressure of Field 2 is 0.3~1.8 MPa with an interval of 0.3 MPa. Each group of confining pressure contains two samples for comparison, except for the sample with a confining pressure of 0.3 MPa.
The confining pressure of Field 3 is 2.0~12.0 MPa with an interval of 2 MPa. Each group of confining pressure contains two samples for comparison.
During the loading process, the confining and axial forces were applied synchronously to the predetermined confining pressure values at a loading speed of 0.05 MPa/s. Record the axial deformation value as the initial value of the sample. During the test, the confining pressure should be kept constant. Furthermore, there was a continuous loading method for measuring the axial load. Then, the researchers read the axial load and axial deformation step by step until the sample broke. At last, record the breaking load of each sample.

2.5. Binocular Vision

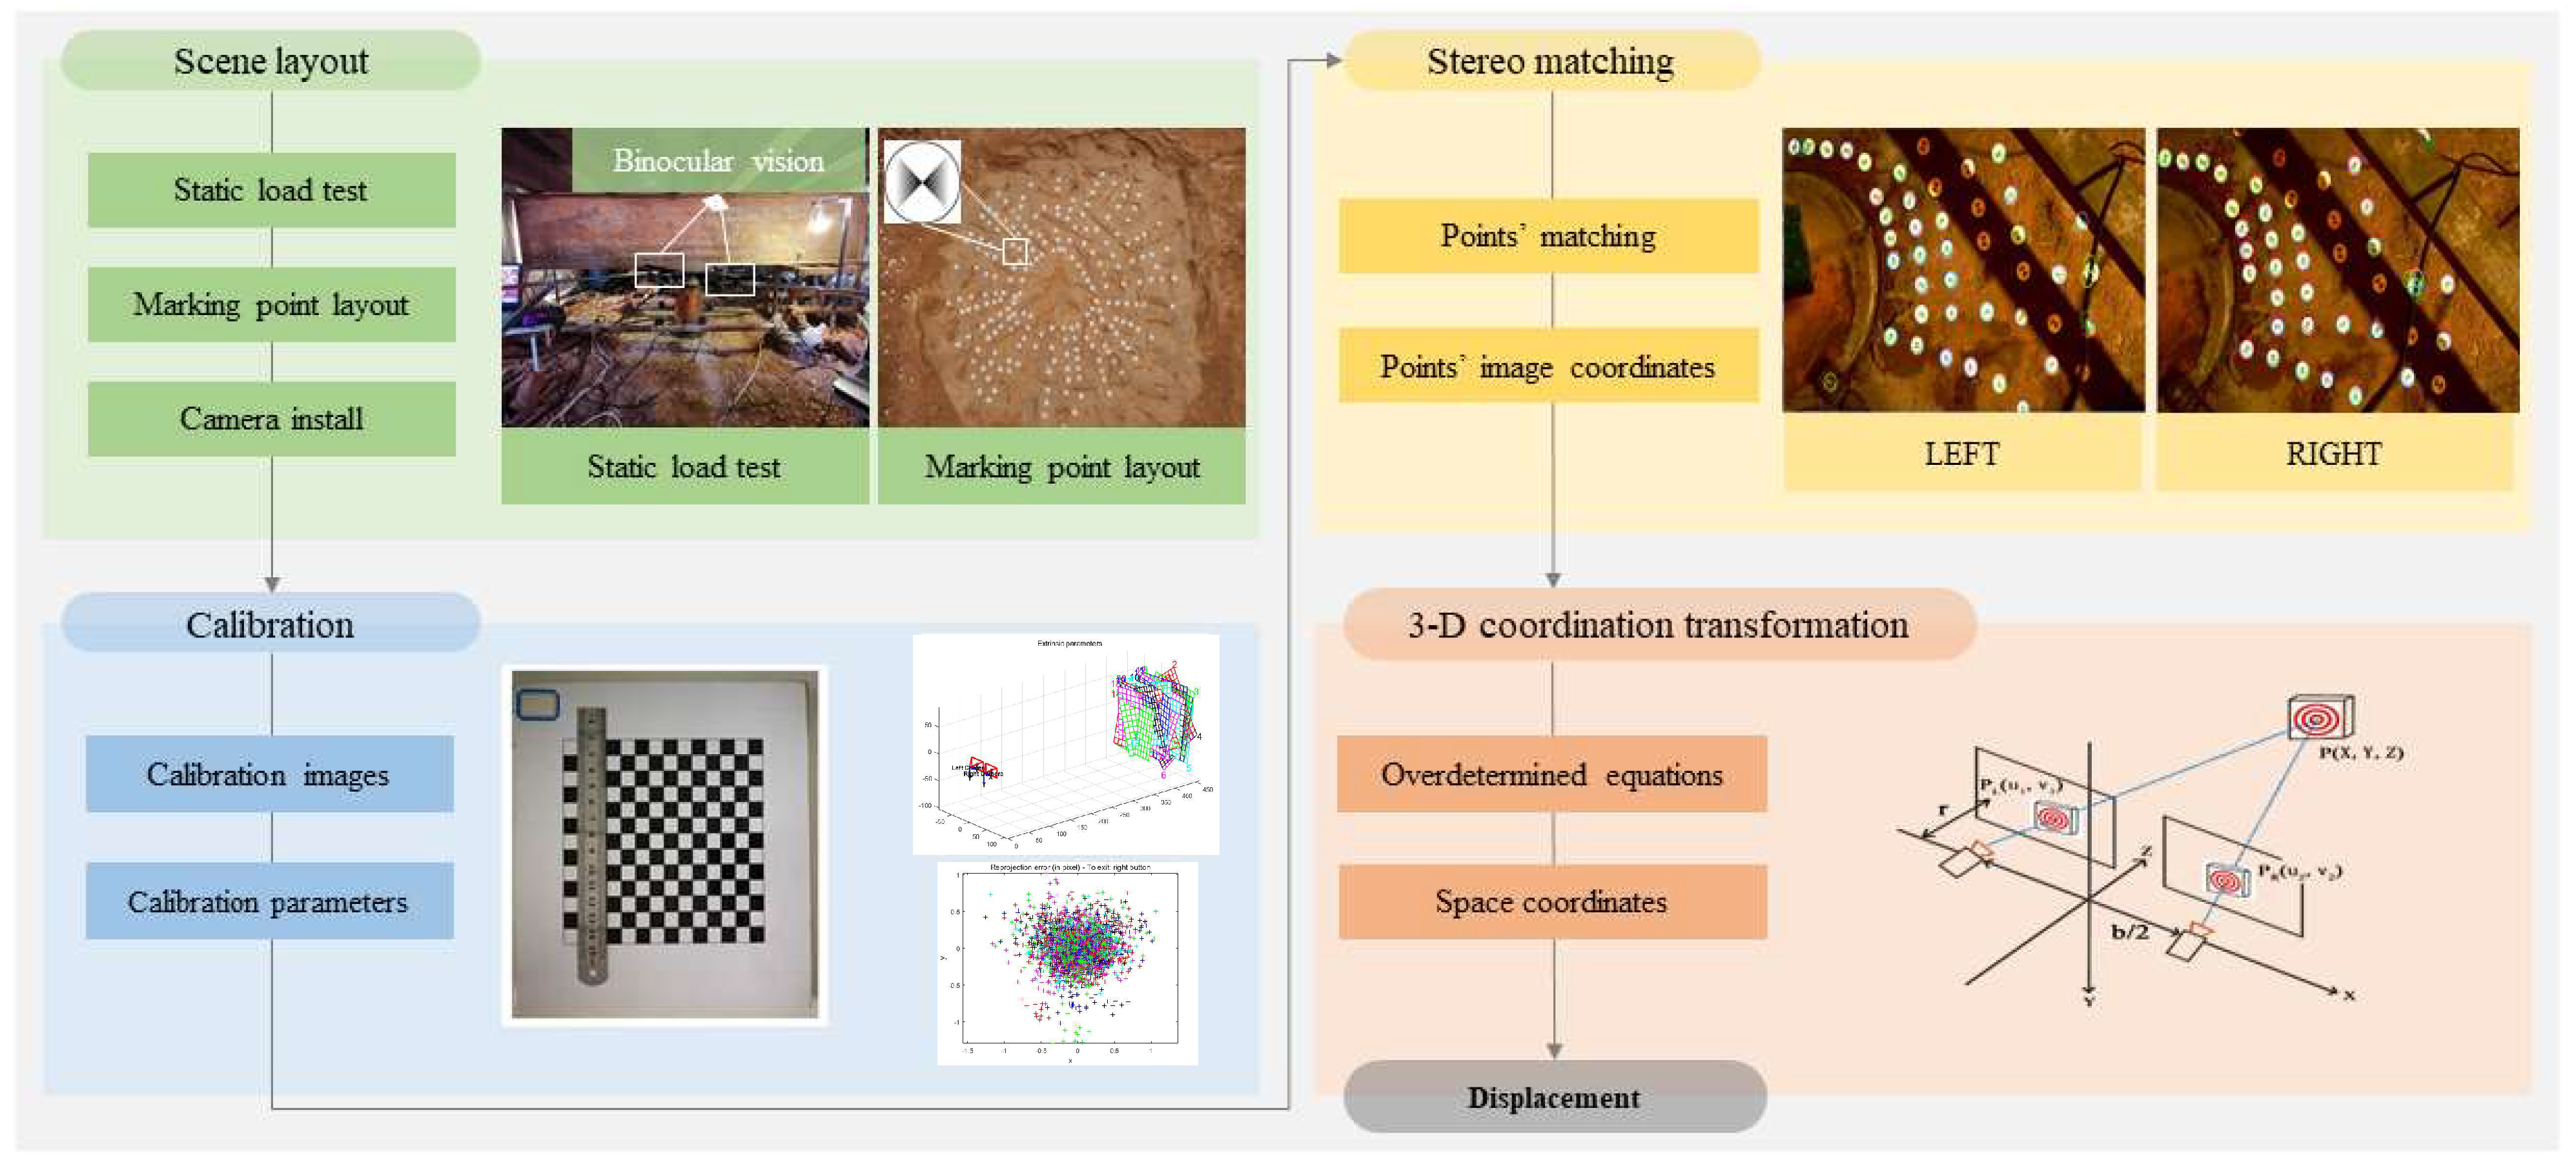
Binocular vision technology was a method of dynamically measuring the rock mass’s surface deformation. Figure 2 shows the process of binocular vision measuring, including scene layout, calibration, stereo matching, and a three-dimensional coordinate solution.
Multistage loading is carried out on the natural foundation of moderately weathered mudstone. In the range of 1 m × 1 m near the bearing plate, the surface of the rock and soil body should be polished to remove the dust on the surface, to facilitate the sticking of the mark points. The binocular vision monitoring system needs to record the rock and soil surface changes during the pressurization process completely. The binocular system was used for image acquisition before loading, and the system could be withdrawn after the end of the pressure.
Measurement accuracy test: There was a test for measurement accuracy of the binocular vision system before measurement. The influence of mark point size on the accuracy of measurement results was quantified by laboratory tests. The main test equipment includes a binocular camera, laptop computer, different size markers, camera bracket, etc. Five kinds of mark points with different diameters were made, and several groups of distance measurement accuracy tests were designed. The parameter design is shown in Table 1. To verify the accuracy of this method, binocular vision was used to measure the distance between two mark points under the same conditions.
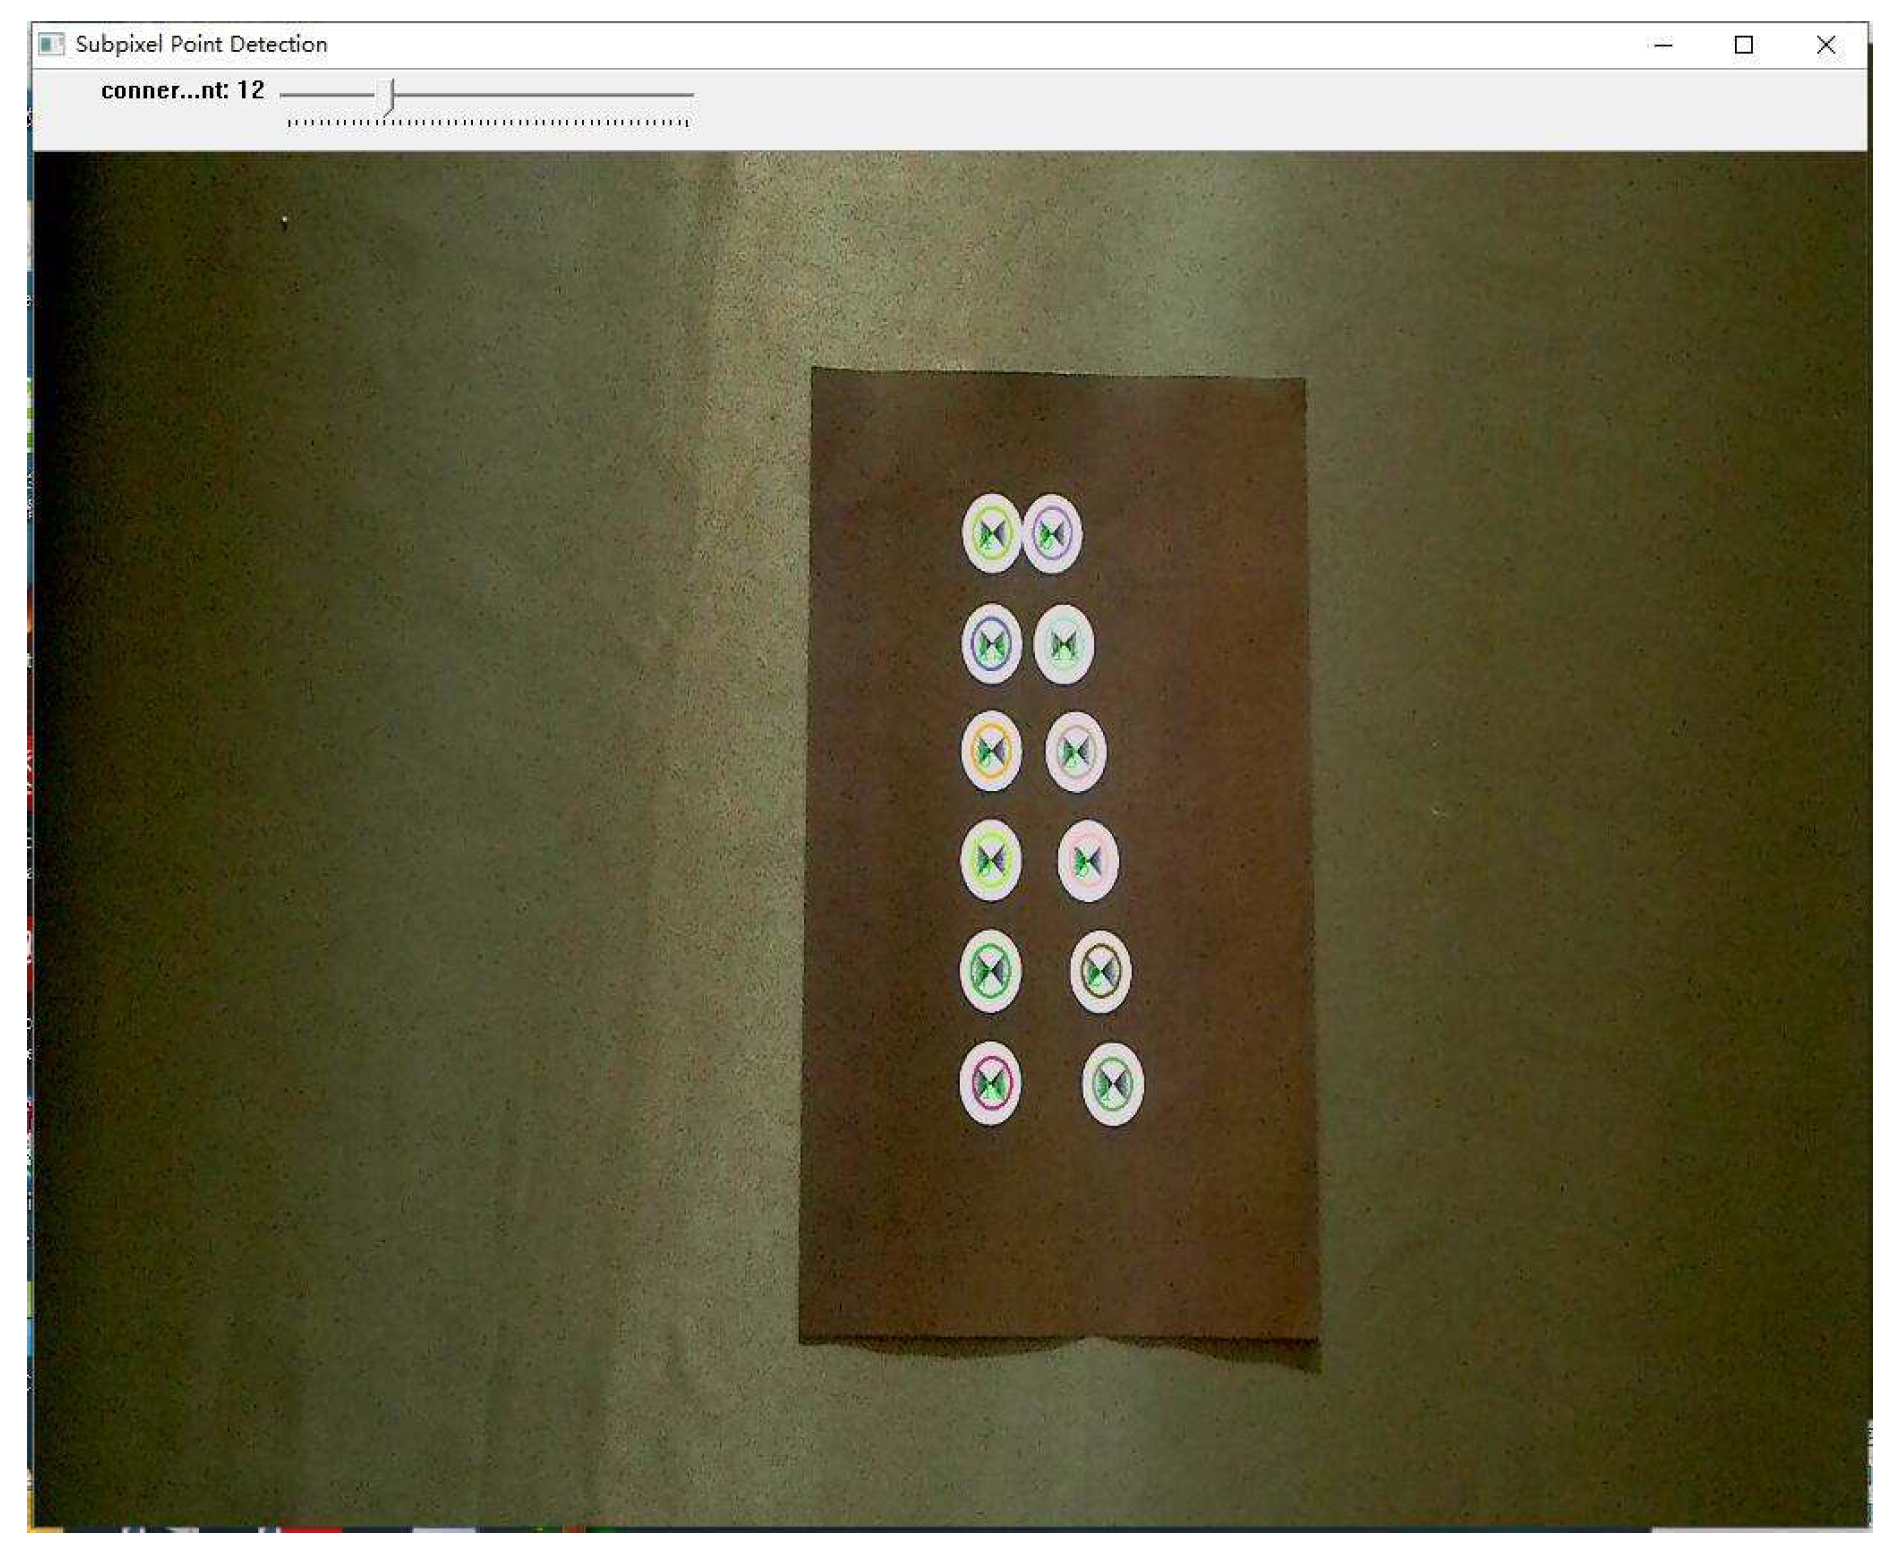
Extracting the center pixel coordinates from the mark points of different diameters using the sub-pixel corner detection algorithm. Figure 3 shows the recognition results of the mark points with a diameter of 25.
Sub-pixel coordinate extraction effects of mark points with different diameters are shown in Table 2.
The measurement results and errors are shown in Table 3, Table 4, Table 5, Table 6 and Table 7. Among them, the absolute error refers to the difference between the true value and the binocular measurement value, and the relative error refers to the ratio of the absolute error caused by binocular vision technology to the true value of the distance, expressed in percentage.
For each diameter of mark points, the absolute error of distance measurement is no more than 1 mm, and the relative error is within 2%, as the testing results show. The relative error curves of different marker sizes are shown in Figure 4.
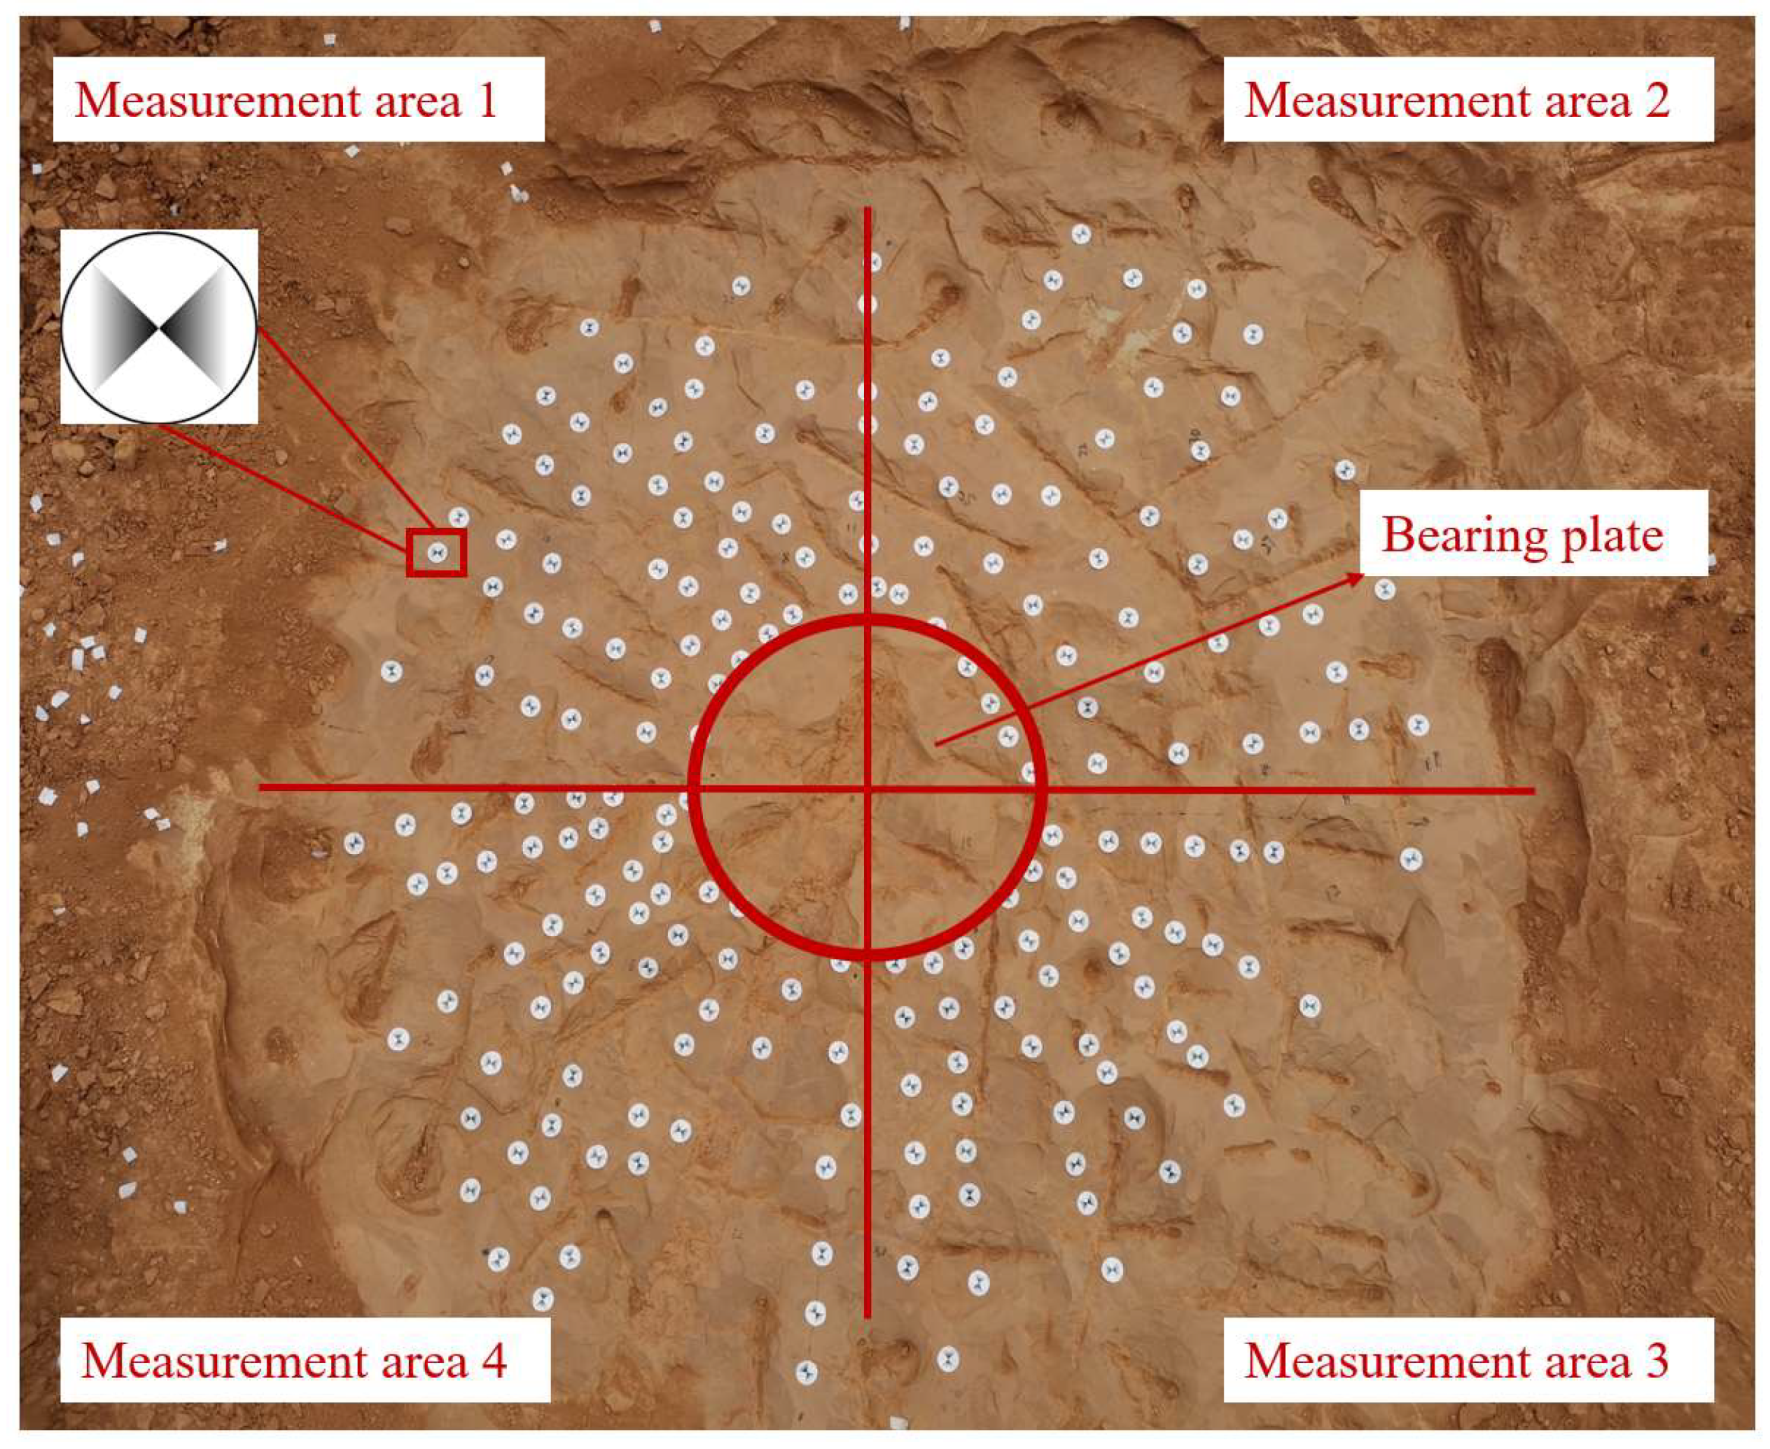
Scene layout: The scene was divided into four measurement areas, with the bearing plate as the center in the stage on the scene layout. Each site was radially arranged with about 50 marking points, accumulating nearly 200 in the scene layout, as Figure 5 shows.
This research adopts Zhang’s calibration method [34]. Formula (1) was used for extracting the two-dimensional coordinates of the marking points’ center:
R ( x , y ) = a x 2 + b y 2 + c x y + d x + e y + f
where R(x,y) is the corner reaction function, given by utilizing the least-square method. Sub-pixel corner points correspond to the maximum points of the quadratic polynomials. Take the derivative of the formula to obtain the coordinates of the moment as Formula (2).
{ R x = 2 a x + c y + d = 0 R y = 2 b y + c x + e = 0
Suppose there is any point P in space. According to the three-dimensional projection, the point is projected as P1 and P2 on the left camera C1 and the right camera C2, respectively. The camera’s ideal linear model can be represented by Equations (3) and (4):
Z C 1 [ u 1 v 1 1 ] = P 1 [ X Y Z 1 ] = [ p 00 1 p 01 1 p 02 1 p 03 1 p 10 1 p 11 1 p 12 1 p 13 1 p 20 1 p 21 1 p 22 1 p 23 1 ] [ X Y Z 1 ]
Z C 2 [ u 2 v 2 1 ] = P 2 [ X Y Z 1 ] = [ p 00 2 p 01 2 p 02 2 p 03 2 p 10 2 p 11 2 p 12 2 p 13 2 p 20 2 p 21 2 p 22 2 p 23 2 ] [ X Y Z 1 ]
where (u1, v1, 1) and (u2, v2, 1) are the pixel homogeneous coordinates of P1 and P2 in the left and right images, respectively, (X, Y, Z, 1) is the homogeneous coordinate of P in the world coordinate system, and P1ij and P2ij are coefficient matrices, which can be obtained from the matrix of internal and external parameters of the camera.

3. Results

3.1. Rock Base Load Test

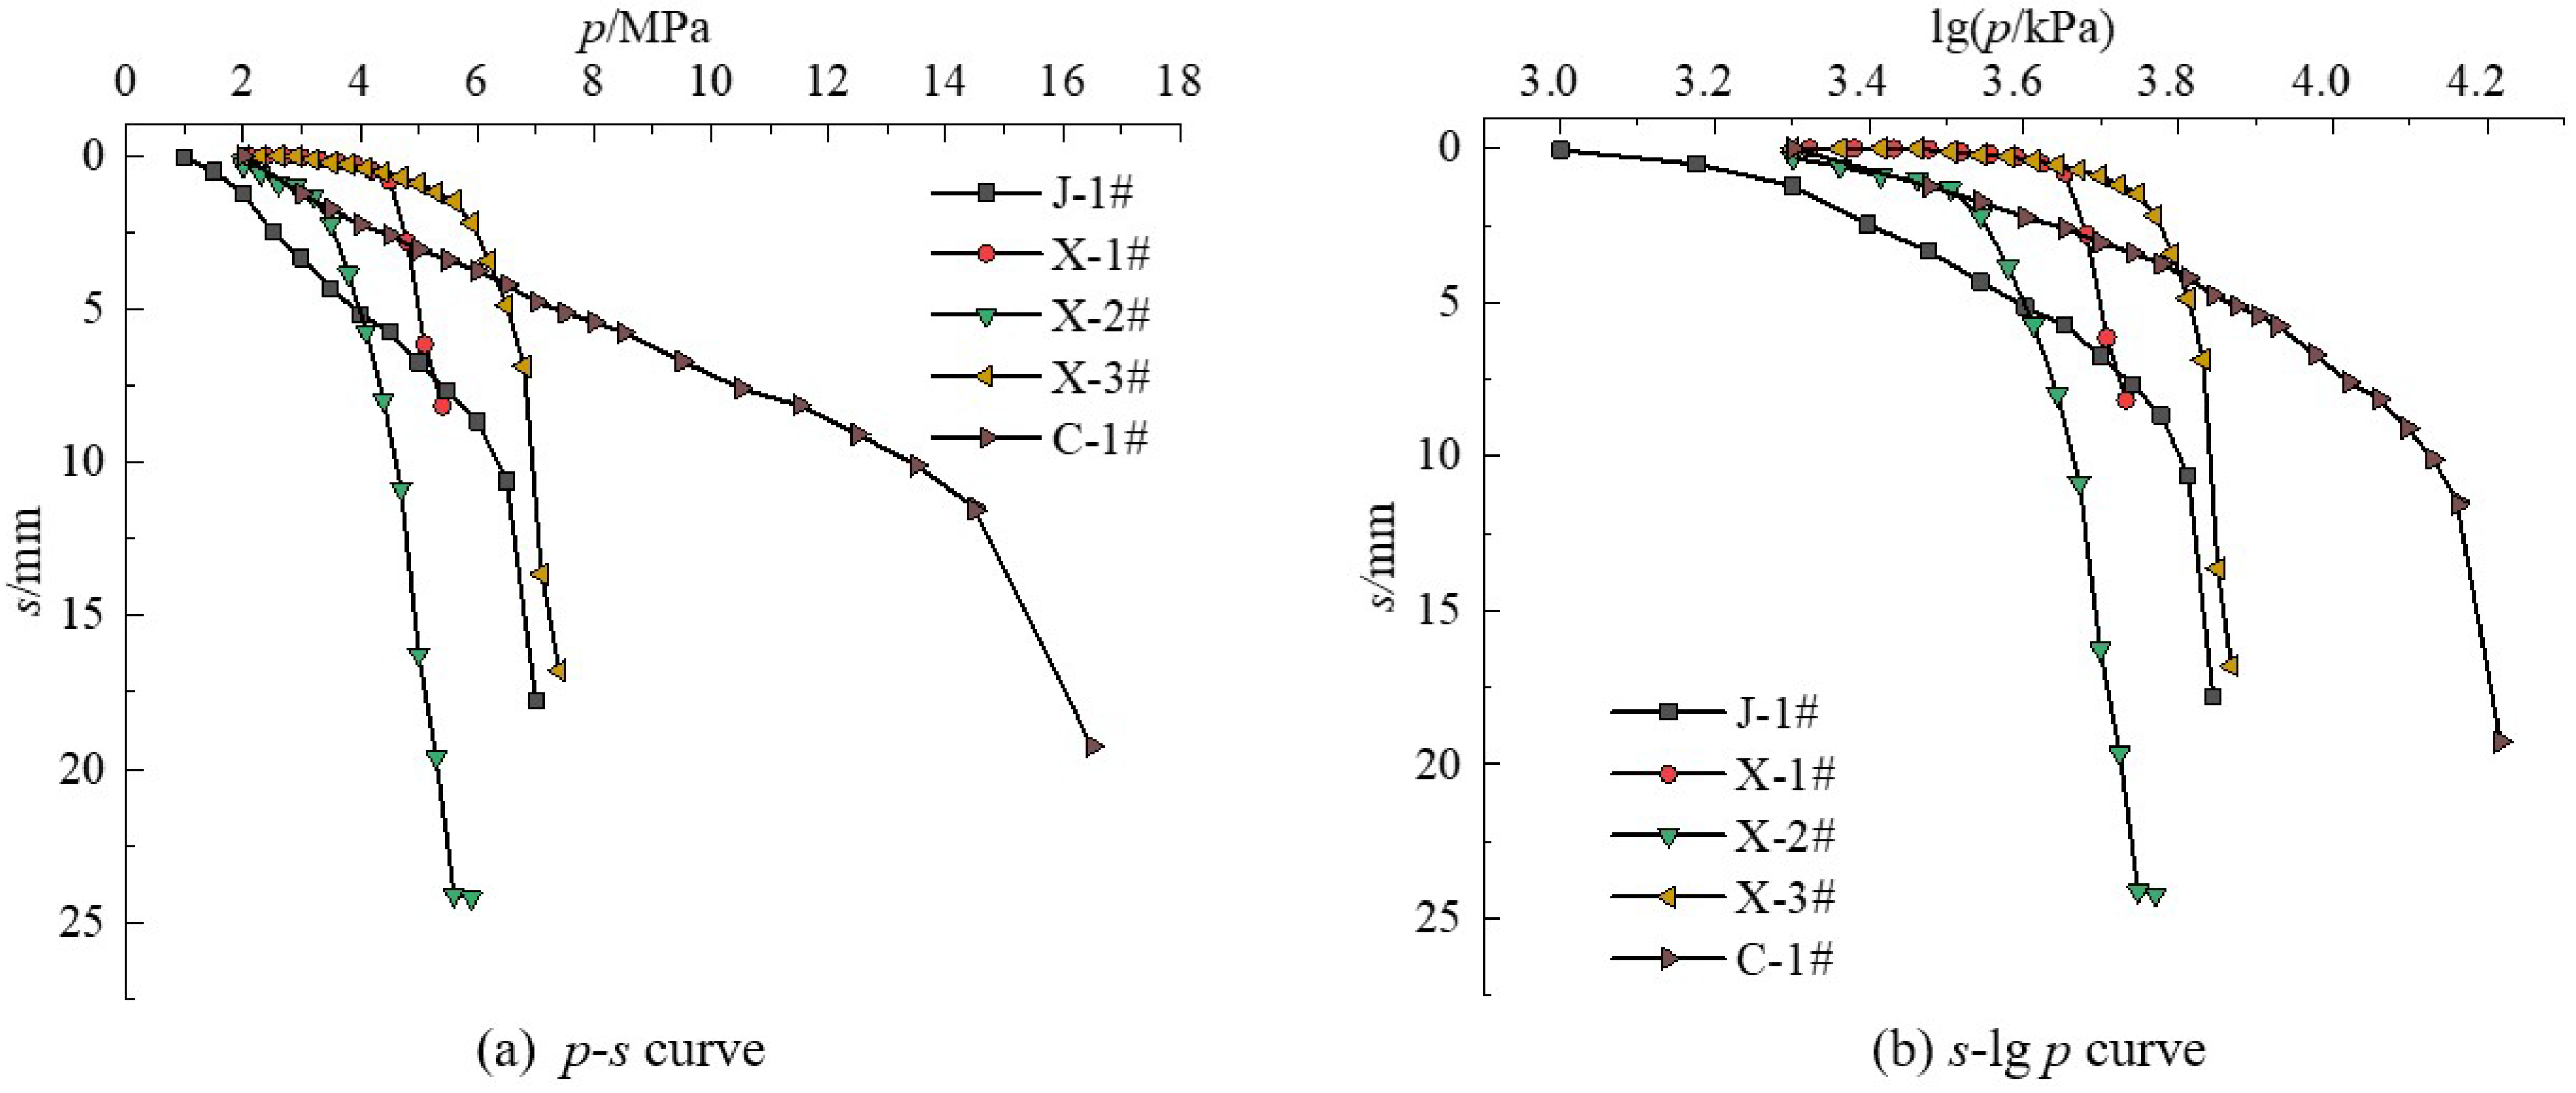
Figure 6 shows the rock-base test results. This research calculated the ultimate characteristic value of the bearing capacity through Code for Design of Building Foundation (GB 50007-2011) [4]. The ultimate characteristic value of the bearing capacity of Field 1 is 2000 kPa. For Field 2, it increases from 1500 kPa to 1966 kPa from east to west. Field 3 was much different from Field 1 and Field 2, and it was 4500 kPa.
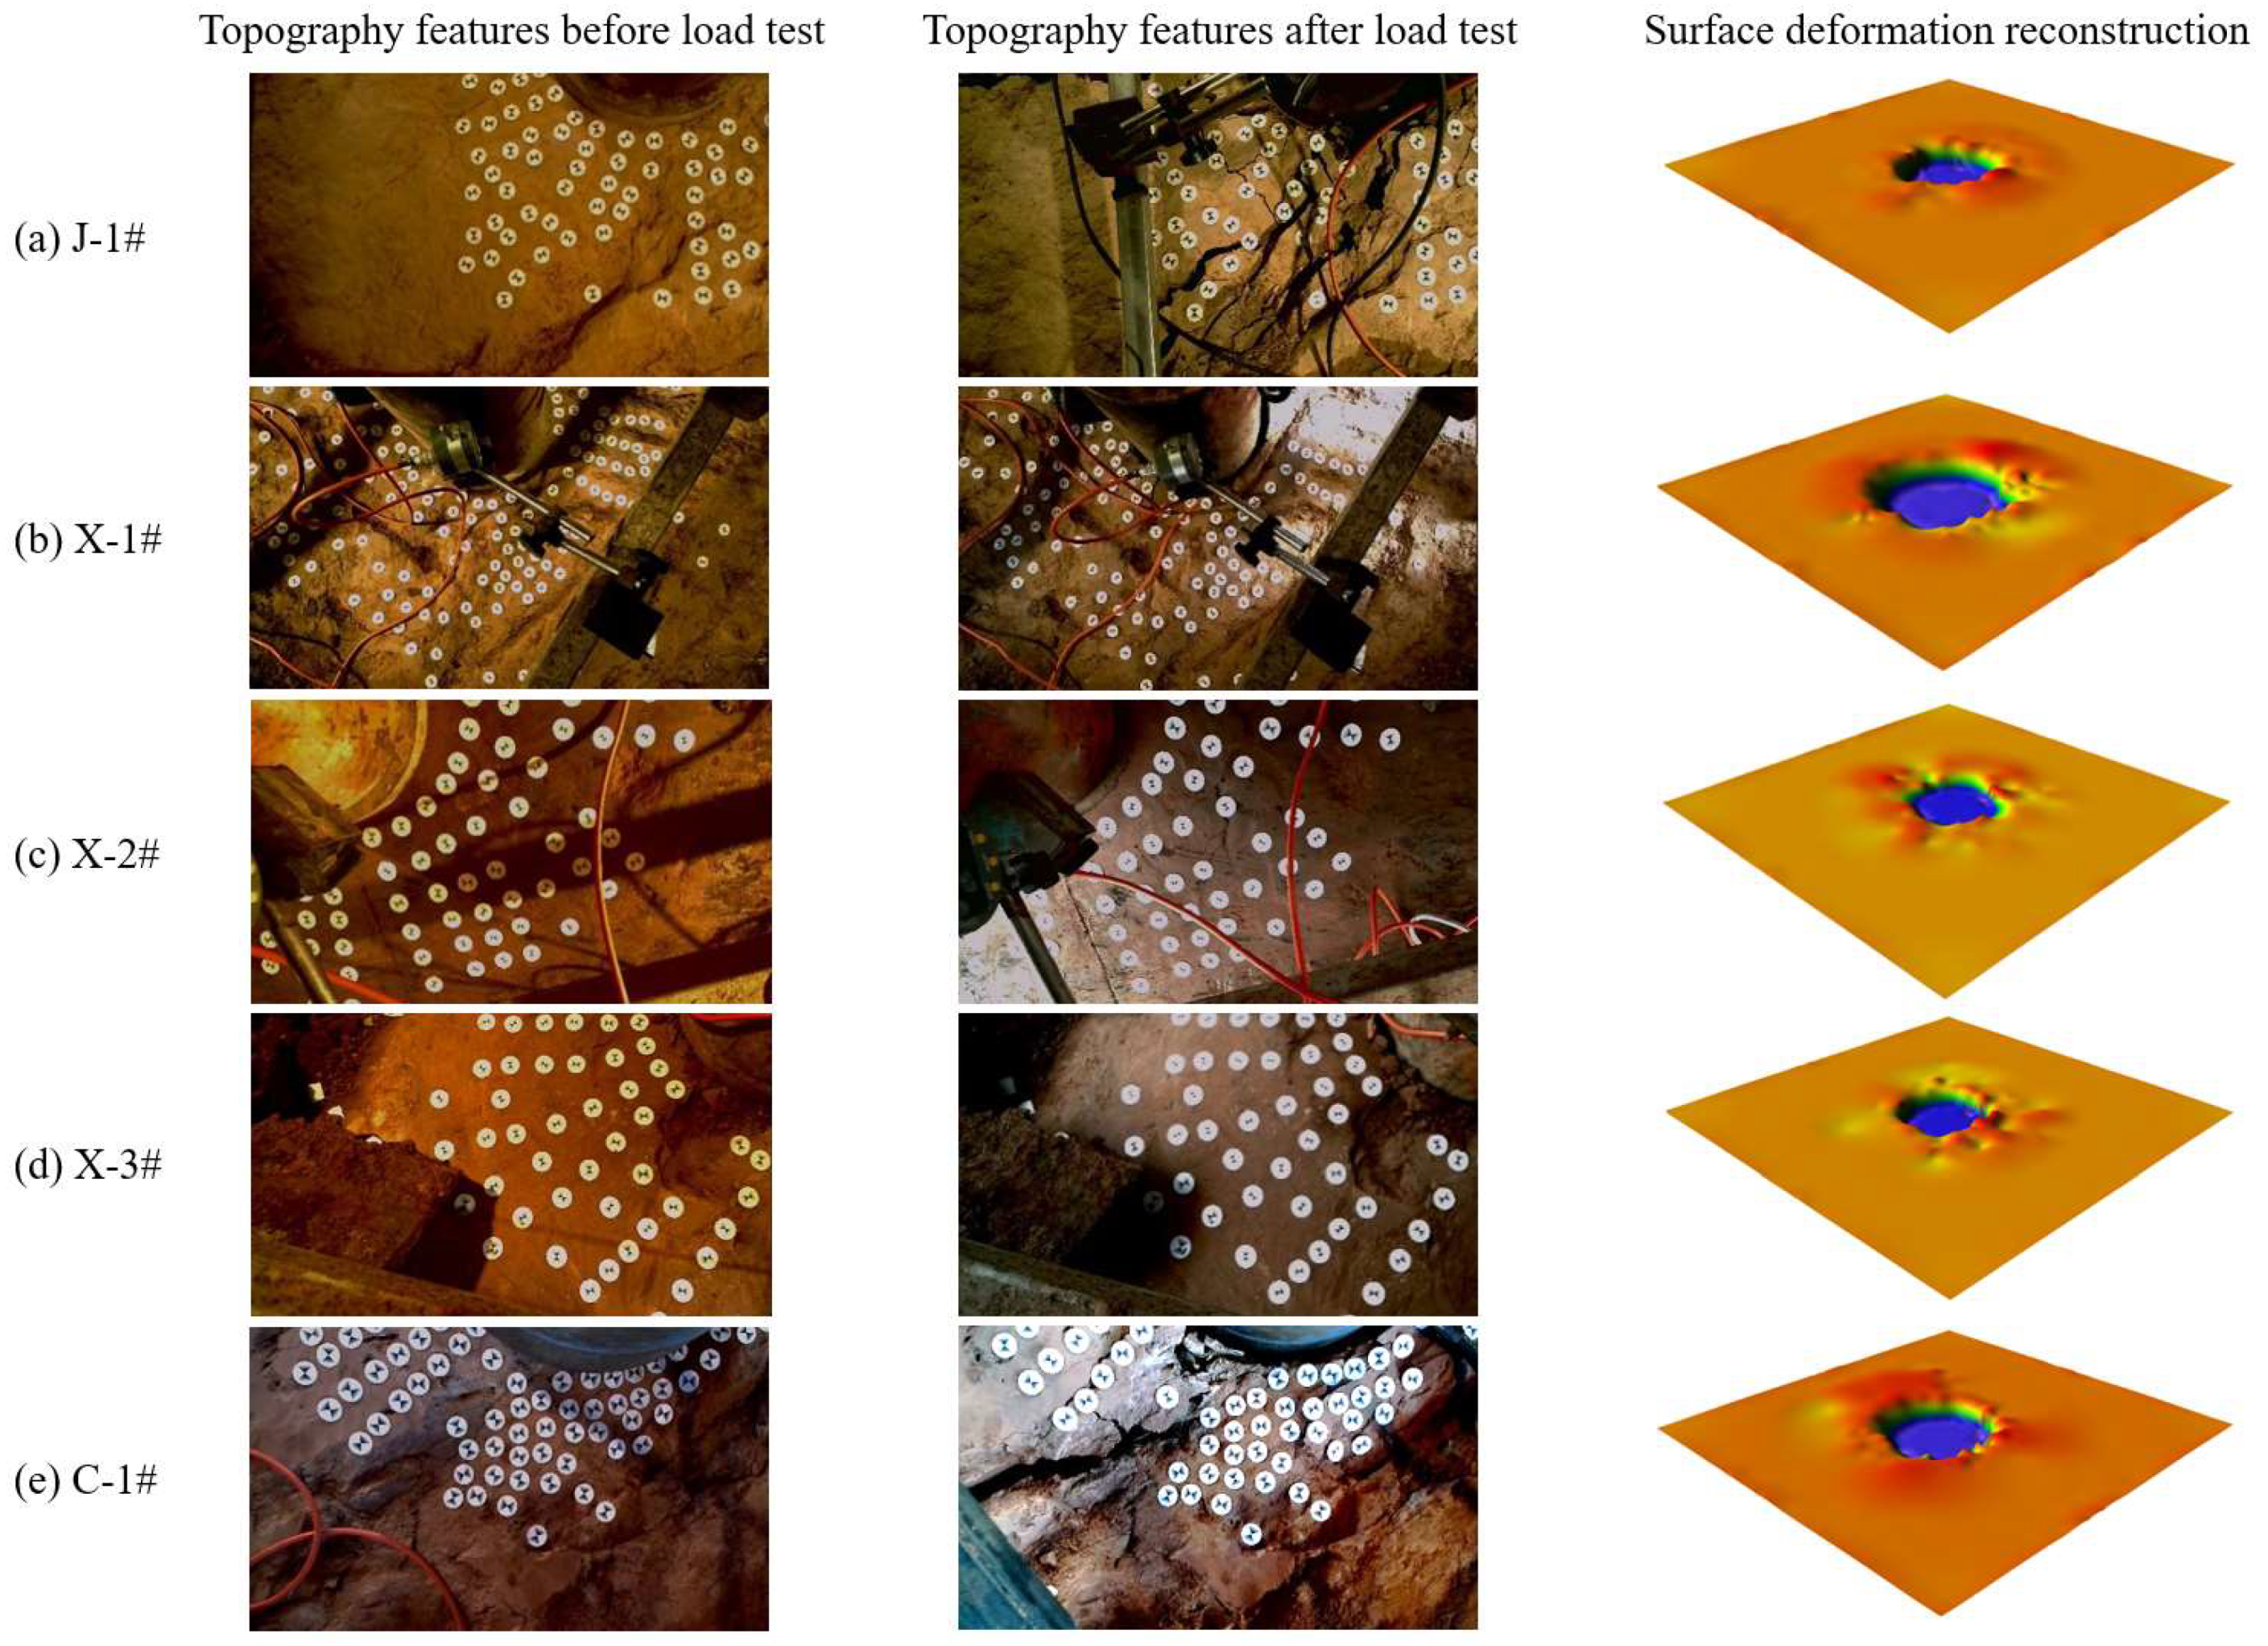
Figure 7 reveals the failure features of the mudstone foundation after the load test. Table 8 summaries the failure features of the red-bedded mudstone foundation.
For Field 1, the J-1# shows an apparent fracture zone, and the rock mass is uplifted by extrusion; the blocks were relatively uniform, the largest of which is 20 × 20   cm 2 .
For Field 2, radial eminence is accompanied by fracture extension. The X-1# was fragmented with the rock base at the edge of the bearing plate lifted, and part of the rock mass fell off and bulged out. One side of the rock mass in the X-2# falls off and bulges out, presenting a clastic division. The rock mass at X-3# was the most complete, and the integrity of rock mass between fractures is good.
In Field 3, the crushing area of C-1# is divided along the crushing zone. For all test fields, the failure bottom surface of the bearing plate is a complete bedding surface.

3.2. Triaxial Test

The confining pressure range of this research is preliminarily determined according to the uniaxial test, actual excavation depth, and the upper load of the foundation. The strength of the sample in Field 2 was low. Therefore, the dynamic triaxial test system (confining pressure range 0~3 MPa) with a low confining pressure of 0.3 MPa, 0.6 MPa, 0.9 MPa, 1.2 MPa, 1.5 MPa, and 1.8 MPa were for the triaxial test. The uniaxial compressive strength of the sample in Field 3 was 5.99 MPa. If the confining pressure range is much larger than the uniaxial compressive strength, the sample may deform as the confining pressure is loaded. That will lead to a distortion of the test results during the subsequent axial loading. Therefore, the confining pressure was 2 MPa, 4 MPa, 6 MPa, 8 MPa, 10 MPa, and 12 MPa to ensure the stability of the confining pressure specimen under loading.
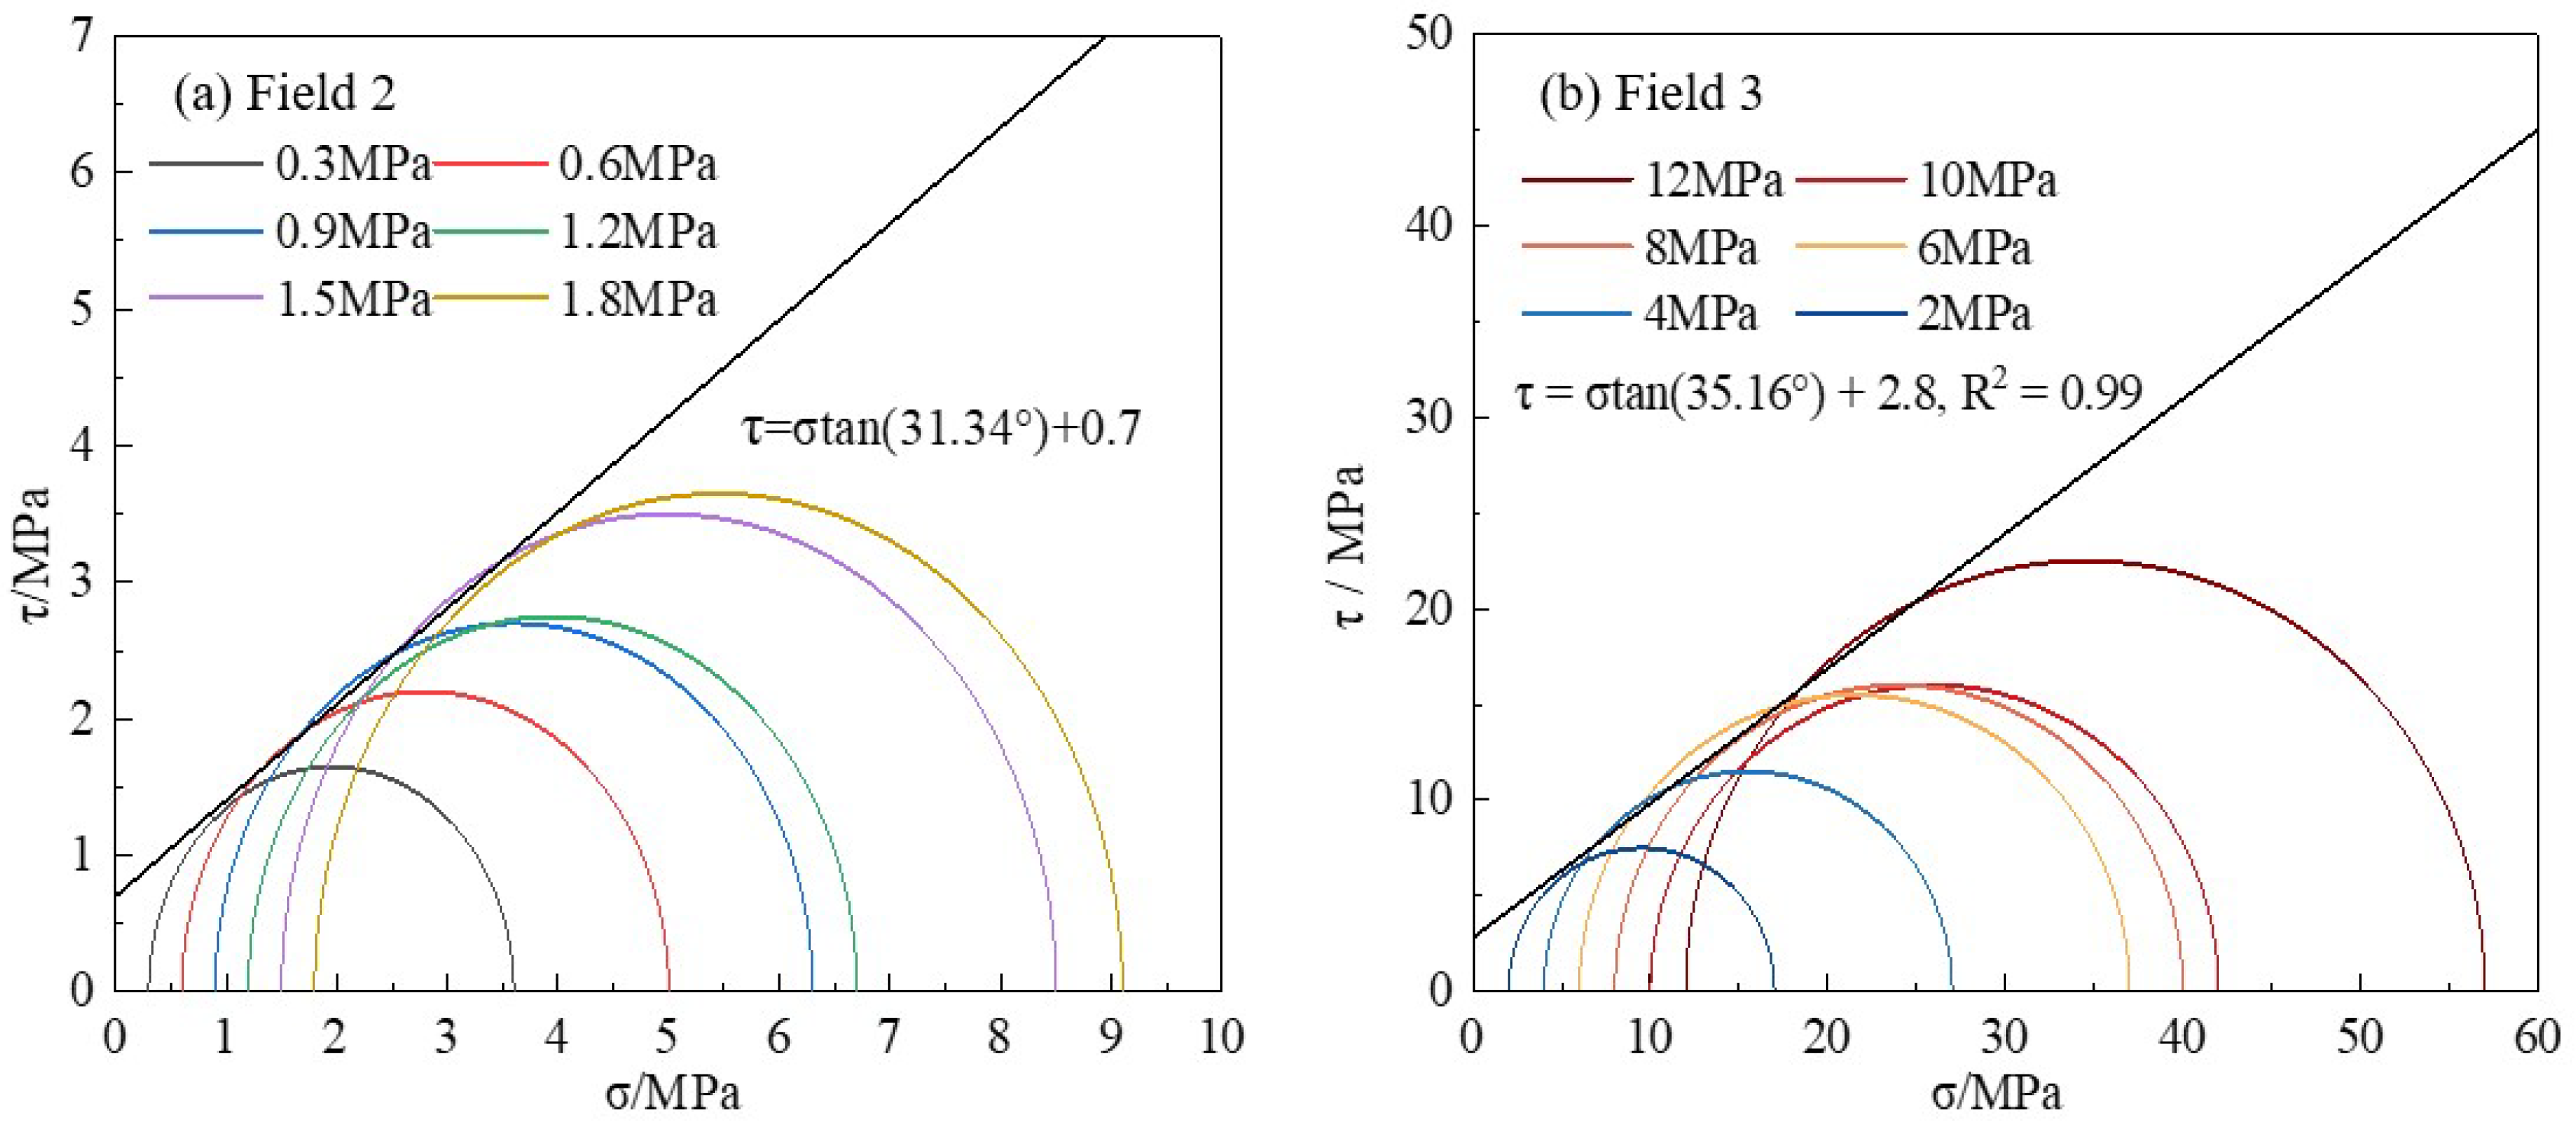
Figure 8 shows the triaxial stress–strain curves, and Figure 9 shows the molar circle of the stress and strength envelope of mudstone.
Figure 8a and Figure 9a were for Field 2. The overall strength of the sample increases as the confining pressure increases. Furthermore, the peak strength increases from 3 MPa to 5.5 MPa. Under low confining pressure, 0.3~0.6 MPa, mudstone shows a strain-softening phenomenon after reaching the peak of deviator stress. When the confining pressure exceeds 0.9 MPa, the deviator stress does not change after getting the peak value. When the axial strain comes to 8%, there were many cracks in the upper part of the rock sample but no apparent cracks in the lower part of the rock sample. The whole-rock sample was not crushed. The calculated internal friction angle φ of the mudstone sample is 31.34°, and cohesion c is 0.7 MPa.
Figure 8b and Figure 9b were for Field 3. The peak strength increased from 15.13 MPa to 45.99 MPa with the increase in confining pressure. After reaching the peak value of deviator stress, the whole rock sample shows a strain-softening phenomenon. The calculated internal friction angle φ of the mudstone sample is 35.16°, and cohesion c is 2.8 MPa.

3.3. Binocular Vision

Figure 10 shows the topography features before and after the load test and surface deformation reconstruction. The test point’s surface deformation reconstruction was based on four measurement areas. Table 9 summarizes the deformation parameters of each test point. For Field 1, the failure range is 26.5 cm, the maximum deformation is 1.1 cm, and the average deformation is 0.7 cm. For the three test points of Field 2, the failure range is 20.4 cm, 35.7 cm, and 33.1 cm; the maximum deformation is 2.0 cm, 1.1 cm, and 1.7 cm; and the average deformation is 1.1 cm, 0.9 cm, and 1.1 cm. Field 3 had the most extensive failure range, 35.9, the maximum deformation is 1.8 cm, and the average is 0.9.
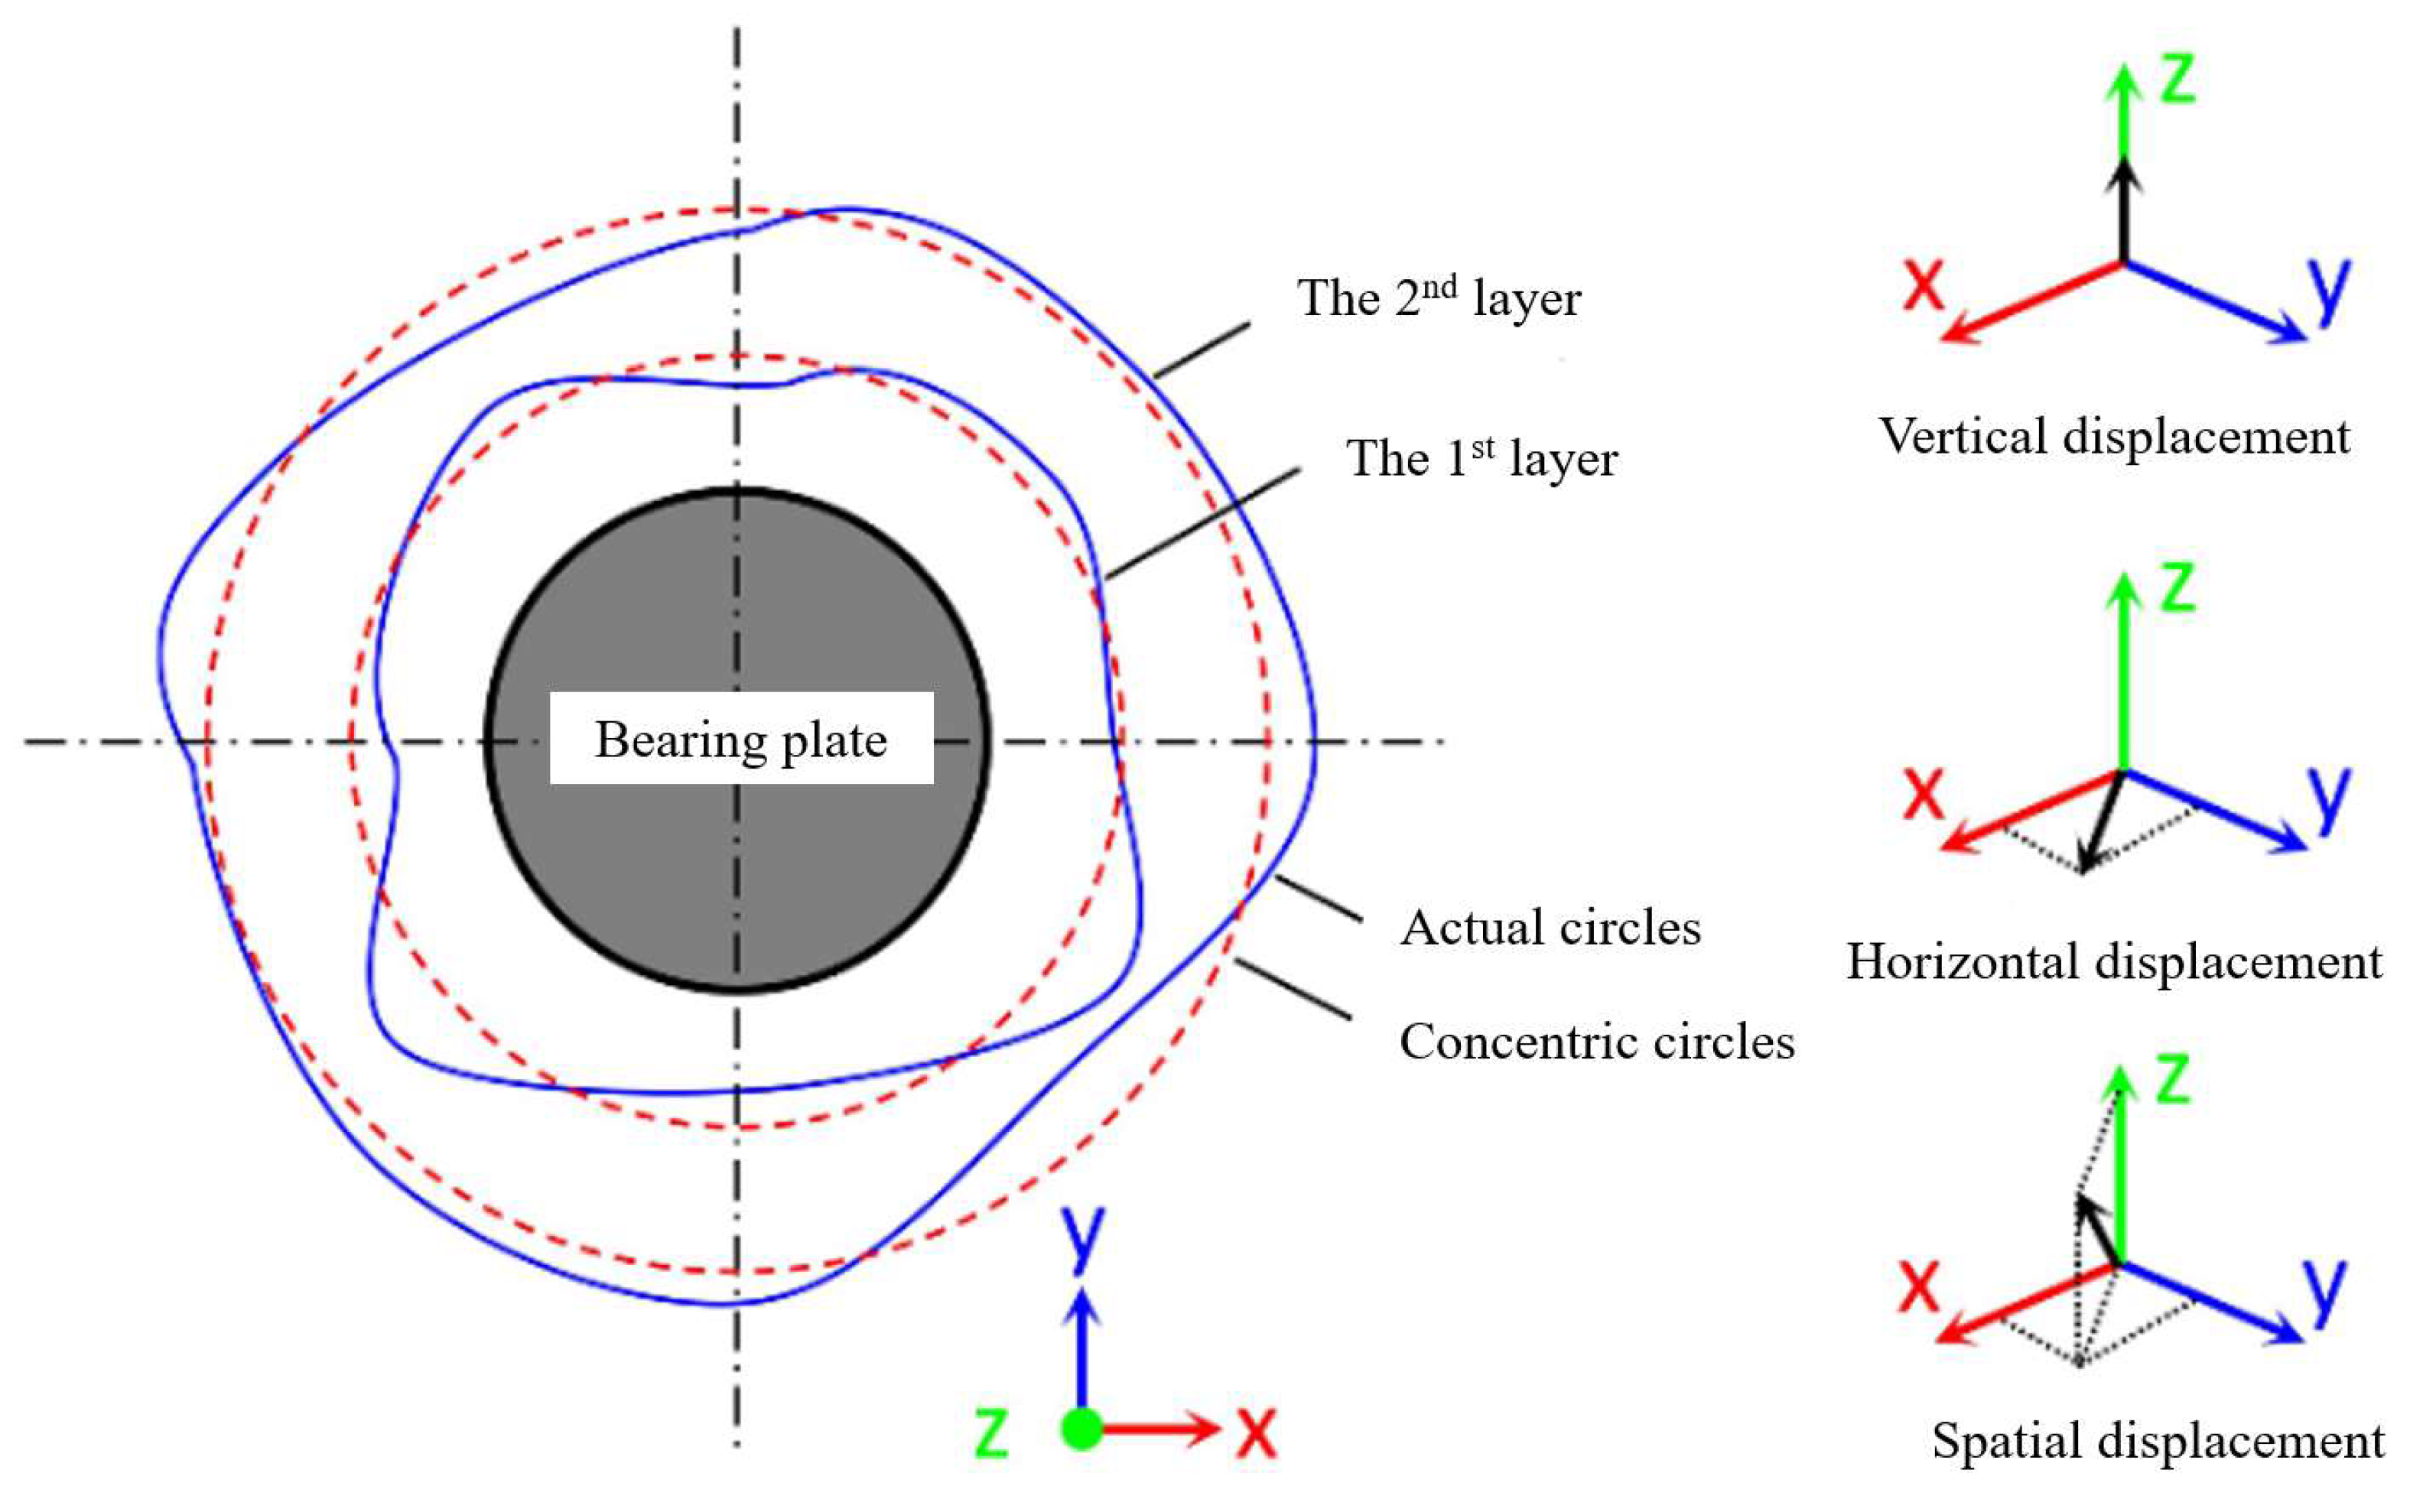
The rock mass of Field 2 is relatively complete in the bedding direction, and there is no weak fracture zone. The rock mass of the X-3# test point is the most comprehensive. In this research, the most typical dynamic data of the X-3# surface deformation was for analyzing the progressive failure law of the moderately weathered red mudstone foundation. The marking points cannot form concentric circles when arranging them as the influence of the actual surface of the rock mass. Therefore, the average deformation at different positions is calculated by approximate concentric circles. Figure 11 shows the diagram of the circle arrangement. The first to sixth layers gradually moved away from the bearing plate. Each layer has an interval of about 20–30 mm. This research defines each layer’s displacement increment (deformation) as the average deformation value of all marking points in the same layer. The cumulative displacement (deformation) was the cumulative value of the displacement increment in the same layer with the change in loading time. Then, we obtain the 3D coordinates of the marking points in each layer of the test point at each time through the vertical, horizontal, and spatial displacement increment (the spatial deformation displacement of any point) of the area around the bearing plate.
The vertical displacement increment was the absolute value of the Z-axis coordinate deformation. The X-axis and Y-axis indicate the deformation increment in the horizontal direction. The spatial distance between the X, Y, and Z axes was the spatial displacement increment. Significantly, the cumulative displacement was not the deformation value of the rock mass at the last moment. In each rock mass deformation and failure stage, any point in the rock mass was not displaced in a constant direction (rising or sinking). Therefore, the absolute value of the incremental change in displacement is used to characterize the surface displacement of the rock mass during each loading stage.
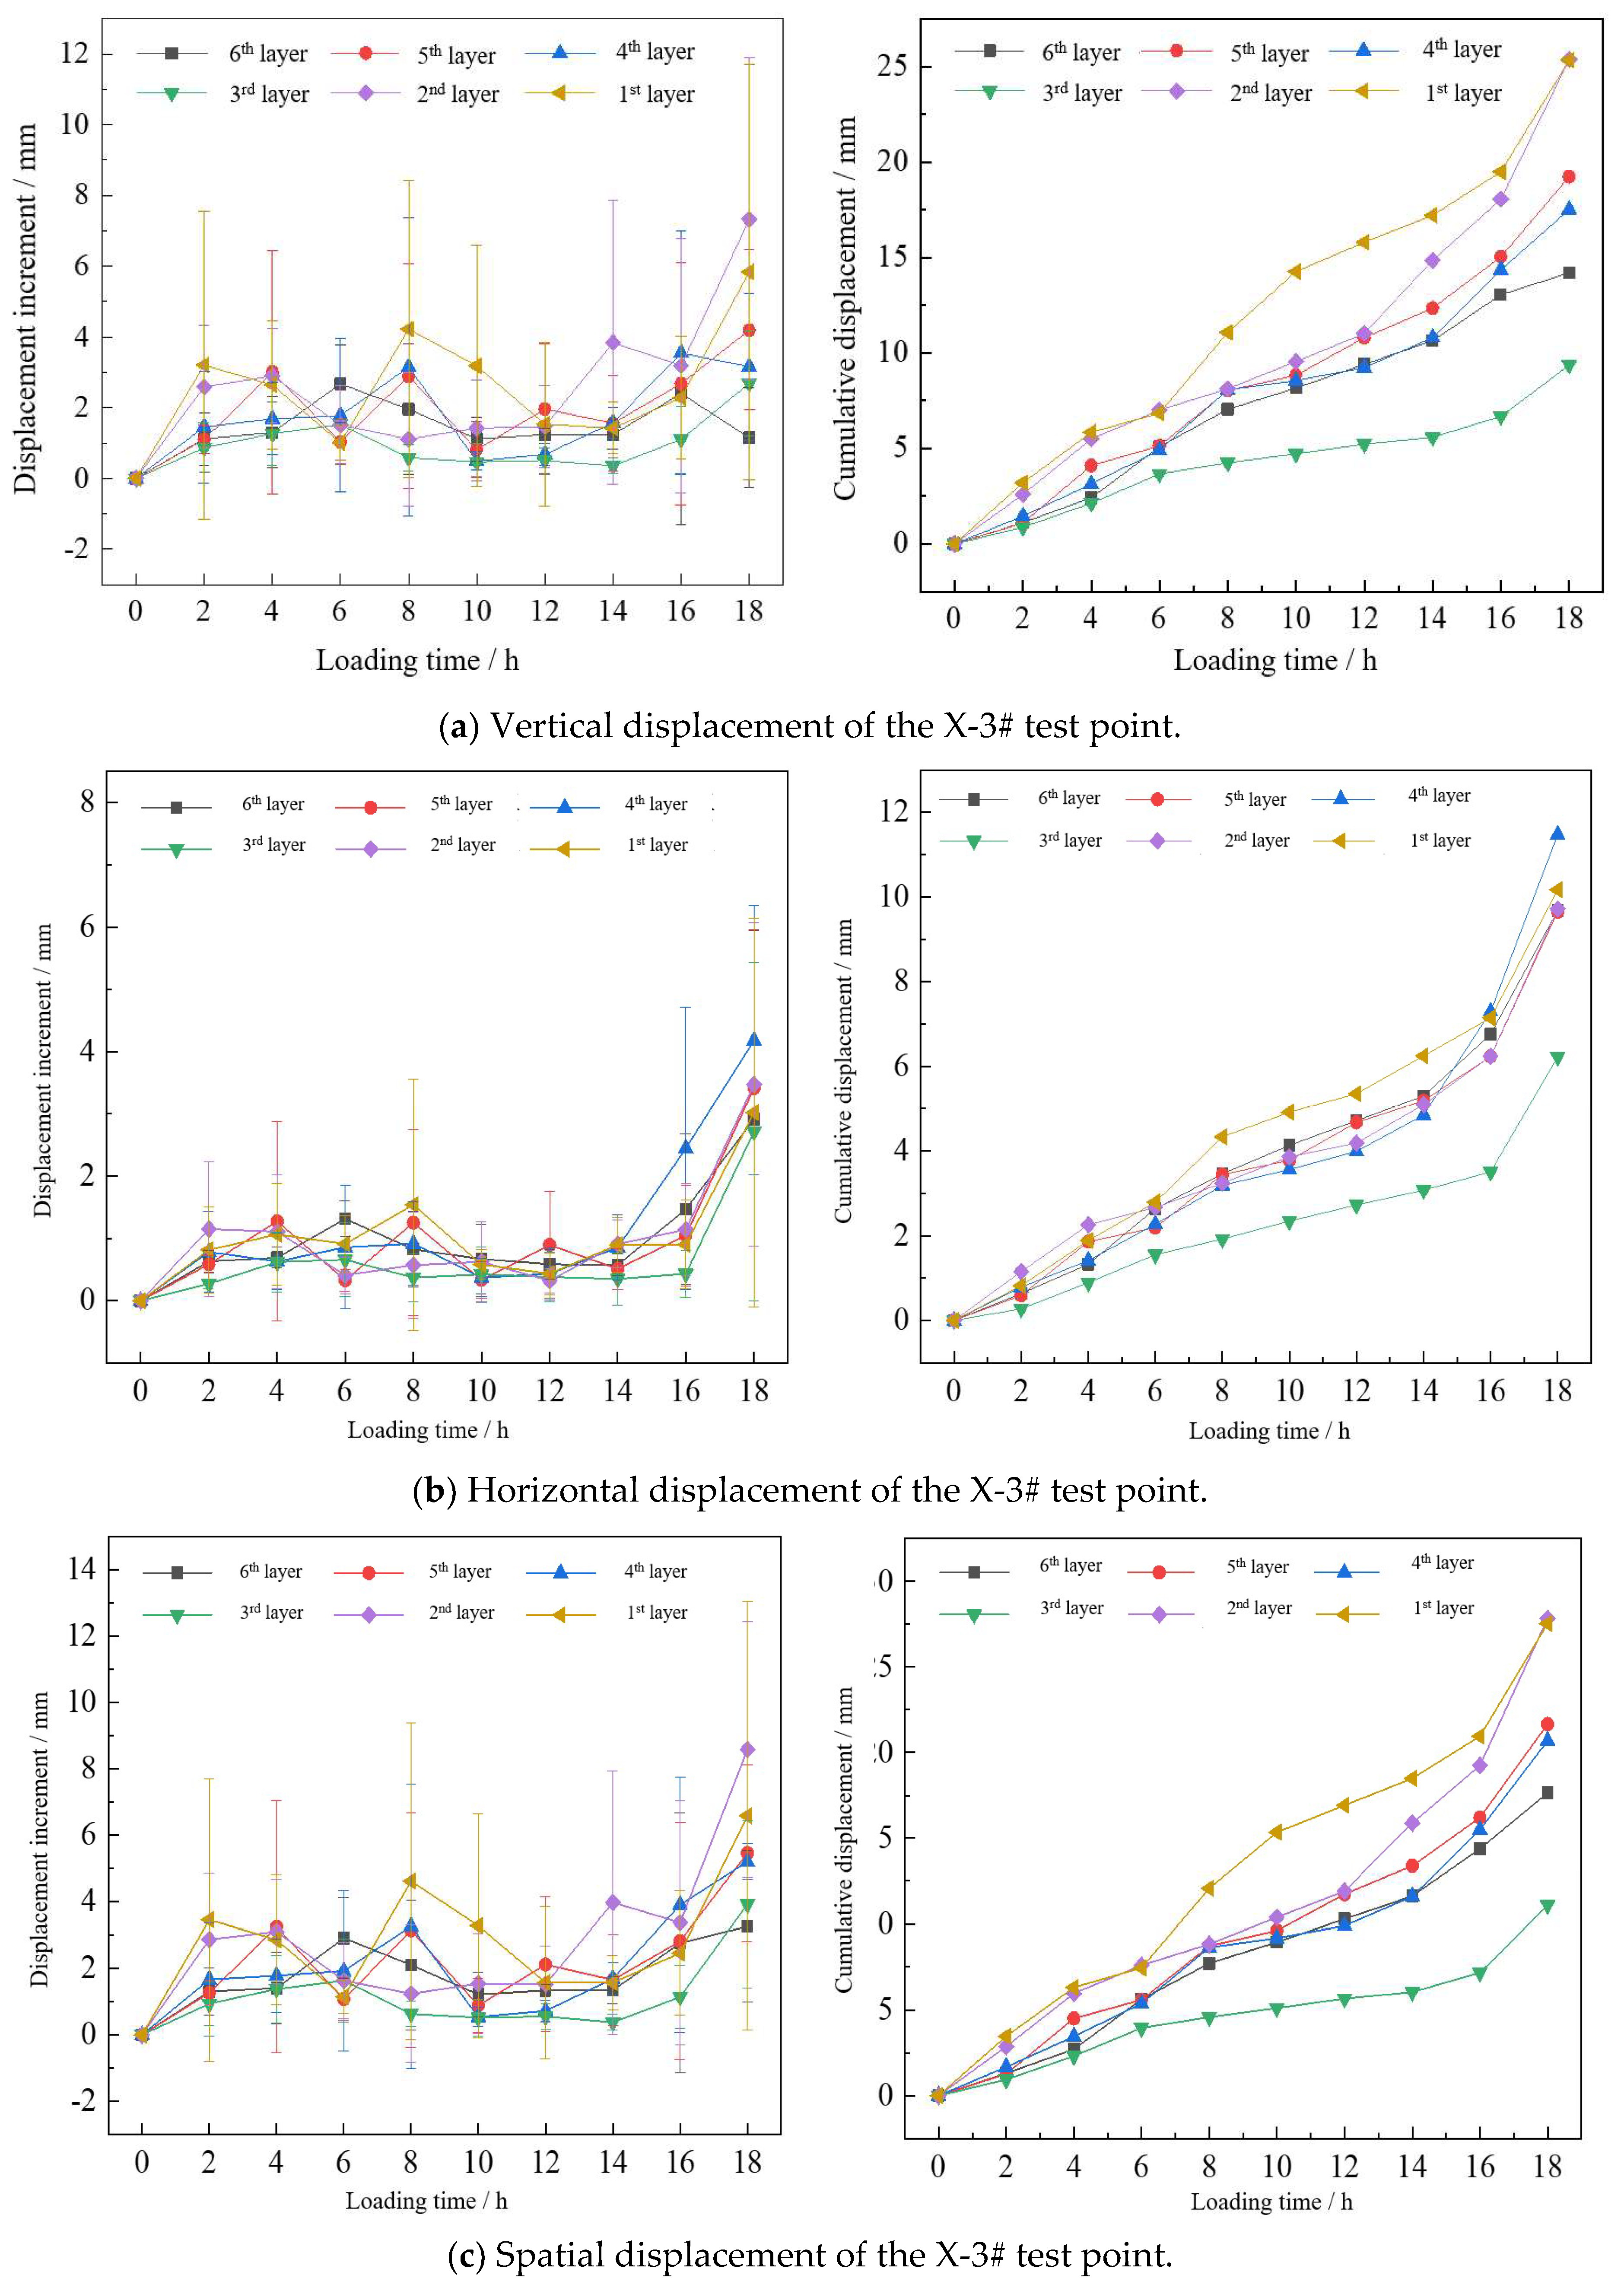
The displacement increment of each layer presents a “fluctuation” phenomenon transmitted from near to far over time, as shown in Figure 12. This research took the first layer as an example. When the upper load increases from 2000 kPa (t = 0 h) to 3200 kPa (t = 2 h), the deformation rises and reaches the first peak value of 3.20 mm. That was when the deformation rate increased to the first peak value. Then, when the upper load came to 3200–4600 kPa (t = 2–6 h), the increment of deformation gradually decreased to 1.01 mm. Next, when the upper load reached 5000 kPa (t = 8 h), the increment of deformation reached the second peak and gradually decayed to 5800 kPa (t = 12 h). At last, when loading to 6000 kPa, the increment of deformation suddenly rose to 5.84 mm, at which time the rock mass failed. The vertical, horizontal, and spatial waves peaked at 1.52 to 4.23 mm, 0.66 to 1.54 mm, and 1.63 to 4.61 mm, respectively. Furthermore, the wave valleys ranged from 0.35 to 1.24 mm, 0.41 to 0.59 mm, and 0.38 to 1.41 mm. Comparing the displacement increments of different rock masses at each time, the displacement increments of the layers close to the bearing plate were generally more significant than those of the other layers. The third circle has the smallest displacement increment. When the upper load was 6000 kPa (t = 14 h), the displacement increments of all layers began to show a rapid growth trend as a whole. The range of the peak deformation increment was from 1.15 to 7.33 mm, from 2.71 to 4.18 mm, and from 3.25 to 8.58 mm for vertical, horizontal and spatial directions, respectively. The cumulative displacement corresponded to the displacement increment, and the situation was similar to the above. It kept growing at different slopes and reached the maximum value. The peak values of cumulative displacement in vertical, horizontal, and spatial were 9.37–25.32 mm, 6.22–11.48 mm, and 11.10–27.83 mm, respectively.
It is worth noting that there were millimeter-level errors in binocular vision monitoring. Moreover, the displacement detected is also millimeter-level. Therefore, sometimes the displacement increment of the second circle is more significant than the first circle. The displacement increment of the fifth circle is in third place at eight and eighteen h.

4. Discussion

4.1. Progressive Failure

It could be seen from the monitoring results of binocular vision that the approximate slope of the triaxial stress–strain curve is inversely proportional to the gradient of the displacement increment. The smoother the bend in the triaxial test, the slower the stress increases, and when the strain increases rapidly, the displacement increment at the corresponding moment rises faster, and vice versa. The first layer is closest to the bearing plate, and its loading state is most comparable to the overlying rock mass under the bearing plate. Therefore, the displacement increments and cumulative displacement in three directions of the first layer (Figure 11) were for comparative analysis with the triaxial compression curve (Figure 8) and p-s curve (Figure 6). There were five stages for rock mass deformation and failure description. Table 10 shows the progressive failure process described above compared to the binocular vision of the increment of displacement around the pressure plate.
The 1st stage (0~6 h) is the compaction stage. At this stage, the displacement increment increases at first and then decreases. The corresponding p-s curve is the stage with a load of 2–4 MPa. The displacement increases due to the closure of cracks and the compaction of filling material in the rock mass. Therefore, the deformation was evident as the stress increased. When the rock mass is compacted, the deformation response to stress weakens gradually, decreasing displacement increment and a slow increase in cumulative displacement.
The 2nd stage (6–8 h) is the elastic stage. The increasing load drives the displacement to increase again. The corresponding p-s curve is the stage with a pack of 4–5 MPa. The stress–strain curve follows a linear relationship. The corresponding displacement increment increases again, and the cumulative displacement rises rapidly.
The 3rd stage (8–12 h) was the elastic–plastic stage with a 5–5.8 MPa on the p-s curve. At this stage, the rock mass deformation exceeded the elastic limit and was between the elastic and plastic sets. The corresponding displacement increment shows a decreasing trend compared with the previous stage, and the cumulative displacement increases slowly.
The 4th stage (12–16 h) was the plastic stage with a 5.8–6.2 MPa on the p-s curve. The subsidence of the bearing plate increases slowly, and the surrounding rock mass is about to fail. As a result, both rock mass displacement increments and the rise in cumulative displacement slowed from 12 to 16 h.
The 5th stage (16–18 h) was the failure stage with a load of 6.2–7.4 MPa. The rock mass begins to fail, resulting in a rapid increase in the displacement increment and cumulative displacement.
The “fluctuation” of the deformation increment was because the layer near the bearing plate reached the peak value at first, then sent the load out to other layers.
In conclusion, when t = 16 h, the rock mass was about to occur in large deformation. The load at this time was the ultimate bearing capacity, 6200 kPa, according to the p-s curve. Then, the characteristic value of bearing capacity was 2066 kPa. That was the characteristic relatively close to the value calculated by the Code for Foundation Design of Buildings (GB 50007-2011) [4], 1966 kPa. In the rock foundation load test, the rock mass deformation and displacement around the bearing plate obtained by binocular vision technology could be supplementary in judging the characteristic value of foundation bearing capacity. In addition, the binocular vision technology could also monitor the deformation displacement and failure range of rock mass at any time to capture the precursor information of rock mass failure.

4.2. Failure Pattern

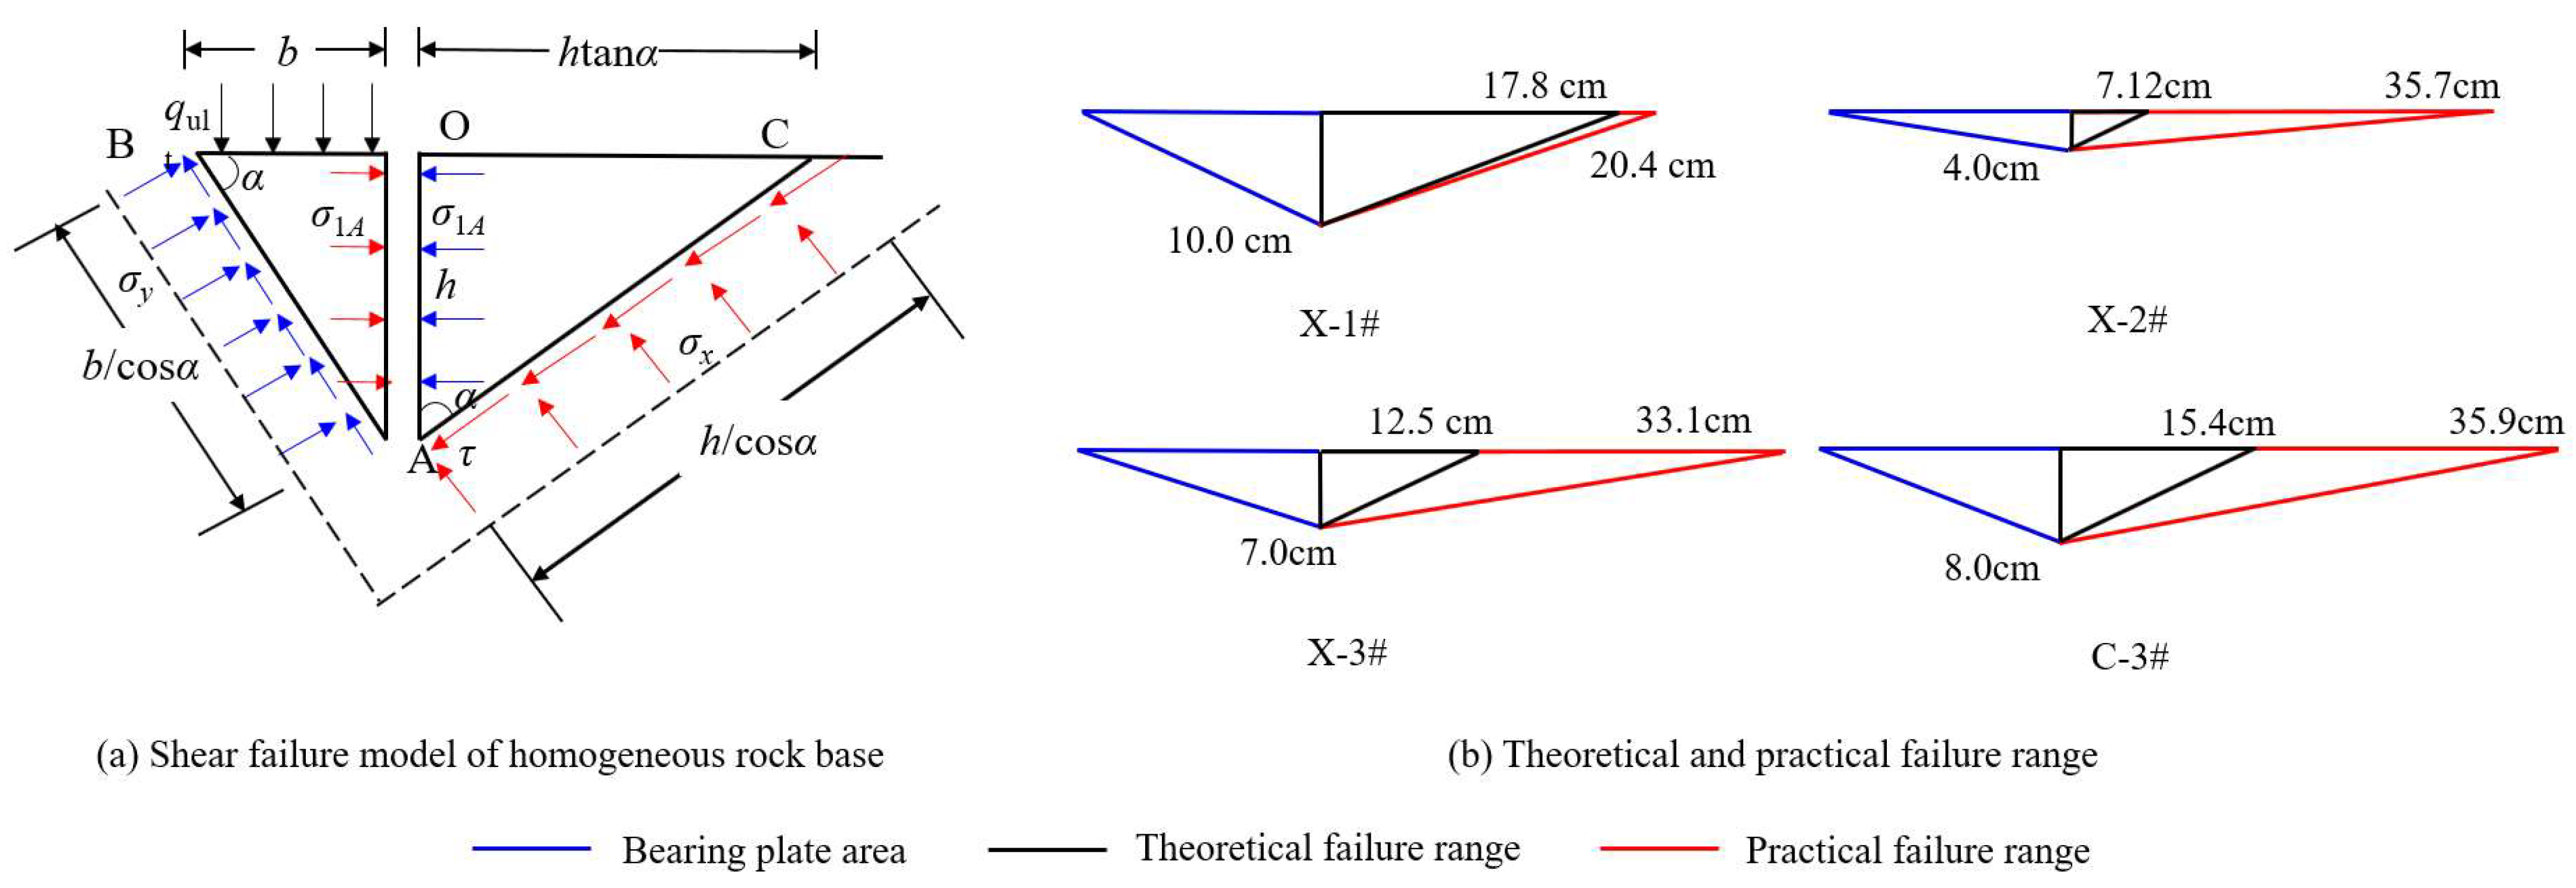
Assume that all test points were shear failure modes so that the theoretical failure range, failure depth, and internal friction angle could be calculated according to the simplified geometrical model of Hoek–Brown shear failure [35], as shown in Figure 13 and Table 11. In the Hoek–Brown simplified geometrical model, the rock base plastic zone is simplified into the Rankine active failure zone and the Rankine passive failure zone. Assuming that the failure surface is straight and smooth, no shear stress exists among the dynamic wedge (left), the passive (right), and the bearing surface. The base pressure on the active wedge was q. The passive wedge shape was not affected by external forces in this research. The theoretical limit internal friction angle φ2 of rock mass could be obtained by Formula (5) according to the deformation range D1 and the practical failure depth H.
φ 2 = 2 ( a r c t a n D 1 H 45 ° )
The theoretical failure range D2 of rock mass was calculated by Formula (6) according to the triaxial friction angle φ1 and the practical failure depth H of the bearing plate.
D 2 = H t a n ( φ 1 2 + 45 ° )
Considering that the fracture zone seriously affected the J-1# test point, it did not conform to the shear failure mode. The test points showed a significant difference between the theoretical and practical results, except for X-1#. Furthermore, since all p-s curves do not have three stages, there is no linear deformation stage, and the overall shear failure mode could also be excluded. The surface deformation of all test points is minimal and large deformation occurs just before failure, which belongs to the punching shear failure. However, the rock mass around the foundation is uplifted and is inconsistent with the punching failure mode.
In conclusion, the failure mode of moderately weathered mudstone foundations could be identified as between shear failure mode and punching shear failure mode. According to their differences, the five test points could be divided into two subclasses. (1) The rock stratum was thicker. The broken (weak) zone dominated the failure. (2) The rock stratum was thinner. The bearing plate could only crush the contact layer and was helpless for the next layer.

5. Conclusions

Internal deformation of rock mass inevitably causes surface deformation. In this research, a binocular vision in situ monitoring method for surface deformation of moderately weathered soft rock foundations is proposed to be used as an auxiliary method in determining the characteristic value of foundation bearing capacity. An experiment was designed to obtain both deep rock base displacement and surface deformation data. That means the binocular vision system is set around the bearing plate. When the loading starts, the displacement data inside the mudstone and the image data of the surface deformation are recorded simultaneously. In addition, the triaxial test is used to obtain the mechanical behavior of mudstone after loading. Binocular vision successfully captured the deformation of the rock base surface. As the load increases, the increment displacement presents a wave format at each moment, and there is a wave peak transfer phenomenon into the distance. At the moment of failure, the increment displacement increases sharply and the surface deformation accelerates. The study concluded that the deformation of rock mass around the bearing plate obtained by binocular vision technology can be used as a supplementary means to judge the characteristic value of foundation bearing capacity. The characteristic value of bearing capacity corresponds to the moment when a large displacement is about to occur on the displacement curve of rock and soil surface at each moment.
This research proposed a binocular vision in situ monitoring method for surface deformation of moderately weathered soft rock foundations as an auxiliary way of determining the characteristic value of foundation-bearing capacity. This research helps to provide valuable information in assisting construction design and contributes to increasing the design basis of high-rise and super-high-rise buildings. All these together would benefit engineers and managers. In terms of the theoretical aspects, this research has elucidated the relationship between internal displacement and surface deformation of moderately weathered red mudstone, which would enable the information on mudstone surface deformation to judge the characteristic value of bearing capacity.

Author Contributions

Conceptualization, Y.B. and Q.H.; methodology, Y.B. and Q.H.; validation, L.H.; formal analysis, Y.B.; investigation, Y.B.; resources, S.F. and L.Z.; data curation, Y.B.; writing—original draft preparation, Y.B.; writing—review and editing, Y.B.; visualization, S.F. and L.Z.; supervision, L.H.; project administration, Y.W.; funding acquisition, Q.H. All authors have read and agreed to the published version of the manuscript.

Funding

This research was supported by the National Natural Science Foundation of China (No. 52178357), Sichuan Science and Technology Program (No. 2021JDRC0076), Sichuan Youth Science and Technology Innovation Team (22CXTD0087), and Sichuan “Tianfu Ten Thousand” Tianfu Science and technology elite project (No. 568).

Data Availability Statement

All data generated or analyzed during the research were included in the submitted article.

Conflicts of Interest

The authors declare no potential conflict of interest with respect to the research, authorship, and publication of this article.

References

  1. Dai, Z.; Guo, J.; Yu, F.; Zhou, Z.; Li, J.; Chen, S. Long-term uplift of high-speed railway subgrade caused by swelling effect of red-bed mudstone: Case study in Southwest China. Bull. Eng. Geol. Environ. 2021, 80, 4855–4869. [Google Scholar] [CrossRef]
  2. Zhang, S.; Xu, Q.; Hu, Z. Effects of rainwater softening on red mudstone of deep-seated landslide, Southwest China. Eng. Geol. 2016, 204, 1–13. [Google Scholar] [CrossRef]
  3. Zhang, C.-L.; Jiang, G.-L.; Su, L.-J.; Liu, W.-M. Dynamic behaviour of weathered red mudstone in Sichuan (China) under triaxial cyclic loading. J. Mt. Sci. 2018, 15, 1789–1906. [Google Scholar] [CrossRef]
  4. GB 50007-2011; Code for Foundation Design of Buildings. China Building Industry Press: Beijing, China, 2011.
  5. Ahmadi, S.; Kamalian, M.; Askari, F. Evaluation of the Static Bearing Capacity Coefficients of Rough Strip Footing Using the Stress Characteristics Method. Int. J. Civ. Eng. 2021, 19, 155–165. [Google Scholar] [CrossRef]
  6. Cascone, E.; Casablanca, O. Static and seismic bearing capacity of shallow strip footings. Soil Dyn. Earthq. Eng. 2016, 84, 204–223. [Google Scholar] [CrossRef]
  7. Huang, C.-C.; Al-Aghbari, M.Y.; Mohamedzein, Y.E.-A. Ultimate bearing capacity of saturated reinforced horizontal ground. Geosynth. Int. 2016, 23, 1–8. [Google Scholar] [CrossRef]
  8. Shen, P.; Tang, H.; Wang, D.; Ning, Y.; Zhang, Y.; Su, X. A statistical damage constitutive model based on unified strength theory for embankment rocks. Mar. Georesour. Geotechnol. 2019, 38, 818–829. [Google Scholar] [CrossRef]
  9. Shen, P.; Tang, H.; Wang, D.; Su, X.; Huang, L. Weakening of mudstone fragments due to disintegration: An experimental investigation. Bull. Eng. Geol. Environ. 2020, 79, 5477–5497. [Google Scholar] [CrossRef]
  10. Zhang, C.; Jiang, G.; Buzzi, O.; Su, L. Full-scale model testing on the dynamic behaviour of weathered red mudstone subgrade under railway cyclic loading. Soils Found. 2019, 59, 296–315. [Google Scholar] [CrossRef]
  11. Bell, F. Engineering in Rock Masses; Butterworth-Heinemann: New York, NY, USA, 1994. [Google Scholar]
  12. Duncan, C.W. Foundations on Rock; E & FN Spon: London, UK, 1992. [Google Scholar]
  13. AlKhafaji, H.; Imani, M.; Fahimifar, A. Ultimate Bearing Capacity of Rock Mass Foundations Subjected to Seepage Forces Using Modified Hoek–Brown Criterion. Rock Mech. Rock Eng. 2020, 53, 251–268. [Google Scholar] [CrossRef]
  14. Yodsomjai, W.; Keawsawasvong, S.; Lai, V.Q. Correction to: Limit Analysis Solutions for Bearing Capacity of Ring Foundations on Rocks Using Hoek–Brown Failure Criterion. Int. J. Geosynth. Ground Eng. 2021, 7, 29. [Google Scholar] [CrossRef]
  15. Imani, M.; Fahimifar, A.; Sharifzadeh, M. Bearing failure modes of rock foundations with consideration of joint spacing. Sci. Iran. 2012, 19, 1411–1421. [Google Scholar] [CrossRef] [Green Version]
  16. Aydin, A.; Borja, R.I.; Eichhubl, P. Geological and mathematical framework for failure modes in granular rock. J. Struct. Geol. 2006, 28, 83–98. [Google Scholar] [CrossRef]
  17. Zhang, L.; Li, B.; Zhu, B.; Luo, B. Study on loading and unloading mechanical properties and energy evolution mechanism of red-bed mudstone. J. Southwest Jiaotong Univ. 2021, 40, 1000–1007. [Google Scholar]
  18. Wang, Z.; Wang, J.; Yang, S.; Li, L.; Li, M. Failure behaviour and acoustic emission characteristics of different rocks under uniaxial compression. J. Geophys. Eng. 2020, 17, 76–88. [Google Scholar] [CrossRef]
  19. Marek, L.; Miřijovský, J.; Tuček, P. Monitoring of the shallow landslide using UAV photogrammetry and geodetic measurements. In Engineering Geology for Society and Territory; Springer: Berlin/Heidelberg, Germany, 2015; Volume 2, pp. 113–116. [Google Scholar]
  20. Benoit, L.; Briole, P.; Martin, O.; Thom, C.; Malet, J.-P.; Ulrich, P. Monitoring landslide displacements with the Geocube wireless network of low-cost GPS. Eng. Geol. 2015, 195, 111–121. [Google Scholar] [CrossRef]
  21. Woo, K.-S.; Eberhardt, E.; Rabus, B.; Stead, D.; Vyazmensky, A. Integration of field characterisation, mine production and InSAR monitoring data to constrain and calibrate 3-D numerical modelling of block caving-induced subsidence. Int. J. Rock Mech. Min. Sci. 2012, 53, 166–178. [Google Scholar] [CrossRef]
  22. Tang, H.; Ge, Y.; Wang, L.; Yuan, Y.; Huang, L.; Sun, M. Study on estimation method of rock mass discontinuity shear strength based on three-dimensional laser scanning and image technique. J. Earth Sci. 2012, 23, 908–913. [Google Scholar] [CrossRef]
  23. Liu, C.; Liu, X.; Peng, X.; Wang, E.; Wang, S. Application of 3D-DDA integrated with unmanned aerial vehicle–laser scanner (UAV-LS) photogrammetry for stability analysis of a blocky rock mass slope. Landslides 2019, 16, 1645–1661. [Google Scholar] [CrossRef]
  24. Ohnishi, Y.; Nishiyama, S.; Yano, T.; Matsuyama, H.; Amano, K. A study of the application of digital photogrammetry to slope monitoring systems. Int. J. Rock Mech. Min. Sci. 2006, 43, 756–7666. [Google Scholar] [CrossRef]
  25. Hastaoğlu, K.Ö.; Gül, Y.; Poyraz, F.; Kara, B.C. Monitoring 3D areal displacements by a new methodology and software using UAV photogrammetry. Int. J. Appl. Earth Obs. Geoinf. 2019, 83, 101916. [Google Scholar] [CrossRef]
  26. Wang, W.; Song, H.; Zhang, Z.; Cui, H. Landslide Multi-attitude Data Measurement of Bedding Rock Slope Model. Int. J. Parallel Program. 2019, 48, 928–939. [Google Scholar] [CrossRef]
  27. Yang, L.; Wang, B.; Zhang, R.; Zhou, H.; Wang, R. Analysis on Location Accuracy for the Binocular Stereo Vision System. IEEE Photonics J. 2018, 10, 7800316. [Google Scholar] [CrossRef]
  28. Zhao, S.; Kang, F.; Li, J. Displacement monitoring for slope stability evaluation based on binocular vision systems. Optik 2018, 171, 658–671. [Google Scholar] [CrossRef]
  29. Zhao, P.; Wang, N.-H. Precise perimeter measurement for 3D object with a binocular stereo vision measurement system. Optik 2010, 121, 953–957. [Google Scholar] [CrossRef]
  30. Hu, Q.; He, S.; Wang, S.; Liu, Y.; Zhang, Z.; He, L.; Wang, F.; Cai, Q.; Shi, R.; Yang, Y. A High-Speed Target-Free Vision-Based Sensor for Bus Rapid Transit Viaduct Vibration Measurements Using CMT and ORB Algorithms. Sensors 2017, 17, 1305. [Google Scholar] [CrossRef] [Green Version]
  31. Hu, Q.; Feng, Z.; He, L.; Shou, Z.; Zeng, J.; Tan, J.; Bai, Y.; Cai, Q.; Gu, Y. Accuracy improvement of binocular vision measurement system for slope deformation monitoring. Sensors 2020, 20, 1994. [Google Scholar] [CrossRef] [Green Version]
  32. Hu, Q.; Ma, C.; Bai, Y.; He, L.; Tan, J.; Cai, Q.; Zeng, J. A rapid method of the rock mass surface reconstruction for surface deformation detection at close range. Sensors 2020, 20, 5371. [Google Scholar] [CrossRef]
  33. He, L.; Tan, J.; Hu, Q.; He, S.; Cai, Q.; Fu, Y.; Tang, S. Non-contact measurement of the surface displacement of a slope based on a smart binocular vision system. Sensors 2018, 18, 2890. [Google Scholar] [CrossRef] [Green Version]
  34. Zhang, Z. A flexible new technique for camera calibration. IEEE Trans. Pattern Anal. Mach. Intell. 2000, 22, 1330–1334. [Google Scholar] [CrossRef] [Green Version]
  35. Kumar, P. Shear failure envelope of Hoek-Brown criterion for rockmass. Tunn. Undergr. Space Technol. 1998, 13, 453–458. [Google Scholar] [CrossRef]
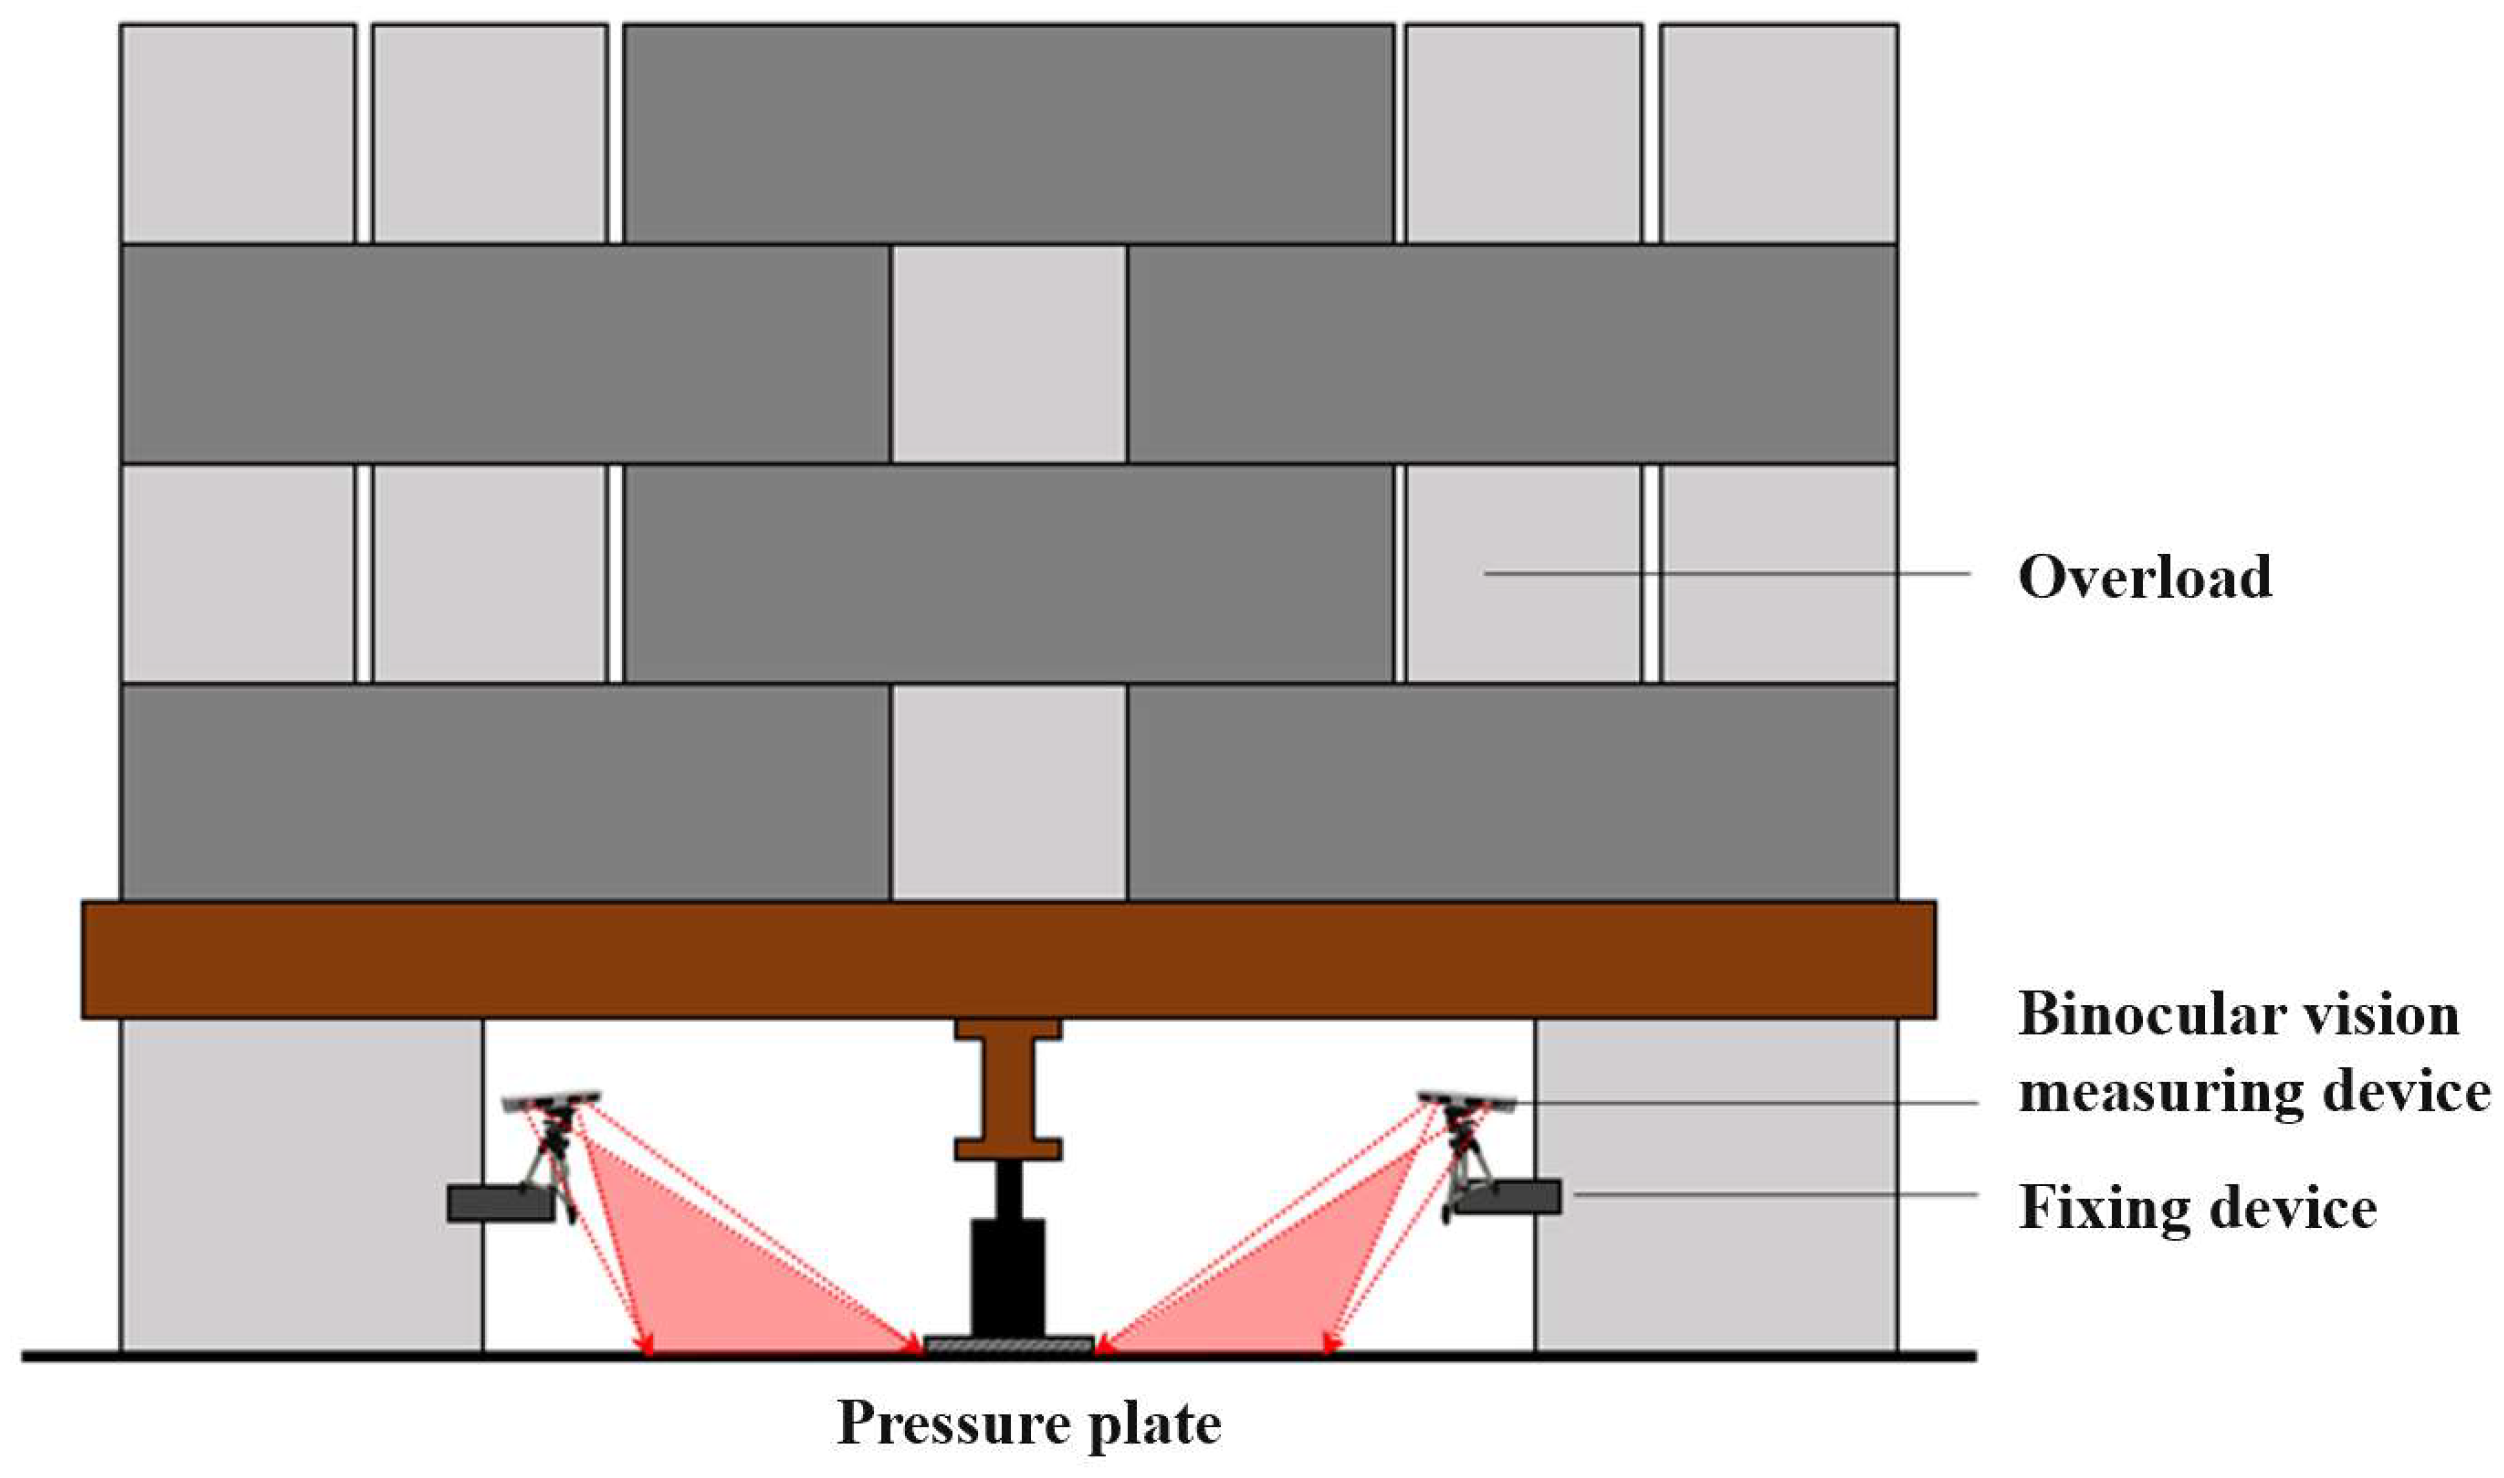
Figure 1. Monitoring system layout.
Buildings 13 00864 g001
Figure 2. Process of binocular vision measuring.
Buildings 13 00864 g002
Figure 3. The recognition results of the mark points with a diameter of 25.
Buildings 13 00864 g003
Figure 4. The relative error curves of different marker sizes.
Buildings 13 00864 g004
Figure 5. Four measurement areas with the bearing plate as the center.
Buildings 13 00864 g005
Figure 6. Load settlement response in the load test.
Buildings 13 00864 g006
Figure 7. Failure features of the mudstone foundation after the load test.
Buildings 13 00864 g007
Figure 8. Triaxial stress–strain curves of mudstone.
Buildings 13 00864 g008
Figure 9. Molar circle of the stress and strength envelope of mudstone.
Buildings 13 00864 g009
Figure 10. Topography features before and after the load test and surface deformation reconstruction.
Buildings 13 00864 g010
Figure 11. Diagram of circle arrangement.
Buildings 13 00864 g011
Figure 12. Difference value of test point displacement increment and cumulative displacement with time.
Buildings 13 00864 g012
Figure 13. Failure range based on binocular visual monitoring and the Hoek–Brown simplified geometrical model.
Buildings 13 00864 g013
Table 1. The parameter designs.
No.The Height Difference
between the Camera and the
Measuring Surface (cm)
Image Size (Pixel)Diameter of Mark Points
(mm)
Design Distance
(mm)
1451920 × 10801515, 20, 25, 30, 35, 40
22020, 25, 30, 35, 40, 45
32525, 30, 35, 40, 45, 50
43030, 35, 40, 45, 50, 55
53535, 40, 45, 50, 55, 60
Table 2. Sub-pixel coordinate extraction effects of mark points with different diameters.
Diameters of Mark Points/d
(mm)
Number of Extraction PointsNumber of
Effective Points
Effective Extraction Rate
LeftRight
1522251248%
2016181266.67%
25121212100%
3013151280%
35121212100%
Table 3. The test result of the accuracy of mark points (d = 15 mm).
Group No.True Value
(mm)
Binocular Measurement
Value (mm)
Absolute
Error (mm)
Relative Error
(mm)
11515.06880.06880.459%
22019.75850.24151.208%
32524.57060.42941.717%
43029.81440.18560.619%
53534.52770.47231.349%
64039.79360.20640.516%
Table 4. The test result of the accuracy of mark points (d = 20 mm).
Group No.True Value
(mm)
Binocular Measurement
Value (mm)
Absolute
Error (mm)
Relative Error
(mm)
12019.87330.12670.634%
22524.55910.44091.763%
33029.74620.25380.846%
43534.39390.60611.732%
54039.33570.66431.661%
64544.14630.85371.897%
Table 5. The test result of the accuracy of mark points (d = 25 mm).
Group No.True Value
(mm)
Binocular Measurement
Value (mm)
Absolute
Error (mm)
Relative Error
(mm)
12524.72930.27071.083%
23029.70880.29120.971%
33534.67000.33000.943%
44039.60470.39530.988%
54544.54140.45861.019%
65049.60110.39890.798%
Table 6. The test result of the accuracy of mark points (d = 30 mm).
Group No.True Value
(mm)
Binocular Measurement
Value (mm)
Absolute
Error (mm)
Relative Error
(mm)
13029.73700.26300.877%
23534.79700.20300.580%
34039.52140.47861.197%
44544.37530.62471.388%
55049.46770.53231.065%
65554.41760.58241.059%
Table 7. The test result of the accuracy of mark points (d = 35 mm).
Group No.True Value
(mm)
Binocular Measurement
Value (mm)
Absolute
Error (mm)
Relative Error
(mm)
13534.67300.32700.934%
24039.53720.46281.157%
34544.50030.49971.111%
45049.41580.58421.168%
55554.48260.51740.941%
66059.37540.62461.041%
Table 8. A summary of the failure features of the red-bedded mudstone foundation.
Test PointFailure Diameter of Bearing Plate/cmFailure Depth of Bearing Plate/cmCrack Length/cmCrack Scope
/cm2
Breaking Condition
J-1#381438~70138 × 88The blocks were relatively uniform, the largest of which is 20 × 20   cm 2 .
X-1#30~351020~4055 × 39The X-1# was fragmented with the rock base at the edge of the bearing plate lifted, and part of the rock mass fell off and bulged out.
X-2#30~33430~45-One side of the rock mass falls off and bulges out, presenting a clastic division.
X-3#30720~7878 × 50The integrity of rock mass between fractures is good.
C-1#30843~100140 × 56The crushing area of C-1# is divided along the crushing zone.
Table 9. Deformation parameters of the test points.
ParametersJ-1#X-1#X-2#X-3#C-1#
Failure range/cm26.520.435.733.135.9
Maximum deformation/cm1.12.01.11.71.8
Average deformation/cm0.71.10.91.10.9
Distance between max deformation and bearing plate/cm8.74.713.49.94.3
Table 10. The progressive failure process of mudstone and binocular monitoring displacement change rate (X-3).
No.StagesLoad TimeLoad
(MPa)
The Rate of Displacement Change of a Circle of 1st Layer (mm/h)Crack Feature
VerticalHorizontalSpatial
OAcompaction stage0~6 h2~41.10.51.3/
ABelastic stage6~8 h4~52.10.82.3/
BCelastic–plastic stage8~12 h5~5.81.20.31.2micro fractured
CDplastic stage12~16 h5.8~6.20.90.51.0irreversible crack
DEfailure stage16~18 h6.2~7.42.91.53.3rock broke
Table 11. Test results.
Test PointsDeformation Range/cmInternal Friction Angle/°Bearing Plate Failure Depth/cm D 2 / cm
Measurement Area 1Measurement Area 2Measurement Area 3Measurement Area 4AverageTriaxial φ 2
X-1#19.715.220.126.720.431.337.810.017.8
X-2#31.934.948.527.635.731.377.24.07.1
X-3#29.432.127.443.333.131.366.17.012.5
C-1#37.425.639.041.735.935.164.98.015.4
Disclaimer/Publisher’s Note: The statements, opinions and data contained in all publications are solely those of the individual author(s) and contributor(s) and not of MDPI and/or the editor(s). MDPI and/or the editor(s) disclaim responsibility for any injury to people or property resulting from any ideas, methods, instructions or products referred to in the content.