Article

Multi-Pass Stamping Forming a Concave Ring

College of Mechanical Engineering and Mechanics, Ningbo University, Ningbo 315211, China
*
Author to whom correspondence should be addressed.
Appl. Sci. 2020, 10(18), 6434; https://doi.org/10.3390/app10186434
Submission received: 6 August 2020 / Revised: 10 September 2020 / Accepted: 14 September 2020 / Published: 16 September 2020
(This article belongs to the Special Issue Metal Forming)

Abstract

:
To improve the production quality and efficiency of the concave ring, a multi-pass stamping technology is used to replace the spinning technology to form the concave ring. First, the multi-pass stamping dies are designed according to the structural characteristics of the concave ring. Then, the process parameters are determined based on the bending conditions and the dimensional requirements of the concave ring. Next, the rationality of the designed stamping dies is verified by analyzing the stress and strain field of the multi-pass stamping concave ring. Finally, the stamping experiments are carried out. Experimental results show that the dimensional error of the concave ring formed by multi-pass stamping is less than 0.5%. The multi-pass stamping technology is feasible to form the concave ring. The reasonable design of the mold is the key factor to prevent defects in the workpiece. The concave ring formed by multi-pass stamping meets the industrial requirements.

1. Introduction

As a key part of an aero-engine, sheet metal casing parts are directly related to the overall performance of the aero-engine. The concave ring is an important and consumable part of the sheet metal casing parts. The shape and accuracy of the concave ring must remain stable during the operation of the aero-engine. Therefore, the processing technology of the concave ring must be efficient and highly precise. The widely used process for processing concave rings is spinning technology. The average processing efficiency of spinning the concave ring is 10 min per piece [1]. However, from years of practice and experience, the spinning forming concave ring has been found to have the disadvantages of high technical requirements, a low production efficiency and poor forming quality [2]. So the forming process of the concave ring needs to be improved. Based on the requirements of the forming quality and production efficiency of the concave ring in the production practice, this paper uses the stamping process to form the concave ring.
As shown in Figure 1, the structure of the concave ring is complicated. Concave ring-forming needs to complete the inward bending and the outward bending of the ring part in a small space at the same time. According to the characteristics of the sheet metal stamping and bending process, the dimensional accuracy and geometric accuracy of the workpiece will inevitably change after bending [3,4]—i.e., by locally thinning, springback, warping and twisting after bending. Therefore, to determine whether the bending part is suitable for bending, it is necessary to judge the geometric characteristics of the bending part in combination with the corresponding process limit value before bending. In the research of the sheet metal bending process, Tan et al. [5] proposed a process model for V bending sheet metal. This model combines the analysis method and trial-and-error method to establish the relationship between the punch insertion depth and the corresponding unloading bending angle. Wang et al. [6] established a complete theory and reliable mathematical model for flat strain plate bending to predict the springback, bendability or minimum bending ratio, strain and stress distribution, and maximum loads on punches and dies. A computer code called “BEND” was developed to simulate the air bending and die bending process of U-die, V-die and wiping die. Tekiner [7] presented a springback test method in which the amount of springback of several metal sheets with different bending angles was obtained on a modular V bending die. Lovell et al. [8] presented numerical studies based on various yield criteria and compared the results with the experiments to show that the springback varies with the orientation of the anisotropic sheet in the U-die bending process. Batoz and Guo [9] developed a nonlinear finite element program to predict the distribution of large plastic strains in 3D complex sheet metal forming parts at the design stage. This method is based on knowledge of 3D surfaces. The shape of the original blank was not fixed. Ablat and Qattawi [10] have done a lot of research on the numerical analysis of the sheet metal forming process. The formability of sheet metal is introduced from the perspective of a numerical simulation. Panthi et al. [11] established a typical sheet metal bending model based on the large deformation algorithm of total elastic incremental plastic strain (TEIP). The springback prediction was carried out through numerical experiments. Li [12] proposed an effective and economical method for prototyping sheet metal workpieces while maintaining angular dimensional accuracy and without creating new molds. Cho et al. [13] conducted a numerical study on the springback characteristics of the main process parameters. The updated lagrangian thermoelastoplastic finite element method (FEM) was applied to the U bending process of plane strain sheet metal. Fu and Mo [14] proposed an analytical model and finite element model to study the incremental air bending process. They used FEM to simulate and analyze the influence of tool parameters on the forming shape, air bending forming force and workpiece warpage. Malikov et al. [15] studied the air bending of structured sheet metal. A numerical model was developed to predict the process safety and bend line form. Parsa and Ahkami [16] analyzed the importance of metal sheet bending under tension. An analytical model has been developed for metal sheet to plane strain bending under tension. This model has been used to describe the effect of tension on the bending moment in a linear elastic work-hardened sheet. Wu and Zheng [17] studied the energy parameters, material parameters and geometric parameters for the laser bending of metal sheet. Wu and Zhong [18] presented a finite element simulation of a temperature field during the laser forming. These current studies focus on the establishment of a numerical model of sheet metal bending process, springback prediction and new processing methods. There are few studies on the forming process of the complex bending parts.
Based on the characteristics of sheet metal bending and the limit value of bending, a set of multi-pass stamping dies for the forming of the concave ring is designed. Through simulation, the stress–strain fields during the forming process are analyzed. Finally, the rationality of the die design is verified through experiments.

2. Die Design and Process Parameter Selection

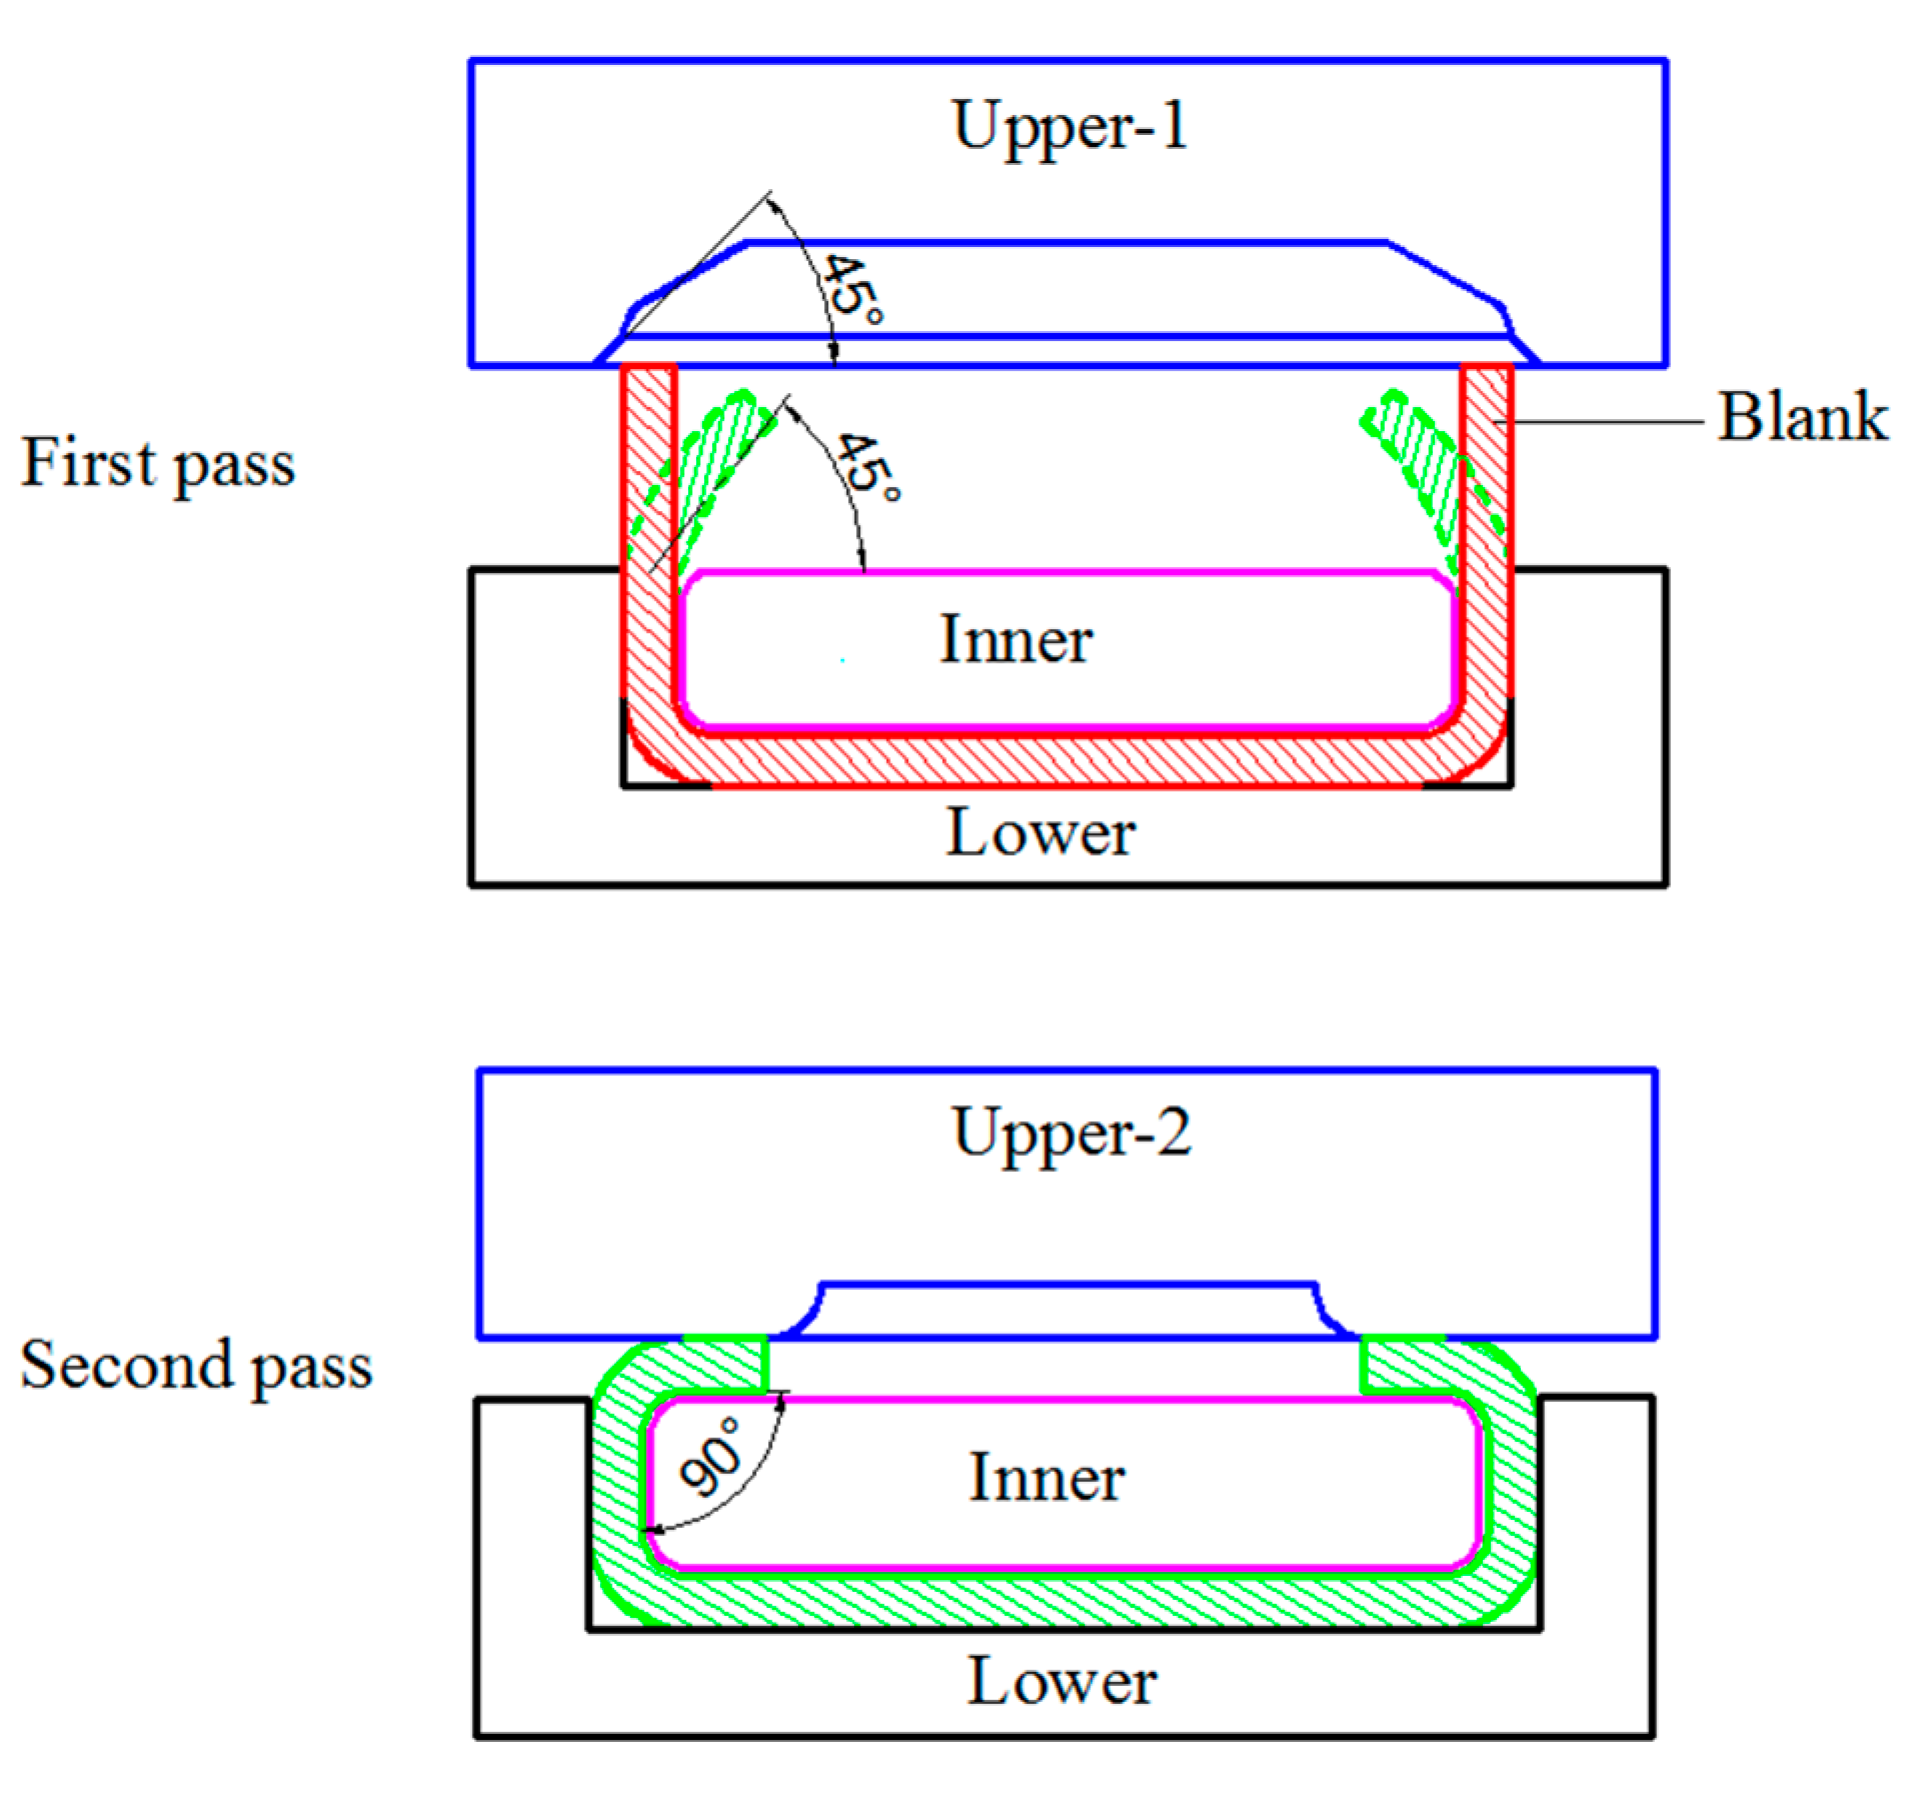
The flanging process was divided into compression-type flanging and elongation-type flanging [19]. The flanging profile of the compression-type flanging is convex. The metal material in the deformation area was subjected to compressive stress which resulted in compression deformation and a thickness increase. In contrast, the flanging profile of the elongation-type flanging is concave. The metal material in the deformation zone was subjected to tensile stress which caused elongation deformation and a thickness reduction. The forming process of a concave ring has both compression-type flanging and elongation-type flanging. It bears compressive and tensile stresses at the same time. The inward flanging of the outer edge of the blank is compression-type. The outward flanging of the hole edge of the blank is elongation-type. The multi-pass stamping and bending process of the concave ring is shown in Figure 2. The contour of the upper-1 groove is composed of chamfers, arcs and straight lines. The 45° chamfer was used to avoid the upper-1 and lower die being unable to be closed due to the roundness error of the blank. The arc of the upper-1 groove is to guide the blank to bend in the desired direction. The inclined straight line is to make the bending angle of the blank reach 45° in the first pass. In the second pass, the bottom surface of the upper-2 was designed as a flat surface, so that the bending angle of workpiece reaches 90°. The inner die is to ensure the forming shape inside the concave ring.
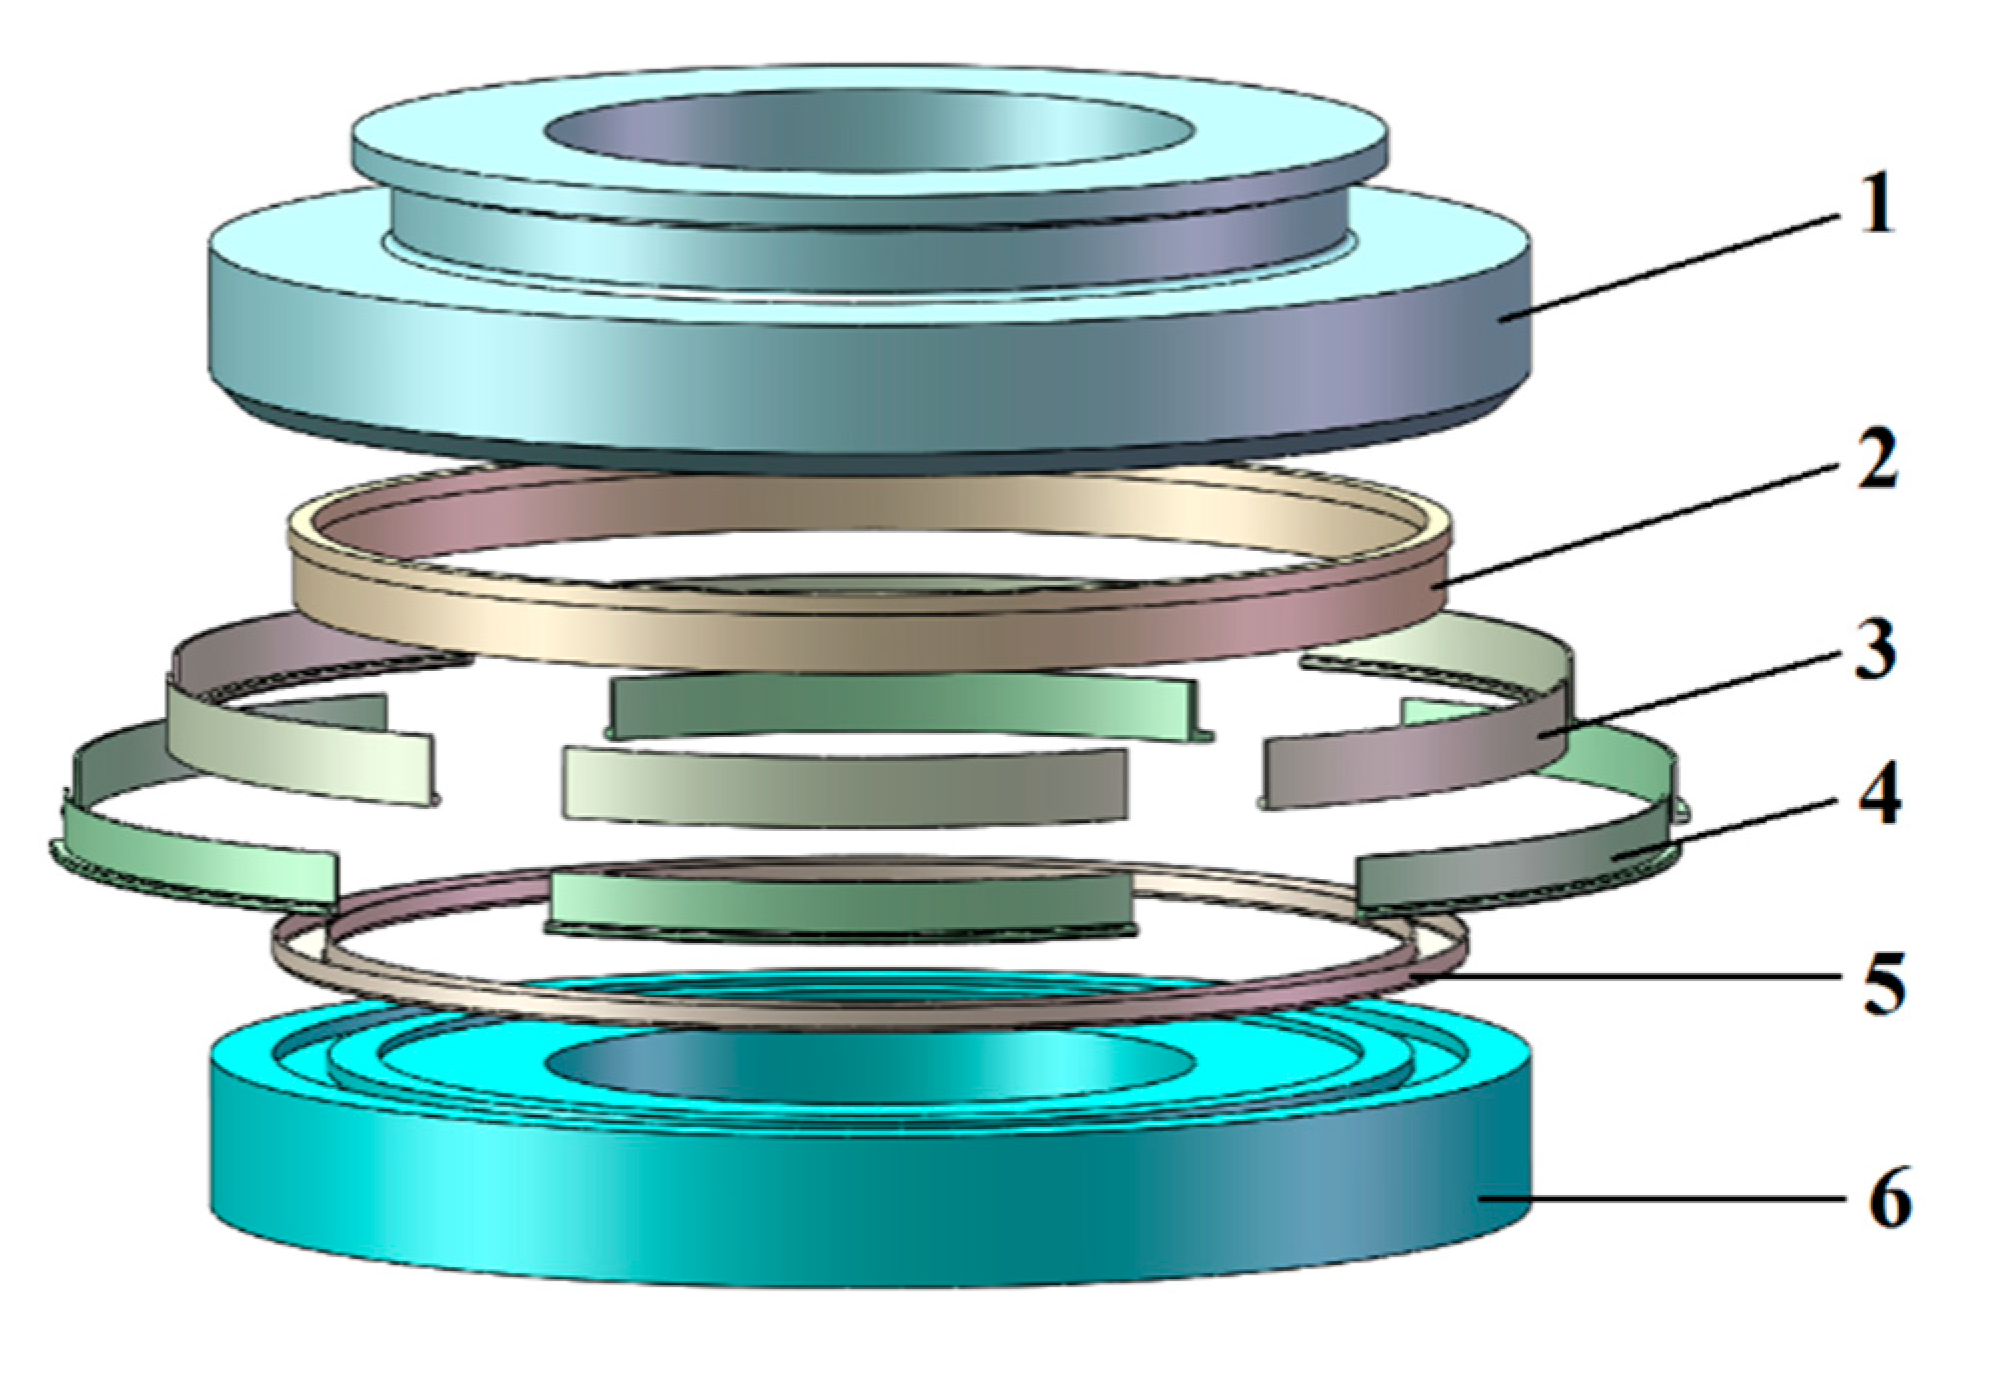
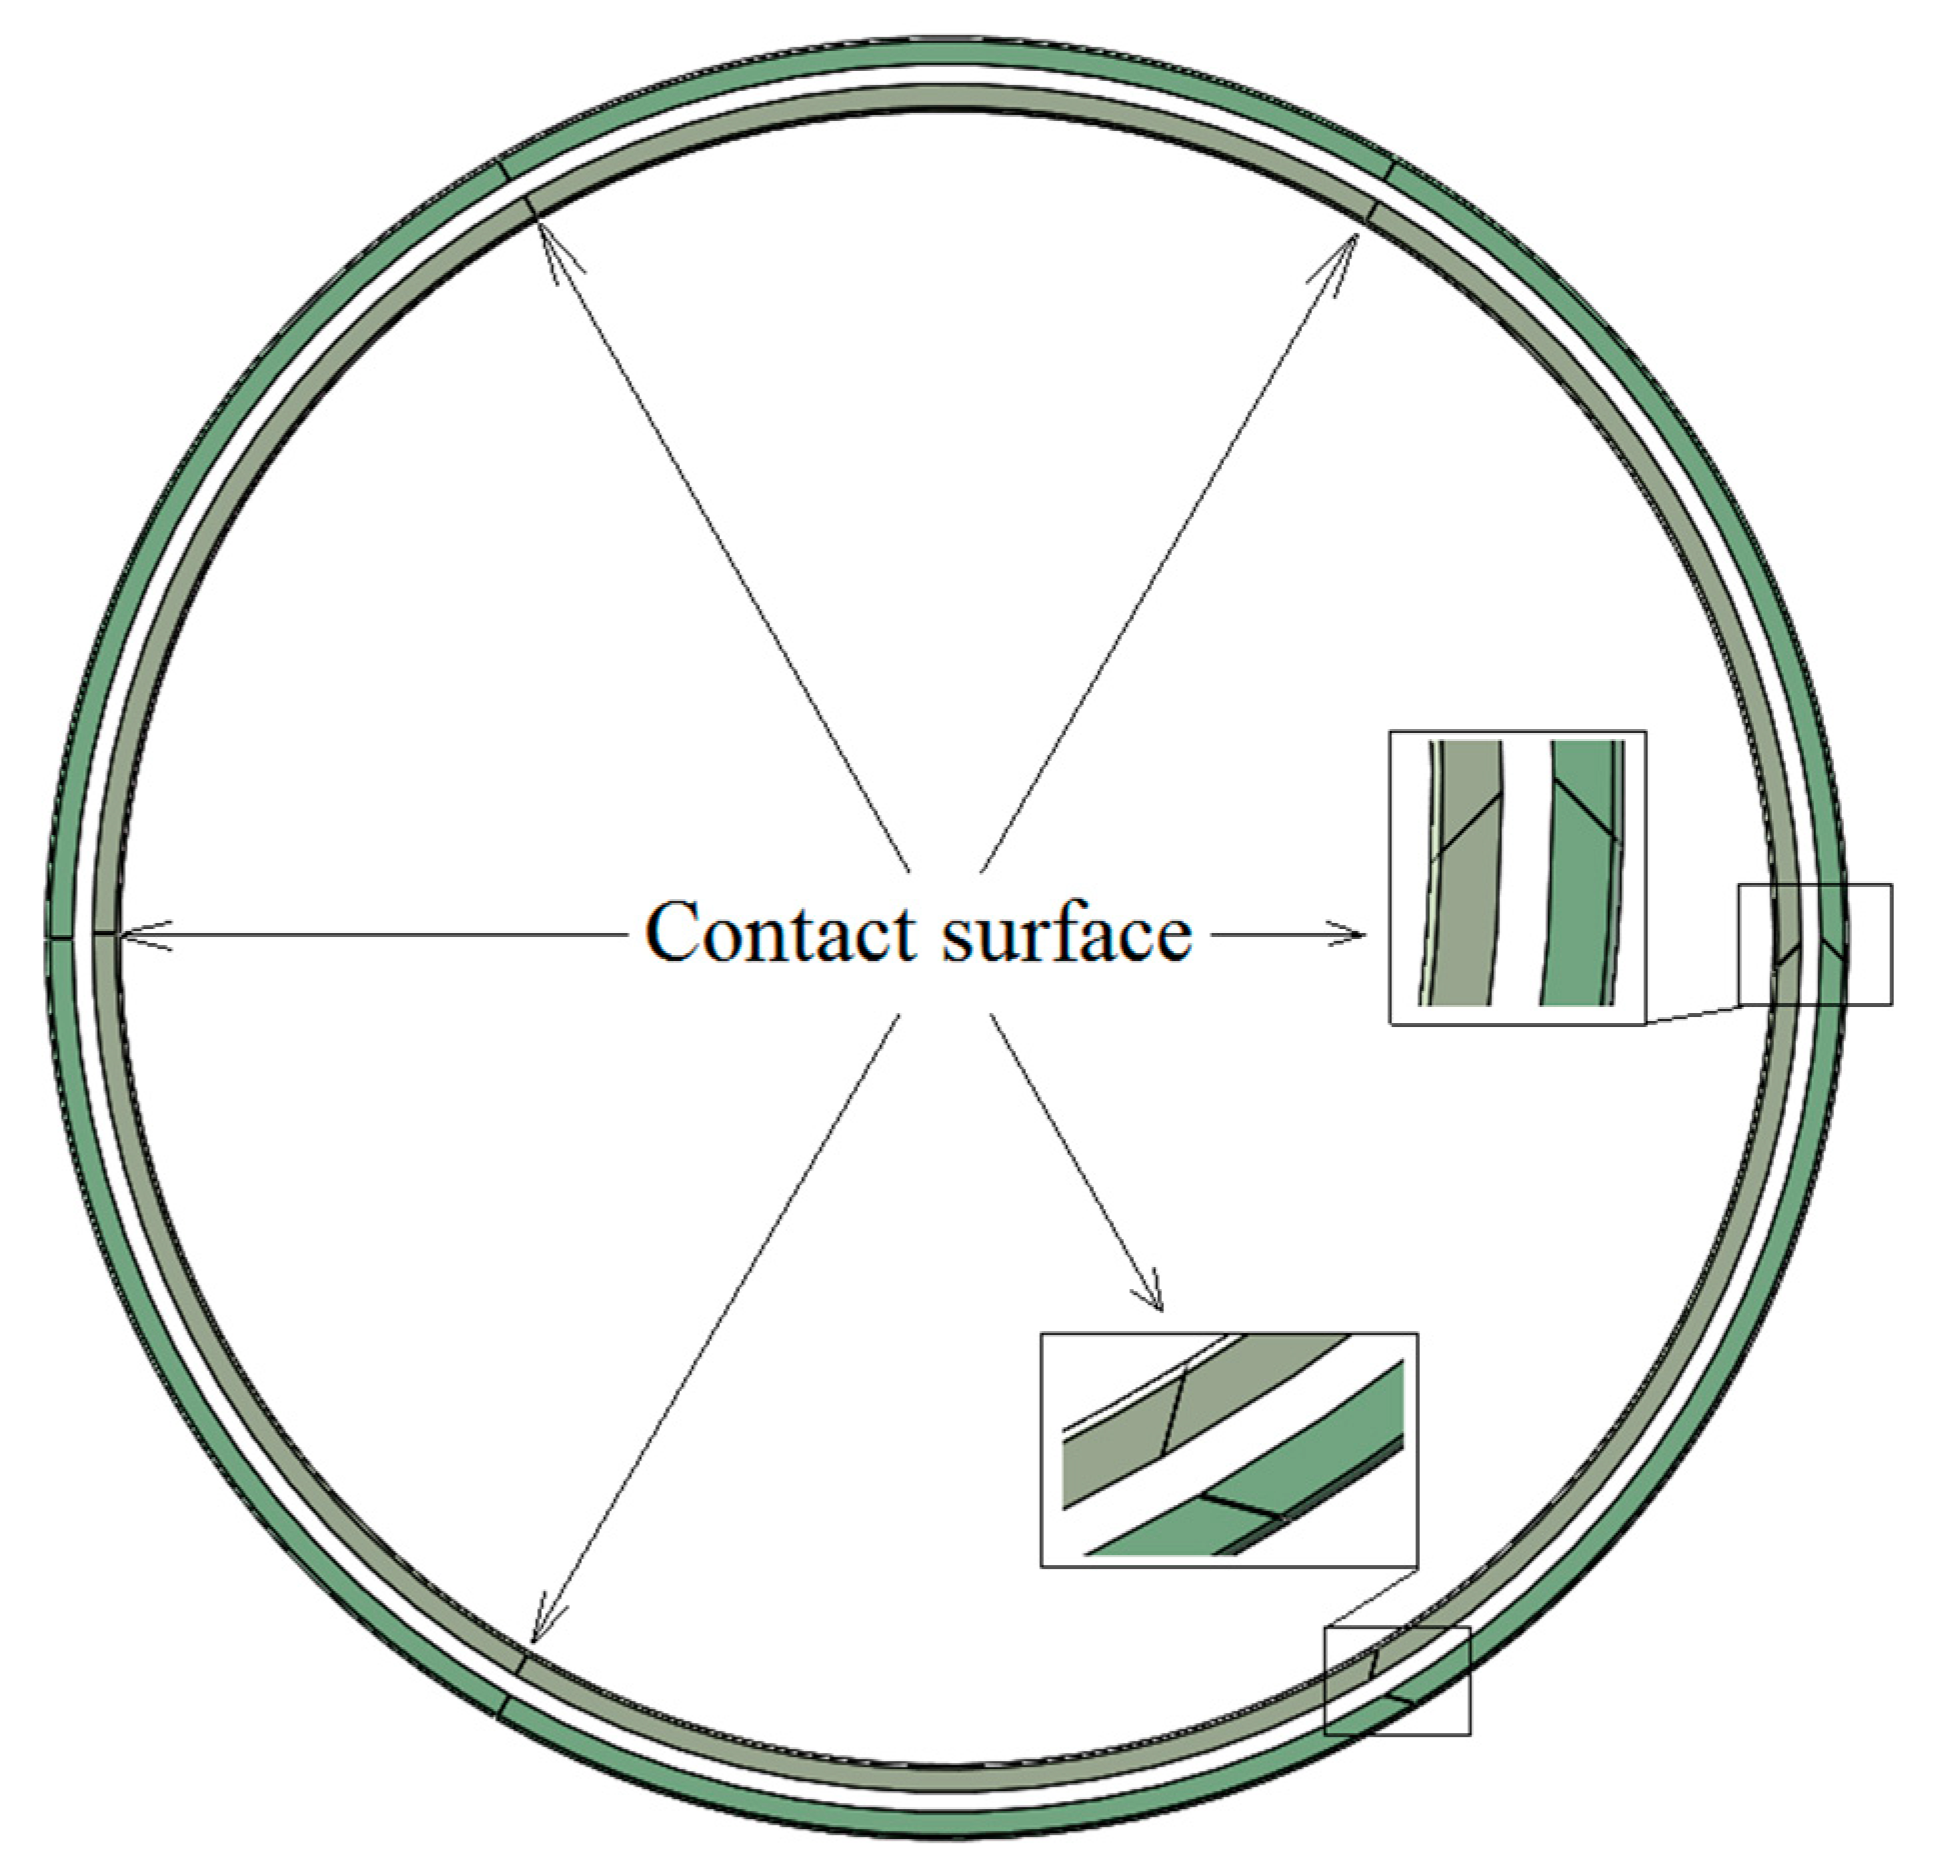
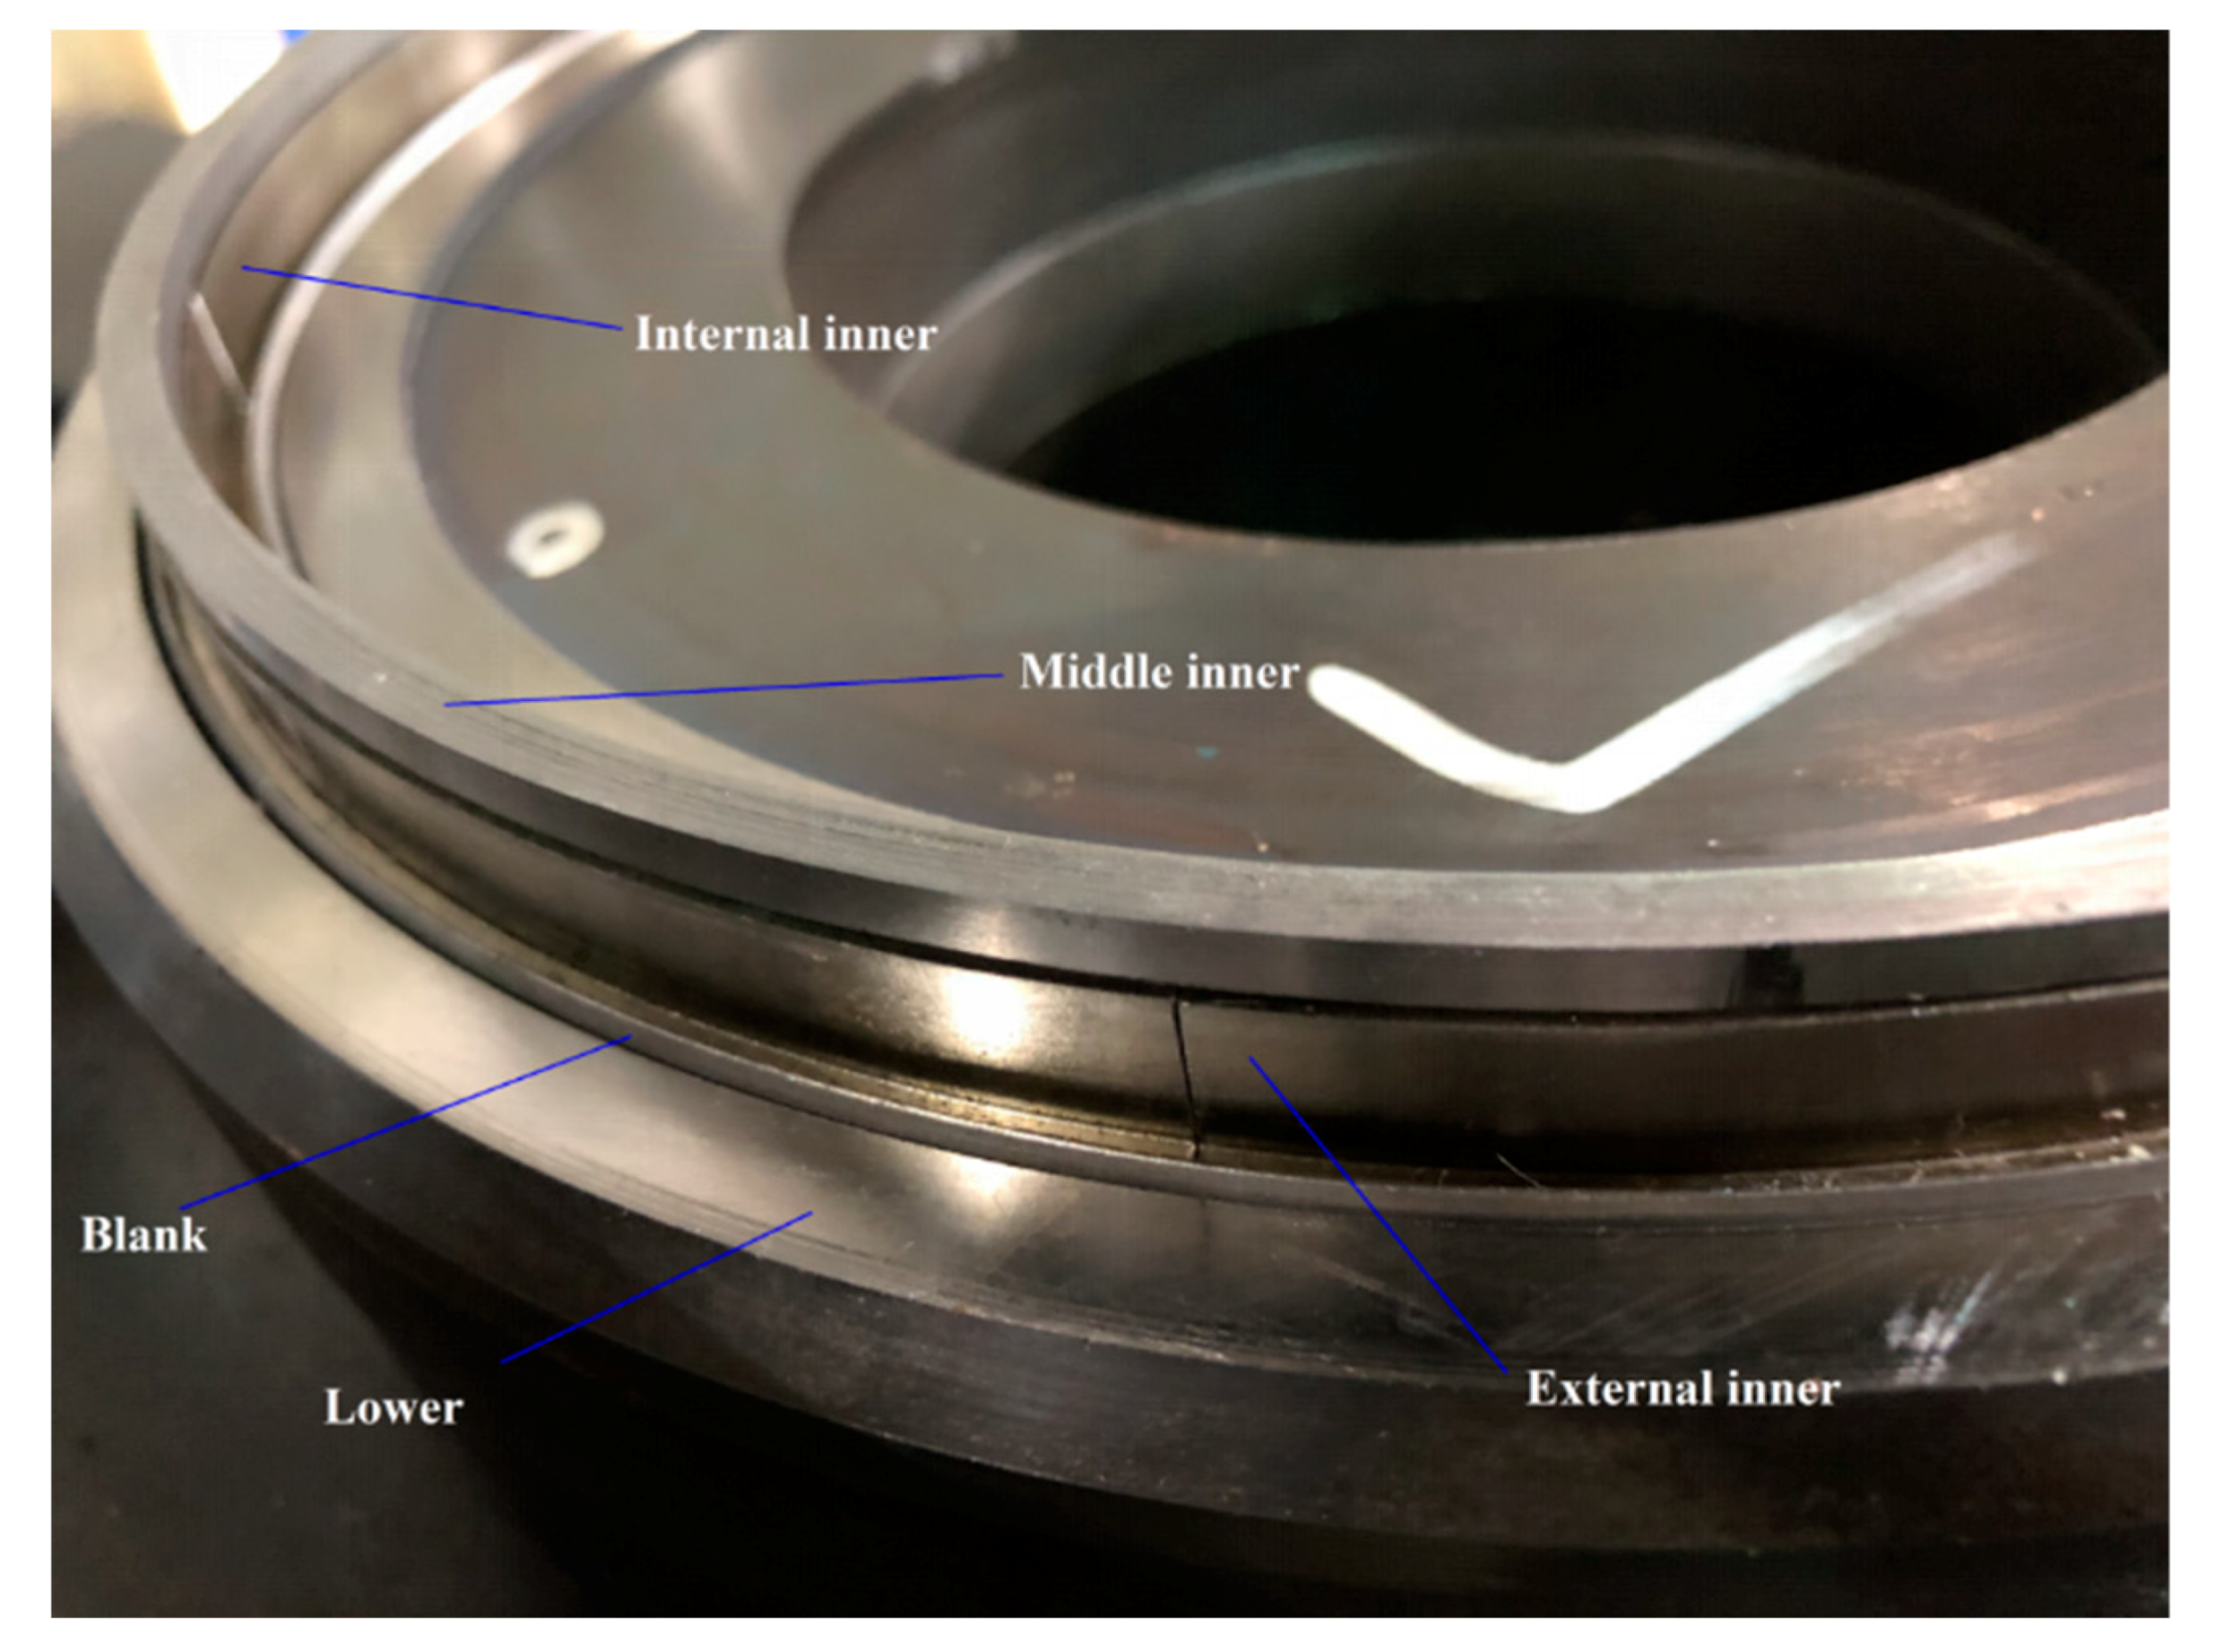
To realize the above forming process, the designed stamping dies consist of six parts: upper (including first-pass upper die and second-pass upper die), inner and lower. The inner was designed in three parts: external inner, internal inner and middle inner. The exploded view of the stamping die assembly is shown in Figure 3. In order to facilitate the installation and removal of the inner, the middle inner is a cone wedge with a cone angle of 1°. The external inner and internal inner were divided into six pieces. The division method of the external inner and internal inner is shown in Figure 4.
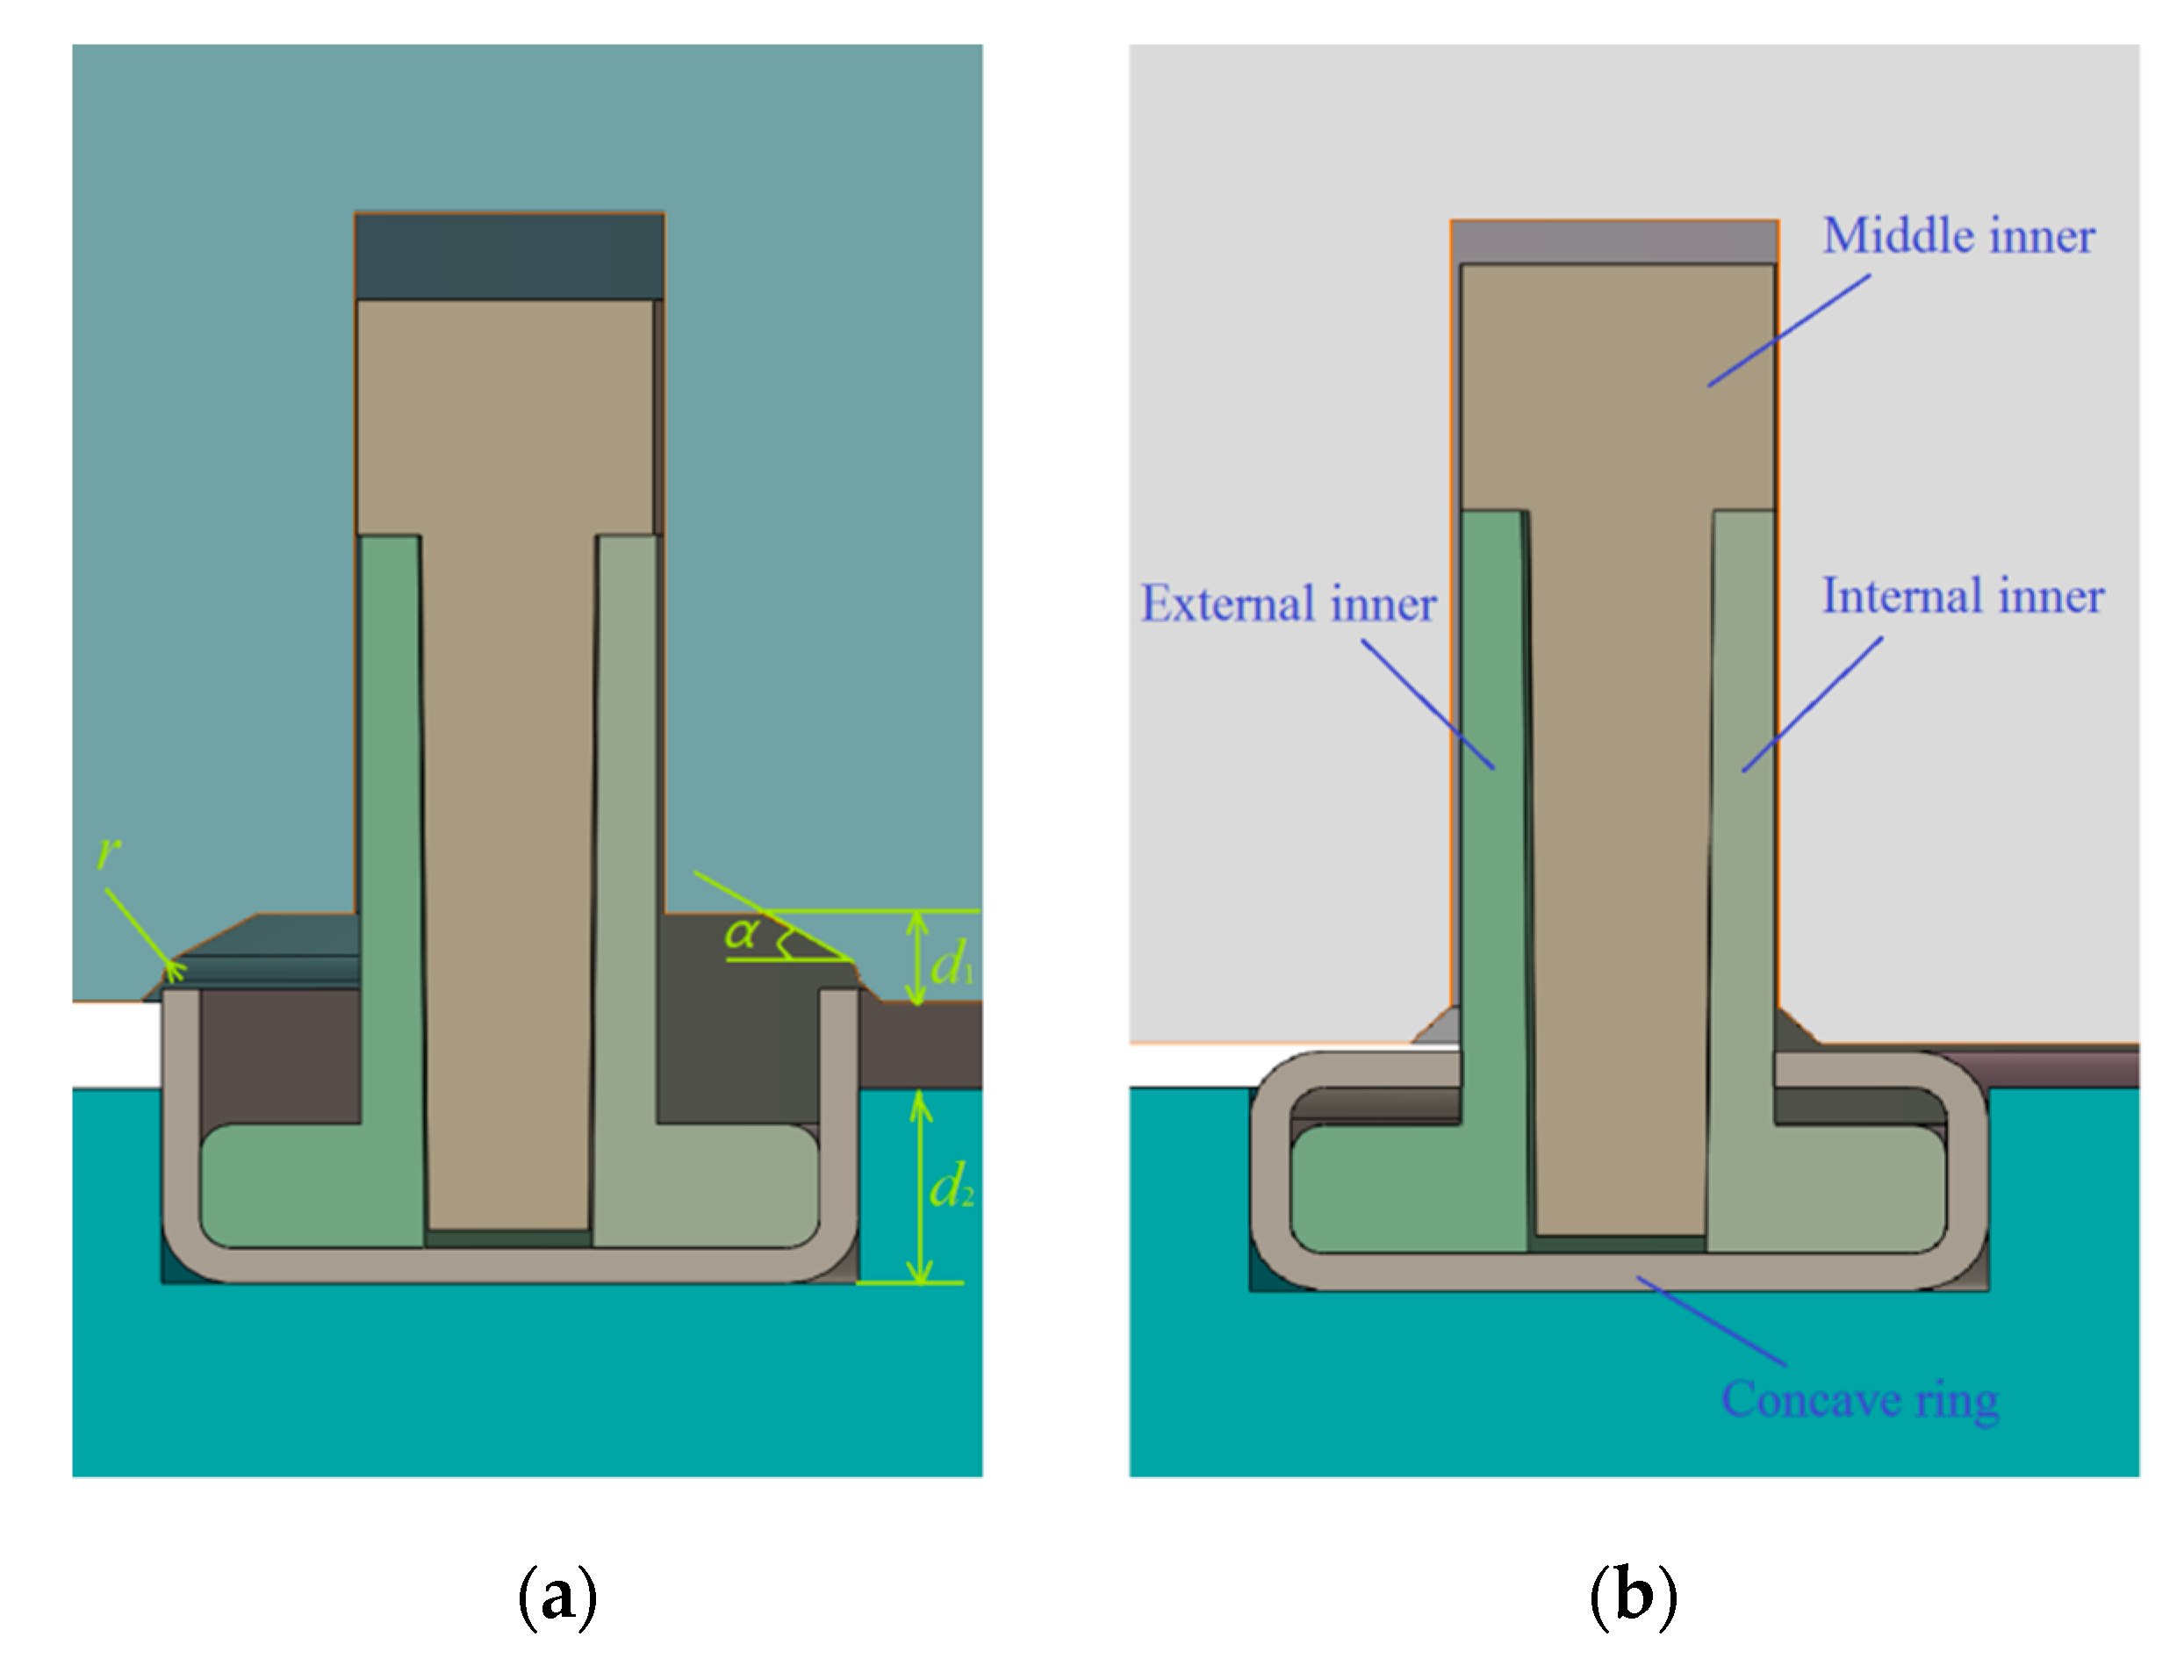
When putting the inner into the workpiece, first install the internal inner, then install the external inner, and finally insert the middle inner. In addition, there is a gap between the bottom of the middle inner and the workpiece. The inner is then inserted into the workpiece, and the installation drawing for the first pass is shown in Figure 5a. After the concave ring is formed, first pull out the middle inner, then take out the internal inner and the external inner in order. In the second pass, the workpiece is bent under the punching of the upper-2 as shown in Figure 5b.
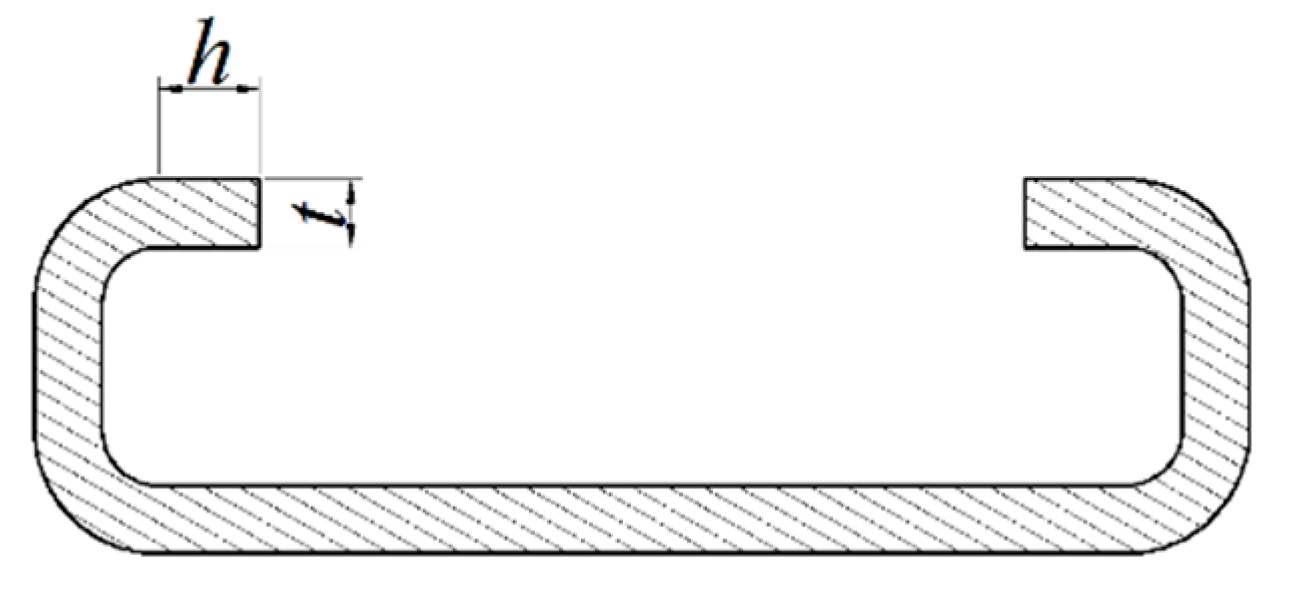
When the concave ring is bent, the length of the straight edge of the bent part must meet the following conditions [19]:
h > 2t
where h is the length of the straight edge of the bent part of the bending piece; t is the thickness of the bending piece.
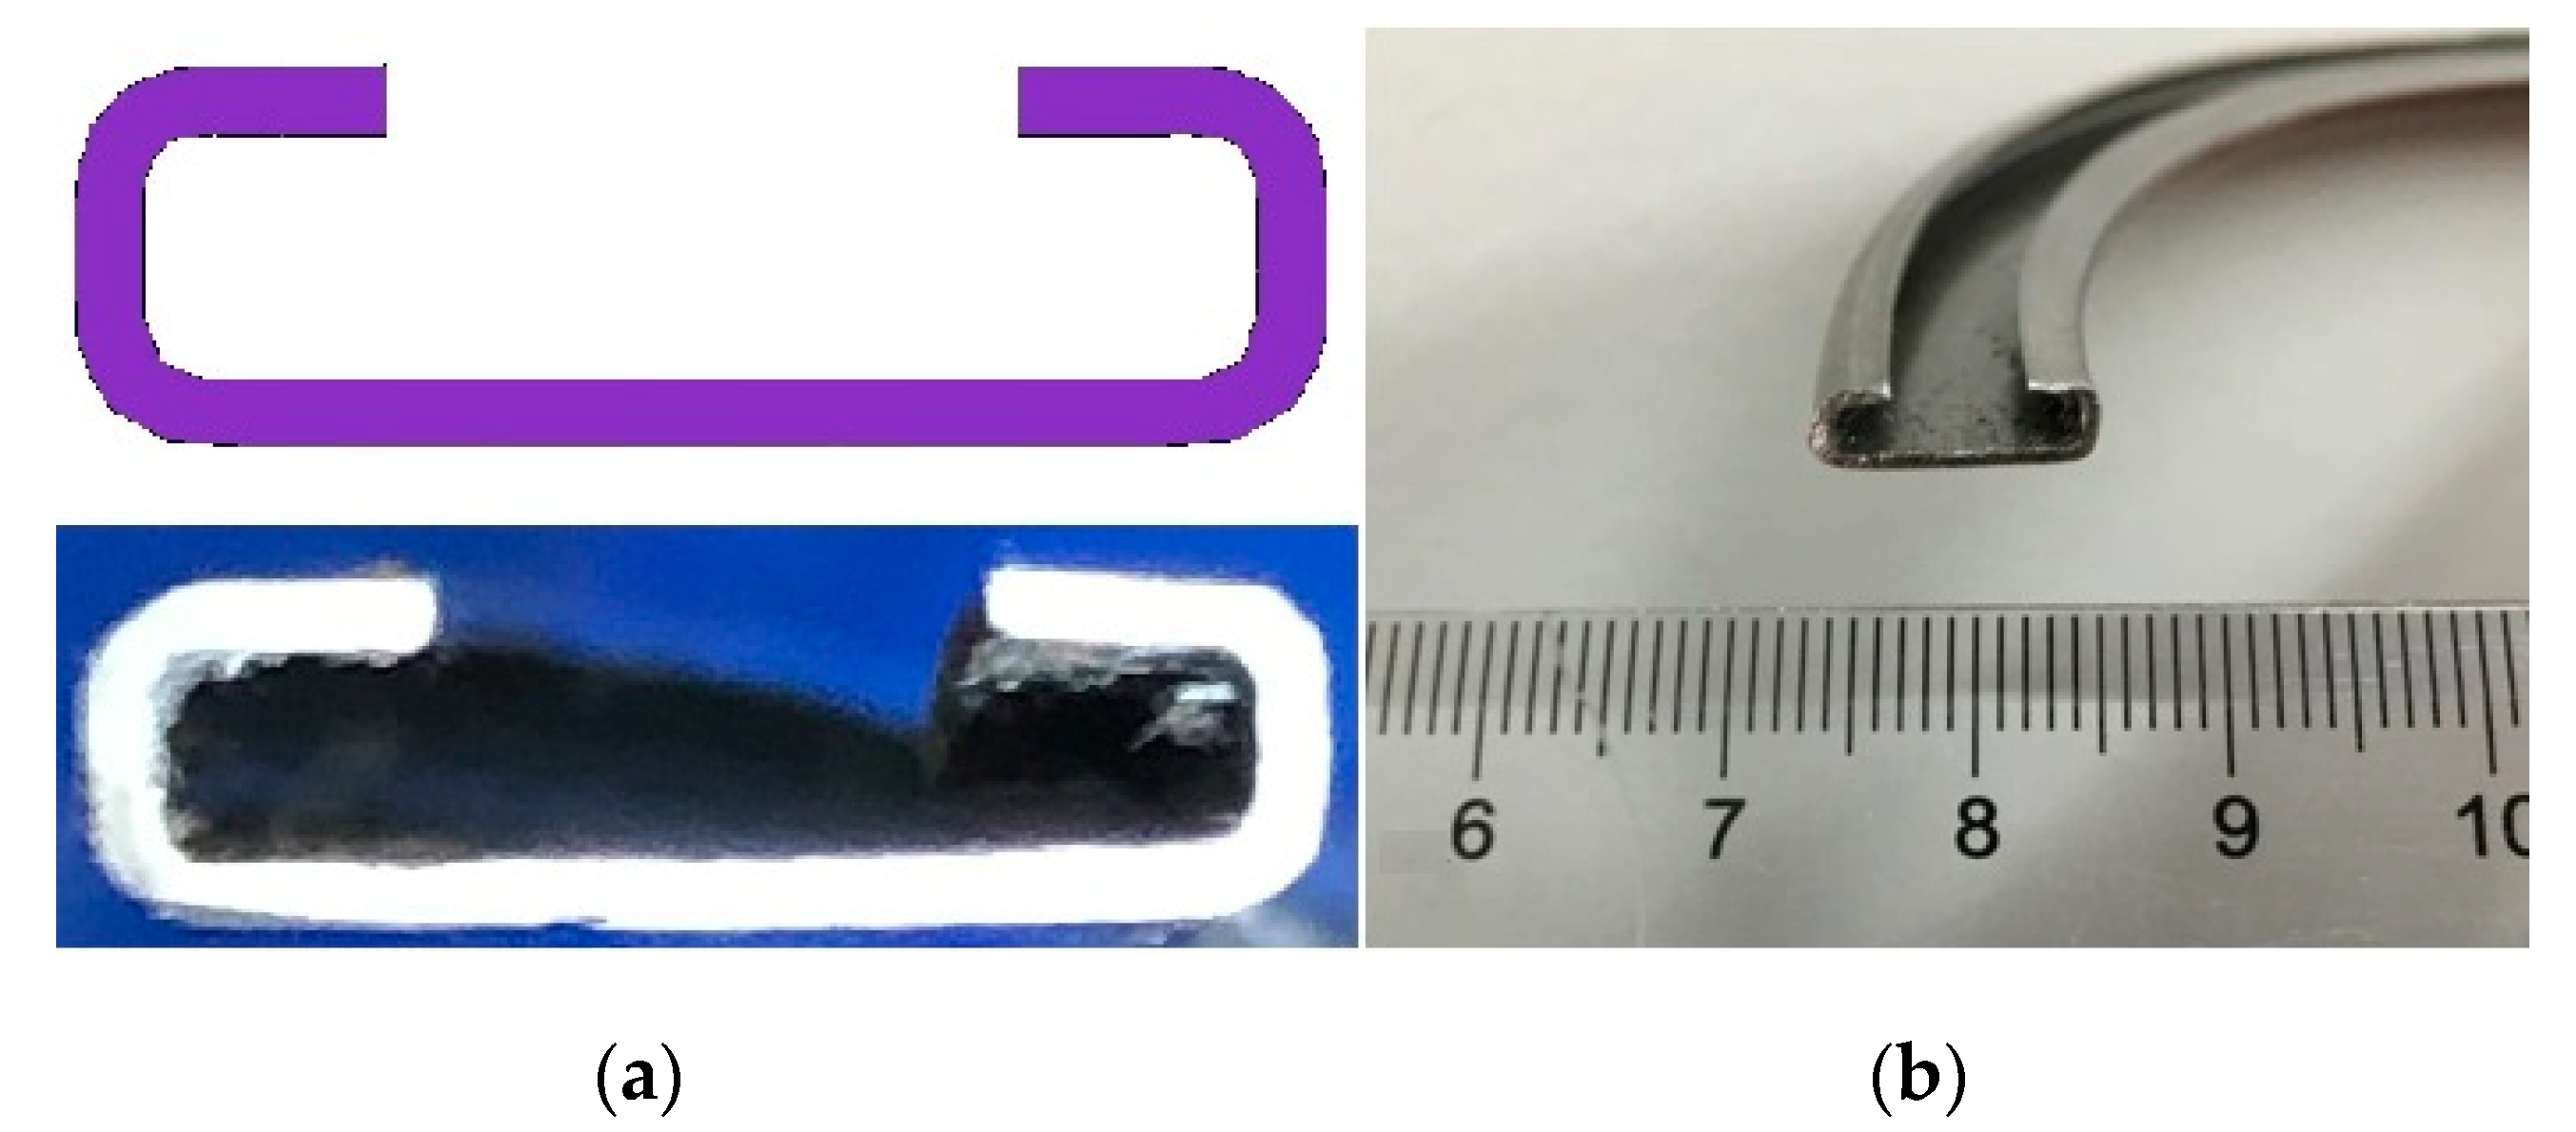
The cross-section of the concave ring is shown in Figure 6. If h < 2t, the straight edge of the blank needs to be increased, and it will be removed when the processing is completed.
According to the bending conditions and the requirements for forming the concave ring, the die parameters are shown in Table 1.

3. Simulation Analysis of the Concave Ring Formed by Multi-Pass Bending

3.1. Establishment of Finite Element Model

The material of the concave ring is 0Cr18Ni9 austenitic stainless steel. Its density is 7930 kg·m−3. The Young’s modulus is 20,400 MPa. Poisson’s ratio is 0.285. The yield stress is 205 MPa. The tensile strength is 730 MPa. The specific heat capacity is 502 J·(kg·K)1. Zhang et al. [20] tested the tensile properties of 0Cr18Ni9 stainless steel at room temperature—true stress–true strain curves at different strain rates were obtained. The constitutive model of 0Cr18Ni9 stainless steel at room temperature is:
σ = 1397.5 × ε 0.4215 ε ˙ 0.098
where σ is the stress; ε is the strain; ε ˙ is the strain rate.
Simufact.Forming software was used for the stamping simulation. The mesher was used to sheet mesh. The element type was hexahedral. The number of elements on the ring thickness was two. The size of a single finite element was set to 0.3 mm. An automatic remeshing tool was used to reconstruct the mesh if the effective strain increased by 0.4. The implicit finite element solver was used to solve the problem. The coefficient of heat transfer between the tools and the material was 15 W/m2K. All die types were set to rigid dies without heat conduction. The friction factor was used to 0.15. The punching velocity was set to 100 mm/s. The finite element model of multi-pass stamping of the concave ring is shown in Figure 7.

3.2. Stress–Strain Field

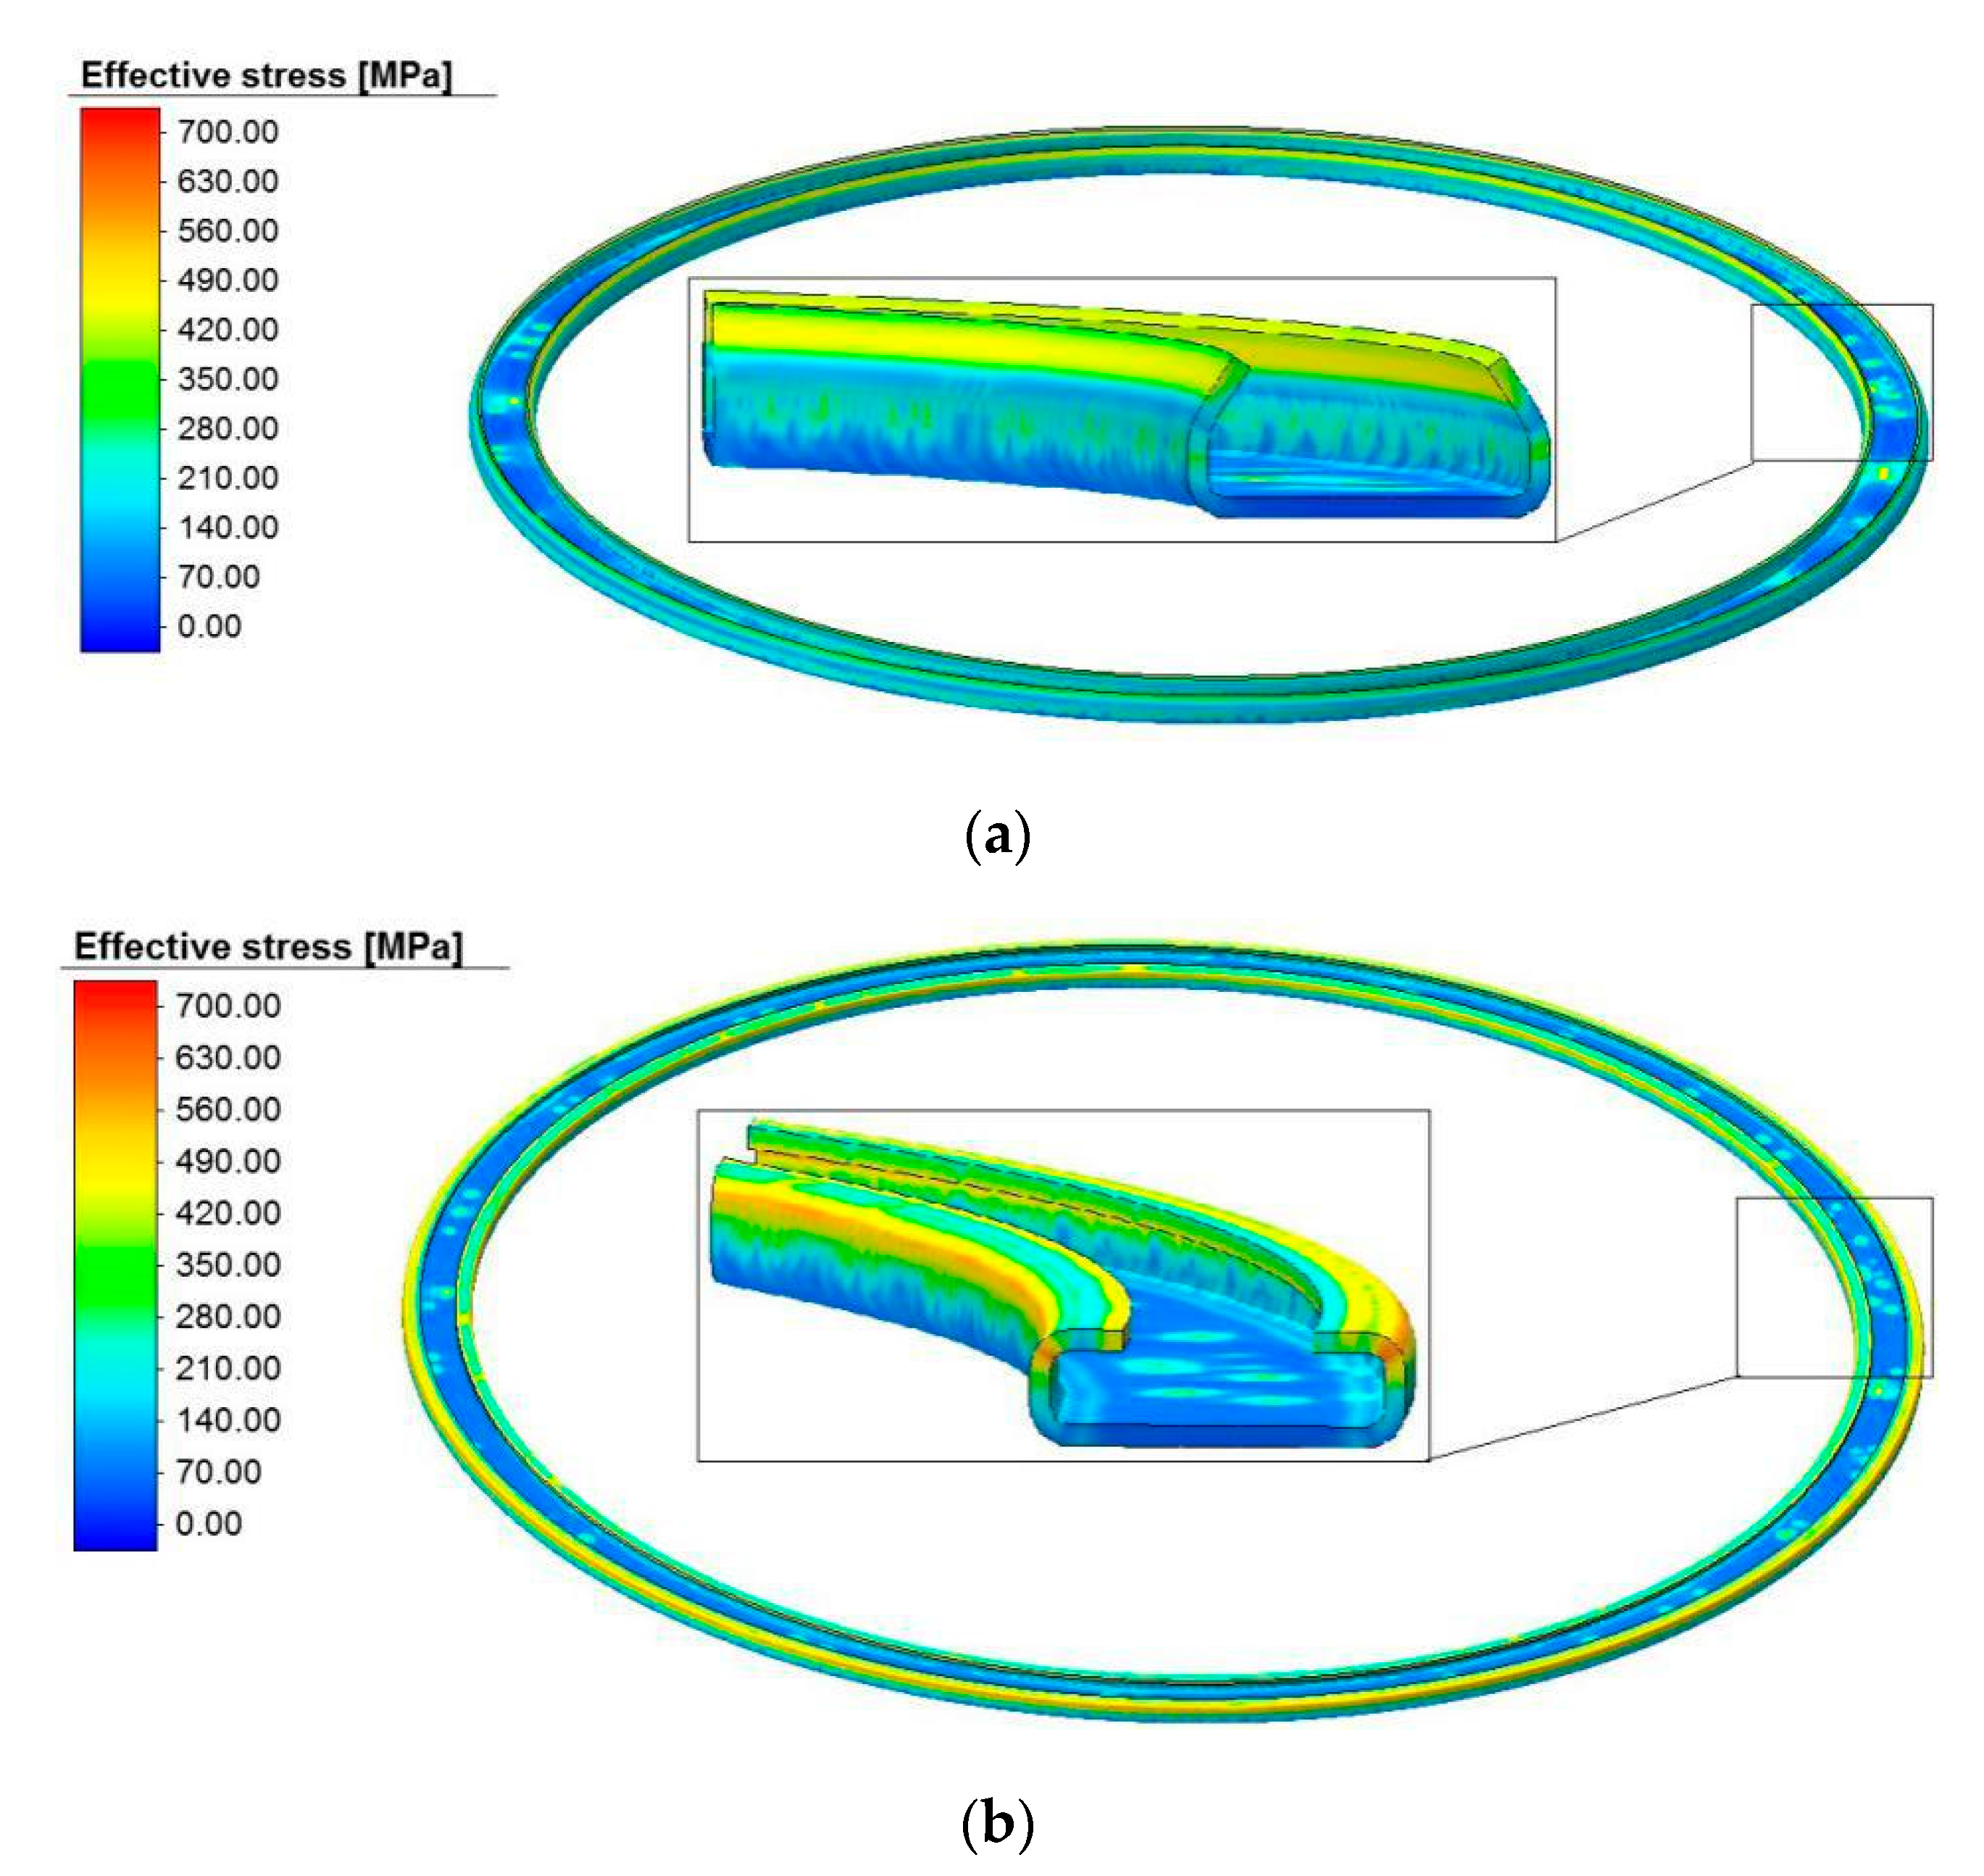
Figure 8a shows the stress distribution of the workpiece after the first pass. From Figure 8a, the area where the blank contacts the upper-1 has the highest stress. The effective stress in this area is less than 500 MPa. The effective stress at the bottom of the workpiece is almost negligible. Figure 8b is the stress distribution of the workpiece after the second pass. From Figure 8b, the highest stress is concentrated in the bending area of the workpiece. The highest effective stress value does not exceed 700 MPa.
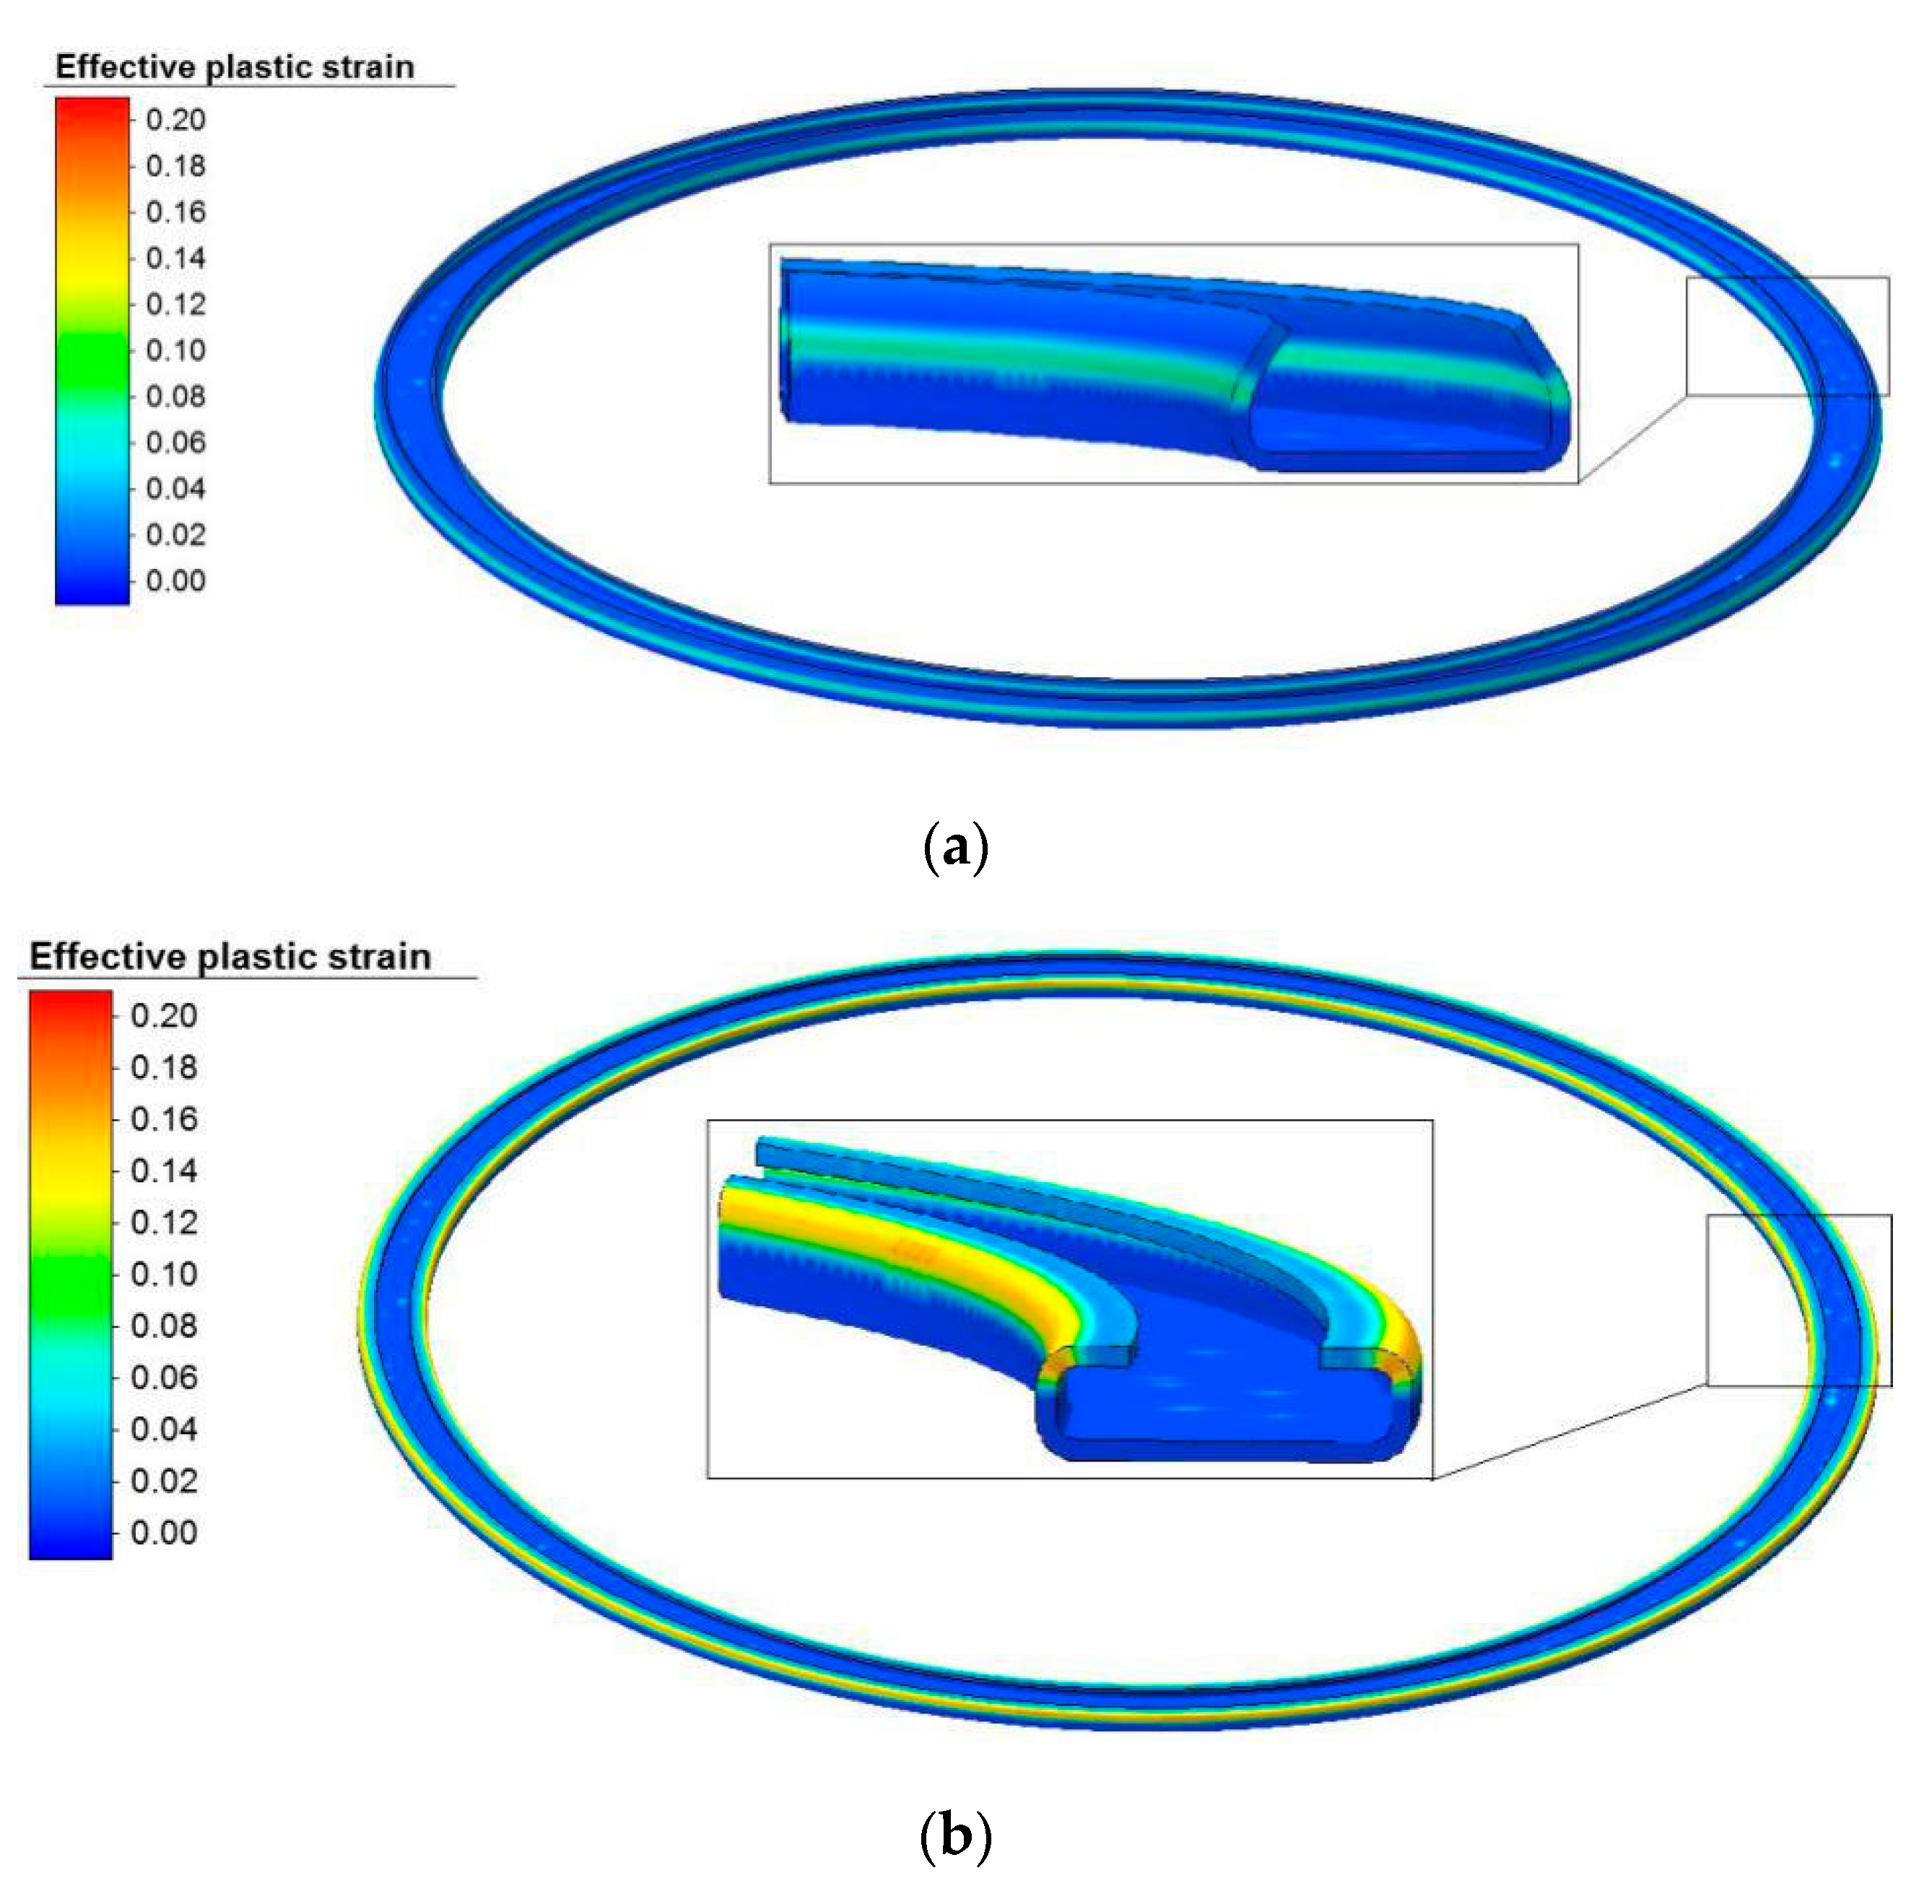
Figure 9a shows the strain distribution of the workpiece after the first pass. From Figure 9a, the effective plastic strain is concentrated in the bending area, which shows that the plastic deformation of the workpiece only occurs in this area. It also means that the design of the upper-1 is reasonable. Figure 9b is the effective plastic strain distribution of the workpiece after the second pass. From Figure 9b, the effective plastic strain is still concentrated in the bending area. After two passes of forming, there were no obvious defects such as cracks or breakage in the bending area.
According to the analysis of the stress and strain field, the plastic deformation area was concentrated in the bending area. There was no obvious plastic deformation in other areas. This shows that a concave ring can be stamped by the above stamping die.

4. Multi-Pass Stamping Experiment

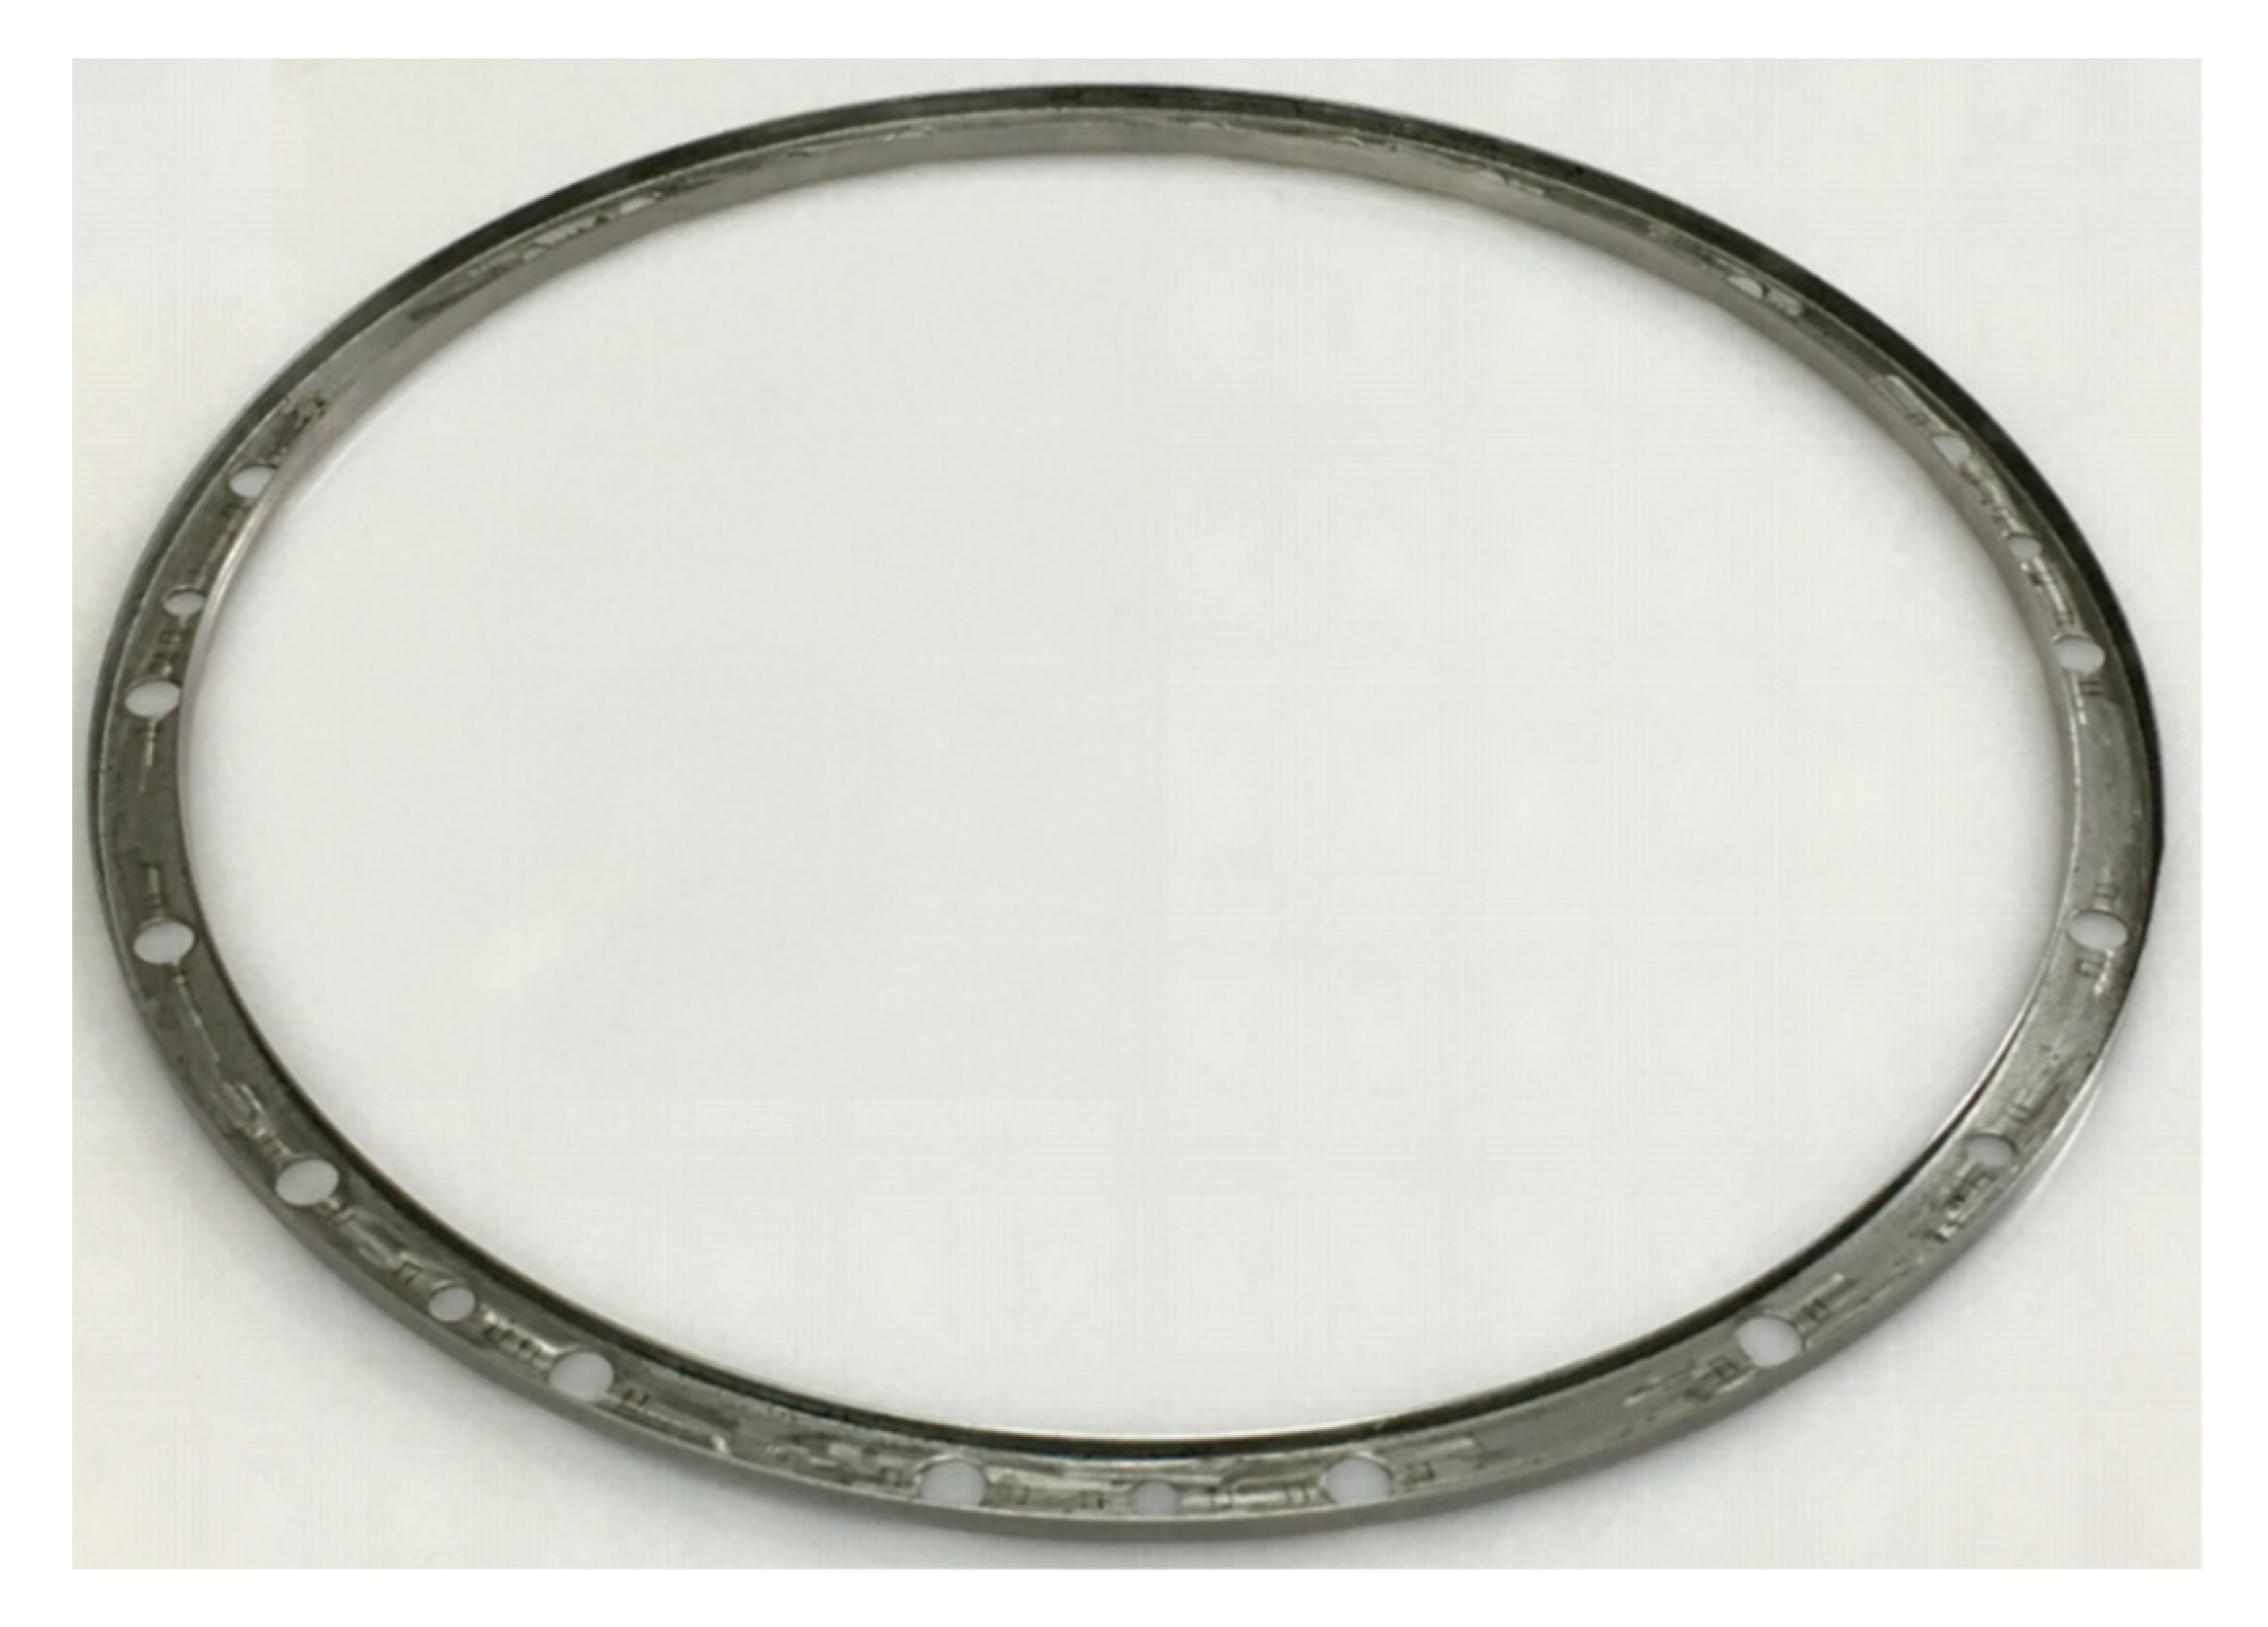
From the above simulation, it proved that stamping is suitable for producing concave rings. The concave ring stamping experiment was performed on a 100 T hydraulic press. The punching velocity was set to 100 mm/s. The blank was shown in Figure 10. The dies need to be installed before the experiment. First, the blank was placed in the groove of the lower. Next, the inner needs to be placed in the groove of the blank in sequence. Figure 11 shows the completion of the mold installation. After the first pass was completed, the upper-1 was replaced by the upper-2 for the second pass forming. The experimental process of the first pass and the second pass is shown in Figure 12.
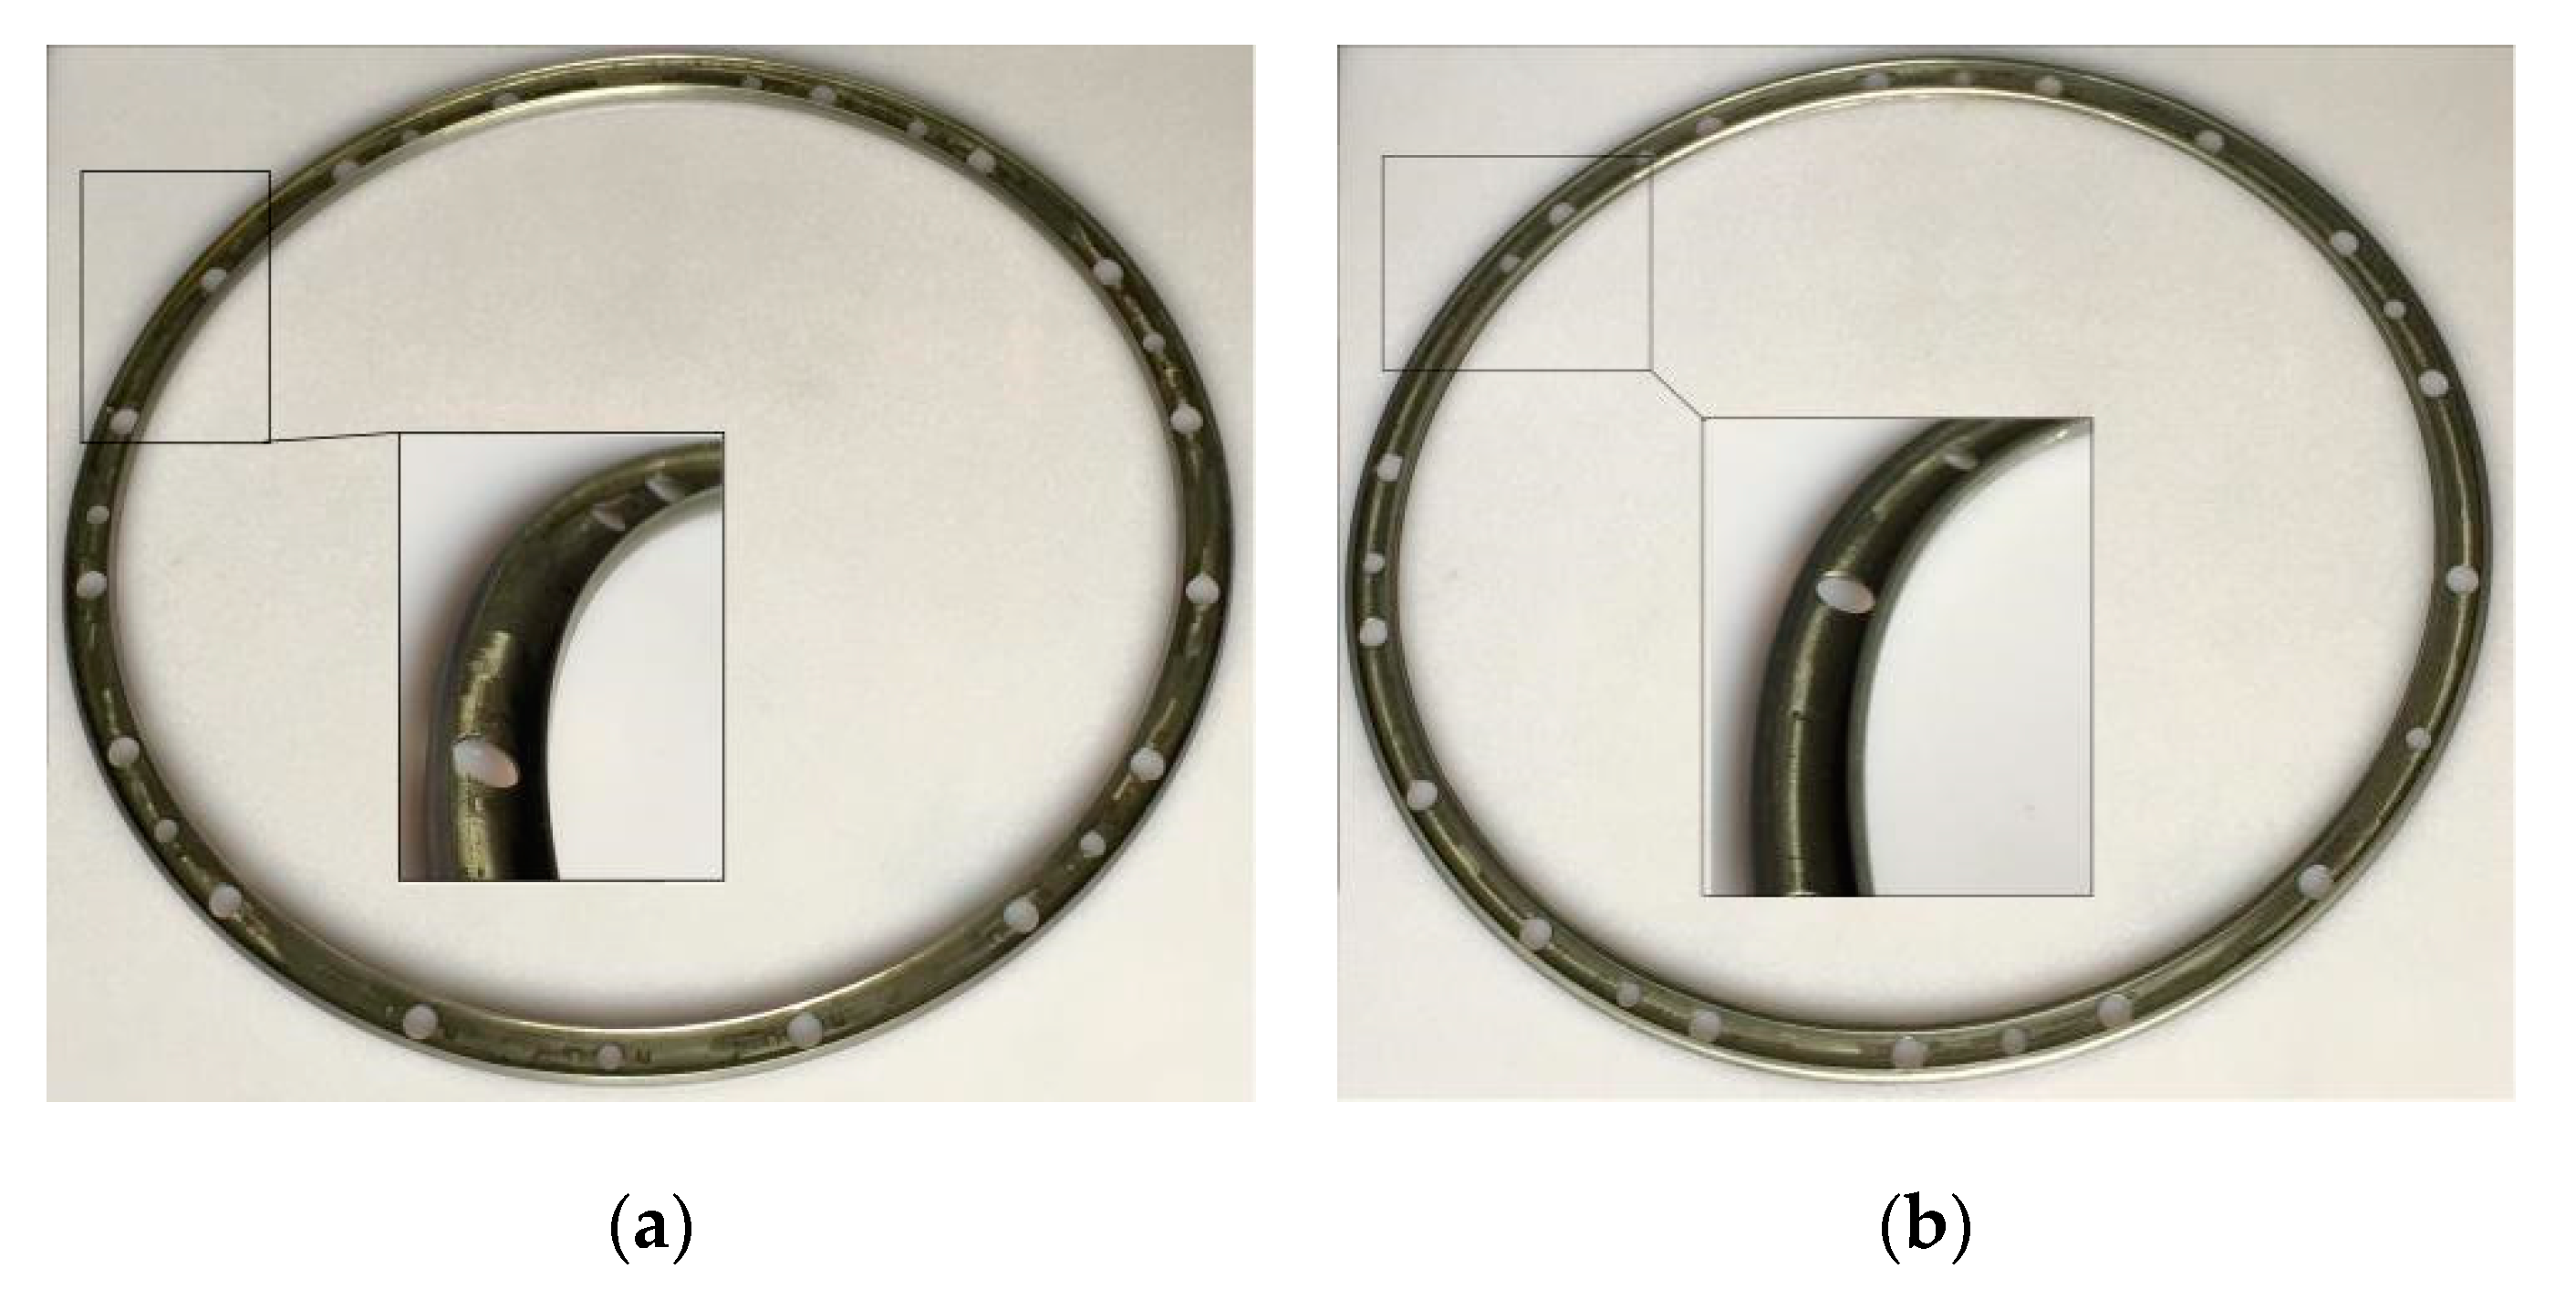
The workpiece after the first pass forming is shown in Figure 13a. The direction and angle of bending of the workpiece are acceptable. The workpiece after the second pass forming is shown in Figure 13b. The final shape of the workpiece is the same as the concave ring. The comparison of the final cross-section of the experimental and simulated workpiece is shown in Figure 14a. The final workpiece is sectioned along the axial direction for measurement, as shown in Figure 14b. The measurement results are shown in Table 2. The height of the workpiece is 3.31 mm. The width is 10.82 mm. They are all within the allowable dimensional tolerance range. The dimensional error is less than 0.5%. The average processing efficiency of stamping the concave ring is 4.6 min per piece.
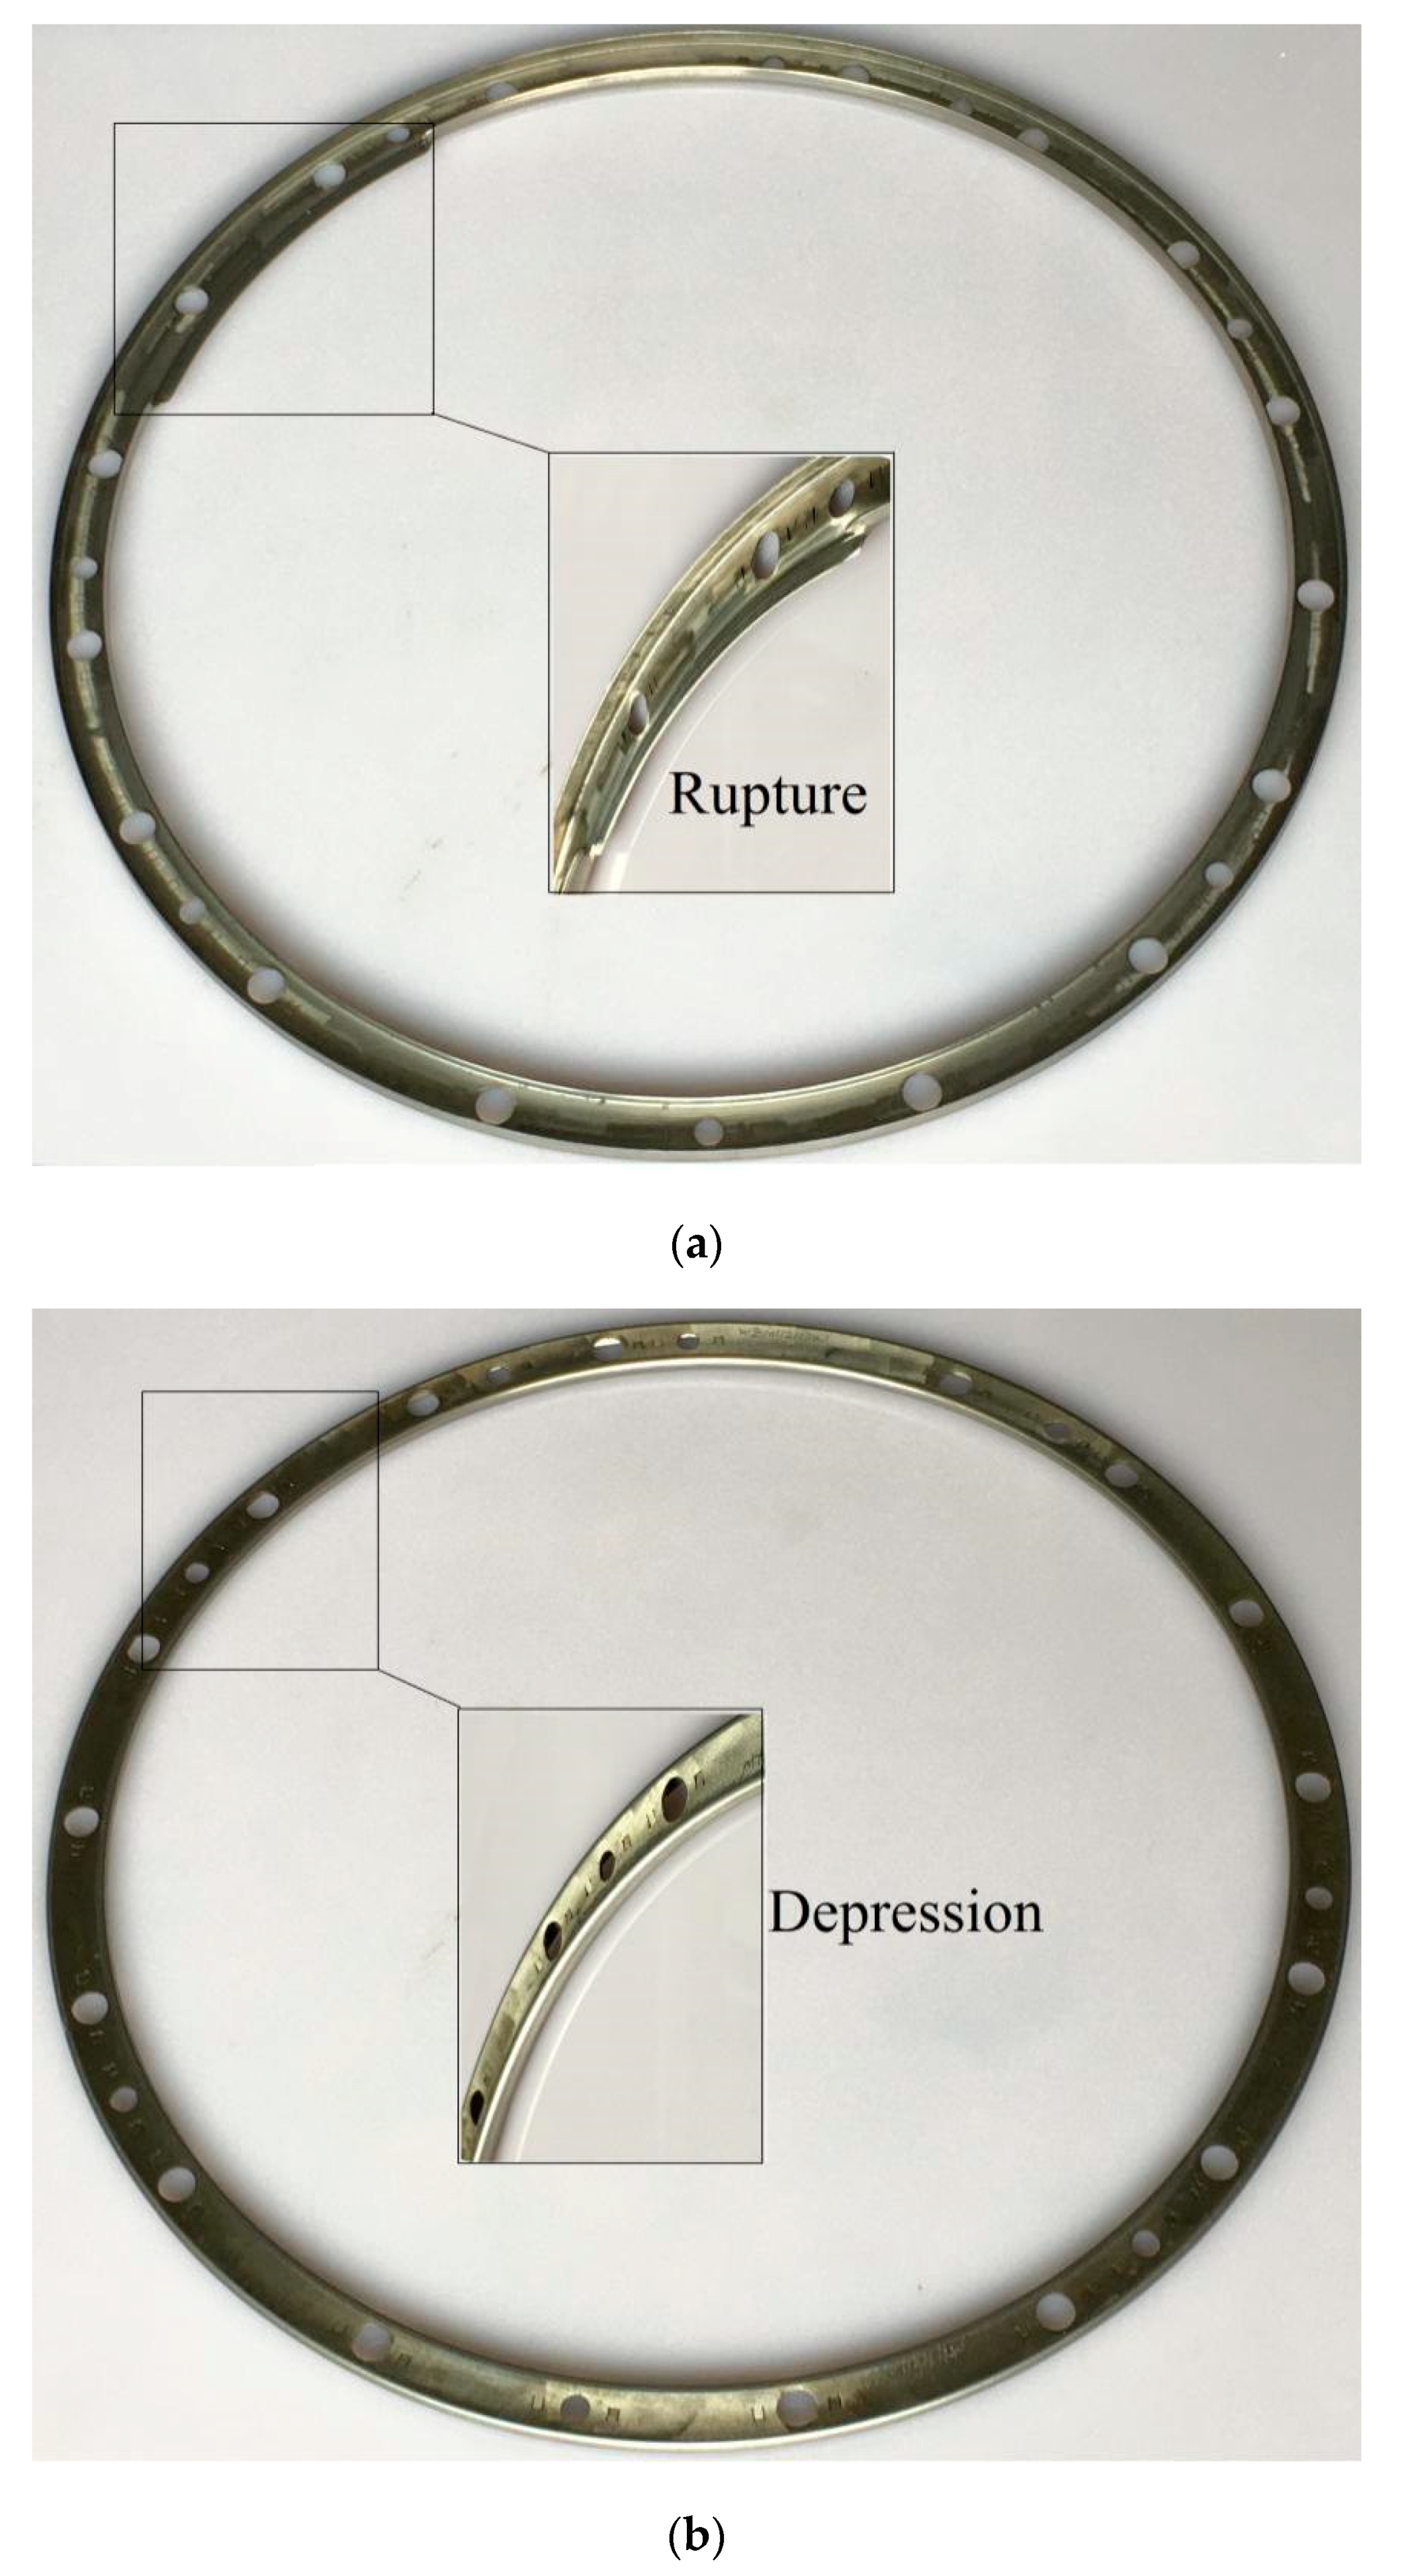
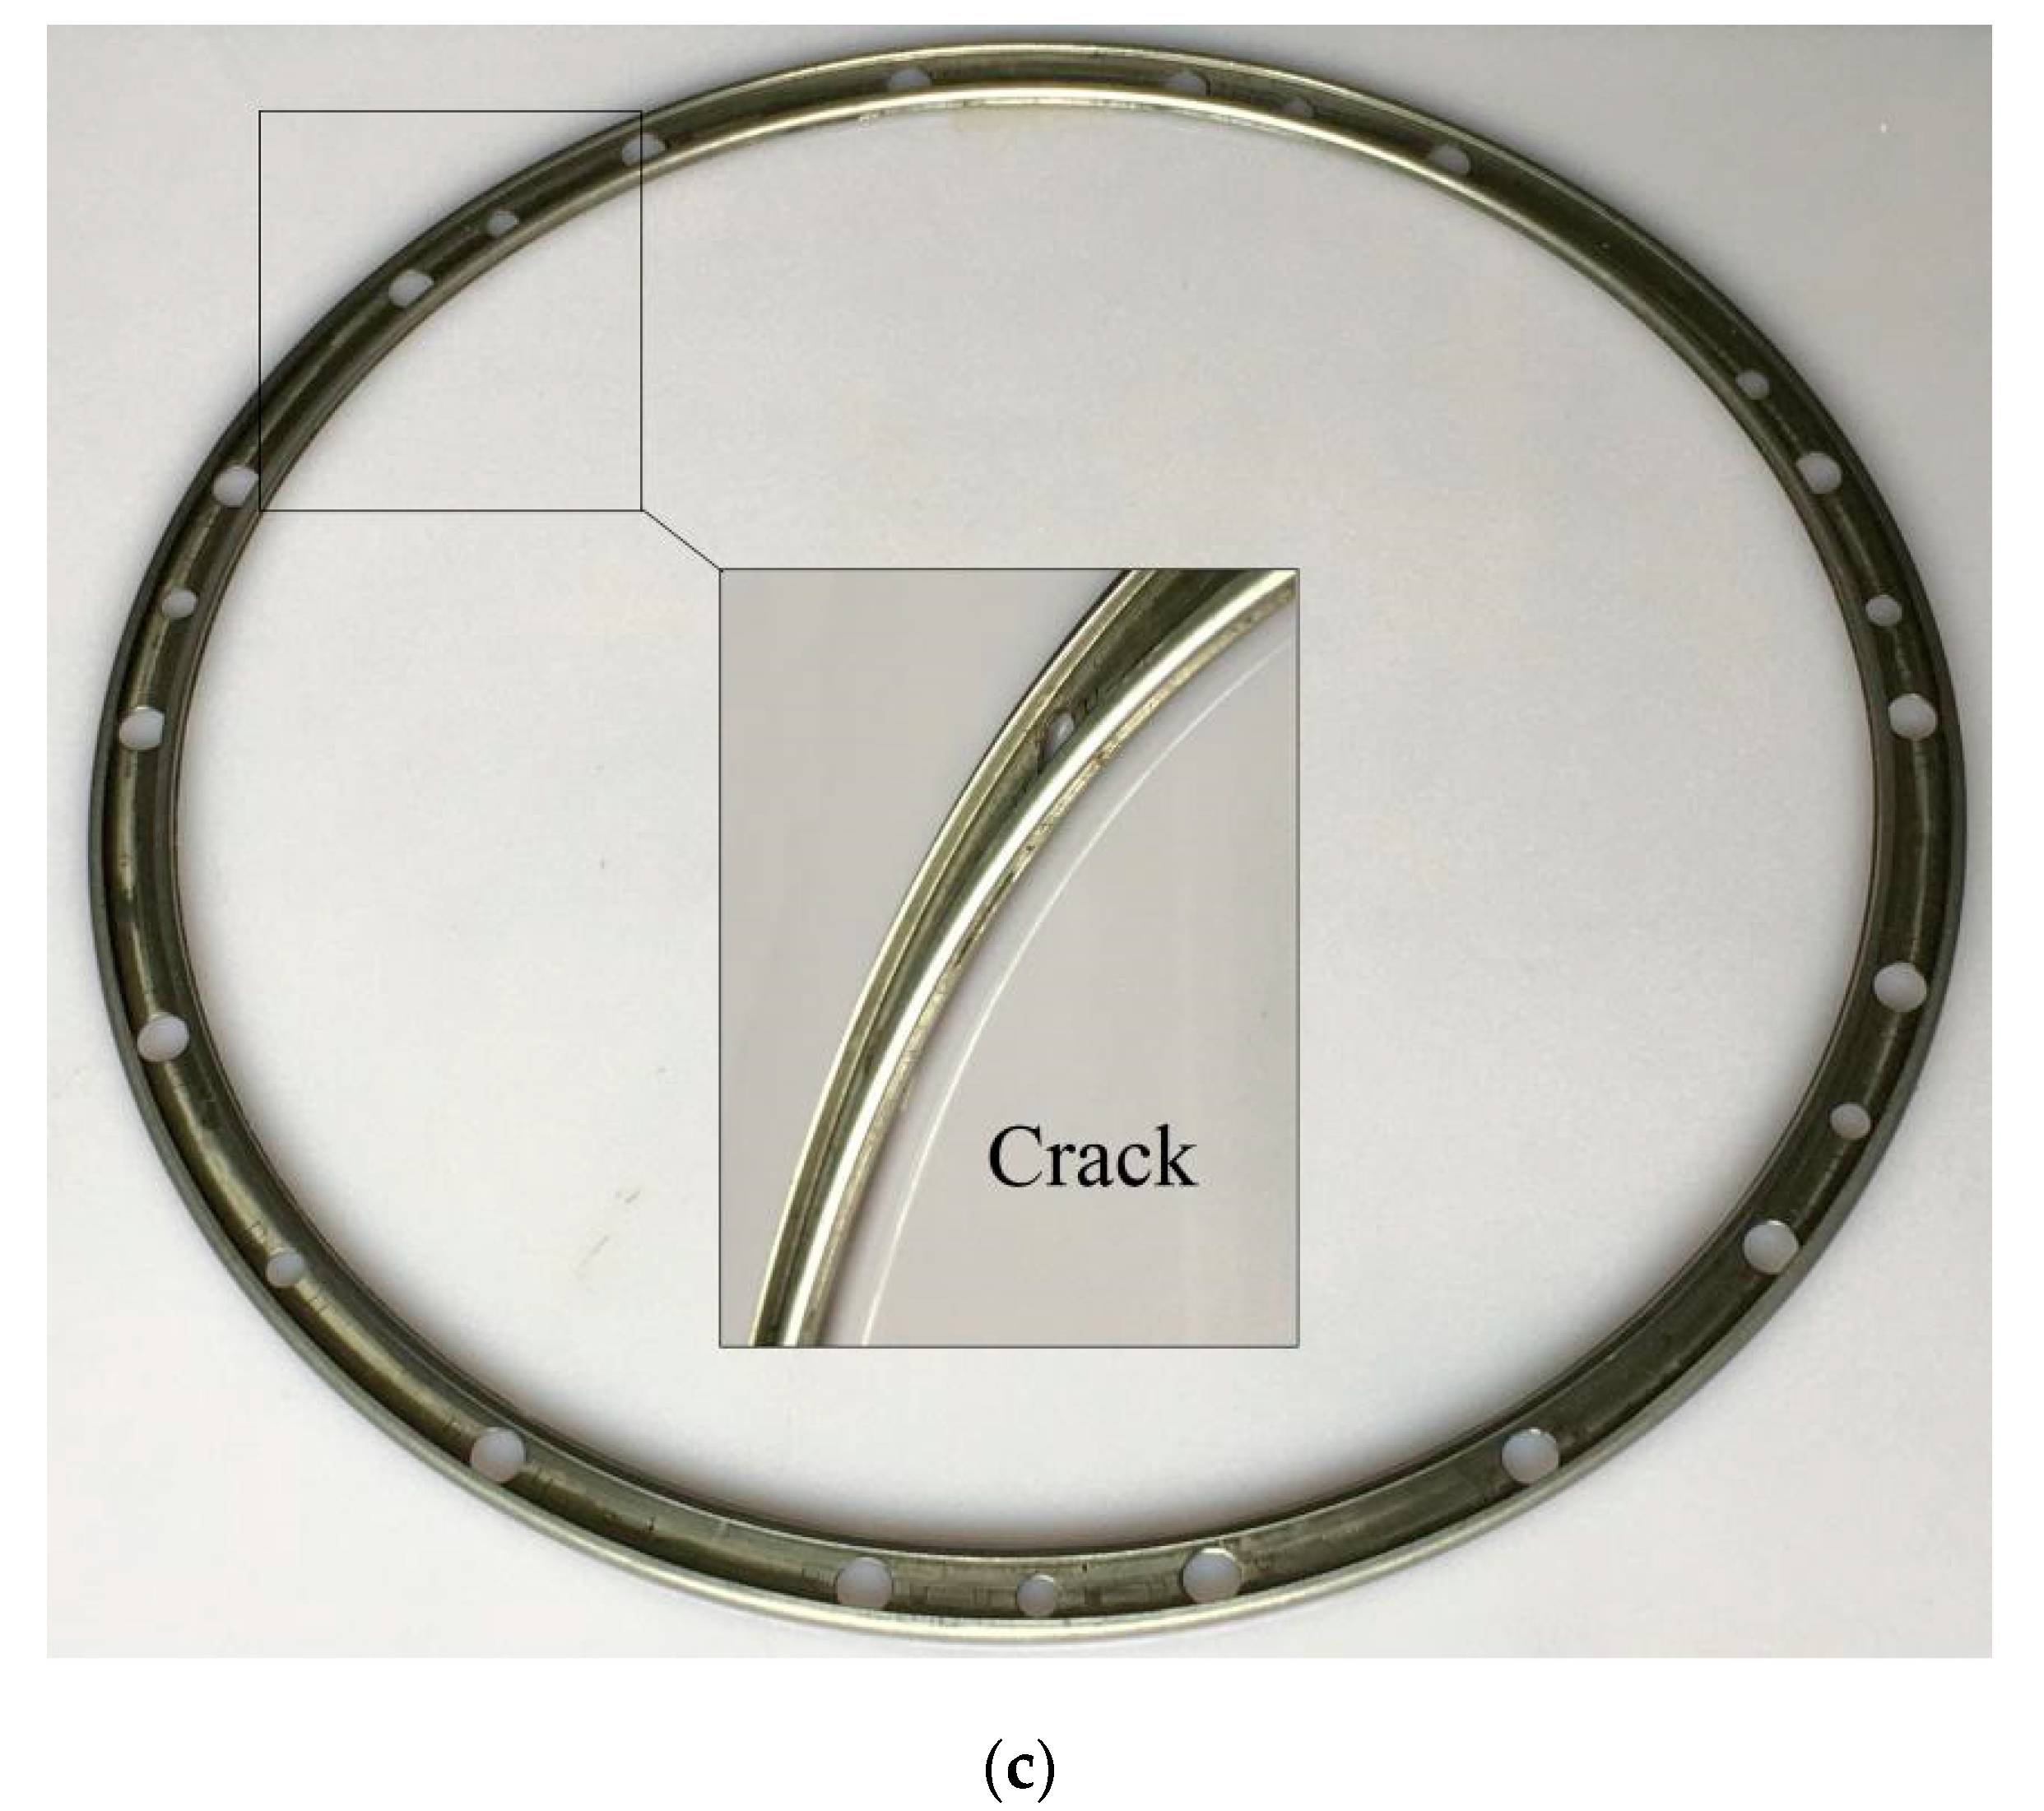
The defects of the concave ring formed by multi-pass stamping are shown in Figure 15. In the first pass, there is a positioning error between the workpiece and the upper-1. If there is no 45° chamfer at the entrance of the upper-1 groove, the bending surface of the workpiece will rupture as shown in Figure 15a. The influence of the positioning error can be eliminated by adding a 45° chamfer at the entrance of the upper-1 groove. In addition, when the inclination α of the upper-1 groove is too small, the force of the upper-1 on the workpiece is mainly in the vertical direction, which makes the bottom of the workpiece bend, as shown in Figure 15b. In the second pass, when the depth of the lower groove is less than the height of the concave ring, cracks will occur on the sidewall of the workpiece where it contacts the top of the lower groove, as shown in Figure 15c. There will be no cracks when the depth of the lower groove is the same as the height of the concave ring.
Simulations and experiments show that it is feasible to form a concave ring by multi-pass stamping. The deformation of the workpiece during stamping is stable. The dimensions of the workpiece after stamping is within the allowable dimensional tolerance range. The multi-pass stamping process for processing the concave ring has a higher production efficiency. It can replace the spinning process for processing the concave ring.

5. Conclusions

Through reasonably designed stamping dies, the multi-pass stamping technology can replace the spinning technology to process the concave ring. The stamping dies includes a first pass upper die, a second pass upper die, a set of inner die and a lower die. The first pass upper die bends the workpiece by 45°. The second pass upper die bends the workpiece 90°. To facilitate the removal of the inner after processing, the internal inner and the external inner were divided into six pieces.
In the first pass, the stress was distributed in the contact area between the blank and the upper-1. In the second pass, the stress was distributed in the bending area of the workpiece. In the first pass and the second pass, the effective plastic strain was concentrated in the bending area. The workpiece only undergoes plastic deformation in the bending area, which means that the design of the multi-pass stamping die is reasonable.
In the first stamping experiment, the bending direction and bending angle of the workpiece are consistent with the theory. The final shape of the experimental workpiece is the same as the simulated workpiece. The height of the final workpiece is 3.31 mm. The width of the final workpiece is 10.82 mm. The dimensional error is less than 0.5%. The dimensional of the concave ring formed by multi-pass stamping meets the design requirements.
An improper mold design can cause ruptures, bends and cracks in the final workpiece. The groove profile of the upper-1 and the depth of the lower groove are the main factors affecting the defects of the concave ring.

Author Contributions

Conceptualization, S.Z. and X.S.; methodology, S.Z.; software, S.Z.; validation, X.S., S.Z. and J.S.; formal analysis, S.Z.; investigation, S.Z.; resources, S.Z.; data curation, S.Z.; writing—original draft preparation, S.Z.; writing—review and editing, S.Z. and J.S.; visualization, Z.L. and J.S.; supervision, Z.L.; project administration, X.S.; funding acquisition, X.S. All authors have read and agreed to the published version of the manuscript.

Funding

This research was funded by the National Natural Science Foundation of China, grant number 51975301 and the Natural Science Foundation of Zhejiang, grant number LZ17E050001.

Conflicts of Interest

The authors declare no conflict of interest.

References

  1. Liu, Z.G.; Ye, G.N.; Zhang, D.; Wang, Z.Y. Research on the Spinning Forming Process of Deflector of an Aeroengine. New Technol. New Process 2016, 2, 16–18. [Google Scholar]
  2. He, Z. Research on Ball Spinning Flanging Technology and Design of Special Equipment. Master’s Thesis, Yanshan University, Qinhuangdao, China, 2017. [Google Scholar]
  3. Li, F.; Zhou, X.H.; Ruan, X.Y. Manufacturability Evaluation of Sheet Metal Parts. Forg. Stamp. Technol. 1999, 24, 24–26. (In Chinese) [Google Scholar]
  4. Chu, X.N.; Hans, H. Product manufacturability control for Concurrent engineering. Comput. Ind. 1994, 24, 29–38. [Google Scholar] [CrossRef]
  5. Tan, Z. An Empiric Model for Controlling Springback in V-die Bending of Sheet Metal. J. Mater. Process. Technol. 1992, 34, 402–405. [Google Scholar] [CrossRef]
  6. Wang, C.T.; Kinzel, G.; Altan, T. Mathematical modeling of plane-strain bending of sheet and plate. J. Mater. Process. Technol. 1993, 39, 279–304. [Google Scholar] [CrossRef]
  7. Tekiner, Z. An experimental study on the examination of springback of sheet metals with several thicknesses and properties in bending dies. J. Mater. Process. Technol. 2004, 145, 109–117. [Google Scholar] [CrossRef]
  8. Gomes, C.; Onipede, O.; Lovell, M. Investigation of springback in high strength anisotropic steels. J. Mater. Process. Technol. 2005, 159, 91–98. [Google Scholar] [CrossRef]
  9. Batoz, J.L. An inverse finite element procedure to estimate the large plastic strain in sheet metal forming. 3rd ICTP 1994, 3, 1403–1408. [Google Scholar]
  10. Ablat, M.A.; Qattawi, A. Numerical simulation of sheet metal forming: A review. Int. J. Adv. Manuf. Technol. 2017, 89, 1235. [Google Scholar] [CrossRef]
  11. Panthi, S.K.; Ramakrishnan, N.; Pathak, K.K.; Chouhan, J.S. An analysis of springback in sheet metal bending using finite element method (FEM). J. Mater. Process. Technol. 2007, 186, 120–124. [Google Scholar] [CrossRef]
  12. Li, Y. Rapid prototyping of sheet metal workpieces using bending-machining hybrid process. Int. J. Adv. Manuf. Technol. 2018, 99, 287–300. [Google Scholar] [CrossRef]
  13. Cho, J.R.; Moon, S.J.; Moon, Y.H.; Kang, S.S. Finite element investigation on spring-back characteristics in sheet metal U-bending process. J. Mater. Process. Technol. 2003, 141, 109–116. [Google Scholar] [CrossRef]
  14. Fu, Z.; Mo, J. Multiple-step incremental air-bending forming of high-strength sheet metal based on simulation analysis. Mater. Manuf. Process. 2010, 25, 808–816. [Google Scholar] [CrossRef]
  15. Malikov, V.; Ossenbrink, R.; Viehweger, B.; Michailov, V. Investigation of air bending of structured sheet metals by multistage FE simulation. Int. J. Adv. Manuf. Technol. 2012, 63, 449–455. [Google Scholar] [CrossRef]
  16. Parsa, M.H.; Al Ahkami, S.N. Bending of work hardening sheet metals subjected to tension. Int. J. Mater. Form. 2008, 1 (Suppl. 1), 173–176. [Google Scholar] [CrossRef]
  17. Wu, S.C.; Zheng, J.S. An experimental study of laser bending for sheet metals. J. Mater. Process. Technol. 2001, 110, 160–163. [Google Scholar]
  18. Ji, Z.; Wu, S. FEM simulation of the temperature field during the laser forming of sheet metal. J. Mater. Process. Technol. 1998, 74, 89–95. [Google Scholar] [CrossRef]
  19. Tian, G.H.; Lin, H.Q. Mould Design and Manufacturing, 2nd ed.; Peking University Press: Beijing, China, 2015; pp. 61–73. (In Chinese) [Google Scholar]
  20. Zhang, X.B.; Li, J.M.; Liu, W.C. Numerical Simulation of Deep Drawing of 0Cr18Ni9 Stainless Steel Sheet. Hot Work. Technol. 2013, 42, 132–134. (In Chinese) [Google Scholar]
Figure 1. Concave ring.
Applsci 10 06434 g001
Figure 2. Stamping and bending forming process of concave ring.
Applsci 10 06434 g002
Figure 3. Exploded view of concave ring stamping die assembly. 1—upper; 2—middle inner; 3—internal inner; 4—external inner; 5—blank; 6—lower.
Applsci 10 06434 g003
Figure 4. Design of internal inner and external inner.
Applsci 10 06434 g004
Figure 5. Installation drawing of stamping die. (a) First pass; (b) second pass.
Applsci 10 06434 g005
Figure 6. The cross-section of the concave ring.
Applsci 10 06434 g006
Figure 7. Finite element model of multi-pass stamping of concave ring. (a) First pass; (b) Second pass.
Applsci 10 06434 g007
Figure 8. Stress field. (a) First pass; (b) second pass.
Applsci 10 06434 g008
Figure 9. Strain field. (a) First pass; (b) second pass.
Applsci 10 06434 g009
Figure 10. Stamping blank.
Applsci 10 06434 g010
Figure 11. Blank and inner placement is complete.
Applsci 10 06434 g011
Figure 12. The experimental process of the first pass and the second pass.
Applsci 10 06434 g012
Figure 13. The workpiece after the multi-pass forming. (a) First pass; (b) second pass.
Applsci 10 06434 g013
Figure 14. Results of the second pass. (a) Comparison of the cross-section of the experimental and the simulated workpiece; (b) dimensional measurement of the experimental workpiece.
Applsci 10 06434 g014
Figure 15. Defects of the concave ring formed by multi-pass stamping. (a) Rupture; (b) depression; (c) crack.
Applsci 10 06434 g015aApplsci 10 06434 g015b
Table 1. Die parameters.
ParameterValue
Angle of inclined straight line of upper-1 groove α30
Radius of arc of upper-1 groove r/mm0.5
Depth of upper-1 groove d1/mm1.5
Depth of lower groove d2/mm0.5
Length of straight edge h/mm1.5
Table 2. Dimensional measurement results of the experimental workpiece.
Height of the Workpiece (mm)Width of the Workpiece (mm)
Design Value3.3010.80
Actual Value3.3110.82
Error0.3%0.2%