Featured Application
Damage assessment of a reinforced concrete (RC) by means of different nondestructive testing (NDT) techniques. Joined application of a PZT sensor network for AE-based local damage detection and a FOS setup for global strain mapping. Coupling of local and global methods through DIC-based strain localization to reduce the uncertainty on the strain field description. Potential for AE- and strain-based damage detection in large structures of interest to civil engineering.
Abstract
This paper presents the structural and damage assessment of a reinforced concrete (RC) beam subjected to a four-point bending test until yielding of reinforcing steel. The deterioration progress was monitored using different nondestructive testing (NDT) techniques. The strain was measured by distributed fiber optic sensors (FOSs), embedded prior to concrete pouring. The initiation and propagation of cracks were monitored by acoustic emission (AE) sensors attached to the surface of the material. The recorded AE activity results in good agreement with FOS strain measurements. The results of the integrated monitoring system are confirmed by visual observation of the actual crack pattern. At different loading steps, digital image correlation (DIC) analysis was also conducted.
1. Introduction
During their service life structural elements can experience variable and increasing demand conditions (e.g., traffic increase in transportation infrastructures). They are also exposed to environmental effects, that can also degrade their capacity and affect their performance. In particular, reinforced concrete (RC) components can develop cracking due to tensile conditions that are normally absorbed by steel reinforcements. However, cracking can lead to the exposure of the steel bars to the aggression of external agents, such as chlorides, triggering corrosion and strength losses. In this incremental risk scenario for existing infrastructures, the role of the structural health monitoring (SHM) becomes crucial in order to detect unusual behaviors and damage [1,2,3].
The use of fiber optic sensors (FOSs) for SHM is proposed in several research works, including the seminal one that dates to 1990 by Glossop et al. [4]. FOSs can be used in aggressive environments, they show geometric adaptability, independence from electrical and magnetic field interference, and high resolution [5]. These characteristics make them excellent for implementation in the civil engineering field to detect anomalies and cracks in static conditions, while, in dynamic conditions, they can also be used to assess modal parameters [6,7,8].
Acoustic emission (AE) sensors have been widely used to detect early stage damage before it results in failure. One of the earliest applications of AE was related to monitoring rotating machinery in the late 1960s. A comprehensive and critical review on the field of application of AE to condition monitoring and diagnostics of different mechanical components can be found in Mba and Rao (2006) [9]. Behnia et al. [10] present a comprehensive review of the acoustic emission (AE) technique for its applications in concrete structure health monitoring. Methods of AE are also developed for large structures in field application, e.g., for walls, bridge decks and reinforced concrete multi-story buildings (Carpinteri et al., 2007, 2011; McLaskey et al., 2010; Shiotani et al., 2009) [11,12,13,14].
Although AE sensors are normally developed using piezoelectric technology, there are many examples where optical fibers have been introduced as an alternative to piezoelectric sensors (e.g., Liang et al., 2009 [15]). However, there are a few applications where AE sensors are implemented in addition to distributed FOS sensors for strain detection, in order to integrate the monitoring and damage detection results obtained separately from the two systems. A representative example is one by Li et al. [16], where the results of an experimental investigation on corrosion monitoring of a steel reinforced mortar block through combined acoustic emission and fiber Bragg grating strain measurement are presented. Ansari [17] provided a short review of long gage interferometric and acoustic sensors with representative examples on the implementation of serially multiplexed long gage interferometric sensors and multiplexing of optical fiber acoustic emission sensors. Moving to composite fiber/epoxy materials, Park et al. [18] present an application for micro-failure evaluation using embedded fiber-optic sensors and acoustic emission piezoelectric sensors.
Detection of crack-induced AEs by a piezoelectric (PZT) sensor network focuses on individual cracks and displacements providing a very detailed damage description, but it suffers from limited detection range due to high attenuation of ultrasonic waves. Vice versa, global sensors act as a fully distributed sensor network to be interrogated at any point along the fiber length or integrating the response along the FOS length so as to cover a larger area. The disadvantage of global damage detection systems is their poor damage location capability. Therefore, the concurrent application of local and global methods combines damage detection possibilities and advantages of both systems.
Verstrynge et al. [19] applied a global FOS setup for AE-based damage detection in concrete elements. This line-integrating technique did not allow AE source location—carried out in that experiment through concurrent application of PZT transducers—but it has the potential for AE detection in large structures of interest to civil engineering.
Here, AE-based local damage detection through a PZT sensor network is coupled with a FOS setup for global strain mapping. FOSs act as a distributed sensor network to be interrogated at different points along the fiber length. Local and global methods are herein coupled through a digital image correlation (DIC)-based strain localization covering an intermediate-sized area. Hence, DIC-based strain data is herein used to reduce uncertainty on the FOS-based strain field description.
The integrated SHM system has been implemented in an RC beam specimen subjected to a four-points loading test to monitor the state of cracking in terms of initiation and the thickness propagation. The outcomes of the integrated AE and FOS monitoring systems are confirmed by comparison with the final crack pattern. At different loading steps, digital image correlation (DIC) analysis was also conducted in specific areas of the beam specimen to reconstruct the strain field. A numerical model has been implemented to investigate the mechanical behavior of the beam up to collapse and to confirm the monitoring outcomes.
The following sections describe the methodology and the SHM systems; then, the laboratory specimen and setup are discussed. Finally, the results and the conclusive remarks are presented.
2. Experimental Setup and Monitoring Systems
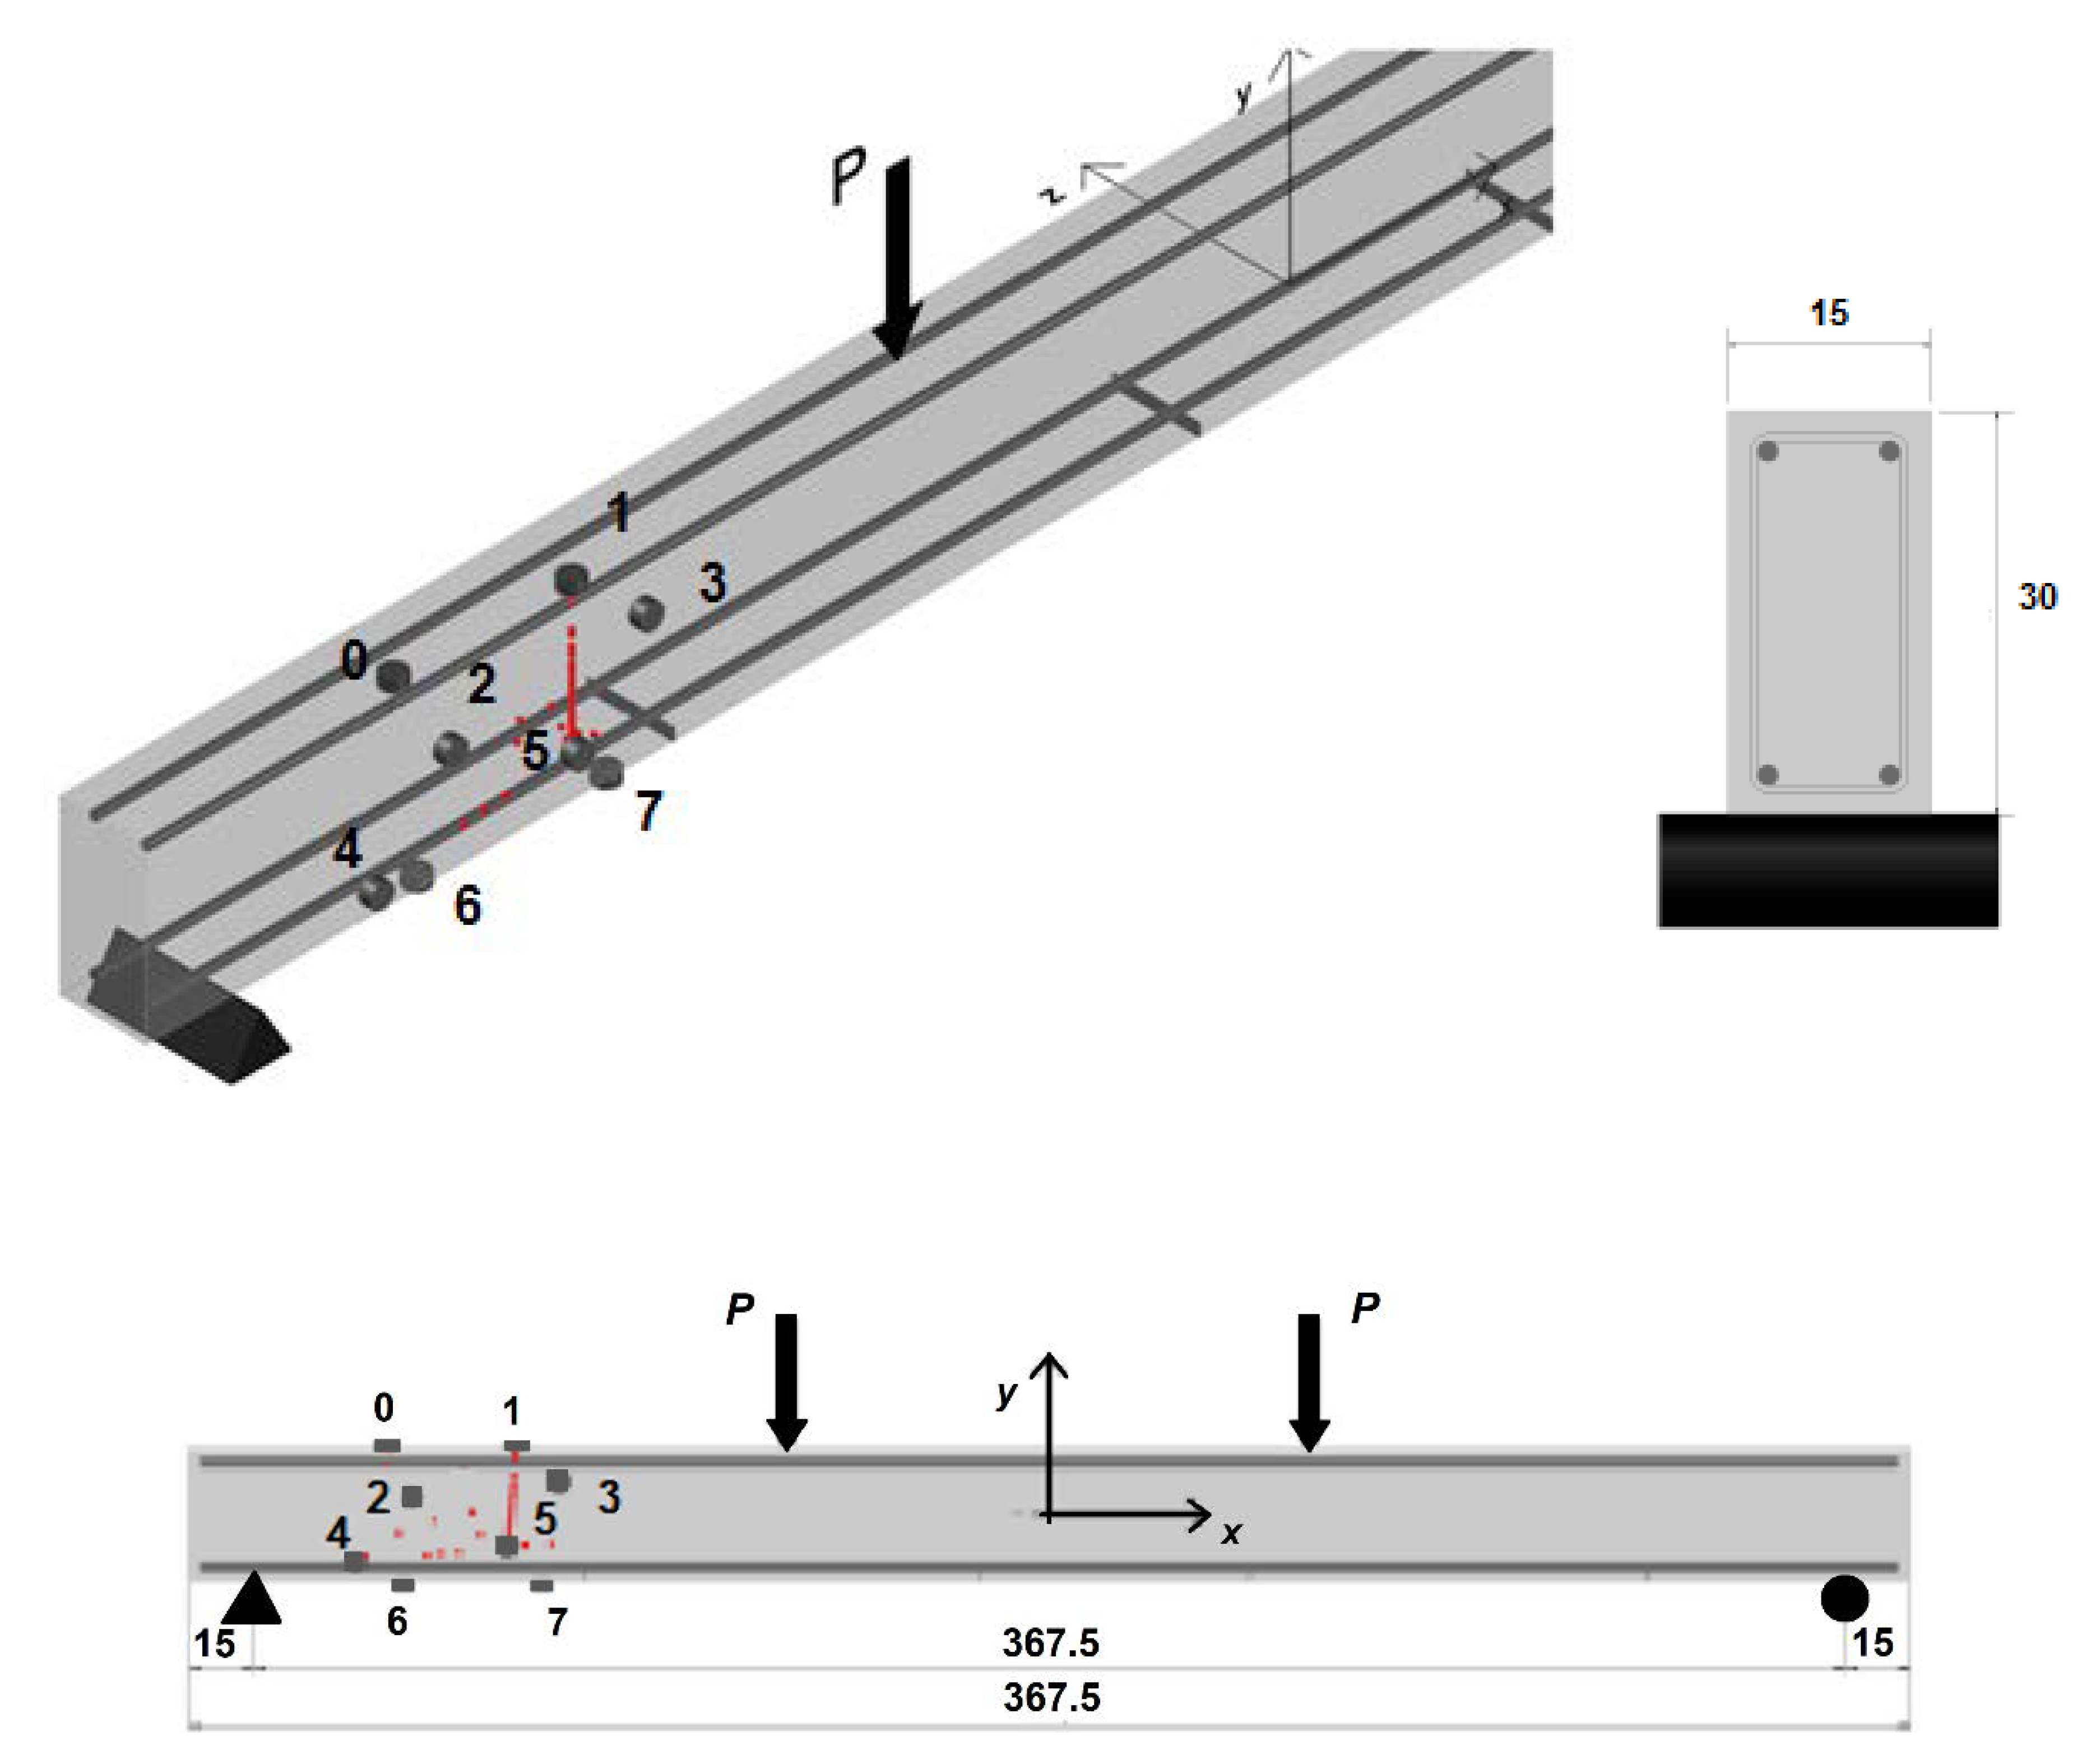
The laboratory test was conducted on a reinforced concrete beam under gradually increasing loading in the four-point bending configuration, as shown in Figure 1. The reinforced concrete beam is 4 m long and was designed to have a ductile behavior to be able to follow a progressive and gradual propagation of cracks. The cross section of the beam is 150 mm wide and 300 mm high. The longitudinal reinforcements are composed of two bars of 14 mm in diameter at the bottom and two bars of 18 mm in diameter at the top of the section, with a concrete cover of 30 mm. Stirrups of 8 mm in diameter as shear reinforcement have been installed with 70 mm spacing at the bearings, while in the remaining beam shear reinforcements are spaced every 140 mm. According to the Italian ministerial decree, Updating of the Technical standards for construction (Gazzetta Ufficiale, D.M. 17 Gennaio 2018), C20/25 and B450C have been selected for the concrete and steel materials. The maximum aggregate size has been fixed to 10 mm with a water–cement weight ratio of about 0.5 and 300 kg/m3 of cement.
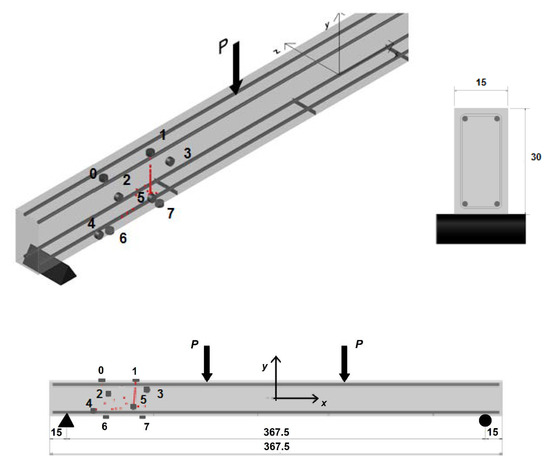
Figure 1.
Specimen geometry and acoustic emission (AE) sensor locations. The eight AE sensors are numbered from 0 to 7. Dimensions are in cm.
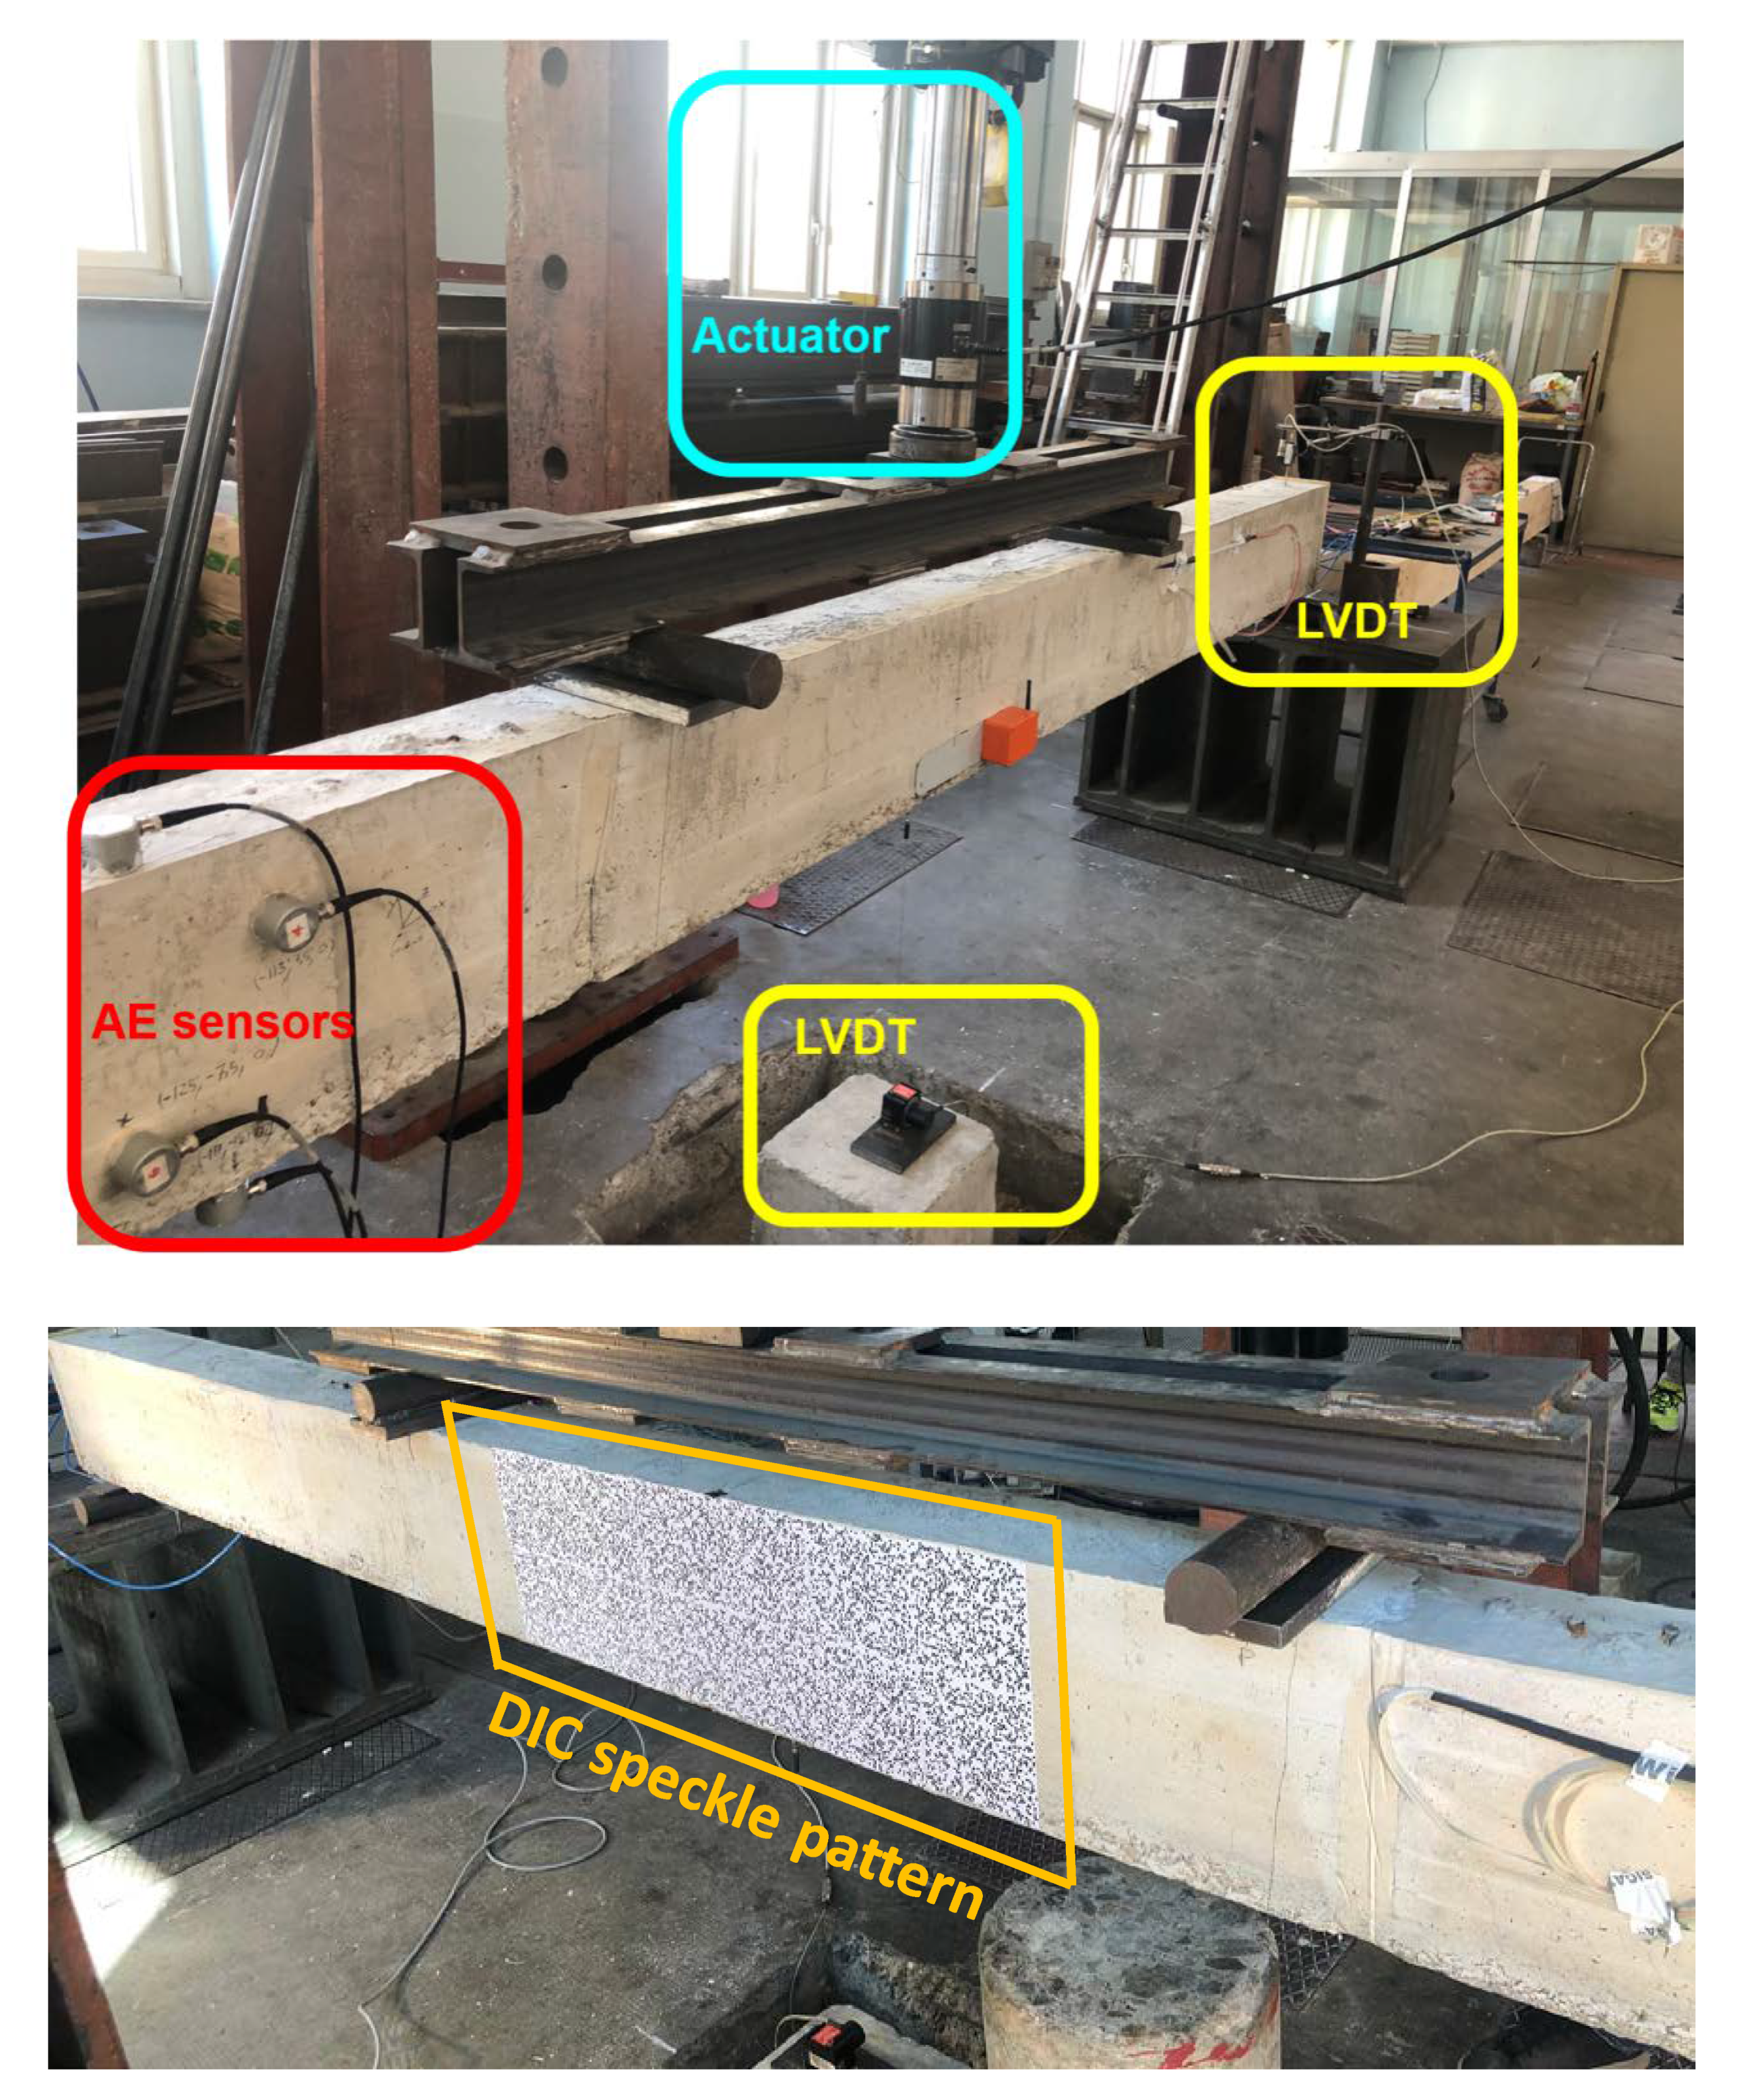
The load frame and the front side of the beam specimen are shown in Figure 2 (top), with a servo hydraulic actuator fixed at the center of the frame. A stepwise increasing load was applied downwards in displacement control by means of steel roller bearings in a four-point bending configuration. The load was measured with a 1000 kN load cell at the bottom of the actuator, while the mid span vertical displacement was measured through a linear variable differential transformer (LVDT) device, compensated with two LVDTs measurement points at the beam supports. Figure 2 (bottom) shows the beam specimen at the back side with the speckle pattern applied to a central surface of about 0.8 m length.
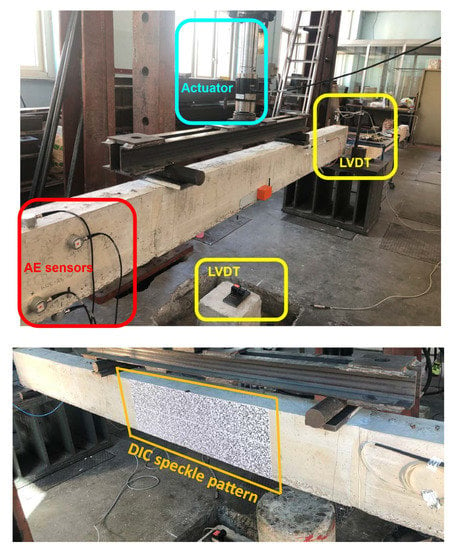
Figure 2.
Front (top) and back (bottom) sides of the test setup showing the servo hydraulic actuator, the linear variable differential transformer (LVDT) sensors, the location of some AE sensors, and the speckle pattern on the central beam surface for digital image correlation (DIC) applications.
3. AE Sensors
Different damage mechanisms and levels can be verified during the four-point bending test of the RC beam, such as tensile cracking followed by shear cracking, yielding of reinforced steel, and crushing. The fracture propagation mainly includes two stages: accumulation of uncorrelated tensile cracks between the central loads, and appearance of diagonal shear cracks, starting on the bottom surface and developing to the top, interconnecting the previously formed tensile cracks. Statistical analysis of the AE signal features can reveal trends that can be ascribed to different damage stages. For example, shear events originate signals with longer rise time (the time delay between onset and peak amplitude) and higher amplitude.
Eight 60 kHz resonant AE sensors were attached at one-fourth of the span’s length (refer to Figure 1 and Figure 2 respectively for beam design and application). When the sensors are hit by a wave (due to crack growth or another reason), the pressure on their surface is converted to electric voltage, exploiting the piezoelectric effect. If the voltage was beyond a given threshold (60 dB to filter out the signal noise in the specific case), the signal was digitized and stored in an 8 channel Lunitek AEmission system with 5 MHz sampling rate per channel. The software associated to the acquisition board permits automatic extraction and storage of some basic parameters for each individual AE signal waveform (feature-based AE analysis), such as amplitude, duration and ring-down counts (RDC), i.e., the total number of times the signal exceeds the threshold level. RDC divided by duration gives the average signal frequency.
4. FOS Sensors
Different FOS distributed sensors have been embedded in the concrete beam to collect strain and temperature measurements. In particular, strain sensors have been applied to the steel reinforcements at the top (FOS #1) and the bottom (FOS #2) of the cross section along the whole beam length (Figure 3).
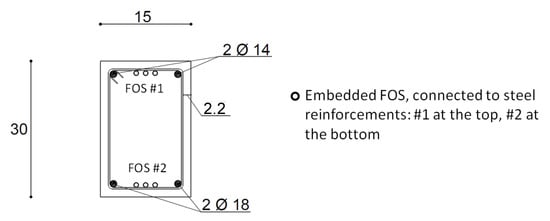
Figure 3.
Fiber optic sensor (FOS) installation (dimensions in cm).
When the optical fiber is strained in the longitudinal direction, the backscattered light of Brillouin is subjected to a frequency shift proportional to the strain. Equation (1) expresses the strain ε as function of the Brillouin frequency shift:
where is the Brillouin frequency with strain, while is the Brillouin frequency without strain. The constant c is the proportional coefficient of strain that depends on the sensor characteristics. Basic principles of Brillouin systems are detailed in Bao et al. [20].
Although sensitive along the entire length, the fiber optic sensors measure at discrete points, that are spaced by constant value called the sampling interval. The measured parameter is an average over a certain length called spatial resolution and corresponds to the pulse width used to interrogate the fiber. For the present research, a SHM FOS system usually employed in full scale real structures has been used, thus the sampling interval and the spatial resolution have been assumed to be 0.2 and 0.5 m, respectively.
5. DIC Technique
DIC photogrammetry is a non-contact, optical measuring method adapted for extracting surface displacement and geometry profiles at different stages or times from images acquired through a camera (or multi-camera). It has been proposed for structural inspection and monitoring, and has been effectively applied previously to analyze different structures at different scales [21].
To perform a DIC measurement, a stochastic pattern (e.g., black dots on a white background or white dots on a black background), must be applied to the surface of interest and the relative position of each of them is identified as the surface deforms over time. Each image can be considered as a matrix of natural integers where white pixels have a 0 grayscale level, while level 100 is associated to black pixels. Since a single value is not a unique point, a neighborhood of pixels is used (i.e., facets or subsets). These facets include several dots of the pattern used and are typically squares with sides of 10–50 pixels. The main principle of DIC is to match the same physical point between a reference image and several deformed images based on gray-scale variations of continuous patterns [22].
The DIC computation is herein performed through NCORR software [23], which is an open-source subset-based 2D DIC package that uses modern DIC algorithms with additional improvements.
6. Test Results
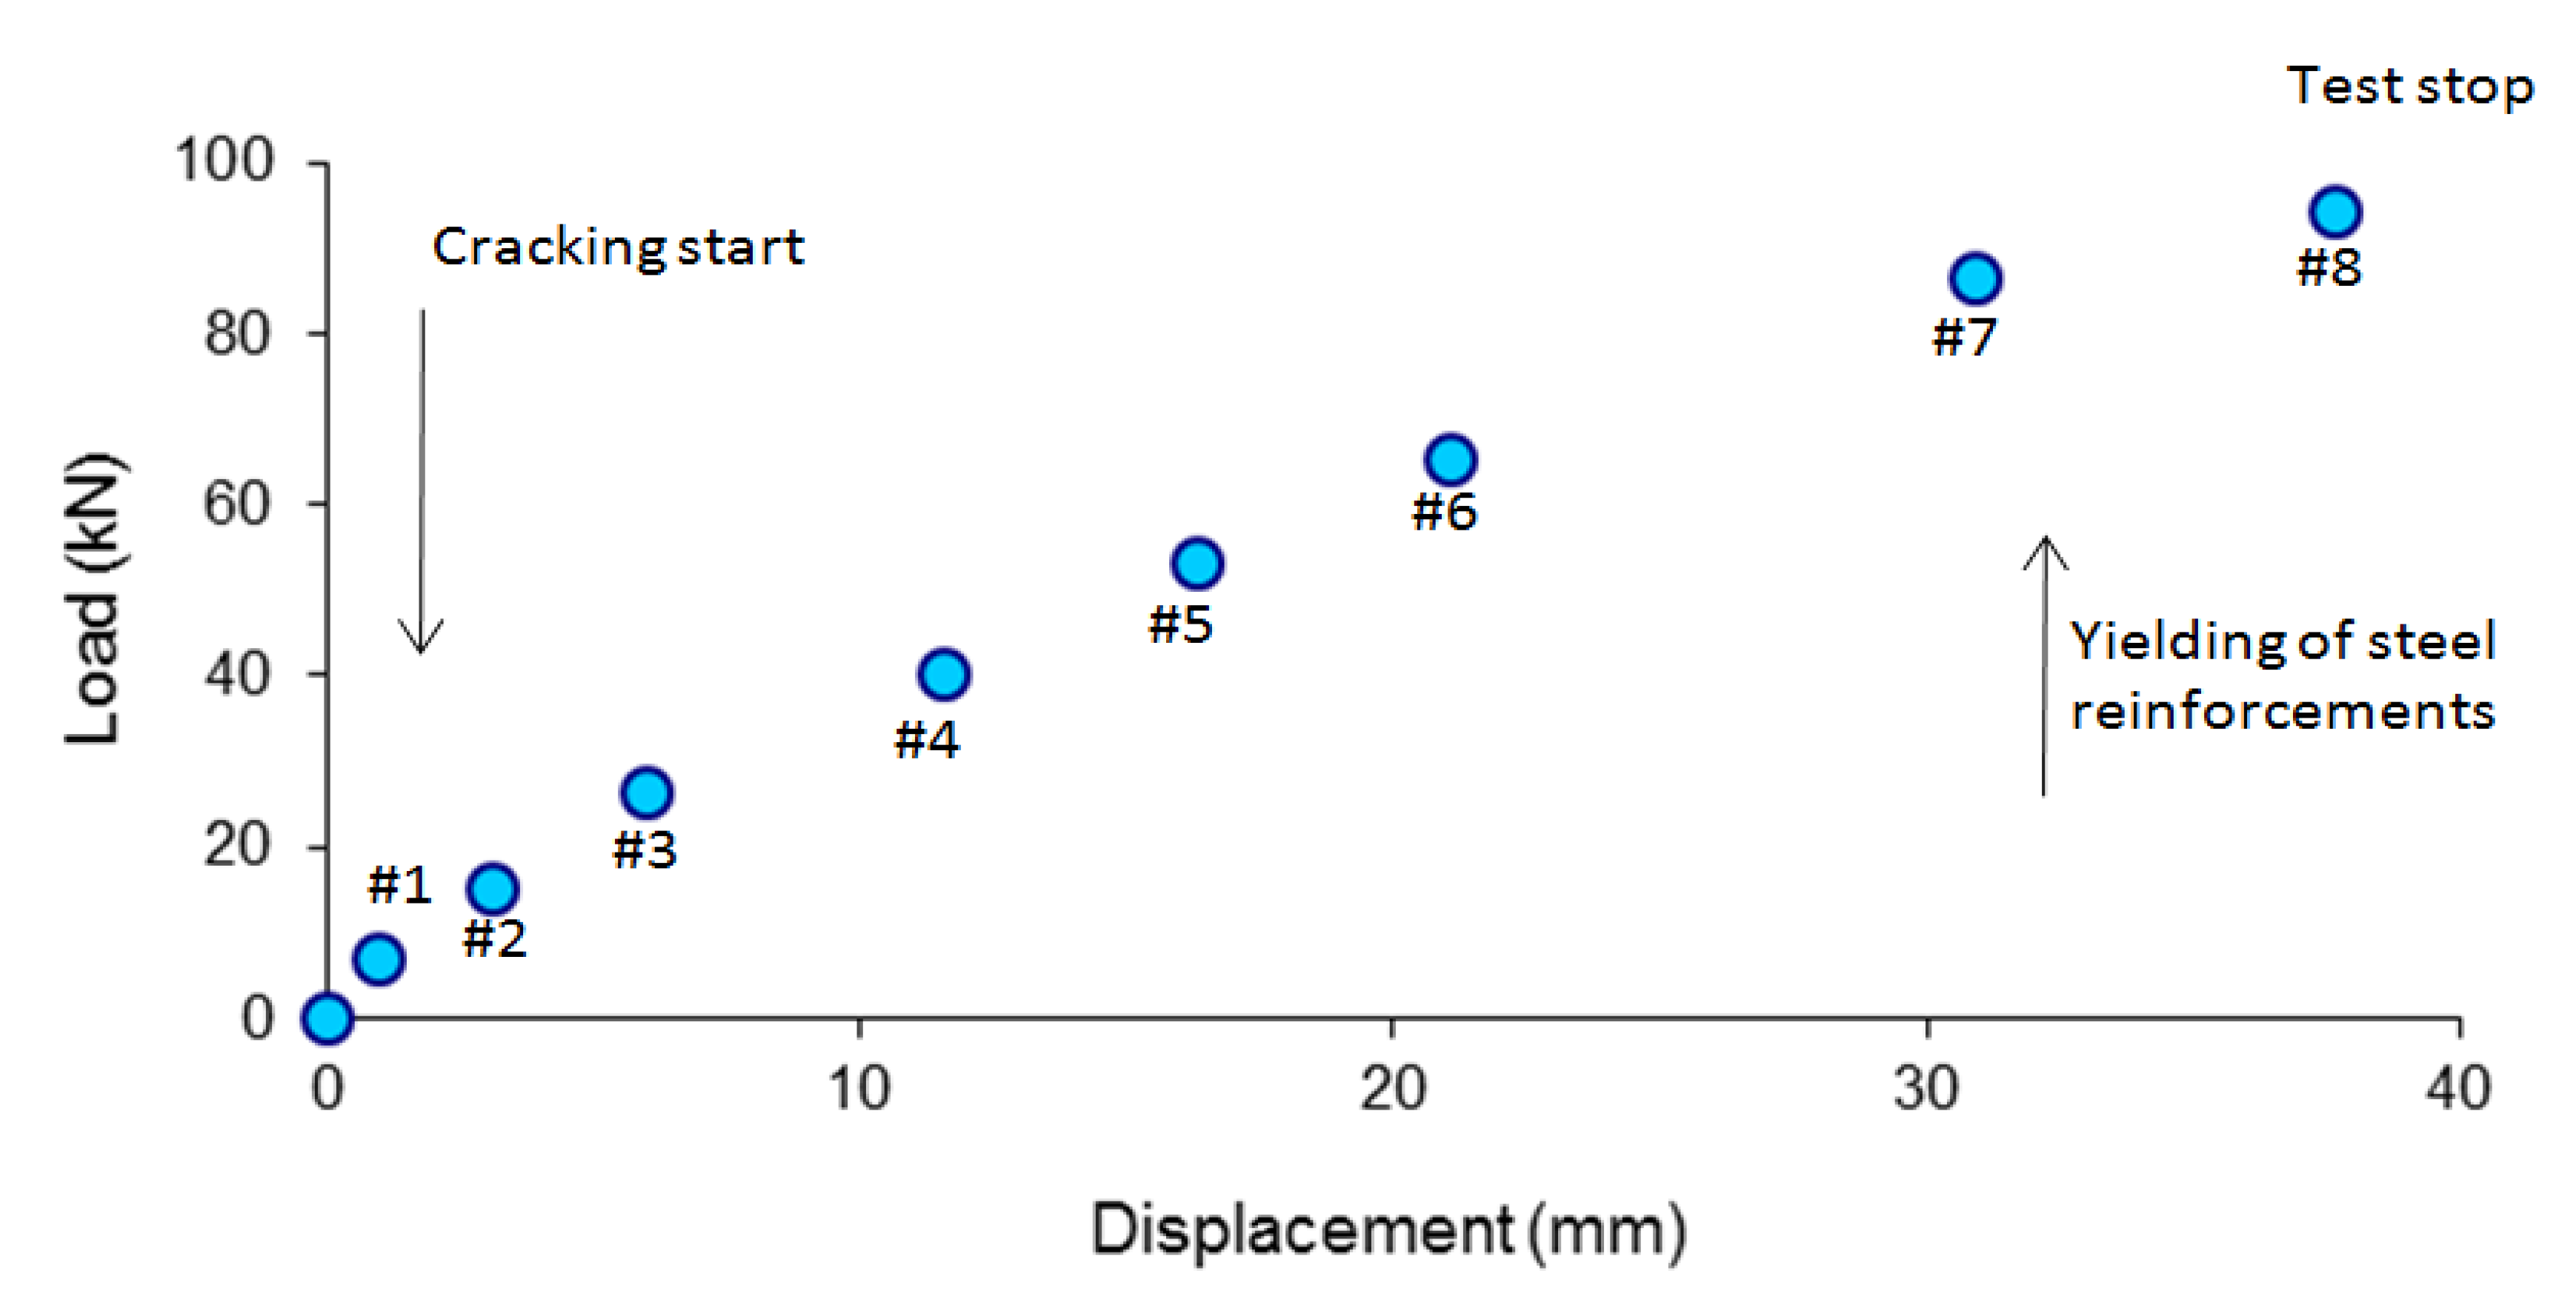
The global behavior in terms of load and mid-span vertical displacement is illustrated in Figure 4. Vertical load has been applied in multiple steps up to the yielding limit of reinforcing bars, and then removed. The first cracking point can be identified between steps #1 and #2. Then, the ductile beam behavior allowed crack propagation up to step #7 when the longitudinal reinforcing steel bars at the bottom of the cross section start yielding. The loading phase of the four-points bending test was stopped at step #8 and loads removed from the beam (unloading phase).
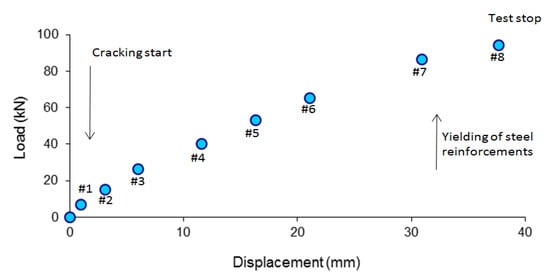
Figure 4.
Load versus mid-span deflection at the different load steps, from #0 to #8.
7. AE Measurements
7.1. Total AE Activity
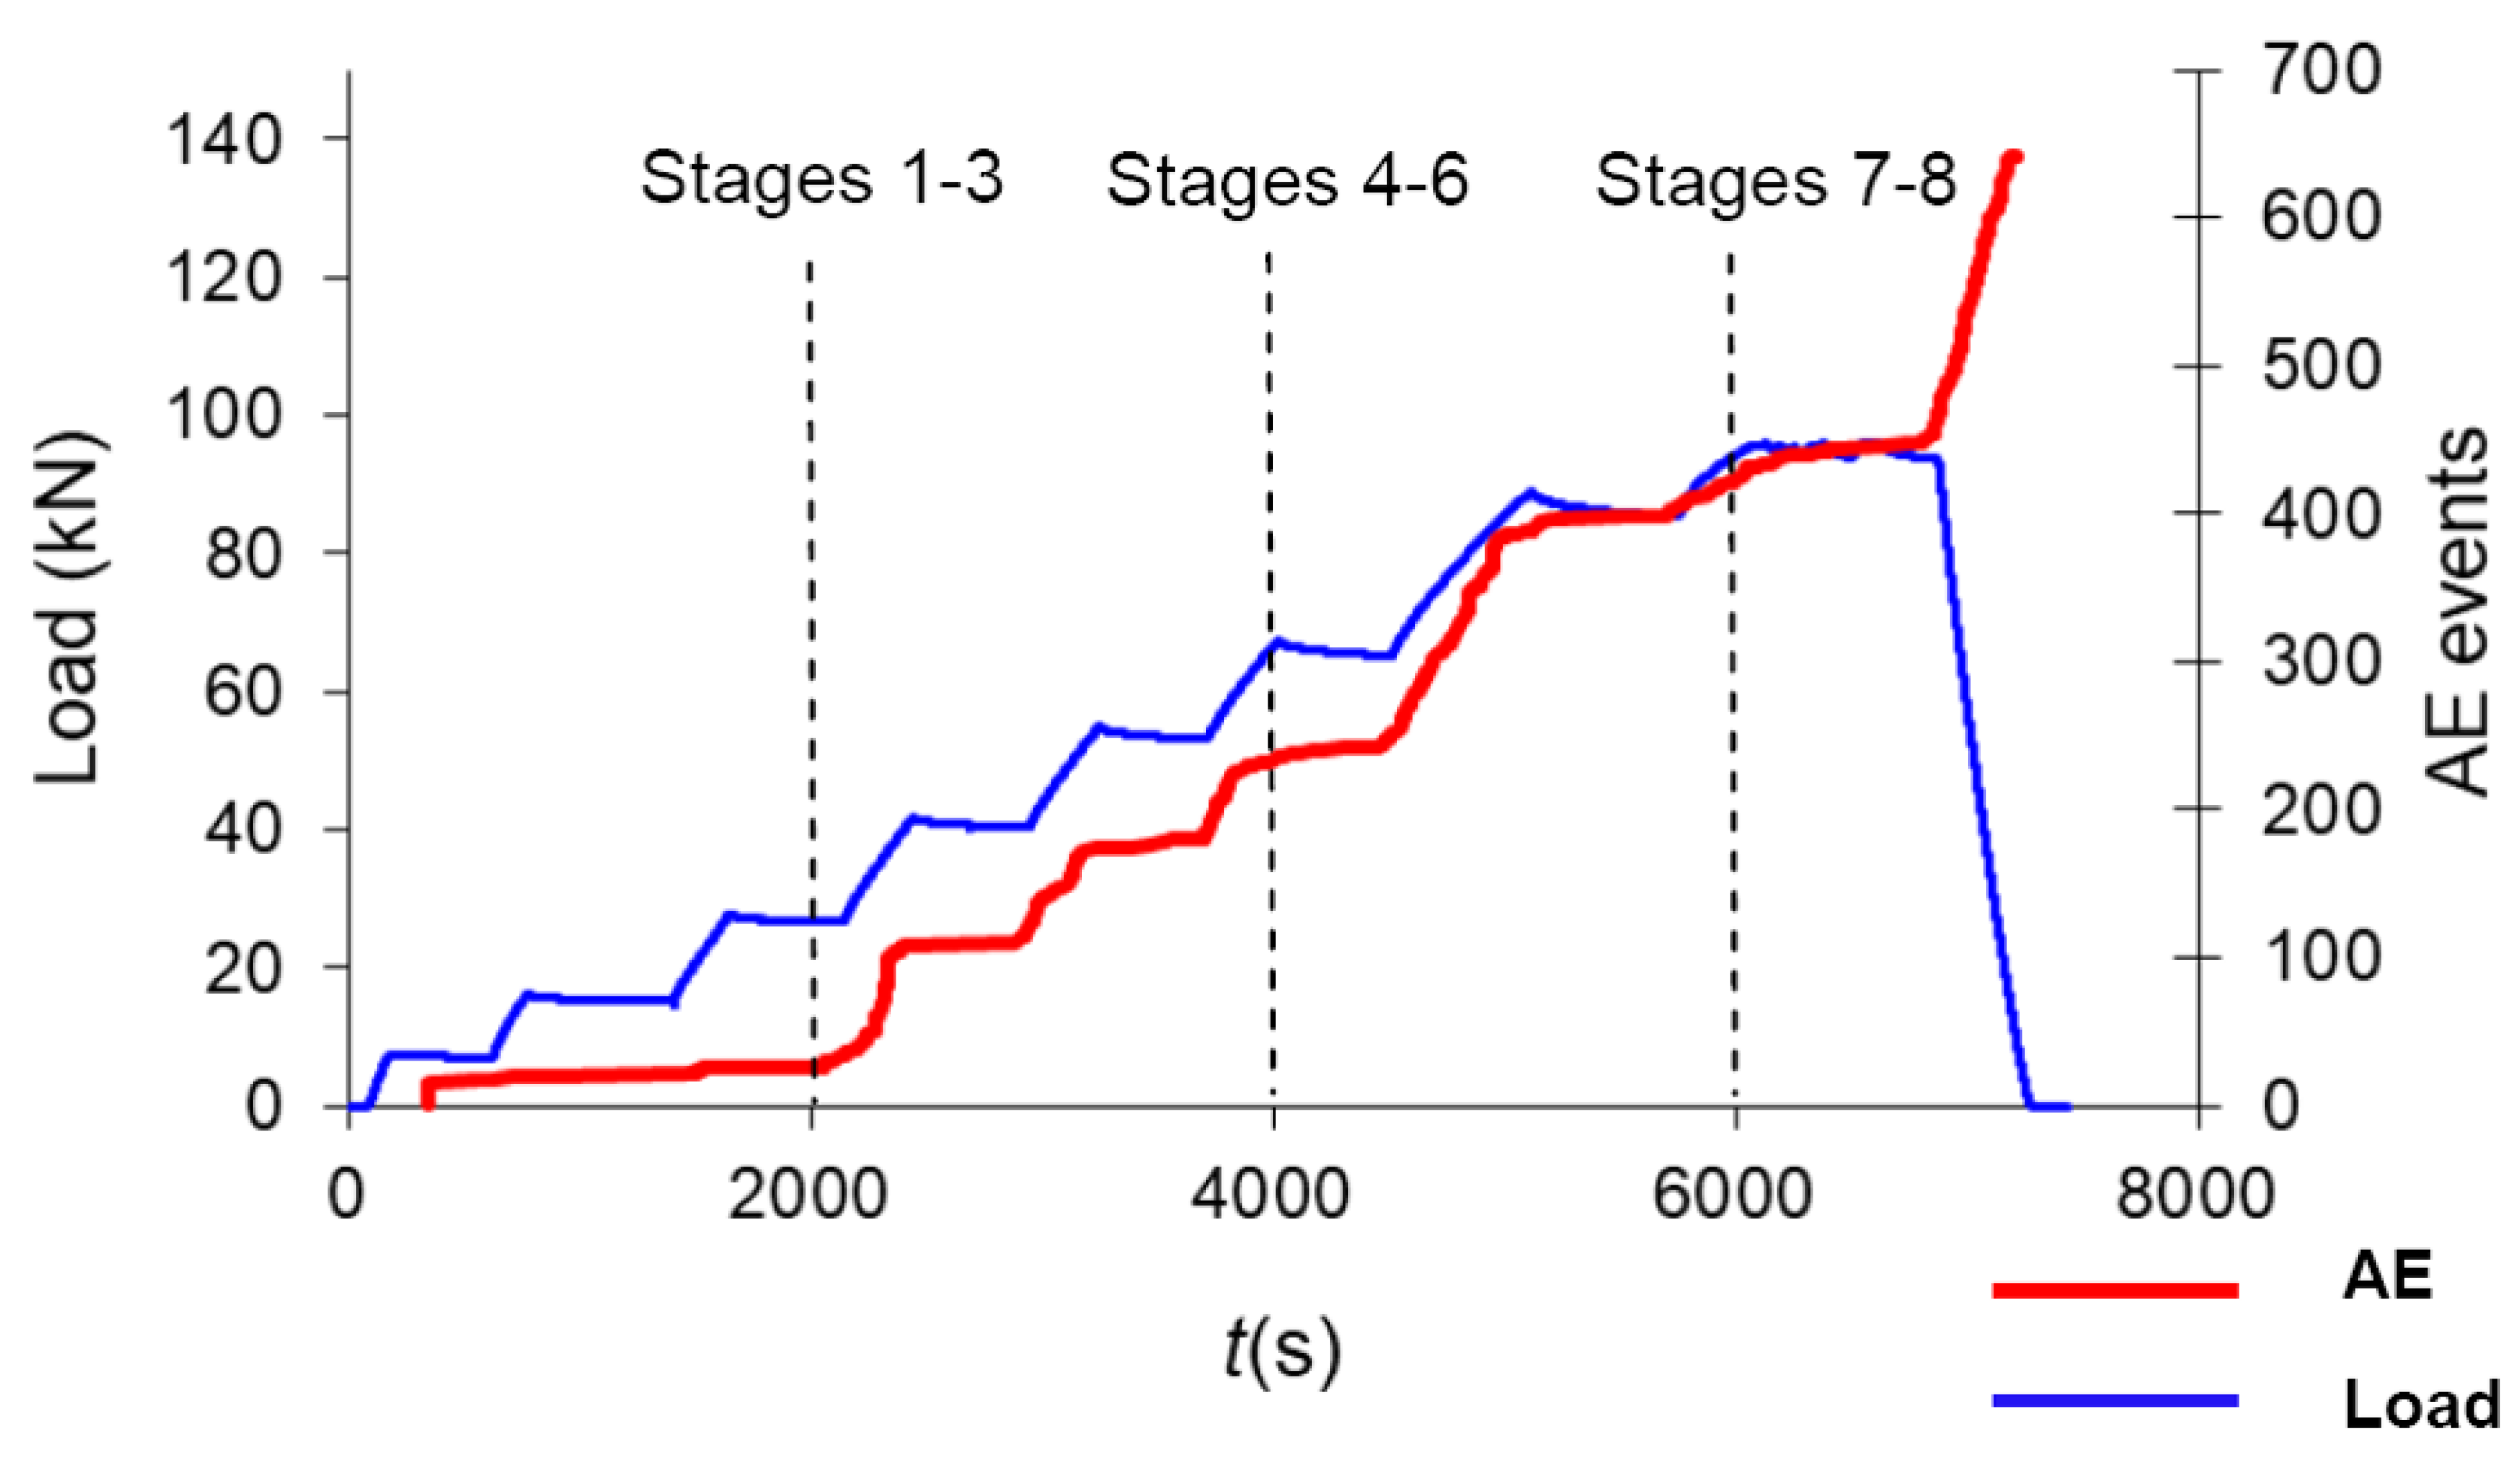
The applied load history along with the accumulated AE events are shown in Figure 5. The number of AE events started to increase rapidly during 4th and 7th load steps at approximately 2100 and 4500 s, meaning intensive cracking phenomena occurred at the time of increased central deflection. The major cluster of events comes at the unloading stage, from approximately 6900 s, where a possible AE source mechanism is the friction in aggregates and reinforcing bars due to cracks reclosing.
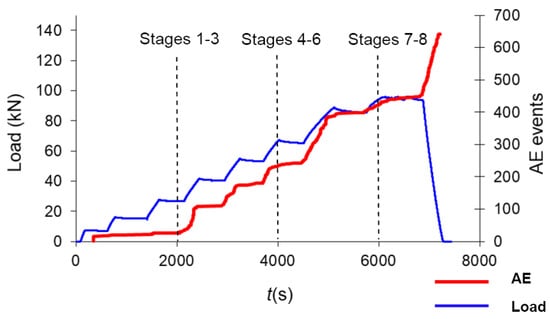
Figure 5.
Step load (blue line) and cumulated AE signals time history (red line). Dashed lines correspond to the 3rd, 6th and 8th load stages.
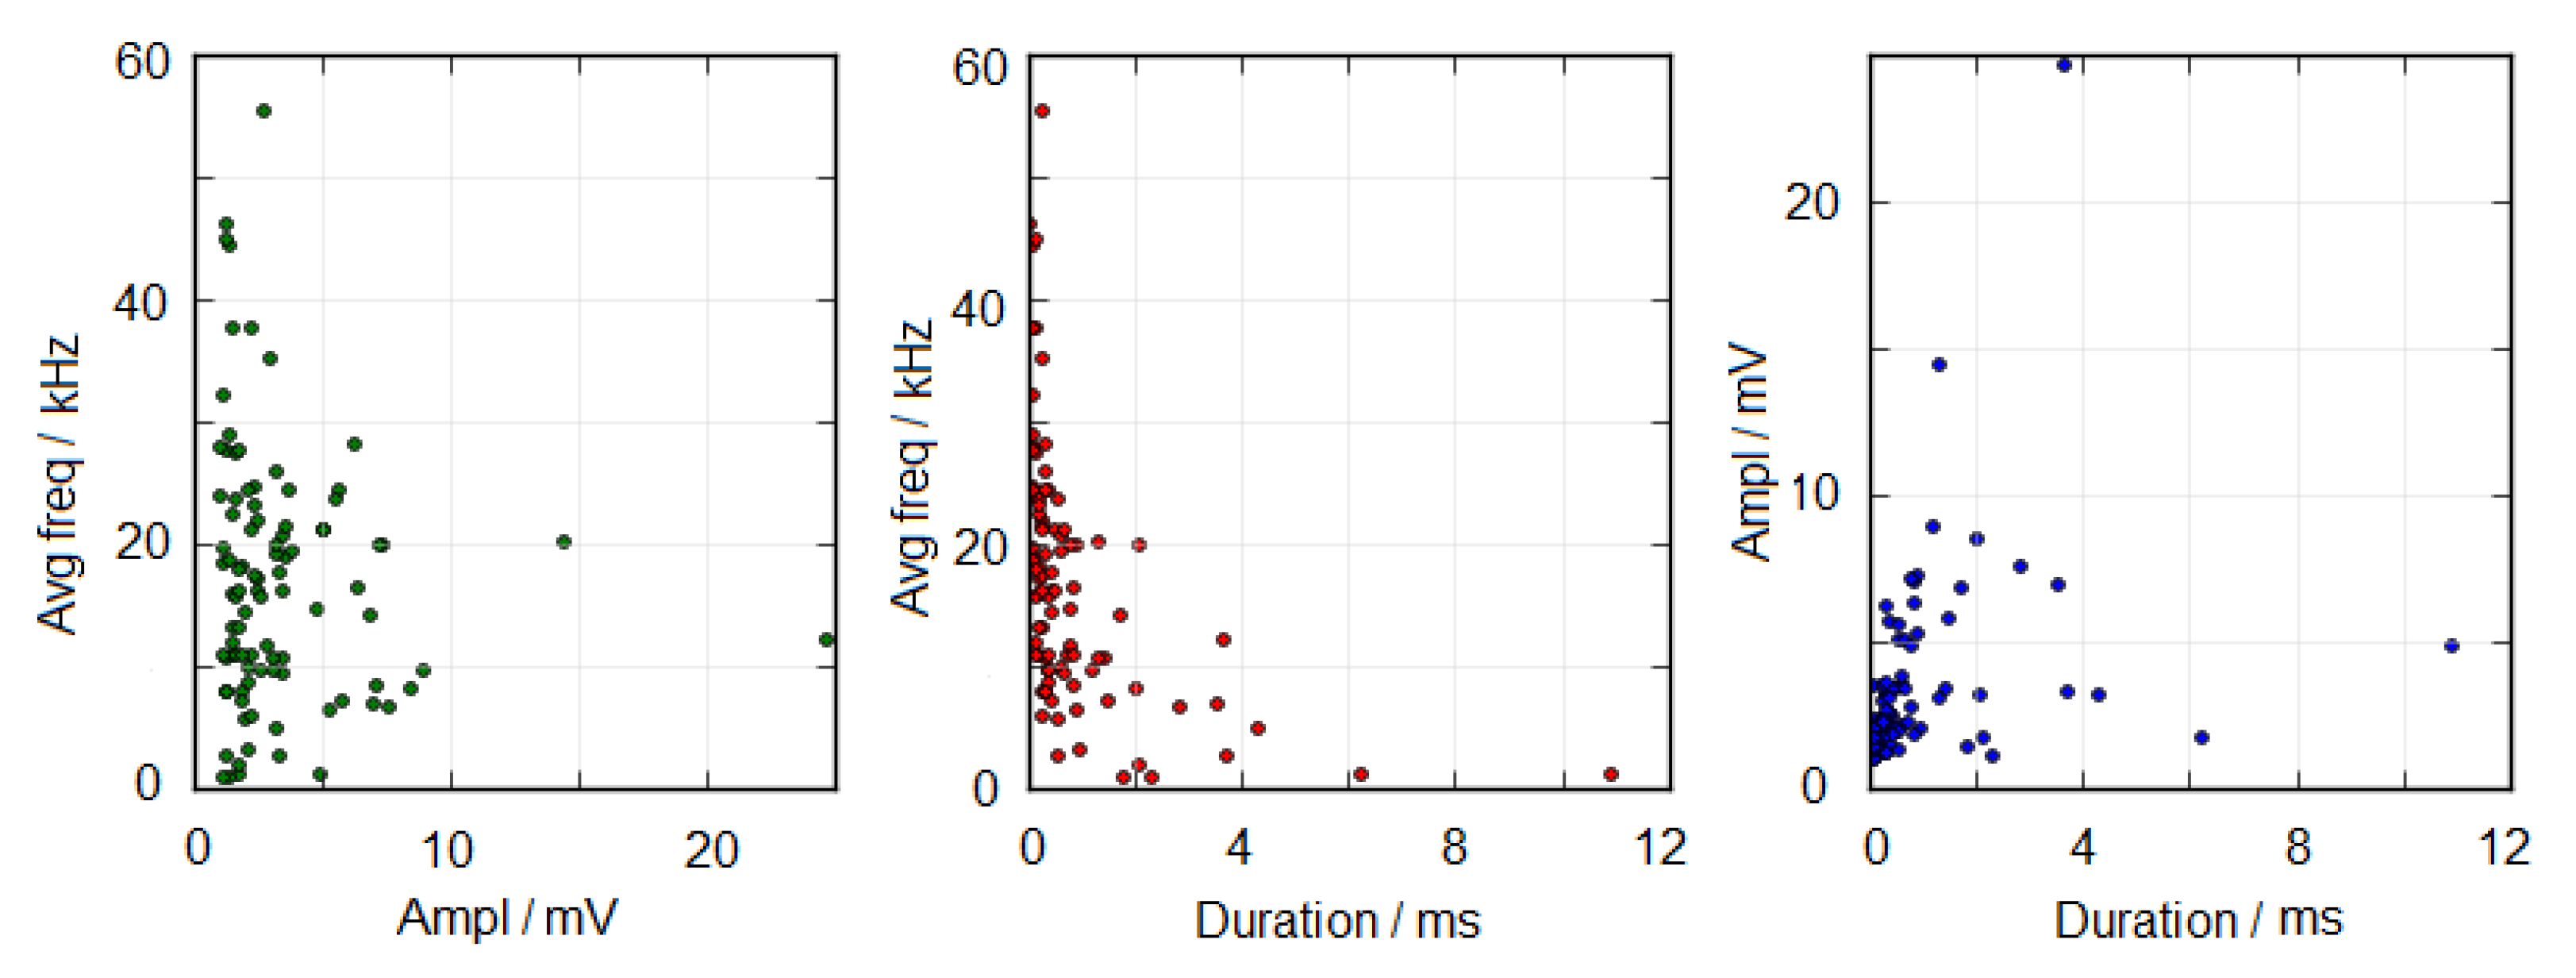
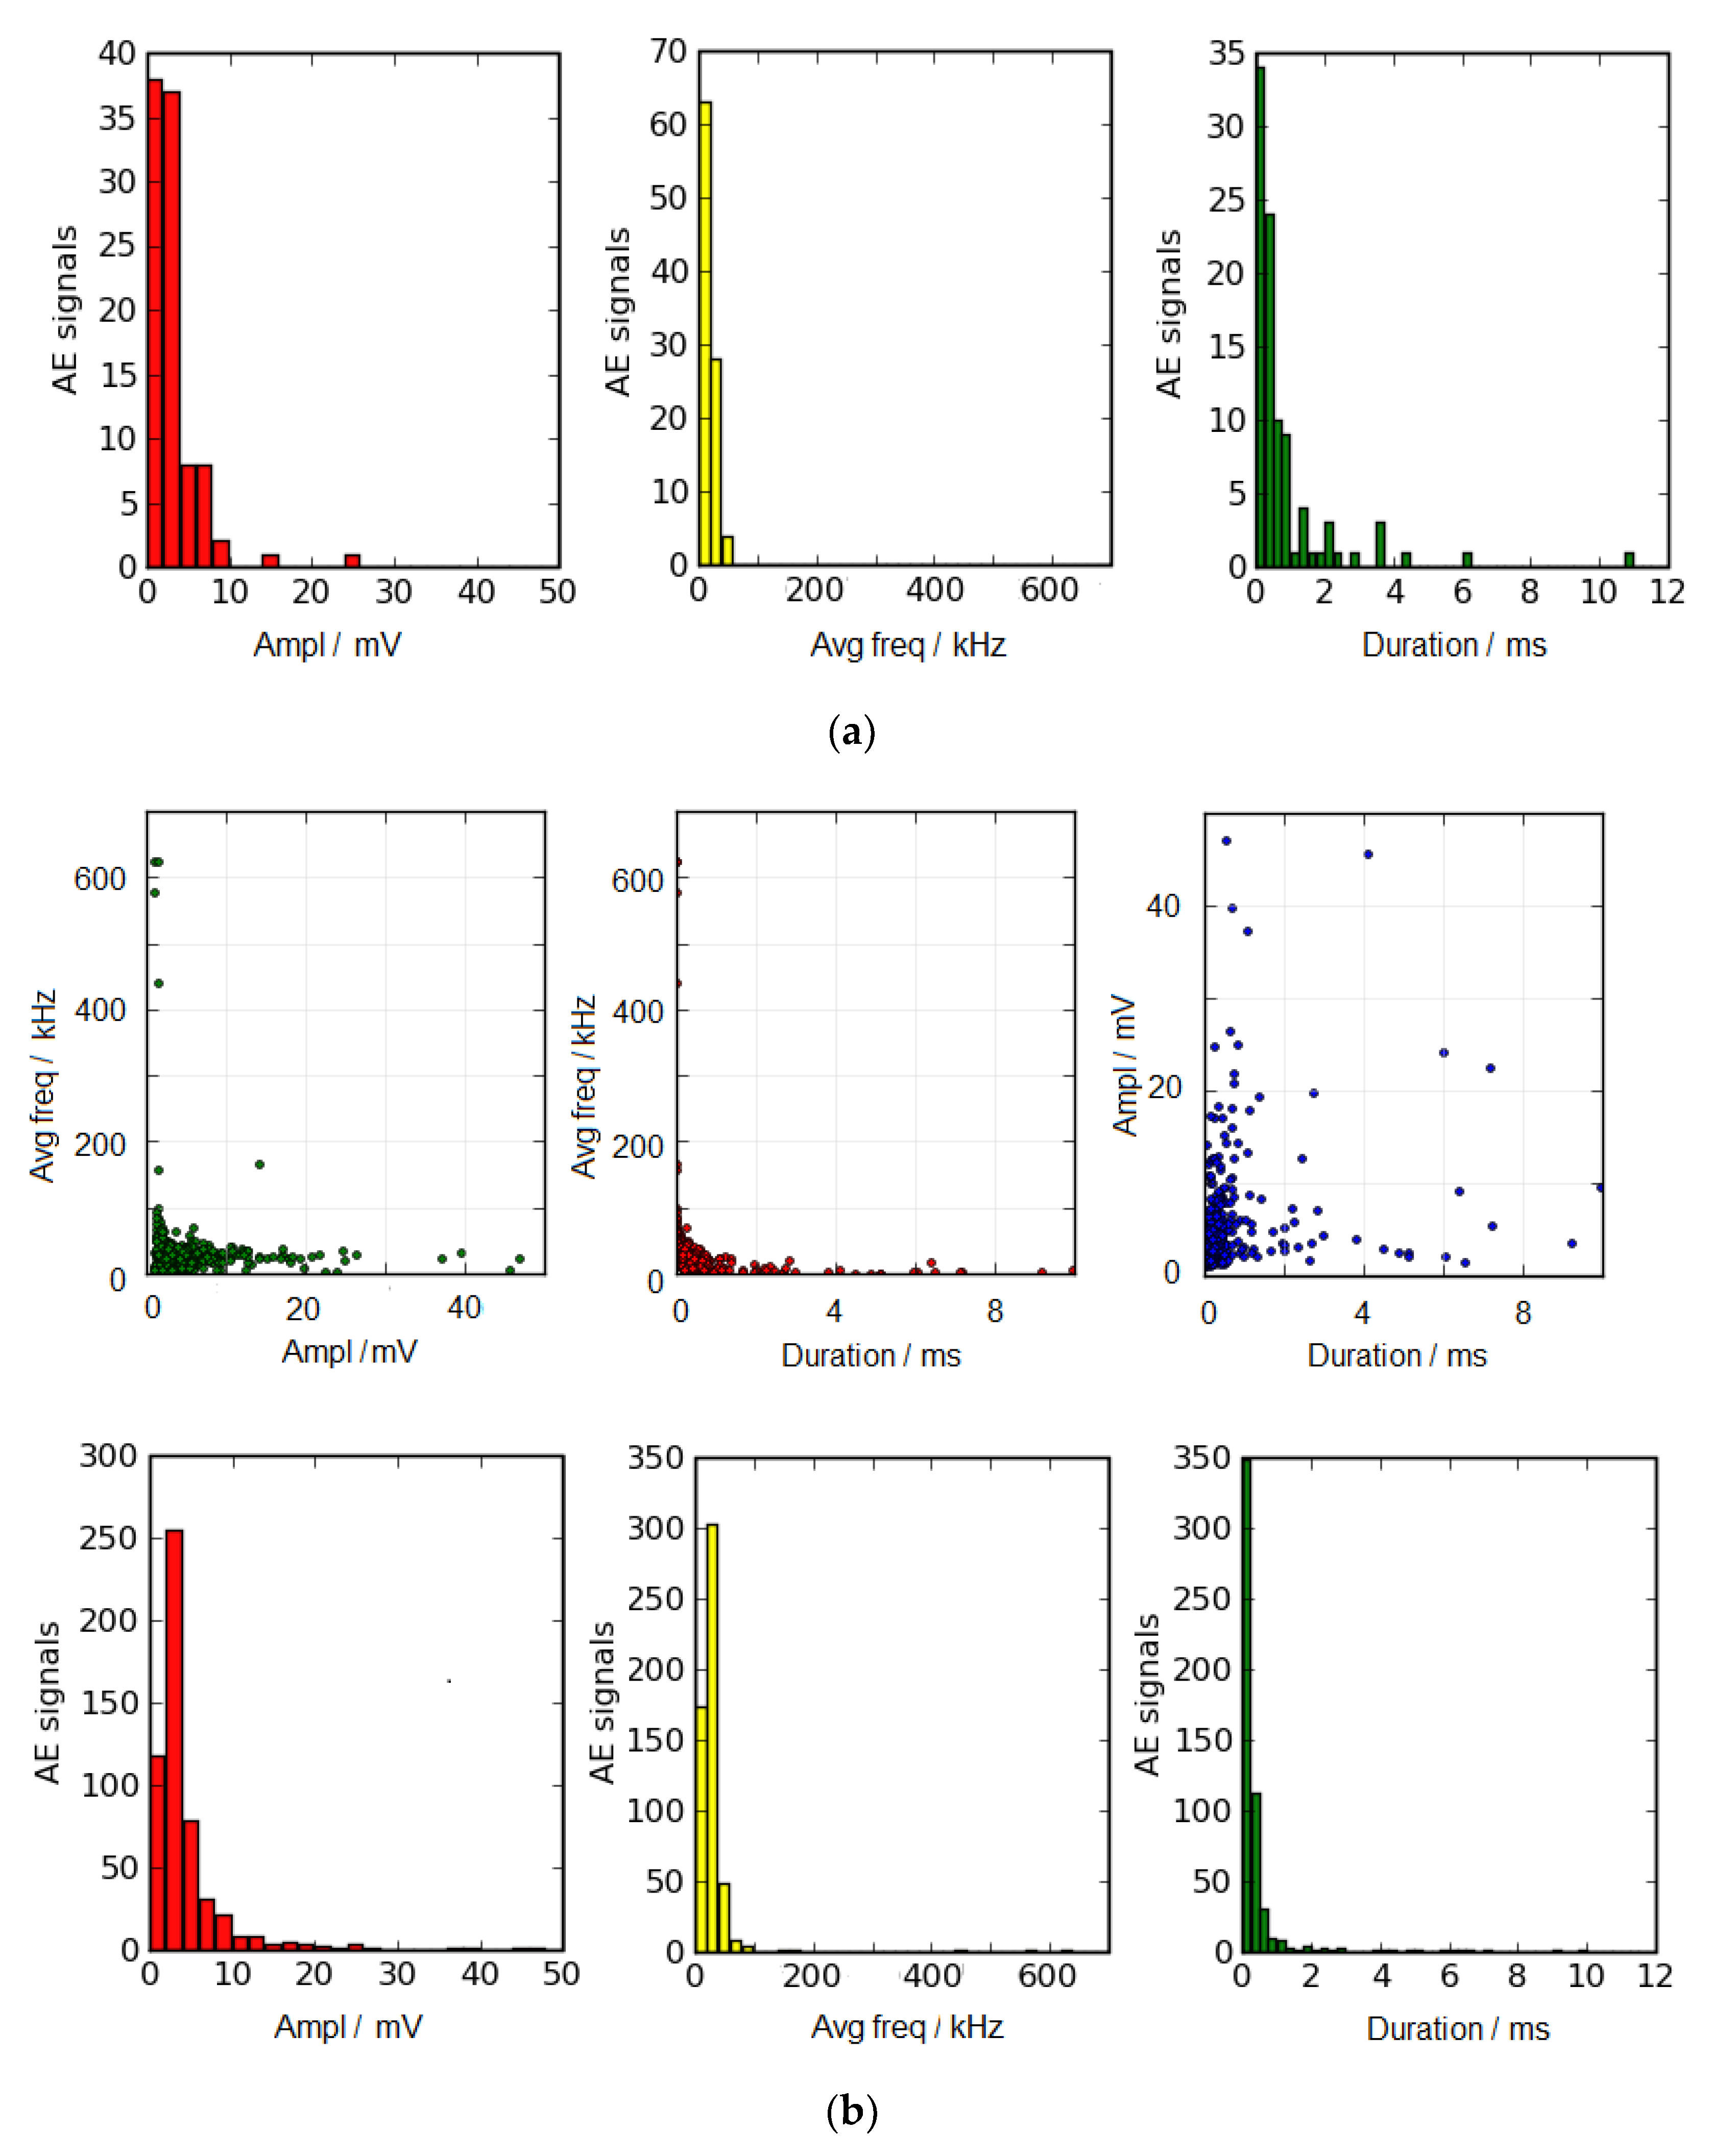
The AE activity is first investigated considering the individual sensor recordings and the related statistical distributions of the signal parameters, i.e., peak amplitude, duration and average frequency. Figure 6a shows the distributions of the received signals by sensors AE0 and AE1, and Figure 6b shows those received by sensors AE4 and AE5. Considering the mean values of the distributions, recordings of AE0 and AE1 (located on the top surface of the beam) are characterized by lower frequency, lower amplitude and longer signal duration than AE4 and AE5 (located next to the bottom surface), namely <f> = 17 kHz vs. 31 kHz, <A> = 3.3 mV vs. 4.5 mV, and <Δt> = 0.8 ms vs. 0.4 ms. These findings can be explained in terms of amplitude loss (signal attenuation)—stronger for high frequencies—and, possibly, of spreading of AE wave packets traveling in a dispersive medium [24], such as the concrete to some extent. Hence, the measured effects appear to be descriptive of AE activity predominantly originating near AE4 and AE5 sensors, consistent with a crack pattern developing from the bottom surface of the beam.
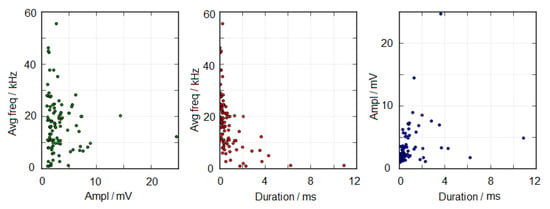

Figure 6.
(a) AE features relationships and distributions of received signals by sensors AE0 and AE1. The mean values of distributions represented by histograms from left to right are: <A> = 3.3 mV, <f> = 17 kHz, and <Δt> = 0.8 ms. (b) AE features relationships and distributions of received signals by sensors AE4 and AE5. The mean values of distributions represented by histograms from left to right are: <A> = 4.5 mV, <f> = 31 kHz, and <Δt> = 0.4 ms.
7.2. The b-Value Analysis
It is reasonable that as the load increases, larger-scale fracture events occur giving rise to AE signals of larger amplitude. The signal amplitudes are converted in a magnitude scale by using the equation M = log10 (V⁄V0), where V is the peak of voltage signal expressed in microvolts, and V0 = 1 μV is the reference voltage (conversion to decibels is possible through M = AdB⁄20). The signal magnitudes are studied by their cumulative distribution, using the b-value analysis. For a population of N events, the b-value is calculated as:
where N(M) is the number of signals with magnitude higher than M, and a and b are fitting constants.
The b-value expresses the absolute gradient of the cumulative magnitude distribution as illustrated in Figure 7. As the fracture process becomes more intense, the percentage of high-amplitude events increases relative to the low-amplitude ones in the total population, resulting in drops of the b-value [25].

Figure 7.
AE magnitude distribution for different damage conditions: low damage (high b-value) and high damage (low b-value).
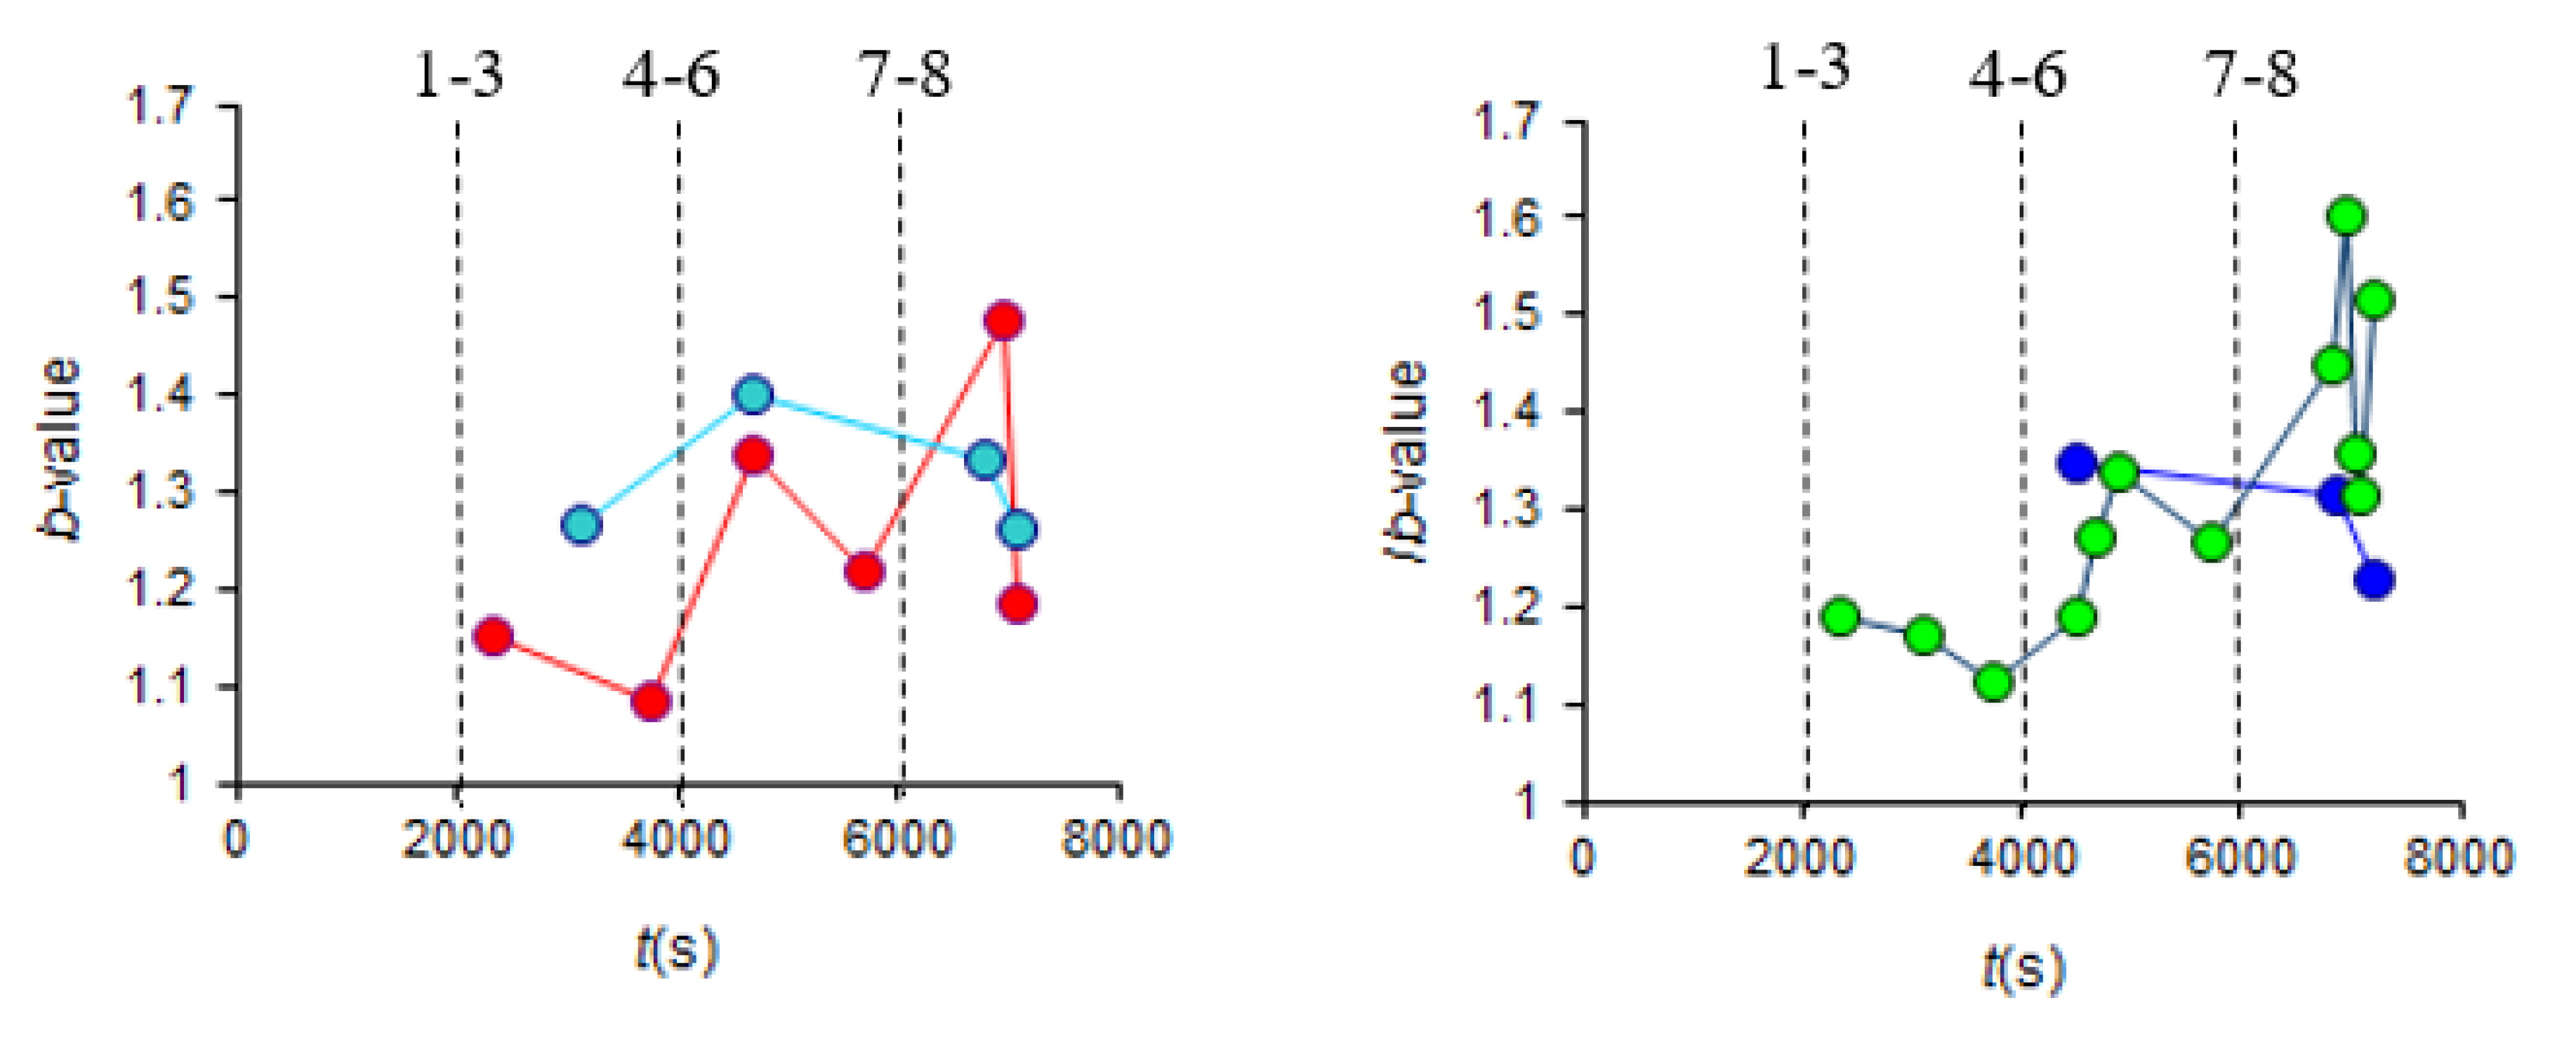
Taking into account the number N of recent events to calculate every single b-value, possible decreasing trends can be identified and associated with damage severity and change in structural performance state, especially during laboratory loading tests where a single minimum is observed just prior to specimen failure. The recommended value number of events for computation (see e.g., [24]) is typically N = 100. Smaller values would yield too strong oscillations, masking the actual trend. Instead, using too large N, any small occurrence producing a small number of AE signals would be undermined in the average of the large population. Here, four partitioning criteria are followed to calculate the evolving b-values during the test, namely using disjoint subsets of N = 100 and 150 events (Figure 8 (left)), or overlapping subsets of N = 100 events with step 25 and a loading stage-based partition (Figure 8 (right)) [25,26]. The most important parameters to be considered in a b-value graph are the general trend and the minima of the curve. Comparing all the time series, nothing more than an oscillating trend can be identified, with b-values mainly ranging between 1.2 and 1.6 (with an isolated minimum at 1.1 reported in two cases) as descriptive of minor to moderate damage levels reached during the test. As herein illustrated—and widely recognized—the b-value, although being sensitive to damage, does not necessarily decrease monotonically. That is due to the presence of both healthy material encountered during crack propagation and steel reinforcements that limit crack growth in concrete matrix. Namely, fracture propagates during steel deformation or concrete sliding with respect to steel. Fracture generates signals related to early damage, which are mixed with those of the already heavily damaged part, as stated in [27,28,29,30].

Figure 8.
b-value time histories with dashed lines referring to the load stages of Figure 5. Using disjoint subsets of N = 100 (red dots) and N = 150 signals (cyan dots) (left). Ib-value with overlapping subsets of N = 100 events with step 25 (green dots) and b-value by a stage-based partition (blue dots) (right).
7.3. AE Source Location
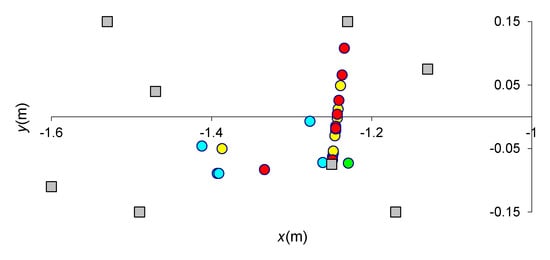
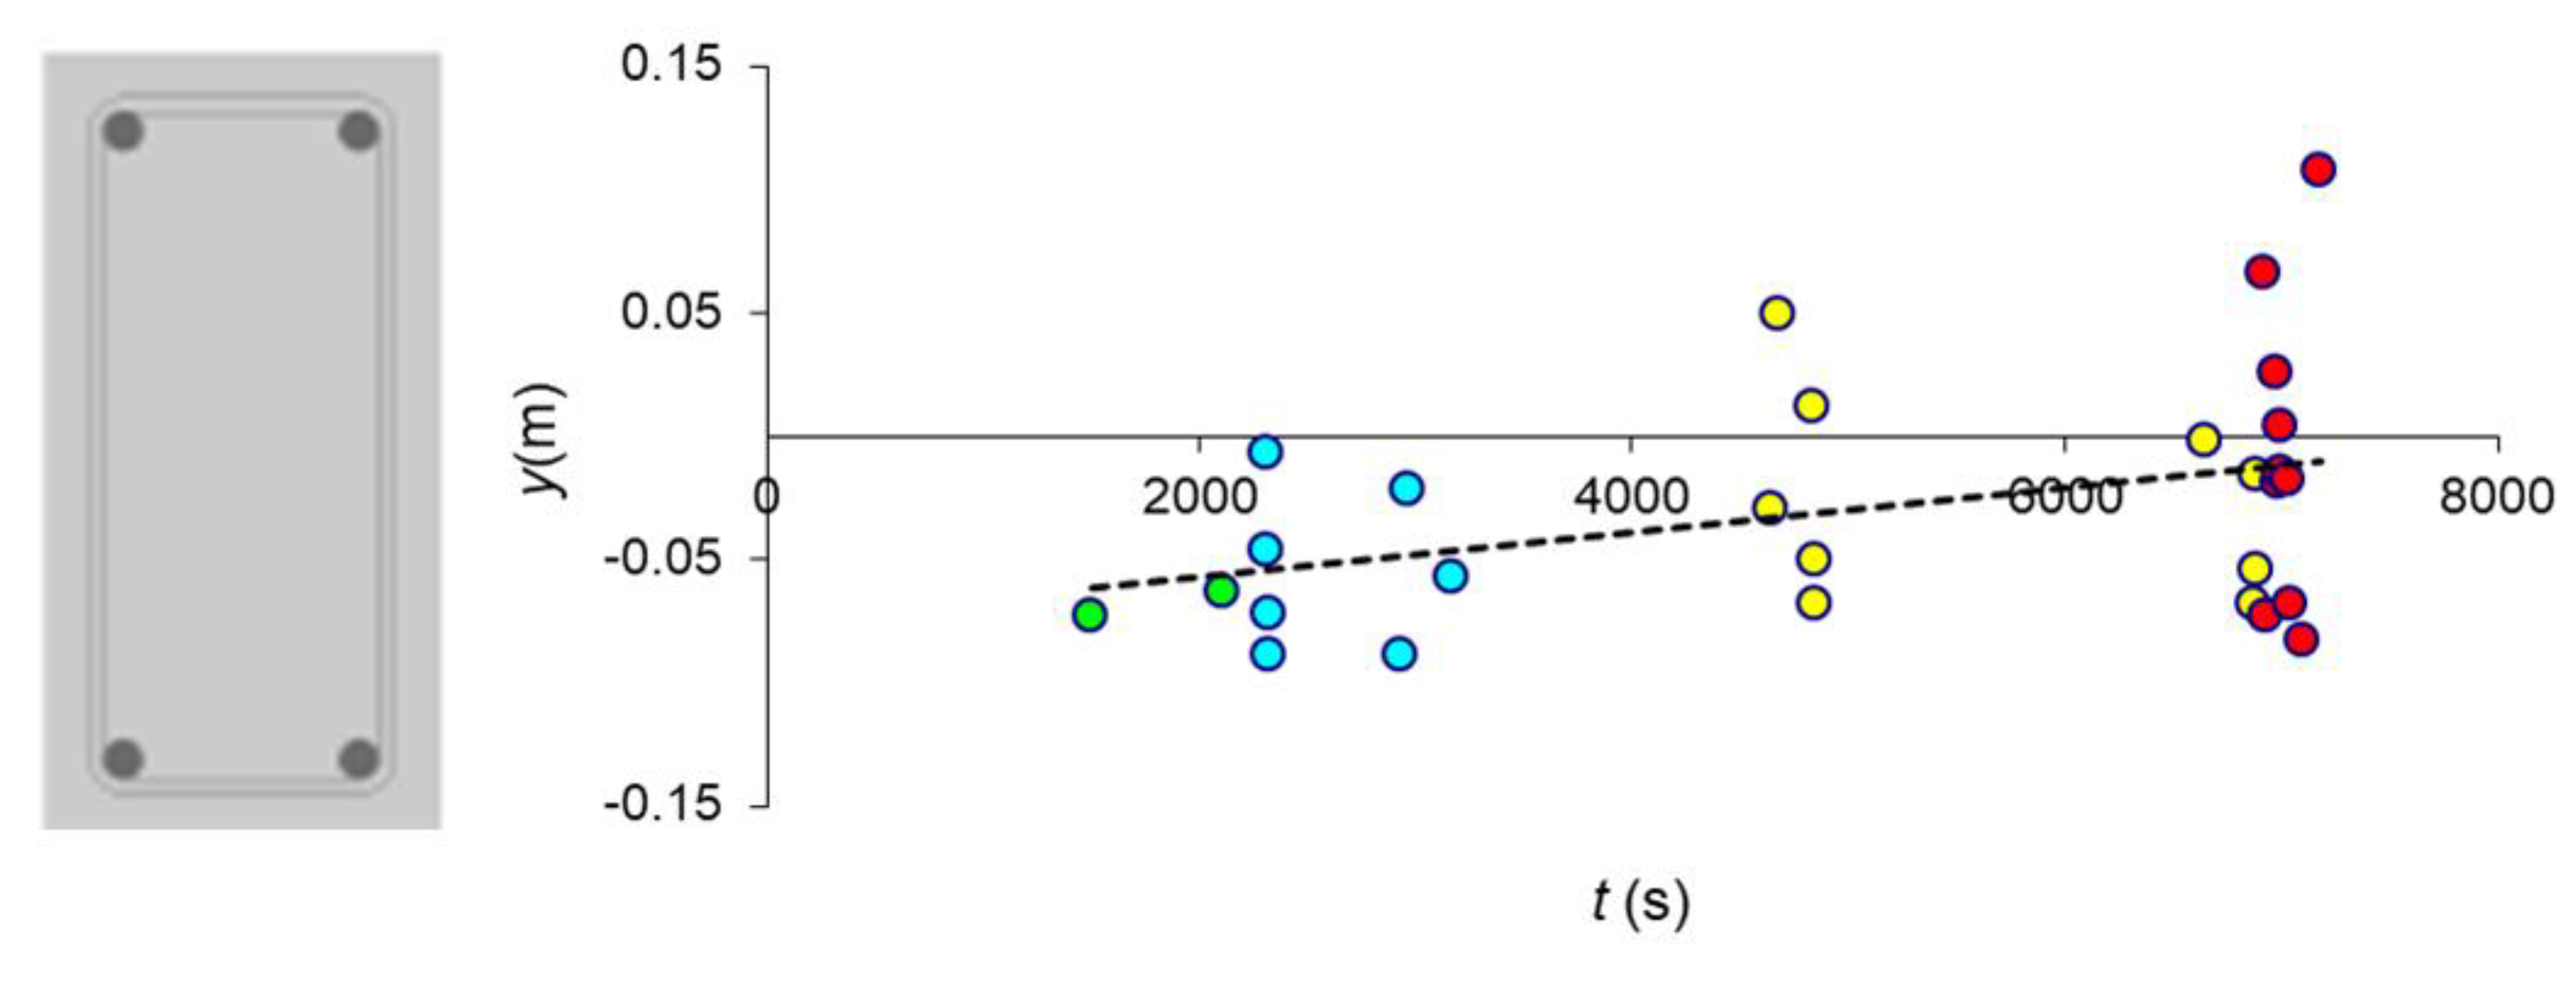
Due to the configuration of the experiment, the tensile surface is identified at the bottom of the beam cross sections. Therefore, crack initiation reasonably occurs close to the bottom surface. This is revealed by Figure 9, where the height of localized AE sources is depicted for different loading steps. The fitting line identifies the average height of localized events, exhibiting a slightly ascending trend. At the lowest load level, the average location is close to the bottom surface (−0.06 m). As the cracks propagate towards the top, the AE sources naturally move to higher y-locations, reaching 0.1 m.
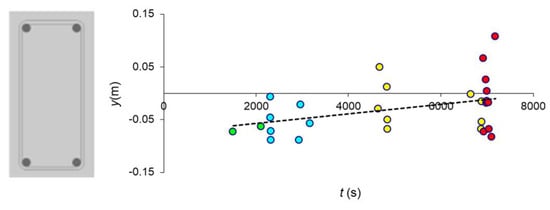
Figure 9.
Height of localized AE events for different loading stages. Adopted reference system (x, y, z) as in Figure 1. Green color refers to load stages #1–#4, blue to #5 and #6, yellow to #7 and #8, and red to #9.
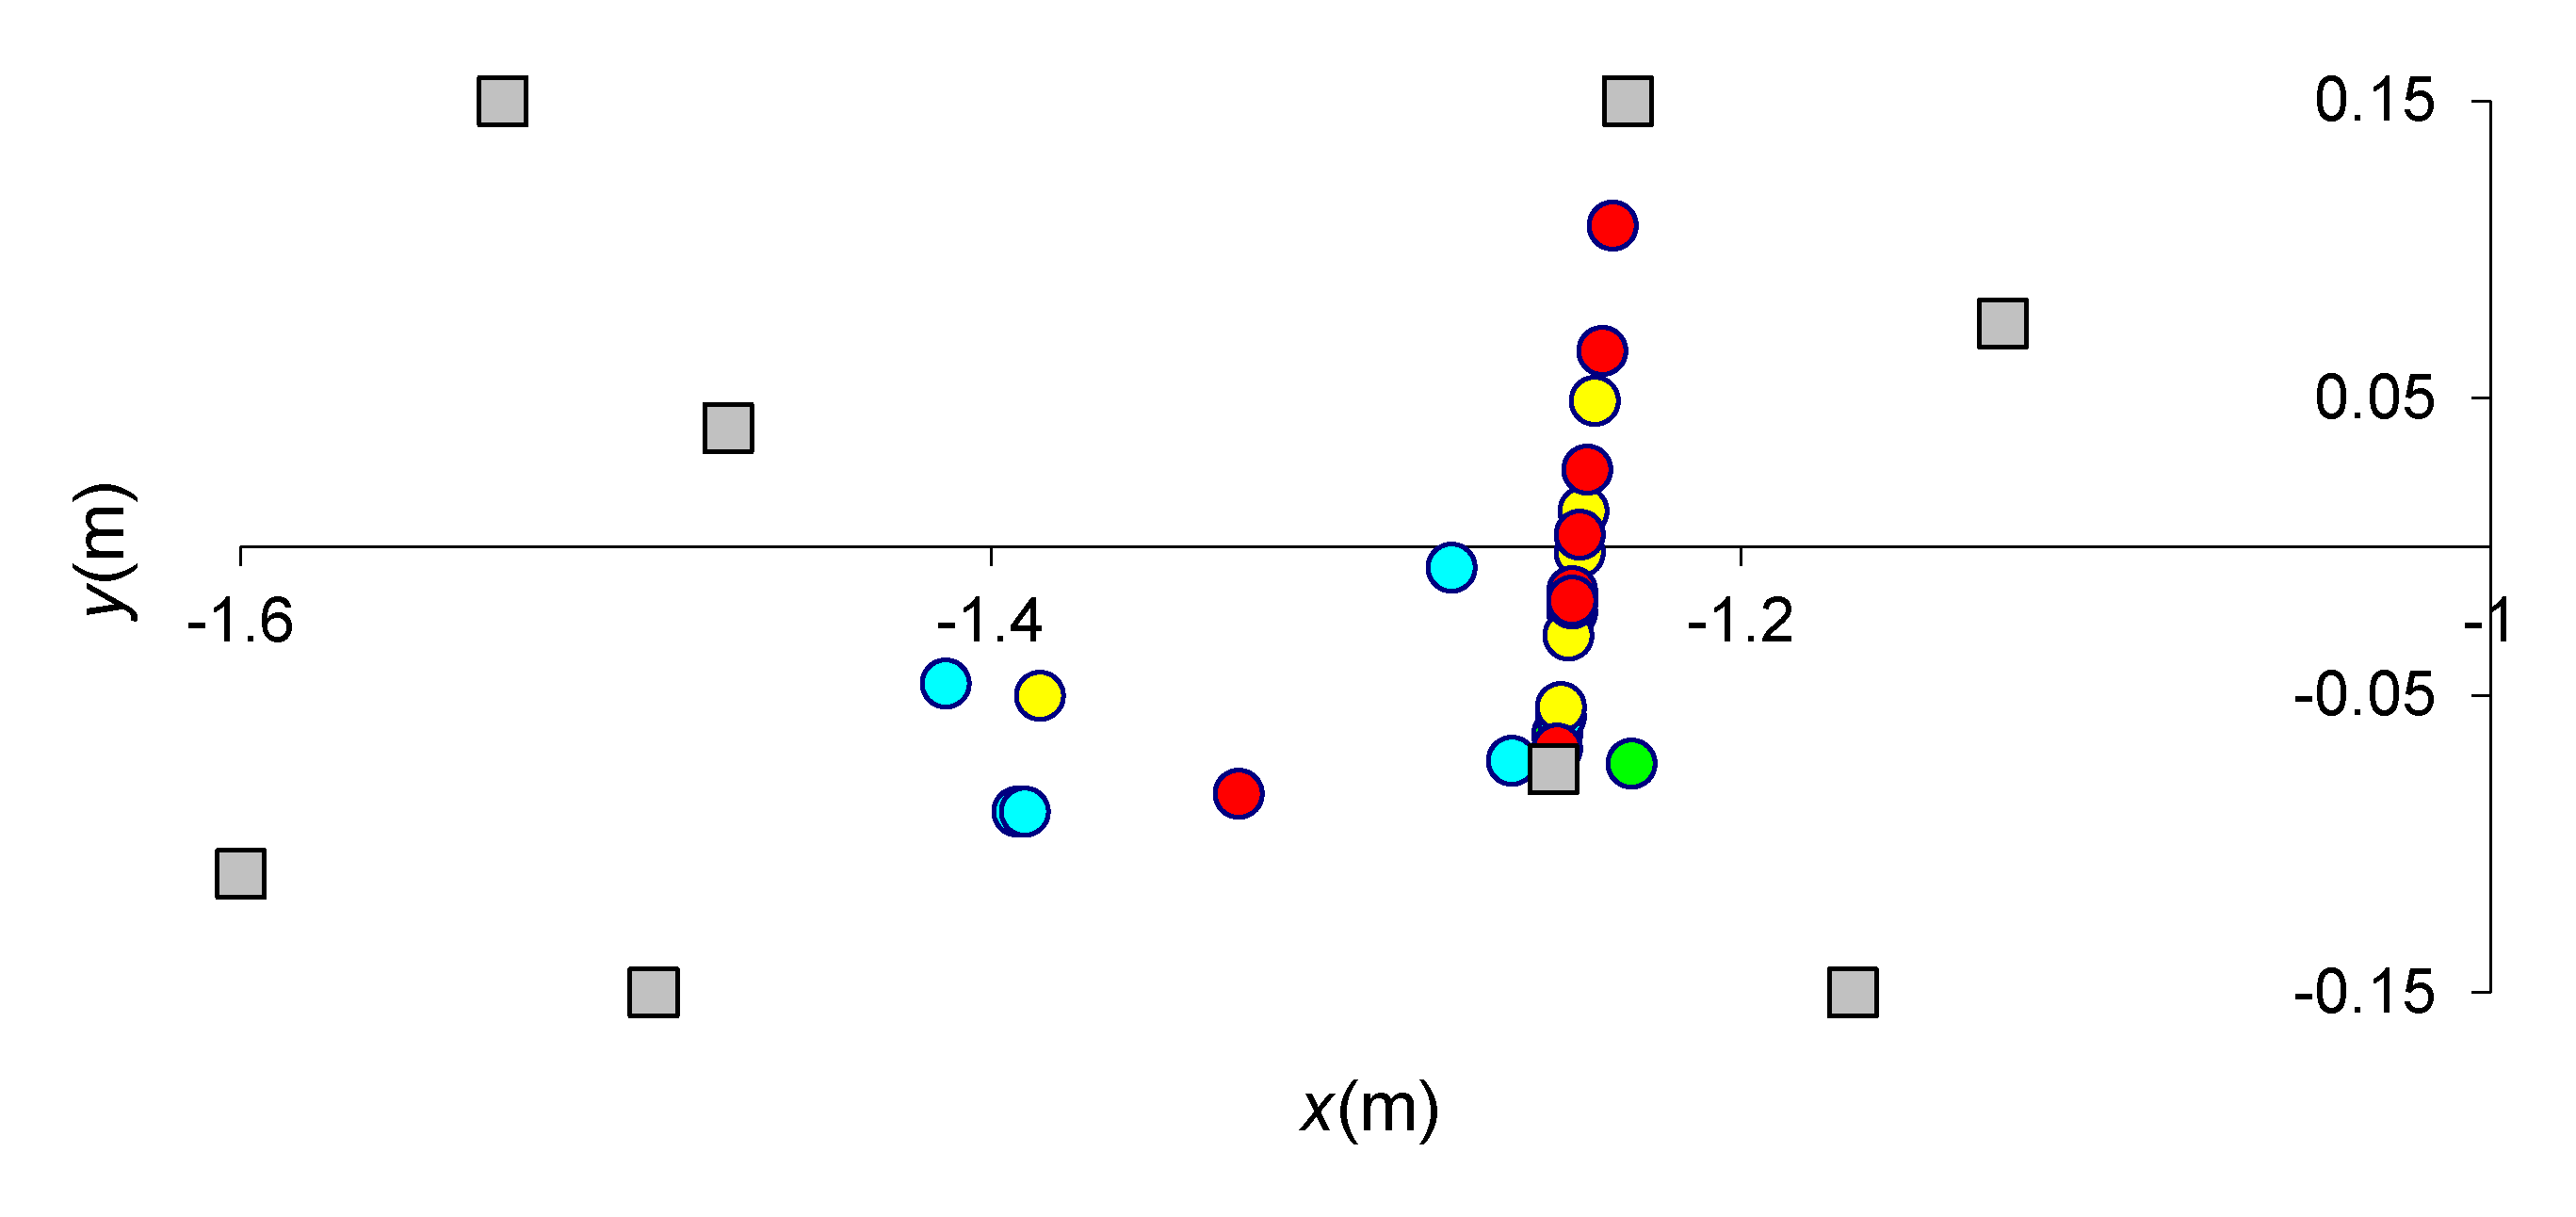
The determined locations of AE events concerning different loading stages are depicted together with sensor positions in Figure 10. Location data are only available in 2D, along the beam’s lateral axis due to the almost 2D sensor setup, and therefore, information regarding depth position of AE sources cannot be provided. Typically, AE source location is carried out along lines between detecting sensors, i.e., AE0, AE1, AE4 and AE5. Hence, location data do not exactly match the crack initiation from the bottom surface of the beam. One can see localized AE sources starting from the left and accumulating vertically towards the top surface, as the signature of coalescence of uncorrelated tensile cracks and the appearance of diagonal shear cracks. Red circles, representing localized events at the unloading stage, are probably due to friction between aggregates and reinforcing bars during reclosing of the cracks.
8. FOS Strain Measurements
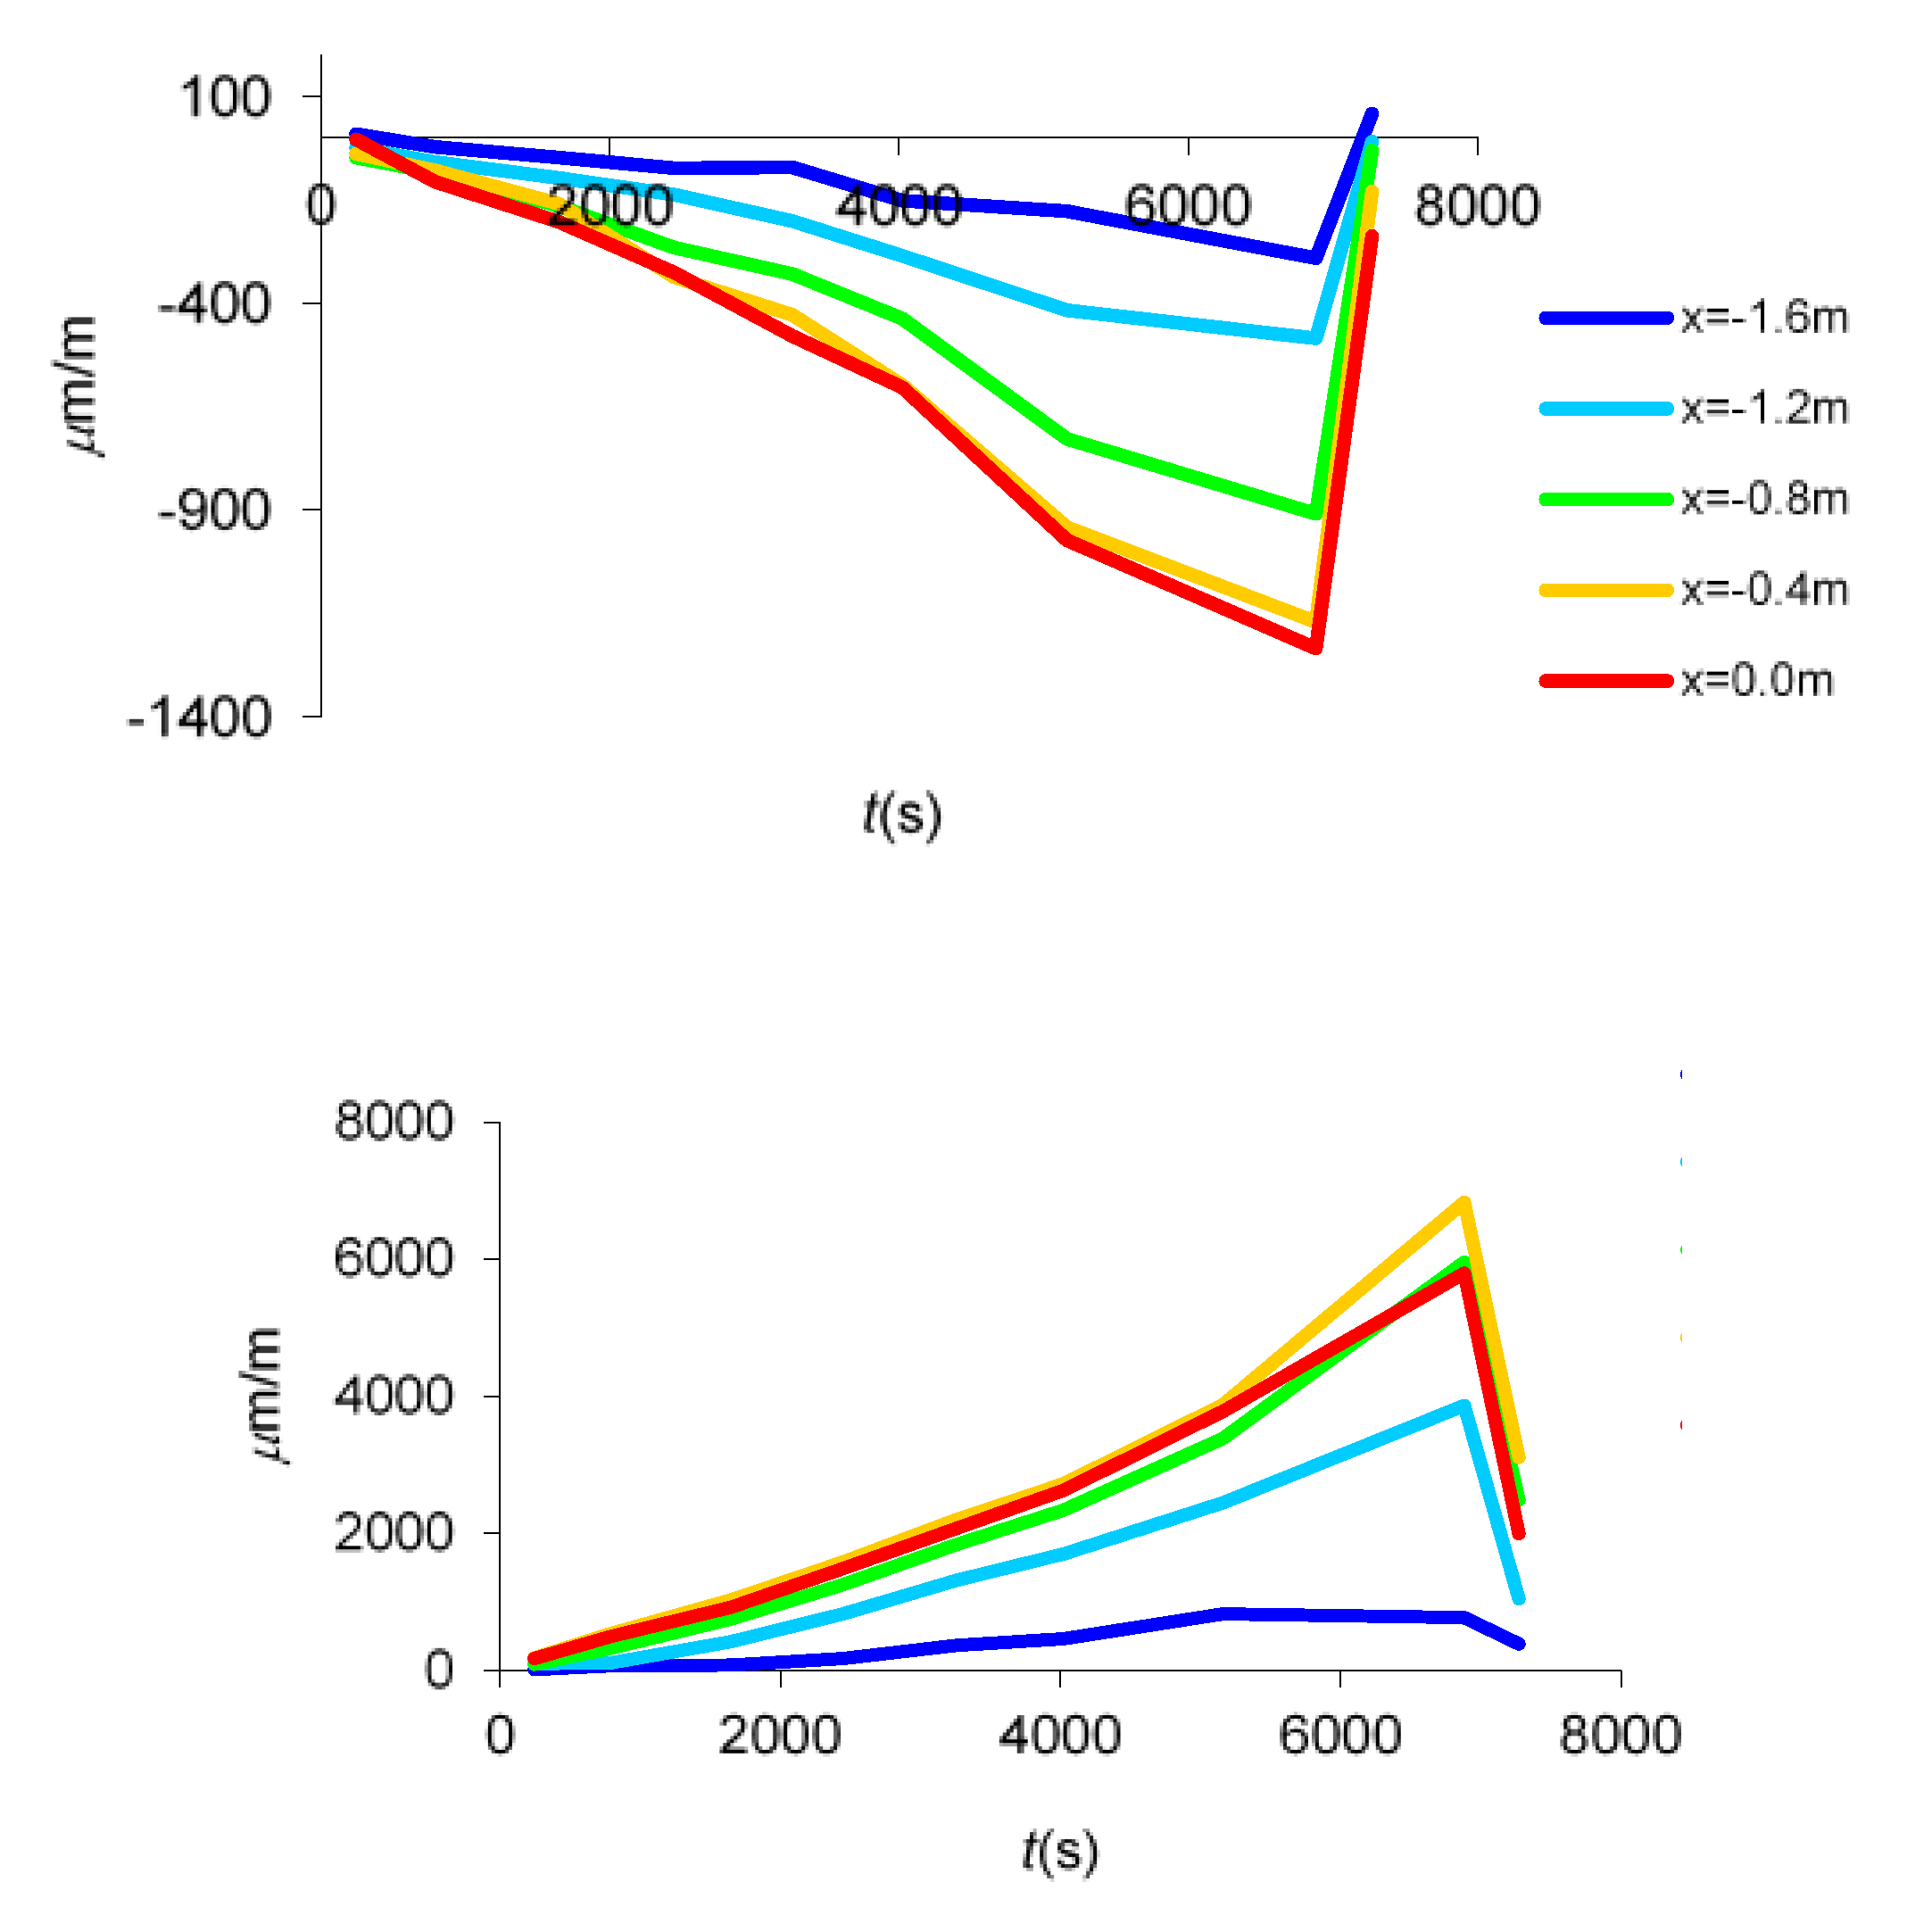
In line with the configuration of the experiment, the tensile state at the bottom of the beam cross sections is revealed by Figure 11, which depicts the history of the internal positive strain measured by the embedded FOS #2 running about 30 mm from the bottom of the external surface. Vice versa, the expected negative strain values in the compressed zone are measured by the FOS #1, running 30 mm from the top external surface (Figure 3).
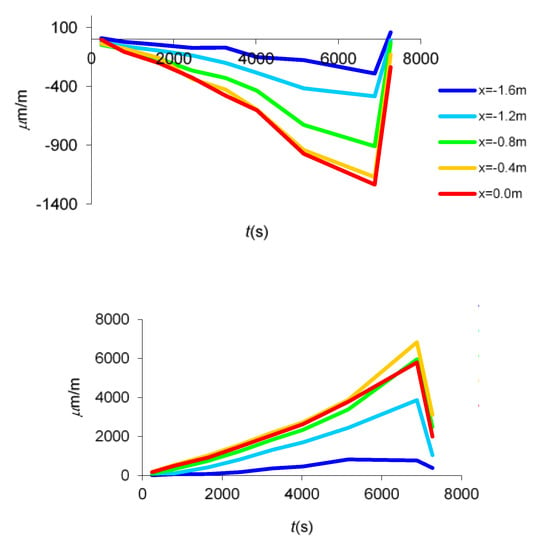
Figure 11.
FOS strain measurements at different loading stages along the beam length: FOS #1 (up), FOS #2 (down).
8.1. AE vs. FOS Measurements
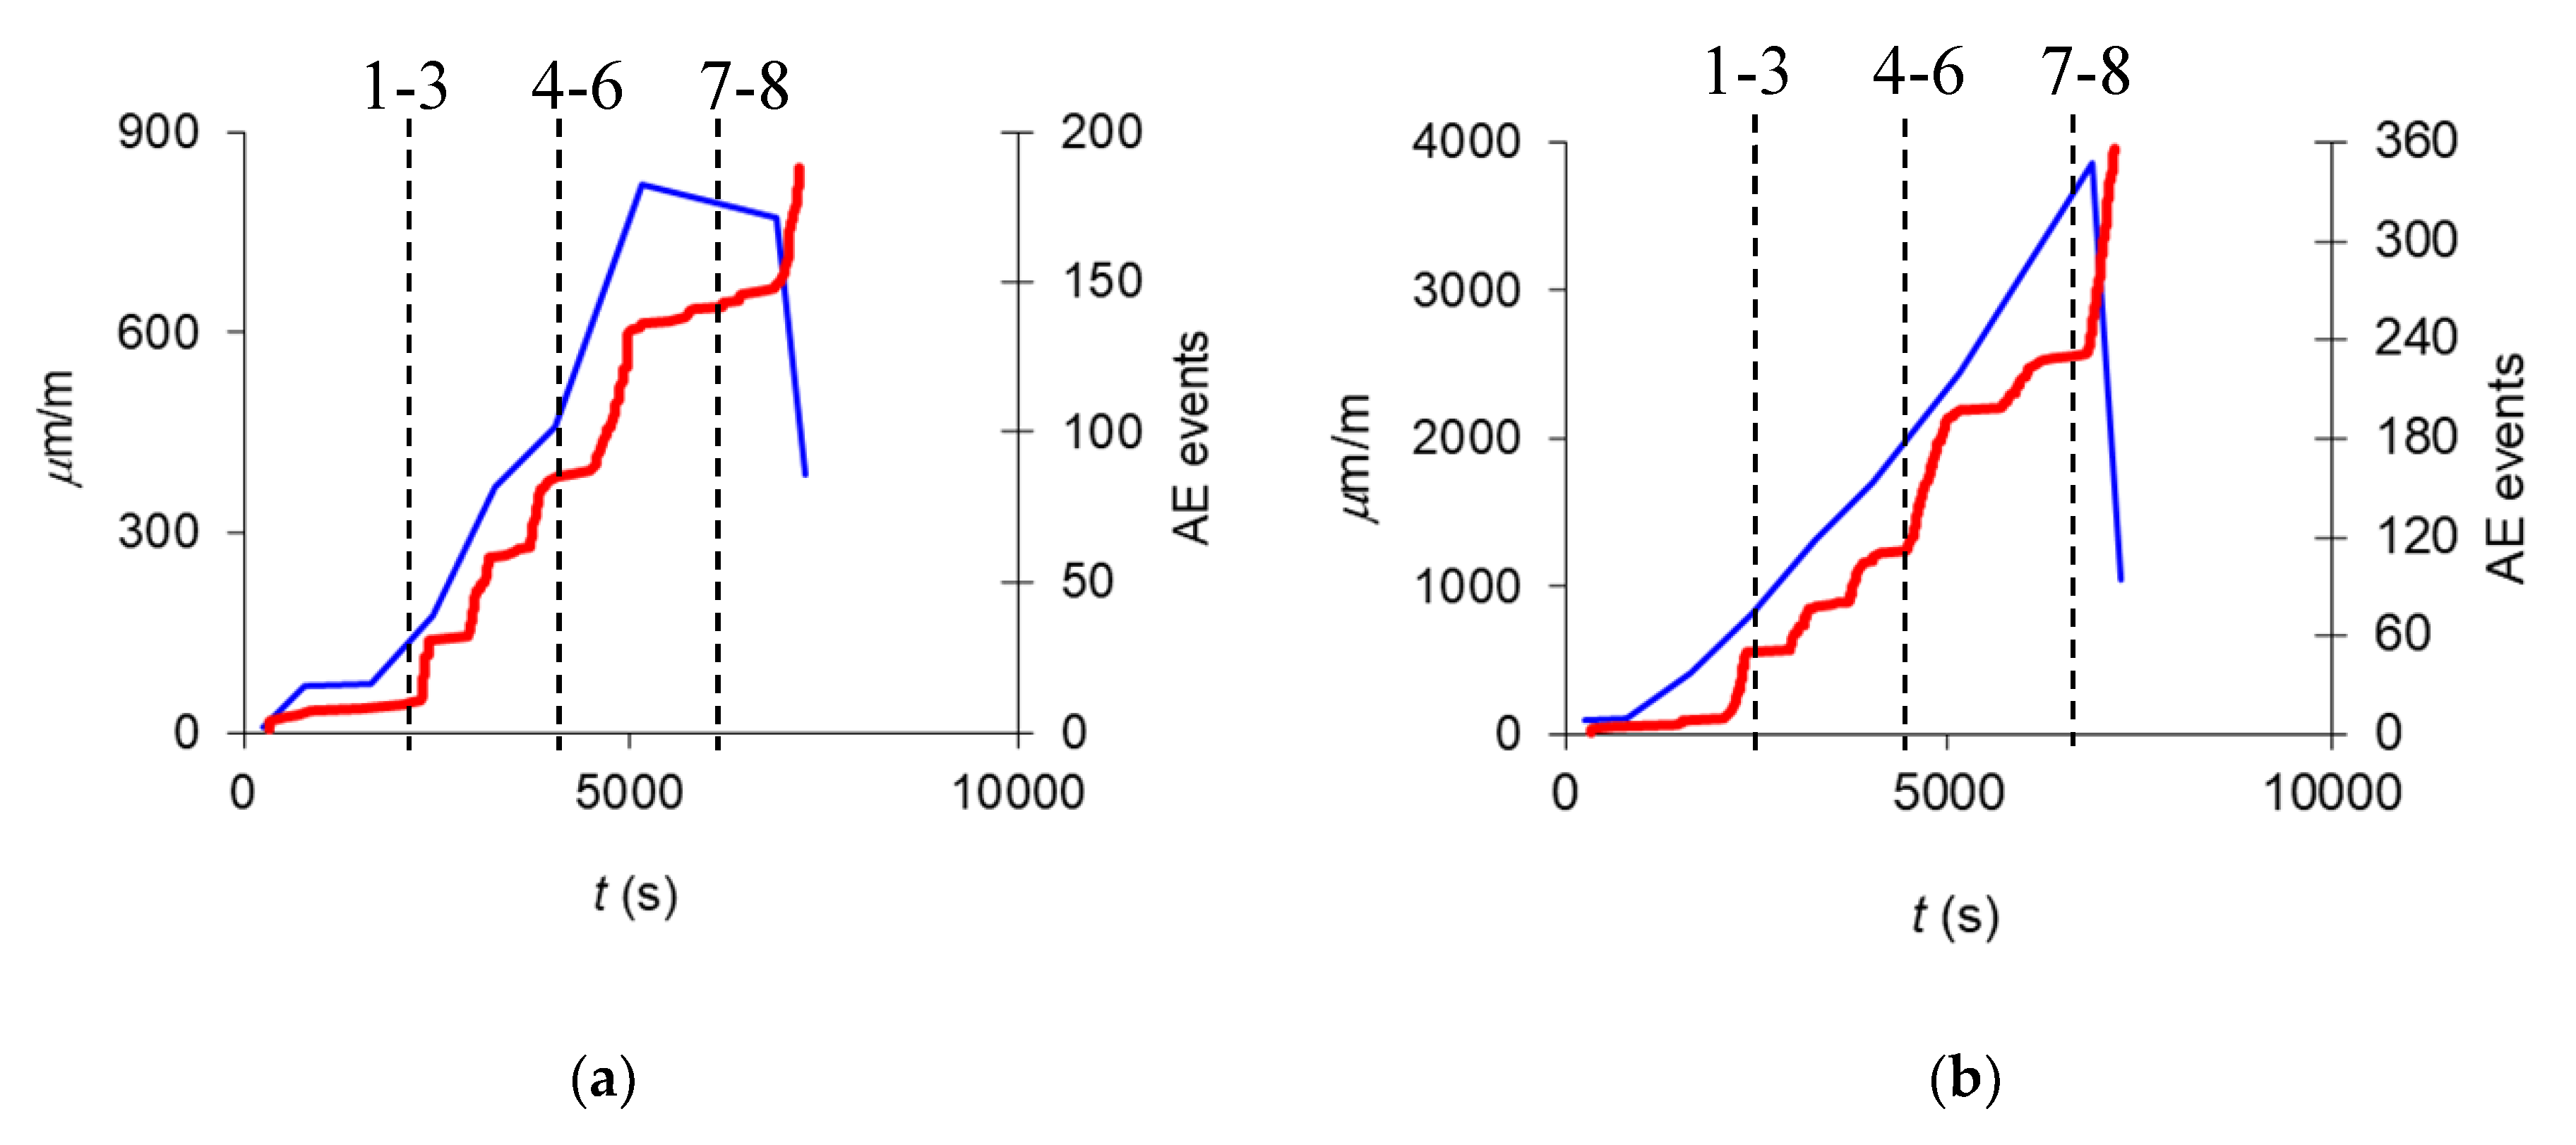
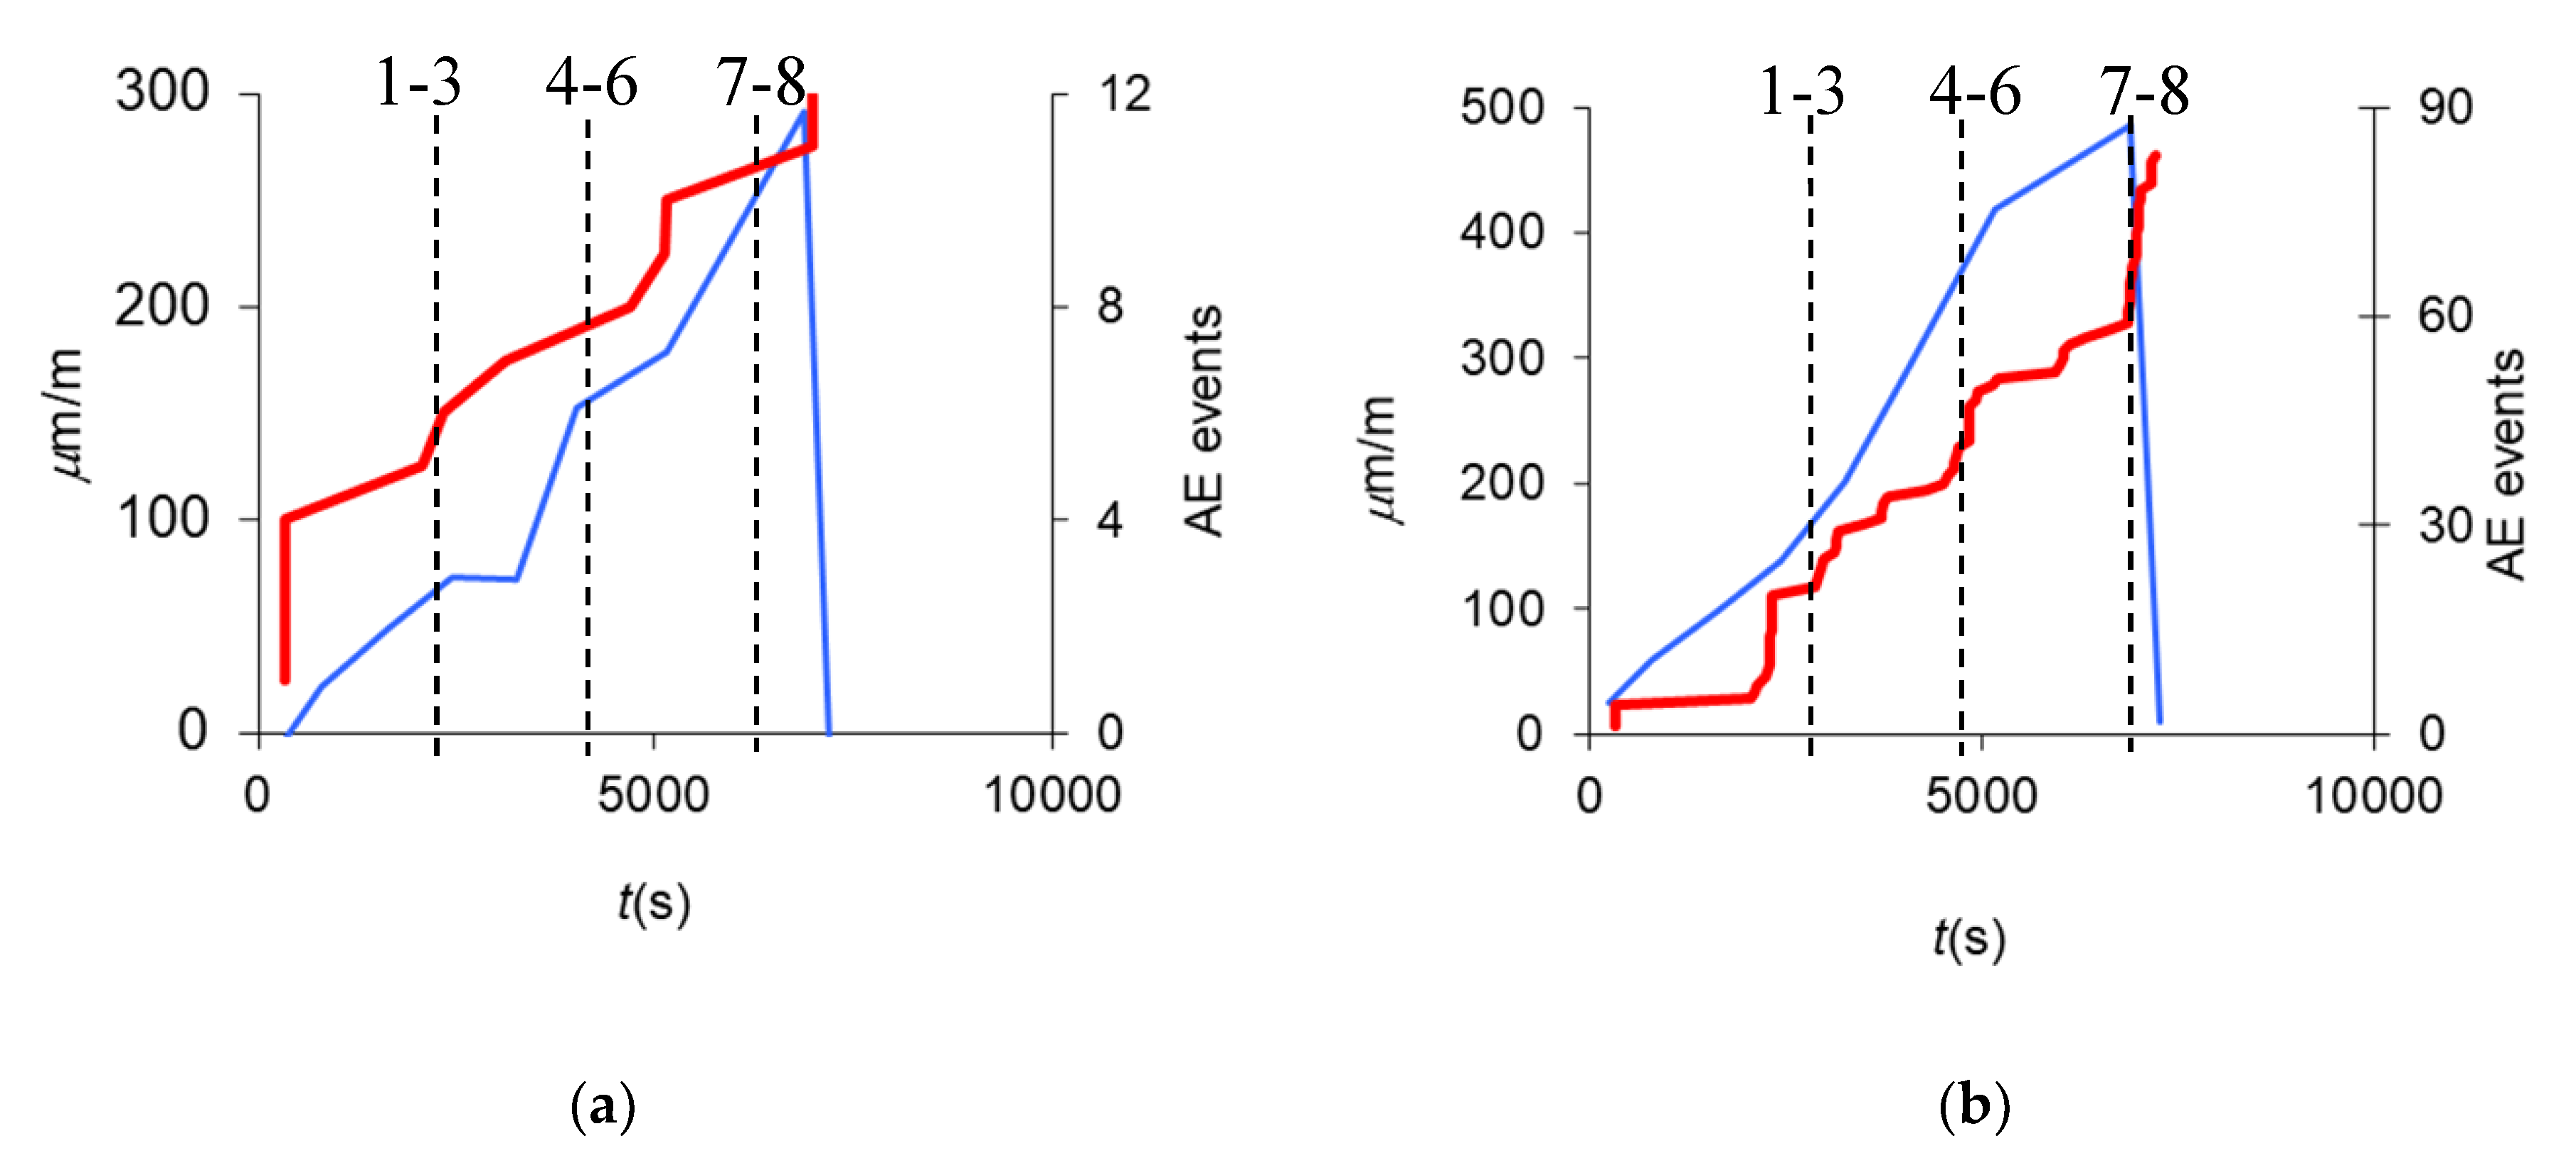
Figure 12a,b compares the strain history (depicted by a blue line) measured close to the bottom surface by FOS #2, respectively at the horizontal locations of −1600 and −1200 mm, with the accumulated AE activity (red line) recorded by the nearest AE sensor, respectively AE4 and AE5.
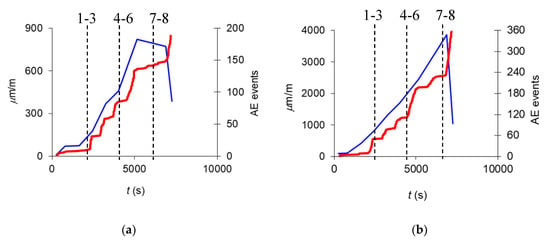
Figure 12.
Cumulative AE activity (red) and FOS strain (blue) time histories for: (a) fiber optic n.9 at x = −1.6 m and AE sensor n.4; (b) fiber optic n.9 at x = −1.2 m and AE sensor n.5. The dashed lines identify the different loading stages.
Figure 13a,b compares the strain history measured close to the top surface by FOS #1, at x = −1600 and −1200 mm, with the accumulated AE activity recorded by the nearest AE sensors, namely AE0 and AE1. Both Figure 12 and Figure 13 illustrate noticeable similarity between AE and FOS graphs.
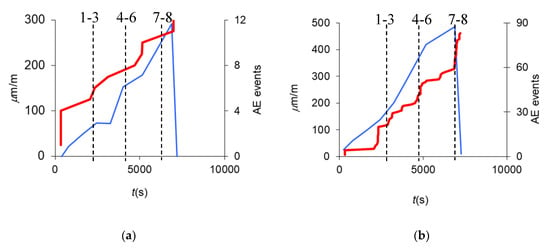
Figure 13.
Cumulative AE activity and FOS strain time histories for: (a) fiber optic n.7 at x = −1.6 m and AE sensor n.0; (b) fiber optic n.7 at x = −1.2 m and AE sensor n.1. The dashed lines identify the different loading stages.
8.2. Cracks Pattern
The results of FOS and AE monitoring are compared with the actual pattern of cracks directly observable in the laboratory. Figure 14 shows the cracks at loading step #7 where the crack development at the bottom side of the beam can be noticed. Furthermore, the transition of crack development from the vertical shape (due to pure bending moment at the center of the beam) to the inclined shape at the extremity (due to shear effects at the support) is highlighted.
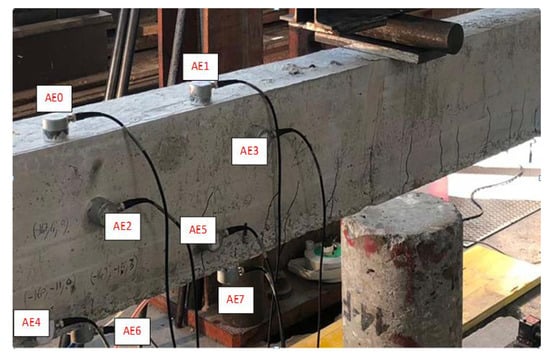
Figure 14.
Crack pattern at loading step #7 and numbered AE sensors.
9. DIC Strain Assessment
A comparison between DIC results in terms of the strain field on the central span of the beam specimen and the FOS #2 measurements has also been presented in this section. Figure 15 (top) presents the strain field computed through DIC [22] at loading steps #4 (left) and #8 (right), while the FOS strains at the bottom side of the specimen are reported for the same loading steps at Figure 15 (bottom). Focusing on the 0.8 m central length of interest, the FOS #2 sensor highlights a reasonable constant tensile strain of about 1700 μm/m at step #4 and 7000 μm/m at step #8. These results have been computed considering a sampling interval and spatial resolution of 0.2 and 0.5 m, respectively, typically used for large real structures.

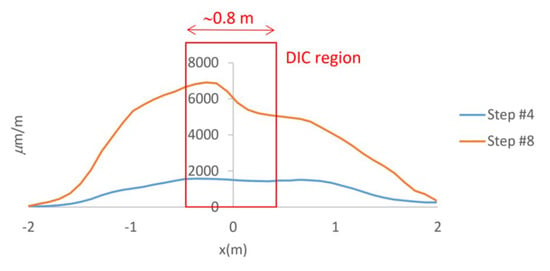
Figure 15.
DIC (top) and FOS #2 (bottom) outcomes at loading steps #4 (top-left) and #8 (top-right) in the central area of the beam specimen (between the vertical loads—see Figure 2).
The DIC strain field at the bottom side results in the range 1000–3500 μm/m at step #4, and 4000–12,000 μm/m at step #8. Therefore, a satisfactory comparison between the two adopted techniques can be verified.
10. Numerical Analysis
A numerical model of the beam has been prepared through the applied element method (AEM) to perform nonlinear static analysis and reproduce the laboratory observations up to collapse. The AEM is a rather new method, akin to the discrete element method, which is capable of predicting with a reasonable degree of accuracy the continuum and with a high degree of accuracy the discrete behavior of structures during the collapse. The AEM has been proved to track the structural collapse behavior passing through all the application load stages. Within the AEM, the structure is modeled as an assembly of 8-points hexahedral elements. Therefore, each element is assumed rigid (6 degrees-of-freedom) and has a 3-D physical solid shape. Two adjacent elements are assumed to be connected by one normal and two shear springs distributed around the elements’ edges on the interface. Each group of springs represents the entire stresses and deformations of a certain volume. More details on the theoretical aspects related to AEM and its comparison with finite element method can be found in Grunwald et al. [31].
The four-points bending test on the reinforced concrete beam has been reproduced through nonlinear static analysis in AEM. The results have been used to anticipate the structural behavior and to compare with the measurements [32]. Different AEM models have been developed by considering a sensitivity analysis to identify a reasonable discretization for the beam. Accordingly, materials have been assumed to be C20/25 and B450C for concrete and steel respectively, with nonlinear constitutive laws following the models by Menegotto and Pinto for steel and Maekawa and Okamura for concrete [33]. A 5 cm side-length element mesh has been selected for the comparison with SHM systems as the reasonable compromise between computational efforts and accuracy.
Considering the global behavior (Figure 16a), the AEM model performs satisfactorily by reasonably anticipating the force–displacement response. Moving to the local behavior, the selected mesh results also are able to correctly trace the bending and shear cracks. Figure 16b, in particular, reports the development of a crack at step #8. The two regions where the AE and DIC techniques have been applied can be observed. The strain concentration due to crack opening, as detected by the DIC technique (Figure 15, top-right) in the central region and by the AE sensors at the extremity, is correctly reproduced by the AEM simulation. It is worth underlining how the screen effect of voids, generated by micro-fractures and distributed damage in the concrete matrix, does not allow the AE sensors to detect the cracks generated at the mid-span of the beam.
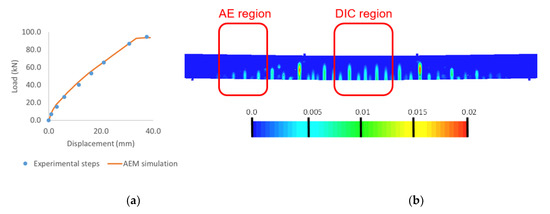
Figure 16.
(a) Force–displacement response up to collapse, (b) development of cracks at step #8.
11. Conclusions
The implementation of integrated SHM schemes of nondestructive testing techniques is presented in this paper for a reinforced concrete beam tested in laboratory through a four-points bending arrangement. The beam is subjected to loading stages to induce characteristic concrete cracking and steel reinforcements yielding. All of these phases have been identified in a global behavior curve in terms of force–displacement measurements.
The strain measures of the embedded fiber optic system have been compared to the acoustic emission sensors’ outcomes. Furthermore, visual observation of the actual cracks pattern has been also considered in parallel with DIC analysis in the central region of the beam specimen.
The recorded AE activity resulted in good agreement with FOS strain measurements. Furthermore, the results of the AE–FOS integrated SHM system are confirmed by the actual cracks pattern. Focusing on the pure bending moment region of the specimen, the strain field computed by DIC also resulted in good agreement with the FOS tensile strains at the bottom side of the specimen.
A numerical model has also been prepared to investigate the mechanical behavior of the beam up to collapse. The analysis has been focused on both the global behavior in terms of force–displacement response, and also the local characterization of cracks. A satisfactory match between the numerical outcomes and the monitoring data has been observed.
Therefore, the integrated use of different nondestructive testing techniques as proposed in this paper is a reasonable and reliable SHM strategy for damage detection and localization in RC elements. This study confirms how the application of different nondestructive testing techniques can be useful for specific civil engineering applications, e.g., for large-sized structural elements where visual inspection is not always possible and accurate. Thus, the simultaneous use of nondestructive testing techniques such as acoustic emission, embedded fiber optic sensors, and digital image correlation, possibly aided by visual inspection, seems to be a step toward the realization of a reliable real-time structural alert system.
Author Contributions
Conceptualization, M.D., G.N., G.L., G.P.C.; investigation and data curation, M.D., G.N.; writing—review and editing, M.D., G.N., G.L.; supervision and project administration, G.P.C. All authors have read and agreed to the published version of the manuscript.
Funding
The research is partially supported by the European Research Council under the Grant Agreement n° ERC_IDEalreSCUE_637842 of the project IDEAL RESCUE-Integrated Design and control of Sustainable Communities during Emergencies.
Acknowledgments
Maurizio Morgese assisted the laboratory analyses in partial fulfillment for the requirements of the Bachelor’s Degree in Civil Engineering at Politecnico di Torino, under the guidance of the Authors. His contribution is gratefully acknowledged. The technical support of SMARTEC (CH) and MastrLab at Politecnico di Torino-DISEG is gratefully acknowledged.
Conflicts of Interest
The authors declare no conflict of interest.
References
- Farrar, C.R.; Czarnecki, J.J.; Sohn, H.; Hemez, F.M. A Review of Structural Health Monitoring Literature 1996–2001; Report Number: LA-13976-MS; Los Alamos National Laboratory: Los Alamos, NM, USA, 2002; pp. 1–301.
- Farrar, C.R.; Worden, K. An introduction to structural health monitoring. Philos. Trans. R. Soc. A 2006, 365, 303–317. [Google Scholar] [CrossRef]
- Mechbal, N.; Uribe, J.S.; Rébillat, M. A probabilistic multi-class classifier for structural health monitoring. Mech. Syst. Signal 2015, 60–61, 106–123. [Google Scholar] [CrossRef]
- Glossop, N.D.W.; Dubois, S.; Tsaw, W.; Leblanc, M.; Lymer, J.; Measures, R.M.; Tennyson, R.C. Optical fibre damage detection for an aircraft composite leading edge. Composites 1990, 21, 71–80. [Google Scholar] [CrossRef]
- Glišić, B.; Inaudi, D. Fibre Optic Methods for Structural Health Monitoring; Wiley Online Library: Hoboken, NJ, USA, 2007; pp. 1–262. [Google Scholar]
- Ansari, F. Practical implementation of optical fiber sensors in civil structural health monitoring. J. Intell. Mater. Syst. Struct. 2007, 18, 879–889. [Google Scholar] [CrossRef]
- Casciati, S.; Domaneschi, M.; Inaudi, D. Damage assessment from SOFO dynamic measurements. In Proceedings of the SPIE 17th International Conference on Optical Fibre Sensors, Bruges, Belgium, 23–27 May 2005; Volume 5855, pp. 1048–1051. [Google Scholar]
- Domaneschi, M.; Sigurdardottir, D.; Glišić, B. Damage detection based on output-only monitoring of dynamic curvature in concrete-steel composite bridge decks. Struct. Monit. Maint. Int. J. 2017, 4, 1–15. [Google Scholar]
- Mba, D.; Rao, R.B.K.N. Development of acoustic emission technology for condition monitoring and diagnosis of rotating machines: Bearings, pumps, gearboxes, engines, and rotating structures. Shock Vib. Dig. 2006, 38, 3–16. [Google Scholar] [CrossRef]
- Behnia, A.; Chai, H.K.; Shiotani, T. Advanced structural health monitoring of concrete structures with the aid of acoustic emission. Constr. Build. Mater. 2014, 65, 282–302. [Google Scholar] [CrossRef]
- Carpinteri, A.; Lacidogna, G.; Pugno, N. Structural damage diagnosis and life-time assessment by acoustic emission monitoring. Eng. Fract. Mech. 2007, 74, 273–289. [Google Scholar] [CrossRef]
- McLaskey, G.C.; Glaser, S.D.; Grosse, C.U. Beamforming array techniques for acoustic emission monitoring of large concrete structures. J. Sound Vib. 2010, 329, 2384–2394. [Google Scholar] [CrossRef]
- Shiotani, T.; Aggelis, D.G.; Makishima, O. Global monitoring of large concrete structures using acoustic emission and ultrasonic techniques: Case study. J. Bridge Eng. 2009, 14, 188–192. [Google Scholar] [CrossRef]
- Carpinteri, A.; Lacidogna, G.; Niccolini, G. Damage analysis of reinforced concrete buildings by the acoustic emission technique. Struct. Control Health 2011, 18, 660–673. [Google Scholar] [CrossRef]
- Liang, S.; Zhang, C.; Lin, W.; Li, L.; Li, C.; Feng, X.; Lin, B. Fiber-optic intrinsic distributed acoustic emission sensor for large structure health monitoring. Opt. Lett. 2009, 34, 1858–1860. [Google Scholar] [CrossRef] [PubMed]
- Li, W.; Xu, C.; Ho, S.C.; Wang, B.; Song, G. Monitoring concrete deterioration due to reinforcement corrosion by integrating acoustic emission and FBG strain measurements. Sensors 2017, 17, 657. [Google Scholar] [CrossRef]
- Ansari, A. Fiber optic health monitoring of civil structures using long gage and acoustic sensors. Smart Mater. Struct. 2005, 14, S1–S7. [Google Scholar] [CrossRef]
- Park, J.M.; Lee, S.I.; Kwon, O.Y.; Choi, H.S.; Lee, J.H. Comparison of nondestructive micro-failure evaluation of fiber-optic Bragg grating and acoustic emission piezoelectric sensors using fragmentation test. Compos. Part A Appl. Sci. Manuf. 2003, 34, 203–216. [Google Scholar] [CrossRef]
- Verstrynge, E.; Pfeiffer, H.; Wevers, M. A novel technique for acoustic emission monitoring in civil structures with global fiber optic sensors. Smart Mater. Struct. 2014, 23, 065022. [Google Scholar] [CrossRef]
- Bao, X.; Chen, L. Recent progress in Brillouin scattering based fiber sensors. Sensors 2011, 11, 4152–4187. [Google Scholar] [CrossRef]
- Nonis, C.; Niezrecki, C.; Yu, T.Y.; Ahmed, S.; Su, C.F.; Schmidt, T. Structural health monitoring of bridges using digital image correlation. In Proceedings of the SPIE Smart Structures and Materials + Nondestructive Evaluation and Health Monitoring, San Diego, CA, USA, 17 April 2013; Volume 869507, pp. 1–13. [Google Scholar]
- Chu, T.; Ranson, W.; Sutton, M.A. Applications of digital-image-correlation techniques to experimental mechanics. Exp. Mech. 1985, 25, 232–244. [Google Scholar] [CrossRef]
- Blaber, J.; Adair, B.; Antoniou, A. Ncorr: Open-Source 2D Digital Image Correlation Matlab Software. Exp. Mech. 2015, 55, 1105–1122. [Google Scholar] [CrossRef]
- Lympertos, E.M.; Dermatas, E.S. Acoustic emission source location in dispersive media. Signal Process. 2007, 87, 3218–3225. [Google Scholar] [CrossRef]
- Shiotani, T.; Yuyama, S.; Li, Z.W.; Ohtsu, M. Application of AE improved b-value to quantitative evaluation of fracture process in concrete materials. J. Acoust. Emiss. 2001, 19, 118–132. [Google Scholar]
- Rao, M.V.M.S.; Prasanna-Lakshmi, K.J. Analysis of b-value and improved b-value of acoustic emissions accompanying rock fracture. Curr. Sci. 2005, 89, 1577–1582. [Google Scholar]
- Colombo, S.; Main, I.; Forde, M. Assessing damage of reinforced concrete beam using “b–value” analysis of acoustic emission signals. J. Mater. Civ. Eng. 2003, 15, 280–286. [Google Scholar] [CrossRef]
- Carpinteri, A.; Lacidogna, G.; Manuello, A.; Niccolini, G. A study on the structural stability of the Asinelli Tower in Bologna. Struct. Control Health 2016, 23, 659–667. [Google Scholar] [CrossRef]
- Carpinteri, A.; Lacidogna, G.; Corrado, M.; Di Battista, E. Cracking and crackling in concrete-like materials: A dynamic energy balance. Eng. Fract. Mech. 2016, 155, 130–144. [Google Scholar] [CrossRef]
- Niccolini, G.; Borla, O.; Accornero, F.; Lacidogna, G.; Carpinteri, A. Scaling in damage by electrical resistance measurements: An application to the terracotta statues of the Sacred Mountain of Varallo Renaissance Complex (Italy). Rend. Lincei Sci. Fis. Nat. 2015, 26, 203–209. [Google Scholar] [CrossRef]
- Grunwald, C.; Khalil, A.A.; Schaufelberger, B.; Ricciardi, E.M.; Pellecchia, C.; De Iuliis, E.; Riedel, W. Reliability of collapse simulation—Comparing Finite and Applied Element Method at different levels. Eng. Struct. 2018, 176, 265–278. [Google Scholar] [CrossRef]
- Domaneschi, M.; Cimellaro, G.P.; Marano, G.C.; Morgese, M.; Pellecchia, C.; Khalil, A.A. Numerical simulations of collapse tests on RC beams. In Proceedings of the 10th International Conference on Bridge Maintenance, Safety and Management—IABMAS 2020, Sapporo, Japan, 11–15 April 2020. [Google Scholar]
- Applied Science International LLC. Extreme Loading for Structures 2018; Applied Science International LLC.: Durham, NC, USA, 2018; Available online: https://www.appliedscienceint.com/extreme-loading-for-structures/ (accessed on 30 March 2020).
© 2020 by the authors. Licensee MDPI, Basel, Switzerland. This article is an open access article distributed under the terms and conditions of the Creative Commons Attribution (CC BY) license (http://creativecommons.org/licenses/by/4.0/).

