Abstract
Prosthetic rehabilitation has hardly changed since the 1970s, and it is a time-consuming process that requires great skill and precision. This article presents the workflow related to the prosthetic reconstruction of patients with extensive maxillofacial defects using digital technologies such as cone beam computed tomography (CBCT), Zbrush software and three-dimensional (3D) printing. The use of CBCT captures a 3D image of a patient’s face in a few seconds, thus shortening the time to prepare an impression and increasing the patient’s comfort. Zbrush digital sculpting software enables one to quickly and efficiently design a prosthetic restoration. Printing a trial version for a try-on, as well as designing and printing pre-cast forms, improves workflow and eliminates the chances of an error. As shown in the example of a patient after a nasal resection, CBCT, digital sculpting, and 3D printing accelerate and improve the workflow of an anaplastologist when designing the epithesis. New technologies reduce costs and save time, while helping to overcome the technical obstacles that limit access to a facial prosthesis.
1. Introduction
Extensive maxillofacial defects have always been a challenge to reconstruct due to varied structures, including the auricle, orbit, nose and oral cavity. The reconstruction of lost tissues and organs is an important functional and aesthetic aspect, which improves a patient’s self-esteem and quality of life. Complex maxillofacial defects can be reconstructed surgically or prosthetically with an epithesis [1]. Most facial defects arise as a result of an oncological resection, followed by trauma (e.g., gunshot wounds) and congenital defects (e.g., hemifacial microsomia). Typical sites of facial defects include the orbit, nose and auricle. The most common causes of orbital exenteration and ear or nose resection are skin malignancies [1,2]. Surgical reconstructions of extensive maxillofacial defects are often multi-stage procedures associated with the risk of donor and recipient site morbidity [1]. Maxillofacial defects can be reconstructed with local and free flaps [3,4,5]. However, it is difficult to achieve satisfactory results after surgical reconstruction of extensive defects. Another problem is time. Hospitalizations, often multiple, result from multi-stage surgical procedures. In addition, most of the oncological patients who require reconstruction are elderly and have multiple comorbidities, which increase the risk of complications during general anesthesia. In addition, a complete closure of the post-resection defect with flaps makes clinical examinations difficult in proper assessment of the postoperative field for local recurrence. In these cases, oncological follow-up is based on computed tomography (CT) or magnetic resonance imaging. In addition, some patients simply refuse further surgical interventions.
Maxillofacial prosthetics might be applied in patients where satisfying surgical reconstruction is almost impossible due to such factors as poor prognosis, comorbidities, lack of patient’s consent, affected healing due to scarring, and earlier surgical reconstruction failures. An epithesis might be also used along with surgical reconstruction [6]. Facial prostheses provide not only an aesthetic solution by covering an affected area but also functional benefits such as warming the air, maintaining the humidity of the upper aerodigestive tract, modulating speech, and providing support for eyeglasses [1]. Prosthetic reconstruction also exerts a significant psychological impact on self-esteem and quality of life of a patient with a maxillofacial defect [7,8]. New digital technologies are now widely used in the manufacture of facial prostheses. The continuous improvements in the quality of facial area scanning, computer sculpting, and the accuracy of three-dimensional (3D) printing have revolutionized the entire process, which can be performed in a multi-directional way. Cone beam computed tomography (CBCT) is now widely available in dental offices and hospitals. A face scan performed in CBCT is costless, fast, and avoids the need for taking a facial impression. Combining new media and analogue techniques enables generating more complex epitheses than ever before. Zbrush software creates high-precision 3D models including skin texture. The crucial difference between Zbrush and other software dedicated to 3D modeling results from the creative features of Zbrush that increase users’ comfort and give them more freedom while producing complex organic shapes [9]. It is easier to prepare a 3D model ready for 3D printing or to 3D print a mold ready for cast in silicone. The digitalization of epithesis formation has also created key solutions for the communication stages of each project, as this makes it possible to consult on a particular model with other team members and/or the patient by sending and resending 3D model data files. Moreover, 3D printing nowadays is a new technology that enables the faster production of facial epitheses, with greater accuracy and efficiency [8].
This paper presents a prosthetic rehabilitation workflow using new digital technologies (CBCT, digital sculpting, and 3D printing) for patients suffering from extensive maxillofacial defects in comparison with the traditional workflow of epitheses creation.
2. Materials and Methods
The digital facial scan data were obtained with CBCT (CS 9600 CBCT Scanner). A 3D reconstruction was used for a proper maxillofacial defect assessment. In the presented case, the nasal prosthesis was designed based on the patient’s facial photography, before oncological treatment. The sculpting process took place according to the following stages:
- importing the CBCT scan into the Zbrush software as a 3D mesh.
- determining the area of the face in need of supplementation with an epithesis (finding the border and points of contact with the body).
- extracting a fragment of the 3D mesh to be transformed into a 3D epithesis model using the mask tool and creating a polygroup tool.
- repairing and increasing the 3D mesh density using the dynamesh tool in Zbrush for free-hand sculpting.
- placing a picture of the patient’s face (before oncological treatment) into the Zbrush software in front of the CBTC scan and fitting its scale.
- using the transparency function of the CBCT scan, which reveals missing parts of the nose on the scan and leads to a conclusion of what exactly needs to be added [10,11].
After the shape and size of the digital epithesis had been worked out in detail, the sculpture and scan were precisely adjusted using the Boolean tool in Zbrush. Once the epithesis shape was prepared, the resolution of the 3D mesh could be increased to approximately 10 million polygons and the texture was ready to be applied via the alpha spray tool as the skin [10]. In the resulting digital sculpting design, the skin texture was added, a comparison with the patient’s photo was made, and all corrections were carried out. The computer visualization of the future prosthesis was accepted by the patient. (Figure 1).
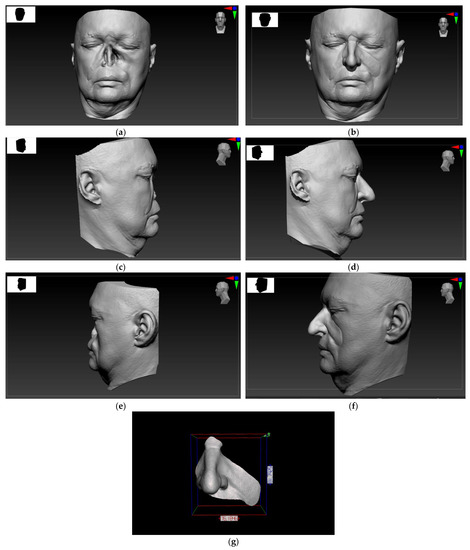
Figure 1.
Digital scans of the facial topography displayed on the Zbrush software designed for digital sculpting: Extensive defect of the nose, and part of the left maxilla and cheek (a) en face view; (c) right profile view; and (e) left profile view of the patient. A 3D digital model design of the maxillofacial prosthesis: (b) en face view; (d) right profile view; (f) left profile view of the patient; and (g) en face view with scale bar.
The digital version was 3D printed and served as a test version for the try-on. Contrary to silicone, which is the target material, the resin that was used to print the trial prosthesis is not plastic. This can be problematic when trying to fit a prosthesis which should remain in the resection site by wedging and adhesion. In this case, the printed trial prosthesis was intended for try-on only, so that the patient could accept the shape of the restoration. The patient’s glasses were chosen as the main support element for the prosthesis. An edge-to-skin interface of the trial model, if needed, can be assessed and any corrections can be transferred into Zbrush software to improve the digital version of the epithesis’ final molds, or, if there is no need for corrections, the molds can be printed. Reverse engineering is required to make the molds. Obtaining a digital negative is made possible by using the tools of the Zbrush software program. The Zbrush is required in order to make the molds. Obtaining a digital negative is made possible using tools such as the Boolean, Zremesher, Qmesh, and the Polygroup island [12]. In addition, it is very important to properly design the division of negative forms, venting channels, and pouring channels. They should be designed individually for each prosthetic restoration. Since the silicon on the edges of the epithesis is very thin, it is extremely easy to damage if the molds are not planned in the proper way. The elasticity of the silicone allows for slight retention; however, if too much retention is left in the molds, the prosthesis will jam and may be damaged during the release process. The molds were printed on an SLA printer (Phrozen Sonic Mighty 4K). (Figure 2).
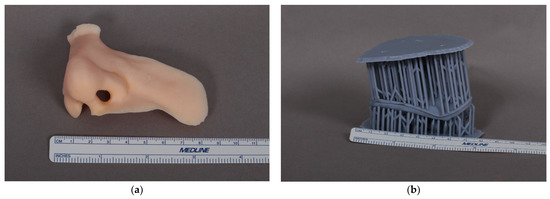
Figure 2.
(a) A 3D printed trial prosthesis of the nose. (b) Molds printed on a 3D SLA printer.
Finally, the silicone, Platsil Gel 10 fast curing platinum/addition cure, was prepared for casting. The base color of the silicone was matched to the color of the patient’s capillary refill time, which is the brightest individual color tone that can occur in a given patient. The skin tone selected in this way is an excellent base for individual shading. Mixing in pigments and flocking to the silicone helps to achieve a cohesive color. Flocking helps with achieving small vein and broken vessels effect. Depending on which part of the face is being rebuilt, an adequate amount of Smiths Prosthetic Deadener is added to vary the softness of the prosthetic and match it with surrounding tissues, thus eliminating the synthetic look and feel of common silicone rubbers. Deadened Platsil Gel 10 can be made to look, feel, and move like a variety of living tissues. The mold was closed tight with bar clamps that applied a particular pressure, ensuring a thorough seal. The silicone was injected through the infusion hole. A superfluity silicone mixture came out through the air slot and no air bubbles remained. Properly designing the edge of the epithesis is essential. To obtain an unostentatious interface between the epithesis and a patient’s tissues, the edges must be cautiously tapered. The edges of the prosthesis should taper out from 0.3 to 0.1 mm, an amount proven to be adequate for maintaining durability while achieving a sufficient prosthesis–skin interface.
The cured silicone prosthesis was removed from the mold for final detailing after a 30 min bench cure at room temperature. The excess silicon from the rim of the prosthesis was trimmed and inspected to make sure no defects were formed during casting. For a final result, a layer of extrinsic coloration was applied by hand to the surface with a makeup set, using a Skin Illustrator Palette. These pigments add details such as shading and increase the aesthetic qualities of the prosthesis, giving it depth and density, and making it more realistic. Once the silicone paint had set, the sealing and matting process followed. In a complex process, a silicone prosthetic sealant was applied, texturized and matted to secure the details of the prosthesis, which increased the resemblance of the color and texture of the tissues surrounding the patient’s facial defect.
3. Results
The description of the methodology for creating a facial epithesis is presented through the example of a 50-year-old patient who was operated on in September 2019 for squamous cell carcinoma of the nose with infiltration of the left maxilla and the nasal cavity (T4N0M0). Due to the advanced stage, the patient additionally underwent adjuvant radiochemotherapy. In 2020, a bone sequestrectomy was performed in the left maxilla and the piriform aperture. Due to difficult healing and complications after radiotherapy, the patient qualified for facial reconstruction with a prosthesis without endosseous implants. Maxillofacial prosthesis retention was achieved with eyeglasses, anatomic undercuts and an adhesive (Pros-Aide The original adhesive). Satisfactory aesthetic and functional effects were obtained. (Figure 3).
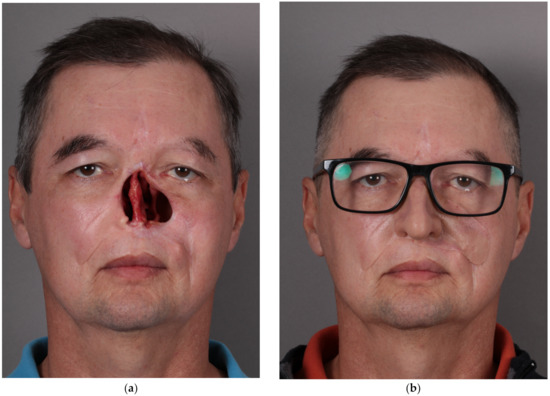
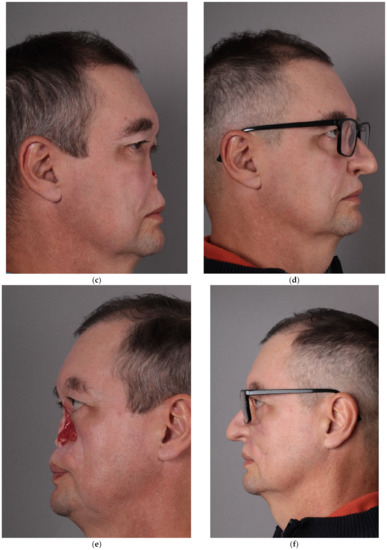
Figure 3.
Patient after resection of squamous cell carcinoma of the nose, part of the left maxilla and cheek, and postoperative radiochemotherapy: (a) en face view; (c) right profile view; and (e) left profile view of the patient. Restorative facial prosthesis: (b) en face view; (d) right profile view; and (f) left profile view of the patient.
4. Discussion
The traditional workflow for creating an epithesis takes an anaplastologist approximately 7–14 days to finish the fabrication using traditional contact impression, mold making, wax carving, and casting and creating the silicone epithesis, as well as including patient visits to the hospital related to the fittings of the prosthesis at individual stages of the workflow [13]. The process of taking a facial impression was very uncomfortable for the patient due to the duration of plaster setting, the possibility of aspiration of the impression mass to the upper respiratory tract, and the inability to accurately reproduce the whole post-resection defect [6]. Aspiration of plaster during a facial impression can be a life-threatening situation [14]. This time-consuming and stressful process can now be replaced by a painless CBCT procedure. Unlike a standard dental X-ray, CBCT captures a 3D image and images of the soft tissues of the face. It is a non-invasive way to get a complete 3D picture of the surface of a patient’s face [15]. It exposes patients to substantially less radiation than a traditional CT. CBCT is used to create a 3D image of a body region, usually the mouth, head, and face. A scan takes approximately 20 s and is completely painless. This is a tremendous innovation compared with a manual impression. Better facial topography and skin texture capture is also possible using high-resolution 3D scanners [16]. Yet another advantage of CBCT is its utility in planning for implantation for implant-retained prostheses rehabilitation.
In the next stage of the traditional workflow for creating an epithesis, the anaplastologist manually sculpts a wax model of the prosthesis on a plaster model of the face. Unfortunately, the wax carving has a serious defect in that once the changes have been made, they cannot be easily undone. Each change of design requires many hours of work, excellent manual skills, and is associated with the inability to immediately return to the previous version of the sculpture design. This is where the Zbrush software and digital sculpting prove useful in designing the prosthesis. A digitally designed epithesis trial model can be printed for fitting, the same as a wax model [8]. In the traditional workflow, the next step would be to make plaster molds. The wax model is lost in the technological process of making them. The resulting forms can also be damaged during the casting of a silicone prosthesis. If that happens, all work has to be started from the beginning, which could be a huge setback in the process. In comparison, the main advantage of a computer design is that each step of the design process can be saved, refined and improved. Most importantly, it is possible to reprint molds without the need of designing them again, which is of great importance when the final denture wears out or breaks down [17,18]. Another advantage of digital sculpting is that a patient can actively participate in the designing of the prosthetic restoration, and can give the creator tips on how he/she would like to look after the restoration while simultaneously viewing the effects on the screen. Digital tools enable the preparation of many virtual epitheses without the need of ultimate implementation. The result can be presented to the patient who might accept the best version. This affects not only the aesthetic but especially the psychological aspect of the process as well that favors the full acceptance of the patient’s new appearance. The whole process does not have to take place in a hospital, which can often be associated with painful procedures and loss of a part of the patient’s own identity [7]. All that is needed for visualization is a laptop or tablet with dedicated software, which ensures that meeting in a safe and patient-friendly environment is possible.
The workflow color selection and coloring of the prosthesis was done by a skilled prosthetist. However, visual perception can fail. Many factors, such as light, influence the way the human eye sees and processes color. The same color can be seen one way on a cloudy day, differently on a sunny one, and differently under artificial light. An incorrectly selected silicon base color might spoil the end result of the time-consuming work of manufacturing a prosthesis. Another possibility of facilitation is the usage of a spectrophotometer for the digital skin color assessment in order to select the appropriate silicone color for a facial prosthesis [8,16]. This utility might automate and speed up the prosthesis workflow even more and eliminate human errors, which can be made by visual perception. Additionally, the elimination of the stage of mold production by direct epithesis 3D printing might save time [13]. Unkovskiy et al. showed that direct 3D printing of silicone facial prostheses is possible [19]. However, there are still some limitations to this process such as achieving a satisfactory texture in the SLA-method-printed pre-cast molds [20,21]. Moreover, the profile of skin texture on prefabricated forms with SLA printing has its drawbacks compared with the PolyJet method, such as 7% of skin-profile loss [21]. The manual finishing of the prosthesis is necessary to achieve an acceptable aesthetic outcome. The roughened silicone surface of the printed prosthesis is required for better pigmentation, but at the cost of losing wrinkles and furrows applied by the computer-aided design (CAD) software [22,23]. Another problem is the edge-to-skin interface of the prosthesis. The printed prosthesis has a layer of thickness of 0.4 mm, which is much greater compared with the thicknesses of approximately 0.1 mm achieved in the conventional casting process. For this reason, aesthetic outcomes are not sufficiently satisfactory. Therefore, at this point, this type of prosthesis might only be an intermediate step before the final epithesis or surgical reconstruction. In addition, currently printed prostheses are not made from a medically certified silicone [19]. Furthermore, the biggest problem is that the silicone 3D printers for this type of epithesis production are not widely available and are still expensive. The solution to this problem might be prostheses printed with medically certified, flexible resins using widely available SLA printers [24]. However, research on this problem still requires further development. Another important issue to mention is the functionality of the facial prosthesis. An auricle or an orbital prosthesis usually fulfills aesthetic functions. The sculpture and pigmentation of the prosthesis must be at the highest possible degree of quality, so a patient can feel psychological comfort [7,8]. A nasal prosthesis, besides providing an aesthetic function, is also an important element of the patient’s rehabilitation [25].
Presumably, a silicone epithesis is expected to last 12–24 months before material degradation and fraying of the appliance edges reach a point where a new prosthesis is needed. Unfortunately, many patients cannot afford to get a prosthesis and usually cover their defect with a patch. Even after obtaining a first prosthesis, the cost of the replacement is often so high that patients end up wearing a worn out, faded, and discolored prosthesis. This article only highlights how the epithesis manufacturing process can be improved in a way that is not so expensive and does not require many additional devices, such as a high-resolution digital 3D scanner or a spectrophotometer. Combining the digital methods, starting with the CBCT of the patient’s face through to the digitization of the design of the prosthetic restoration and ending with the design and printing of molds, seems to be a beneficial and timesaving solution. With many new technologies becoming more and more available, it is enough to combine them together to obtain the best clinical result, while saving time and cost. Most likely, the future is facial scanning with digital skin color and texture selection, computer modeling, and direct 3D printing of the prosthesis where color and texture are perfectly matched. Even the surgeon alone will be able to do it after a single appointment with the patient.
5. Conclusions
In conclusion, the innovation and adaptation of new technologies might not only speed up and facilitate the workflow in the prosthodontic and maxillofacial surgery departments but, above all, would also be beneficial for the patient. Within seconds, CBCT gives an excellent quality digital scan of the patient’s face, thus saving not only time but also any stress associated with the traditional method of taking an impression. High-resolution digital scanners and spectrophotometers allow for an accurate scan of the skin surface, as well as its texture and color. Digital sculpting software for the manipulation of complex 3D digital data sets is a tool with unlimited possibilities in the field of maxillofacial prosthetic reconstruction. High-resolution 3D printers and resin used for printing still require research, especially biocompatible elastic resins, which might replace silicone and can be used in the 3D printing of restorative prostheses. The use of digital technologies can help reduce costs, improve quality and efficiency, and overcome the technical obstacles that limit access to facial prostheses for many patients around the world.
Author Contributions
Conceptualization, K.E., P.I., and M.G.; methodology, K.E., P.I., and M.G.; software, P.I., J.B., and M.G.; validation, K.E., G.W.-P., and J.Z.; formal analysis, M.G., G.W.-P., and J.Z.; investigation, K.E., J.B., P.I., and M.G.; resources, M.G., J.Z., and G.W.-P.; data curation, K.E., P.I., and J.B.; writing—original draft preparation, K.E., P.I., and M.G.; writing—review and editing, K.E. and G.W.-P.; visualization, P.I., M.G., and J.B.; supervision, M.G., J.Z., and G.W.-P.; project administration, M.G. and J.Z. All authors have read and agreed to the published version of the manuscript.
Funding
This research received no external funding.
Institutional Review Board Statement
The study was conducted according to the guidelines of the Declaration of Helsinki and approved by the Institutional Review Board of the Jagiellonian University (No: 1072.6120.229.2021, date of approval is on 29 September 2021).
Informed Consent Statement
The patient has given his consent for the case report to be published.
Data Availability Statement
Restrictions apply to the availability of these data. Data were obtained from a patient treated at the Department of Cranio-Maxillofacial Surgery, Cracow, Poland, and cannot be shared, in accordance with the General Data Protection Regulation (EU) 2016/679.
Acknowledgments
We thank Krzysztof Śliwiński for technical assistance in clinical imaging.
Conflicts of Interest
The authors declare no conflict of interest.
References
- Nyberg, E.L.; Farris, A.L.; Hung, B.P.; Dias, M.; Garcia, J.R.; Dorafshar, A.H.; Grayson, W.L. 3D-Printing Technologies for Craniofacial Rehabilitation, Reconstruction, and Regeneration. Ann. Biomed. Eng. 2017, 45, 45–57. [Google Scholar] [CrossRef] [PubMed]
- PPapaspyrou, G.; Schick, B.; Schneider, M.; Al Kadah, B. Epithetic nasal reconstruction for nasal carcinoma: Retrospective analysis on 22 patients. Eur. Arch. Otorhinolaryngol. 2017, 274, 867–872. [Google Scholar] [CrossRef] [PubMed]
- Pawar, S.S.; Kim, M. Updates in forehead flap reconstruction of facial defects. Curr. Opin. Otolaryngol. Head Neck Surg. 2013, 21, 384–388. [Google Scholar] [CrossRef] [PubMed]
- Krakowczyk, Ł.; Szymczyk, C.; Wierzgoń, J.; Oleś, K.; Smyczek, D.; Ulczok, R.; Donocik, K.; Hadasik, G.; Piotrowska, A.; Maciejewski, A. Microvascular nose reconstruction after extended tumor resection. Pol. Przegl. Chir. 2020, 25, 1–7. [Google Scholar] [CrossRef] [PubMed]
- López, F.; Suárez, C.; Carnero, S.; Martín, C.; Camporro, D.; Llorente, J.L. Free flaps in orbital exenteration: A safe and effective method for reconstruction. Eur. Arch Otorhinolaryngol. 2013, 270, 1947–1952. [Google Scholar] [CrossRef] [PubMed]
- Jain, S.; Guttal, S.S. Prosthetic Rehabilitation of Nose After Partial Rhinectomy in a Patient Affected with Mucormycosis: A Case Report Indian. J. Otolaryngol. Head Neck Surg. 2021, 29, 1–4. [Google Scholar] [CrossRef] [PubMed]
- Dings, J.P.; Merkx, M.A.; Maclennan-Naphausen, M.T.D.C.; van de Pol, P.; Maal, T.J.; Meijer, G.J. Maxillofacial prosthetic rehabilitation: A survey on the quality of life. J. Prosthet. Dent. 2018, 120, 780–786. [Google Scholar] [CrossRef] [PubMed]
- Yousefi, P.; Yeganeh, F.; Cheshmi, B.; Keyhan, S.O.; Azari, A.; Mosharraf, R. Facial prosthesis: Conventional methods versus 3D concepts. In Integrated Procedures in Facial Cosmetic Surgery; Springer eBook; Springer: Berlin/Heidelberg, Germany, 2021; pp. 209–219. [Google Scholar] [CrossRef]
- Zbrush 2022 Sfeatures. Available online: http://docs.pixologic.com/features/ (accessed on 7 November 2022).
- Tickoo, S. Pixologic ZBrush 2021: A Comprehensive Guide, 7th ed.; CADCIM Technologies: Schererville, IN, USA, 2021. [Google Scholar]
- Sandis, K.; Uldis, Z. Anatomy for Sculptors, Understanding the Human Figure; Anatomy Next: Riga, Latvia, 2014. [Google Scholar]
- Zbrush 3D modeling. Available online: http://docs.pixologic.com/user-guide/3d-modeling/ (accessed on 7 November 2022).
- Nuseir, A.; Hatamleh, M.M.; Alnazzawi, A. Direct 3D Printing of Flexible Nasal Prosthesis: Optimized Digital Workflow from Scan to Fit. J. Prosthodont. 2019, 28, 10–14. [Google Scholar] [CrossRef] [PubMed]
- Rui Hou, R.; Zhou, H.; Hu, K. Thorough documentation of the accidental aspiration and ingestion of foreign objects during dental procedure is necessary: Review and analysis of 617 cases. Head Face Med. 2016, 12, 23. [Google Scholar] [CrossRef]
- Lincoln, K.P.; Sun, A.Y.T.; Prihoda, T.J.; Sutton, A.J. Comparative Accuracy of Facial Models Fabricated Using Traditional and 3D Imaging Techniques. J. Prosthodont. 2016, 25, 207–215. [Google Scholar] [CrossRef] [PubMed]
- Weisson, E.H.; Fittipaldi, M.; Concepcion, C.A.; Pelaez, D.; Grace, L.; Tse, D.T. Automated Noncontact Facial Topography Mapping, 3- Dimensional Printing, and Silicone Casting of Orbital Prosthesis. Am. J. Ophthalmol. 2020, 220, 27–36. [Google Scholar] [CrossRef] [PubMed]
- Bachelet, J.; Jouan, R.; Prade, V.; Francisco, C.; Jaby, P.; Gleizal, A. Place of 3D printing in facial epithesis. J. Stomatol. Oral Maxillofac. Surg. 2017, 118, 224–227. [Google Scholar] [CrossRef] [PubMed]
- Powell, S.K.; Cruz, R.L.J.; Ross, M.T.; Woodruff, M.A. Past, Present, and Future of Soft-Tissue Prosthetics: Advanced Polymers and Advanced Manufacturing. Adv. Mater. 2020, 32, e2001122. [Google Scholar] [CrossRef] [PubMed]
- Unkovskiy, A.; Spintzyk, S.; Brom, J.; Huettig, F.; Keutel, C. Direct 3D printing of silicone facial prostheses: A preliminary experience in digital workflow. J. Prosthet. Dent. 2018, 120, 303–308. [Google Scholar] [CrossRef] [PubMed]
- Unkovskiy, A.; Roehler, A.; Huettig, F.; Geis-Gerstorfer, J.; Brom, J.; Keutel, C.; Spintzyk, S. Simplifying the digital workflow of facial prostheses manufacturing using a three-dimensional (3D) database: Setup, development, and aspects of virtual data validation for reproduction. J. Prosthodont. Res. 2019, 63, 313–320. [Google Scholar] [CrossRef] [PubMed]
- Unkovskiy, A.; Spintzyk, S.; Kiemle, T.; Roehler, A.; Huettig, F. Trueness and precision of skin surface reproduction in digital workflows for facial prosthesis fabrication. J. Prosthet. Dent. 2022, 4, S0022-3913(21)00397-8. [Google Scholar] [CrossRef] [PubMed]
- Jindal, S.K.; Sherriff, M.; Waters, M.G.; Coward, T.J. Development of a 3D printable maxillofacial silicone: Part I. Optimization of polydimethylsiloxane chains and cross-linker concentration. J. Prosthet. Dent. 2016, 116, 617–622. [Google Scholar] [CrossRef]
- Jindal, S.K.; Sherriff, M.; Waters, M.G.; Smay, J.E.; Coward, T.J. Development of a 3D printable maxillofacial silicone: Part II. Optimization of moderator and thixotropic agent. J. Prosthet. Dent. 2018, 119, 299–304. [Google Scholar] [CrossRef] [PubMed]
- Fay, C.D.; Jeiranikhameneh, A.; Sayyar, S.; Talebian, S.; Nagle, A.; Cheng, K.; Fleming, S.; Mukherjee, P.; Wallace, G.G. Development of a customised 3D printer as a potential tool for direct printing of patient-specific facial prosthesis. Int. J. Adv. Manuf. Technol. 2022, 120, 7143–7155. [Google Scholar] [CrossRef]
- Meran, Z.; Besinis, A.; De Peralta, T. Antifungal properties and biocompatibility of silver nanoparticle coatings on silicone maxillofacial prostheses in vitro. J. Biomed. Mater. Res. B Appl. Biomater. 2018, 106, 1038–1051. [Google Scholar] [CrossRef] [PubMed]


Publisher’s Note: MDPI stays neutral with regard to jurisdictional claims in published maps and institutional affiliations. |
© 2022 by the authors. Licensee MDPI, Basel, Switzerland. This article is an open access article distributed under the terms and conditions of the Creative Commons Attribution (CC BY) license (https://creativecommons.org/licenses/by/4.0/).