Article

Dry Test Methods for Micropumps

Debiotech SA, 28 Avenue de Sévelin, 1004 Lausanne, Switzerland
Appl. Sci. 2022, 12(23), 12258; https://doi.org/10.3390/app122312258
Submission received: 10 November 2022 / Revised: 24 November 2022 / Accepted: 26 November 2022 / Published: 30 November 2022
(This article belongs to the Collection BioMEMS)

Abstract

:

Featured Application

This work describes the design for testability and the industrialized functional test methods of an insulin micropump for type 1 diabetes care.

Abstract

The test in the production of microfluidic devices dedicated to medical applications poses several challenges in terms of contamination, reliability, and cost. The present article describes the Design-for-Testability approach used to make an insulin MEMS micropump that can be fully tested in production in a few seconds. Each key functional parameter of a positive displacement micropump with check valves is described together with detailed pneumatic test methods. The typical failure modes of the device are considered and tested experimentally to show that these methods can also be used for failure analysis and process control. A simplified Built-In-Self-Test is also presented. Finally, advanced methods to characterize the piezoelectric actuator are also described and tested.

1. Introduction

The development of high throughput and low-cost testing methods and equipment for MEMS-based products has become a strategic topic to penetrate the consumer market. In addition, the Design-for-Testability approach is of great interest to reduce the cost of the test and to enable a built-in self-test where applicable. Due to the complexity of MEMS structures compared to ICs, the cost of the test in production can represent up to 30% of the end product price [1,2,3,4]. MEMS devices exploit multiple domains (electrical, chemical, optical, mechanical, thermal, biological, fluidic, etc.) that require the development of specific test methods [5]. Depending on the production yield, tests are performed at different stages: at the wafer level (e.g., Electrical Wafer Sorting) using Automatic Test Equipment (ATE), after singulation and wire bonding, or after packaging to verify the overall device functionality. The goal of this approach is to reject a defective device in the earliest stage because the packaging of MEMS often represents 50% of the total manufacturing costs [3,4,5]. During the final test of MEMS in production, physical, electrical, or any other stimuli are submitted to the system, and the device output is monitored to determine conformity to product requirements and to calibrate some key parameters. The test strategy is based on the analysis of the key output parameters and the failure modes of the device [5,6,7]. MEMS inertial sensors are, for instance, submitted to an acceleration that is representative of their use in the field (low-g consumer applications or high-g automotive domain). Zero-g level and sensor sensitivity are also calibrated during the test. RF MEMS devices require spectrum analyzers connected to a probe station [8,9]. The self-functional test of piezoresistive pressure sensors consist of the generation of the mechanical stimuli to the sensor membrane through a pneumatic actuation [10]. The air inside the pressure sensor cavity is heated by Joule effect that results from the generation of an electrical pulse to a resistor.
BioMEMS, which refers, in its wider acceptance, to any biomedical device that is partly or fully made using any microfabrication process and which therefore has at least one micrometric or submicrometric feature, presents difficulties related to risks of contamination and loss of sterility during the postproduction tests. Examples of bioMEMS devices include micropumps, lab-on-a-chip, organ-on-a-chip, DNA microarray, chemical sensor array, retina array, neuroMEMS, cell chips, droplet sorting devices using Electro-conjugate Fluid micropumps, etc. [11,12,13].
A BioMEMS for drug delivery should ideally be tested with a liquid to evaluate the effectiveness of the device. However, this method, which is difficult to implement and costly due to interconnection, drying, pollution, and sterility issues, can often be considered destructive except if the liquid remains in the system. In implantable applications, when the cost of the test does not matter, the pumping device can be filled near to capacity with sterile water and tested in production. This method was used by Medtronic for Synchromed II, the most implanted device in the USA for pain and spasticity [14,15]. So, one of the first end-user operations is to empty the reservoir before the transfer of the drug into the pump reservoir. This procedure is cumbersome and impacts the concentration of the drug due to the presence of some residual sterile water in the reservoir. Priming the pump in production may also be considered if the system is not self-priming, but this option is costly and requires specific storage conditions. In addition, a device prefilled with a drug or biologic is a combination product regulated as a medicinal product [16]. This option has therefore an important impact on the time-to-market and the development cost. Alternatively, functional testing with gas is an attractive approach for several types of microfluidic devices, notably passive flow regulators [17], micropumps [18,19], gas sensing [20,21], or gas flow sensors [22,23]. The functional testing of BioMEMS can be therefore a critical risk for the project, and the associated cost may be not compatible with the reimbursement strategy of the medical device. Determining the functional test approach during the early development phase can be a determinant factor to market the device. An interesting example is the functional testing approach for pin-constrained biochips. Indeed, the increase in density and surface area of biochips generates, as for integrated circuits, higher defect densities, which reinforce the need for postproduction tests. Xu et al. developed innovative techniques that address fundamental biochip operations, such as droplet dispensing, droplet transportation, mixing, splitting, and capacitive sensing. Functional testing is performed through parallel droplet pathways and leads to qualified regions where synthesis tools can map microfluidic functional modules [24].
The present paper describes the Design-for-Testability of an insulin micropump dedicated to type 1 diabetes care. Diabetes is a chronic, metabolic disorder characterized by high blood sugar levels (hyperglycemia), which leads to severe damage over time. Type 1 diabetes, also known as insulin-dependent diabetes, is a chronic condition in which the beta cells of the pancreas produce little or no insulin. For people with type 1 diabetes, daily insulin administration is essential for their survival. Traditionally, the most common route of insulin administration in patients with diabetes is by subcutaneous injection using an insulin syringe or a pen. The most advanced insulin delivery systems are patch pumps that deliver, through a thin cannula placed subcutaneously, rapid-acting insulin 24 h a day to match body requirements. These pumps can be programmed to deliver basal and bolus insulin doses. The rates of basal insulin delivery can be programmed based on individual patient requirements. Insulin pumps can also deliver bolus insulin to minimize postmeal high blood sugar level excursions [25]. Recent trends include connectivity to a Continuous Glucose Monitoring system (CGM) that transmits glucose readings to the device. The artificial pancreas or closed-loop system consists of an automated insulin delivery system, a CGM, and an insulin delivery algorithm. Such a system aims to deliver a continuous and precise dose of insulin to mimic physiologic insulin secretion by the pancreatic beta cells [26]. Hemoglobin A1C and glucose control are better controlled, and the daily insulin dosage is reduced together with hypoglycemia risk and glycemic variability to ultimately improve patient satisfaction and quality of life.
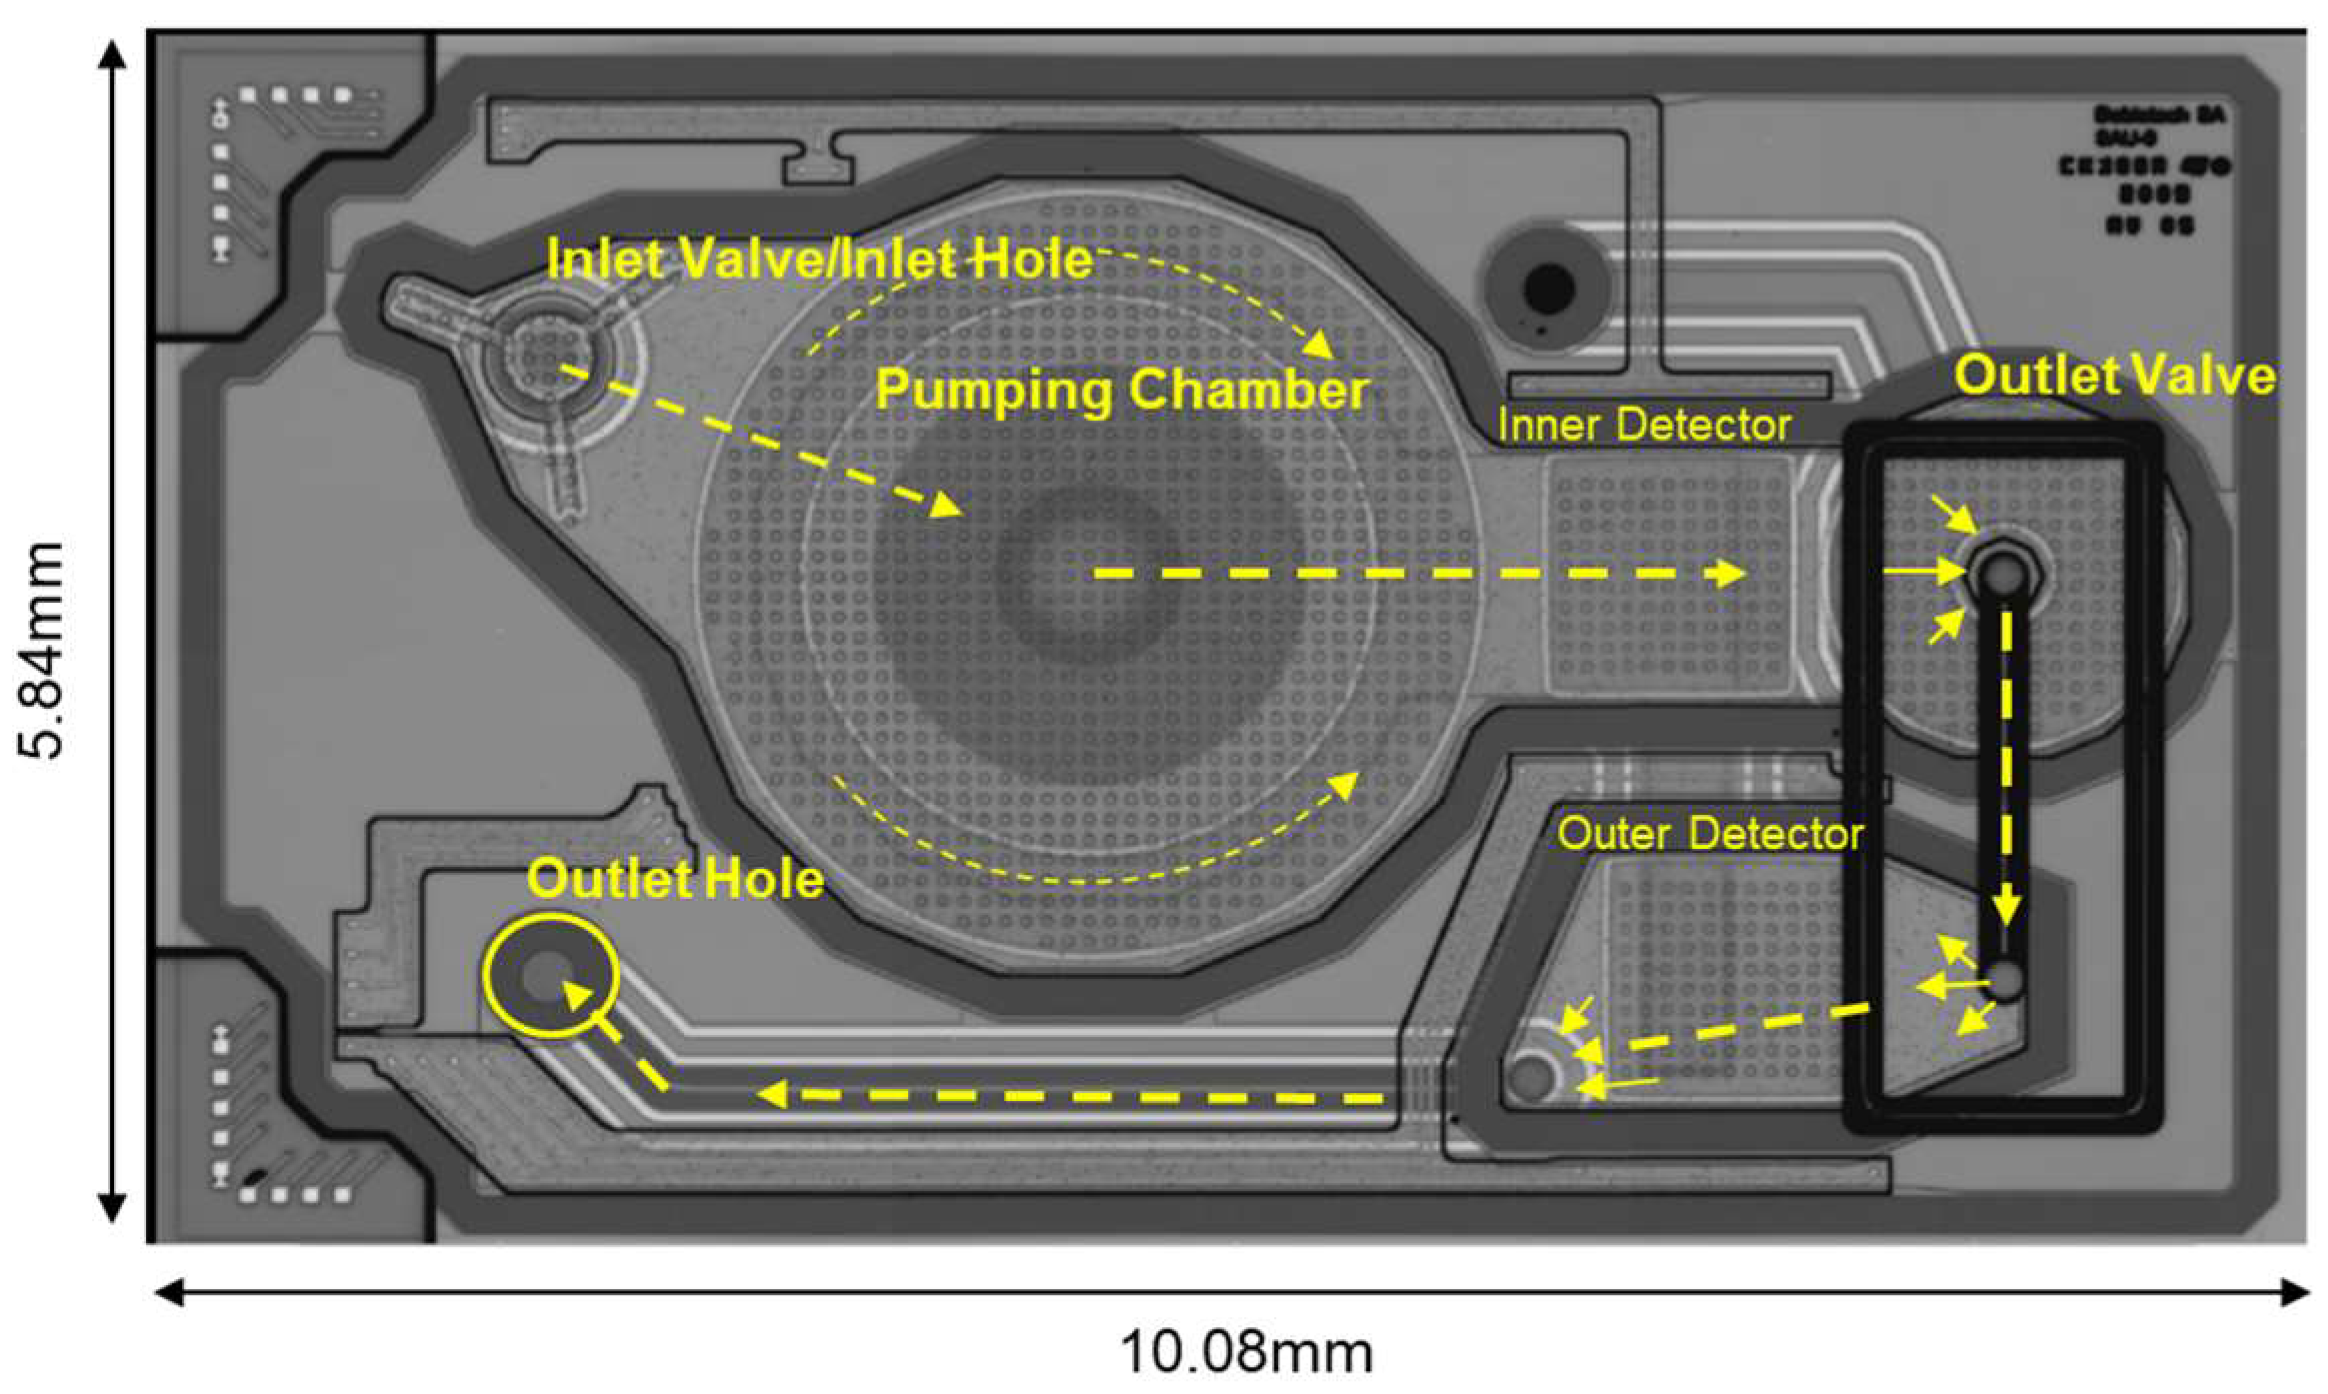
The device considered here is a disposable MEMS micropump powered by a piezo actuator. The system is a membrane micropump with two passive check valves. Due to the high potency of insulin, the production test will verify that the system presents any risks of over- and under-delivery during use. Figure 1 presents an exploded view of the volumetric piezoelectric micropump with two passive check valves considered here to illustrate the Design-for-Testability method [27,28]. The micropump can deliver basal insulin in increments of 0.02 units (U) of U100 insulin per hour with high accuracy. Each pump stroke infuses 0.2 microliters of insulin with a maximum error of 3%, making it compatible with a highly concentrated insulin formulation (up to 500 U/mL (U-500) insulin). The device is made of a triple stack of wafers bonded together by Au–Au thermocompression: one silicon-on-insulator plate with the micromachined pump and valve structures and top and cover silicon plates with through holes (see Figure 1). Two square silicon membranes comprising piezoresistive strain gauges obtained by boron implantation are used to measure the pressure in the pumping chamber and at the outlet of the micropump. The yellow lines represent the sealing and bonding structures. The references [27,28,29] provide a detailed description of the system. The fluid pathway is shown in Figure 2. The features related to testability are discussed in the following sections. The opening thresholds of the passive check valves (i.e., valve pretensions) are equal to 100 mbar.
A brief review of the Critical-to-Quality parameters of an insulin MEMS micropump and some key features of the system considered in this study are provided first, including notably the Design-for-Testability features. Generic test methods with air that enable fast and reliable functional testing in production are then described in detail. The experimental pressure profiles of micropumps exhibiting various failure modes are shown, and advanced test methods used in process control to monitor and characterize the piezo actuator assembly are described and tested experimentally. Finally, a simplified Built-in Self-Test that is performed before the positioning of the system onto the patient is also discussed.

2. Materials and Methods

2.1. Design Description

2.1.1. MEMS Membrane Micropump

The present article investigates means to test MEMS membrane micropumps in production, considering the important constraints in terms of sterility, contamination, cost, and reliability. A membrane micropump consists of a variable volume pumping chamber, a movable membrane, an actuator, and, at the inlet and the outlet of the pumping chamber, flow-rectifying elements that can be holes, nozzles, or passive check valves [19,30]. The membrane micropump is built around the reciprocating concept: a cyclic movement of the membrane is obtained with an actuator, and the resulting volume changes in the pumping chamber lead to two alternate pumping phases:
  • Supply phase: the upward movement of the membrane leads to an increase in the pumping chamber volume and a lowering of the pressure; thus, liquid enters from the inlet toward the pumping chamber.
  • Infusion phase: the downward movement of the membrane lowers the pumping chamber volume and increases the pressure; thus, liquid flows from the pumping chamber toward the outlet.
The two phases of the actuation cycle of a membrane micropump with check valves are illustrated in Figure 3. The stroke volume V S is the volume displaced during an actuation cycle. The minimum pumping chamber volume (at the end of the infusion phase) is the dead volume V D . Therefore, the volume of the pumping chamber varies alternatively between V D (at the end of the infusion phase) and V 0 + V S (at the end of the supply phase).
The compression ratio ε is defined by:
ε = V S V D

2.1.2. Critical-to-Quality Parameters and Basic Outputs

The determination of the Critical-to-Quality parameters of an insulin micropump is part of the risk management activity. A functional test in production is implemented to check the essential performances of the system and mitigate the two main patient risks, namely over- and under-deliveries. Both failure modes can be due to a pumping cavity out-of-specification. Valve leakage is another typical root cause of under-delivery and eventually over-delivery in the case of free flow conditions. In addition to standard electrical or wireless self-tests performed in the production, the functional test that mimics the micropump action in the field consists of pumping fluid. Below is a list of parameters or characteristics that can ideally be evaluated during this test:
  • Compression ratio;
  • Stroke volume;
  • Pumping cavity tightness;
  • Valve tightness;
  • Valve pretension (opening threshold);
  • Pressure sensor functionality (calibration/offset);
  • Outlet fluid path tightness;
  • Maximum pumping pressure;
  • Actuator functionality.
Additional nice-to-have characteristics can also be monitored for process control and process setup, including:
  • Membrane offset;
  • Pumping mechanism stiffness;
  • Actuator blocking force.

2.1.3. Design-for-Testability

Functional tests can be performed at the wafer level and the end of the packaging. A focus here is on the final test in production, but some insights about wafer-level tests will be addressed too.
As discussed previously, testing with a liquid could only be considered for a few limited numbers of applications and prefilled devices. A micropump is ideally tested with nitrogen, dry air, or any other inactive gas to prevent any risk of valve stiction, contamination, change of the surface properties, uncontrolled bioburden, etc. For a pulsatile micropump, performing accuracy tests with water turns out to be a complex task. As an example, the integration time of microflowmeters can prevent the correct determination of the stroke volume, and weighing tests are usually preferred [31]. With gas, the use of a flowmeter is even more challenging except if the device includes embedded flow-sensing elements. The monitoring of the pressure inside the pumping cavity during air pumping is an interesting option that offers numerous advantages including high sensitivity, fast response, and a large signal-to-noise ratio.
Design-for-Testability consists in enabling individual pneumatic access to each micropump membrane, including the pumping membrane, the sensing membranes (pressure sensors), and the outlet membrane. Pneumatic access is obtained by micromachining of through holes (DRIE) in the bottom plate and tight sealing between the coupling areas (SOI wafer backside and bottom wafer front side). The schematic is straightforward for the pumping membrane and the pressure sensor. The specific outlet valve pneumatic access is illustrated in Figure 4. Pressurizing the backside of the valve can either force the valve open or close depending on the test sequence that is described in the following sections. After the final assembly of the micropump onto the insulin reservoir (see [28] for a detailed description of the system structure), the backside of the outlet valve is in pneumatic communication with the reservoir to prevent insulin free flow. In the case of an increase in the pressure gradient between the reservoir and micropump outlet, the outlet valve remains closed as the same pressure applies on both surfaces of the valve that is furthermore normally closed, with an opening threshold of about +100 mbar.

2.2. Methods

If not specified, absolute pressures are used in the equations.

2.2.1. Compression Ratio and Stroke Volume

The compression ratio is an important micropump characteristic that affects self-priming, maximum output pressure, and stroke volume.
The pressure applied at the backside of the outlet valve is noted P v e n t , and the atmospheric pressure is P a t m . The test method—compression test #1—is described hereafter:
  • Admission phase
    Pull down the pumping membrane;
    Set P v e n t at low pressure (e.g., <0.3 bar or −0.7 barg) to widely open the outlet valve and thus fill the pumping chamber with air at the pressure P a t m .
  • Compression phase:
    Set P v e n t at high pressure (e.g., >2.1 bar or +1.1 barg) to keep the outlet closed during the compression of the air in the pumping chamber;
    Push up the pumping membrane and compress the gas in the pumping chamber.
During this compression test #1, the pressure sensor signal is monitored.
The pumping chamber volumes before and after compression are V D + V S and V D respectively, where V S is the stroke volume, and V D is the dead volume.
Due to the dimensions of the system and the nature of the materials (Silicon), it is assumed that the compression is isothermal. The pumping cavity is assumed to be tight enough to allow the measurement of the compression ratio. Thus, according to the Boyle–Mariotte law:
P V = c o n s t a n t
where P is the absolute pressure in the pumping cavity, and V is its volume.
The maximum pressure value P m a x at the end of the compression indicates the compression ratio ε of the micropump:
ε = V S V D = P m a x P a t m 1 = P m a x P a t m
where P m a x = P m a x P a t m . Because the dead volume of a MEMS micropump is well controlled during the manufacturing process, it is possible to estimate the stroke volume V S as follow:
V S = P m a x P a t m V D
The embedded pressure sensor is powered by a constant voltage, and there is no amplifier at the Wheatstone bridge output. Further, high accuracy meter is used to monitor the bridge voltage.
The output detector signal V S   O U T is:
V S     O U T = V i n S v P + V S     o f f s e t
where P is the pressure gradient between both sides of the sensing membranes; V i n is the input voltage; S v is the detector sensitivity in V/V/bar, and V S   o f f s e t is the pressure sensor offset. The total measurement error includes therefore errors due to the input voltage, the pressure sensor (sensitivity, linearity, calibration, and offset), the method itself (directly linked here to the error on the compression ratio and therefore the dead volume), and finally the measurement of the absolute pressure and the temperature if the sensor has no compensation. Because the value of the atmospheric pressure P a t m matters, a careful measurement of this value during the final test of the micropump is therefore mandatory to obtain the accuracy of the stroke volume estimation better than 5%.
In the case of valve leakage, Equation (2) is not applicable. This compression test will therefore be performed together with a leak test to improve the measurement reliability. This topic is discussed in the next subsection.

2.2.2. Valve Leakage

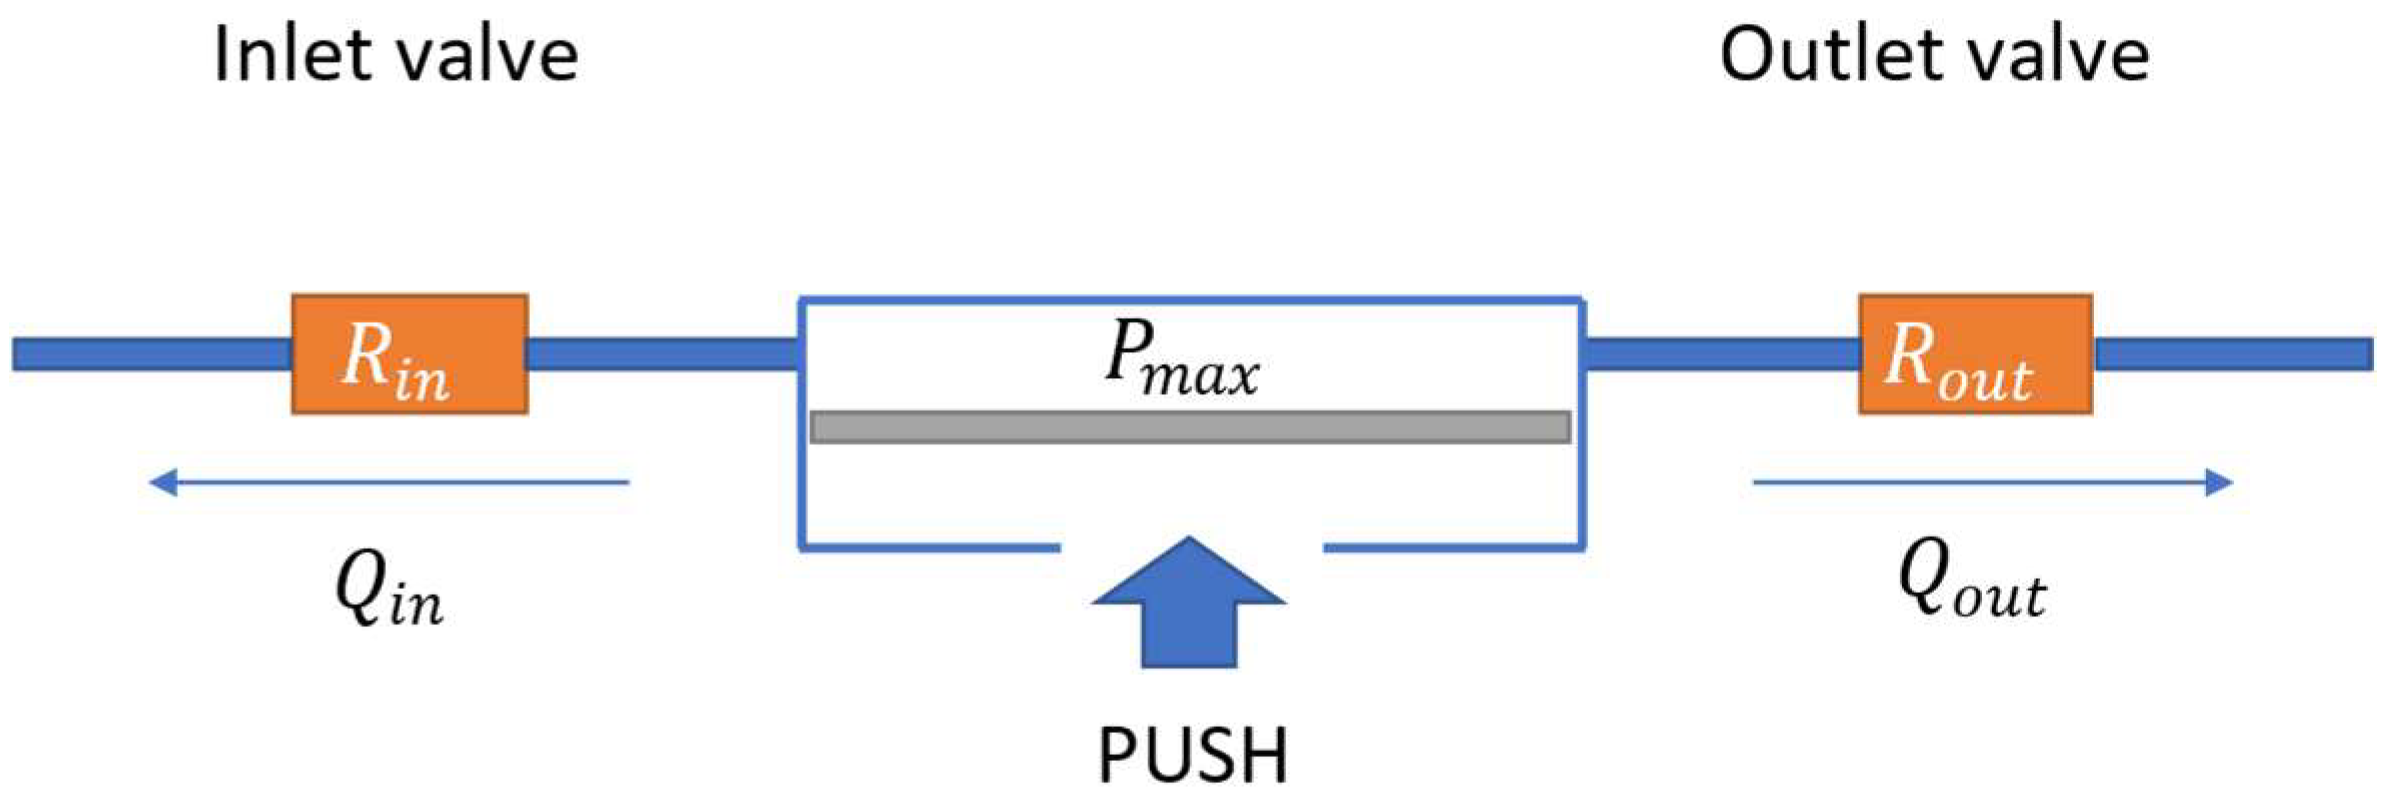
The micropump status during a compression test is schematically represented in Figure 5. The inlet and outlet valves are in the closed position, and the residual fluid pathways can be modeled by fluidic resistance R i n and R o u t .
The equivalent fluidic resistance R e q of these two resistances in parallel is:
R e q = R i n R o u t R i n + R o u t
The R e q value is therefore driven by the lowest resistance between R i n and R o u t . The airflow is assumed to be laminar, and the expansion is isothermal. The elasticity of the pumping chamber when the pumping membrane is pushed, a full compression, against a mechanical stop is here neglected. In these conditions, the differentiation of the ideal gas equation leads to:
d P P = d n n = Q V D d t
where n is the number of air moles in the pumping cavity, and Q = Q i n + Q o u t is the net flow from the cavity to the outside.
After the initial compression at t = t 0 , the pressure in the pumping chamber satisfies the following differential equation:
d t = R e q V D d P P ( P P a t m ) = R e q V D P a t m ( 1 P 1 P P a t m ) d P
Solving Equation (8) with the initial condition P = P a t m at t = t 0 leads to:
P ( t ) = P a t m 1 ( 1 P a t m P m a x ) e P a t m ( t t 0 ) R e q V D
The value of R e q can be evaluated at each time t :
R e q ( t ) = P a t m ( t t 0 ) V D   l n [ P ( P m a x P a t m ) P m a x ( P P a t m ) ]
The time τ 1 / 2 necessary to lower the maximum pressure by a factor of two is:
τ 1 / 2 = R e q V D P a t m ln [ 1 + P a t m P m a x ]
R e q and τ 1 / 2 provide useful quantitative characteristics of the pumping cavity’s tightness. A hypothesis about the relative contribution to each valve will be made to estimate the maximum free flow of the micropump.

2.2.3. Maximum Free Flow

The free flow can occur if two conditions are met:
  • An open fluid path between the reservoir and the delivery site;
  • A pressure gradient to generate the flow.
In a MEMS micropump, the valves are made of hard material (silicon, silicon oxide, or nitride, etc.), and due to the absence of material compliance, the interface between the movable part of the valve and its valve seat is never perfectly tight, except in the case of bonding, but this is not desirable. Through silicon valves in the closed position, a tiny residual fluidic pathway is always present despite careful process control that limits contamination, uncontrolled surface roughness, and other manufacturing defects.
A pressure gradient between the reservoir and the delivery site can be observed in several configurations:
  • In the normal condition of use, if the micropump is connected to the patient with a catheter. As an example, a 1 m connection line can generate a hydrostatic pressure of up to 100 mbar.
  • In a faulty condition of use, if the patient overfills the reservoir or leaves air bubbles in a rigid reservoir. Air bubbles can indeed expand and pressurize the reservoir in the case of a temperature increase or change in atmospheric pressure [15].
The valve pretensions are by design large enough to prevent the valve opening in normal conditions. However, the presence of minute leakage through the valves in the closed state makes it necessary, especially for very potent drugs, such as insulin, to assess this maximum free flow during a functional test.
The micropump is placed in between the drug reservoir and the patient. Therefore, the valves are in a closed state, and the two resistances, R i n and R o u t , are now in series. For a given value of R e q , it can be easily demonstrated that the maximum flow rate is observed when R i n and R o u t are both equal to 2 R e q :
R i n = R o u t = 2 R e q
In this worst case, the maximum free flow Q m a x in absence of actuation is:
Q m a x = P 4 R e q
where the pressure gradient P is equal to P = P r e s e r v o i r P p a t i e n t .
The risk analysis determines, for the highest-risk patient category (usually low-weight infants if the device is approved for pediatric use), the maximum allowable insulin rate that leads to a given severity (e.g., severity level two: minor) and the associated pressure conditions. A value of R e q is derived from this analysis and corrected to account for the lower viscosity of the test medium during the leak test. In the laminar regime, the value of R e q is about 57 times lower for nitrogen than for water or insulin due to their relative dynamic viscosity values. The final acceptance criteria for R e q will also include some margin to account for measurement errors and repeatability issues.
The combination of the following factors:
  • Large generated pressure (up to +1 bar);
  • Small cavity (typical dead volume of 200 nL);
  • Low viscosity (e.g., 0.0175 mPa.s);
  • High-pressure sensor sensitivity (better than 1 mbar).
Leads to very fast pressure decay after compression and outstanding values of insulin leak rate sensitivity as low as a few nL/h. Such sensitivity cannot be obtained by standard flow measurement methods [31].
In functioning, the early detection of free flow conditions is also critical to patient safety because the flow of insulin through the valve may change their residual leak rate characteristics. The complete derivation of the set of equations and the description of the related leak detection methods can be found elsewhere [32].

2.2.4. Valve Pretensions

Valve pretensions, or opening thresholds, depending on many process parameters and the tolerance stack-up lead to a relatively large variability [29]. As an example, the stiffness of a valve with free-standing arms of length L and thickness t depends on the ratio t / L to the power 3. Membrane valve stiffness depends on the membrane thickness and diameter at powers 3 and 4, respectively. Variability of each of these parameters has, therefore, among other parameters, a strong impact on the pretension value. In addition, because valve pretension is critical to safety, this parameter will be systematically measured in production.
The measurement of this parameter is straightforward. The test simply consists in activating the micropump without any external control of the outlet valve and measuring the pressure in the pumping chamber during the filling and infusion phases of the pumping cycle. The pressure values measured just after inlet and outlet valve openings provide a good estimation of their respective pretensions.

2.2.5. Membrane Offset

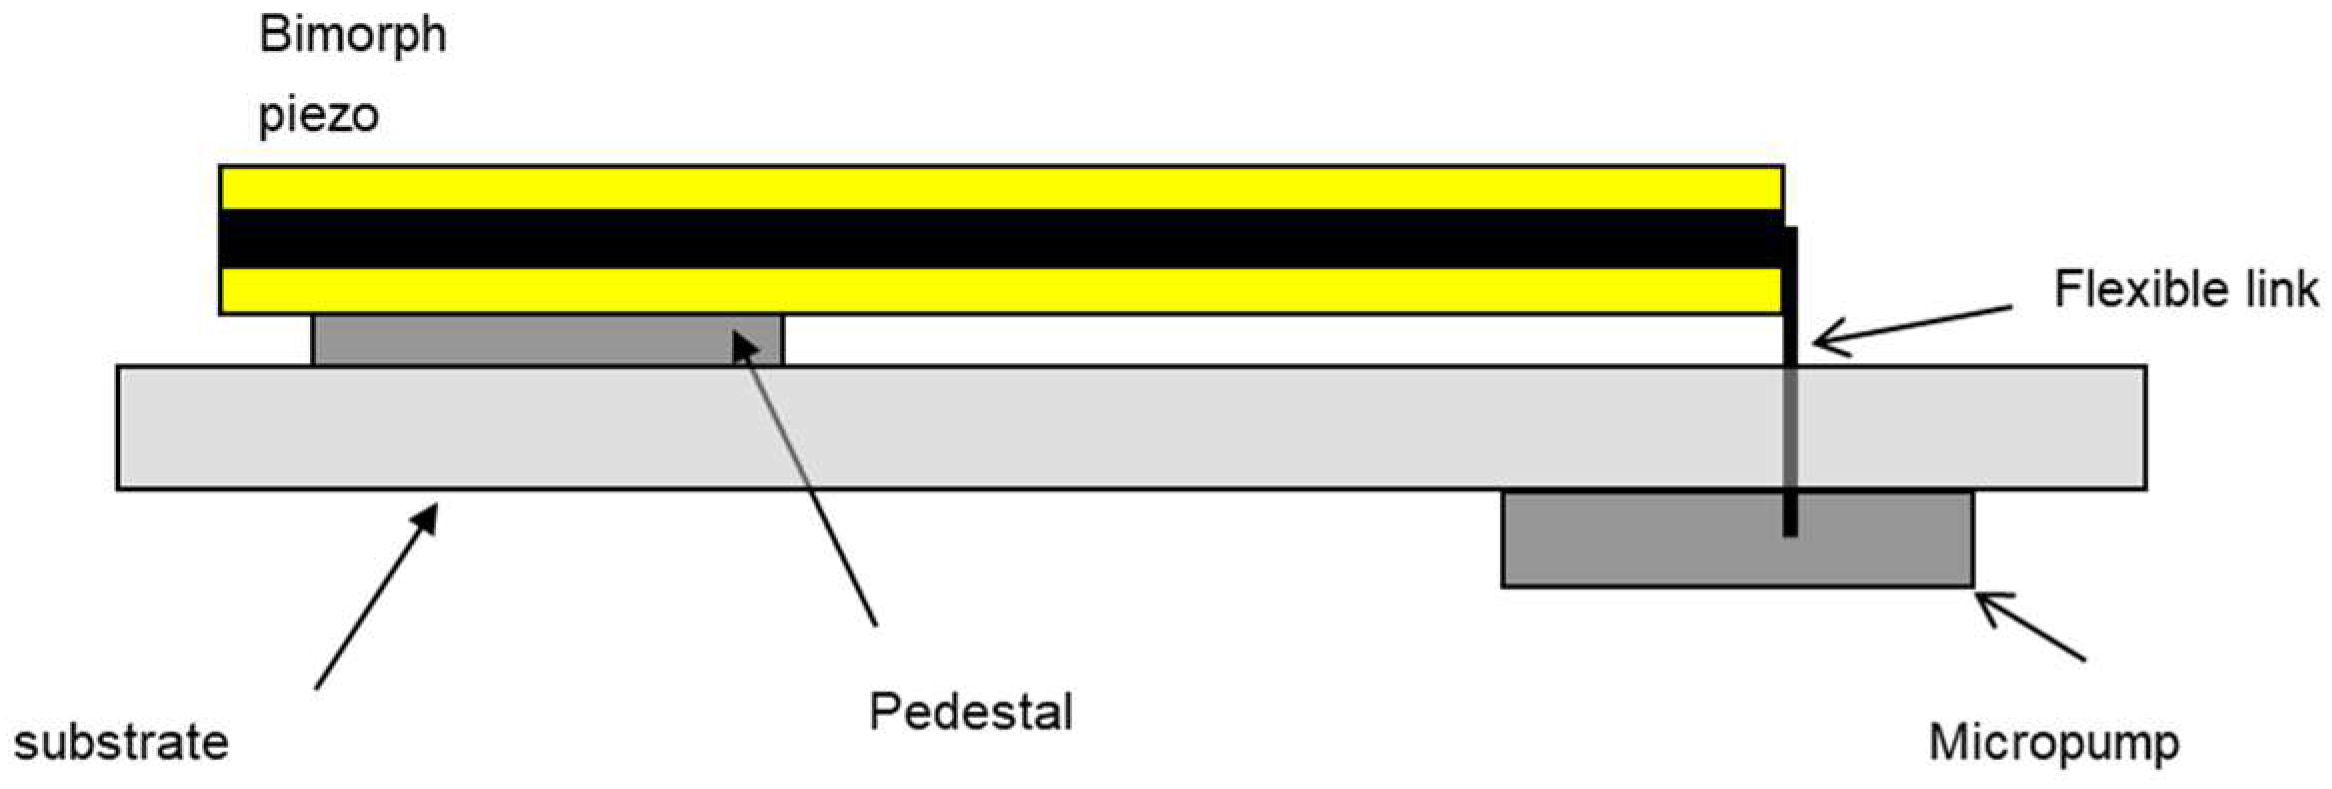
The measurement of the membrane rest position after connection to the actuator is relevant for the push–pull activation scheme. The micropump depicted in Figure 1 and Figure 2 is assembled to a substrate together with a bimorph piezo actuator [28,29]. A pedestal is used to allow the piezo displacement in both directions. A flexible blade is glued to both the piezo tip and the pumping membrane to prevent the membrane from being blocked. The actuator indeed does not push or pull exactly along the symmetry axis of the pumping membrane, and the flexibility of the blade allows force transmission and compensation of piezo tip rotation. Figure 6 shows a schematic view of the micropump assembly that forms a mechanical loop. The closing of the loop is ensured by glue polymerization, which, in turn, generates shrinkage that pulls the pumping membrane toward the actuator.
The rest position of the pumping membrane always exhibits an offset with respect to its position before piezo assembly (see Figure 7). Offset measurement is mandatory when optimizing the assembly process and controlling the production because, in addition to several sources of variability (piezo positioning, ceramic and blade dimensions, blade tilt, assembly tolerance, etc.), the main physical phenomenon causing the effect—glue shrinkage—is by nature not entirely predictable. This parameter is critical to quality because an offset out-of-specifications can lower volume accuracy and modify the pressure signal shapes. Several nondestructive methods could be used to measure this offset including IR interferometry [33,34], digital holography [35,36,37], or vibrometry [38]. Alternatively, design features can be implemented to measure the membrane position (implanted strain gauges, capacitive sectors, etc.) [39,40]. A pneumatic method that does not require any additional equipment or process steps and that can be performed during the functional test described previously, would be a smart and cost-effective way to estimate the membrane offset in production.
Figure 7 shows the relative positions of the pumping membrane and the piezo actuator during the different tests performed to characterize the mechanical loop assembly. The stroke δ 1 corresponds to the total displacement of the pumping membrane from the PULL and PUSH positions. It is assumed that this stroke is equal to its nominal value thanks to careful process control at the wafer level.
Because the pumping membrane has a rigid mesa that is large compared to its flexible part [28], the volume in the pumping cavity is assumed to linearly depend on the distance between the mesa and the mechanical stops (either PUSH or PULL positions).
To determine the membrane offset M o f f pneumatically, a compression test will be performed from a position or over a distance that directly depends on M o f f .
The isothermal compression between the rest position of the pumping membrane and the PUSH position is considered here (compression test #2). Equation (2) leads to:
P a t m ( V D + ( δ 1 δ 2 δ 1 ) V S ) = P 2 V D
where P 2 is the pressure after compression; δ 1 is the full stroke, and δ 2 is the stroke of this specific compression (see Figure 7). Combining Equations (4) and (14) gives:
δ 2 δ 1 = 1 P 2 P m a x
where
P x = P x P a t m
According to Figure 7, the membrane offset is:
M o f f = δ 2 δ 1 2
Combining Equations (15) and (17) leads to the expected formula:
M o f f = δ 1 2 ( 1 2 P 2 P m a x )
where the term ( 1 2 P 2 P m a x ) corresponds to the relative displacement of the membrane during assembly with respect to its original rest position at a distance δ 1 / 2 from the mechanical stops.
The test procedure is therefore coupled to the compression test since the value of P m a x is required. From a practical point of view, the micropump cavity is vented by opening pneumatically the outlet valve. The previously described compression test from the rest position to the PUSH position is achieved by activating the actuator while forcing the outlet valve closed by applying high pneumatic pressure to its vent port. The procedure mimics the one used for the estimation of the compression ratio, and only the initial position of the pumping membrane changes.
For a pressure sensor having a resolution of 1 mbar and an error in the stroke value of about 2% at 3 σ in production, a submicronic resolution is expected for the estimation of the membrane offset.

2.2.6. Pumping Mechanism Stiffness

Two main functional characteristics of the piezo actuator are the free deflection and the blocking force, which is defined as the maximum force the actuator can deliver at zero deflection. Quality control is performed during piezo manufacturing by sampling. The actuators are clamped and activated to measure the deflection of the piezo tip in both directions. The blocking force is evaluated during piezo activation with a fixed-force probe placed at the end of the bender. After assembly, these two characteristics can no longer be directly evaluated. Due to the complexity of the mechanical loop, an assessment of the piezo actuator performances after assembly is, however, crucial to set up the manufacturing process and to anticipate any drift in production. Once coupled to the pumping membrane, the essential performances of the piezo actuator can be formulated a little differently: the actuator will be able to maintain a force after a given displacement, typically a half stroke. This force, which allows the desired volume to be delivered whatever the specified pressure conditions, is indirectly estimated through the measurement of the maximum pressure that can generate the micropump at the outlet. This test, which is described later, provides a good indication of the blocking force.
Since the full description of the pumping membrane movement upon actuation is not required here (see [29]), the system can be significantly simplified to model the blocking force. The equivalent stiffness k e q of the piezo actuator coupled to the pumping membrane will be calculated first. It is assumed that the stiffnesses of the pumping membrane and the piezo actuator are constant and noted as k m and k p , respectively. The flexible blade is assumed to fully transmit the piezo force without storing elastic energy in a first approximation.
For a given position z of the pumping membrane (see Figure 7), the restoring forces of the pumping membrane F m and the piezo actuator F p onto the flexible blade are:
F m = k m ( δ 1 2 z )
And
F p = k p ( δ 2 δ 0 z )
In the presence of a gradient of pressure P between the pumping cavity and the external environment of the micropump, the sum of the forces onto the blade at equilibrium is equal to zero:
P S m + F m + F p = 0
where S m is the surface of the pumping membrane. This equation can be rewritten as:
P S m = z   k e q C
where the equivalent stiffness k e q of the system is:
k e q = k m + k p
And C is a constant equal to:
C = k q ( δ 2 δ 0 ) k m δ 1 2
Applying a voltage V to the piezo actuator leads to an additional force F ( V ) that satisfies, at equilibrium, the following equation:
F ( V ) = P S m + z   k e q + C
After assembly, using V = 0 , P = 0 , and z = δ 2 , Equation (25) leads to:
k m ( δ 1 2 δ 2 ) = k p δ 0
Based on this simple model, compression tests #3 and #4 can be built to derive the equivalent stiffness k e q experimentally.
Compression test #3:
  • Activate the piezo to pull down the pumping membrane up to z = 0 (PULL position);
  • Apply a vacuum to the outlet valve port to vent the pumping chamber;
  • Apply a large pressure (>+ 1 barg) to the outlet valve port to force the valve closed;
  • Set the piezo voltage to V = 0 to release the actuator and compress the air in the pumping chamber; the pumping membrane moves from position z = 0 to z = δ 3 .
Compression test #4:
  • Activate the piezo to pull down the pumping membrane up to z = 0 (PULL position);
  • Apply a vacuum to the outlet valve port to vent the pumping chamber;
  • Apply a large pressure (>+ 1 barg) to the outlet valve port to force the valve closed;
  • Set the piezo voltage to a value V to move the pumping chamber up to the position z = δ 4 .
At the end of compression #3, the pumping membrane moves from position z = 0 to z = δ 3 (see Figure 7). During compression #4, the piezo voltage will allow a movement of the piezo membrane up to an intermediate position z = δ 4 with δ 2 < δ 4 < δ 1 as illustrated in Figure 7.
The detailed calculation of the expression of k e q that only depends on measurable pressures or parameters that are well controlled in MEMS fabrication is provided in Appendix A.
Finally, the equivalent stiffness k e q of the system can be written as:
k e q = P 3 S m δ 2 δ 1 γ
where
γ = P 3 P 3 P m a x P m a x

2.2.7. Actuator Blocking Force

The actuator blocking force can be evaluated by analyzing further the compression #4 test. A voltage is applied to move the pumping membrane to an intermediate position z = δ 4 with δ 2 < δ 4 < δ 1 . A voltage V = V m a x / 2   , where V m a x is the maximum voltage applied on the piezo electrodes during functioning was chosen here according to the characteristics of the actuator [28,29].
Hence, the active force generated by the piezo at V m a x / 2 is equal to F b / 2 where F b is the blocking force or the maximum force of the actuator.
After compression #4, Equation (25) becomes:
P 4 S m + δ 4 k e q + C = F b 2
Combining Equations (A4), (A5)—see Appendix A—with (29) gives:
( P 4 P 3 ) S m + δ 1 k e q P m a x P m a x ( P 4 P 4 P 3 P 3 ) = F b 2
By introducing the expression of k e q given in Equation (28) into Equation (29), the blocking force formula can be derived:
F b = 2 S m [ P 4 + P 3 ( P 4 P 4 P 3 P 3 P m a x P m a x ( 1 P 2 P m a x ) P 3 P 3 1 ) ]
The blocking force formula is a function of the pressures measured by the integrated sensors after the four compression tests and the surface of the membrane that is well defined during the lithography process.

2.2.8. Maximum Pumping Pressure

The maximum micropump differential pressure P O U T   m a x is equal to the maximum back pressure the micropump can work against. This pressure can be evaluated experimentally by closing the micropump outlet and pumping at full speed until reaching maximum pressure. The flow rate of a micropump that experiences a back pressure P m a x is equal to zero.
An alternative parameter is a maximum pressure P O U T   m a x the micropump can generate when the pumping membrane is still able to reach the upper mechanical stop (PUSH position—see Figure 7) without generating any reaction force. If the following pull movement of the pumping membrane is fast enough to close the outlet valve instantaneously, the micropump is still able, at this pressure, to infuse the nominal stroke volume of liquid because there is no backflow from the outlet and the pumping membrane performs a complete stroke. These considerations are valid for an antifree-flow outlet valve having a reference port vented (see Figure 4).
An estimation of P O U T   m a x can be made by writing the equilibrium of forces onto the pumping membrane submitted to the maximum piezo force F b :
F b = P O U T   m a x   S m + δ 1 k e q + C
Combining (A6) and (32) yields:
P O U T   m a x = P 3 + F b + δ 1 k e q ( γ 1 ) S m
Equation (32) can be rewritten using only measurable pressures as follow:
P o u t   M A X = 2 P 4 + P 3 ( 2 ( P 4 P 4 P 3 P 3 ) ( 1 P 2 P m a x ) P m a x P m a x P 3 P 3 1 1 1 P 2 P m a x ( 1 P 3 P 3 P m a x P m a x ) )
Using standard actuation profiles, with controlled displacements of the piezo actuator, the back flow will occur through the outlet valve, and volume accuracy is expected to be reduced at P o u t   M A X . In this later configuration, the value derived in Equation (34) is rather an estimation of the maximum pressure that can generate the micropump.

2.2.9. Test Setup

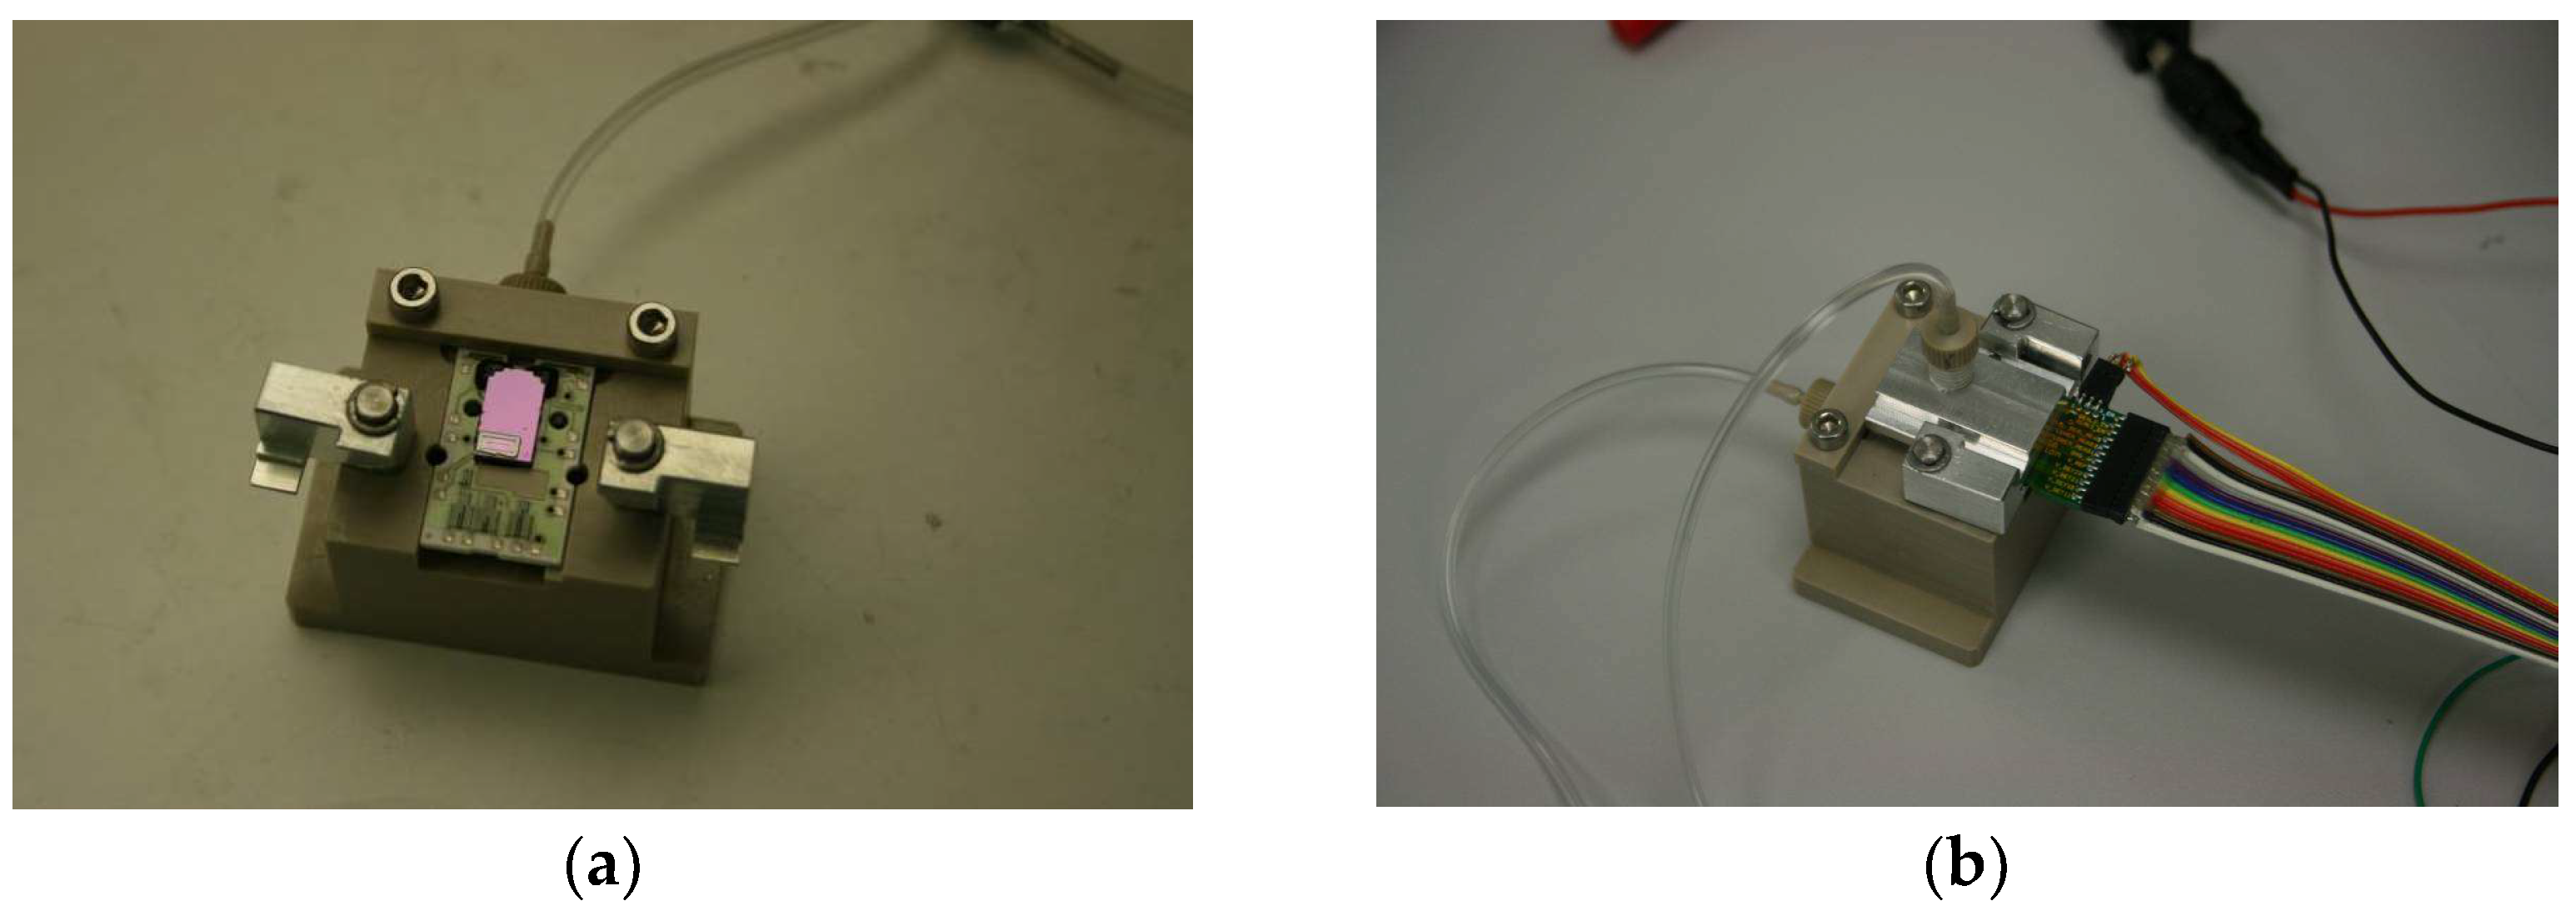
The setup used to actuate the piezo, monitor the pressure signals, and control the pressure of the vent of the outlet valve consists of a custom sample holder, a PCB with spring contacts to connect the piezo and the micropump electrically, and a pressure controller PACE5000 (General Electric, Boston, MA, USA). A photo of the sample holder is shown in Figure 8. Three AA batteries were used to power the pressure sensors, while the high voltage for piezo actuation was obtained using an amplifier from AA-Lab Systems 400V. Test automation was performed using DAQ USB-Ni-6221 and Labview (National Instruments, Austin, TX, USA).

3. Results

3.1. Nominal Pressure Profile

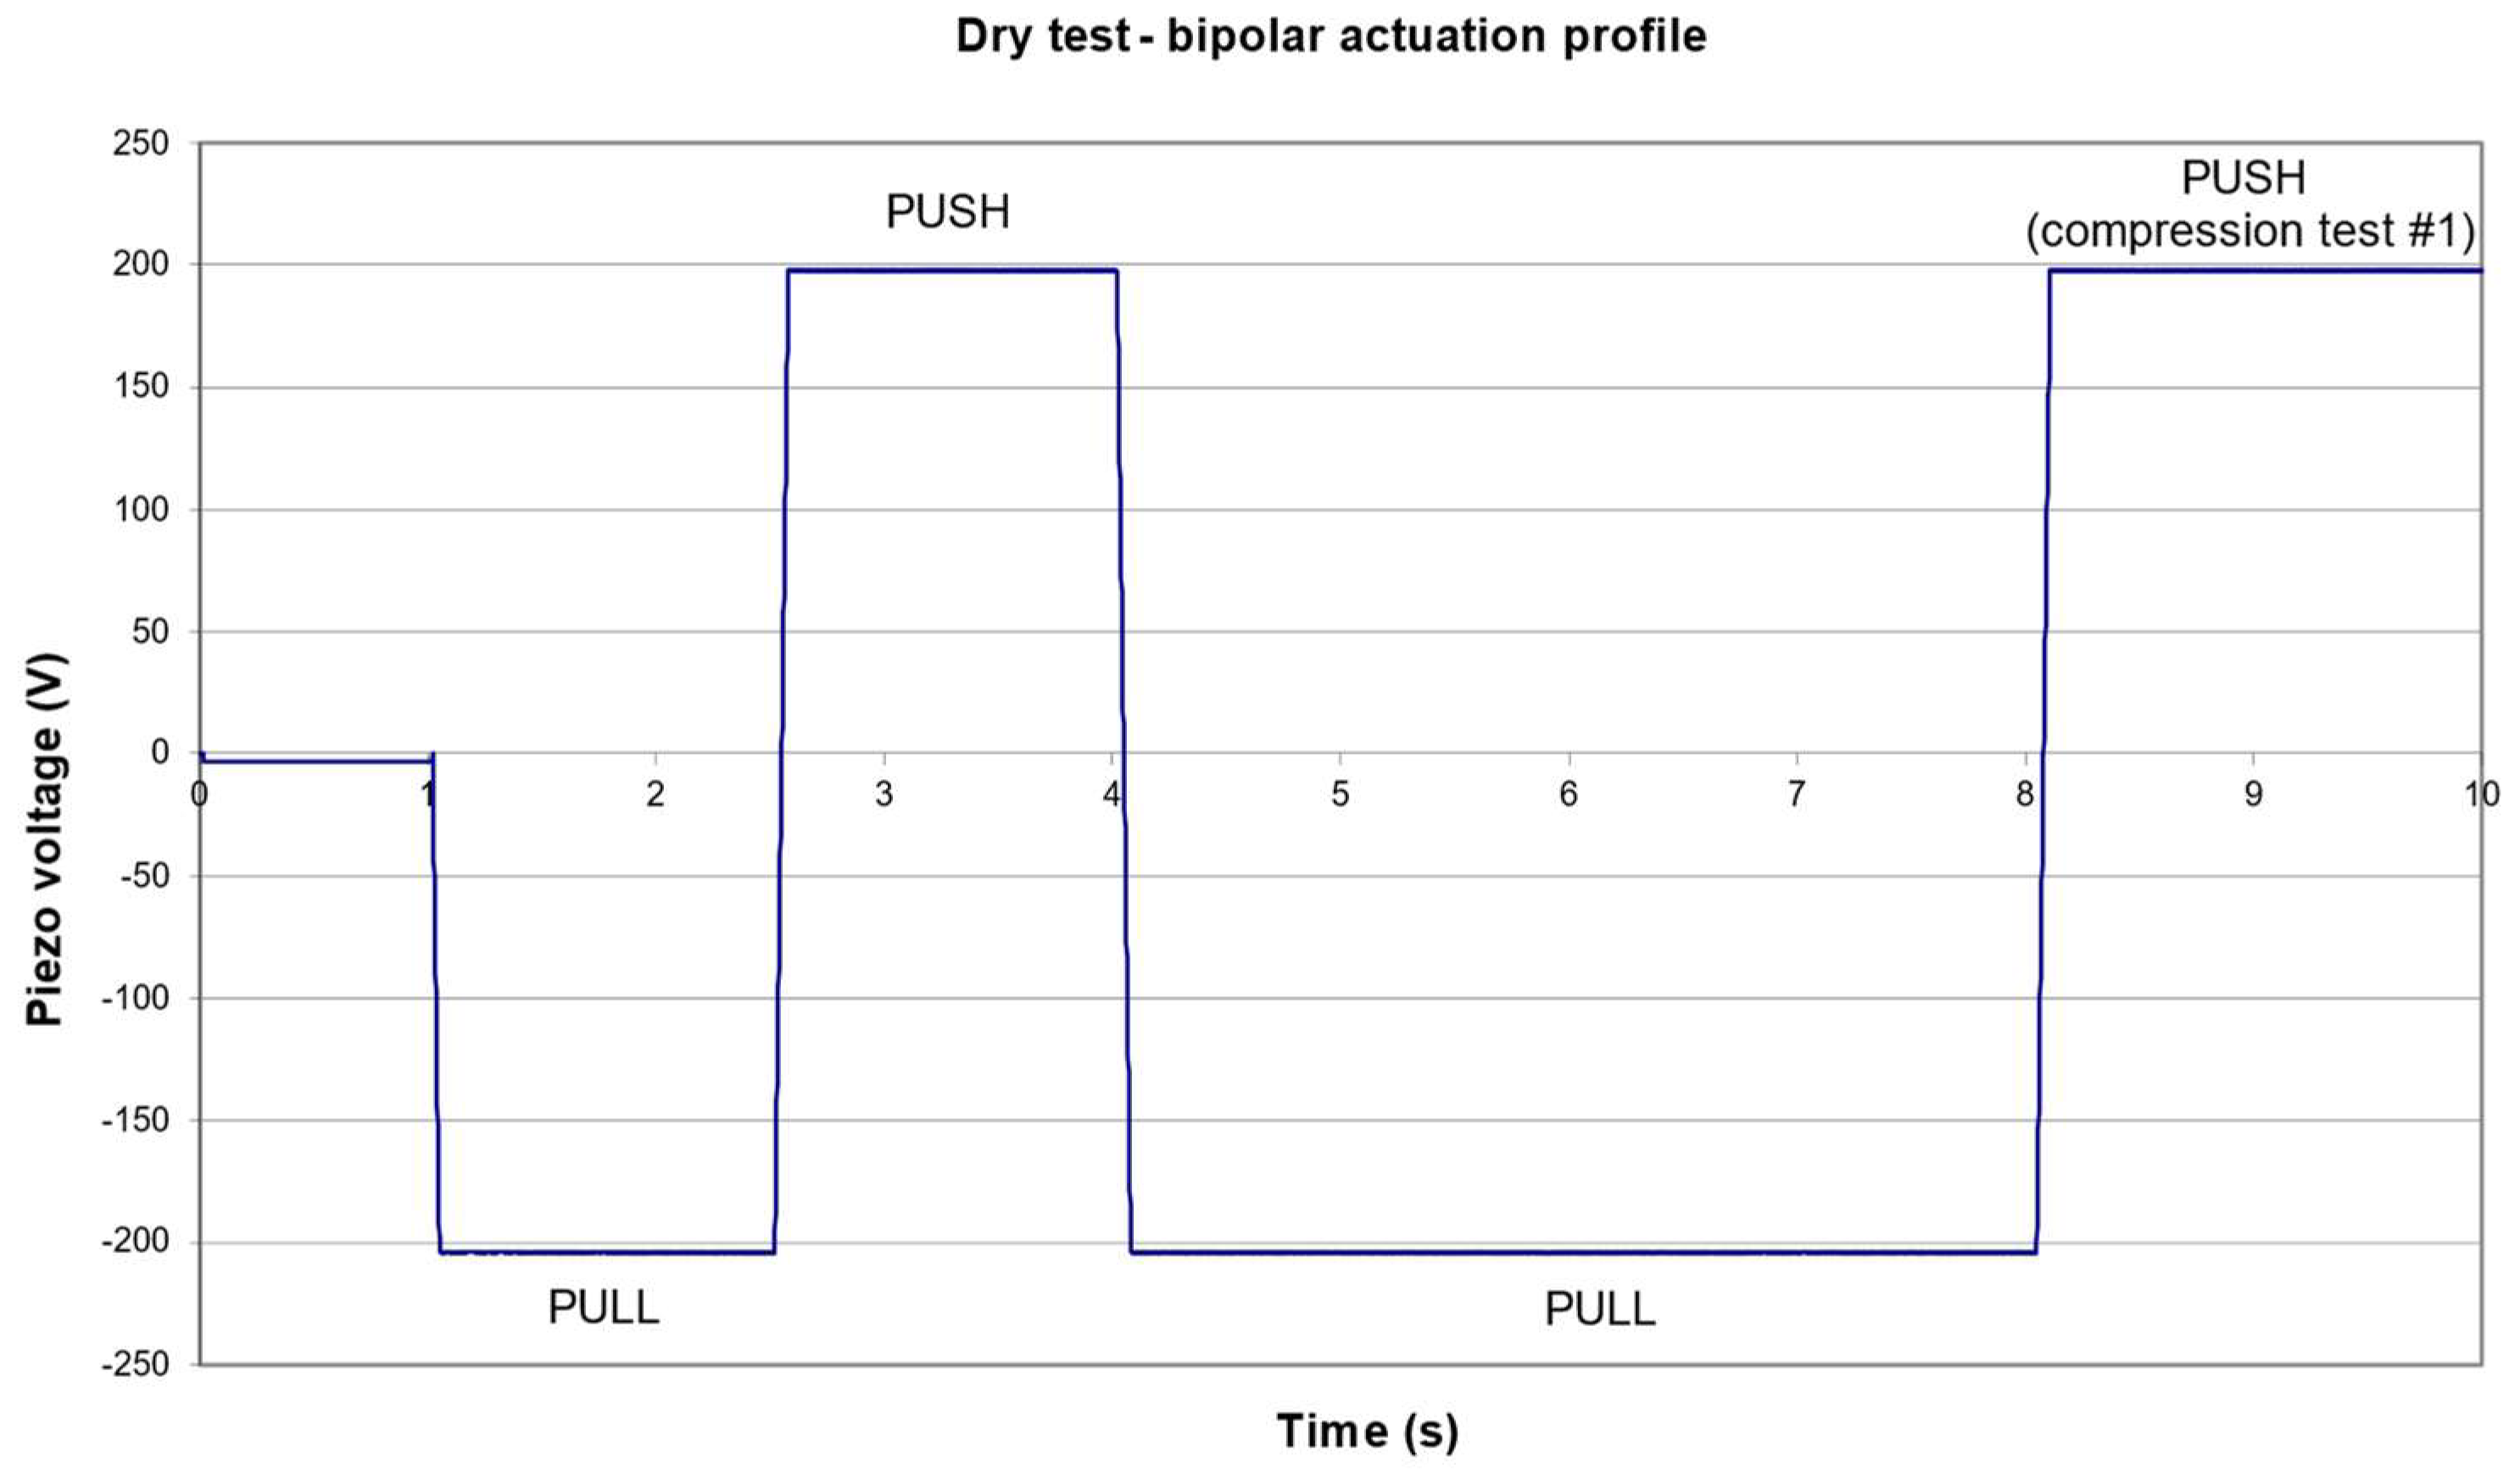
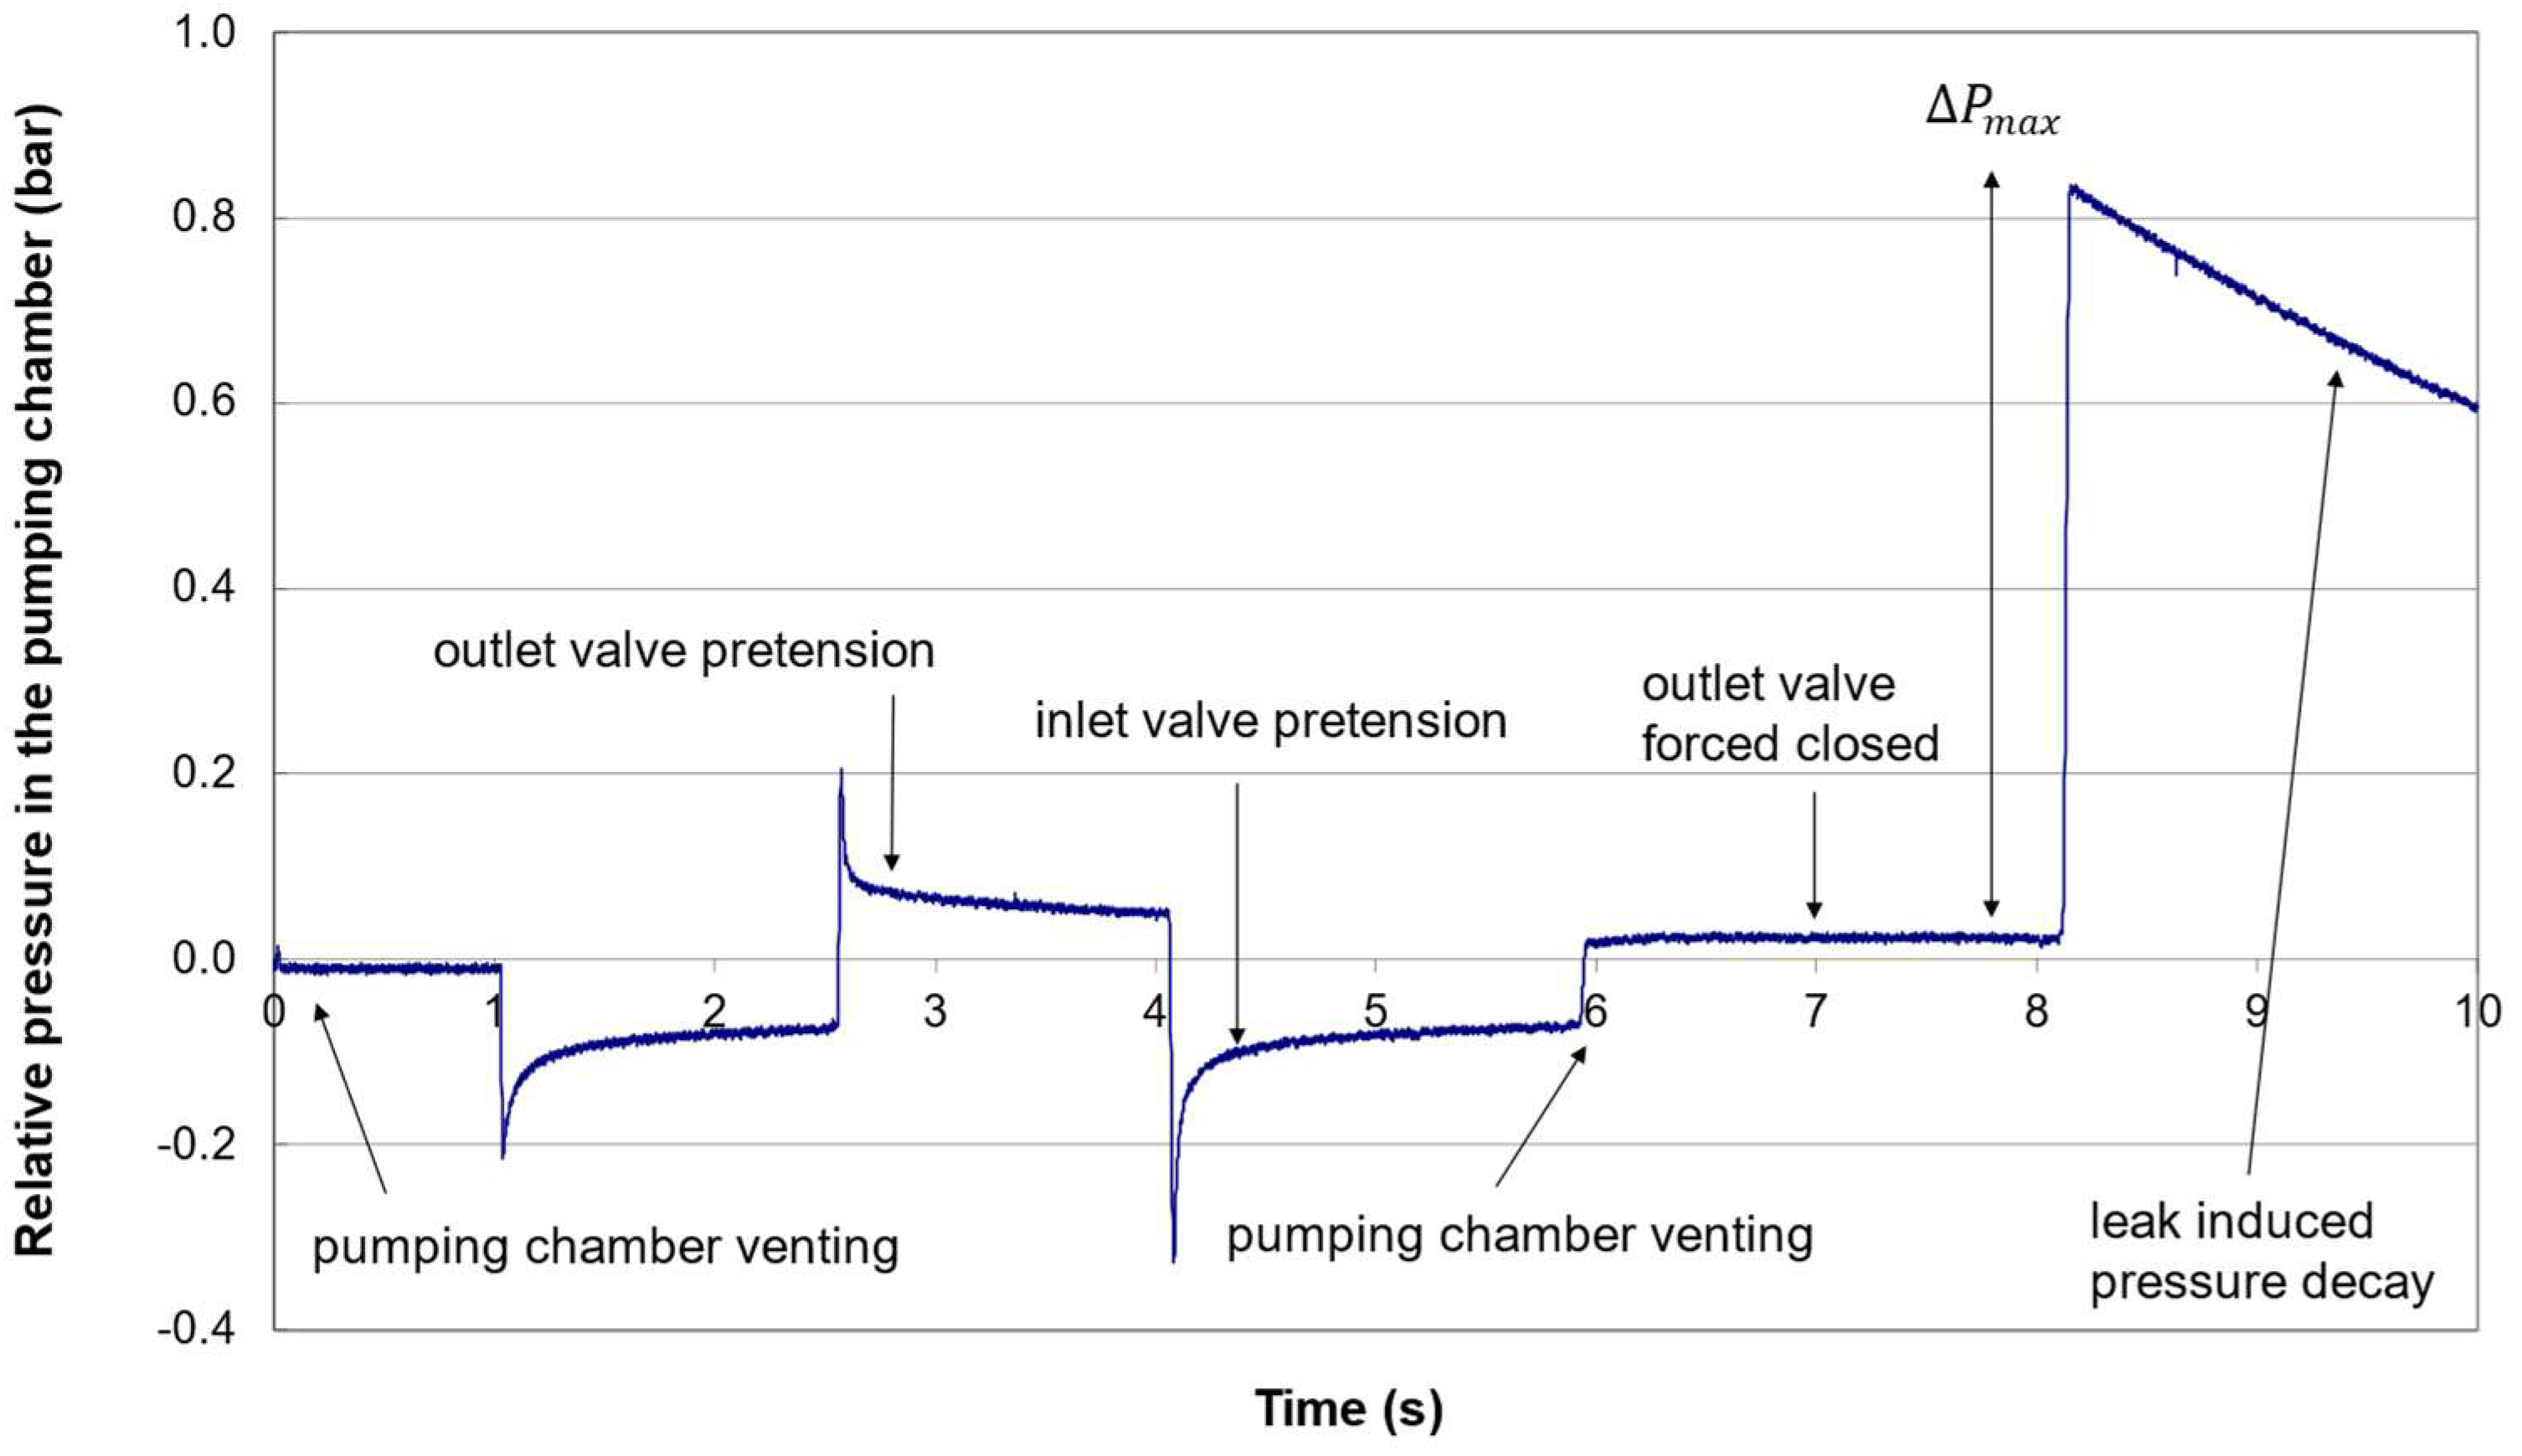
The main critical-to-quality parameters of the micropump (see Section 2.2.1, Section 2.2.2, Section 2.2.3 and Section 2.2.4) can be analyzed in a single test sequence. The bipolar actuation profile of the piezo actuator is shown in Figure 9. The resulting pressure profile, monitored by the pressure sensor located inside pumping chamber, is presented in Figure 10. The pumping cavity is first vented to estimate the reference pressure (here about −10 mbar) for the valve pretensions. The first actuation cycle (PULL/PUSH) is used to determine the outlet valve pretension that corresponds to pressure just after the positive peak at t = 2.6   s . An additional PULL allows the determination of the inlet valve pretension by measuring the pressure after the negative peak of pressure at t = 4.25   s . The vent of the pumping cavity at t = 6   s is immediately followed by the application of a large pneumatic pressure to force the outlet valve closed. Pretension values of + 105 and 101   mbar are obtained here. Compression test #1 is then performed, and the leak test is initiated at about t = 8   s . The maximum pressure is recorded to derive the value of the compression ratio ε = 0.816 and the stroke volume S V = 201   nL using P a t m = 963   mbar (atmospheric pressure QFE at Lausanne [41]). The pressure at t = 10   s is compared to a reference value to determine if the leak rate is acceptable or if the micropump will be discarded. If the leak rate is within the specifications, the measurements and analysis of the other parameters can be performed. Micropumps showing valve pretensions or compression ratio out of the acceptance range are discarded too.
Such a test sequence could be achieved in a few seconds and is suitable to detect the different failure modes of the device. Typical examples of pressure profiles under failure conditions are provided in the results section.

3.2. Failure Detection

Any failure of an element of the micropump will induce a significant change in the nominal pressure profile. The careful analysis of the pressure profiles collected using automated equipment is very useful to determine the yield detractors in production and to anticipate any potential deviation during manufacturing that could impact the quality of the devices over time.
Typical pressure profiles that correspond to the main failure modes of a piezoelectric micropump are provided in Figure 11.
Except in the case of very large leakage that does not allow any pressurization of the pumping chamber (see Figure 11a), the analysis of the pressure profile enables the determination of a single failure mode or multiple failure modes. Figure 11b,d,f show a leaky micropump, a micropump with both valves stuck, and a combination of the two failure modes, respectively. Figure 11g shows a leaky micropump with a piezo poling issue. The application of voltage opposite to poling leads to a movement in the wrong direction (positive pressure peak instead of negative at t = 1   s ) followed by a repolling, at high voltage, of the piezo along the applied electrical field. Single-valve stiction is observed in Figure 11c for the inlet and in Figure 11e for the outlet. Finally, a nonfunctional outlet valve vent port (either clogged or leaking) does not allow the control of the outlet valve, and some features of the micropump cannot be evaluated during the dry test (e.g., compression ratio).

3.3. Extended Dry Tests for Piezo Actuator Assembly Characterization

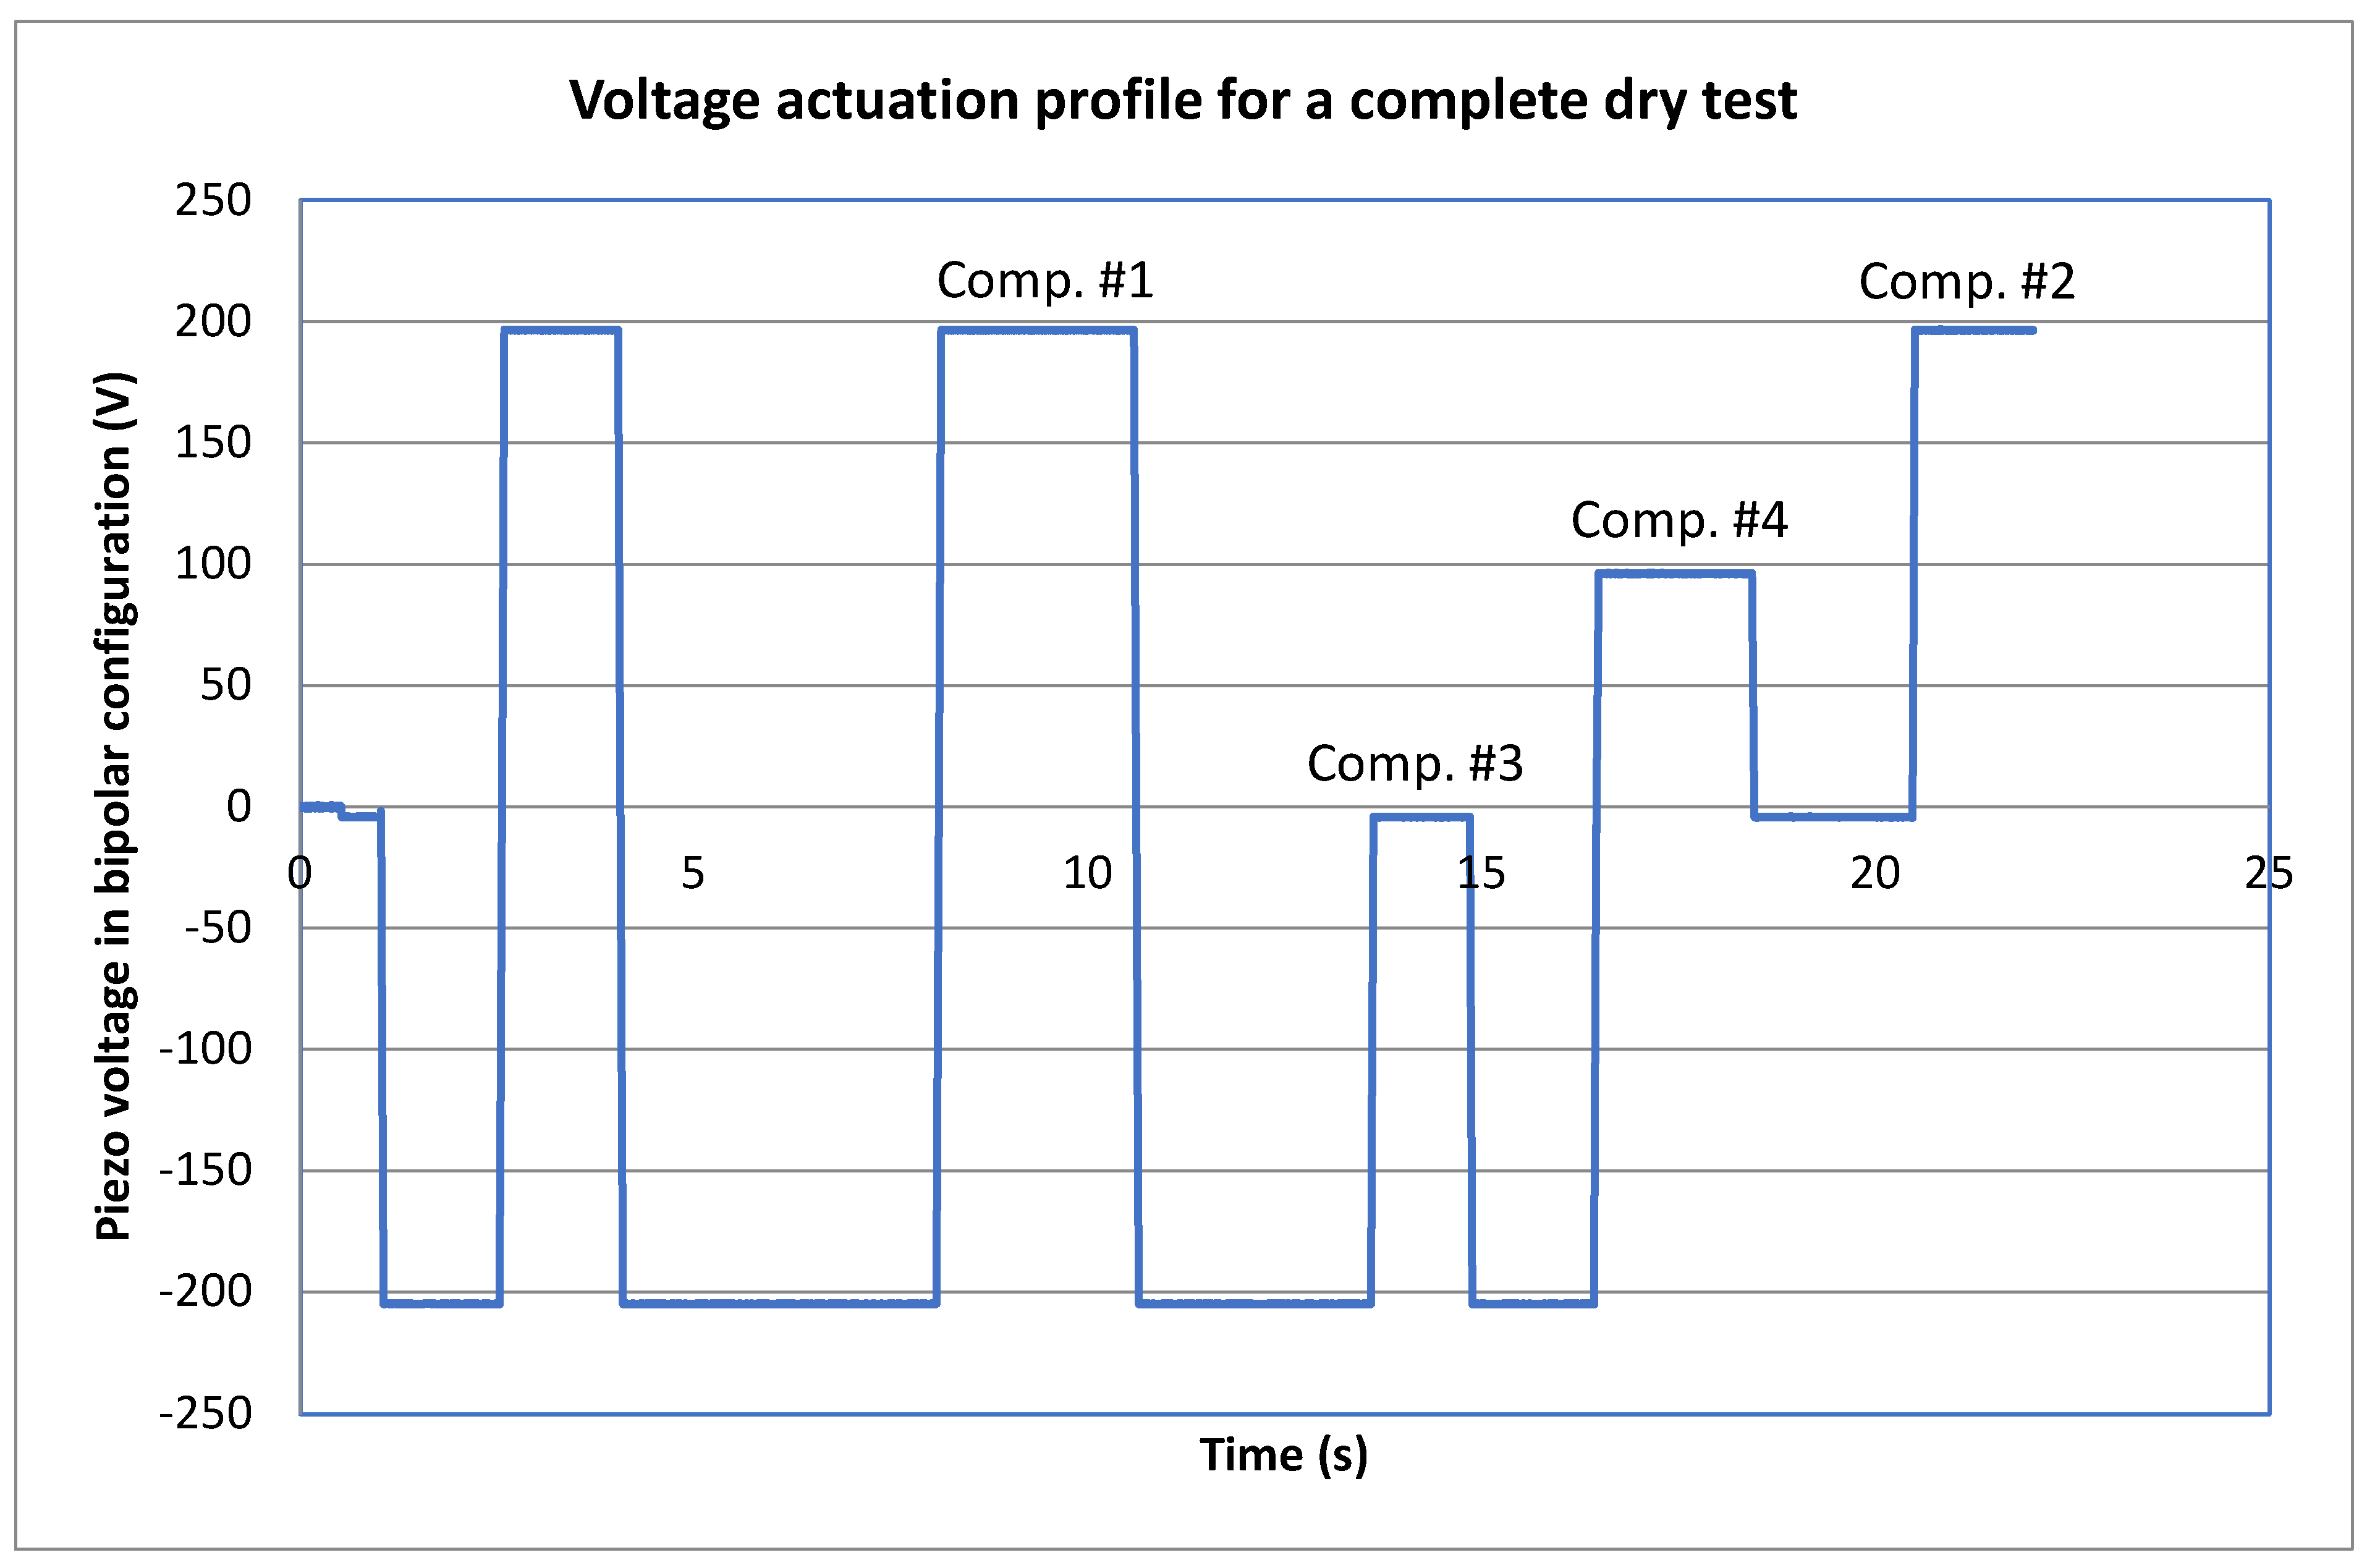
The dry test described previously can be extended to determine typical characteristics of the piezo actuator performances after assembly onto the substrate and coupling to the pumping membrane. According to the methods described in Section 2.2.5, Section 2.2.6, Section 2.2.7 and Section 2.2.8, a voltage actuation profile can be built to perform each specific compression test, as illustrated in Figure 12. Compression test #2 was performed after compressions #3 and #4 to account for the relative position of the pumping membrane during the test and thus limiting the test duration. The device under test successfully passed the routine sorting tests in the front end and back end. The micropump was assembled with a piezo having a certificate of conformity delivery by the manufacturer. The estimated micropump and piezo actuator characteristics will be therefore compared to specifications.
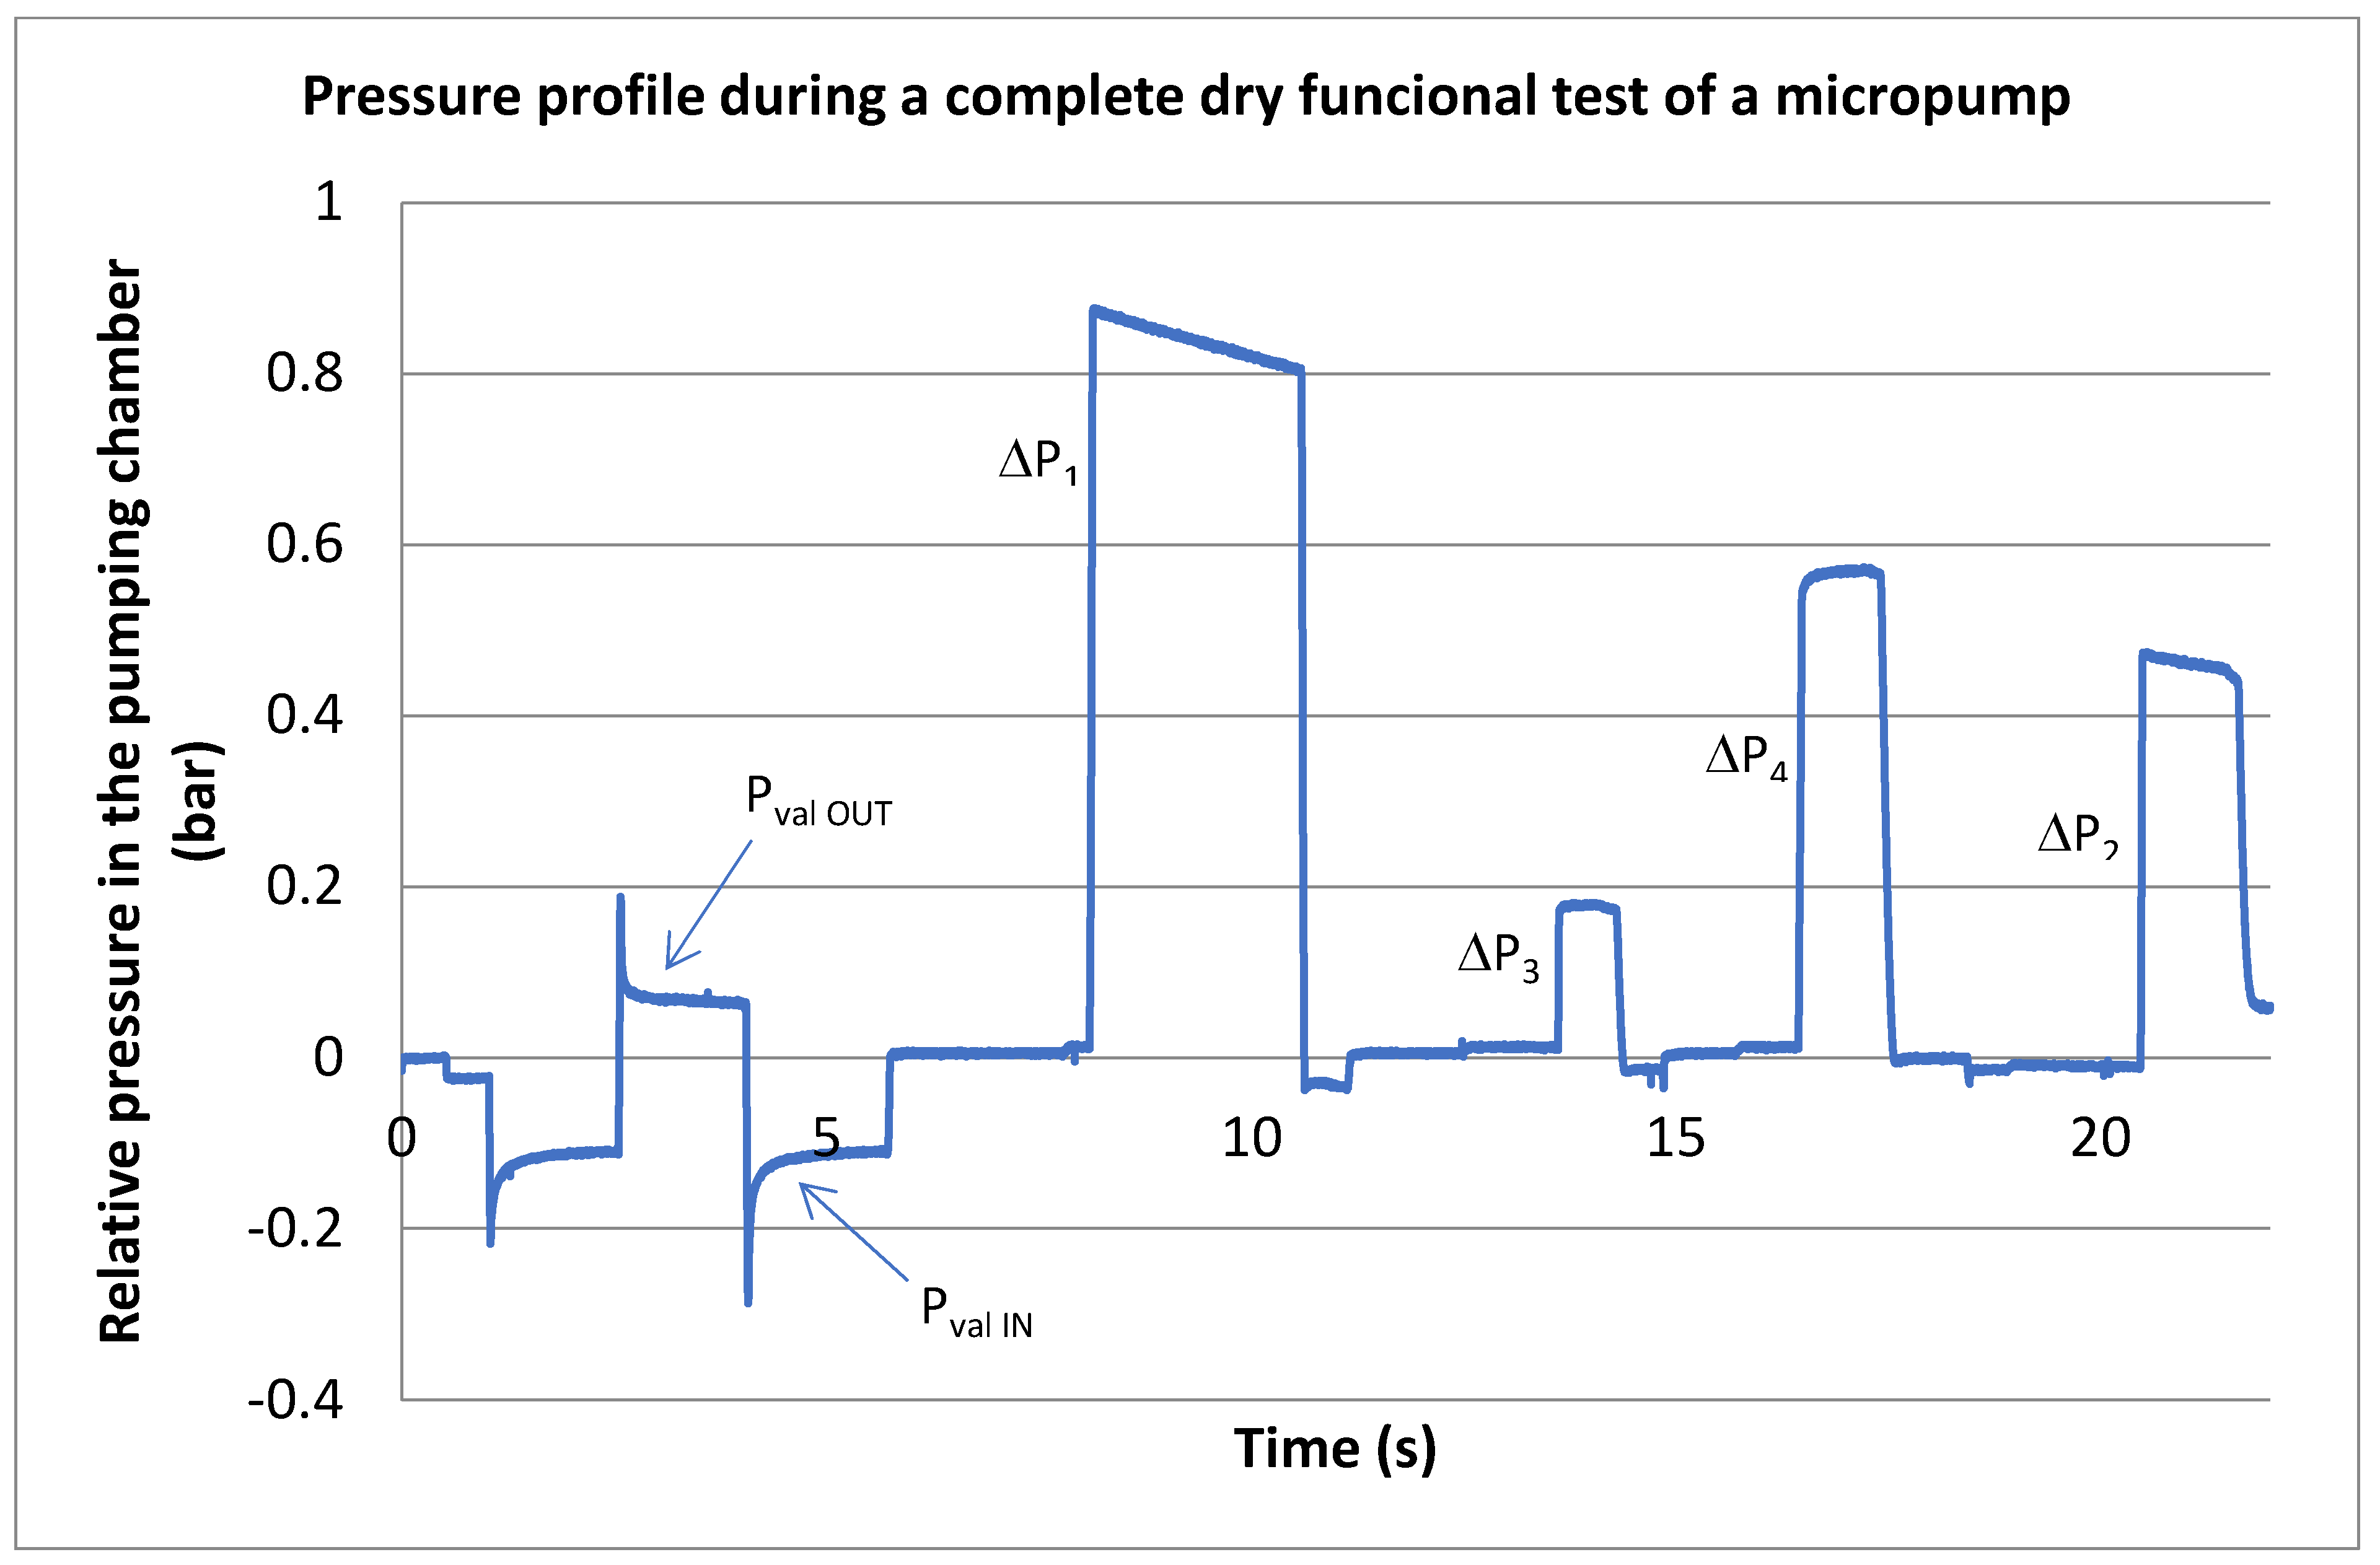
Figure 13 shows a typical experimental pressure profile of the extended dry test of a functional micropump.
From the pressure data shown in Figure 13, the following parameters can be retrieved using the formula derived in Section 2.2.5, Section 2.2.6, Section 2.2.7 and Section 2.2.8:
M o f f = 7.73 %
k e q = 63615   N / m
F b = 2.352   N
P o u t   M A X = 1.255   bar

4. Discussion

The combination of a Design-for-Test and specific pneumatic test methods provides fast, reliable, and quantitative characterization of the micropump after packaging. The main output parameters of the micropump can be estimated, and the determination of the device functionality is straightforward: the test results are compared to specifications, and any deviation leads to a failed test, and the micropump is then discarded.
The data analysis is based on considerations about the micropump dynamics. Experimental results were coupled with numerical simulations to determine, for instance, at which time of the test sequence the valve pretensions P v a l   I N and P v a l   O U T will be evaluated to match the theoretical value of ± 100   mbar [28,29]. Indeed, the first positive peak of pressure at about t = 2.5   s corresponds to the opening of the outlet valve when the pressure in the pumping chamber exceeds P v a l   O U T . The gas flows out of the pumping chamber during this peak of pressure. The pressure decrease corresponds to a progressive closure of the outlet valve. A pressure plateau at about 100 mbar follows the peak of pressure. Valve leakage can be evaluated at this stage (see e.g., the exponential pressure decay in Figure 11b), but a more reliable estimate is obtained during compression test #1, which is about 8 times more sensitive due to the larger pressure in the pumping chamber. An equivalent leak rate as low as a few nL/h of insulin can be measured during this test. From Figure 10, the estimated inlet and outlet valve pretensions of +105 mbar and −101 mbar, respectively, together with the compression ratio value of 0.816, indicate that the tested micropump meets the specifications [28,29].
It is important to note that the purpose of the dry test is not to determine the exact value of specific mechanical characteristics but rather to verify that the device is safe and effective. Indeed, the large variability of critical parameters, including the valve pretensions, is due to manufacturing tolerances (up to ± 30 % at 3 σ ). The designer will consider this variability as a design input so as not to make patient safety conditional on too narrow tolerance and thus acceptance criteria for the functional test. As an example, a direct and noncontact measurement of the membrane displacement upon actuation provides a better estimate of the stroke volume that its derivation through compression test #1. On the other hand, the control of the etch process of the pumping cavity, coupled with the dry test described previously, provides good confidence that the micropump will infuse insulin with accuracy. However, to improve test accuracy, e.g., for a sake of process control, it is possible to calibrate in situ the integrated pressure sensors. The outlet valve is forced open, while a pressure controller generates the test pressure. Pressure sensor offset and linearity can be measured during this test to make the contribution of these sensors to the overall dry test error negligible.
The functional dry test can further provide strong evidence of the failure mode as illustrated in Figure 11. However, this analysis must be performed in a precise order because some failures can mask others. The presence of a large leakage flattens the pressure signals, and the test method is no longer effective. In addition, for a micropump that successfully passes electrical tests, the determination of the compression ratio is only valid if the leak rate is within specifications, the valves are not stuck, and the pneumatic control of the outlet valve is operational. Note that electrical failures are discarded prior to the dry test. Under these conditions, this dry test proves to be a powerful tool in process control to determine the failure modes.
These remarks apply to the extended dry test that aims at providing quantitative data about the performance of the piezo actuator after assembly to the substrate and connection to the micropump. The test sequence includes several compression tests (from #2 to #4.) that were used to determine the estimations of the pumping membrane offset, the blocking force, and the maximum pressure at the outlet. From the measured pressure gradients P 1 to P 4 , the formulae described in Section 2.2.5, Section 2.2.6, Section 2.2.7 and Section 2.2.8 lead to numerical values that are consistent with the specifications of the piezo actuator: blocking a force larger than 2N, membrane offset better than ± 40 % and maximum outlet pressure of the micropump (>+1 barg). Again, the objective of this extended dry test is not to determine the exact value of these parameters but rather to verify that the piezo assembly allows the correct functioning of the micropump.
Test automation is crucial in mass production. Test equipment able to characterize four micropumps in parallel was developed by ST Microelectronics. Test duration can be reduced to only a few seconds (typically 5 s) to ensure that this functional test is not the bottleneck of production. The means to secure the device traceability were implemented to comply with FDA 21 CFR Part 820 [42]. The validation of the test equipment included measurements of functional and nonfunctional micropumps using the test setup described in the present document and the replication of the test on the automated machine.
The test method is partly used in the field to check, after unpacking the device but before the filling of the insulin reservoir, that the system is functional. This built-in self-test consists of performing actuation cycles and monitoring the pressure sensor signals. The pressure profiles are like a dry test performed in production except for the last compression test #1, which cannot be performed because the outlet valve is not controlled. The failure detection algorithm mimics the approach used during the dry test. Since the test is performed before filling, only the micropump is discarded and no insulin is lost. In use, the micropump functionality is continuously monitored. Additional failure modes can be analyzed including air detection, partial or total occlusion, insulin reservoir over or under pressure, empty reservoir, etc. A detailed description of the pressure profiles during both basal and bolus modes is provided in the references [28,29].

5. Conclusions

A Design-for-Testability and dry test methods for insulin MEMS micropumps were presented. Samples were manufactured and tested to demonstrate that the main output parameters of the device can be measured in a few seconds and without risk of contamination. It has been shown that these dry tests can determine the device functionality but also the nature of the potential defects. Further, a simplified built-in self-test can be performed to monitor the device functionality in the field. The methods presented here are generic and can be implemented in mechanical micropumps that include means to monitor the pressure in the pumping chamber and to control the outlet valve.
This paper focuses on postproduction tests, but pneumatic tests at the wafer level are also of great interest. Future research includes the generation of pressure by the device itself or the functionalization of the wafer chuck to enable the pneumatic actuation of the pumping membrane. The membrane displacement could be obtained using a noncontact method or through the measurement of the pumping chamber pressure using electric probes to monitor the pressure sensor signals.

Funding

This research received no external funding.

Institutional Review Board Statement

Not applicable.

Informed Consent Statement

Not applicable.

Data Availability Statement

Not applicable.

Acknowledgments

Thanks to the Microsystems Department Team, Debiotech SA Lausanne, Switzerland, as well as to the team of the MEMS. Sensor & High Advanced Analog Product Division of STMicroelectronics, Agrate Brianza, Italia.

Conflicts of Interest

The author declares no conflict of interest.

Appendix A

Detailed derivation of the equivalent stiffness of the system
Applying Equation (2) during compressions #3 and #4 yields:
P a t m ( V D + V S ) = P 3 ( V D + V S ( δ 1 δ 3 δ 1 ) )
And
P a t m ( V D + V S ) = P 4 ( V D + V S ( δ 1 δ 4 δ 1 ) )
Using Equation (3), the membrane positions δ 3 and δ 4 can be expressed as a function of measurable pressures only:
δ 3 δ 1 = P 3 P 3 P m a x P m a x
And
δ 4 δ 1 = P 4 P 4 P m a x P m a x
During compression #3, the piezo actuator is not powered, and F ( V ) = 0 . Thus, at equilibrium, Equation (25) takes the form:
P 3 S m + δ 3 k e q + C = 0
Combining Equations (A2) and (A5) leads to an expression of the constant C:
C = P 3 S m δ 1 γ k e q
where
γ = P 3 P 3 P m a x P m a x
The combination of Equations (24) and (A6) yields:
k m ( γ δ 1 δ 1 2 ) + k p ( γ δ 1 + δ 0 δ 2 ) = P 3 S m
Introducing Equation (26) into (A8) yields:
k m ( γ δ 1 δ 1 2 ) + k p ( γ δ 1 δ 2 ) + k m ( δ 1 2 δ 2 ) = P 3 S m
Simplifying Equation (A9) provides an expression of k e q that only depends on measurable pressures or parameters that are well controlled in MEMS fabrication:
k e q = P 3 S m δ 2 δ 1 γ

References

  1. Lawes, R. MEMS Cost Analysis: From Laboratory to Industry; CRC Press: Boca Raton, FL, USA, 2014. [Google Scholar] [CrossRef]
  2. Vranes, M. Cost of MEMS testing: A strategic perspective. In Proceedings of the 3rd Annual MTR Conference, Shanghai, China, 15–16 September 2011. [Google Scholar]
  3. Hantos, G.; Flynn, D.; Desmulliez, M.P.Y. Built-In Self-Test (BIST) Methods for MEMS: A Review. Micromachines 2021, 12, 40. [Google Scholar] [CrossRef] [PubMed]
  4. Kerkhoff, H.G. Testing of MEMS-based microsystems. In Proceedings of the European Test Symposium (ETS’05), Tallinn, Estonia, 22–25 May 2005; pp. 223–228. [Google Scholar] [CrossRef]
  5. Shoaib, M.; Hamid, N.H.; Malik, A.F.; Zain Ali, N.B.; Tariq Jan, M. A review on key issues and challenges in devices level MEMS testing. J. Sens. 2016, 2016, 1639805. [Google Scholar] [CrossRef] [Green Version]
  6. Tanner, D.M. MEMS reliability: Where are we now? Microelectron. Reliab. 2009, 49, 937–940. [Google Scholar] [CrossRef]
  7. Olbrich, T.; Richardson, A.M.D.; Bradley, D.A. Built-in self-test and diagnostic support for safety critical microsystems. Microelectron. Reliab. 1996, 36, 1125–1136. [Google Scholar] [CrossRef]
  8. Ramadoss, R.; Dean, R.; Xiong, X. MEMS testing. In System-on-Chip Test Architectures; Elsevier: Amsterdam, The Netherlands, 2008; pp. 591–651. [Google Scholar] [CrossRef]
  9. Clark, J.R.; Hsu, W.T.; Nguyen, C.T.C. Measurement techniques for capacitively-transduced VHF-to-UHF micromechanical resonators. In Transducers’ 01 Eurosensors XV; Springer: Berlin/Heidelberg, Germany, 2001; pp. 1090–1093. [Google Scholar] [CrossRef]
  10. Puers, R.; De Bruyker, D.; Cozma, A. A novel combined redundant pressure sensor with self-test function. Sens. Actuators A Phys. 1997, 60, 68–71. [Google Scholar] [CrossRef]
  11. Whitesides, G.M. The origins and the future of microfluidics. Nature 2006, 442, 368–373. [Google Scholar] [CrossRef] [PubMed]
  12. Grayson, A.C.R.; Shawgo, R.S.; Johnson, A.M.; Flynn, N.T.; Li, Y.; Cima, M.J.; Langer, R. A BioMEMS review: MEMS technology for physiologically integrated devices. Proc. IEEE 2004, 92, 6–21. [Google Scholar] [CrossRef]
  13. Mao, Z.; Yoshida, K.; Kim, J.W. Active sorting of droplets by using an ECF (Electro-conjugate Fluid)micropump. Sens. Actuators A Phys. 2020, 303, 111702. [Google Scholar] [CrossRef]
  14. Medtronic plc. Medtronic SynchroMed®II Infusion System Implant Manual; Medtronic PLC.: Minneapolis, MN, USA, 2017. [Google Scholar]
  15. Chappel, E. Implantable Drug Delivery Devices. In Drug Delivery Devices and Therapeutic Systems; Chappel, E., Ed.; Academic Press: New York, NY, USA, 2020; pp. 129–156. [Google Scholar] [CrossRef]
  16. Combination Products. Available online: https://www.fda.gov/combination-products (accessed on 12 October 2022).
  17. Chappel, E. A Review of Passive Constant Flow Regulators for Microfluidic Applications. Appl. Sci. 2020, 10, 8858. [Google Scholar] [CrossRef]
  18. Bußmann, A.; Leistner, H.; Zhou, D.; Wackerle, M.; Congar, Y.; Richter, M.; Hubbuch, J. Piezoelectric Silicon Micropump for Drug Delivery Applications. Appl. Sci. 2021, 11, 8008. [Google Scholar] [CrossRef]
  19. Dumont-Fillon, D.; Chappel, E. Micropumps for drug delivery. In Drug Delivery Devices and Therapeutic Systems; Chappel, E., Ed.; Academic Press: New York, NY, USA, 2020. [Google Scholar] [CrossRef]
  20. Rebordão, G.; Palma, S.I.C.J.; Roque, A.C.A. Microfluidics in Gas Sensing and Artificial Olfaction. Sensors 2020, 20, 5742. [Google Scholar] [CrossRef] [PubMed]
  21. Chen, H.; Huo, D.; Zhang, J. Gas Recognition in E-Nose System: A Review. IEEE Trans. Biomed. Circuits Syst. 2022, 16, 169–184. [Google Scholar] [CrossRef] [PubMed]
  22. Wang, Y.H.; Chen, C.P.; Chang, C.M.; Lin, C.-P.; Lin, C.-H.; Fu, L.-M.; Lee, C.-Y. MEMS-based gas flow sensors. Microfluid Nanofluid 2009, 6, 333. [Google Scholar] [CrossRef]
  23. Cho, M.-O.; Jang, W.; Lim, S.-H. Fabrication and Evaluation of a Flexible MEMS-Based Microthermal Flow Sensor. Sensors 2021, 21, 8153. [Google Scholar] [CrossRef]
  24. Xu, T.; Chakrabarty, K. Fault modeling and functional test methods for digital microfluidic biochips. IEEE Trans. Biomed. Circuits Syst. 2009, 3, 241–253. [Google Scholar] [CrossRef] [Green Version]
  25. Shah, R.B.; Patel, M.; Maahs, D.M.; Shah, V.N. Insulin delivery methods: Past. present and future. Int. J. Pharm. Investig. 2016, 6, 1–9. [Google Scholar] [CrossRef] [Green Version]
  26. Hovorka, R. Closed-loop insulin delivery: From bench to clinical practice. Nat. Rev. Endocrinol. 2011, 7, 385–395. [Google Scholar] [CrossRef]
  27. Schneeberger, N.; Allendes, R.; Bianchi, F.; Chappel, E.; Conan, C.; Gamper, S.; Schlund, M. Drug delivery micropump with built-in monitoring. Procedia Chem. 2009, 1, 1339–1342. [Google Scholar] [CrossRef] [Green Version]
  28. Dumont-Fillon, D.; Tahriou, H.; Conan, C.; Chappel, E. Insulin Micropump with Embedded Pressure Sensors for Failure Detection and Delivery of Accurate Monitoring. Micromachines 2014, 5, 1161–1172. [Google Scholar] [CrossRef] [Green Version]
  29. Fournier, S.; Chappel, E. Modeling of a Piezoelectric MEMS Micropump Dedicated to Insulin Delivery and Experimental Validation Using Integrated Pressure Sensors: Application to Partial Occlusion Management. J. Sens. 2017, 2017, 3719853. [Google Scholar] [CrossRef]
  30. Richter, M.; Linnemann, R.; Woias, P. Robust design of gas and liquid micropumps. Sens. Actuators A Phys. 1998, 68, 480–486. [Google Scholar] [CrossRef]
  31. Bissig, H.; Petter, H.T.; Lucas, P.; Batista, E.; Filipe, E.; Almeida, N.; Ribeiro, L.F.; Gala, J.; Martins, R.; Savanier, B.; et al. Primary standards for measuring flow rates from 100 nl/min to 1 ml/min–gravimetric principle. Biomed. Eng./Biomed. Tech. 2015, 60, 301–316. [Google Scholar] [CrossRef] [PubMed]
  32. Chappel, E.; Proennecke, S.; Neftel, F. Method and System for Detecting Malfunction of a MEMS Micropump. U.S. Patent No 10.286.144, 14 May 2019. [Google Scholar]
  33. Gastinger, K.; Haugholt, K.H.; Kujawinska, M.; Jozwik, M.; Schaeffel, C.; Beer, S. Optical mechanical and electro-optical design of an interferometric test station for massive parallel inspection of MEMS and MOEMS. In Proceedings of the Optical Measurement Systems for Industrial Inspection VI (SPIE), Munich, Germany, 17 June 2009; Volume 7389, pp. 487–498. [Google Scholar] [CrossRef]
  34. Krauter, J.; Osten, W. Nondestructive surface profiling of hidden MEMS using an infrared low-coherence interferometric microscope. Surf. Topogr. Metrol. Prop. 2019, 6, 015005. [Google Scholar] [CrossRef]
  35. Emery, Y.; Cuche, E.; Marquet, F.; Aspert, N.; Marquet, P.; Kühn, J.; Botkine, M.; Colomb, T.; Montfort, F.; Charrière, F.; et al. Digital holographic microscopy (DHM) for metrology and dynamic characterization of MEMS and MOEMS. In Proceedings of the SPIE 6185, Mems, Moems, and Micromachining II, Strasbourg, France, 21 April 2006; pp. 205–209. [Google Scholar] [CrossRef]
  36. Singh, V.R.; Asundi, A. In-line digital holography for dynamic metrology of MEMS. Chin. Opt. Lett. 2009, 7, 1117–1122. [Google Scholar] [CrossRef]
  37. Singh, V.R.; Miao, J.; Wang, Z.; Hegde, G.; Asundi, A. Dynamic characterization of MEMS diaphragm using time averaged in-line digital holography. Opt. Commun. 2007, 280, 285–290. [Google Scholar] [CrossRef]
  38. Krehl, P.; Engemann, S.; Rembe, C.; Hofer, E.P. High-speed visualization. a powerful diagnostic tool for microactuators–retrospect and prospect. Microsyst. Technol. 1999, 5, 113–132. [Google Scholar] [CrossRef]
  39. Puers, R. Capacitive Sensors: When and How to use them. Sens. Actuators A Phys. 1993, 37, 93–105. [Google Scholar] [CrossRef]
  40. Algamili, A.S.; Khir, M.H.M.; Dennis, J.O.; Ahmed, A.Y.; Alabsi, S.S.; Ba Hashwan, S.S.; Junaid, M.M. A Review of Actuation and Sensing Mechanisms in MEMS-Based Sensor Devices. Nanoscale Res. Lett. 2021, 16, 16. [Google Scholar] [CrossRef]
  41. Atmospheric Pressure (QFE, QFF, QNH). Available online: https://www.meteoswiss.admin.ch/home/weather/wetterbegriffe/atmospheric-pressure-qfe-qff-qnh.html (accessed on 31 October 2022).
  42. CFR-Code of Federal Regulations Title 21. Available online: https://www.accessdata.fda.gov/scripts/cdrh/cfdocs/cfcfr/CFRSearch.cfm?CFRPart=820&showFR=1&subpartNode=21:8.0.1.1.12.6 (accessed on 31 October 2022).
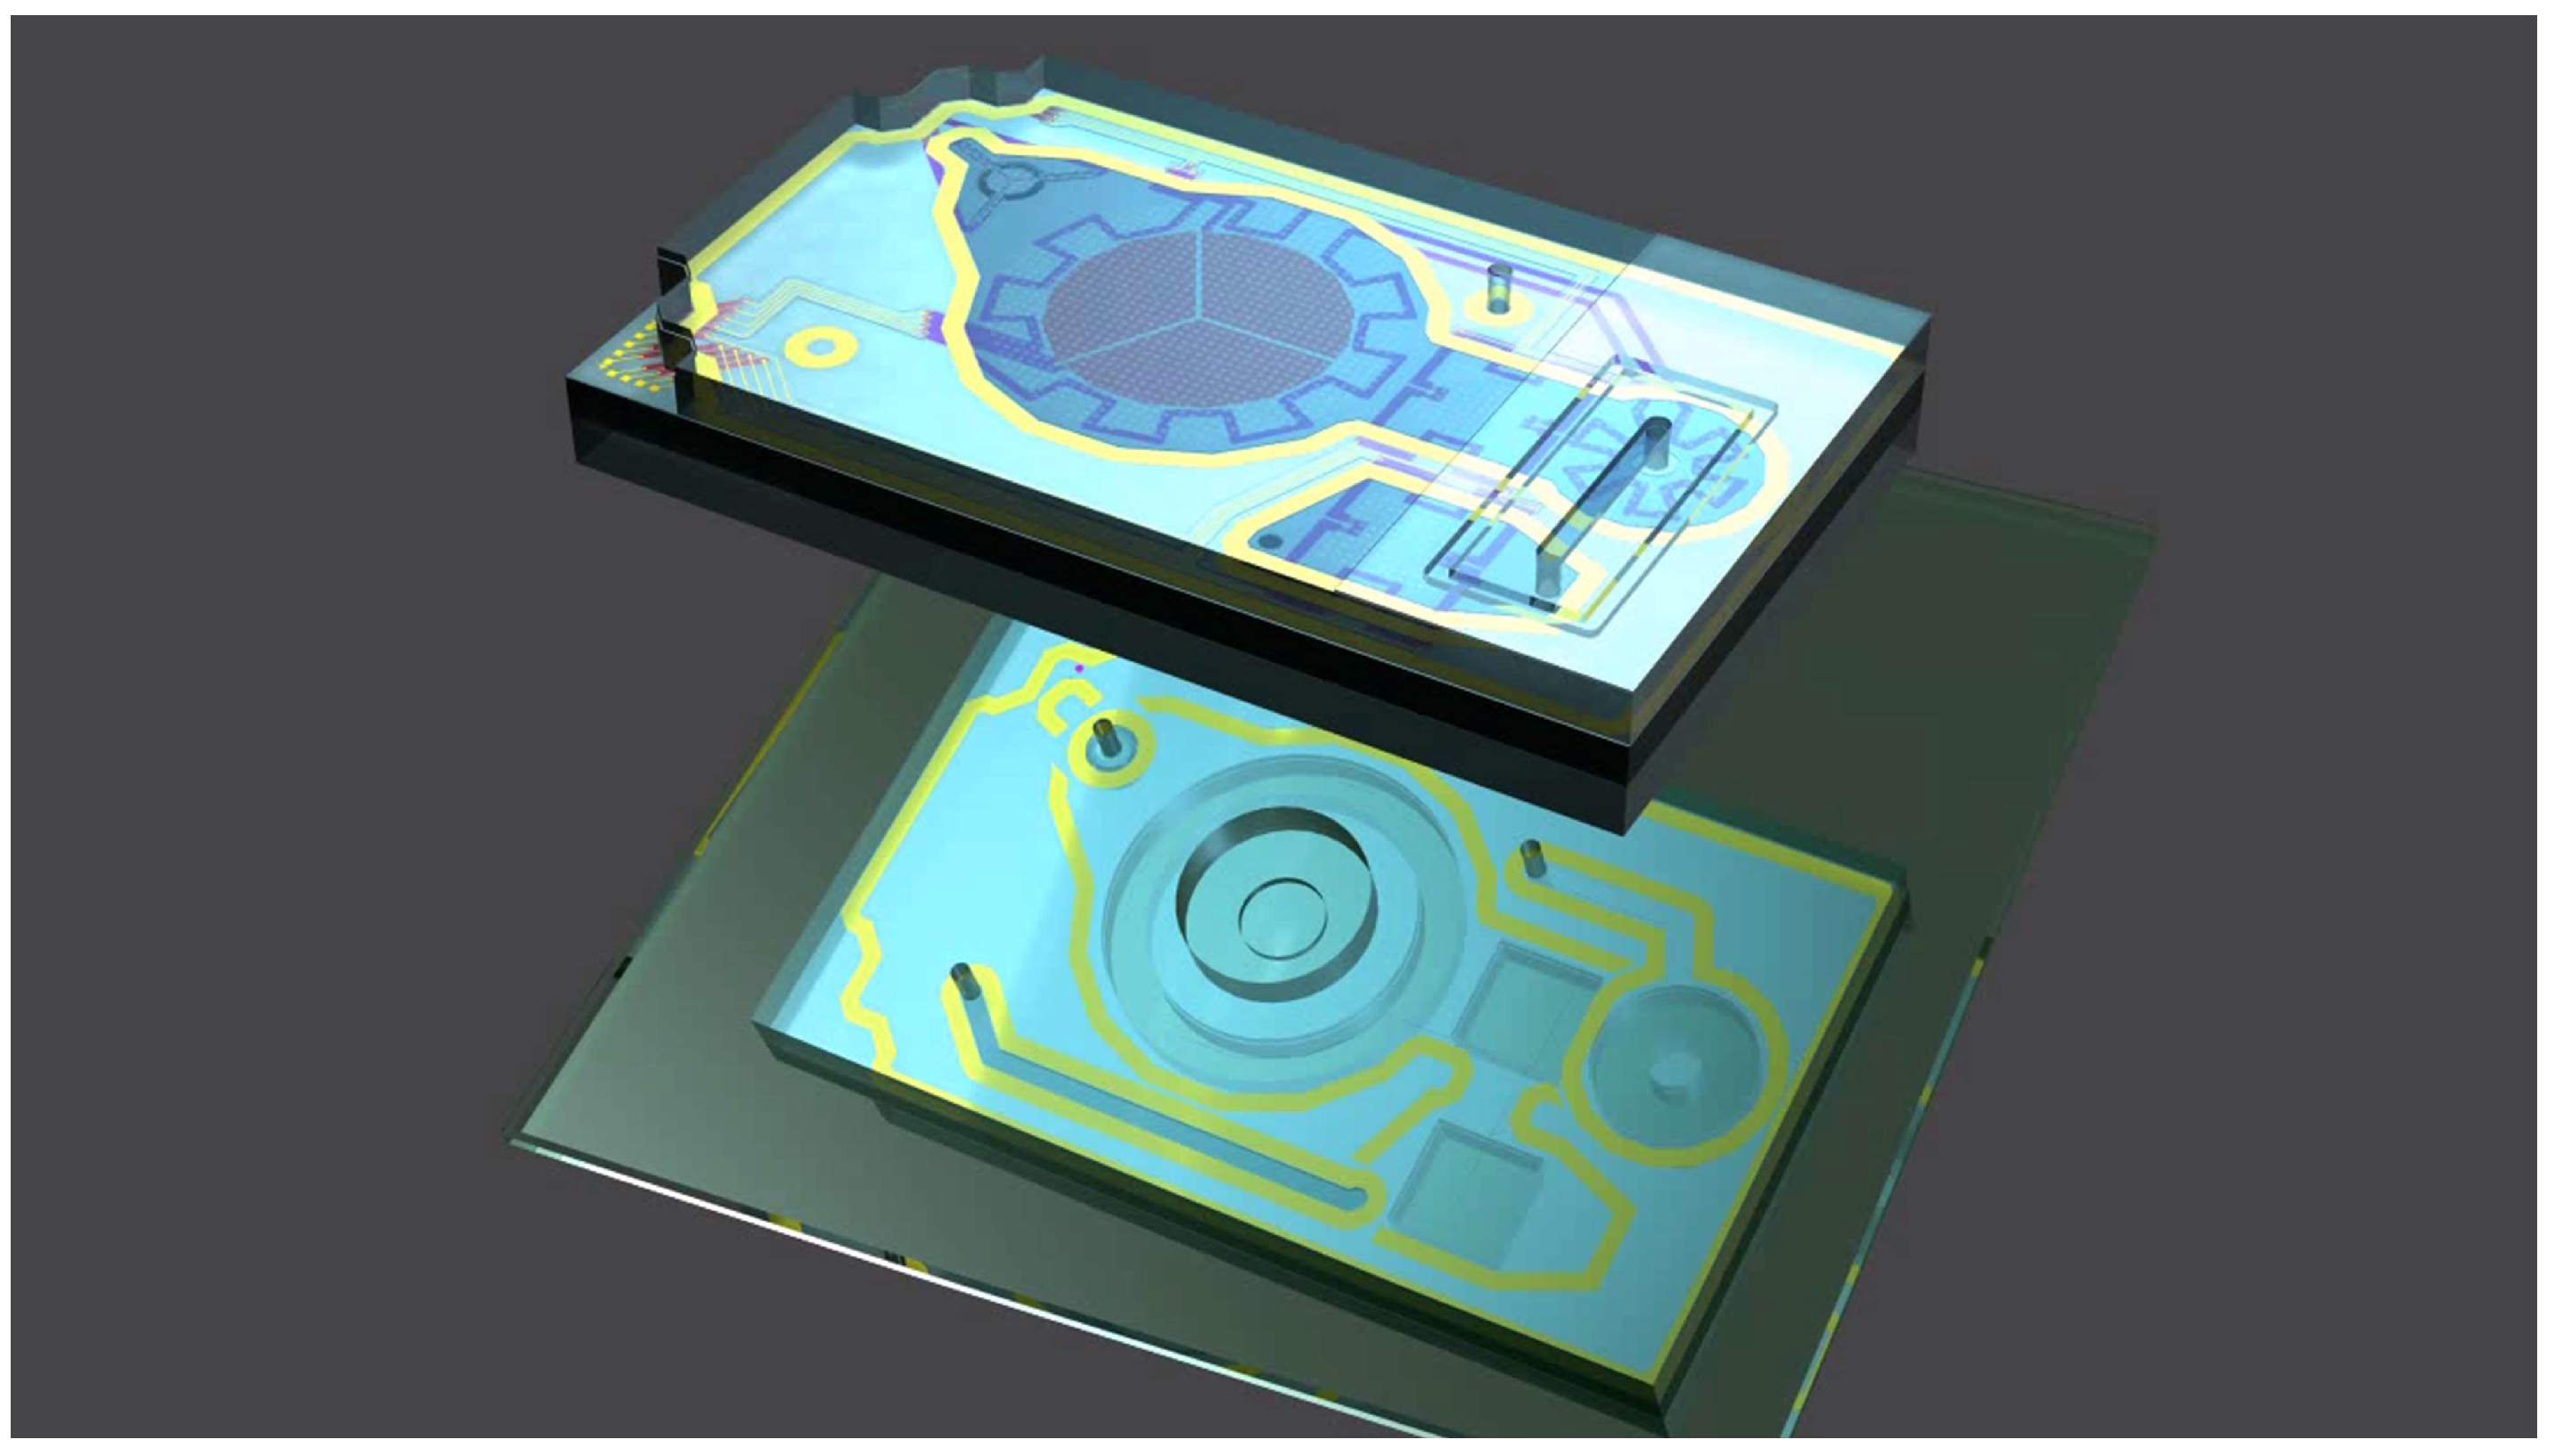
Figure 1. Schematic view of Debiotech’s triple-stack micropump with electrical routing and bonding structures. The chip dimensions in mm are 10.08 × 5.84 × 1.416   ( L × W × H ) .
Applsci 12 12258 g001
Figure 2. Top view of the MEMS micropump developed by Debiotech (IR microscopy). The fluid pathway is indicated by yellow arrows. A rectangular glass cover is glued above the outlet valve to connect fluidically the outer detector and to allow the outlet port to be on the same side as the inlet port.
Applsci 12 12258 g002
Figure 3. Schematics of a membrane micropump with passive check valves during (a) the supply phase and (b) the infusion phase.
Applsci 12 12258 g003
Figure 4. Schematic cross-section of an outlet valve with a venting hole that can be used to control pneumatically the opening and closure of the valve. The Anti-Bonding Layer (ABL) in pink is deposited onto the top wafer to a downward shift of the valve and thus a pretension (valve normally closed). The membrane in the middle wafer (SOI—buried oxide in green) is 15 microns thick [28]. The venting hole is machined in the bottom wafer. Other dimensions are not disclosed because the methods described below are not specific to this model but generic to membrane pumps.
Applsci 12 12258 g004
Figure 5. Schematic representation of the micropump during leak tests. The pressurized air in the pumping chamber flows through the residual fluid pathways of the inlet and outlet valves in closed positions. The direction of the airflow is indicated by blue arrows.
Applsci 12 12258 g005
Figure 6. Sketch of the “mechanical loop” with the pedestal, the piezo, the flexible link, the micropump chip, and the substrate.
Applsci 12 12258 g006
Figure 7. Schematic view (not to scale) of the piezo and the pumping membrane at specific positions defined in the different methods used hereafter. The origin z = 0 was chosen at the pull position of the membrane. The pumping membrane and the piezo actuator offsets were noted; M o f f and δ 0 correspond to their respective displacement along the z-axis during assembly. The different strokes δ 1 to δ 4 correspond to the pumping membrane displacement during the compression tests #1 to #4 (a detailed description of these tests is provided in the text).
Applsci 12 12258 g007
Figure 8. (a) Sample holder with the ceramic substrate and the micropump; the piezo actuator, located beneath the substrate, is not visible here. (b) Sample holder after positioning of the PCB for electrical connections. The side and top pneumatic connections are used to calibrate the pressure sensors and to control the outlet valve vent port.
Applsci 12 12258 g008
Figure 9. Bipolar actuation profile of the piezo actuator during the dry test sequence.
Applsci 12 12258 g009
Figure 10. Typical pressure profile of a functional micropump during the dry test sequence. Positive (and negative) peaks of pressure are induced by the push (and pull) movement of the actuator. The arrows indicate the actions on the outlet valve (venting or pressurization to force the valve closed) and the measurement points for the estimated parameters. The compression test followed by the evaluation of the leaks is performed together with the application of a large pressure at the outlet valve vent to keep it closed. Before this final test, a venting of the pumping chamber at t = 6   s is performed to improve measurement accuracy.
Applsci 12 12258 g010
Figure 11. Pressure profiles of micropumps that fail during the functional dry test in production. The vertical axis is the relative pressure in the pumping chamber in bar, while the horizontal axis is the time in milliseconds. A non-exhaustive list of failure modes is shown here: (a) large leakage; (b) medium leakage; (c) inlet valve stuck; (d) inlet valve stuck and leakage; (e) outlet valve stuck; (f) inlet and outlet valves stuck and leakage; (g) leakage and inverted piezo poling that induces a positive peak of pressure at t = 1   s ; (h) vent issue that does not allow the pneumatic control of the outlet valve during the dry test.
Applsci 12 12258 g011
Figure 12. Piezo voltage in bipolar configuration during an extended dry test sequence. A full PUSH (and PULL) corresponds to an applied voltage of +200 V (and −200 V). From t = 0   s to t = 10   s , the sequence is equivalent to the dry test sequence shown in Figure 9.
Applsci 12 12258 g012
Figure 13. Experimental pressure profile during the extended dry test of a functional micropump. The different pressure gradients refer to the compression tests described in the previous sections. P v a l   I N and P v a l   O U T are the inlet and outlet valve pretensions, respectively.
Applsci 12 12258 g013
Publisher’s Note: MDPI stays neutral with regard to jurisdictional claims in published maps and institutional affiliations.