Article

Stretching and Forming Limit Curve of Steel–Glass Fibre Reinforced and Non-Reinforced Polyamide–Steel Sandwich Materials

1
Institute of Metallurgy, TU Clausthal, Robert-Koch-Straße 42, 38678 Clausthal-Zellerfeld, Germany
2
Clausthal Centre of Material Technology, TU Clausthal, Agricolastrasse 2, 38678 Clausthal-Zellerfeld, Germany
3
Department of Metallurgical and Materials Engineering, Faculty of Petroleum and Mining Engineering, Suez University, Suez 43512, Egypt
4
Institute of Polymer Materials and Plastics Engineering, TU Clausthal, Agricolastrasse 6, 38678 Clausthal-Zellerfeld, Germany
5
Institute of Physics and Chemistry of Materials of Strasbourg, University of Strasbourg, 23 rue du Loess, 67034 Strasbourg, France
6
Space Engineering Department, Samara National Research University, Moskovskoye Hwy 34, 443086 Samara, Russia
*
Authors to whom correspondence should be addressed.
Appl. Sci. 2023, 13(11), 6611; https://doi.org/10.3390/app13116611
Submission received: 17 April 2023 / Revised: 10 May 2023 / Accepted: 22 May 2023 / Published: 29 May 2023
(This article belongs to the Special Issue Processing, Properties and Applications of Composite Materials)

Abstract

:
This paper focuses on investigating the forming behaviour of sandwich materials composed of steel sheets and glass fibre-reinforced polyamide 6 (GF-PA6), i.e., thermoplastic-based fibre metal laminates (FML). Stretching and forming limit curve (FLC) determination of FML with different cover/core layer thickness ratios at various forming temperatures, i.e., at room temperature (RT), 200 and 235 °C, are the main approaches for characterizing their formability. In addition, the formability of mono-materials and non-reinforced sandwich materials is investigated as a reference. For a successful test and reliable results, several technical issues are considered, such as the suitable lubrication configuration and digital image correlation at elevated forming temperatures. The results revealed that the formability of non-reinforced sandwich materials with different core layer thicknesses exhibited compared formability to their monolithic steel sheet and no remarkable improvement in their formability with increasing the temperature up to 200 °C. Conversely, the formability of FML shows significant improvement (approx. 300%) with increasing temperature with a forming depth of about 33 mm at 235 °C compared to only 12 mm at RT.

1. Introduction

The design and application of sandwich materials gain their advantages from its lightweight potential and adapted mechanical properties in comparison to mono-materials. Nowadays, different categories of sandwich materials have been developed. The first category is the one without fibre reinforcement (metal/polymer/metal (MPM)) such as Alucobond®, Dibond® and Hylite® (3A Composites GmbH, Singen, Germany), which are a combination of Aluminium (Al)-sheets and Polypropylene (PP) or Polyethylene (PE) cores. These examples have been applied in the automotive industry, such as in the VW Lupo and Audi A2 [1]. Others represent combination of steel and polyamide-polyethylene blend (PA-PE) core, such as the Litecor® (thyssenkrupp Steel Europe AG, Duisburg, Germany), which is developed in the framework of the “InCar Plus” project and aimed at a weight saving up to 60% compared to monolithic steel sheets [2]. The main advantages of Litecor® can be found in its core layer properties, where the PA-PE blend combines the formability (due to PE) with the better thermal stability (due to the higher melting pointing of PA). This make Litecor® more suitable for the cataphoretic painting while processing at a temperature of approximately 200 °C. Thus, this MPM has a great possibility to be applied as door and roof structures in body-in-white (BIW), for example. The second kind of the sandwich material is the combination of metal cover and fibre-reinforced polymer core, the so-called fibre metal laminates (FML). A traditional FML is composed normally of metal sheets (cover sheets or even interlayer ones) and fibre-reinforced epoxy resin, providing sandwich structures with excellent fatigue, impact and damage tolerance properties and low density [3]. For instance, ARALL® (Al/Aramid-fibre-resin/Al) is developed and is applied as wing panel materials on the Fokker F-27 in the 1980s [4]. Further products of these kinds of FML are GLARE® (Al/Glass-fibre-resin/Al) and CARALL® (Al/Carbon-fibre-resin/Al), finding increasing application potential in aerospace and automotive industries [5]. For example, GLARE® has been further improved with the substitution of aramid fibres with glass fibres to minimise the possibility of failure when used as fuselage material of Airbus A380 [4,6,7]. Since the beginning of the 21st century, further metal sheets, such as steels [8] and magnesium (Mg) alloys, have been used as cover layers to construct FML structures [9]. However, these thermoset-based FML are always accompanied with cost-intensive manufacturing techniques that have too-high cycle times for automotive series applications, as the curing and consolidation of resin in autoclaves due to its nature require elevated processing temperature and pressure for a relatively long period. In contrast, newly-developed thermoplastic-based FML offers equivalent mechanical properties, such as thermoset-based FML, and has an advantage of formability, recyclability and lower process cycle time, leading to cost-reducing production and time-efficiency [10,11]. For instance, the Leika® project, a research project of the “Research and Technology Centre for Resource Efficient Lightweight Structures for Electromobility” (FOREL), has developed several components and structures by combining steel/Mg sheets and fibre reinforced thermoplastic, as well as the advanced forming technologies to produce sandwich structures with approximately 24% weight saving compared to the reference floor assembly of e-vehicles, while maintaining the same performance in various crash load cases [12]. Moreover, several research works or concepts by using the thermoplastic-based FML as roof structures, backrest of a backseat and battery package boxes in e-vehicles are carried out by [12,13,14,15]. Other thermoplastic-based FML examples are developed based on thermoplastic matrix like PA6 and PEEK (Polyetheretherketone), such as CAPAAL® (Al/Carbon-fibre-PA6/Al) and CAPET® (Titanium/Carbon-fibre-PEEK/Titanium) [16,17,18].
Conventional lay-up techniques are regularly used to produce the thermoset-based FML with simple geometry [19,20]. However, depending on the application, the sandwich panel should provide the possibility to be formed into complex-shaped components to be applied in aircraft and automobile sectors. Thus, satisfactory sheet forming potential should be fulfilled under, for instance, deep drawing, draw bending and stretch forming conditions. From those, stretch forming is being widely applied in automotive industries. In this regard, several aspects about describing the forming behaviour of sandwich materials are missing the available literature, especially for the thermoplastic-based FML, which requires special forming conditions for reaching defect-free components, e.g., the application of warm forming or one-step thermoforming processes [21]. In contrast, it is possible to form flat MPM semi-products into complex components following the technical guidelines for the monolithic sheets, even at RT. However, its forming potential is less than that of the mono-materials of the same total thickness. Those limits further decreased as core layer thickness increased [22]. Moreover, the thermoset-based FML shows inherently poor formability at RT after the curing/solidification of the resin and could not be reheated to improve its formability due to the nature of the resin [23]. The unique way to enhance its formability is to form the blank sheet before the resin matrix is completely cured. For instance, when forming GLARE® with a semi-solidified or uncured matrix, the maximum drawing depth increased, but accompanied with severe wrinkling problems and time cost for final curing. [24,25]. Thus, the thermoplastic-based FML gained more attention, as it could be formed at elevated temperatures due to the thermoplastic nature of the matrix. For instance, the stretch forming of the thermoplastic-based FML made of Al and a self-reinforced PP composite is studied at varied temperatures [26], in which the strain experienced by the FML system is affected by holding force, stiffness of the composite and interlaminar adhesion state. Further studies about the thermoforming of thermoplastic-based FML are carried out, in which different punch geometries are considered (e.g., circular cup geometry [17], hat geometry [27] and rectangular geometry) [28]. Some previous studies have also demonstrated the feasibility of thermoforming thermoplastic-based FML into the dome or hat profile in one step, namely joining and forming of the blank sheets at the same time, which is proven to be efficient and highly deformable of the thermoplastic-FML based on steel sheets and organosheets (continuous fibre reinforced thermoplastic) [21,29,30]. However, the interlayer is subjected to local flowing in their liquid state during forming, leading to an irregular total blank thickness of the shaped part. Besides the wrinkling and irregular thickness distribution, other defects like cracking or delamination are also found [31].
Additionally, the forming limit diagram (FLD) is an essential method for evaluating the formability of sheet materials, which is developed firstly by Keeler and Backofen [32]. The forming limit curve (FLC) in FLD depicts the deformations on a sheet as major and minor strains and makes it possible to define limit forming ratios. To keep safe forming conditions, the strains appearing on the deformed part must be located below the FLC level. Thus, it is important to determine the FLC of the sandwich materials as well, offering a chance to evaluate the stamping characteristics of them in comparison to the monolithic metal sheets. It is stated that the FLC level of sandwich materials depends on the material compositions and forming conditions. For instance, FLC level of Al/PE/Al sandwich material is higher than that of its monolithic Al sheet at RT [33]. Moreover, a slight increasing tendency of drawing depth was found to increase the core layer thickness [34]. In comparison, the core thickness has no significant influence on the FLC levels for sandwich materials based on steel covers and polymer core, e.g., steel/PP-PE/steel. With increasing core layer thickness, MPM are subjected to failure at lower strains in the stretching region of the FLC [22,35]. Investigations about the FLC-determination of FML based on metal sheets and organosheets regarding the influence of temperature changes are rarely found in the literature survey. Some studies reported to use chopped fibres for a reinforced core in the thermoplastic-based FML under RT, in which the formability of FML is proven to be good due to the poor mechanical properties of GF-Polyurethane (GF-PU) as a core layer in this Al/GF-PU hybrid system [36]. The GF-PU used in the FML has a high elongation at failure of ~15% and absolute low stiffness, i.e., elastic modulus of 1.7 GPa [36]. A similar study to determine the FLC of FML based on Al5005/self-reinforced PP/Al5005 at RT is performed in [37], in which the strain evolution of thermoplastic-based FML was found to be larger than that of monolithic Al sheets and therewith a higher FLC level and better formability of thermoplastic-based FML. However, the used self-reinforced PP is the Curv™ from Propex Fabrics, which has an elongation at failure of 20%, tensile strength of 120 MPa and tensile modulus of 4.2 GPa [38]. In short, the above-mentioned studies chose fibre-reinforced cores with good formability for improving the formability of FML due to its nature of chopped fibres or self-reinforcement, but losing its integral strength. Furthermore, there is still a lack of research on the FLC determination of thermoplastic-based FML consisting of metal and organosheets. Since the nature of organosheets dictates the poor formability and good stiffness of such FML at RT, most studies have focused on warm thermoforming processes. However, the results are not abundant for explaining the accompanying defects and mechanism of improving foamability, such as the investigation of thermoforming FML based on steel/GF-PP/steel at two forming temperature levels of 140 °C and 170 °C, especially when taking into account that the melting point of PP is 160 °C [39]. Its result presented significant thickness irregularities of the composite core and flow of the matrix out of the die is detected by stretch forming at higher temperatures, i.e., 170 °C.
From the literature survey, rare studies have been carried out to determine the stretch forming-behaviour and FLC levels of thermoplastic-based FML, which is composed of steel covers and composite core. The aim of this study is to investigate the influence of material combinations, forming conditions and thickness ratios on their forming behaviour, especially the FML based on organosheets. The structure of this study is illustrated in Figure 1, describing the study sequence and the utilized investigation methods. Firstly, the material selection, including the mechanical characterization and semi-finished sandwich panel preparation for stretch forming, are described in Section 2.1. A method to determine the FLC levels and the corresponding sample geometries are also introduced. Some interesting technical issues and the development of new warm forming tool to perform the desired tests are introduced in Section 2.2. In Section 2.3, we provide a description of the experimental plan, where the mono-materials and laminates without core reinforcement (MPM) are considered as a benchmark for the study. In addition, the method to determine the FLC levels is explained in Section 2.4. Further, the results are described and analysed in Section 3, which is divided into two parts: Section 3.1 for describing the results of stretch-forming behaviour and Section 3.2 for describing the results of FLC determination. The conclusion is offered in Section 4.

2. Materials and Experimental Work

2.1. Materials and Sandwich Production

Here, 2 steel grades were used as cover sheets for producing the sandwich panels, namely the electrolytic-galvanized steel grades TS290 and TS275, which were delivered by the thyssenkrupp Steel Europe AG. These good deep-drawable thin steel grades are typically used in the food packaging industry and currently have more application potential in the automotive industry, which has similar mechanical properties to the cover sheets used in Litecor [2]. For the core materials, three kinds were applied: (a) unreinforced polyamide 6 (PA6) core, which was delivered by Infiana Germany GmbH & Co. KG, Forchheim, Germany; (b) fibre reinforced PA6, namely the Tepex Twill RG (50% fibre content in each weft and warp directions); and (c) Tepex unidirectional RGUD (20% fibre content in weft direction and 80% in warp direction). A summary of the materials used is given in Table 1. In this case, the properties of the mono-materials used (cover, core and adhesive) and the surface treatments (Figure 2) for preparing sandwich panels were previously specified in [40]. First, the core material was treated by cleaning it with acetone after drying it at 80 °C for at least 12 h (Figure 2a). The steel sheet was cleaned, grinded (gird size 60) and tempered (at 440 °C for 1 min) before the adhesion promoter SI-Coating was spread on the treated steel surface and activated at 250 °C for 3 min, as described in Figure 2b.
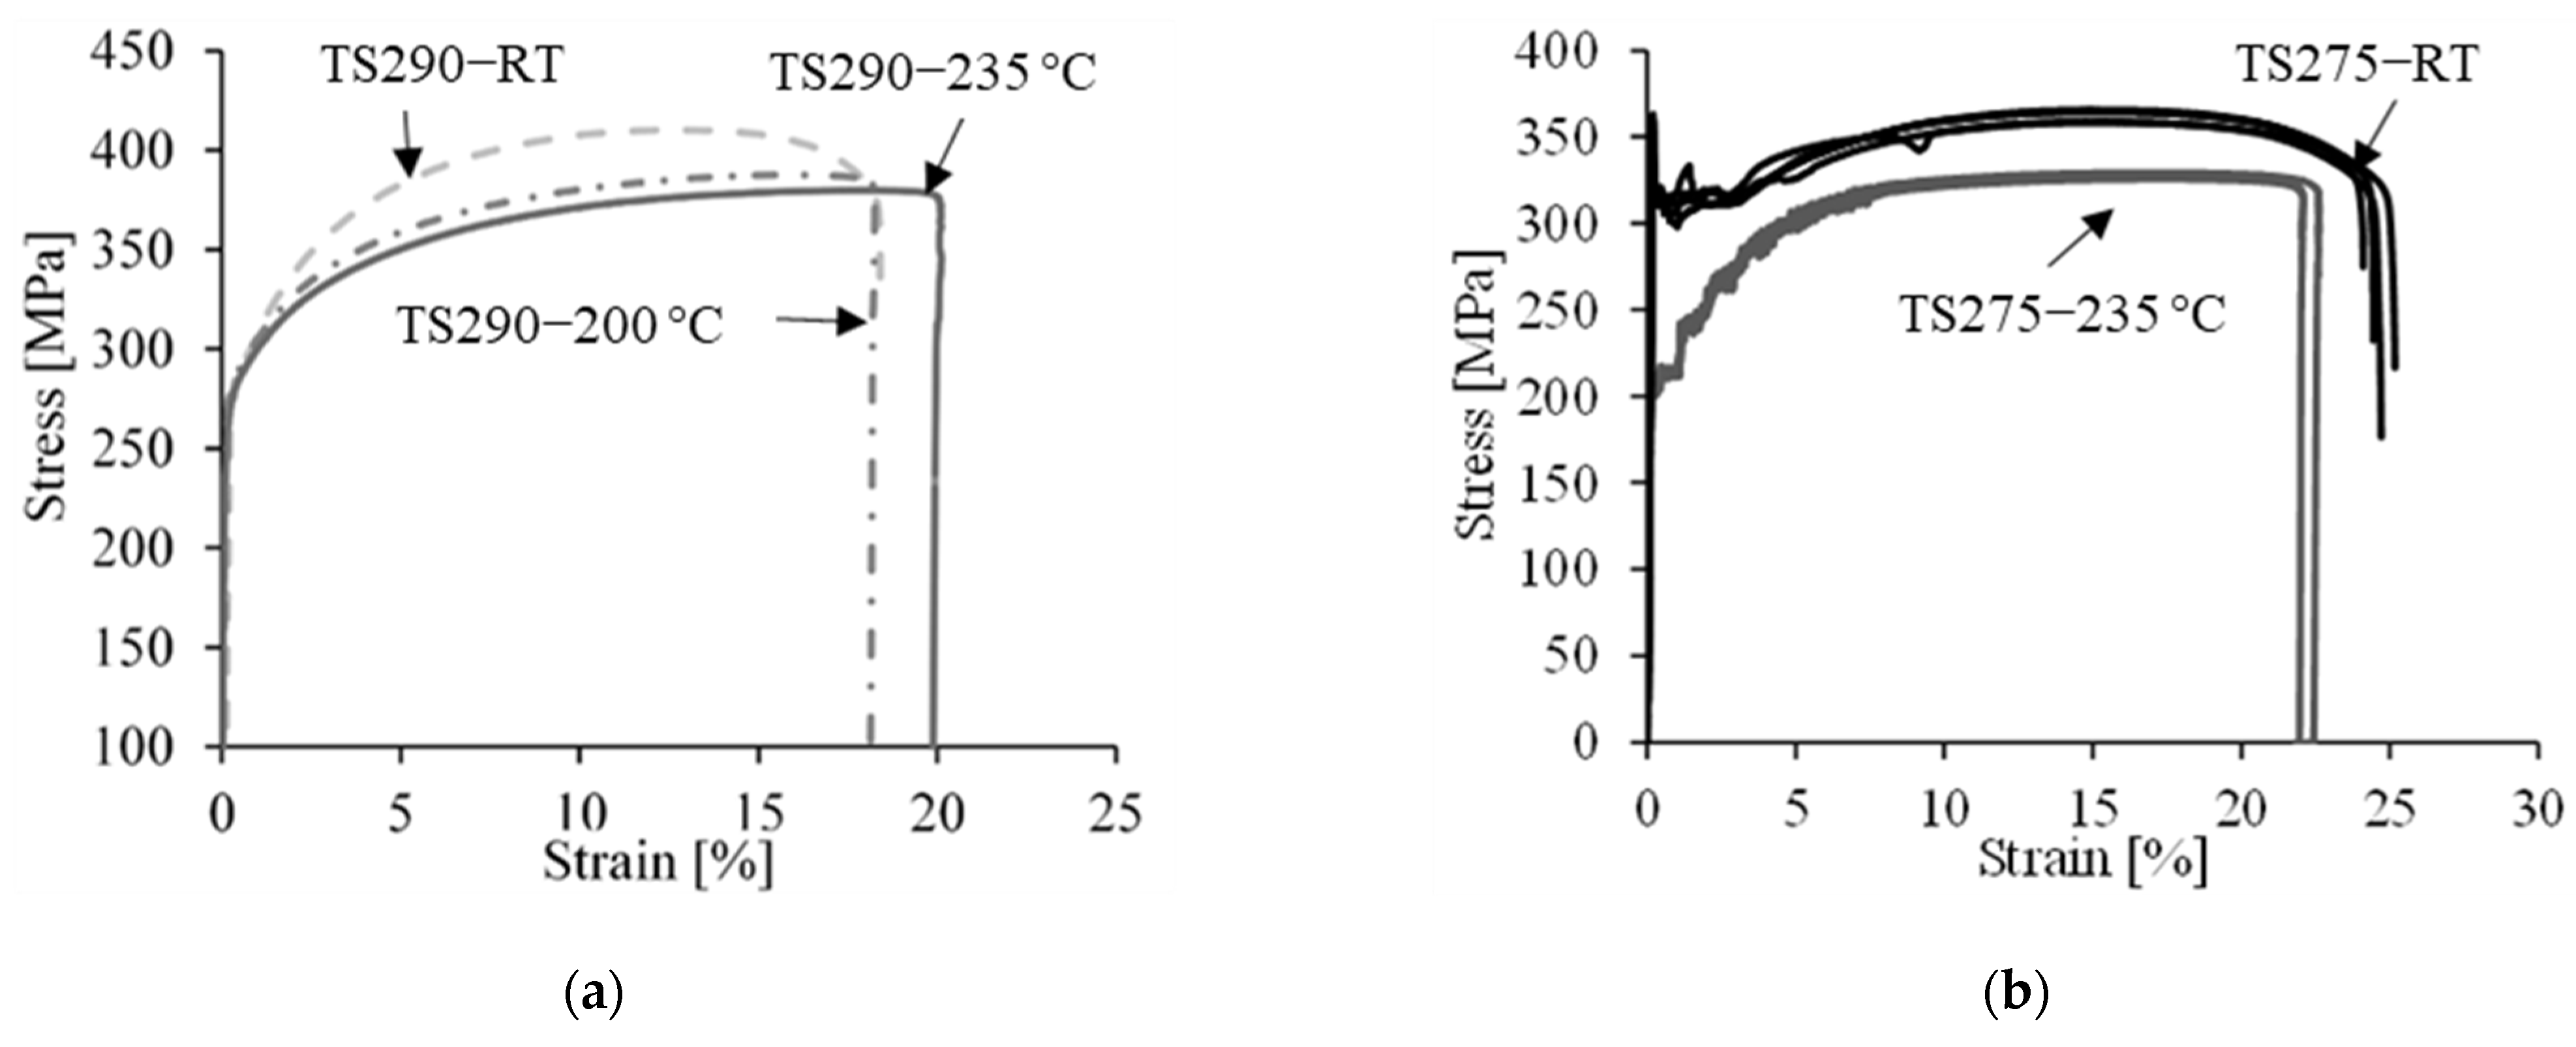
The tensile tests were carried out at RT, 200 and 235 °C to characterize their effect on the mechanical properties of the steel sheets, which could be correlated to their forming behaviour in the form of the MPM or FML, as shown in Figure 3. The test condition, sample geometry and used standard for tensile tests are presented in [41]. As expected, the tensile strength of the steel sheets was reduced as the temperature increased, and the elongation at failure of TS290 increased at the elevated temperatures of 200 and 235 °C, as shown in Figure 3a. In contrast, the elongation at failure of TS275 decreased with increasing temperature, as depicted in Figure 3b. This can be attributed to the Portevin-Le Chatelier (PLC) effect of TS275 at 235 °C, causing an intermittent activity of highly localised strain rate bands Therefore, a flat to slant crack transition was observed. During the slant fracture at high temperature, less fracture energy was absorbed compared to flat fracture at RT [42]. As such, a reduction of fracture resistance in terms of the fracture strain value from 25% to 21.5% was observed (Figure 3b).
To investigate the forming behaviour of the different sandwich panels as combinations of the two steel sheets with the reinforced and non-reinforced cores, the sandwich panels were firstly produced. For this, a batch process by hot-pressing was applied after the surface treatment, as shown in Figure 2. It is wort mentioning that during FML production, the organosheet RG or RGUD was stacked with the orientation of its warp direction in the rolling direction (RD) of the steel sheet. This layup was placed in the hot-pressing tool, which consists of two electrically-heatable and water-coolable plates having a size of 340 × 340 mm2. The hot-pressing conditions were 245 °C, 3 bar and 5 min. Under this condition, a sufficient adhesion in terms of a lap shear strength value of >20 MPa can be achieved [40]. After the consolidation and achieving adhesion, the sandwich panels were demoulded after cooling down to approx. 80 °C.
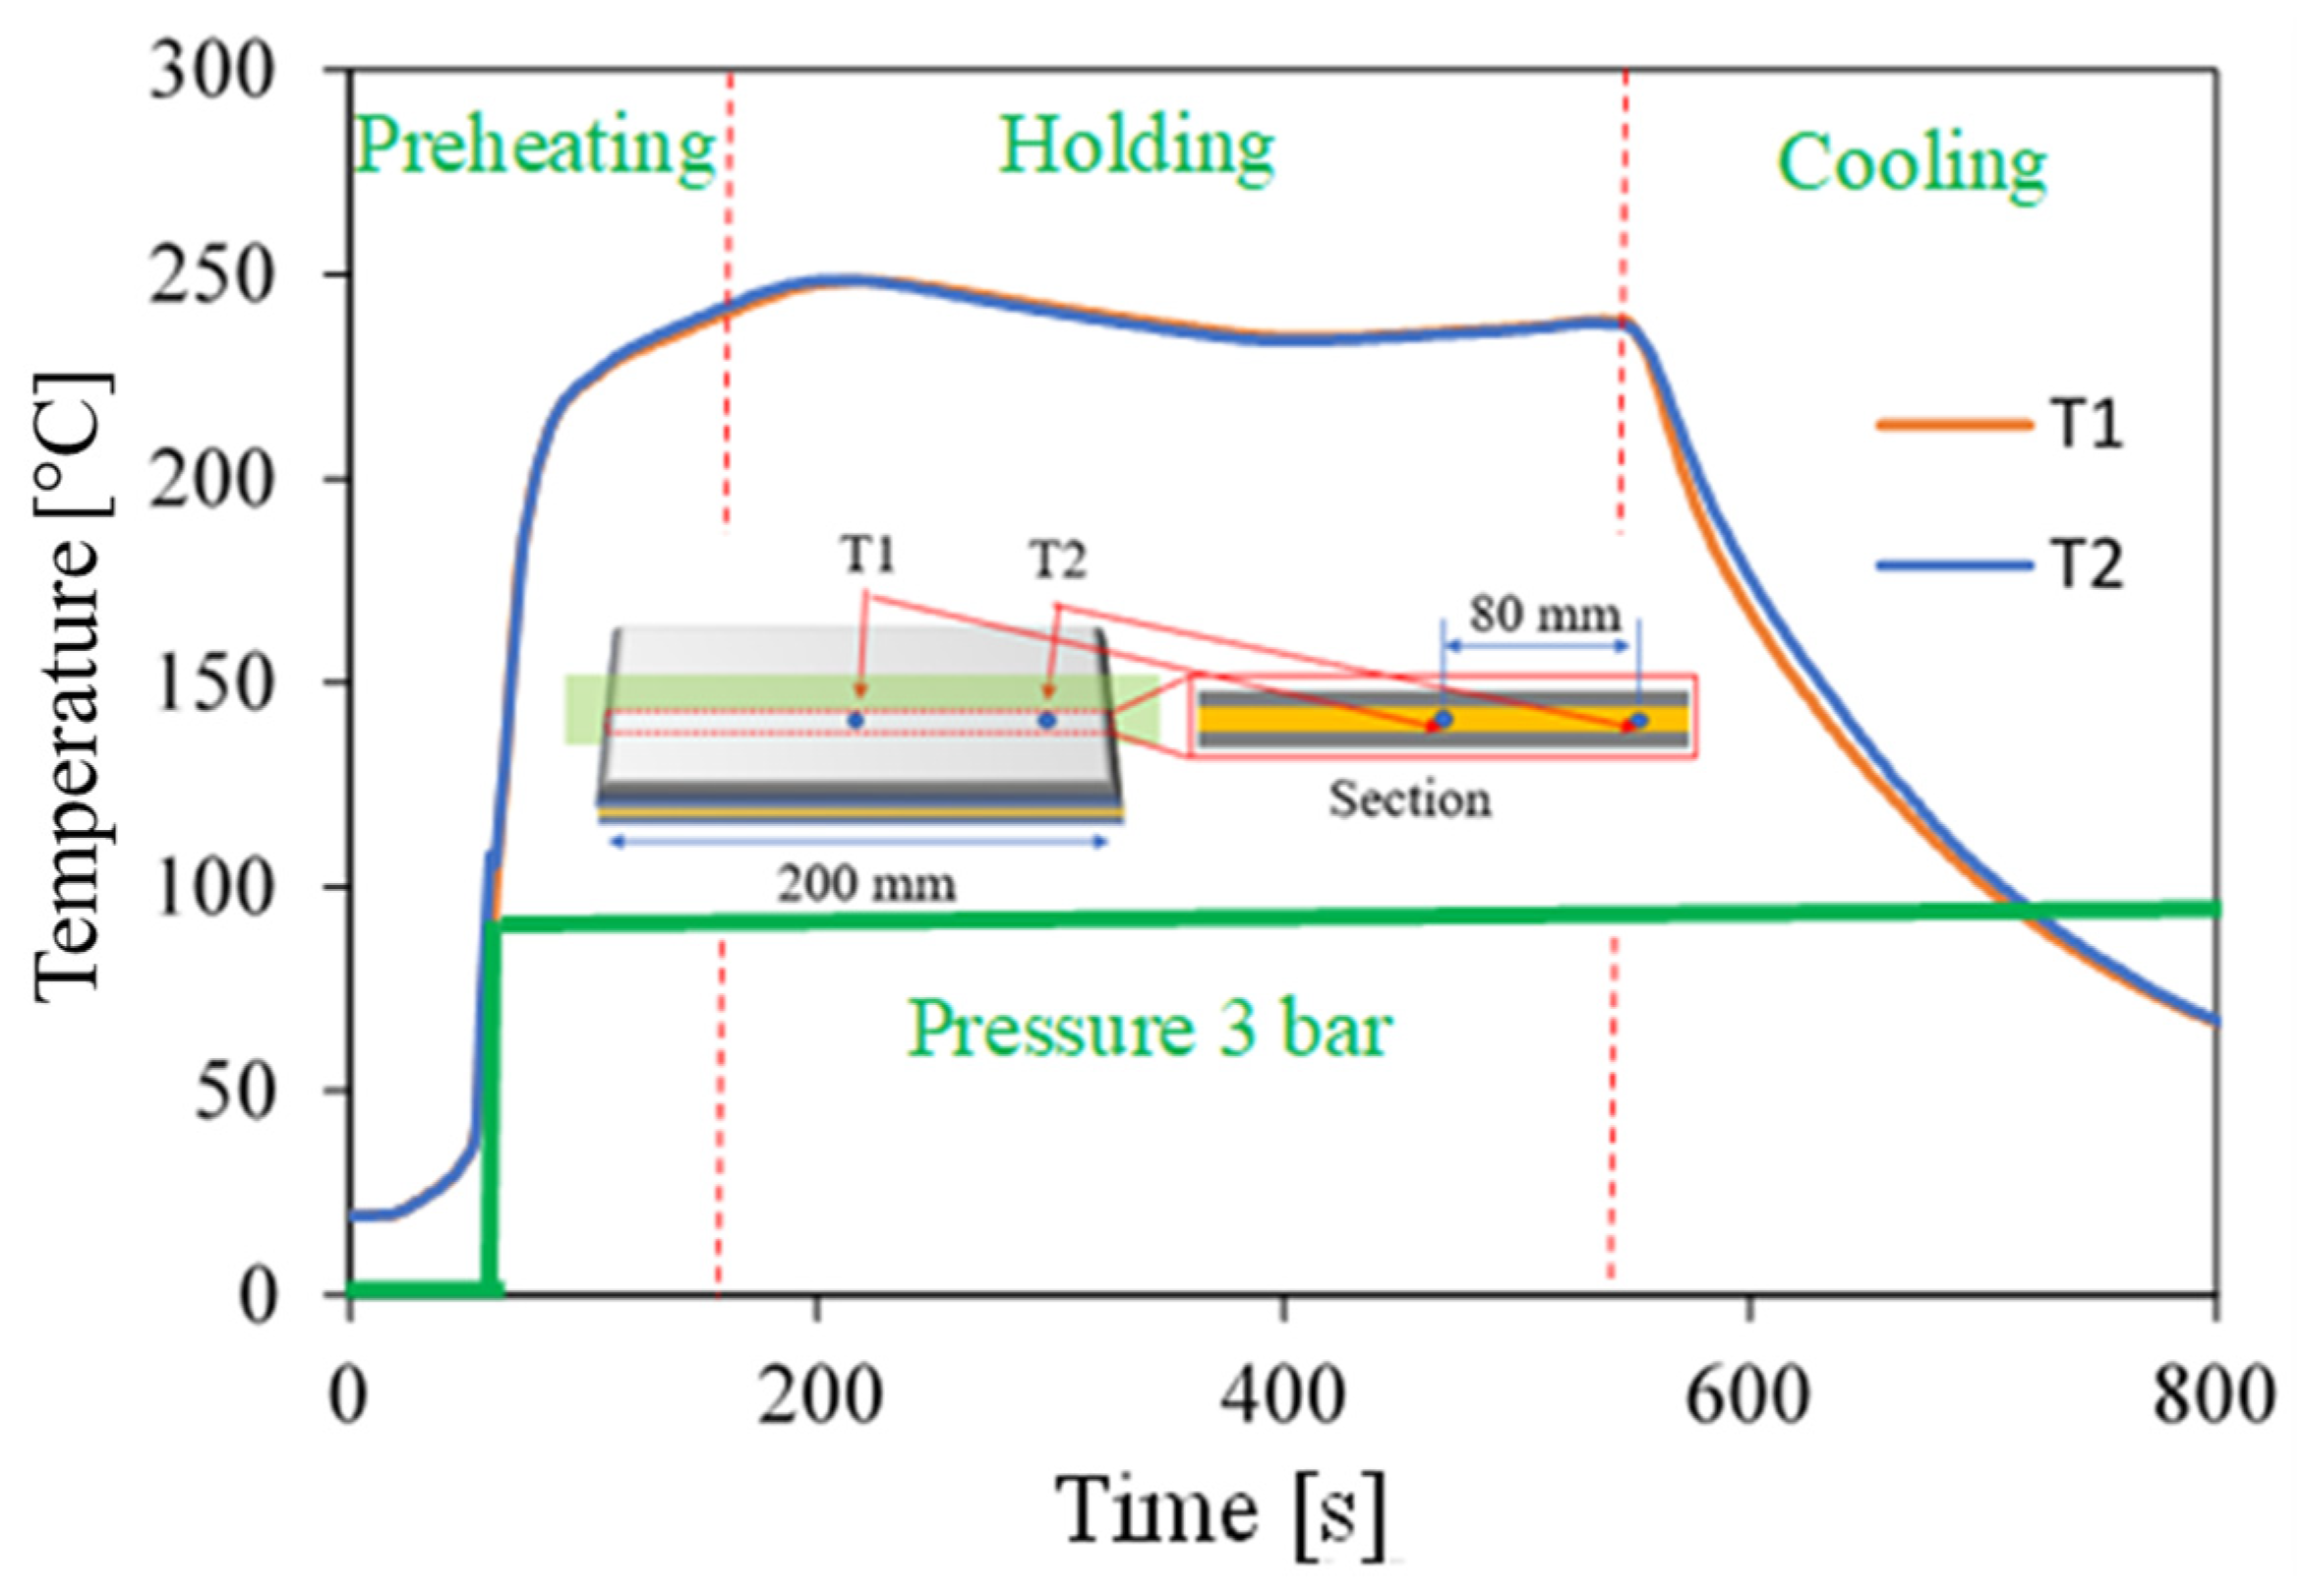
Figure 4 shows the temperature profile of the hot-pressing process for sandwich production, wherein the thermocouples were placed inside the sandwich panel with a size of 200 × 200 mm2 in two regions: panel centre (T1) and close to its side (T2). The temperature deviation from centre to side was ignorable. A heating rate of approximately 2 K/s and a cooling rate of 40 K/min was achieved.

2.2. Warm Forming: Tool Design and Technical Issues

2.2.1. Tool Design

To analyse the deformation behaviour under stretch forming conditions at elevated temperatures, we chose to use a standard semi-spherical punch. The test condition is summarized in Table 2, where the diameter of blank and punch, die radius, test speed and holding force are shown to have been kept constant. The forming temperature, however, varied.
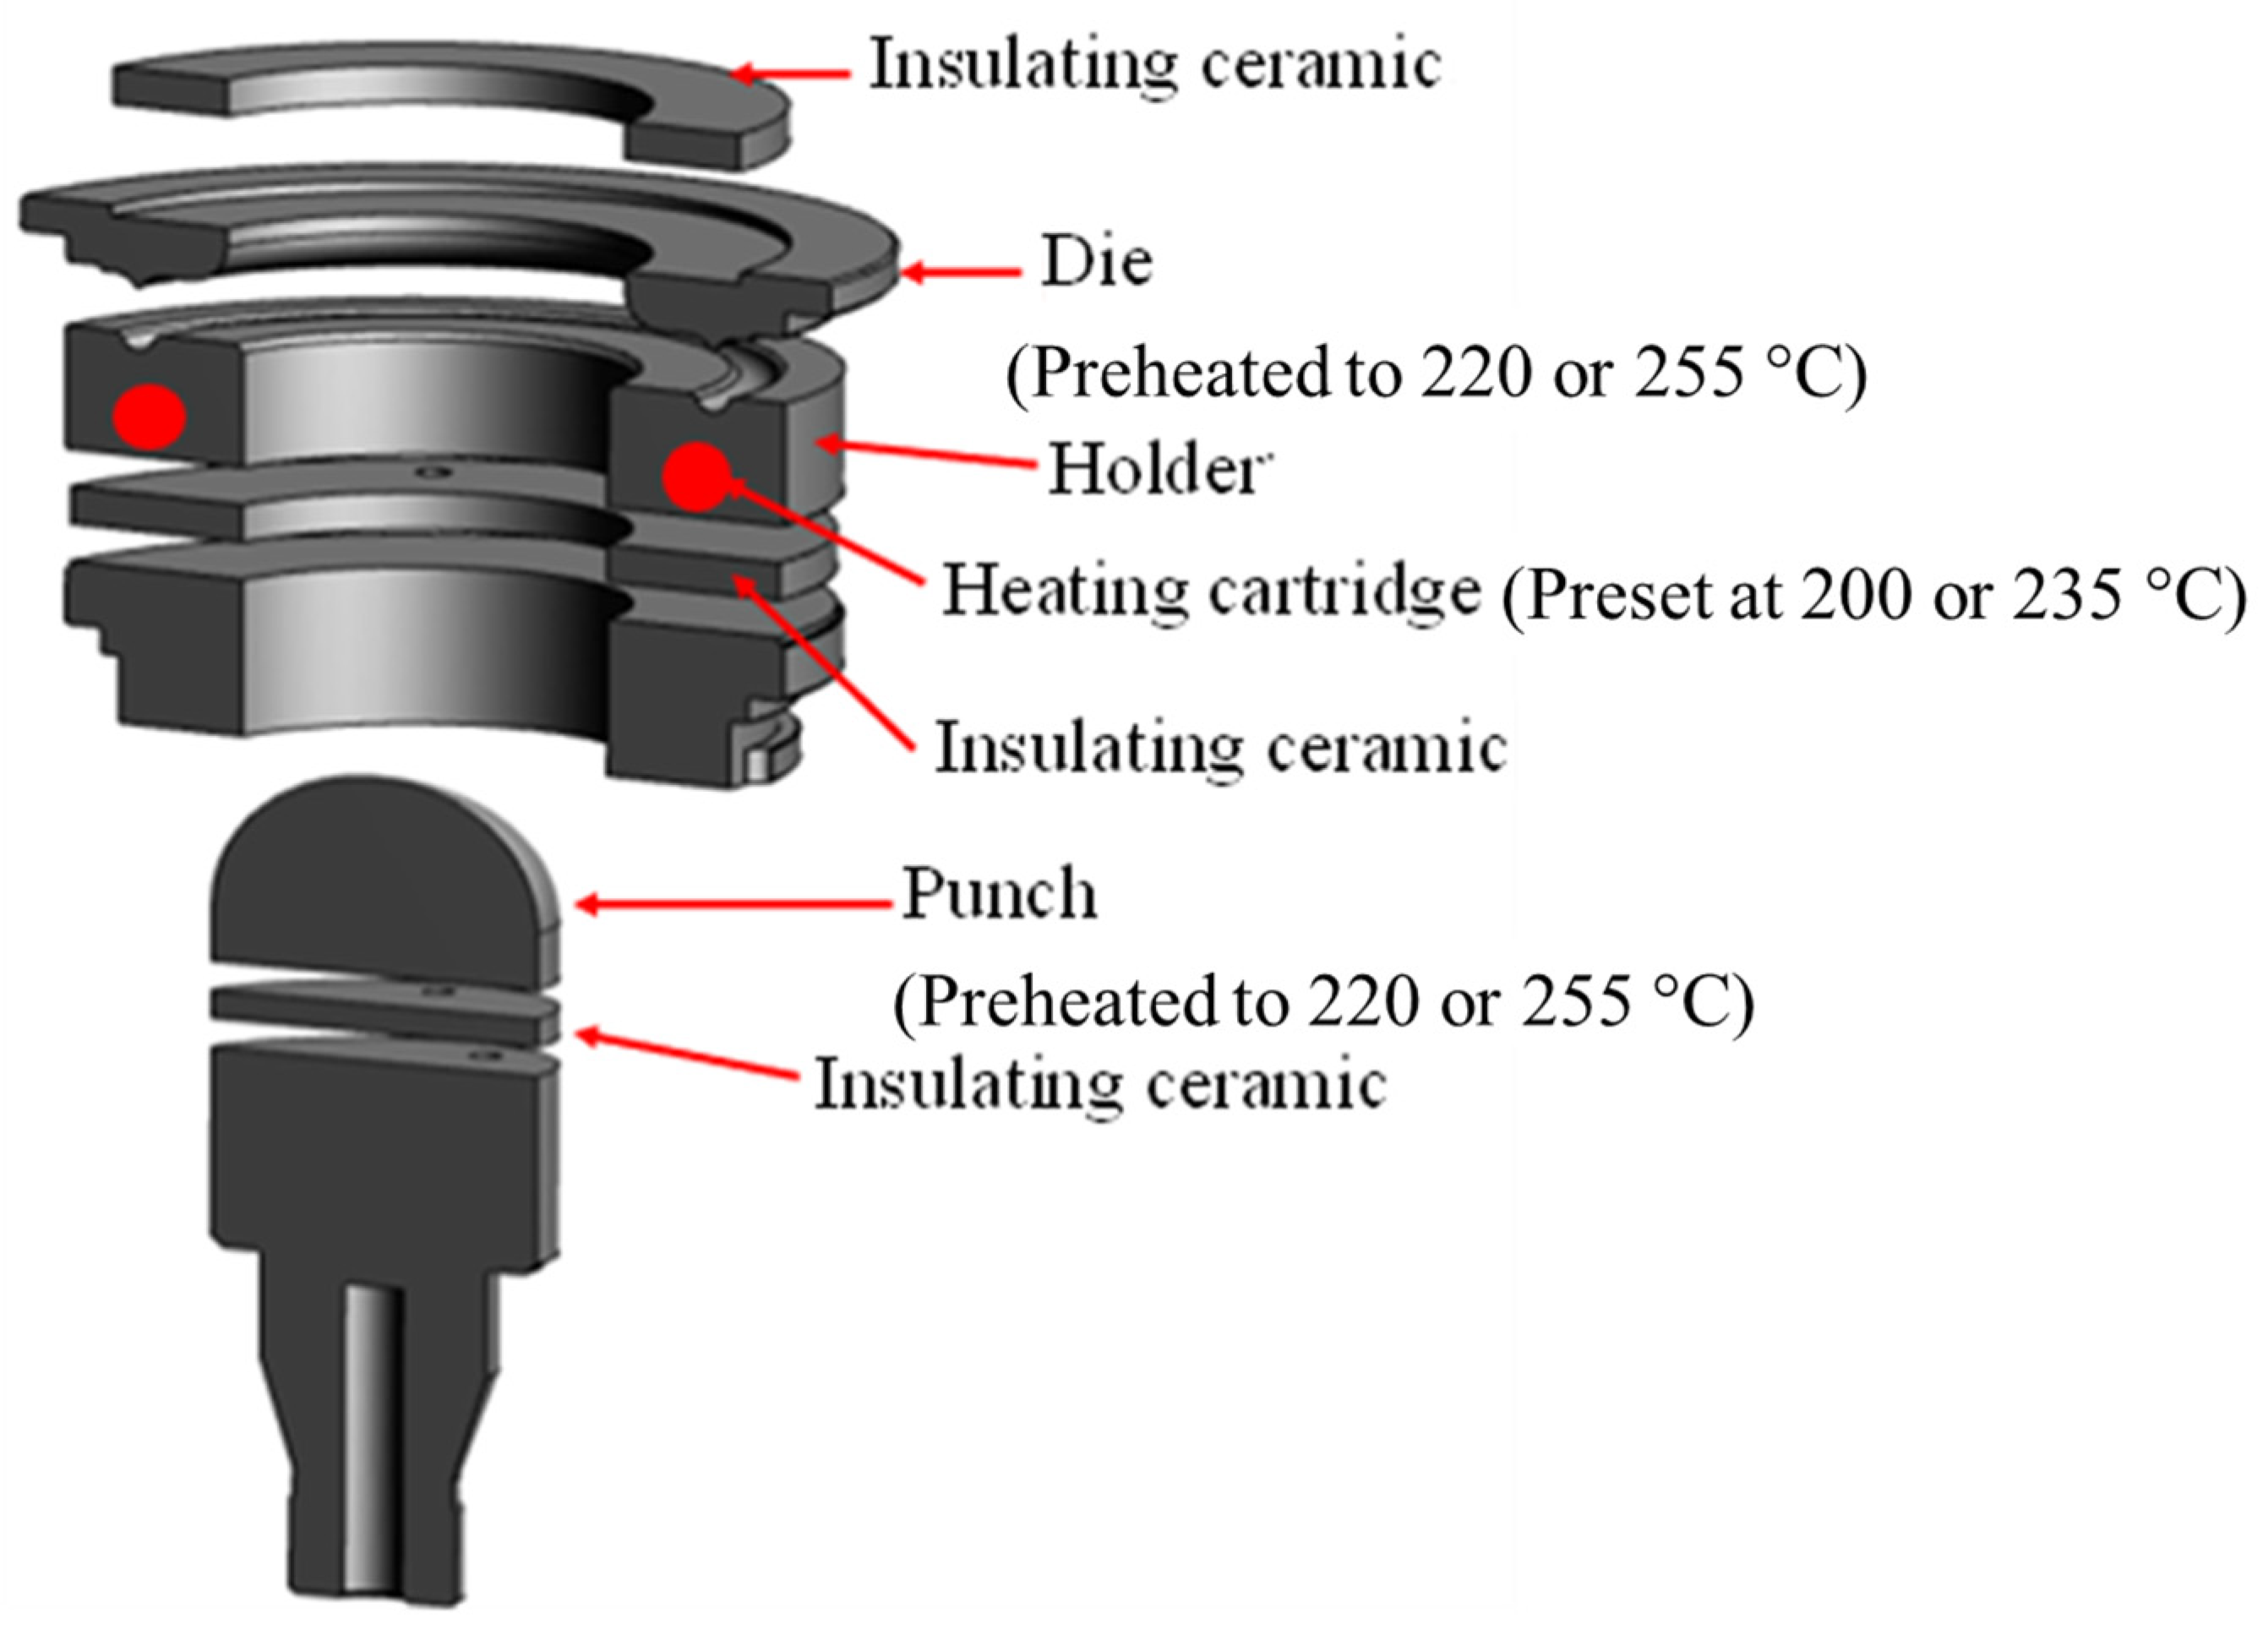
Moreover, the tool design in a standard Erichsen sheet testing machine was modified to be suitable for the warm forming condition, as can be seen in Figure 5. The blank holder was equipped with flexible heating cartridges, which is embedded in a ring in the holder andcontrolled by a temperature control unit. The punch and die were pre-heated to the desired temperature (adding approximately 20 °C overheating to compensate the heat loss during transfer) in an external furnace. These tools were separated from the test machine by insulating ceramic discs to avoid excessive heating up of the testing machine and to maintain heat in the specimen.

2.2.2. Temperature Profile

To control the testing temperature in the specimen, the temperature-time profile starting from the heating-up step in the furnace to final cooling step was recorded and illustrated. Figure 6 shows that the temperature was measured inside the sandwich specimen at two positions: at its centre position (T1) and at 40-mm away from the centre (T2). Then, the four stages from preheating to cooling and demoulding are illustrated in the diagram: (a) preheating the sandwich in an external furnace between two 2.0 mm backing sheet to reduce the heat loss during the transport from the furnace to the sheet testing machine; (b) transfer and setting in the Erichsen machine, where approximately 10–15 °C temperature drops occurred; (c) forming until visual failure and at the end; and (d) cooling and specimen removal.
Here, 2 elevated temperature levels were chosen to perform the stretch forming tests of FML, namely at 235 °C (>Tmelt, PA6) and at 200 °C (<Tmelt, PA6). The first experiments were deployed to determine the temperature profile of FML01-RG0.5 (abbreviation according to Table 3) and the possible temperature deviation. As can be seen in Figure 6, a homogeneous temperature distribution in the specimen from the centre to the edge was found, which was the same as FML01-RG1.0 and FML01-RG2.0 at 235 °C and FML01-RG2.0 at 200 °C. In general, minor differences between T1 and T2 were found. During the forming step, the forming temperature were successfully adjusted to 235 (±5) °C and 200 (±5) °C.

2.2.3. Lubrication

As is well known, deformation by stretch forming can only be achieved or maximized by using suitable lubrication conditions that provide the least-possible friction between the punch and the specimen. Thus, different lubrication conditions are experimented with for the cold and warm stretch forming tests. After the first trials, a lubrication setup composed of PP/PE copolymer film and grease could be recommended for forming at RT. However, at elevated temperatures, a Teflon-film was selected as a lubricant.

2.2.4. Digital Image Correlation (DIC) Analysis and Heat Streaks

For the strain analysis, we used the DIC method. The setup of the DIC unit is illustrated in Figure 7a. By painting the specimen surface with black stochastic patterns on a white background, different paint sprays were sampled. The white paint spray Dupli for RT was not temperature-resistant and became severely discoloured at elevated temperatures, so another kind of white paint was selected, i.e., Ulfalux® white paint spray (Table 4).
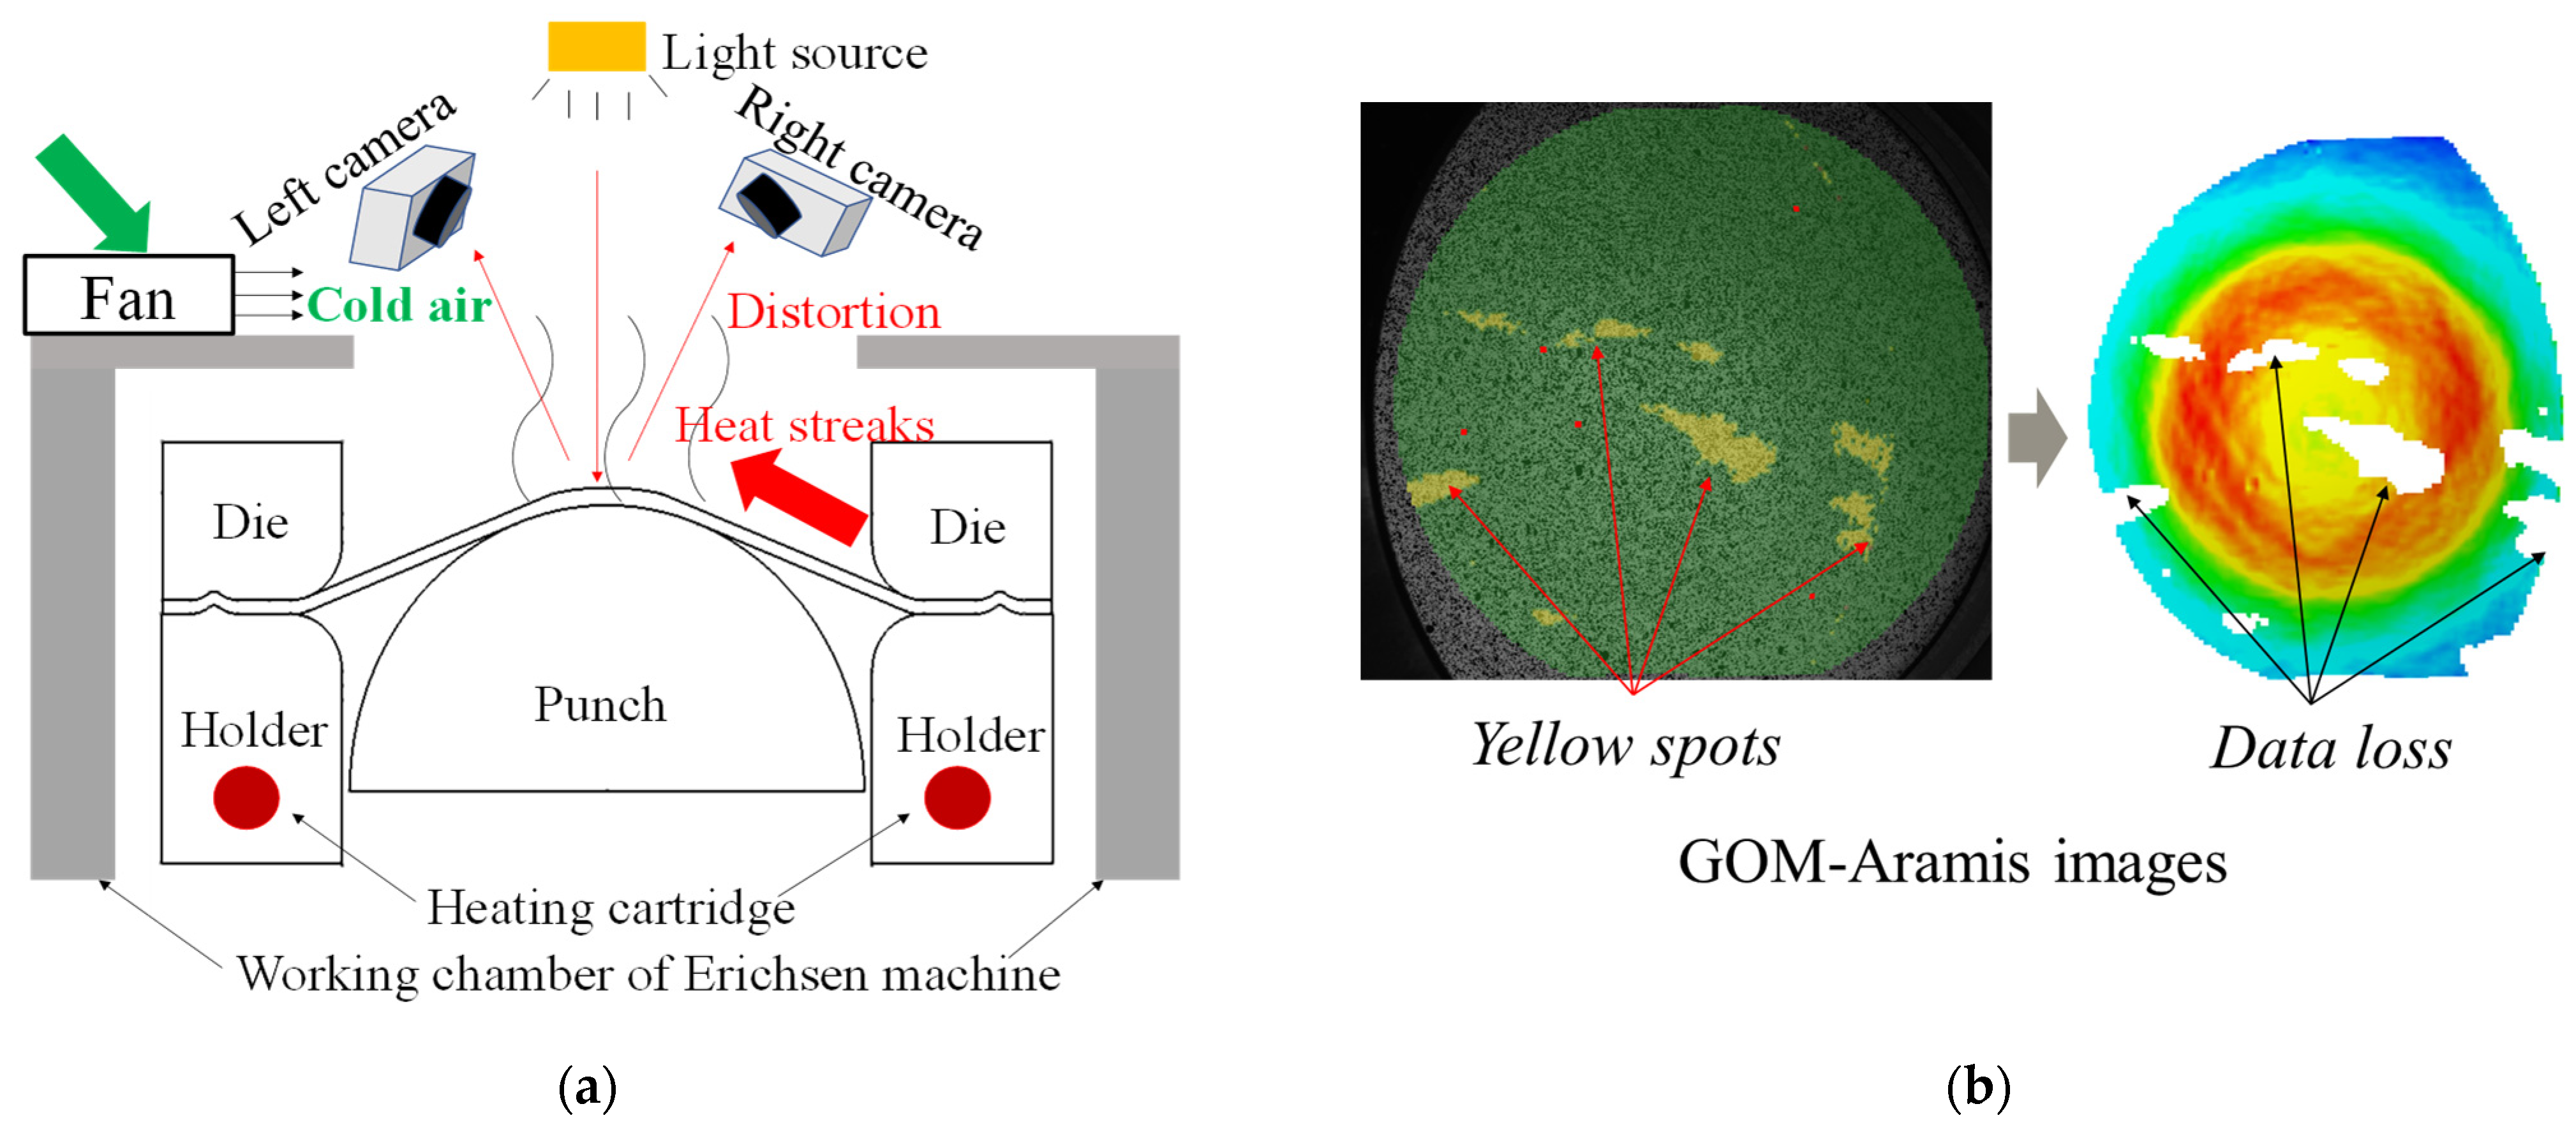
Another issue to be considered is heat streaks, which arise from the hot specimen surface and flow upwards in the gap between the specimen and DIC system (i.e., the 2 cameras), as schematically illustrated in Figure 7a. These streaks distort the image capture of the DIC unit and cause yellow spots on DIC images, which refer to the higher deviation and accordingly unreliable strain results, as can be seen in Figure 7b. Here, this issue was overcome by the application of a small-side ventilator to remove the heat streaks, which was located between the cameras and forming region of the test machine, as referred by a green arrow in Figure 7a.

2.3. Evaluation of the Stretch-Forming Behaviour

In addition to characterizing the stretch-forming behaviour of the sandwich panels (MPM and FML), the stretch-forming behaviour of the monolithic steel sheets, as well as the organosheets, were analysed. For this purpose, the force evolution, major strain and thickness distribution and other failure modes at different adhesion conditions, forming temperatures and core layer thickness, were evaluated following the test plan given in Table 5. Each test condition was repeated 3 times to ensure the repeatability.
The effect of the cover/core adhesion condition of the stretch-forming behaviour was investigated following 2 approaches:
  • Semi-products of the sheet-like specimens of MPM and FML are prepared via hot pressing, as is described in Section 2.1 (i.e., the stretch forming is performed on pre-bonded sandwich panels).
  • The stretch forming of FML without pre-bonding is performed at 235 °C, i.e., the separated cover and core layers are pre-treated, according to Figure 2, and heated up in an external furnace without hot-pressing. The aim of the approach is to investigate the effect of the one-step forming and bonding condition on the stretch forming of the sandwich panels. In this case, at a temperature above the melting point of PA6, free sliding and shearing of the fibre-reinforced polyamide core layer between the two metallic skin sheets is enabled during the forming step. The trial without pre-bonding resembles the one-step thermoforming method that is earlier developed [43,44].

2.4. FLC Investigation

To develop the FLC—the major ε 1 and minor ε 2 —strain values were determined firstly at different strain paths (Figure 8a). Thus, different specimens with an hourglass shape were needed, as shown in Figure 8b, where the hour-glass shape specimen with different central widths varied from 50 mm to 150 mm while maintaining a corner radius of 20 mm, a specimen radius of 100 mm and an opening width of 60 mm, as well as a complete round blank with a diameter of 200 mm. The rolling direction of the steel sheets was kept vertical to the hour-glass shape.
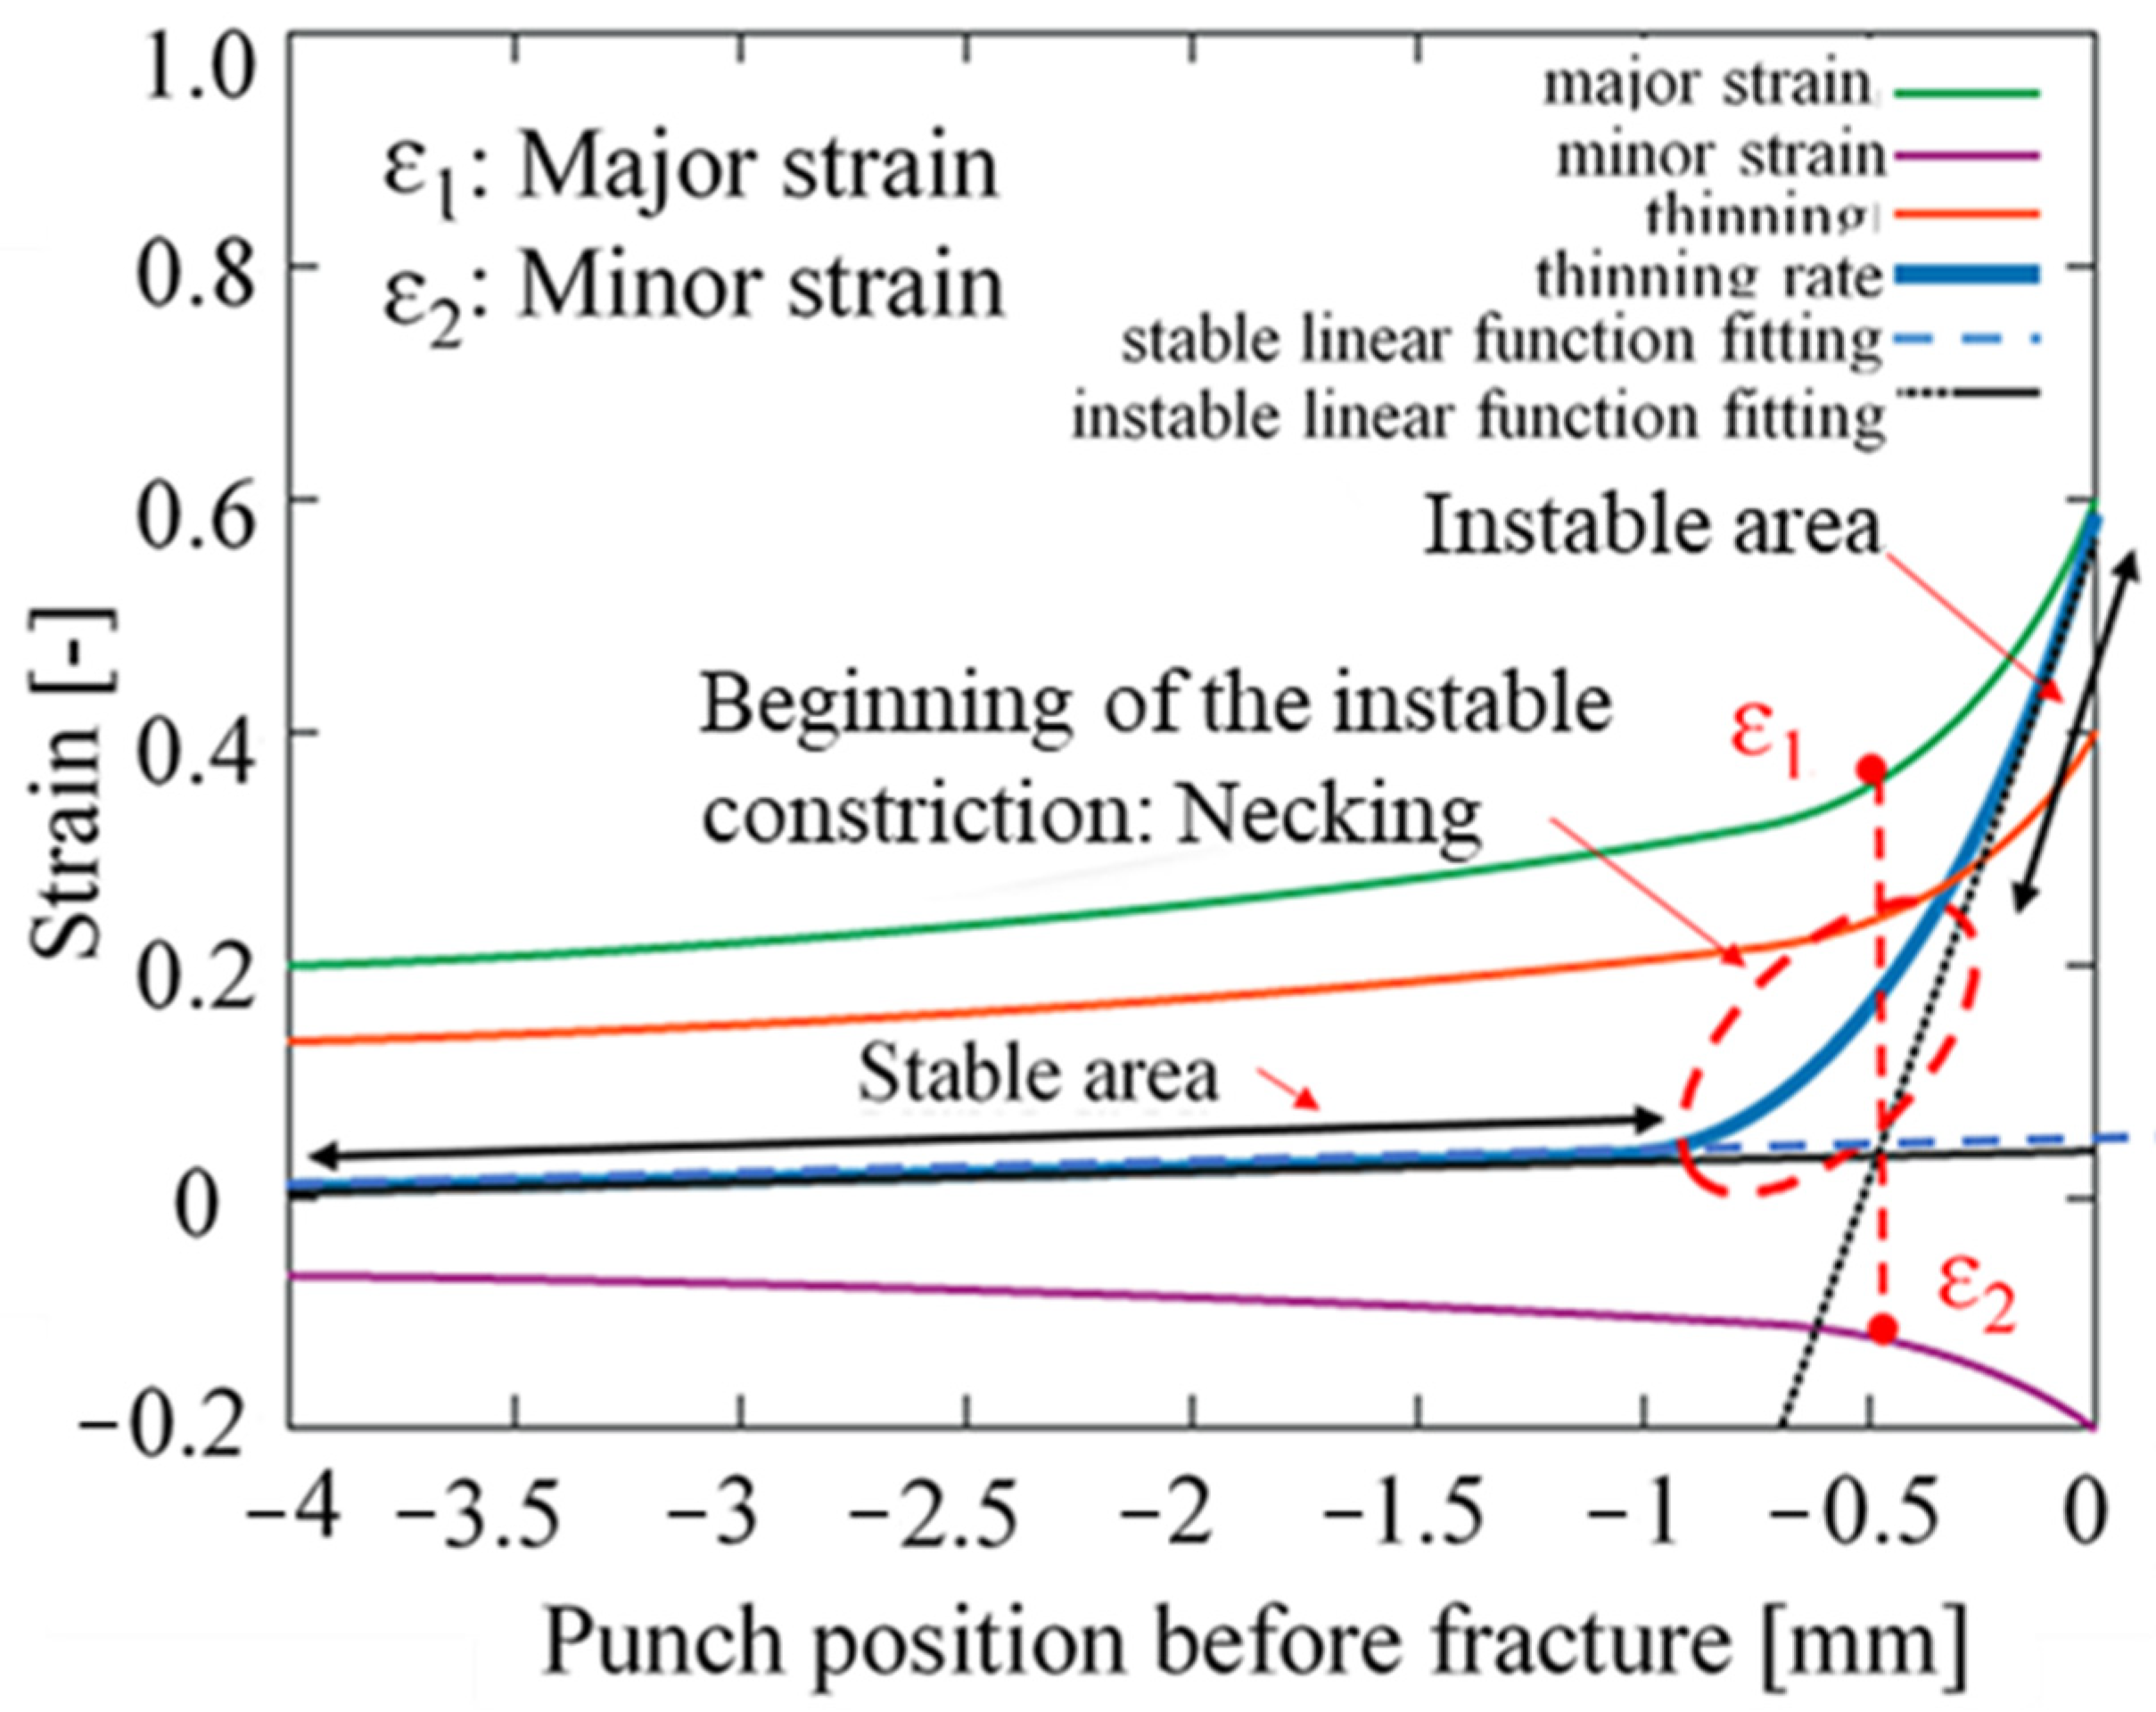
We used the time-dependent line fit method for FLC determination, as described in Figure 9 [45]. In this method, a dotted black tangent curve (instable linear function fitting: instable area) is generated along the blue thinning rate curve and intersects with the blue dotted tangent curve (stable linear function fitting: stable area), then a vertical dotted red line is generated through the intersection point with the green (major strain: ε 1 ) and purple (minor strain: ε 2 ) lines, respectively, generating two points on the curves, namely the major and minor limiting strain values for one specimen geometry. A series of such point values for the other specimen sizes are then used for building the whole FLC. The advantage of this method is that it allows a fully automatic derivation of the FLC on the basis of experimental test results and that it is possible to obtain the onset of plastic instability on the basis of a continuous record of the test machine in time, thus determining material failure in the first instance [45]. It should be noted that the methods used to calculate the strains for stretch forming and tensile test were different. For the tensile test, the traditional extensometer was used, where the engineering strain was calculated via l / l ( l : length change of sample, l : original length of sample). However, for the stretch forming test, the DIC system measures Lagrangian strain, which is extremely larger than extensometer’s data after the necking [46].
To investigate the effect of cover sheet properties, forming temperatures and core layer thicknesses on the FLC-levels of monolithic steel sheets, as well as their sandwich panels MPM and FML, two steel grades were considered to determine the FLC (Table 5).

3. Results and Discussion

3.1. Stretch Forming

3.1.1. Forming Force and Strain Evolution of the Mono-Materials

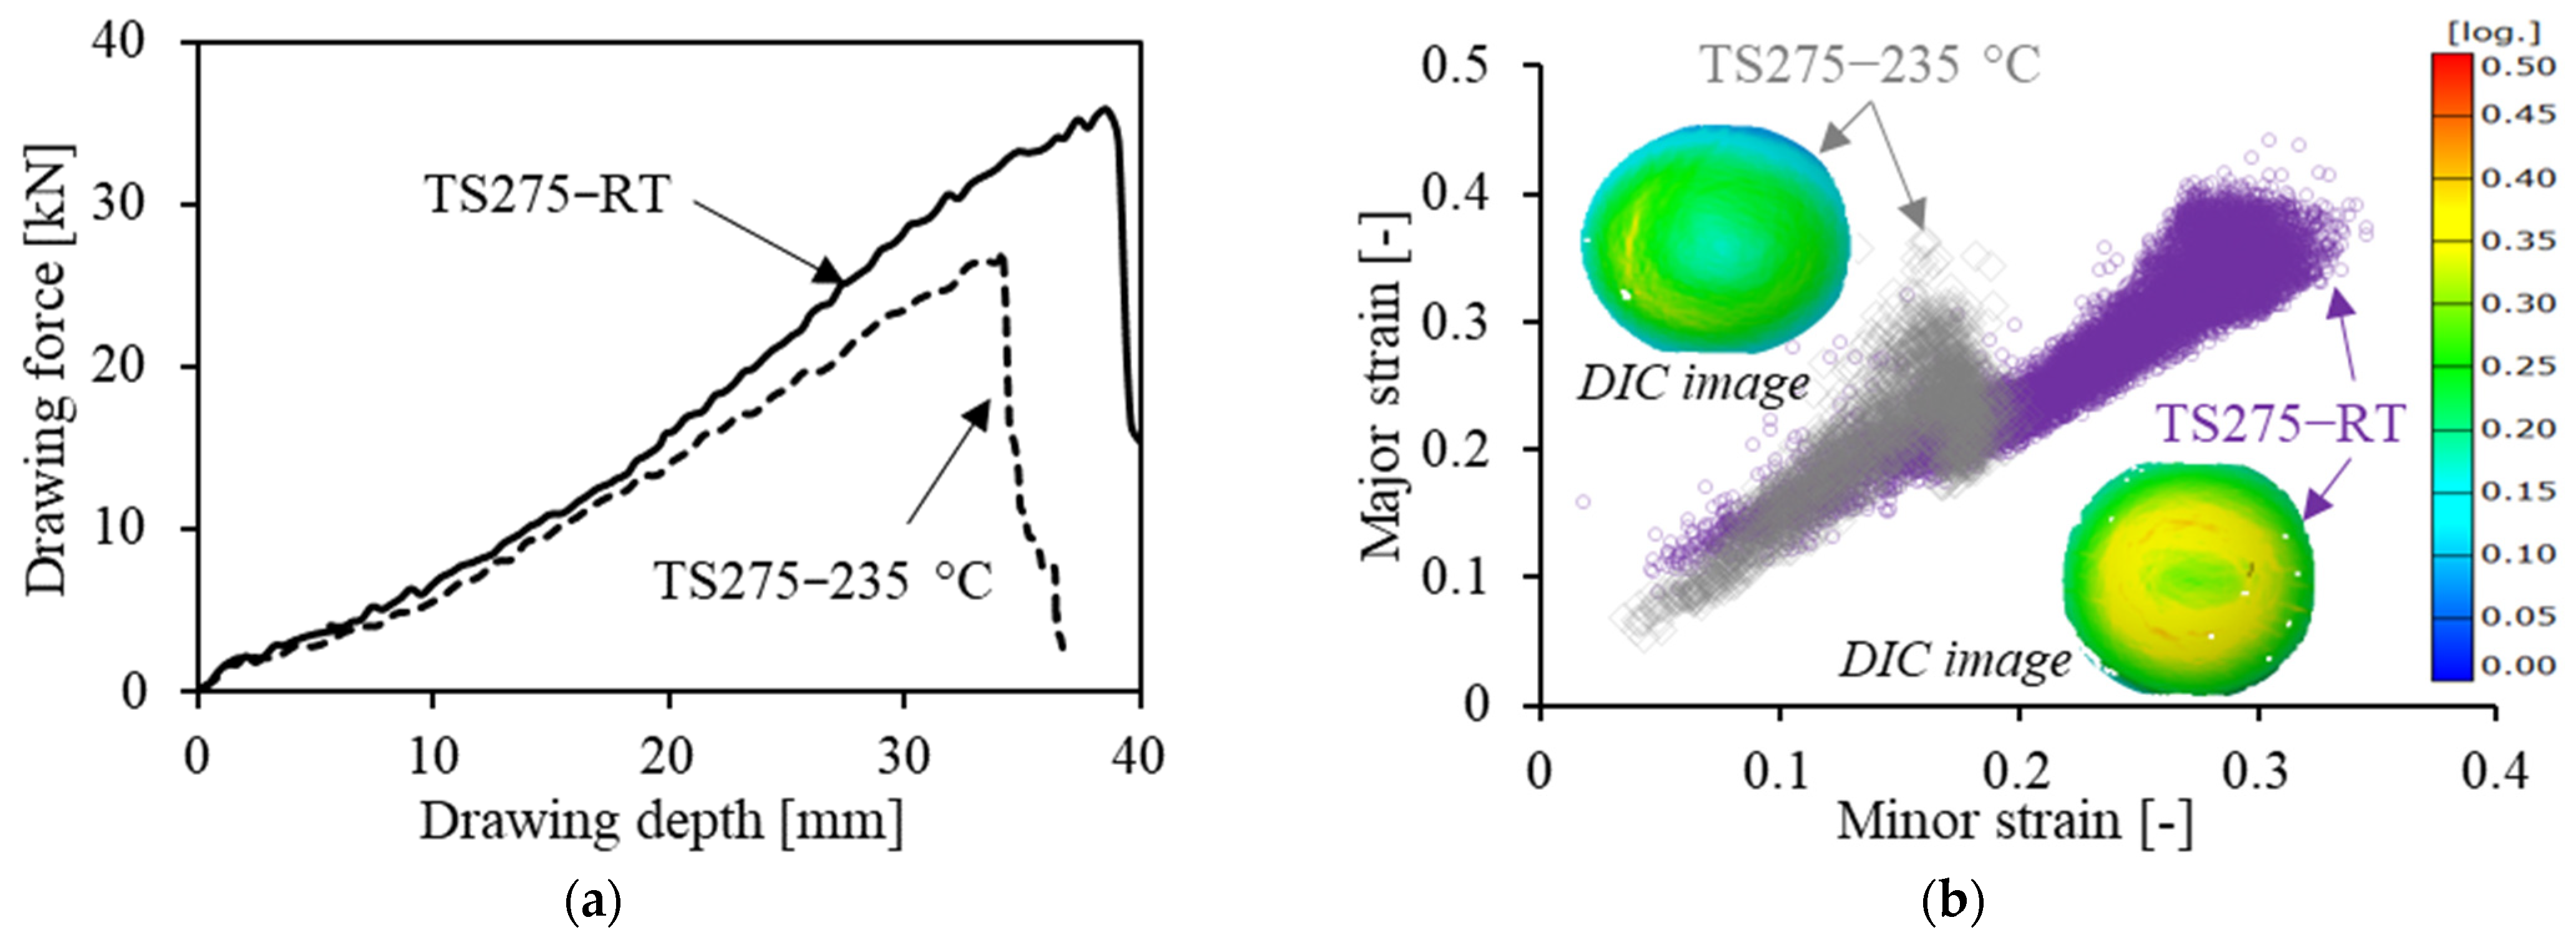
The stretch-forming behaviour of the steel sheet TS275 and the organosheets RG and RGUD were analysed at different forming temperatures. The first results about the stretch forming of TS275 at RT and 235 °C are illustrated in Figure 10. As can be seen, with increasing temperature, the force, drawing depth (Figure 10a) and the strain evolution (Figure 10b) of TS275 decreased, which correlated with its tensile properties (Figure 3). The strain evolution of the steel sheets at different temperatures and the DIC images are indicated by arrows marked with the same colour.
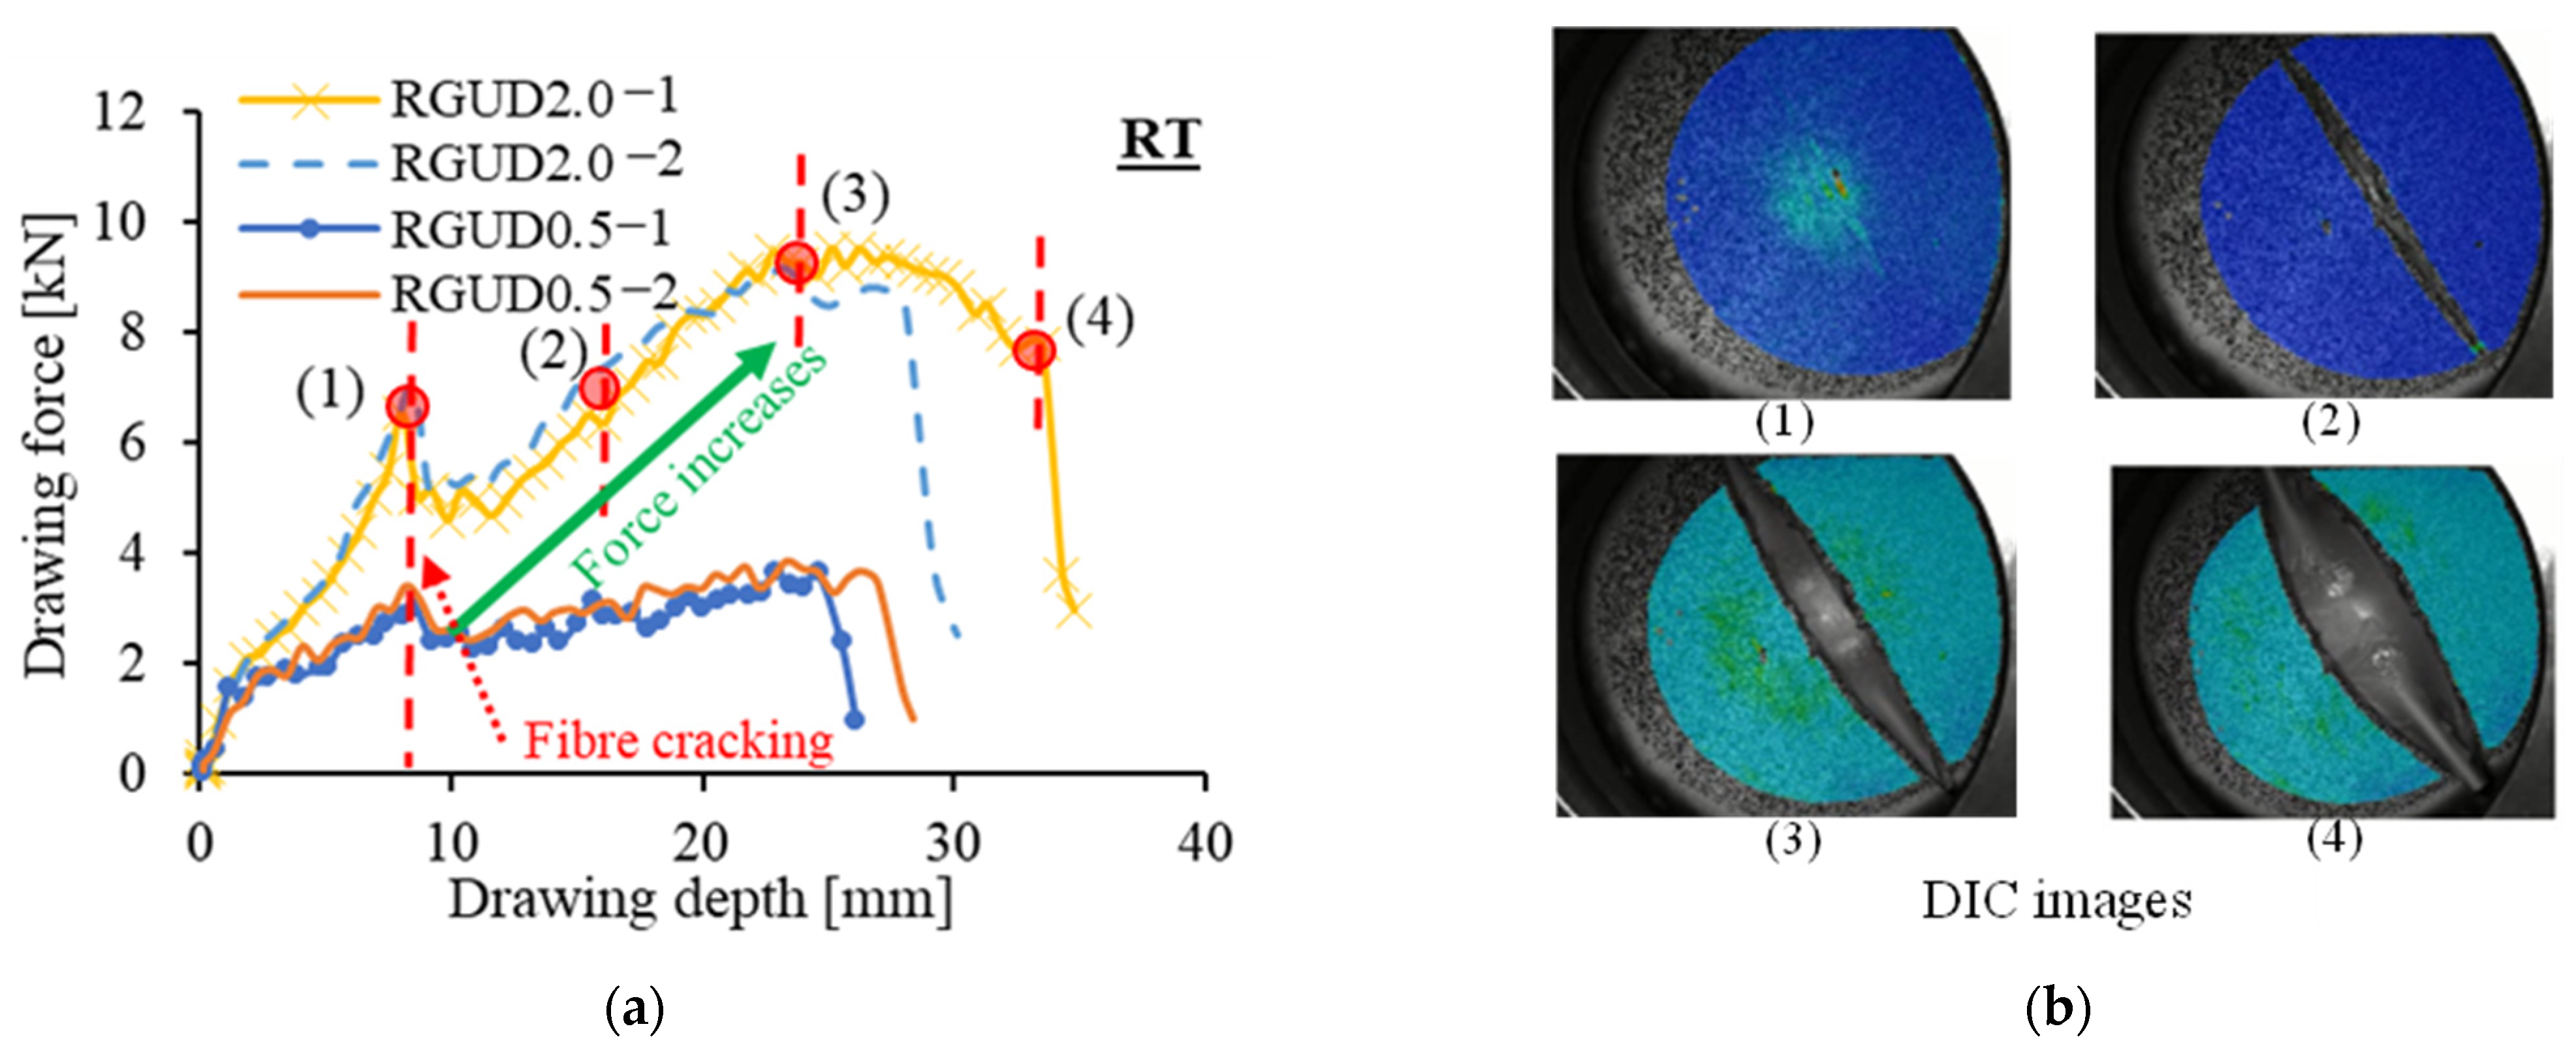
Moreover, the stretch forming experiments of organosheets RGUD at RT were carried out for two thicknesses (0.5 and 2.0 mm), as shown in Figure 11. The four DIC images, in ascending order, shown in Figure 11b correspond to the red points (1)–(4) in the force-depth curve in Figure 11a. As can be observed, with increasing thickness of the organosheet at RT, the drawing force increased. However, at a drawing depth of approximately 8 mm, a first force drop appears, indicating the start of fibre cracking along the warp direction due to the less cracking resistance in weft direction with lower fibre content, giving a limit in formability of the organosheet. With further punch displacement, the force increased again (see the green arrow from point (1)–(3)), which was due to the resistance of the fibres in the wrap direction in the organosheet at RT. This central crack propagated, as shown in Figure 11b, until reaching complete failure at point 4.
Under forming conditions above the melting point of the PA6, a high drawing depth up to 40 mm of both types of the organosheet RG and RGUD with a thickness of 0.5 mm was achieved (Figure 12). The maximum drawing force was reduced to approximately 2 kN. Moreover, no remarkable difference between RGUD and RG was observed. However, a distortion of the organosheet in the die edge area was detected (marked by yellow arrows), which was due to the hindered flowability of the fibres due to the existing draw beads in die/blank holder region.

3.1.2. Force and Strain Evolution of MPM

In this part, the forming behaviour of the MPM with the non-reinforced PA6 core is described. Figure 13a shows the drawing force-depth curves for the MPM01 with different core thicknesses. It can be observed that the drawing depth decreased with increasing core thickness, which is in accordance with the results published in [22]. The strain evolution of the MPM is shown in Figure 13b, in which the strain distribution corresponded to the MPM labelled in the same colour. As can be seen, a decreasing tendency of the major-minor strain evolution with increasing core thickness can be stated, which is in correlation to its force evolution. Since less plastic deformation takes place, the strain evolution was reduced accordingly. From the DIC and specimen images illustrated in the figures, a homogenous strain evolution in the whole deforming zone (Ø 100 mm in the middle area) can be stated before crack appears. When the adhesion between cover and core layers is high enough, the force transferring between the layers is so good that the three MPM layers (two cover layers and a core layer) are subjected to cracking simultaneously. To conclude, the formability of MPM with thin core layer is comparable to that of a monolithic steel sheet (e.g., the MPM01-PA0.5 with a drawing depth of approximately 36 mm in comparison to that of monolithic steel sheet TS275 with a drawing depth of approximately 38 mm). However, here, its formability was reduced when core thickness increased to about 30 mm for MPM01-PA1.5.

3.1.3. Force and Strain Evolution of FML

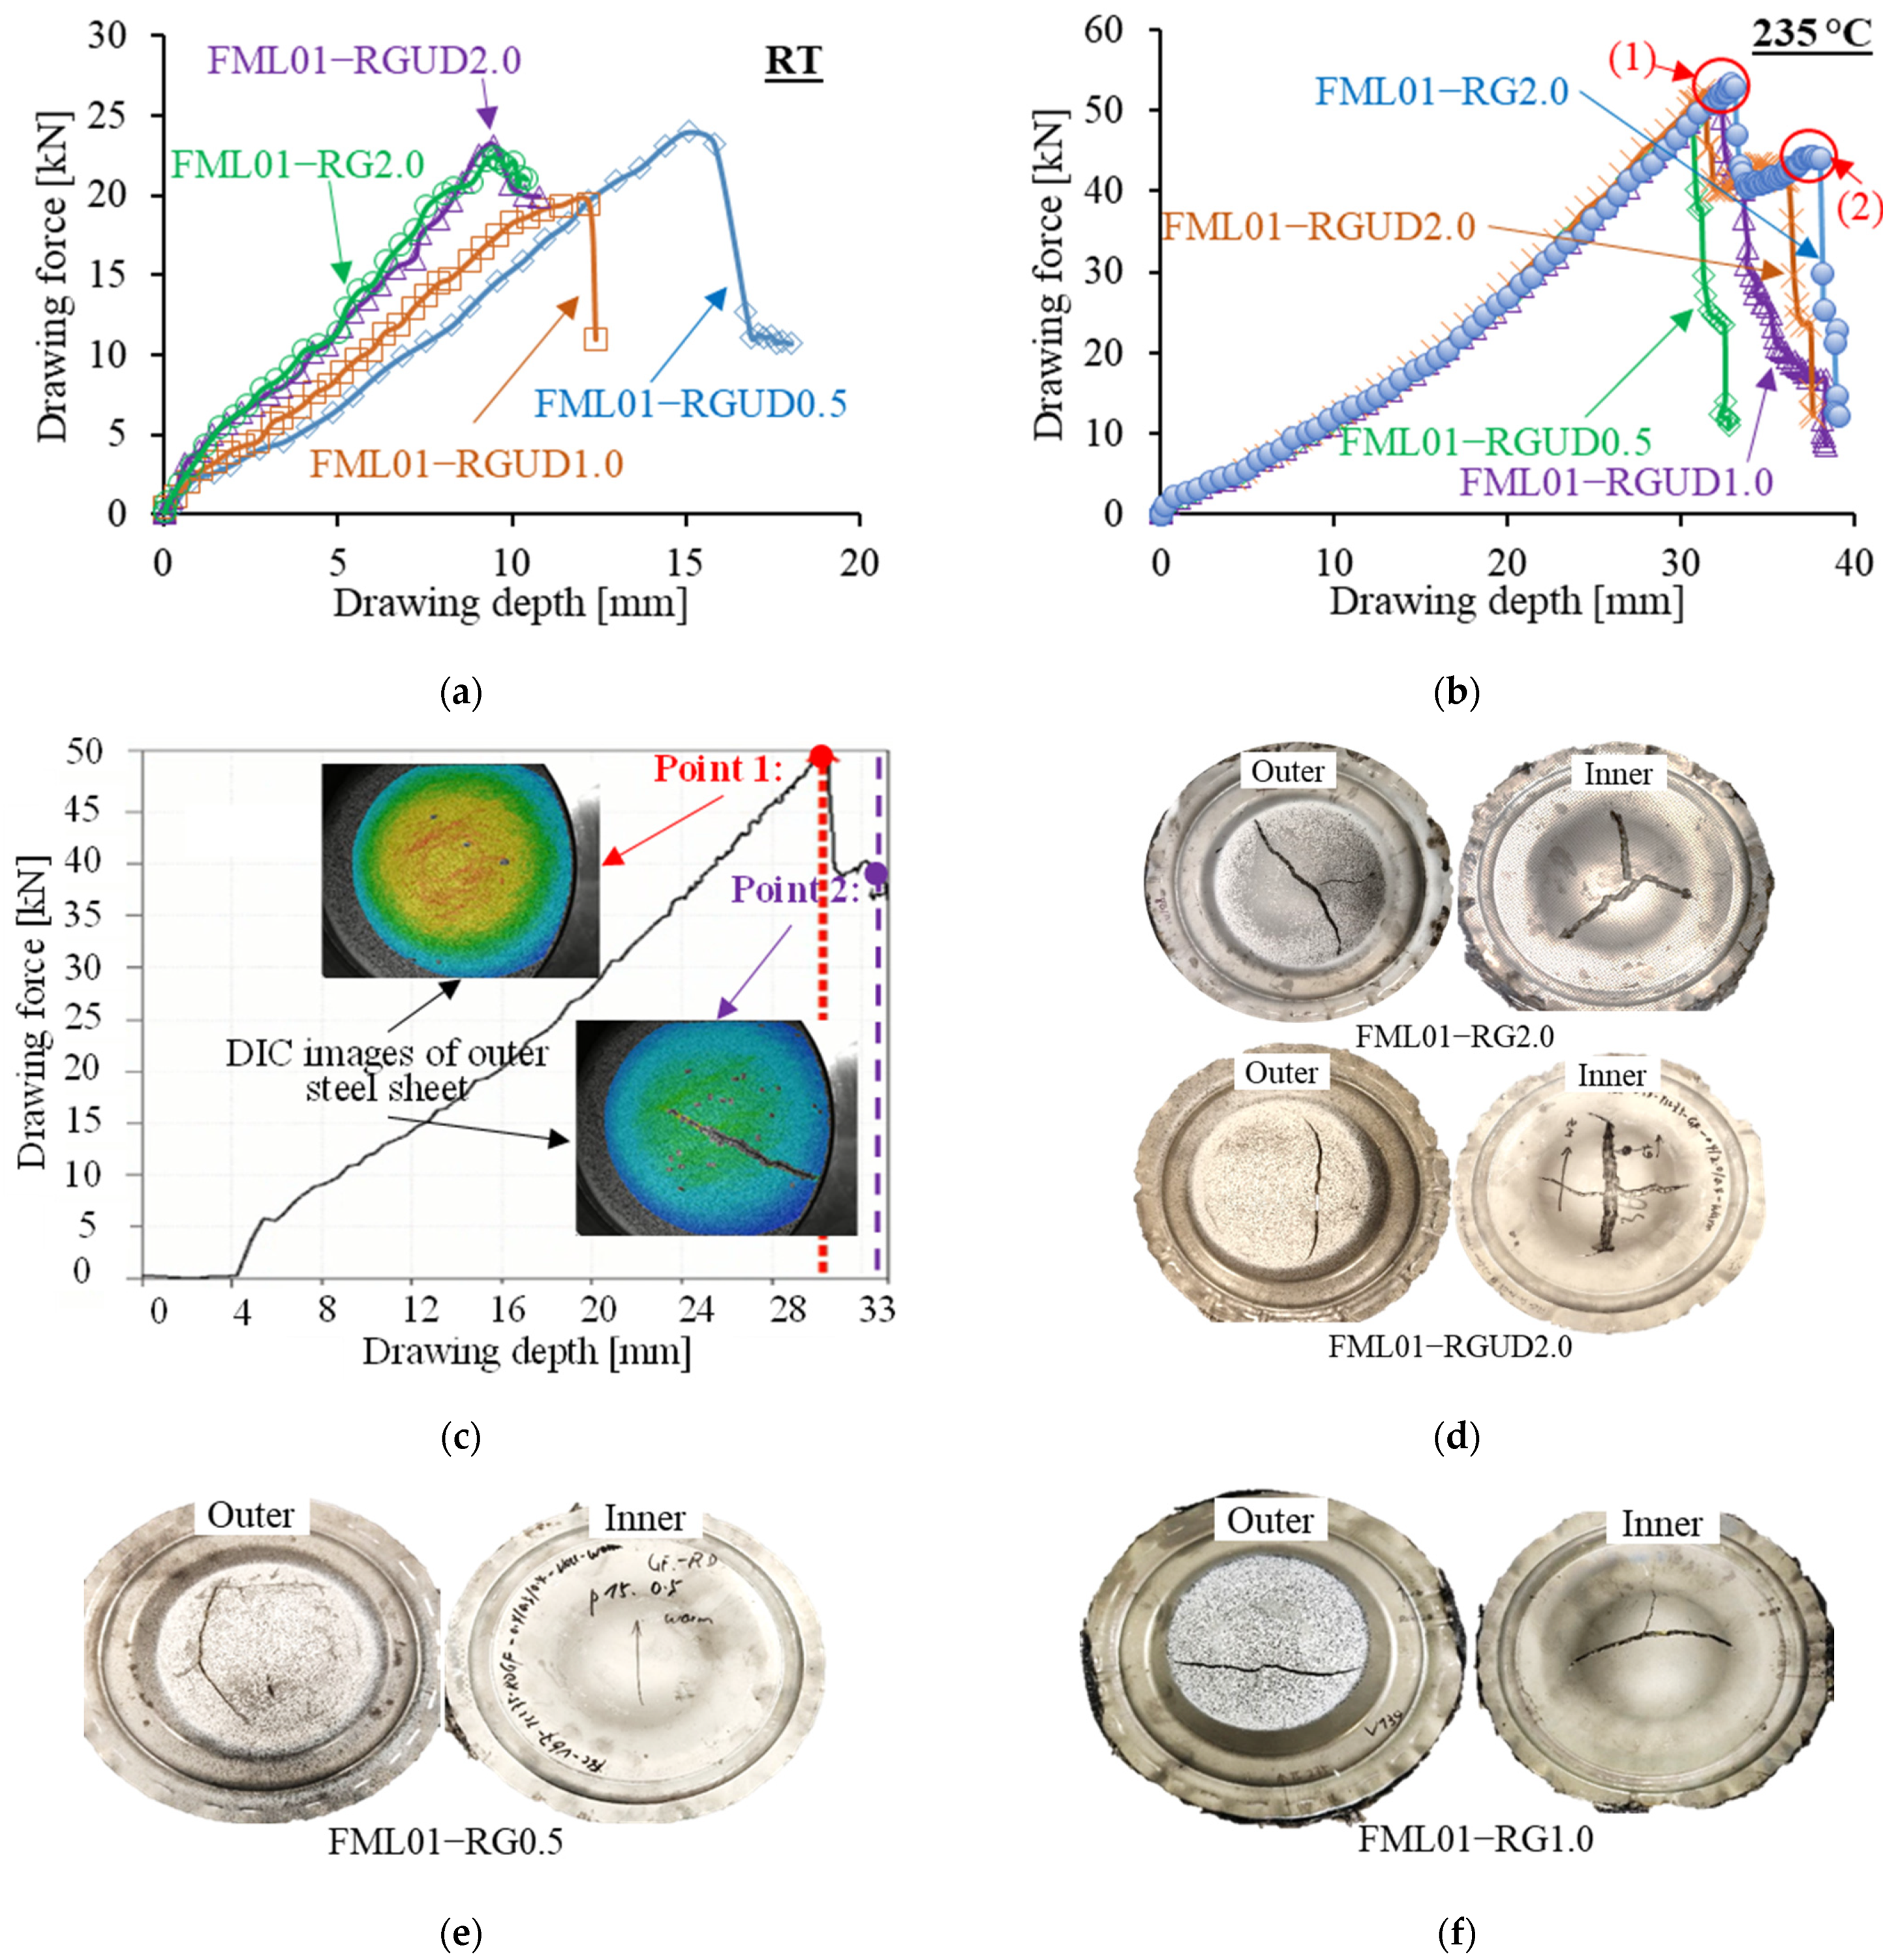
The stretch forming of FML was carried out at two temperature levels: RT and 235 °C. Figure 14a illustrates the results of the drawing force for FML01 with varied core thicknesses and two kinds of organosheets, RG and RGUD. At RT, with increased core thickness, the stiffness increased, but the maximum drawing depth, and therefore the maximum drawing force, were reduced. This effect of core thickness in the case of FML01-RGUD was similar to FML01-RG. Additionally, no remarkable difference in the drawing force between FML01-RG/-RGUD was observed. Moreover, the outer cover sheet failed firstly due to the higher tensile stress generated by the stiff organosheet at RT, as expected.
Regarding the results of the warm stretch forming of FML01, it can be clearly seen in Figure 14b that the formability of FML01 significantly improved at 235 °C, with molten PA6 matrix in the organosheet core. No remarkable difference in drawing depth and stiffness for the FML01 with varied core thicknesses and organosheets RG and RGUD were stated. However, by stretch forming at 235 °C, an earlier cracking of the inner steel sheets of FML01 with the 2.0 mm core layer was detected. As can be seen in Figure 14b, points (1) and (2) indicate two force drop locations for both the FML01-RGUD2.0 and FML01-RG2.0. For both at 235 °C, the first force drop took place without detecting any visual cracking on the outer steel cover sheet (as test end criterion). Therefore, the test was continued until detecting the failure of the outer layer. Upon interpreting the force-displacement progress by DIC unit and the opening size of the crack on the inner and outer layers of FML01 with a core thickness of 2 mm at 235 °C, it can be stated that cracking took place on the inner cover layer first, as the crack opening size in the inner steel sheet was obviously larger than that in the outer one, as can be seen in Figure 14c,d. This was confirmed repeatedly through the three experimental runs. Inversely for the FML with the thinner core, the cracking pattern of FML01-RG0.5 appeared at the outer cover sheet firstly, and that of FML-RG1.0 appeared in both cover sheets (inner and outer) almost simultaneously, as can be seen in Figure 14e,f. The reason for this may be due to changes in the dynamic friction state between the layers, leading to changes in the tensile stress state on the inner and outer cover sheets, which will be more deeply investigated by means of finite element simulations in a subsequent article. Normally, the outer cover sheets are subjected to higher tensile stress under stretch forming condition, therefore they fail firstly, especially at RT.
At 235 °C, based on the current results, it can be stated that the location of crack initiation and propagation depends on the core thickness; with increasing core thickness, the crack initiation is transferred from the outer cover sheet into the inner one. Furthermore, specimens’ pictures for both cold and warm stretch forming are shown in Figure 14g,h, in which the drawing depth was extended up to 33 mm at the warm forming condition compared to only 12 mm at RT, indicating an improvement of almost 300%.
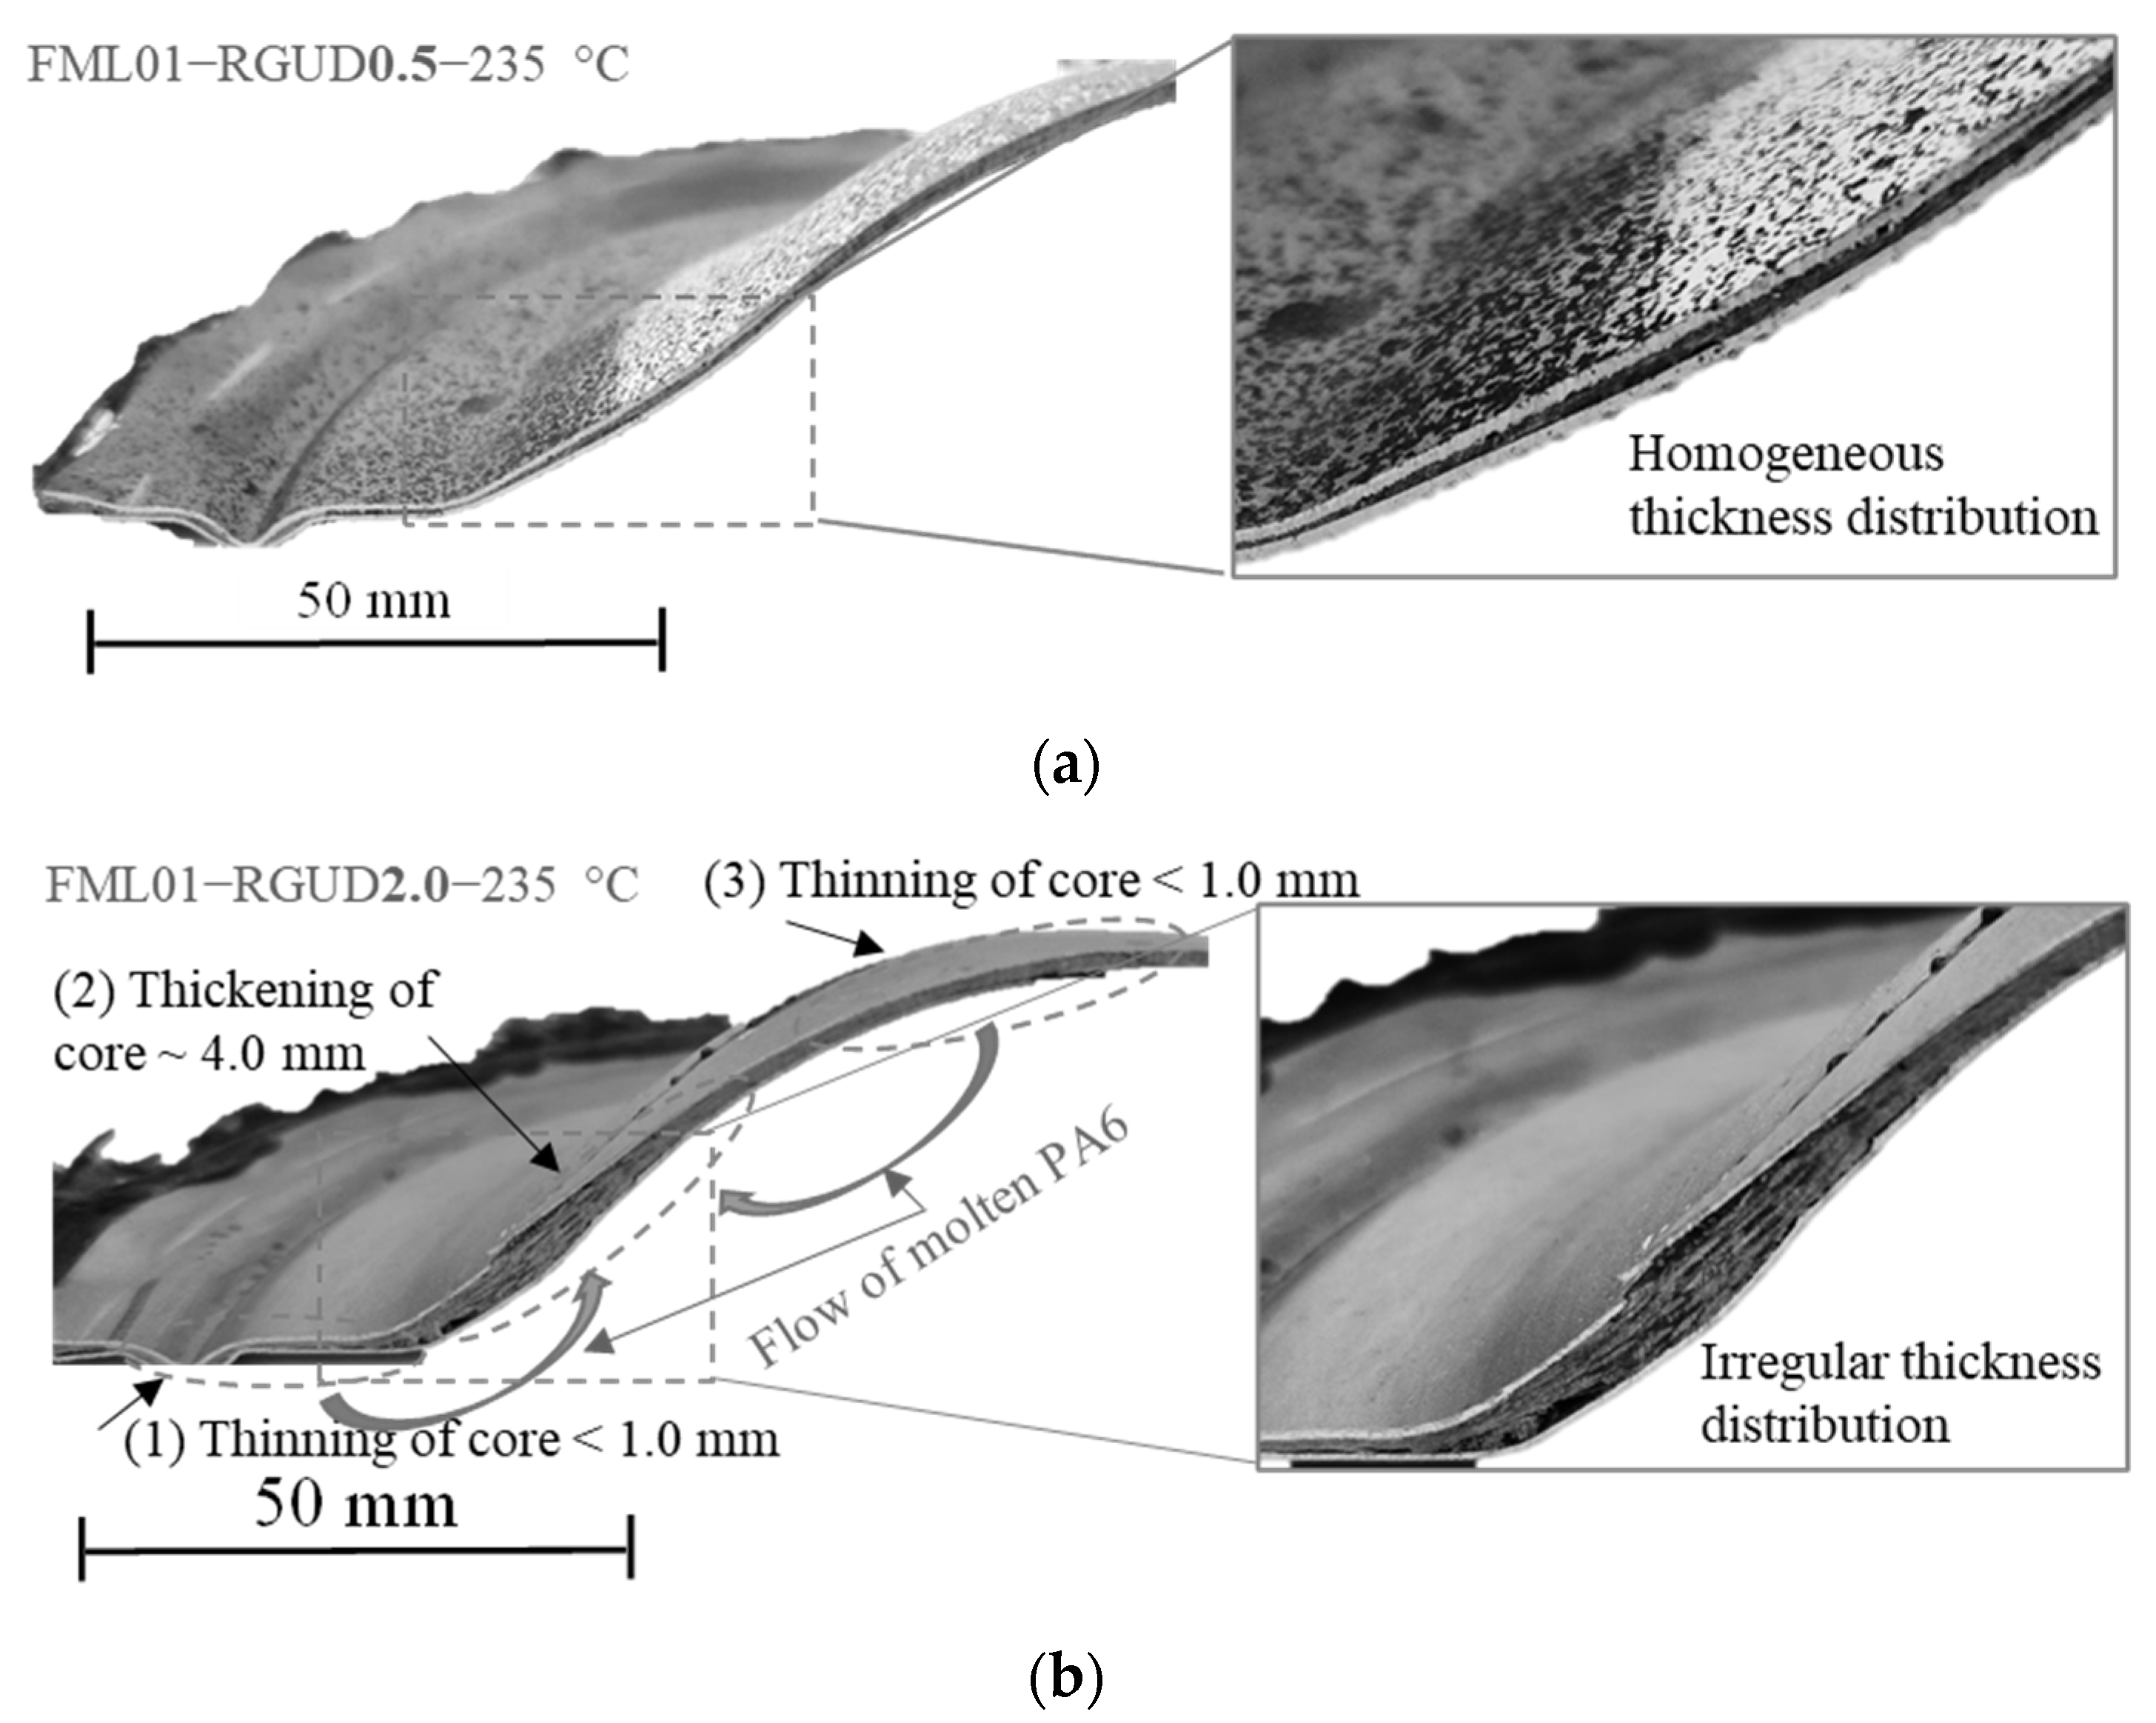
Further analysis about the thickness distribution of FML01-RGUD with two core thicknesses (0.5 mm and 2.0 mm) after the stretch forming at 235 °C is illustrated in Figure 15. As can be seen, the thickness change within FML01-RG0.5 is not remarkable. Conversely, more irregular thickness distribution of the FML01-RG2.0 was found with a thinning of the core in zone (1) and (3) and significant thickening in zone (2), which was due to the flow of molten PA6 matrix from zone (1) and (3) towards the zone (2). In this regard, the total thickness in zone (2) of the FML reaches approximately 5.0 mm, where the dynamic interlayer friction between outer-cover/core layers, as well as inner-cover/core layers, may be reduced accordingly. Therefore, earlier fracture of inner steel sheet occurs. This is because the contact behaviour between the cover sheets and the core layer at 235 °C can be understood as frictional relative sliding [47], and the friction coefficient between the cover and core layers directly affects the fracture behaviour of the cover sheets [41].
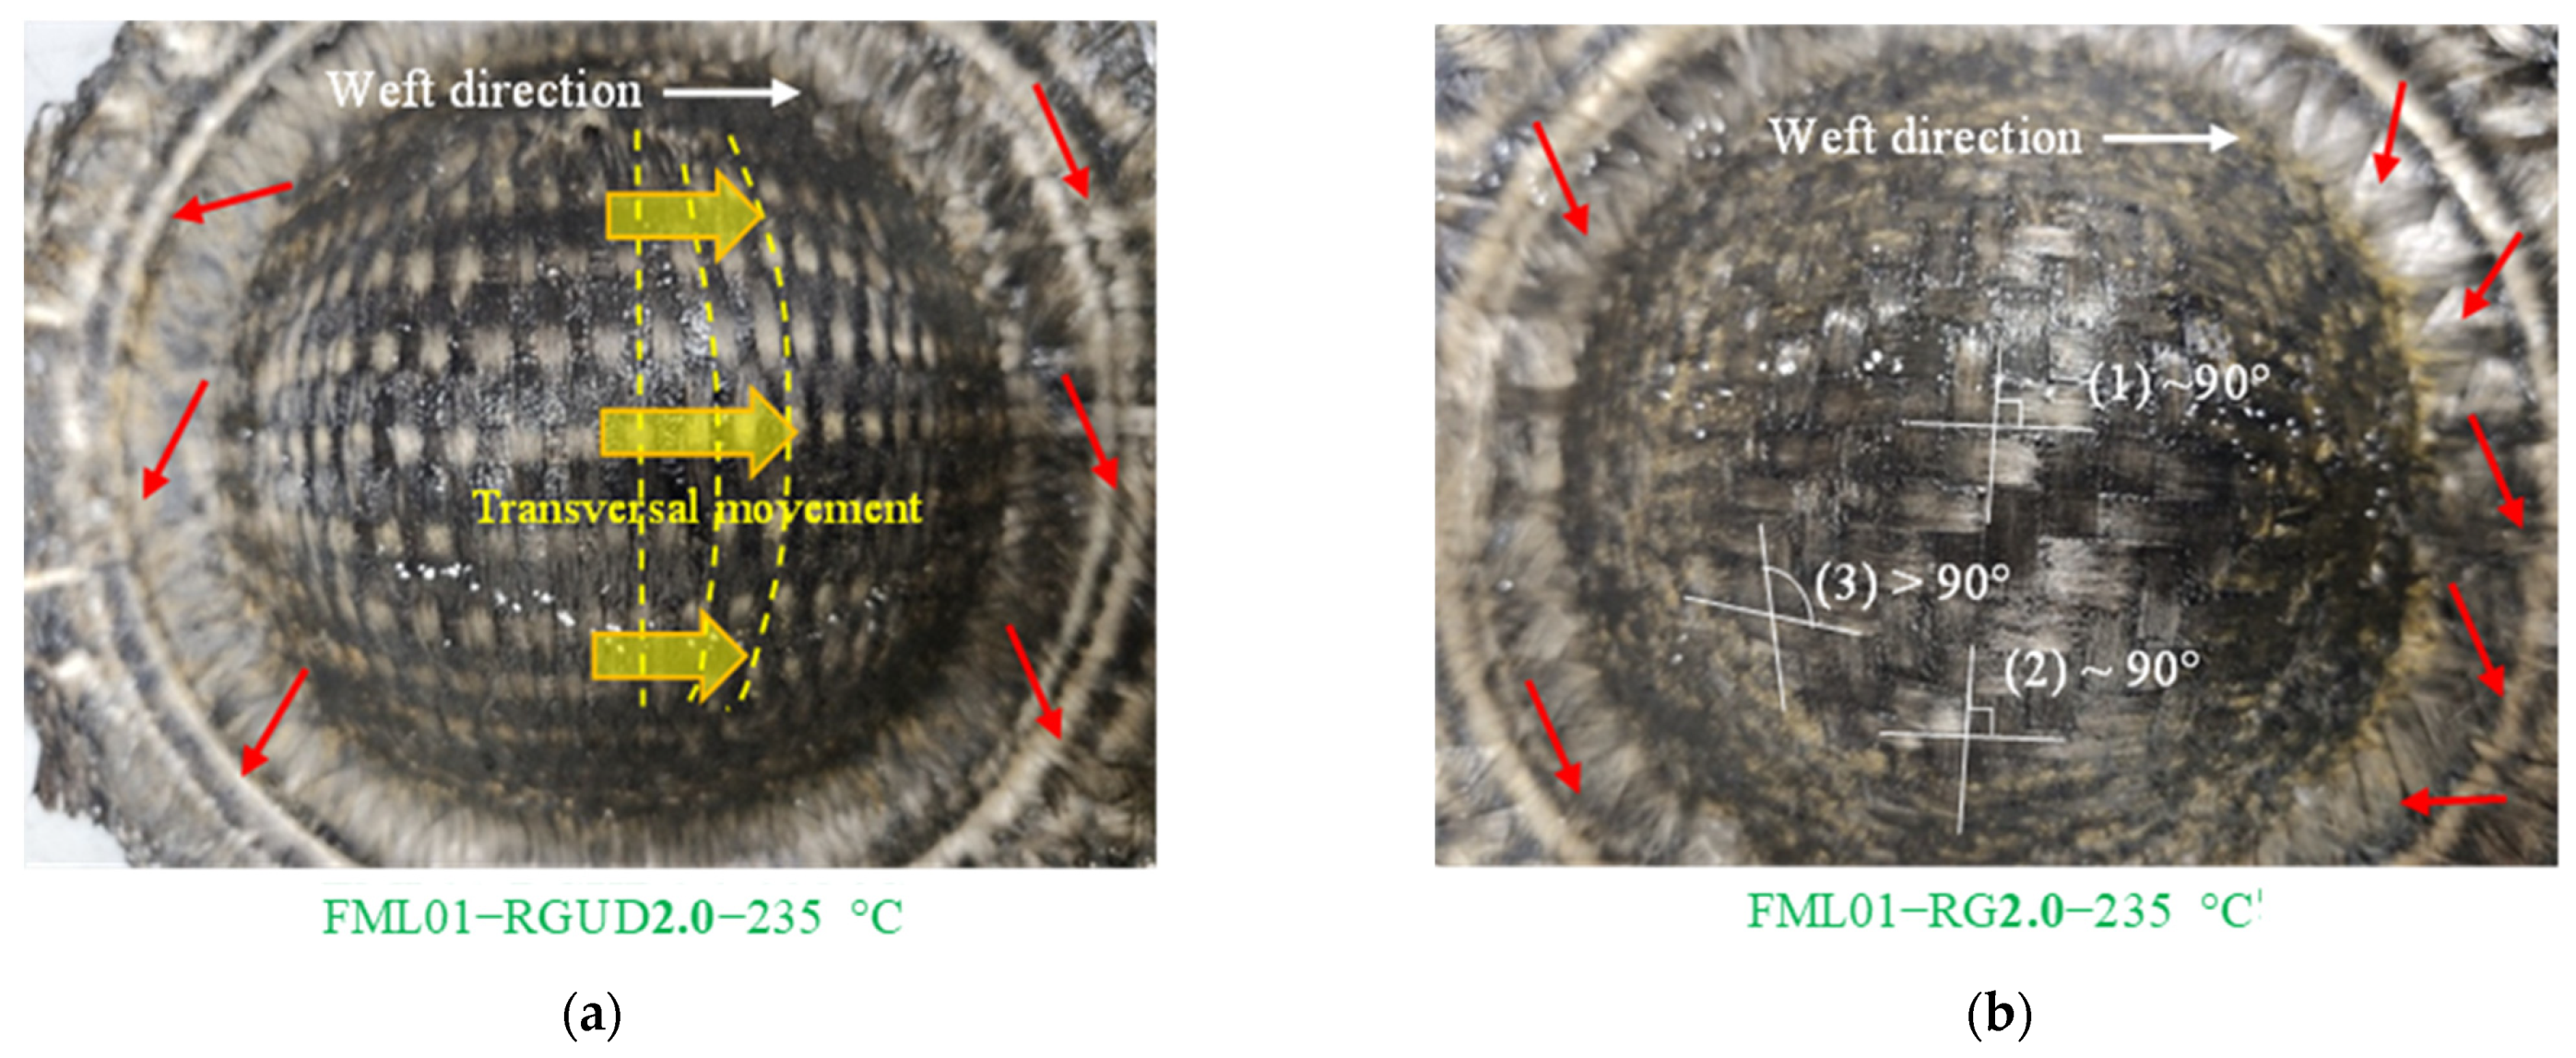
Besides the failure modes appeared on the cover sheets, it is also essential to describe the deformation behaviour of the core material under these warm stretch forming conditions. The cover sheets were removed to be able to detect the distortion of the core layer. Because the cover sheet is tightly bonded to the core layer after the specimen has cooled, in order to remove the cover sheet, it is necessary to reheat the specimen statically to the melting point of PA6 in an external furnace to soften the adhesion layer before separating the outer cover sheet of the FML manually. It can be seen from the specimens’ images in Figure 16 that the fibres in RG and RGUD are not cracked, yet the distortion (marked by red arrows) of them occurs in a die edge area near the drawing beads, which is in accordance with the stretch-forming behaviour of the mono-organosheet at 235 °C, as described in Figure 12. For core material RG2.0 shown in Figure 12b, the shear angle was approximately 90° at the top. Progressing down from the top side along the weft and warp directions, the shear angle remained unchanged. Inversely, along biaxial direction 45°, the shear angle changed to be larger due to the easy-occurring shear deformation in the 45° direction [21].
In comparison to RG, the shear deformation of RGUD was different; there was a slight second transverse normal strain for RGUD in the weft direction, which could have been expected [48,49]. The mobility of fibres in the weft direction was less restricted. Moreover, no wrinkling defects were detected.
Unlike the strain evolution of MPM at RT, the strain distribution of FML was located and oriented along or vertical to the RD of steel sheet. The difference in crack orientation for FML01-RGUD and FML01-RG was dependent on the fibre fraction in the weft and warp directions of their cores. As can be seen in Figure 17a,c, crack propagation was vertical to the RD for FML01-RGUD and parallel to RD for FML01-RG, respectively. The reason is that the strengthening effect of organosheet is greater in the weft and warp directions, causing the largest tensile stress on the outer cover sheet. However, the properties of RG in the weft and warp directions are equal. In this case, the cracking behaviour of steel cover sheet was dominant. Those for the RGUD, however, were different, as the strengthening effect of RGUD in the warp direction was more highlighted. Thus, the cracking propagation is more likely vertical to the RD of the steel sheet. In contrast, the influence of the organosheet types on crack orientation was ignorable at higher temperature, i.e., 235 °C. Moreover, the strain evolutions of both FML01-RG and FML01-RGUD were more extended and homogeneously distributed at 235 °C compared to those at RT, as can be seen in Figure 17b,d. The cracking propagation is more likely along the RD of steel cover sheet, which resembles the cracking behaviour of the monolithic steel sheets under the stretch-forming condition.

3.1.4. One-Step Stretch Forming

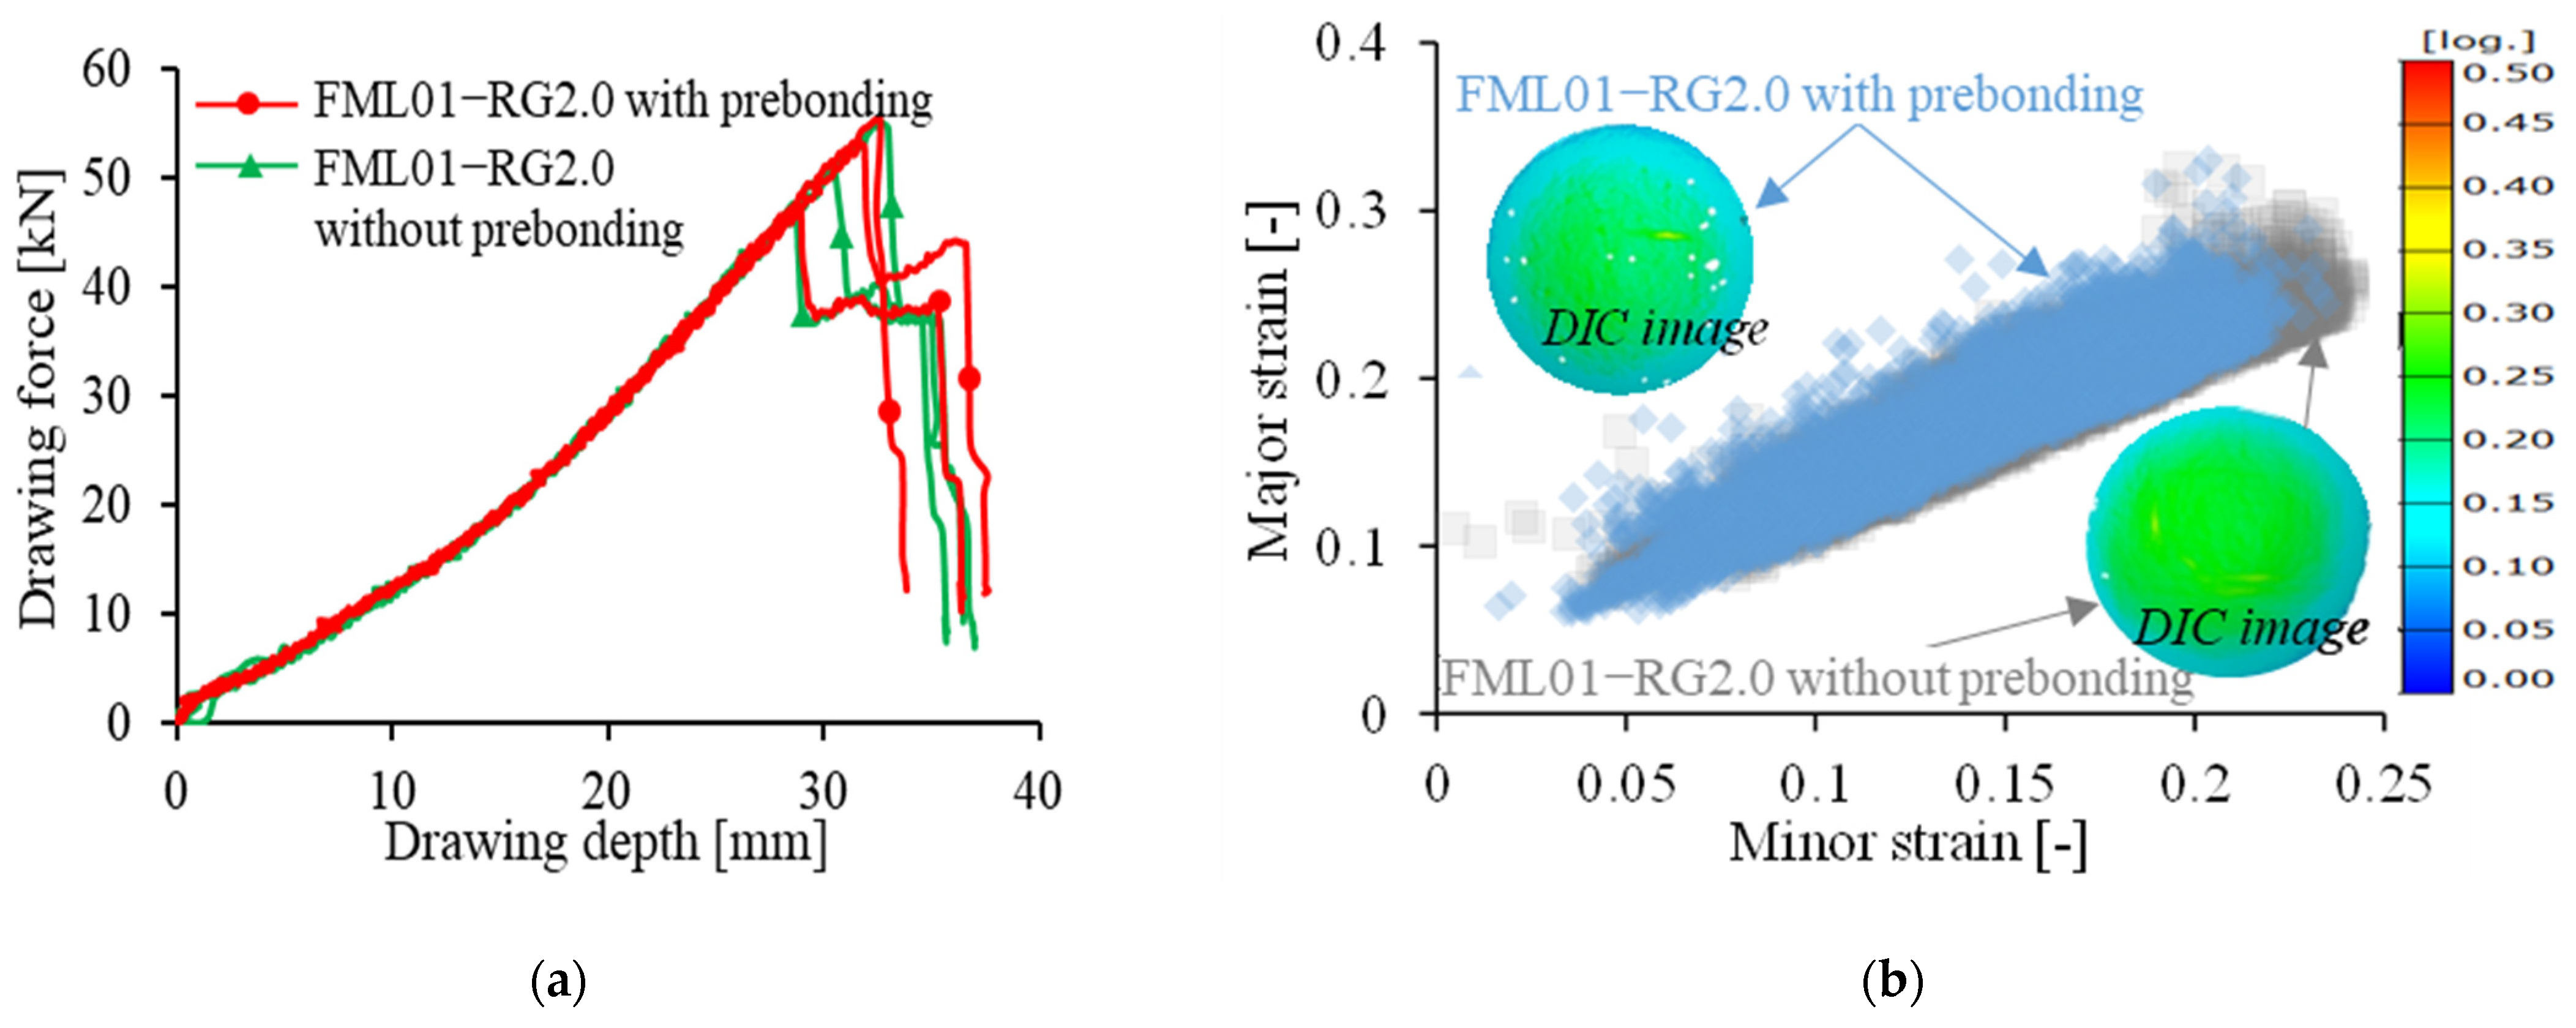
Figure 18 shows the comparison between the stretch forming of FML01-RG2.0 with and without pre-bonding in terms of the drawing force-depth and strain evolution at 235 °C. There were three repetitions for each condition. It was clearly seen that the difference in force and depth, as well as the strain distribution between the specimens with and without pre-bonding, was ignorable. A drawing depth of FML01-RG2.0 without pre-bonding is 30.7 ± 1.8 mm was similar to 31.1 ± 1.6 mm for the pre-bonded one. With this one-step thermoforming process, comparable forming limit was reached while saving the step for producing the sandwich semi-products. In this regard, the results of the investigations in this study with the pre-bonded FML could be a benchmark for the one-step thermal forming without pre-bonding of FML, which is beneficial for further investigation into the 3D shaping of FML through the one-step thermoforming process, such as the top-hat profile manufacturing described in [44]. In addition, both pre-bonded and unbonded specimens showed good interlaminar bonding after cooling at the end of the experiment, except for the area where the steel sheet fractured, which showed local delamination due to lack of backing support and spring-back deformation of the cover sheets.

3.2. FLC Determination

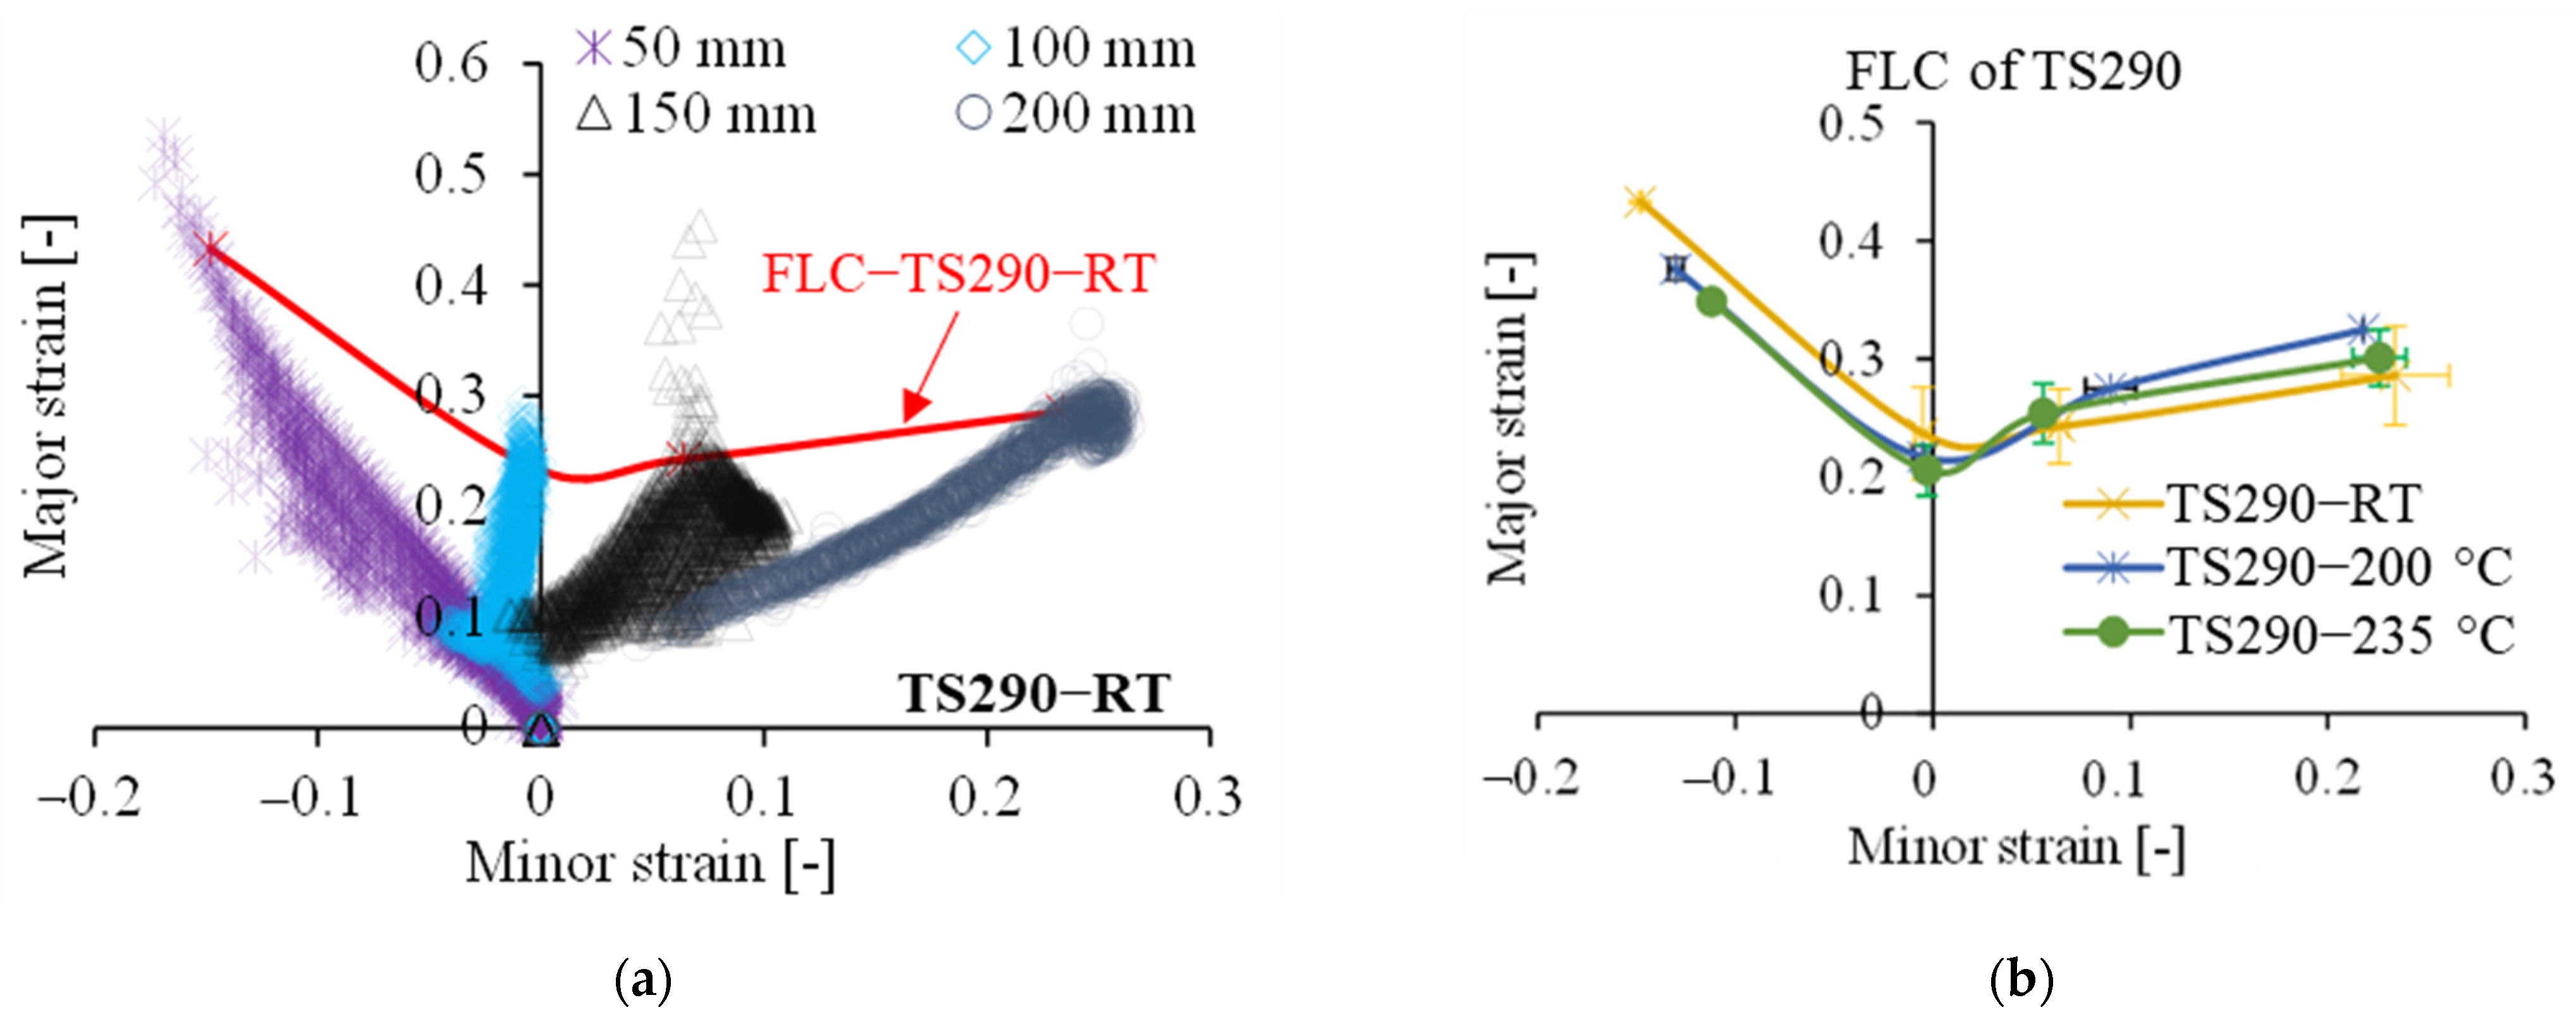
The FLC for the monolithic steel sheets and the sandwich panels were determined. Firstly, the FLC for monolithic steel sheets TS275 and TS290 at different temperatures are shown in Figure 19. In Figure 19a, an example of the FLC for TS290 assessed by the time-dependent line fitting method is shown, as described in Figure 9. In Figure 19b, the FLC level of TS290 was kept almost constant for the different test forming temperatures with only a slight tendency to decrease with increasing temperature in the middle and left parts of the FLD, where the plane and tensile strain paths, respectively, dominated. However, there was a slight improvement of the FLC in the right side, i.e., in the biaxial stretching straining. In contrast, as shown in Figure 19c, the FLC level of TS275 decreased significantly in the tensile (left side) and plane strain (at minor strain ε 2 = 0) regions with increasing temperature, which was consistent with the tensile properties of this steel grade, as shown in Figure 3a.
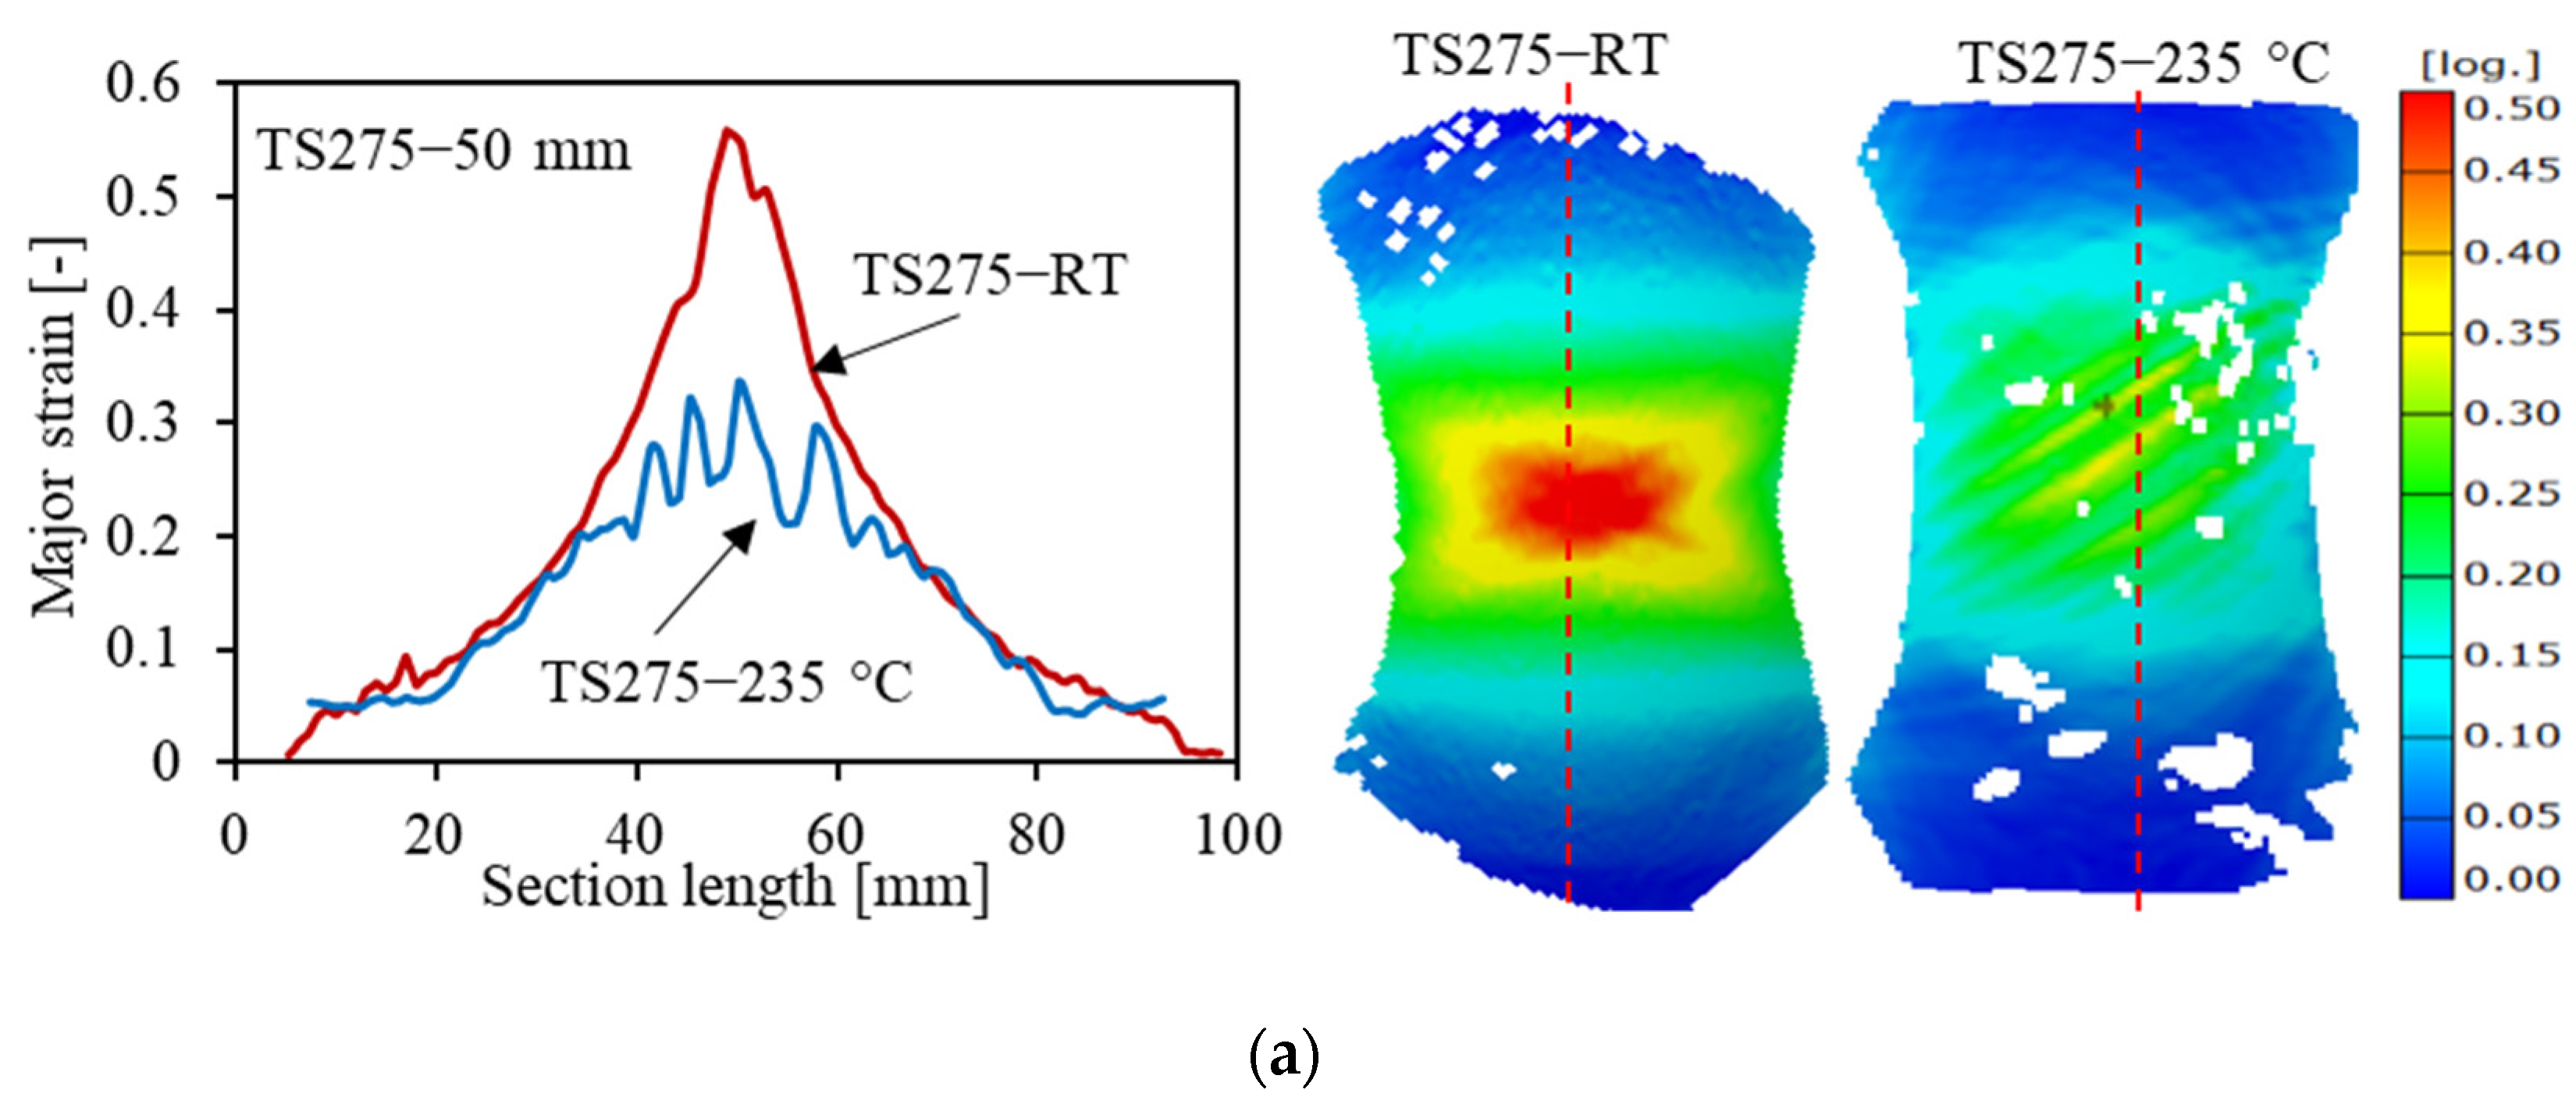
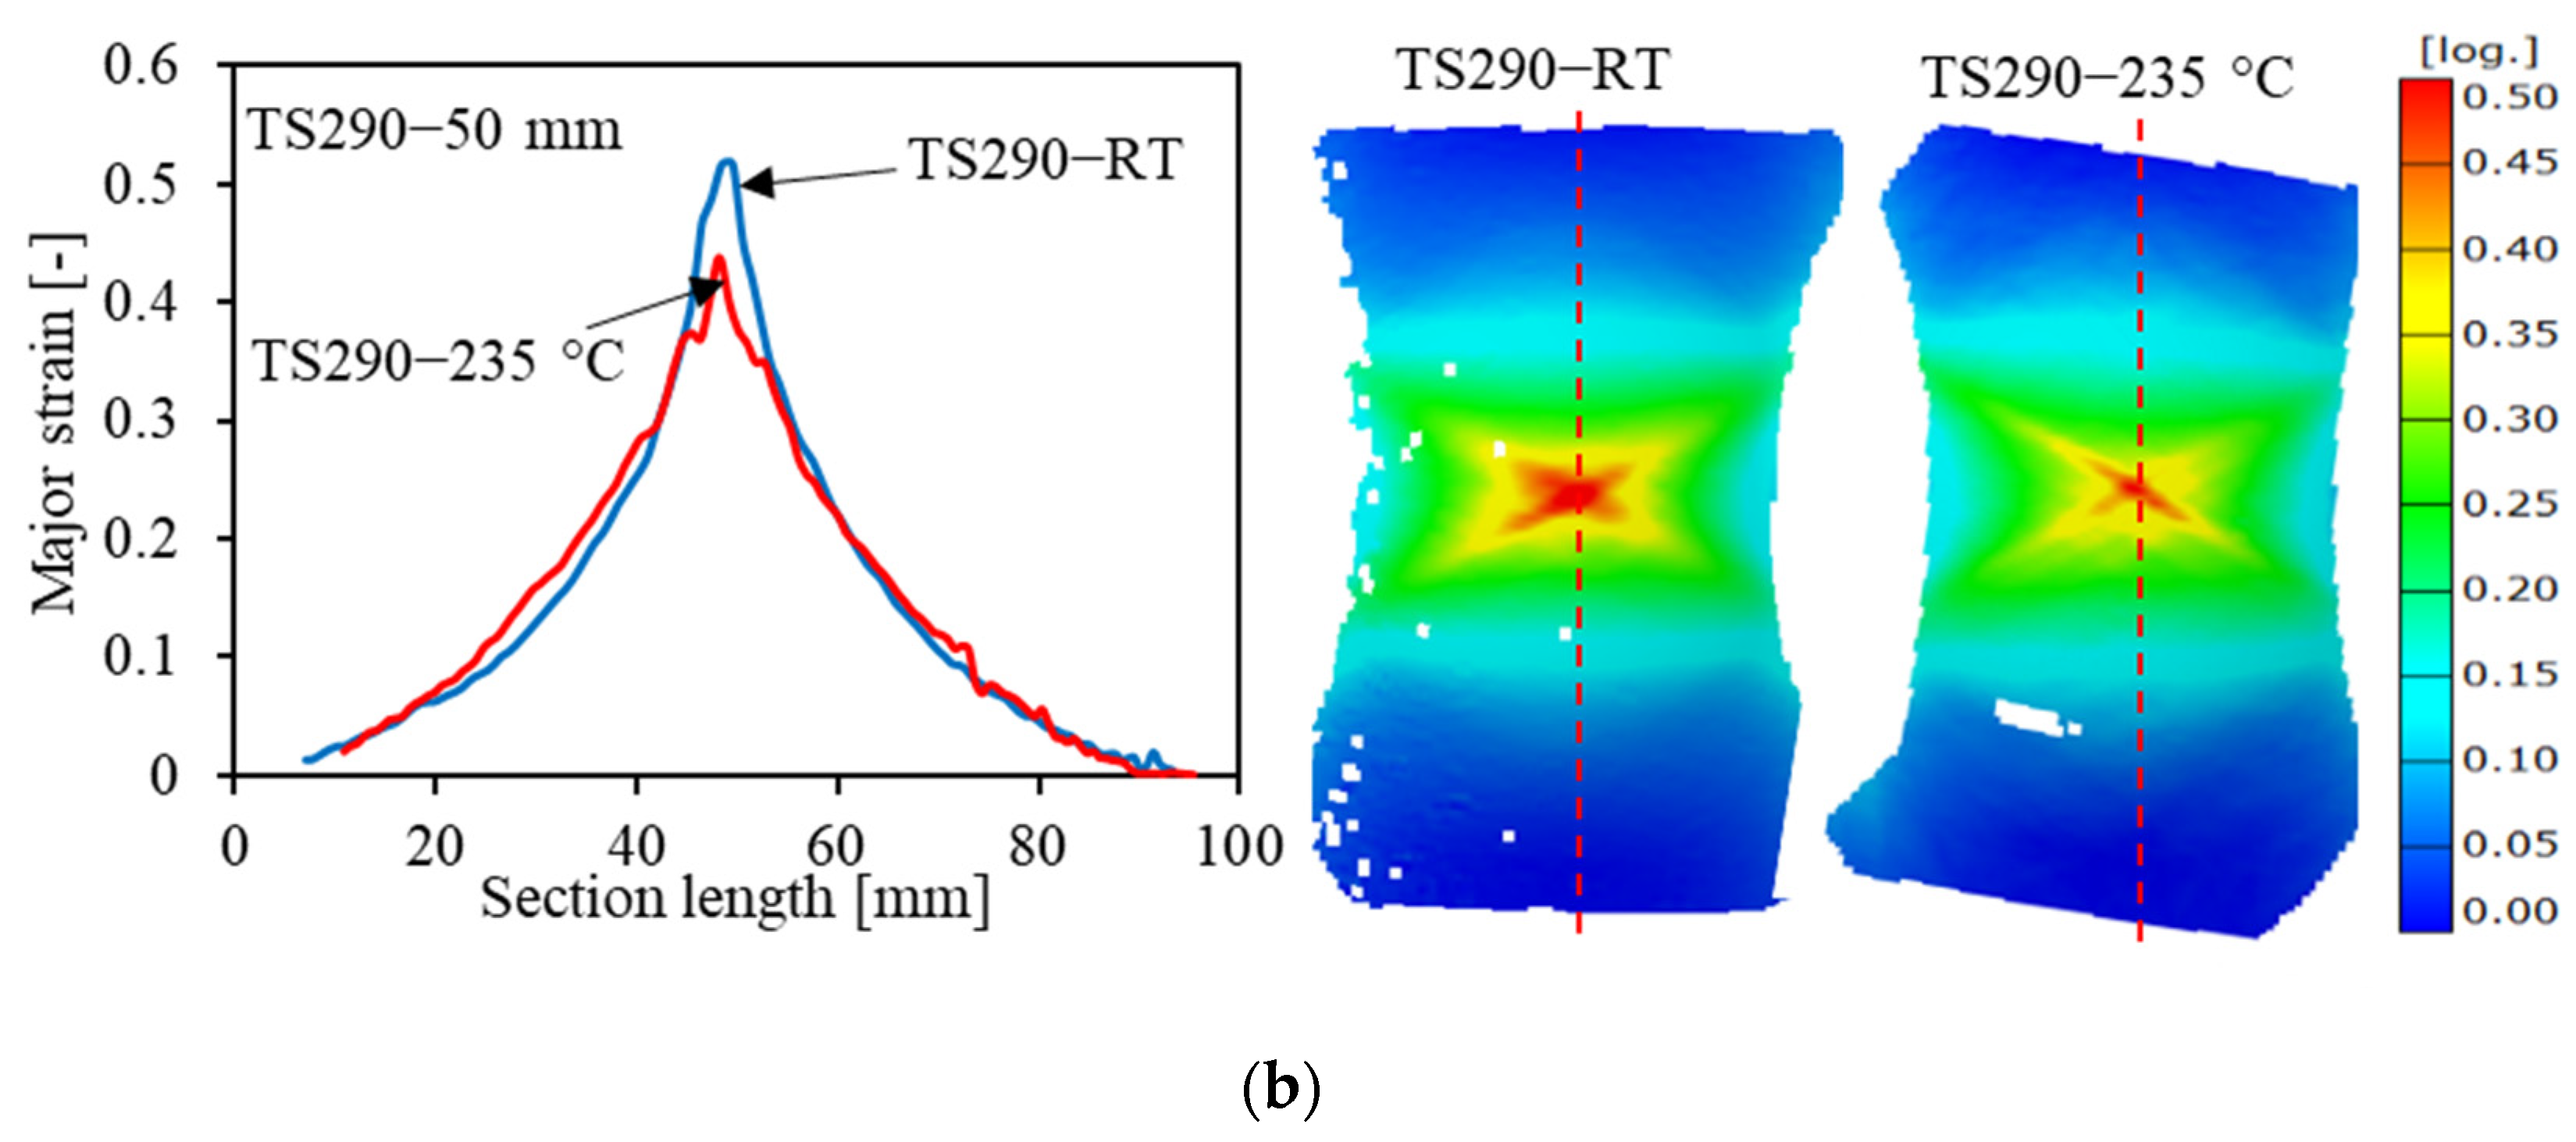
The results in Figure 19 can be interpreted with the help of the strain distribution over a centreline section, as shown in Figure 20, where the test results in terms of the strain evolution for TS275 and TS290 of hourglass-shaped specimens with a central width of 50 mm at RT and 235 °C are illustrated. The following characteristic differences can be stated:
3.
At RT, the development of the plastic zone of both TS290 and TS275 revolves around the centre of the specimen, where the strain evolution along the cross-section lines (the red dotted lines in the figure) shows a smooth progression (Figure 20a,b).
4.
However, at 235 °C intermittent slant strain localization bands are detected, indicating the presence of PLC flip-flopped bands for TS275 at elevated temperatures [42] and leading to a reduction in elongation at failure. In contrast, the strain evolution of TS290 at 235 °C is similar to that at RT, with no detected slant strain localization bands, see Figure 20b.
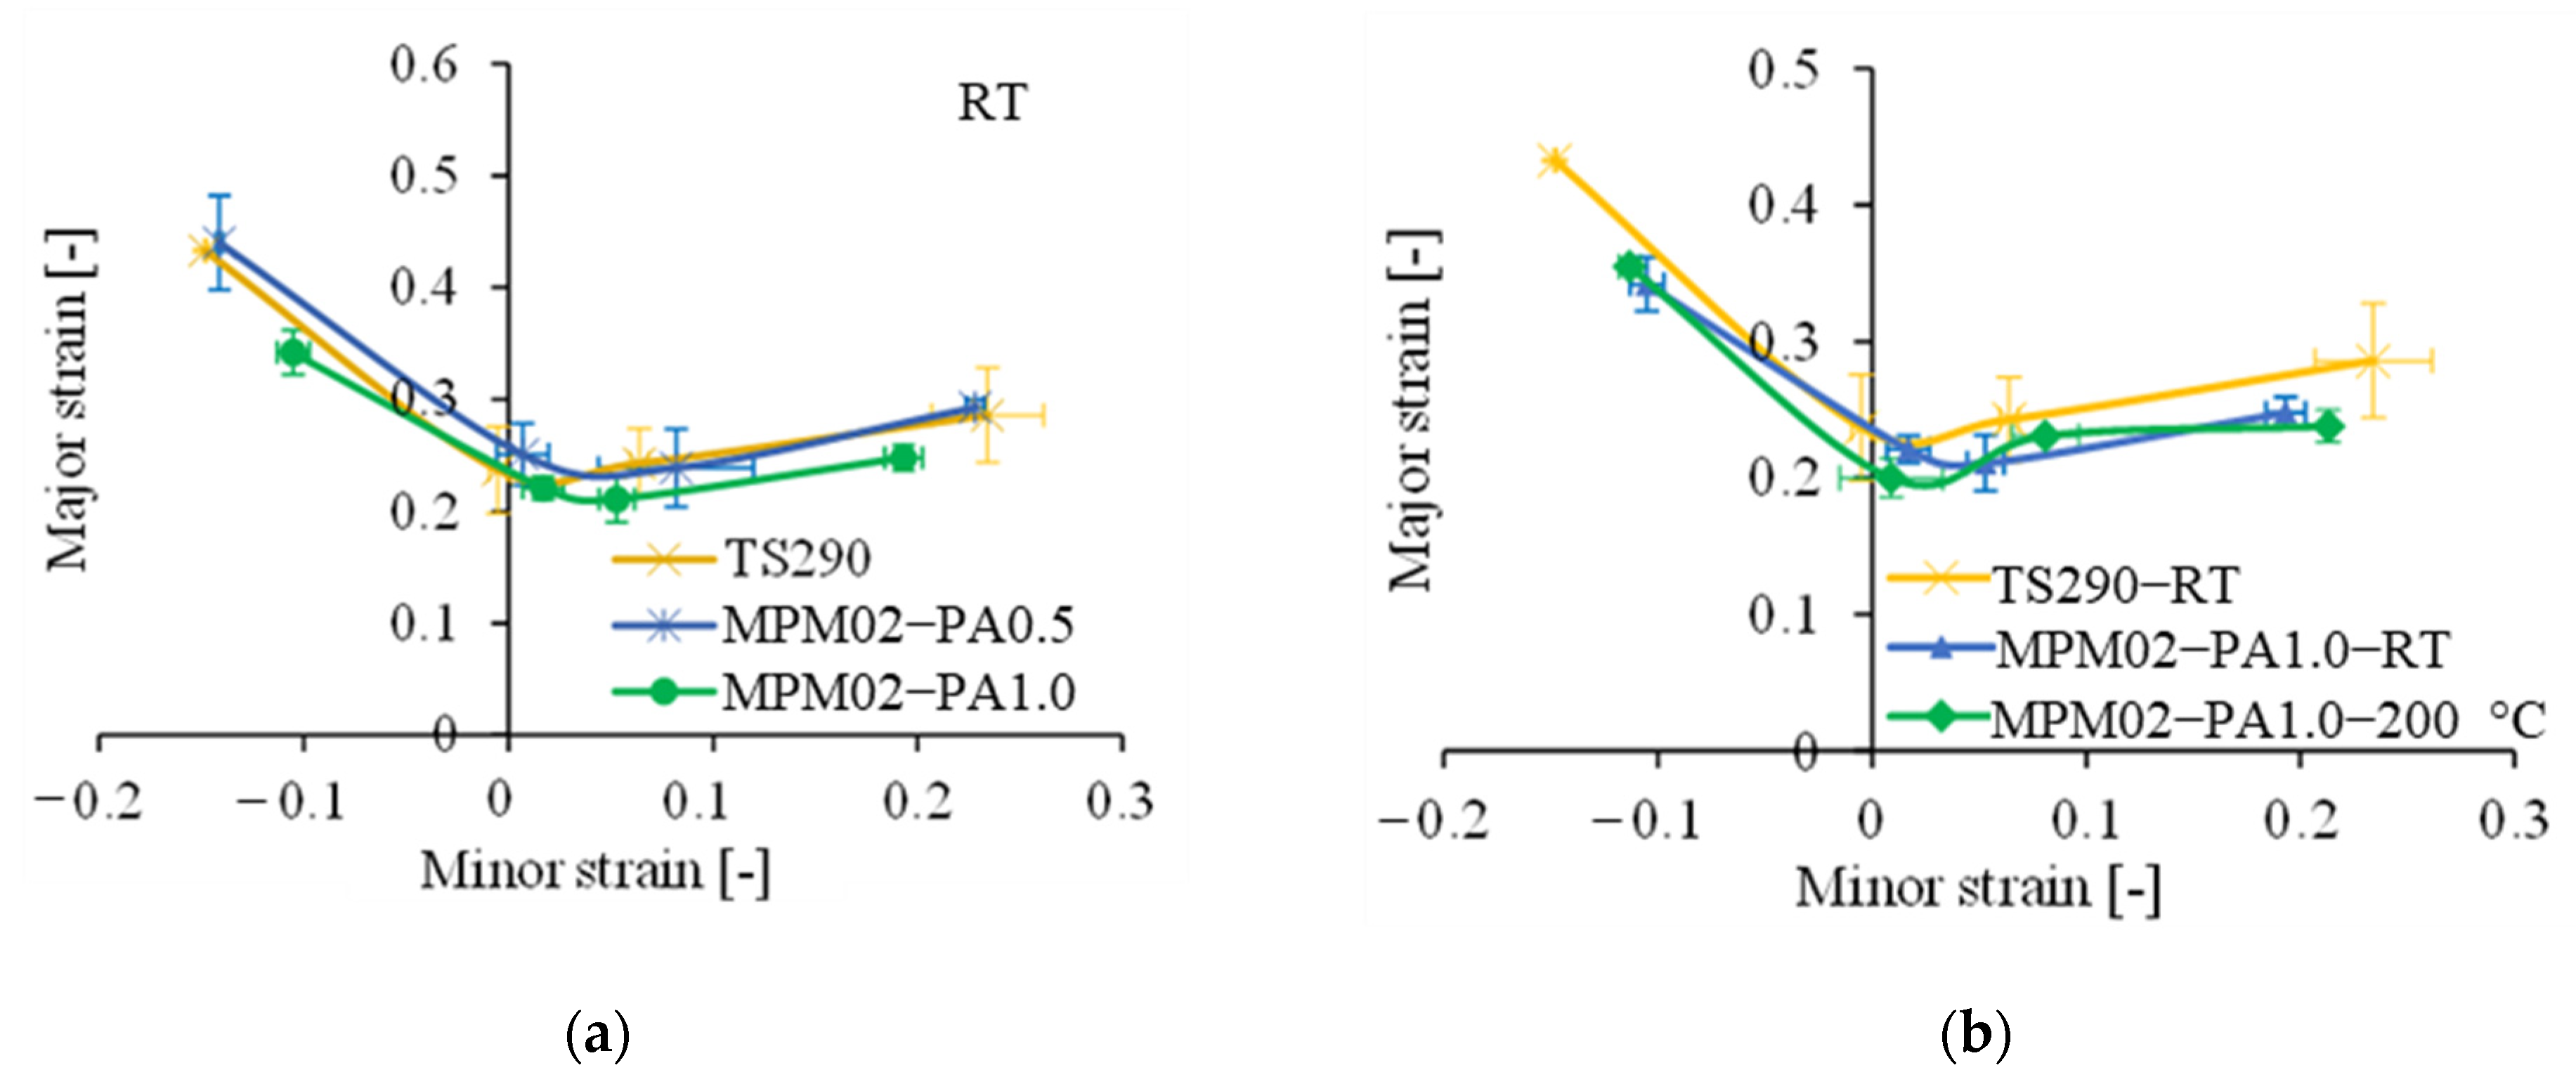
Furthermore, Figure 21 shows the FLC levels of MPM02 with different core layer thicknesses at RT and 200 °C. From Figure 21a, it can be noted that the FLC level of MPM02 decreased slightly with increasing core thickness, which was in coincidence with the stretch-forming behaviour of MPM01 described in Section 3.1.2. As shown in Figure 21b, no significant improvement in the FLC levels of MPM02 was found with increasing temperature, stating that cold forming is satisfactory for processing MPM panels.
Finally, Figure 22 shows the results of the FLC determination for FML01 and FML02 to determine the effect of steel sheet properties on the FLC level. Moreover, the core thicknesses of 0.5 mm and 1.0 mm have been chosen, while the 2.0 mm core was neglected due to the result found earlier that the inner steel sheet cracks earlier making the determination of the FLC not reliable. In principle, to determine the FLC, the failure strain can be obtained by the DIC method for the outer layer. In this case, the determined FLC will be not reliable as the outer steel sheet is still within the safe forming zone; however, the inner cover sheet is already cracked. As can be seen from Figure 22a, the FLC level of FML02 increased significantly with increasing temperature up to 235 °C, compared to RT. The effect of core thickness (0.5 and 1.0 mm) on FLC levels at both RT and 235 °C was negligible, which was similar to the stretch-forming behaviour of FML. Moreover, the FLC levels of FML at RT were found to be very low and the minor strain values positive for all strain paths. This can be attributed to the limited formability of the organosheets and its suppression effect of the plastic deformation on the outer steel sheet. In Figure 22b, the difference between the FLC levels of FML02 at different temperatures 200 and 235 °C is also shown to be negligible, except for the one at RT. Based on these results, preference can be given to forming at 200 °C, where good forming limits can be achieved while reducing the squeezing-out of the polymer matrix in the core at 235 °C, which leads to significant thickness irregularities (Figure 15). However, the temperature of 200 °C is not suitable for the one-step thermoforming of sandwich panels into complex shapes. The reason is that it is not possible to achieve both joining and forming processes at temperatures less than the melting point of the polymer matrix, i.e., 220 °C [40].
From Figure 22c,d, it can be seen that the FLC levels of the FML with different cover sheets TS275 and TS290 do not show significant differences at RT. In contrast, the FLC levels of FML01 and FML02 at 235 °C show a significant difference above the melting point of PA6, being significantly higher for FML02. Furthermore, the major-minor strain distribution at different strain paths for FML are similar to those of their monolithic steel sheets. Therefore, it can be stated that at RT, the forming limit of the organosheet dominates the FLC level to its FML because of early failure. However, at elevated temperatures, i.e., 200 and 235 °C, the cover sheet dominates the FLC level of the FML.

4. Conclusions and Outlook

In this paper, the influence of material properties (cover sheets: TS275-0.4 mm and TS290-0.3 mm, and core layers: PA6, RG and RGUD), thicknesses of core materials (PA6: 0.5, 1.0 and 1.5 mm, and organosheets: 0.5, 1.0 and 2.0 mm) and forming temperatures (RT, 200 and 235 °C) on stretch-forming behaviour and FLC-levels were experimentally determined and characterised. Based on the obtained results, the following conclusions can be made:
  • Stretch forming of the organosheets at RT was highly restricted. A further increase of the stretching force was due to its resistance of unfractured fibres in warp direction of RGUD.
  • The formability of the MPMs was found to be comparable to that of their monolithic steel cover sheets, yet it decreased when core thickness increased. The same effect was found regarding the FLC-levels.
  • The stiffness of FML increased when core thickness increased, but its formability decreased accordingly.
  • At 235 °C, i.e., above the melting point of PA6, no remarkable difference of drawing depth and stiffness of FML with varied core thicknesses and different organosheets RG and RGUD can be stated. The formability of FML was comparable to that of the monolithic steel covers.
  • At 235 °C, irregular thickness distribution of thicker core layer (>1.0 mm) in FML led to decreasing the dynamic friction coefficient and earlier failure of the inner steel sheet.
  • At 235 °C, no fibre cracking in the FML was detected, but severe distortion in the flange region due to the restriction of the fibres’ movement due to the drawing beads was seen.
  • Regarding the FLC of MPM, no remarkable improvement of the FLC-level was observed by increasing the forming temperature.
  • The FLC-levels of FML significantly improved (almost > 300%) at the elevated forming temperatures. The influence of the core thickness (0.5~1.0 mm) on the FLC-level was ignorable at RT, 200 and 235 °C. However, organosheets dominated the FLC-level at RT and the steel cover sheets dominated at elevated temperatures.
For the warm stretch forming of FML, further improvement approaches can be undertaken. For example, by using a multi-step variothermal stretching process, sandwiches are stretched below the melting point (e.g., 200 °C) of the matrix PA6 to obtain the maximum forming limit, and then the shaped specimen can be bonded sufficiently by increasing the temperature (≥230 °C) and applying counter-pressure via a support tool part. This eliminates the non-uniformity of thickness distribution that occurs after the FML has been formed in the molten state of matrix and therewith to avoid the change of dynamic friction state and the earlier cracking of inner cover sheet. In addition, reliable simulation models are needed to be developed to predict the fluidity of the core layer in the molten state and the failure modes of FML during the variothermal forming process, such as thickness change, fibre fracture and cover sheet cracking.

Author Contributions

Conceptualization, W.H., M.H., G.Z. and H.P.; methodology, W.H. and M.H.; software, W.H.; validation, W.H.; investigation, W.H. and M.H.; resources, G.Z. and H.P.; data curation, W.H. and M.H.; writing—original draft preparation, W.H. and M.H.; writing—review and editing, M.H., G.Z., A.C. and H.P.; visualization, W.H.; supervision, G.Z., A.C. and H.P.; project administration, G.Z., A.C. and H.P.; funding acquisition, G.Z. and H.P. All authors have read and agreed to the published version of the manuscript.

Funding

This research was funded by the German Research Foundation, grant number 330043166.

Institutional Review Board Statement

Not applicable.

Informed Consent Statement

Not applicable.

Data Availability Statement

The authors are ready to share the research data upon request.

Acknowledgments

We acknowledge financial support by Open Access Publishing Fund of Clausthal University of Technology. Additionally, we would like to thank thyssenkrupp Steel Europe GmbH for their supplying the steel materials and SI Coatings GmbH for supplying the adhesion promoter. Also, we thank Zhiwei Gong for his support performing the experimental investigations.

Conflicts of Interest

The authors declare no conflict of interest.

References

  1. Burchitz, I.; Boesenkool, R.; van der Zwaag, S.; Tassoul, M. Highlights of Designing with Hylite—A New Material Concept. Mater. Des. 2005, 26, 271–279. [Google Scholar] [CrossRef]
  2. Wiesbaden, S.F. Application potential of Litecor in the body. In ATZextra Worldwide; Springer Fachmedien Wiesbaden: Wiesbaden, Germany, 2014; Volume 19, pp. 108–111. [Google Scholar]
  3. Alderliesten, R. (Ed.) Fatigue and Fracture of Fibre Metal Lminates: Solid Mechanics and Its Applications; Springer International Publishing: Cham, Switzerland, 2017; ISBN 978-3-319-56226-1. [Google Scholar]
  4. Vogelesang, L.B.; Gunnink, J.W. ARALL: A Aaterials Challenge for the next Generation of Aircraft. Mater. Des. 1986, 7, 287–300. [Google Scholar] [CrossRef]
  5. Vlot, A.; Vogelesang, L.B.; Vries, T.J. Towards Application of Fibre Metal Laminates in Large Aircraft. Aircr. Eng. Aerosp. Technol. 1999, 71, 558–570. [Google Scholar] [CrossRef]
  6. Wanhill, R.J.H. Aerospace Materials and Material Technologies: GLARE®: A Versatile Fibre Metal Laminate (FML) Concept; Springer: Singapore, 2017; Volume 5, pp. 291–307. [Google Scholar]
  7. Rendigs, K.H. Airbus and Current Aircrafts Metal Technologies; Airbus Germany: Bremen, Germany, 2008. [Google Scholar]
  8. van Rooijen, R.G.J.; Sinke, J.; van der Zwaag, S. Improving the Adhesion of Thin Stainless Steel Sheets for Fibre Metal Laminate (FML) Applications. J. Adhes. Sci. Technol. 2005, 19, 1387–1396. [Google Scholar] [CrossRef]
  9. Alderlieste, R.; Rans, C.; Benedictus, R. The Applicability of Magnesium based Fibre Metal Laminates in Aerospace Structures. Compos. Sci. Technol. 2008, 68, 2983–2993. [Google Scholar] [CrossRef]
  10. Reyes, G.; Kang, H. Mechanical Behavior of Lightweight Thermoplastic Fiber–Metal Laminates. J. Mater. Process. Technol. 2007, 186, 284–290. [Google Scholar] [CrossRef]
  11. Reyes, G.; Cantwell, W.J. The Mechanical Properties of Fibre-Metal Laminates based on Glass Fibre Reinforced Polypropylene. Compos. Sci. Technol. 2000, 6, 1085–1094. [Google Scholar] [CrossRef]
  12. Wiedemann, S.; Wesseks, H.; Wetterau, H.-J.; Eckstein, L.; Schulte, S.; Modler, N.; Jaschinski, J.; Weber, T.; Wollmann, T.; Kawalla, R.; et al. Effiziente Mischbauweisen für Leichtbau-Karosserien-LEIKA: Final Report (German); Plattform FOREL. 2017. Available online: www.plattform-FOREL.de (accessed on 17 April 2023).
  13. Jahn, K.; Kolonko, A.; Buschner, N.; Scholze, M.; Nestler, D.; Roth-Panke, I.; Lampke, T.; Kroll, L.; Tröltzsch, J. Interface Design of Hybrid Laminates. In Merge Technologies for Multifunctional Lightweight Structures; TU Chemnitz: Chemnitz, Germany, 2017. [Google Scholar]
  14. Nestler, D. Innovative Material, Preform and Technology Development for Large Series; TU Chemnitz: Chemnitz, Germany, 2020. [Google Scholar]
  15. Nestler, D.; Trautmann, M.; Zopp, C.; Tröltzsch, J.; Osiecki, T.; Nendel, S.; Wagner, G.; Kroll, L. Continuous Film Stacking and Thermoforming Process for Hybrid CFRP/Aluminum Laminates. Procedia CIRP 2017, 66, 107–112. [Google Scholar] [CrossRef]
  16. Wielage, B.; Nestler, D.; Steger, H.; Kroll, L.; Tröltzsch, J.; Nendel, S. CAPAAL and CAPET—New Materials of high-strength, high-stiff Hybrid Laminates. In Integrated Systems, Design and Technology 2010; Springer: Berlin/Heidelberg, Germany, 2001; pp. 23–25. [Google Scholar]
  17. Scholz, P.; Schieck, F.; Müller, R.; Seidlitz, H.; Gerstenberger, C.; Osiecki, T.; Grbic, N.; Behrens, B.A.; Vucetic, M.; Neumann, A. Umformprozessketten für Bauteile aus Faser-Kunststoff/Metall-Verbunden. In EFB T40-Intermezzo der Hybriden Werkstofflösungen: Hat Blech eine Zukunft? Europäische Forschungsgesellschaft für Blechverarbeitung eV: Hanover, Germany, 2015; pp. 151–171. [Google Scholar]
  18. Tekkaya, A.E.; Hahn, M.; Hiegemann, L.; Weddeling, C. Umformen Faserverstärkter Thermoplastischer Kunststoff-Halbzeuge mit Metallischen Deckblechen für den Leichtbau; Europäische Forschungsgesellschaft für Blechverarbeitung: Hannover, Germany, 2015; pp. 185–199. [Google Scholar]
  19. Sinmazçelik, T.; Avcu, E.; Bora, M.Ö.; Çoban, O. A Review: Fibre Metal Laminates, Background, Bonding Types and Applied Test Methods. Mater. Des. 2011, 32, 3671–3685. [Google Scholar] [CrossRef]
  20. Botelhoa, E.C.; Silva, R.A.; Pardini, L.C.; Rezende, M.C. A Review on the Development and Properties of Continuous Fiber/Epoxy/Aluminum Hybrid Composites for Aircraft Structures. Mater. Res. 2006, 9, 247–256. [Google Scholar] [CrossRef]
  21. Harhash, M.; Fischer, T.; Grubenmann, M.; Hua, W.; Heingärtner, J.; Hora, P.; Ziegmann, G.; Palkowski, H. Top-hat Crashboxes of Thermoplastic Fibre-Metal-Laminates Processed in One-step Thermoforming: Experimental and Numerical Study. Compos. Part B Eng. 2021, 226, 109367. [Google Scholar] [CrossRef]
  22. Harhash, M.; Carrade, A.; Palkowski, H. Forming Limit Diagram of Steel/Polymer/Steel Sandwich Systems for the Automotive Industry. In Advanced Composites for Aerospace, Marine, and Land Applications; Springer: Cham, Switzerland, 2014; pp. 243–254. [Google Scholar]
  23. Sherkatghanad, E.; Lang, L.H.; Liu, S.C.; Wang, Y. Innovative Approach to Mass Production of Fiber Metal Laminate Sheets. Mater. Manuf. Process. 2018, 33, 552–563. [Google Scholar] [CrossRef]
  24. Dong, A.Q.; Zhao, Y.; Zhao, X.Q.; Yu, Q.Y. Cure Cycle Optimization of Rapidly Cured out-of-Autoclave Composites. Materials 2018, 11, 421. [Google Scholar] [CrossRef] [PubMed]
  25. Liu, S.C.; Lang, L.H.; Sherkatghanad, E.; Wang, Y.; Xu, W.C. Investigation into the Fiber Orientation Effect on the Formability of GLARE Materials in the Stamp Forming Process. Appl. Compos. Mater. 2018, 25, 255–267. [Google Scholar] [CrossRef]
  26. Kalyanasundaram, S.; DharMalingam, S.; Venkatesan, S.; Sexton, A. Effect of Process Parameters during Forming of Self Reinforced—PP based Fiber Metal Laminate. Compos. Struct. 2013, 97, 332–337. [Google Scholar] [CrossRef]
  27. Wollman, T.; Hahn, M.; Wiedermann, S.; Zeiser, A.; Jaschinski, J.; Modler, N.; Khalifa, N.B.; Meißen, F.; Paul, C. Thermoplastic Fibre Metal Laminates: Stiffness Properties and Forming Behaviour by Means of Deep Drawing. Arch. Civ. Mech. Eng. 2018, 18, 442–450. [Google Scholar] [CrossRef]
  28. Guo, Y.Q.; Zhai, C.P.; Li, F.Z.; Zhu, X.F.; Xu, F.; Wu, X.L. Formability, Defects and Strengthening Effect of Steel/CFRP Structures Fabricated by using the Differential Temperature Forming Process. Compos. Struct. 2019, 216, 32–38. [Google Scholar] [CrossRef]
  29. Heggemann, T.; Homberg, W.; Sapli, H. Combined Curing and Forming of Fiber Metal Laminates. Procedia Manuf. 2020, 47, 36–42. [Google Scholar] [CrossRef]
  30. Behrens, B.A.; Hübner, S.; Grbic, N.; Micke-Camuz, M.; Wehrhane, T.; Neumann, A. Forming and Joining of Carbon-Fiber-Reinforced Thermoplastics and Sheet Metal in One Step. Procedia Eng. 2017, 183, 227–232. [Google Scholar]
  31. Ding, Z.R.; Wang, H.Y.; Luo, J.M.; Li, N. A Review on Forming Technologies of Fibre Metal Laminates. Int. J. Lightweight Mater. Manuf. 2021, 4, 110–126. [Google Scholar] [CrossRef]
  32. Keeler, S.; Backhofen, W. Plastic Instability and Fracture in Sheets Stretched over Rigid Punches. ASM Trans. Q. 1964, 56, 25–48. [Google Scholar]
  33. Liu, J.G.; Xue, W. Formability of AA5052/polyethylene/AA5052 Sandwich Sheets. Trans. Nonferrous Met. Soc. China 2013, 23, 964–969. [Google Scholar] [CrossRef]
  34. Kazemi, F.; Hashemi, R.; Niknam, S.A. Formability and Fractography of AA5754/Polyethylene/AA5754 Sandwich Composites. Mech. Based Des. Struct. Mach. 2020, 50, 1253–1267. [Google Scholar] [CrossRef]
  35. Harhash, M.; Carrade, A.; Palkowski, H. Deep- and Stretch Forming of Steel/Polymer/Steel Laminates. In Proceedings of the Euro Hybrid Materials and Structures, Kaiserslautern, Germany, 20–21 April 2016; pp. 69–74. [Google Scholar]
  36. Jalali Aghchai, A.; Khatami, S. Experimental and Numerical Formability Investigation of FML Sheets with Glass Fiber Reinforced Core. Int. J. Adv. Manuf. Technol. 2018, 96, 3881–3891. [Google Scholar] [CrossRef]
  37. Sexton, A.; Cantwell, W.; Kalyanasundaram, S. Stretch Forming Studies on a Fibre Metal Laminate based on a Self-reinforcing Polypropylene Composite. Compos. Struct. 2012, 94, 431–437. [Google Scholar] [CrossRef]
  38. Propex Fabrics Curv™—Technical Data Sheet, C100A. Available online: www.curvonline.com (accessed on 1 May 2023).
  39. Rahiminejad, D.; Compston, P. The Effect of Pre-heat Temperature on the Formability of a Glass-fibre/Polypropylene and Steel-based Fibre–Metal Laminate. Int.J. Mater. 2020, 9, 211. [Google Scholar] [CrossRef]
  40. Hua, W.; Fischer, T.; Harhash, M.; Ziegmann, G.; Palkowski, H. Study on Processing Galvanized Steel/PA6 Sandwich Composites by Hot-pressing: Influence of Interface Properties and Surface Treatment on the Adhesion Strength. Compos. Struct. 2020, 236, 111779. [Google Scholar] [CrossRef]
  41. Hua, W. Forming Behaviour of Sandwich Materials made of Steel Covers and Polyamide Cores with or without Glass Fibre Reinforcements. Doctoral Dissertation, Clausthal University of Technology, Clausthal-Zellerfeld, Germany, May 2022. [Google Scholar]
  42. Ren, S.C.; Morgeneyer, T.F.; Mazière, M.; Forest, S.; Rousselier, G. Effect of Lüders and Portevin–Le Chatelier Localization Bands on Plasticity and Fracture of Notched Steel Specimens Studied by DIC and FE Simulations. Int. J. Plast. 2021, 136, 102880. [Google Scholar] [CrossRef]
  43. Fischer, T.; Grubenmann, M.; Harhash, M.; Hua, W.; Heingärtner, J.; Hora, P.; Palkowski, H.; Ziegmann, G. Experimental and Numerical Investigations on the Quasi-static Structural Properties of Fibre Metal Laminates Processed by Thermoforming. Compos. Struct. 2021, 258, 113418. [Google Scholar] [CrossRef]
  44. Behrens, B.A.; Hübner, S.; Bonk, C.; Bohne, F.; Micke-Camuz, M. Development of a Combined Process of Organic Sheet Forming and GMT Compression Molding. Procedia Eng. 2017, 207, 101–106. [Google Scholar] [CrossRef]
  45. Volk, W.; Hora, P. New Algorithm for a Robust user-independent Evaluation of Beginning Instability for the Experimental FLC Determination. Int. J. Mater. 2011, 4, 339–346. [Google Scholar] [CrossRef]
  46. Yang, L.X.; Smith, L.; Gothekar, A.; Chen, X. Measure Strain Distribution Using Digital Image Correlation (DIC) for Tensile Tests; Oakland University: Rochester, MI, USA, 2010. [Google Scholar]
  47. Schirmaier, F.J.; Weidenmann, K.A.; Kärger, L.; Henning, F. Characterisation of the Draping Behaviour of Unidirectional Non-crimp Fabrics (UD-NCF). Compos. Part A Appl. Sci. Manuf. 2016, 80, 28–38. [Google Scholar] [CrossRef]
  48. Galkin, S.; Kunze, E.; Kärger, L.; Böhm, R.; Gude, M. Experimental and Numerical Determination of the Local Fiber Volume Content of Unidirectional Non-Crimp Fabrics with Forming Effects. J. Compos. Sci. 2019, 3, 19. [Google Scholar] [CrossRef]
  49. Grubenmann, M. Hybrid Thermoforming of Body in White Parts. Doctoral Dissertation, ETH, Zürich, Switzerland, 2020. [Google Scholar]
Figure 1. Flowchart of the foreseen investigations and characterization methods.
Applsci 13 06611 g001
Figure 2. Surface treatments of (a) core materials and (b) cover sheets.
Applsci 13 06611 g002
Figure 3. Tensile properties of (a) TS290 and (b) TS275 at different temperatures.
Applsci 13 06611 g003
Figure 4. Temperature profile inside the sandwich panel along the hot-pressing.
Applsci 13 06611 g004
Figure 5. Tool design for warm stretch forming.
Applsci 13 06611 g005
Figure 6. Temperature-time profile starting from pre-heating the sandwich panels in the furnace to final cooling at the end of the test: (a) preheating, (b) transfer and setting, (c) forming and (d) cooling and specimen removal. Solid lines refer to T1 and dotted ones refer to T2.
Applsci 13 06611 g006
Figure 7. (a) Illustration of heat streaks generated during warm forming and (b) their influence on the strain field measurement obtained by the DIC method.
Applsci 13 06611 g007
Figure 8. (a) Forming limit curve (FLC) and (b) specimen geometries: green arrow refers to the rolling direction (RD) of the steel sheets.
Applsci 13 06611 g008
Figure 9. Illustration of the time-dependent method for FLC-determination [45].
Applsci 13 06611 g009
Figure 10. (a) Force and (b) strain evolution of TS275 under stretch forming at RT and 235 °C.
Applsci 13 06611 g010
Figure 11. (a) Force evolution of RGUD under stretch-forming conditions at RT; (b) DIC images of the crack propagation.
Applsci 13 06611 g011
Figure 12. Force evolution and distortion of RG0.5 and RGUD0.5 under stretch forming at 235 °C.
Applsci 13 06611 g012
Figure 13. Stretch-forming behaviour in terms of: (a) Force and (b) strain evolution of the MPM01 with different core layer thicknesses at RT.
Applsci 13 06611 g013
Figure 14. Force evolution of FML under stretch forming at (a) RT and (b) 235 °C for different core thicknesses and organosheets; (c) DIC images and force evolution of FML01-RGUD2.0 at 235 °C; (d) crack patterns of FML01-RG2.0 and FML01-RGUD2.0, (e) of FML01-RG0.5, (f) of FML01-RG1.0 at 235 °C; (g) specimen picture at RT and (h) at 235 °C.
Applsci 13 06611 g014aApplsci 13 06611 g014b
Figure 15. Thickness distribution of (a) FML01-RGUD0.5 and (b) FML01-RGUD2.0 after warm stretch forming at 235 °C.
Applsci 13 06611 g015
Figure 16. Deformation behaviour of organosheets (a) RGUD2.0 and (b) RG2.0 as core layer in FML01 after stretch forming at 235 °C.
Applsci 13 06611 g016
Figure 17. Crack patterns of FML01-RGUD2.0 at (a) RT and (b) 235 °C, of FML01-RG2.0 at (c) RT and (d) 235 °C.
Applsci 13 06611 g017
Figure 18. Force (a) and strain (b) evolution of FML01-RG2.0 with/without prebonding.
Applsci 13 06611 g018
Figure 19. FLC of TS290 (a) at RT with the evolution of major and minor strains at different strain paths, (b) at different temperatures and (c) FLC of TS275 at different temperatures.
Applsci 13 06611 g019aApplsci 13 06611 g019b
Figure 20. Strain evolutions along the section lines and DIC images for (a) TS275 and (b) TS290 under stretch forming condition at RT and 235 °C.
Applsci 13 06611 g020aApplsci 13 06611 g020b
Figure 21. FLC levels of MPM02 (a) with different core thicknesses and (b) at different temperatures.
Applsci 13 06611 g021
Figure 22. FLC levels for: (a) FML02 with different core thicknesses and (b) at different temperatures, influence of cover sheets on FLC levels: (c) FML01 and (d) FML02.
Applsci 13 06611 g022
Table 1. Summary of the materials used.
Materials/AbbreviationThickness [mm]CoatingFibre Content [vol.-%]Supplier
TS2750.4Zincthyssenkrupp Steel Europe AG
TS2900.3Zinc
PA60.5Infiana Germany GmbH & Co. KG
Twill 2/2 (50/50)–RG0.5, 1.0, 2.047LANXESS Deutschland GmbH, Köln, Germany
Unidirectional (80/20)–RGUD0.5, 1.0, 2.047
Table 2. Test condition for stretch forming and FLC investigation.
Blank Diameter (mm)Punch Diameter (mm)Die Radius (mm)Test Speed (mm/s)Holding Force (kN)Temperatures (°C)
200100101.5100RT, 200, 235
Table 3. Abbreviation of sandwich panels.
Abbreviation Sandwich Panels
MPM01-PAxMPM based on TS275/PA6/TS275 with core layer thickness x
MPM02-PAxMPM based on TS290/PA6/TS290 with core layer thickness x
FML01-RGxFML based on TS275/RG/TS275 with core layer thickness x
FML02-RGxFML based on TS290/RG/TS290 with core layer thickness x
FML01-RGUDxFML based on TS275/RGUD/TS275 with core layer thickness x
FML02-RGUDxFML based on TS290/RGUD/TS290 with core layer thickness x
01: refers to cover sheet TS275, 02: refers to cover sheet TS290.
Table 4. Spray paints for DIC analysis at different temperatures.
Paint SprayTesting TemperatureProduct
White paint sprayRTDupli color®, 252570 aqua white 9010
White paint spray200 °C and 235 °CUlfalux®, Ofenfarben 1190 white-perlmatt
Black paint sprayRT, 200 °C and 235 °CContact Chemistry® Graphit 33 76009-AA
Table 5. Test plan for stretch forming and FLC investigation.
Material/
Abbreviation
Cover SheetCore LayerTest
TS275 (mm)TS290 (mm)PA6 (mm)RG (mm)RGUD (mm)Stretch FormingFLC
0.40.30.51.01.50.51.02.00.51.02.0
TS275x x 1x 1
TS290 x x 3
RGx x x x 1
RGUD x x xx 1
MPM01x x x 2
x x x 2
x x x 2
MPM02 xx x 4
x x x 4
FML01x x x 1x 1
x x x 1
x x x 1
x x x 1*
x x x 1
x x x 1
x xx 1
FML02 x x x 3
x x x 3
x 1: test temperature at RT and 235 °C; x 2: test temperature at RT; x 3: test temperature at RT, 200 and 235 °C; x 4: test temperature at RT, 200 °C; x 1*: test temperature at 235 °C without pre-bonding.
Disclaimer/Publisher’s Note: The statements, opinions and data contained in all publications are solely those of the individual author(s) and contributor(s) and not of MDPI and/or the editor(s). MDPI and/or the editor(s) disclaim responsibility for any injury to people or property resulting from any ideas, methods, instructions or products referred to in the content.