Article

Study of the Kinetics of Adhesive Bond Formation Using the Ultrasonic Method

1
Faculty of Civil and Transport Engineering, Institute of Machines and Motor Vehicles, Poznan University of Technology, 60-965 Poznan, Poland
2
Faculty of Mechanical Engineering, Division of Virtual Engineering, Poznan University of Technology, 60-965 Poznan, Poland
*
Author to whom correspondence should be addressed.
Appl. Sci. 2024, 14(1), 163; https://doi.org/10.3390/app14010163
Submission received: 30 November 2023 / Revised: 15 December 2023 / Accepted: 22 December 2023 / Published: 24 December 2023

Abstract

:
Adhesive bonding is widely used in modern industry. It has many advantages—the main one being the reduction in production costs. It also has certain limitations. One of the limitations of adhesive bonds is the relatively long bonding time of the joints. The main objective of this research was to determine the possibility of studying the kinetics of adhesive bond formation using a non-destructive ultrasonic method. A research experiment was planned and carried out. Adhesive specimens were prepared, and their quality changes over time were evaluated. In addition, the change in ultrasonic measures during the testing of these bonds was evaluated, as well as the hardness of the adhesive. In this study, the choice of test apparatus was made, in particular ultrasonic probes for the adhesive used and the materials to be bonded. The choice of adhesive was also made, for one in which bonding phenomena occur uniformly throughout the volume. This work examined the changes in the mechanical strength and hardness with time. The tests showed that the greatest changes in mechanical strength occur within the first 24 h after the bond was made. With the mechanical strength reaching 12.6 Mpa after 216 h, the strength in the first 24 h was 10.36 (for bonded steel sheets). For bonded steel discs, the maximum tensile strength was 26.99 Mpa (after 216 h), with a hardness of 22.93 Mpa during the first 24 h. Also, significant changes were observed in the adhesive hardness during the first 24 h. The hardness of the adhesive after 216 h was 70.4 Shore’a on the D scale, while after 24 h it was 69.4 Shore’a on the D scale. Changes in the ultrasonic parameters of the adhesive bond quality were found to occur along with changes in the bond quality.

1. Introduction

The main objective of the conducted research was to determine the possibility of studying the kinetics of adhesive bond formation by using a non-destructive ultrasonic method. The work carried out is both cognitive and practical. The purpose of this work stems from the demand of industrial plants (e.g., bus manufacturers) and the identified gaps in the literature. Adhesive bonds are widely used in industry. A particularly large share of adhesive bonds is observed in the production of mass transport vehicles. Vehicle manufacturers are replacing welding where possible and efficiently gluing. For example, in buses, adhesive is used not only for windshields but also for adhesive floor elements, the roof, side wall plating, directional panel covers, divider boards, carpets, etc. In passenger vehicles, gluing is used to join body elements, door skins, engine coverings, and the trunk. Bonding has numerous advantages, such as even stress distribution, good fatigue resistance, vibration and noise dampening, ensuring air- and watertightness, and lower production costs. The main research areas in the field of bonding include determining the quality of joints, the effect of surface preparation on the quality of the joint, the removability of the joint, or the bonding mechanisms from a chemical aspect.
The main limitations of adhesives are the relatively low mechanical strength, often below 30 Mpa, and the long setting time, reaching up to several days [1,2,3,4,5]. Adhesives are characterized by their varying times to full strength, which is particularly important for production planning. Cyanoacrylate adhesives achieve full strength in as little as 1 min, polyurethane adhesives for glass bonding from 1 h to 24 h (depending on the adhesive), and structural epoxy adhesives in up to 7 days. Large mass transit vehicles are designed according to the requirements of end users, which can cause changes in the bonding area. These changes can affect production cycle times. The optimization of production times is closely related to production costs and is the subject of another type of research conducted by various centers.
An important research area is the non-destructive inspection of adhesive joints, particularly ultrasonic evaluation. The ultrasonic testing of adhesive joints has covered many areas, including the properties of the joints themselves and the materials being joined [6,7,8]. The effects of surface roughness for bonding and hardness on ultrasonic measurements have also been studied [9,10]. A literature analysis showed that the attenuation of an ultrasonic wave, estimated by the decrease in the gain of successive reflection pulses of this wave, imaged on the screen of an industrial or laboratory defectoscope, is sensitive to the surface roughness at high frequencies of ultrasonic transducers. For the frequency range used in industry and the customary surface roughness, there is an acceptable level of unambiguousness in the results.
Problems related to production technology using adhesive bonding are also dealt with in the works [11,12,13], where the research included, in particular, surface preparation technology [14]. To plan the times of the production steps, it is necessary to know the setting time of adhesive bonds.
Manufacturers of adhesives provide information in their technical data sheets on the changes in the strength of the adhesive bond in time, but due to the many factors that affect the speed of the formation of adhesive joints, the data provided by manufacturers are a simplification. One of the methods that makes it possible to shorten production times is the use of hybrid joints. There are works in which the connections made by both gluing and clinching [15] as well as spot welding [16,17] technologies were studied. Studies have shown that it is more advantageous to make shaped connections immediately after the application of adhesive [18]. The research conducted in the area of adhesive bonds also includes such areas as the identification of parameters that determine the quality of adhesive joints in terms of the surface preparation, temperature, and humidity [19].
Studies in this area have included not only the formation of bonds but also their degradation [20,21,22]. Adhesive bonds must be resistant to high humidity, oil contamination, and high temperatures, which is why the phenomena that occurred during the degradation of these bonds were studied. Considering the relative percentage, the reduction in failure stress in the epoxy is higher than in the polyurethane. With immersion in oil, the reduction is 20% for the polyurethane and 30.7% for the epoxy. With immersion in water, the reduction is 54.4% for epoxy and 23% for polyurethane. The failure stress with immersion in oil is higher than in water (for polyurethane and epoxy). At the end of 128 days of immersion and considering the relative percentage, the failure of a polyurethane adhesive joint with immersion in oil is 16% higher than in water [23].
There are also studies that have been conducted to develop a methodology to provide easy-to-peel adhesive bonds by combining the induction heating method with the use of thermally expandable particles (TEPs) [24]. In the paper [24], it was shown that it is possible to unstick bonded joints using commercial adhesive systems used in the automotive industry. The weight fraction of TEPs used and the temperature were found to be the major factors in determining the debondability of the joints. The mechanical properties (tensile lap-shear strength) depend on the TEP content, decreasing with increasing the TEP content. However, the joints retain an adequate amount of strength, i.e., more than 70% of the strength (approximately 15 Mpa) for Betamate™2098 and 60% of the strength (approximately 14.5 Mpa) for the SikaForce®7888 adhesive, which can meet, depending on the application, the tensile lap-shear strength requirements of the automotive industry [24].
The research conducted also included surface preparation for bonding [25,26,27,28]. In the study [28], the mechanical performance of adhesively bonded CFRP (carbon fiber-reinforced polymers) joints prepared with an ITRO treatment was investigated under static loading. It was found that ITRO treatment significantly increases the apparent shear strength of the CFRP single-lap joint specimens. High strength comparable to that of the sanded specimen was realized for 12 ITRO treatment passes. Damages in the form of matrix cracks and associated delaminations develop in the CFRP substrates during loading of the ITRO-treated specimens, and the specimens with high strength show the predominantly substrate failure mode.
There are works related to the kinetics of adhesive bond formation, but they involved technological incidents. The work [29] included the effect of the thin-film contact oxidation process on the kinetics of joint formation and its strength. It has been proved that the peel strength at a fixed contact time is determined by the ratio of the gel-fraction in the polymer layer, cBel, which is a measure of the outcome of the oxidative crosslinking, and the content of extractable low-molecular products, elm, characterizing the effect of oxidative destruction. The effect of moisture in the air on the formation of the silicone sealant bond was also studied [30]. This study [30] has basically shown that the migration and diffusion processes that occur across a joint prepared with 1-RTV silicone sealant cause the formation of a gradient of the physical properties across the adhesive layer, from the outer to the inner regions. The consequence of this phenomenon is that properties like the modulus and hardness, as well as the adhesion strength against the substrates are not homogeneous. When the sealant is exposed to ambient air it is observed that, at a constant temperature and humidity, the thickness of the cured layer is initially proportional to the square root of time, but later, the gradient of such a plot increases. There are thus two regions of cure: an outer region and an inner one. The crosslink density is greater in the outer region. This is particularly relevant to the ongoing research, as it confirms the validity of using ultrasonic techniques to evaluate the crosslinking kinetics of adhesive joints.
This analysis showed that the study of adhesive joints is carried out in many centers, and these joints are widely used in modern industry. One of the disadvantages of adhesive joints is the varied and long bonding time. The kinetics of the crosslinking of joints has been studied mainly from technological and chemical aspects. The above analysis has shown that it is reasonable to carry out studies of the kinetics of the formation of adhesive joints using a non-destructive ultrasonic method.

2. Ultrasonic Testing of Materials

2.1. Research Plan

The planned experiment consisted of monitoring the boundary of the adhesive bond with an ultrasonic wave during its consolidation. The test set-up used ensured a constant connection between the ultrasonic transducer and the test specimen and excluded the influence of the transducer pressing force both on the bond being formed and on the results of the tests carried out, as well as possible changes in its position. This entire research work was conducted based on the test plan shown in Figure 1.

2.2. Characteristics of the Study Object

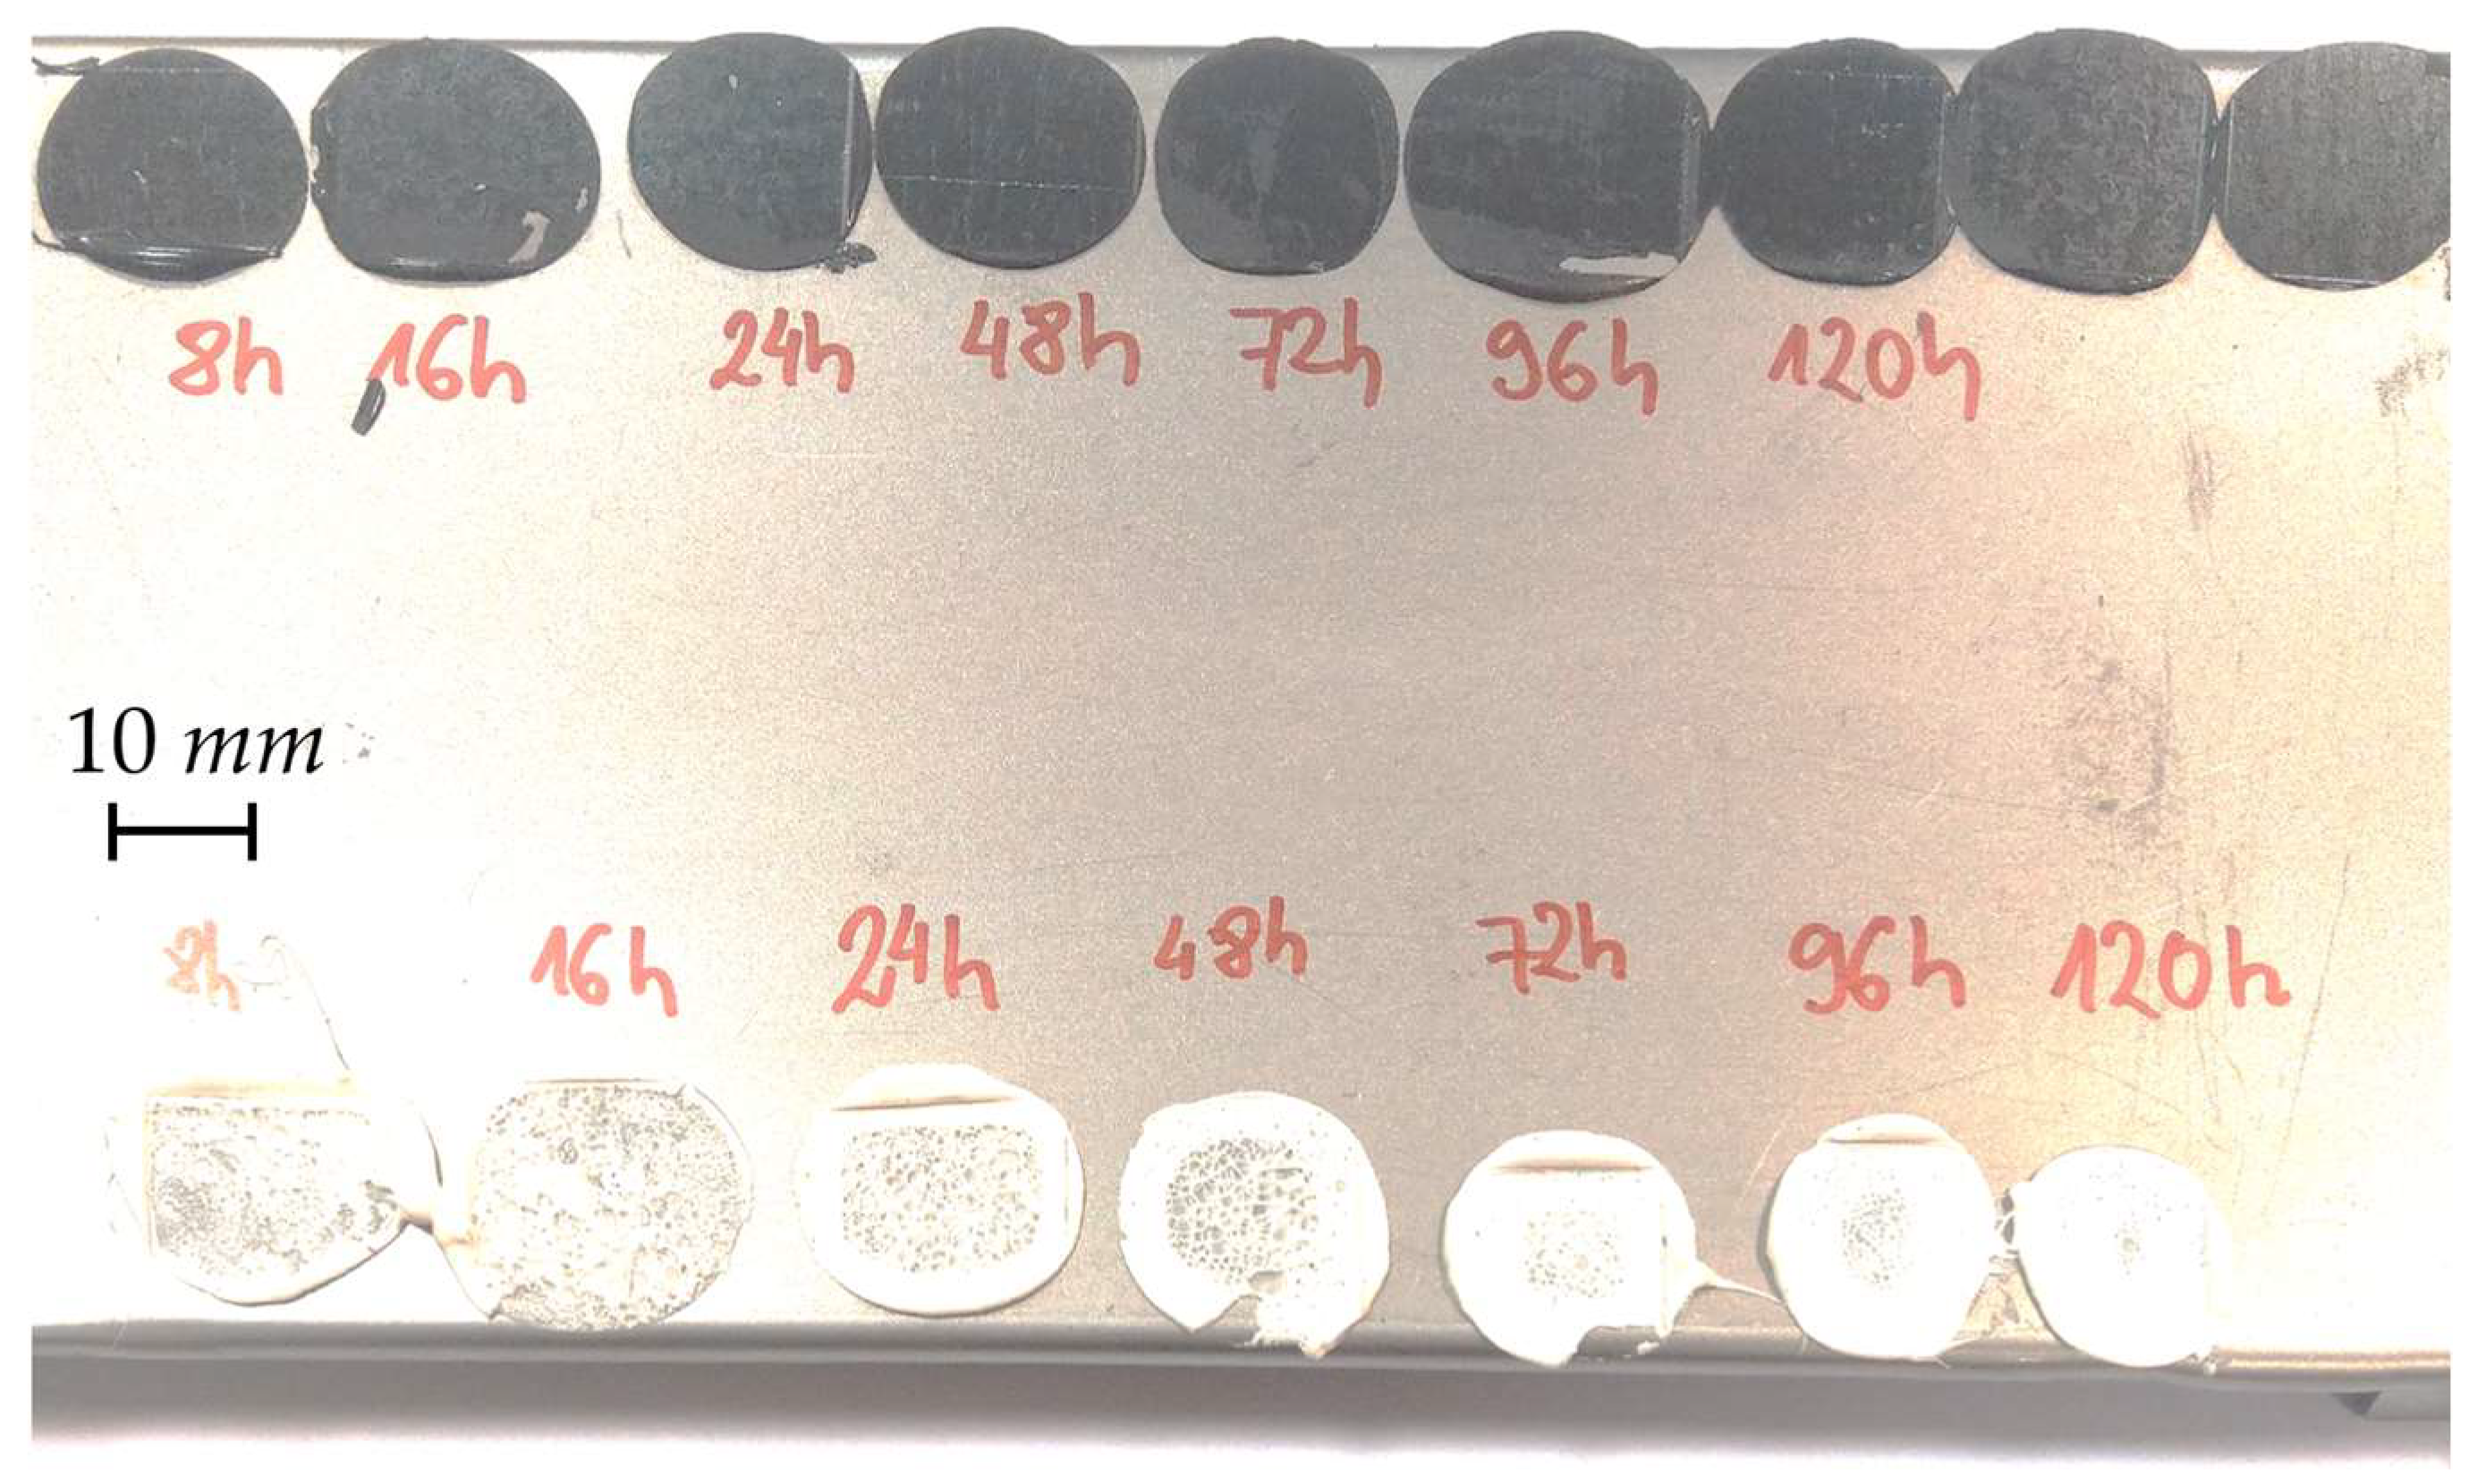
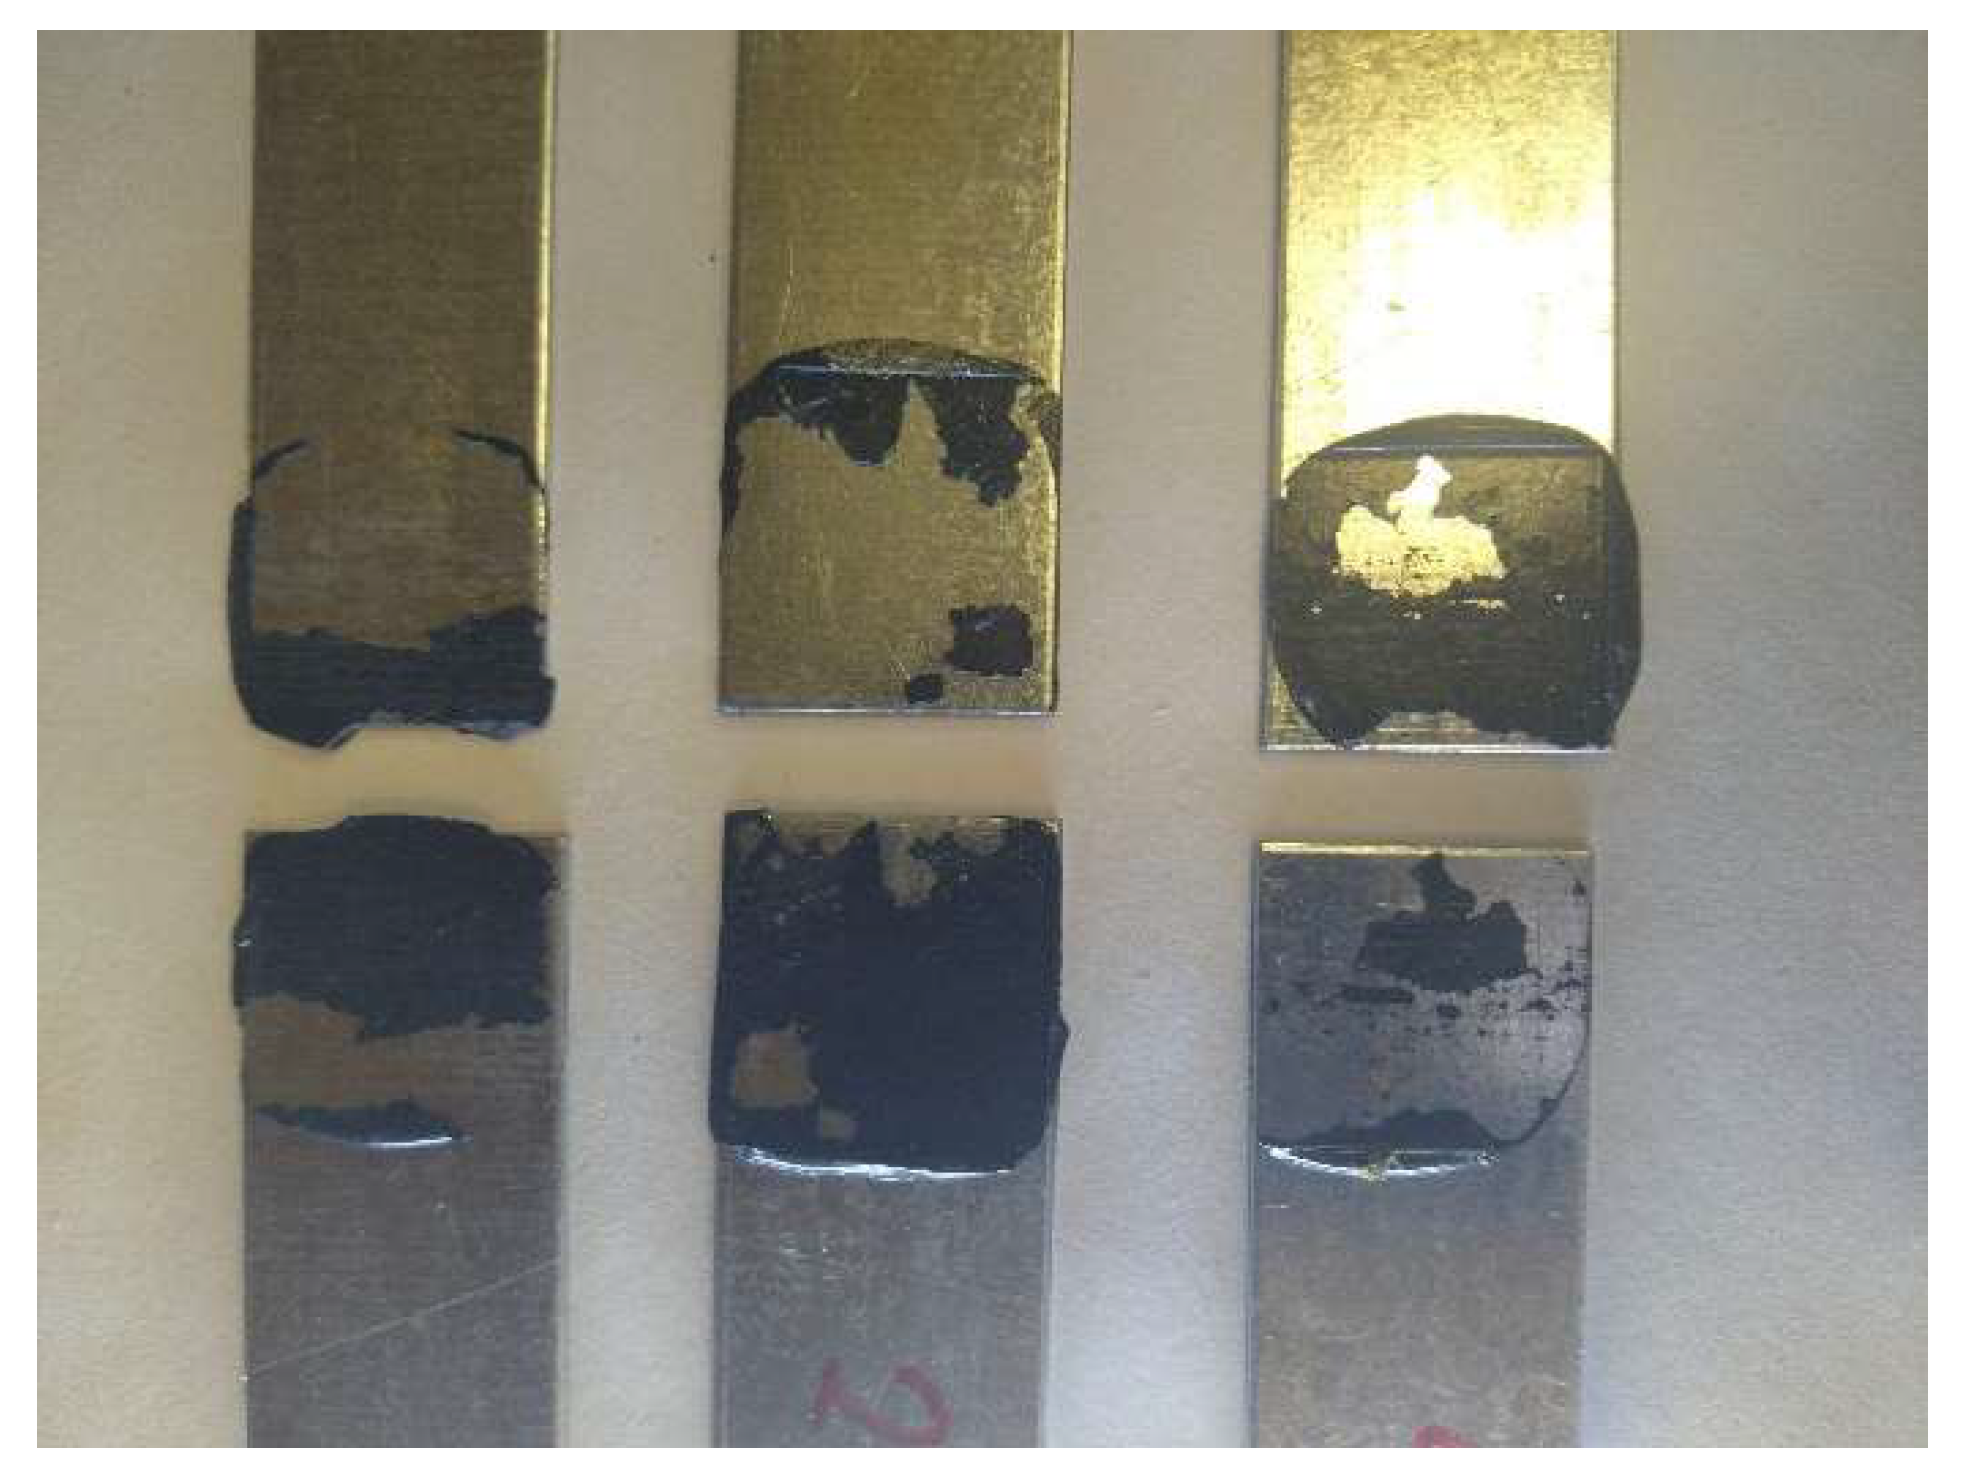
Prior to the start of the basic research, the adhesive for this study was selected. Preliminarily, the number of adhesives was limited to three different types: cyanoacrylate adhesive, polyurethane adhesive, and epoxy adhesive. These are the types of adhesives that are important in industry, including the automotive industry. Modern cyanoacrylate adhesives bond so quickly that it was not practically possible to evaluate the kinetics of the bond formation. Of the other adhesives, epoxy adhesive was chosen for testing because this adhesive crosslinked uniformly throughout the volume, which was important for ultrasonic testing. The preliminary tests showed that the speed of bonding did not depend on the size of the bond. The tests were carried out by gluing steel plates to the sheet and detaching them at every specified time interval. A view of an example specimen is shown in Figure 2, while a view of the adhesive after tearing the bonds is shown in Figure 3.
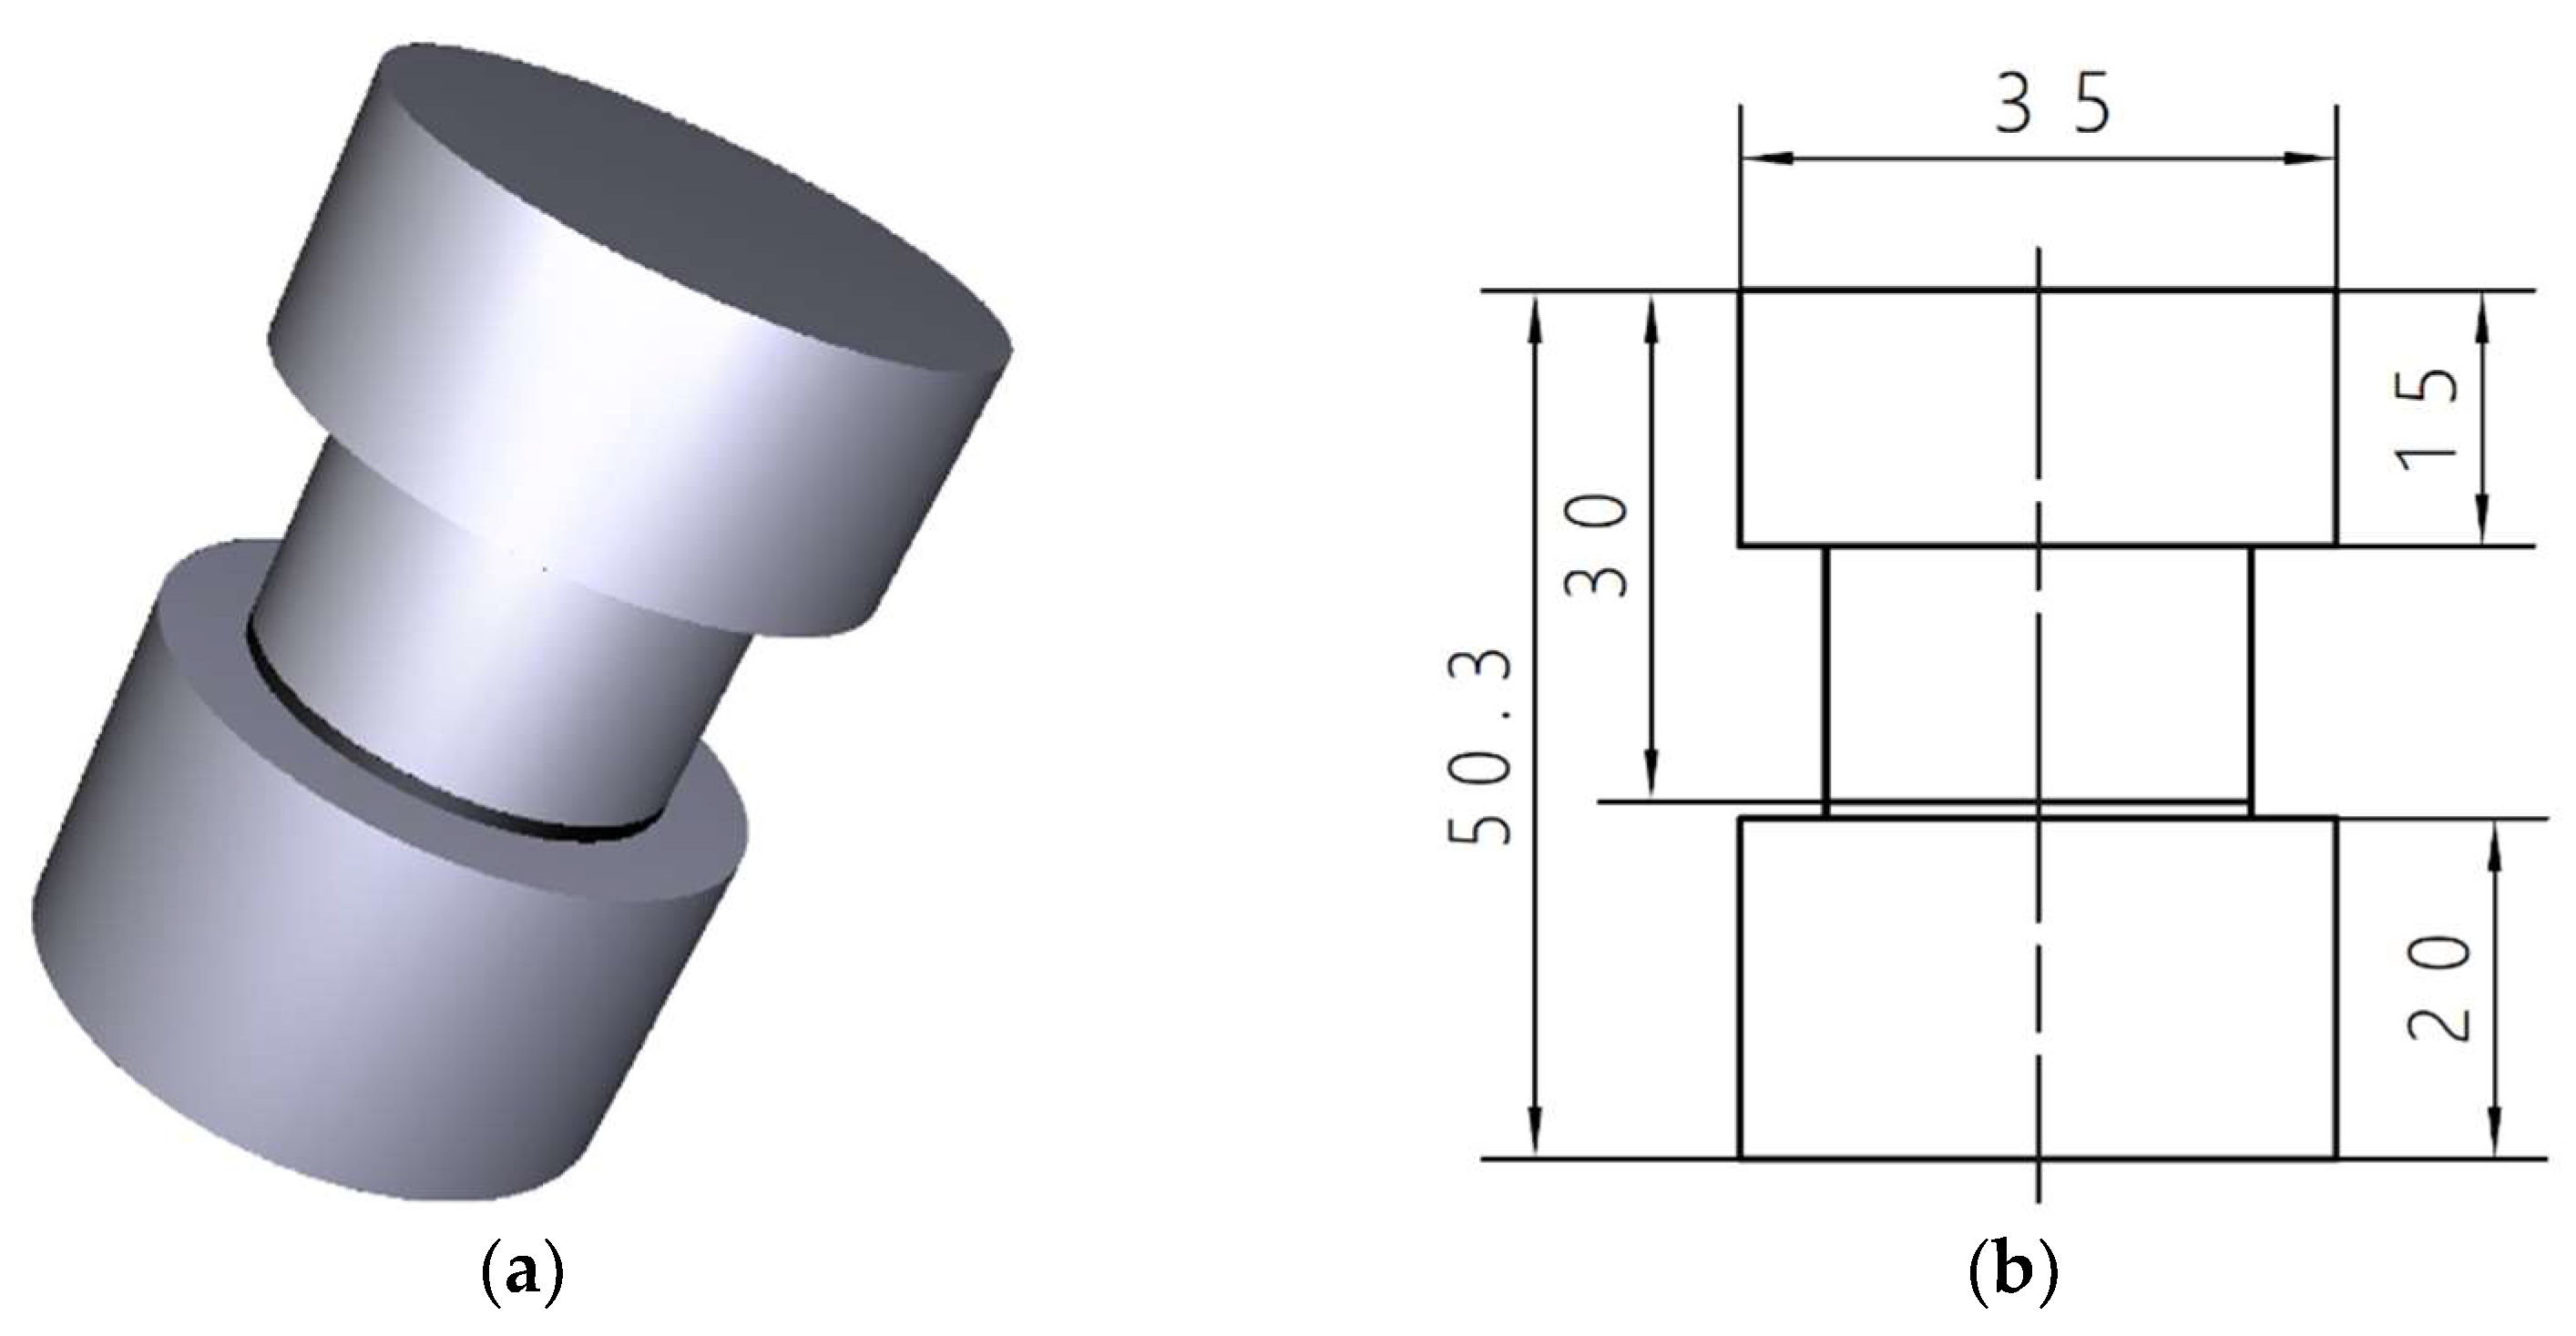
Figure 3 clearly shows that the bonding process of the polyurethane adhesive (white color) occurs slowly and starts toward the outside of the joint. For the epoxy adhesive DP490 3M, the bonding of the adhesive occurred throughout. Joints were also made for the industrial cyanoacrylate adhesive. However, it was noted that the bonding of the adhesive occurs unusually, and it is impossible to assess the kinetics of its formation. For this reason, epoxy adhesive was chosen for further research. This is a high-strength adhesive that, according to the manufacturer, achieves full strength in 7 days. Three different adhesive joints were used in this study. We used glued strips of sheet metal made of DC01 steel (Figure 4) and bonded steel discs made of 1.0503 steel (Figure 5). For the steel sheet, the surface to be bonded was only degreased, and its roughness was Ra-0.2 µm. For the steel discs, the surface was sanded and degreased, and its roughness was Ra-0.2 µm. For the Rayleigh wave test, the samples shown in Figure 6 were used. An additional sample was also made to test the hardness of the adhesive.

2.3. Ultrasonic Testing

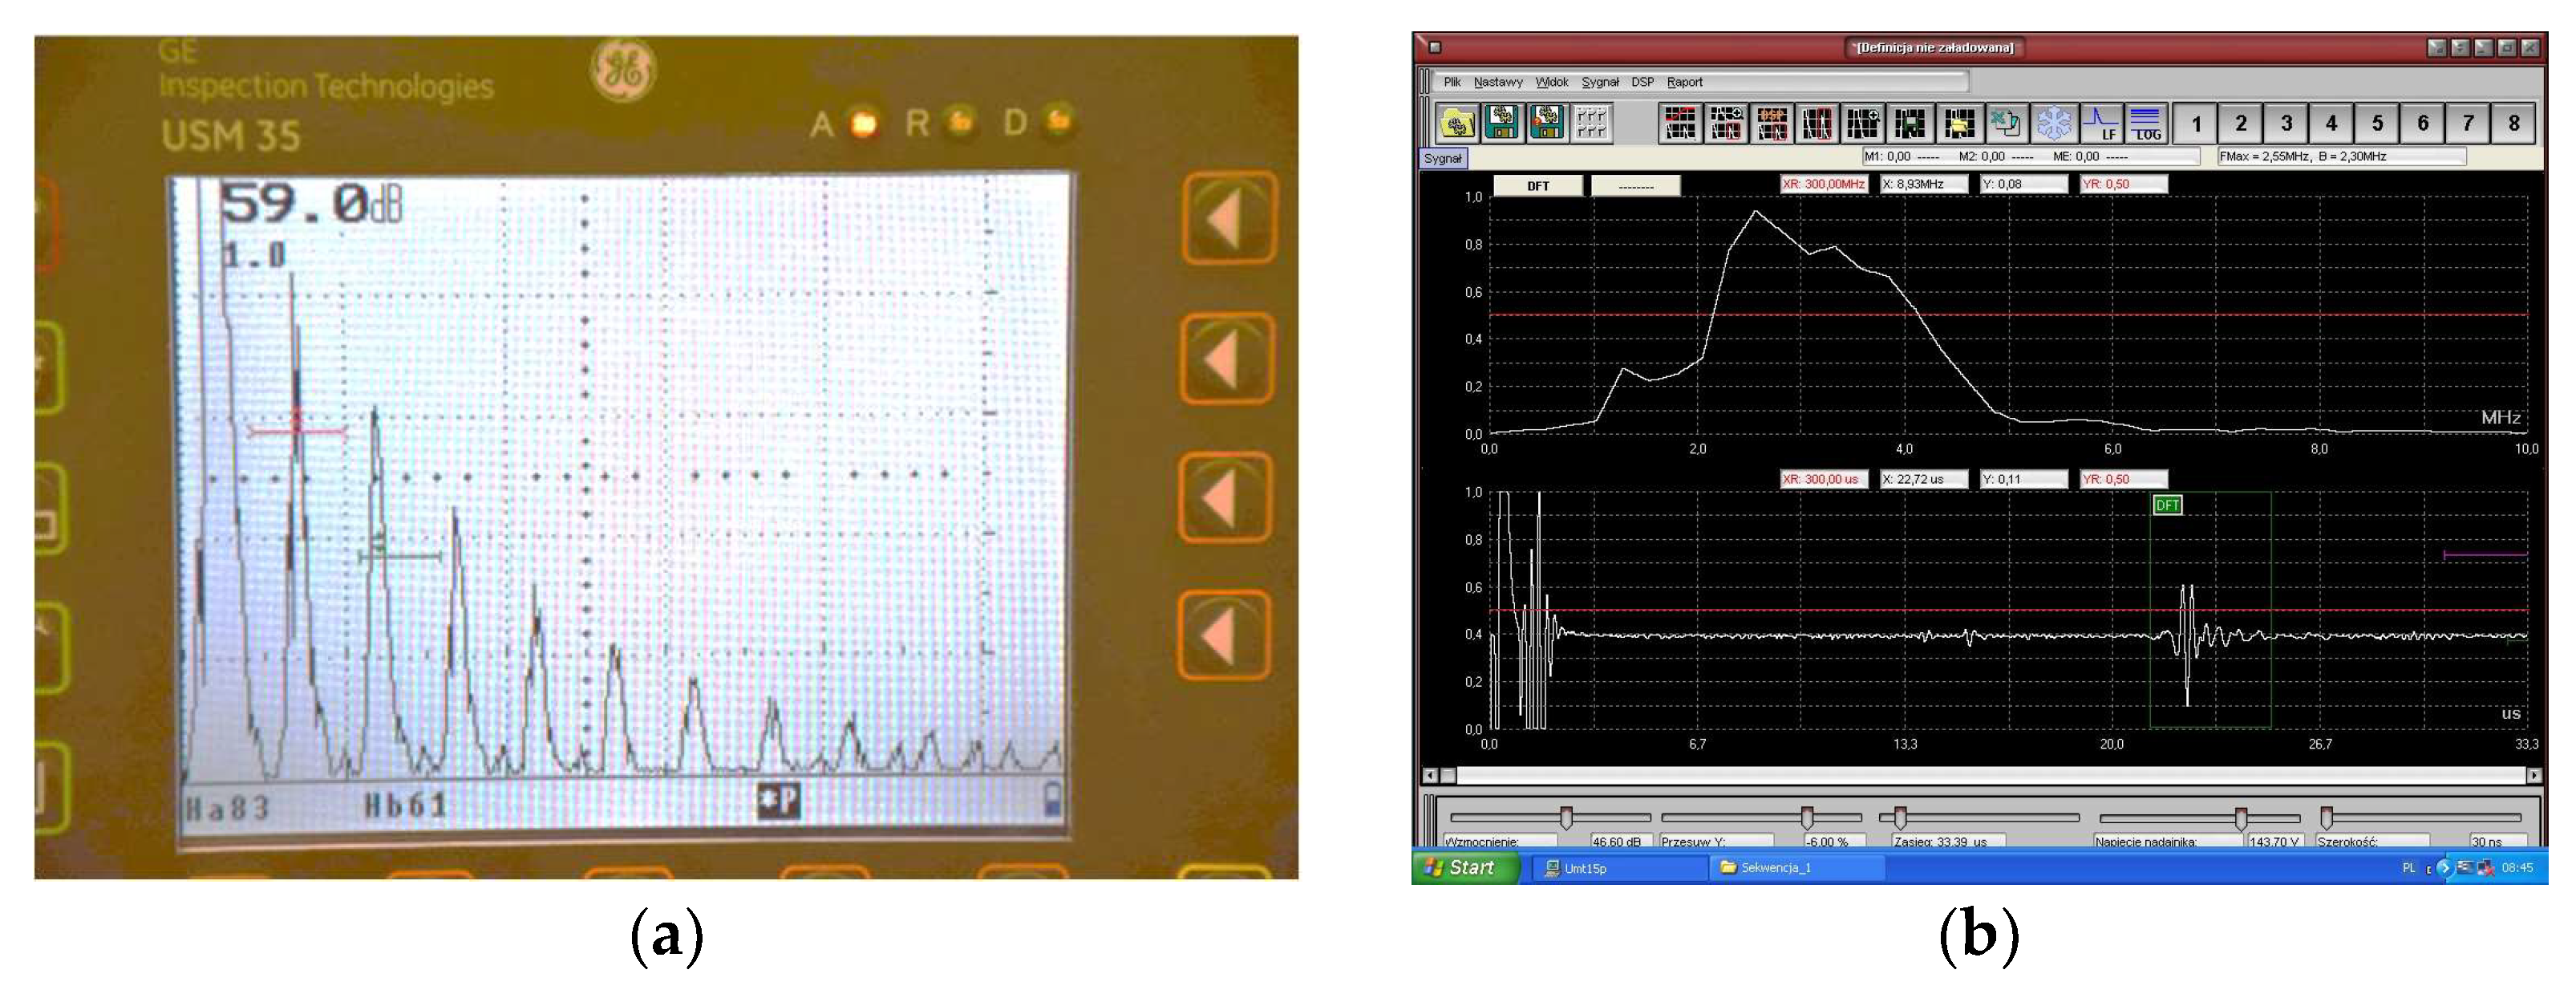
The research conducted was both laboratory and industrial in nature. Accordingly, two digital ultrasonic devices were used in the research: UMT 15 laboratory defectoscope (Ultra—Radom, Poland) and USM 35XS GE (General Electric Company—Boston, MA, USA). The signal waveforms in the time domain were analyzed as well (Figure 7). Three different ultrasonic probes were used in this study, the characteristics of which are shown in Table 1. The normal longitudinal wave transducers were KD1-6 (Karl Deutsch—Wuppertal, Germany) and GE20 (General Electric Company—Boston, MA, USA), and the transducer S6WB10WM by Karl Deutsch was used to generate the surface Rayleigh wave.
An ultrasonic probe with a frequency of 2.4 MHz was used for the examinations of the bond between the steel discs, a probe with a frequency of 20 MHz was used to investigate the connection between two strips of sheet metal with a thickness of 0.8 mm, and probes with a frequency of 10 MHz were used for testing the adhesive applied to the sheet metal. The ultrasonic measurement systems are shown in Figure 8. The condition of the bonds was continuously monitored, with the results recorded for every specified interval. The initial measurement intervals were determined by the separate preliminary tests using the sample in Figure 3.
During this study, the pulse height on the screen of the defectoscope (for an ultrasonic surface Rayleigh wave) was recorded, and the decrease in the decibel gain of the selected pulses was determined in the case of an ultrasonic longitudinal wave, introduced normally (perpendicularly) into the tested bond area. Examples of the images of the ultrasonic wave pulses recorded on the digital defectoscopes screens (USM 35SX and UMT 15) are shown in Figure 8.

2.4. Mechanical Testing

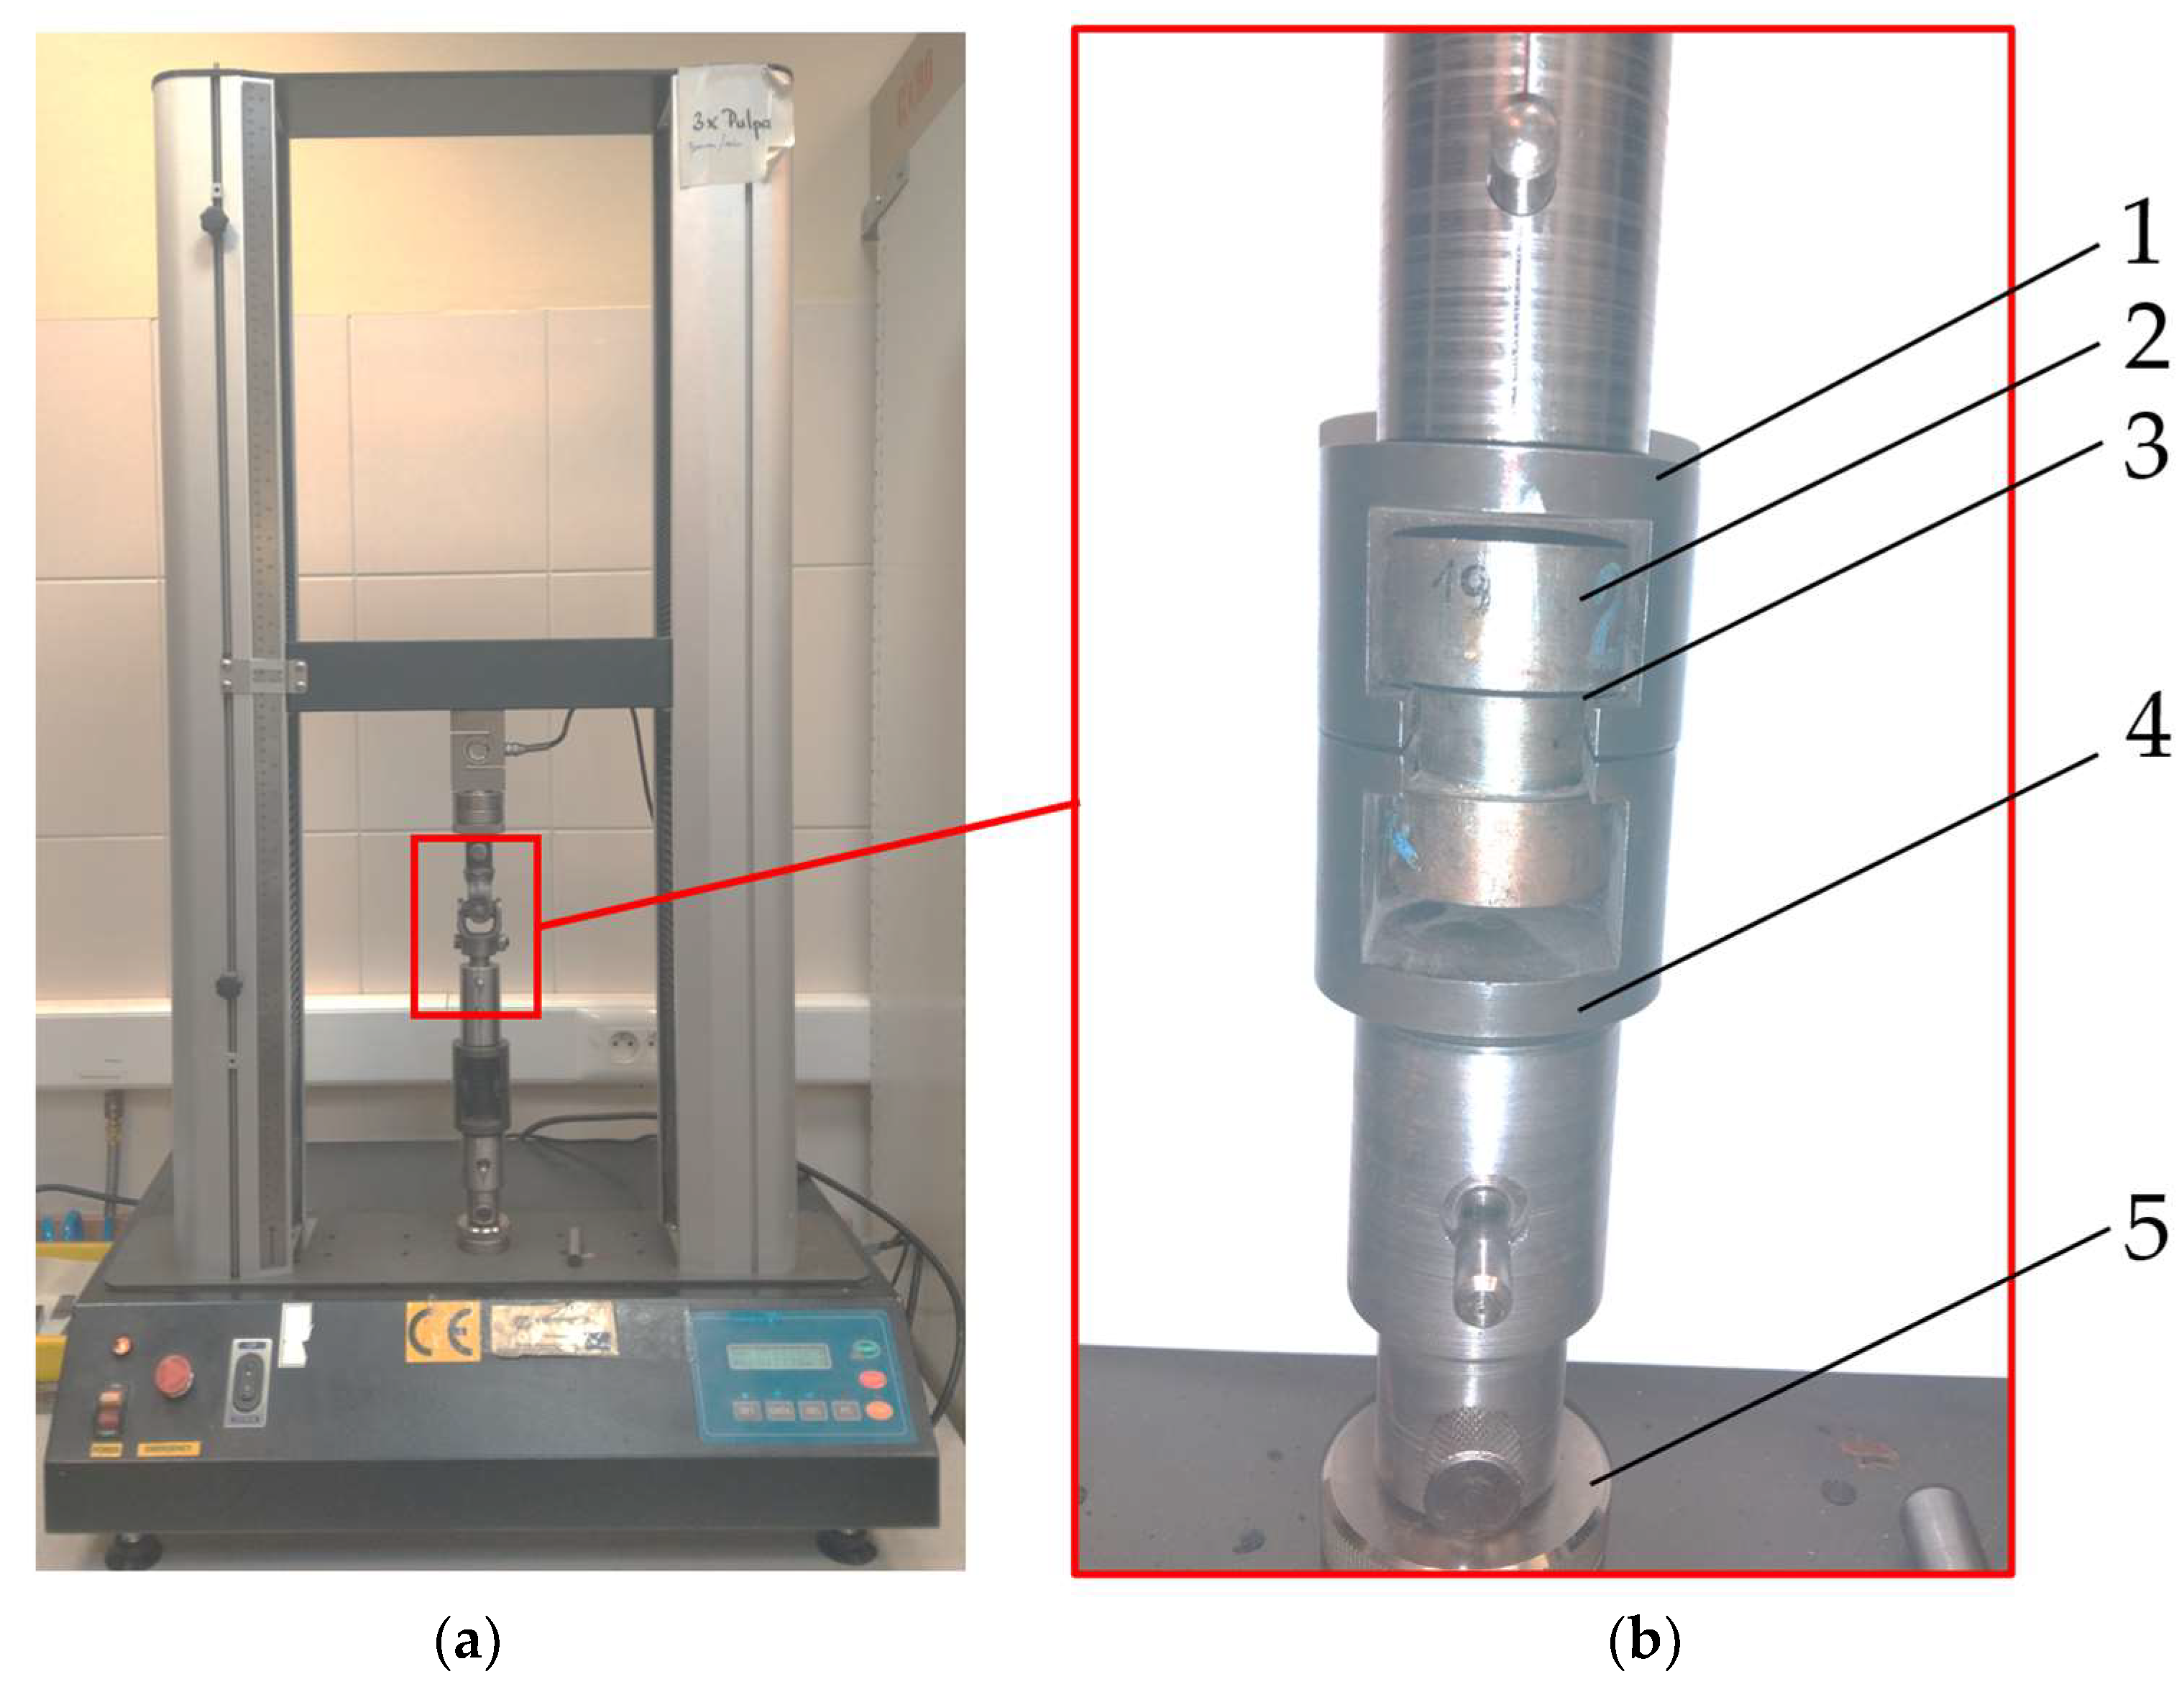
The mechanical testing included examinations of the mechanical strength of the previously non-destructively tested adhesive bonds. The shear strength was determined for the bonded sheet strips and the tensile strength for the bonded discs. All the tests were conducted on the Cometech B1/E testing machine (Cometech Testing Machines Co., Taichung, Taiwan). A view of the machine and an example of the specimen mounted in the lugs of this machine are shown in Figure 9.
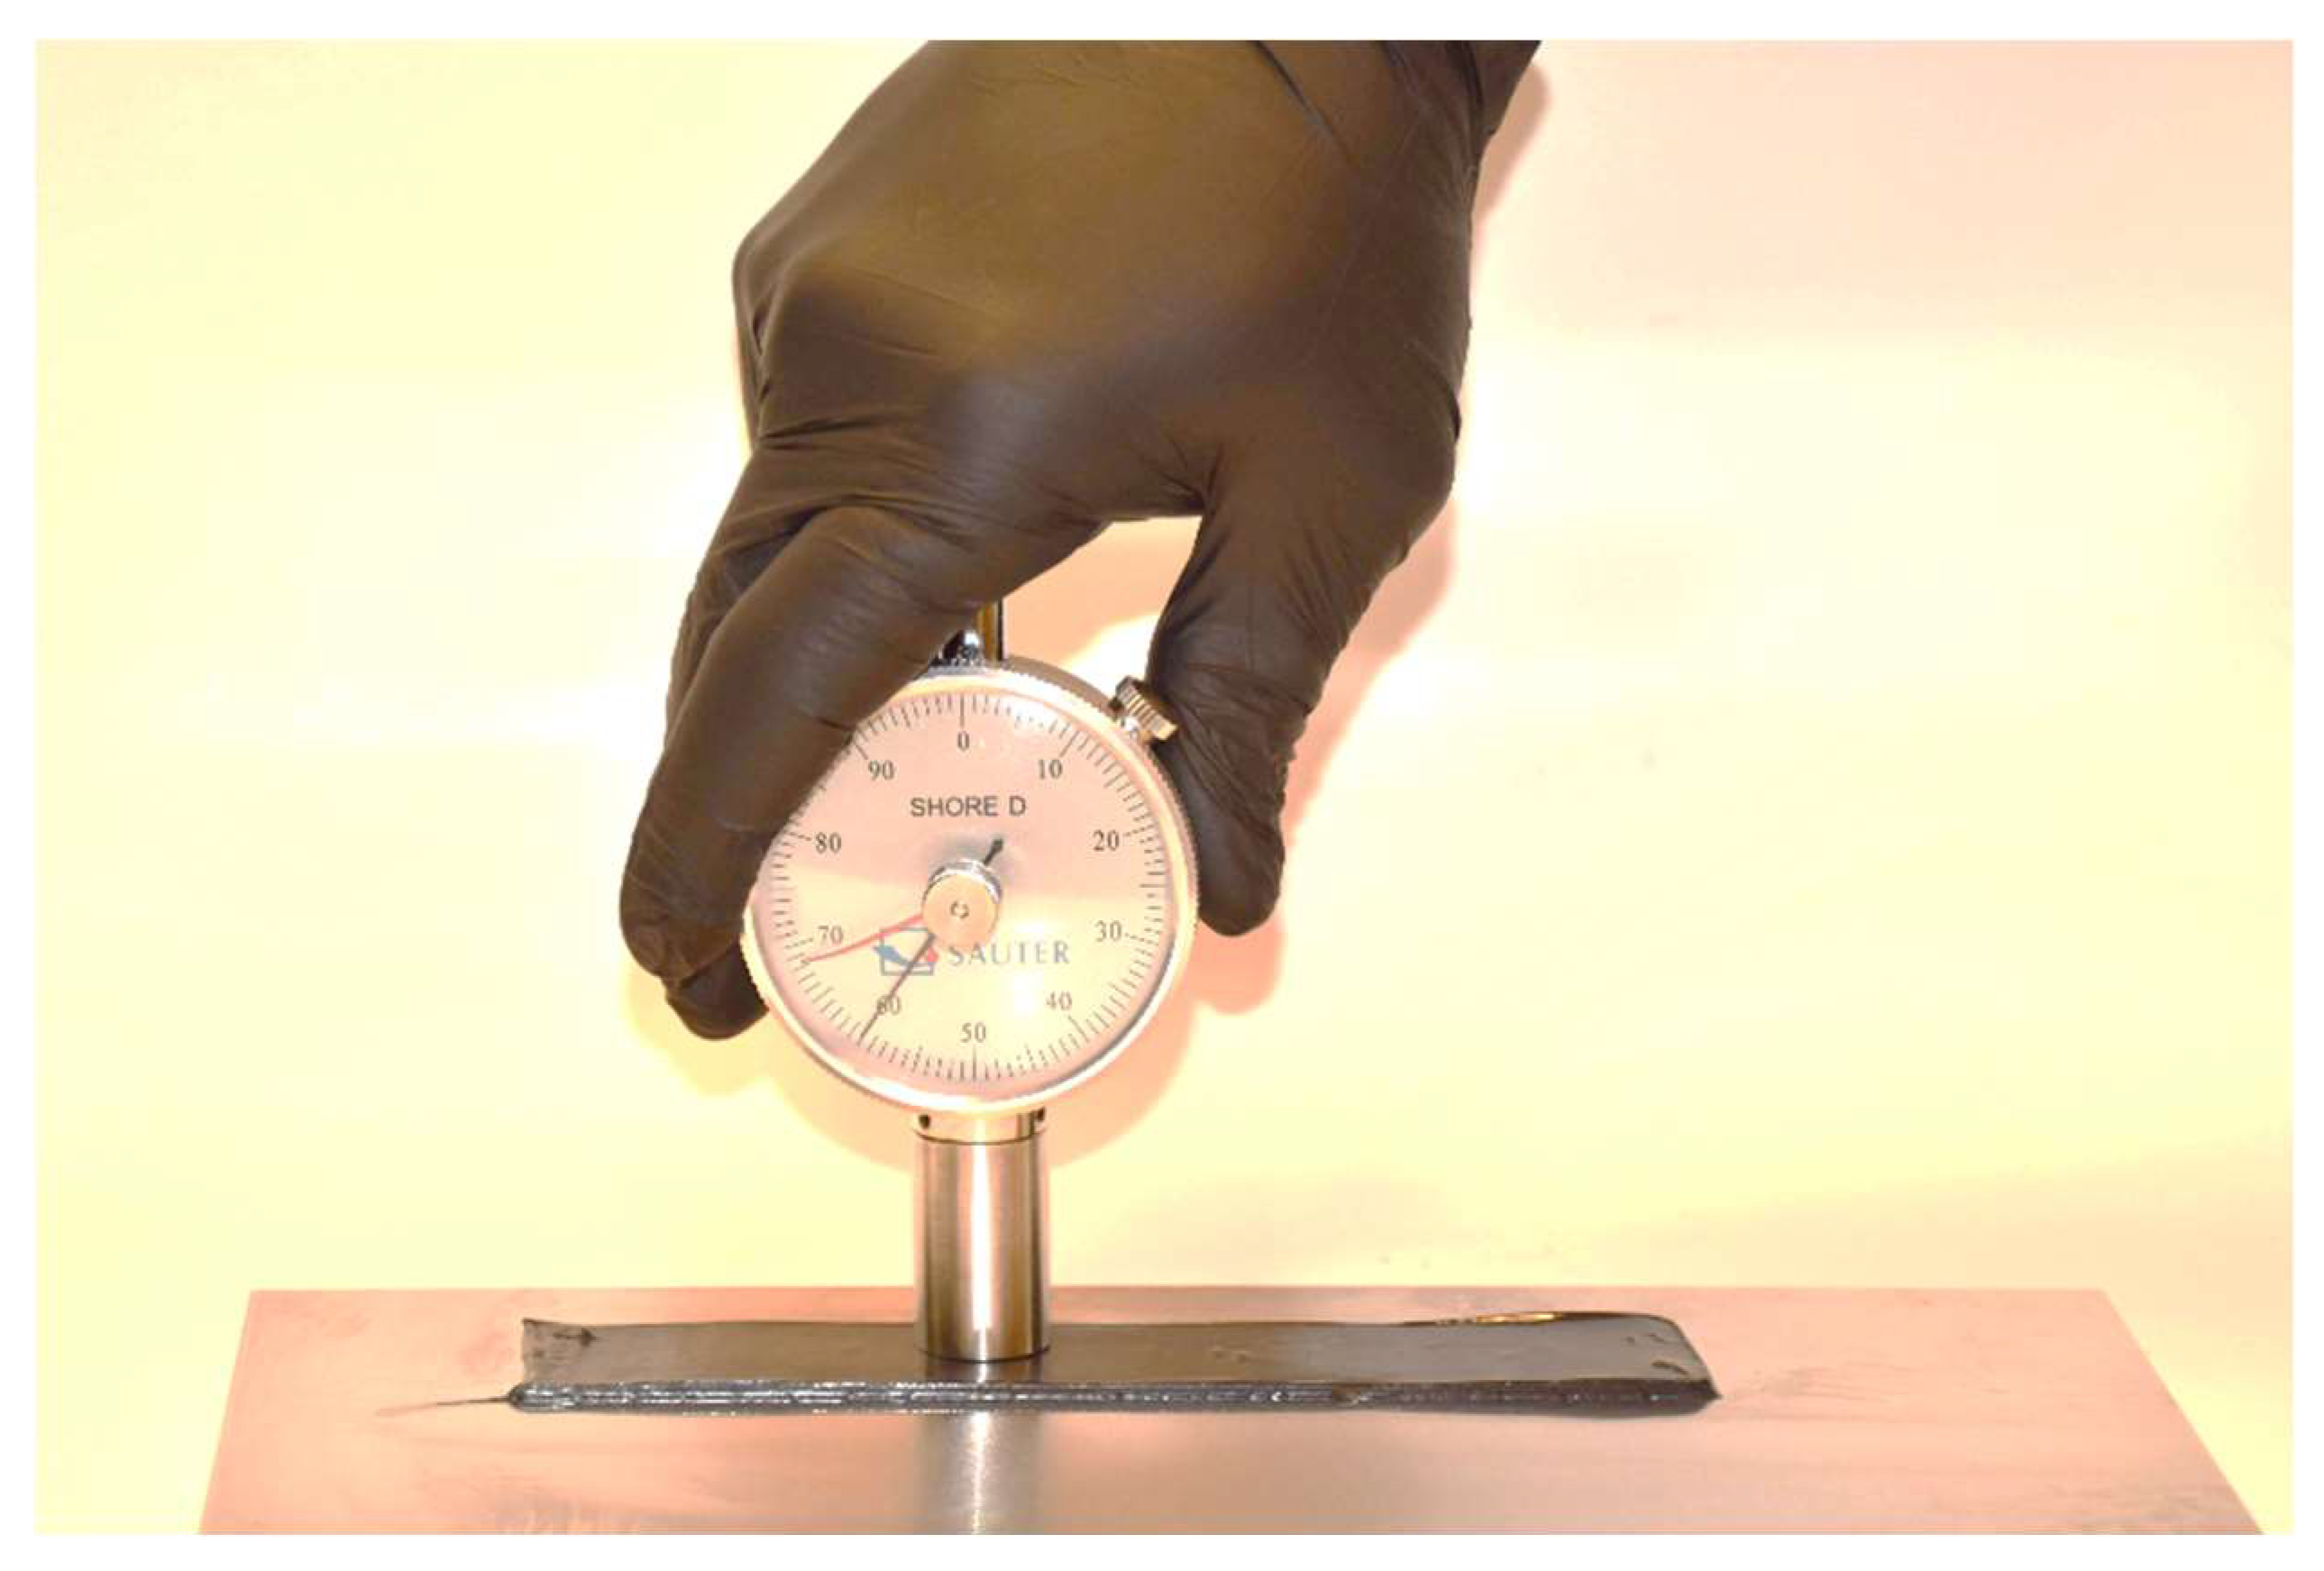
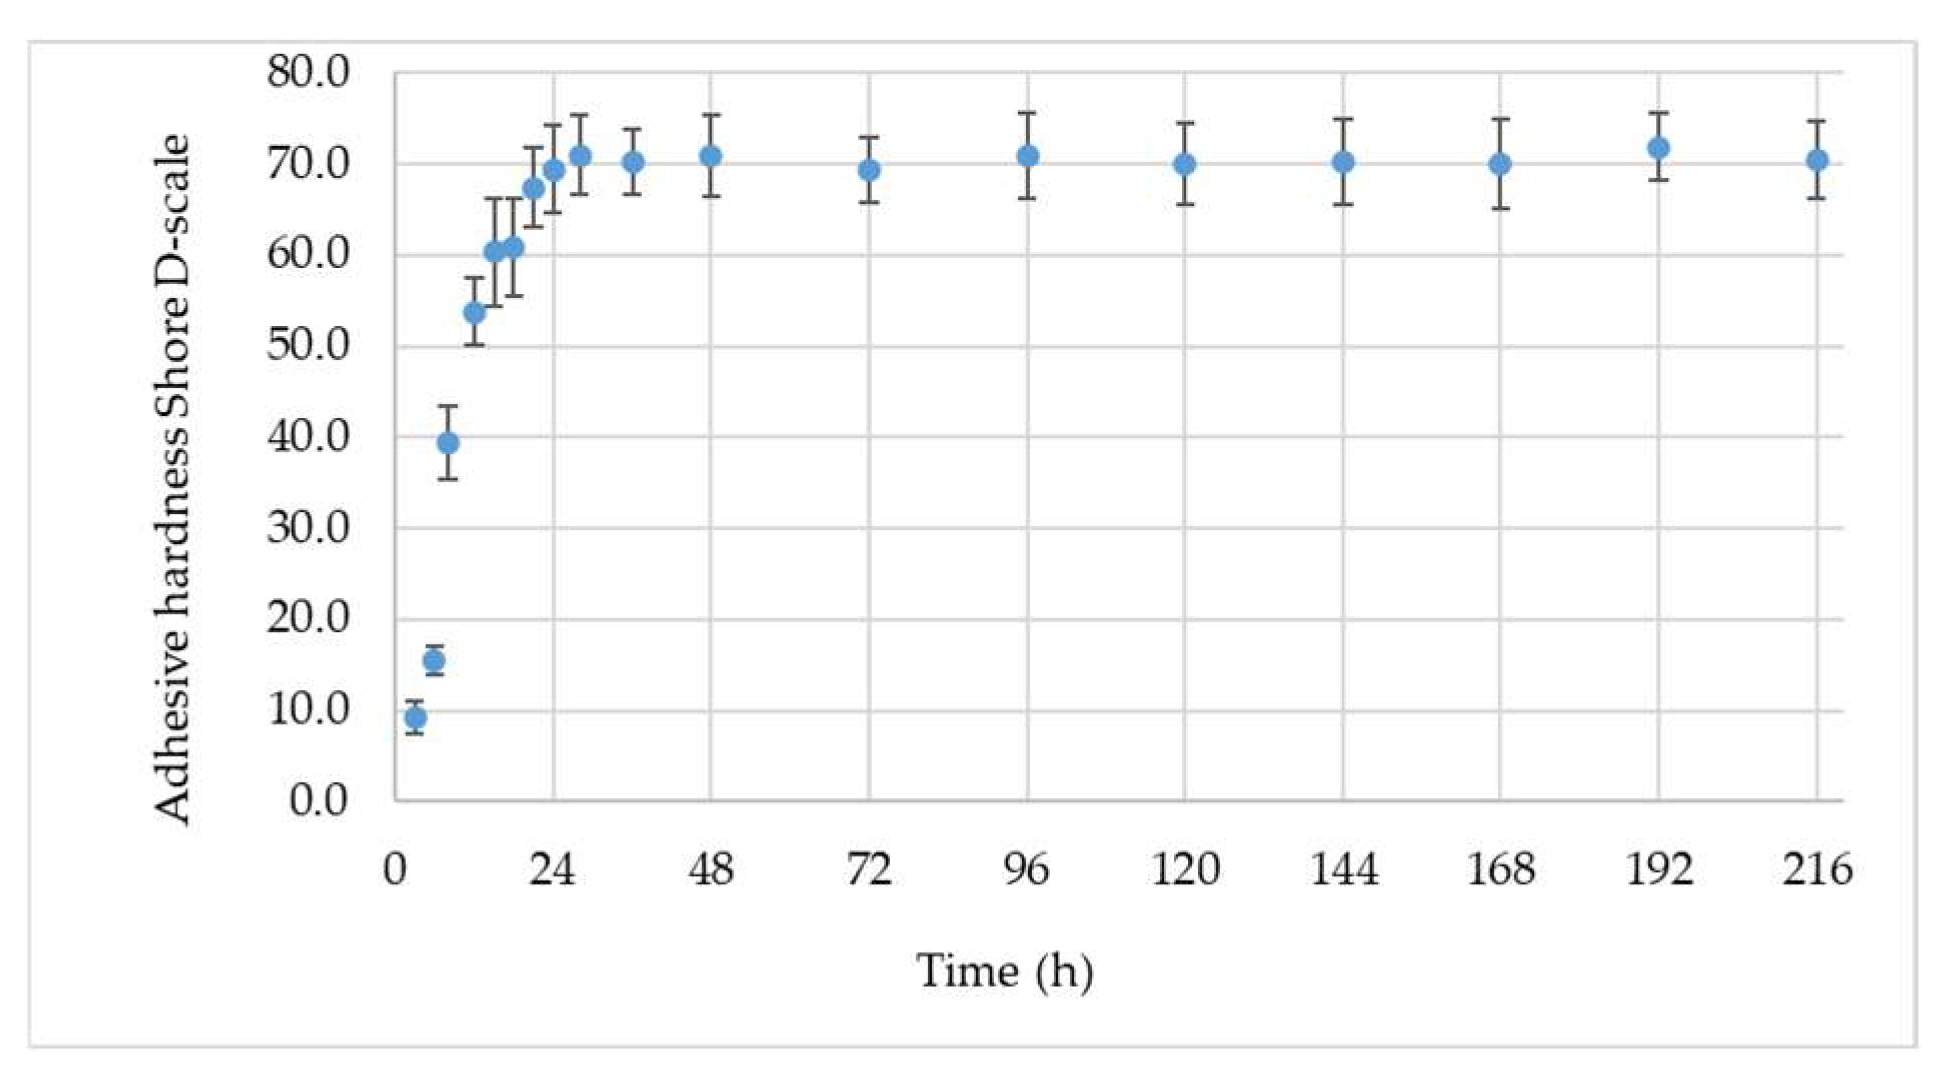
As part of this study, the measurements of the changes in the hardness of the adhesive with time were taken as planned. The tests were conducted using a Shore D-scale hardness tester. The tests were conducted every 3 h, from the time when the measurement due to the viscosity of the adhesive was possible. After the hardness stabilized, the measurements were conducted after 4 h, 12 h, and then every 24 h up to 216 h. The tests were conducted on the adhesive applied to the sheet metal, with different thicknesses from the interval (1–5) mm. Tests were also carried out on the adhesive of 0.3 to 1 mm thickness, but the measurements were started only after the hardness of the adhesive reached such a high enough level that the measuring cone did not penetrate the entire thickness of the adhesive. A view from the adhesive hardness tests on an example specimen is shown in Figure 10.

3. Results

3.1. Ultrasound Results

The ultrasonic testing was divided into stages. In each stage, a different ultrasonic probe was used for the generation of the required ultrasonic wave. In the tests when using an ultrasonic Rayleigh surface wave, the pulse height on the defectoscope screen was taken as the ultrasonic measure of the bond quality. In the tests when a longitudinal wave was used, the decibel drop in the height of the first two pulses on the screen of the ultrasonic defectoscope was adopted as the ultrasonic measure of the bond quality. Measurements were made in the first period after 4, 8, 12, 16, and 24 h and then every 24 h until 216 h. For all the test series, 10 sets of samples were made each. All the measurements were repeated ten times.
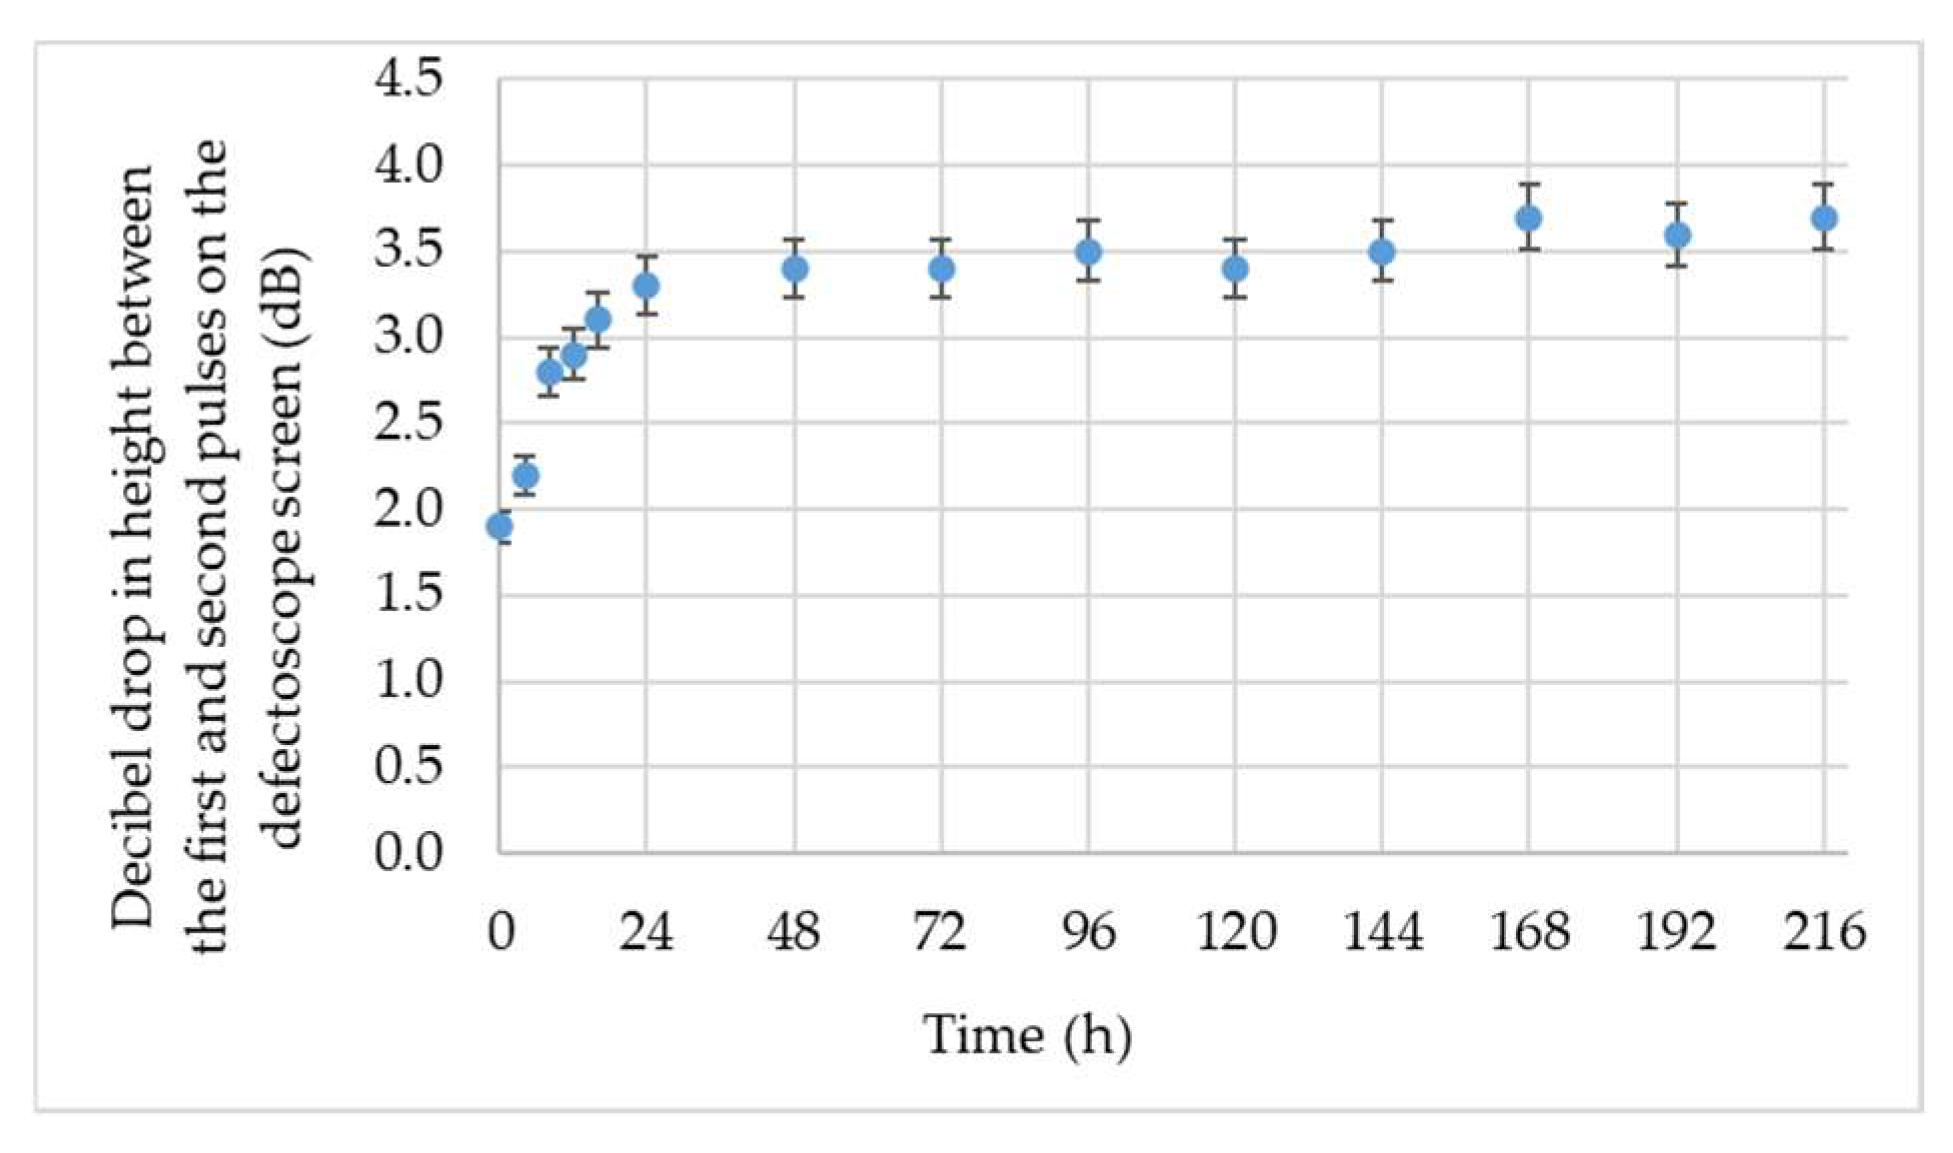
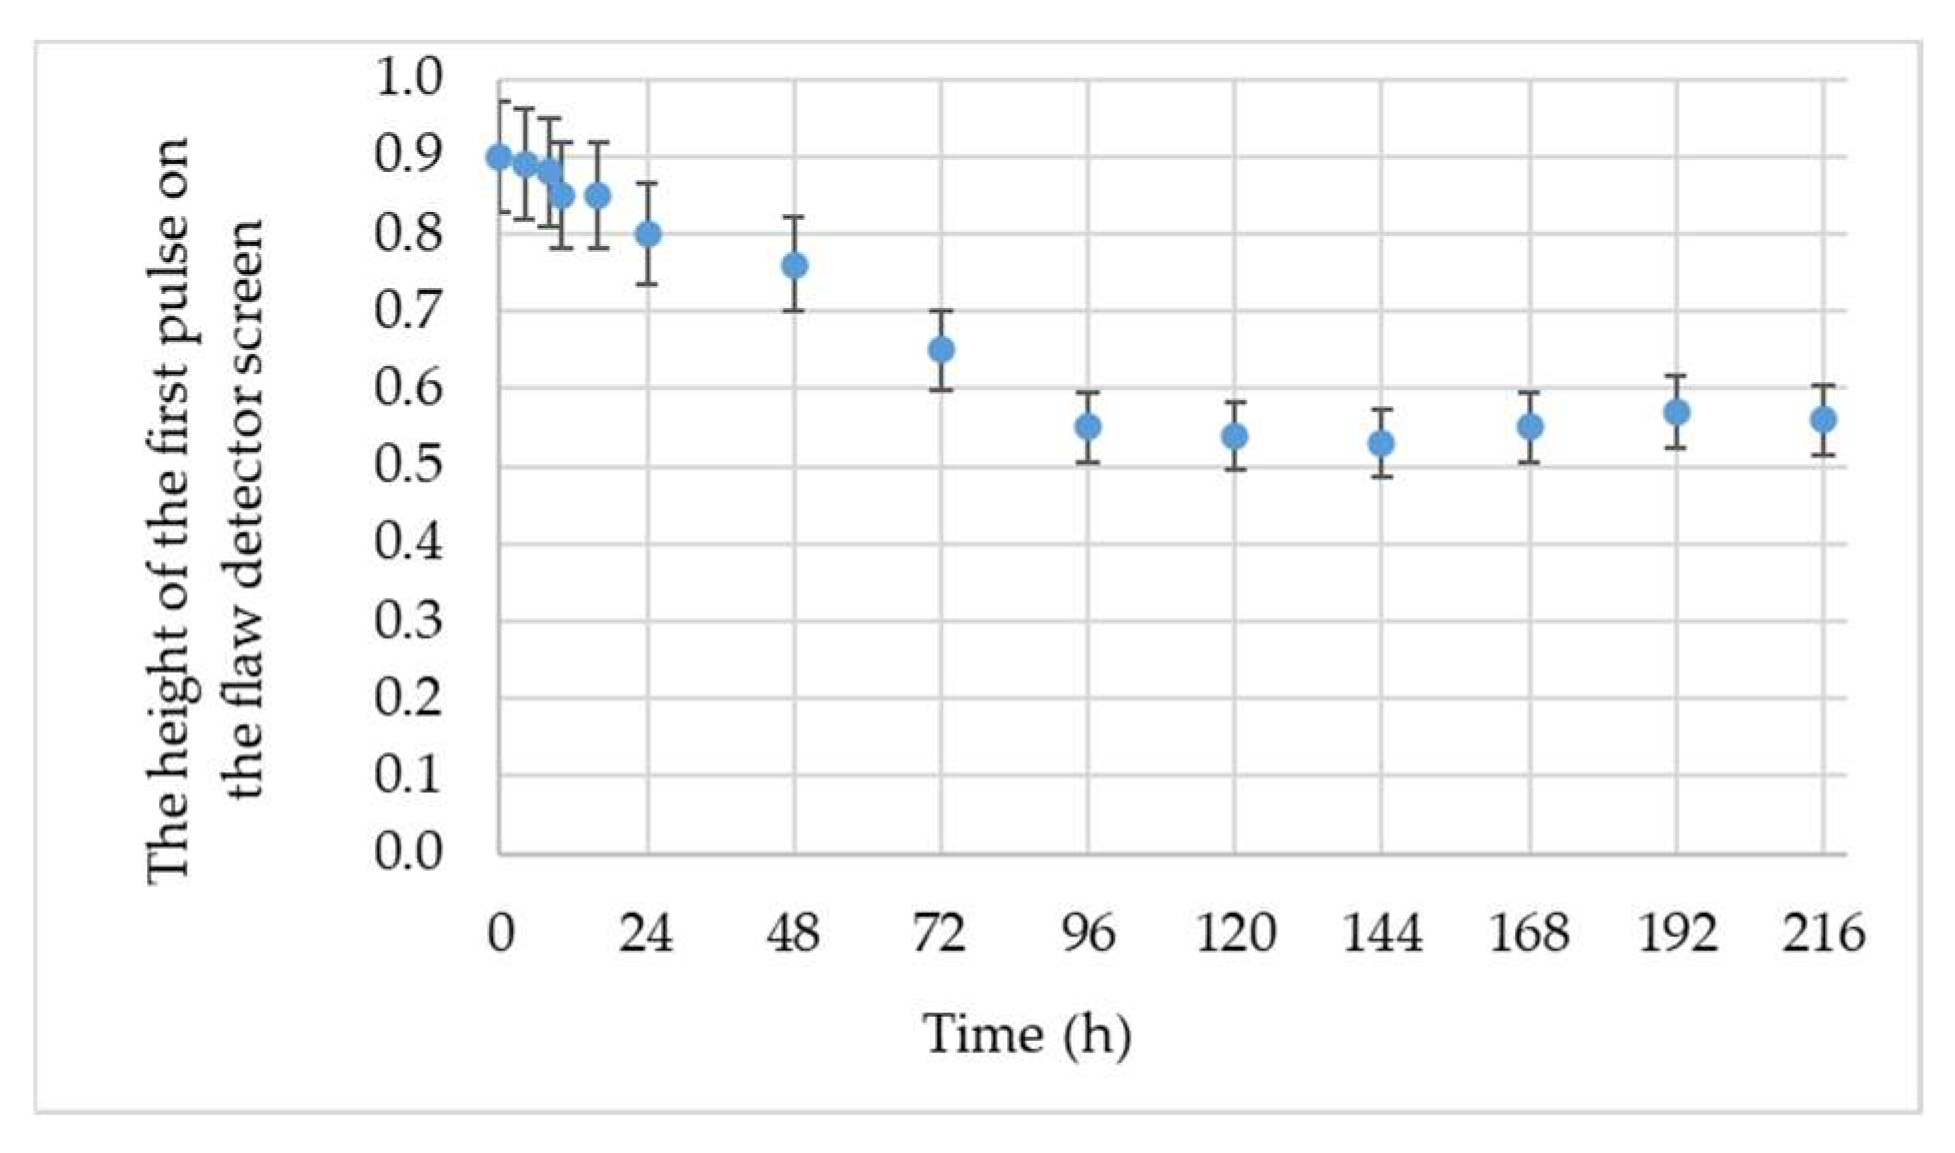
The tests conducted on the steel discs are shown in Figure 11, on the steel plates in Figure 12, and the tests using the surface wave in Figure 13.
When the bonds were tested using a longitudinal ultrasonic wave, regardless of the frequency, it was found that significant changes in the ultrasonic parameter values occur for the first 24 h after the bond is made. In the case of the test using the surface wave, changes in the ultrasonic measure were found to occur for 96 h after the application of the adhesive. This may mean that the surface wave allows for a better evaluation of the quality of the joint, which may be due to the evaluation of virtually the entire adhesive surface.

3.2. Mechanical Test Results

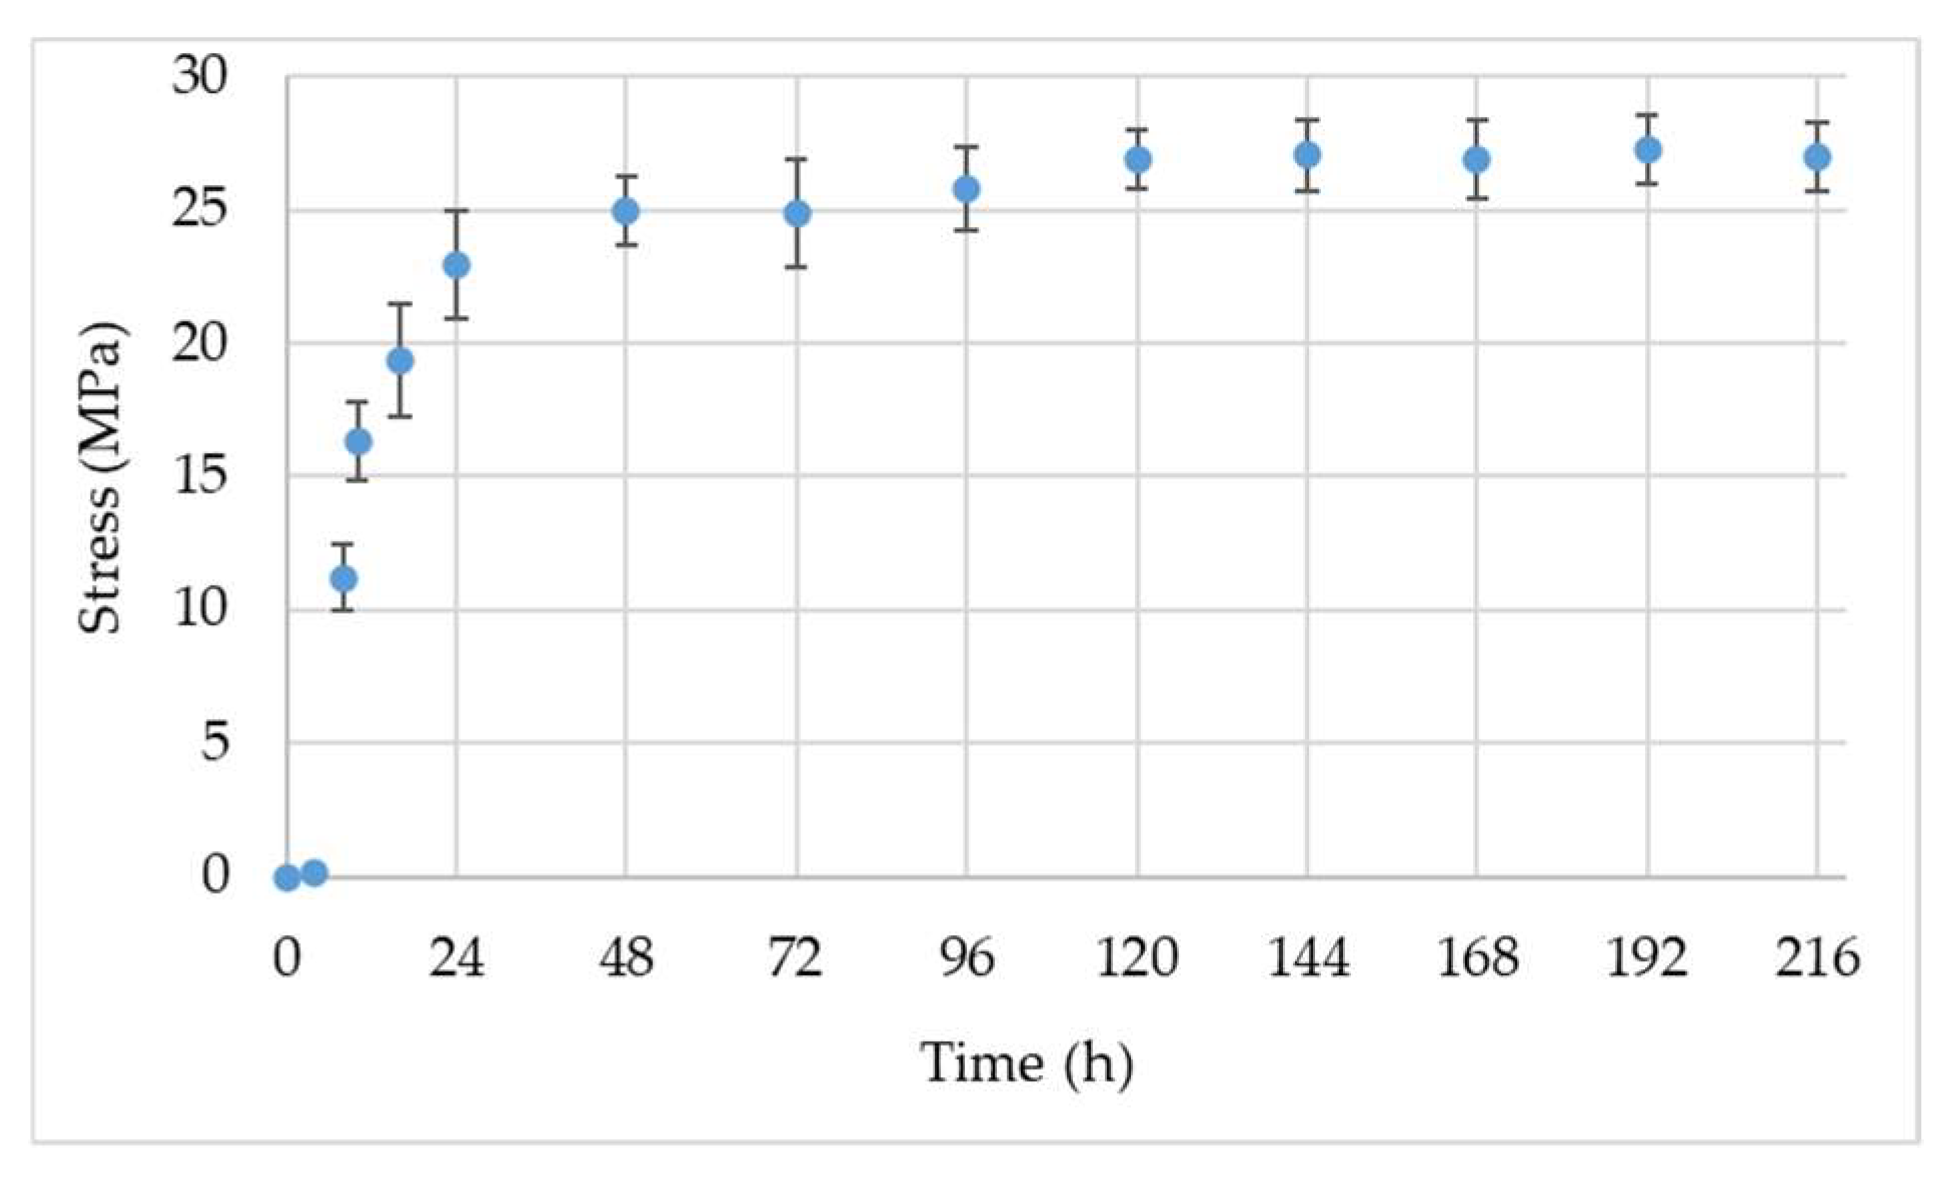
The mechanical testing was divided into two areas. The first studied the change in the mechanical strength over time after the bond was made. The second area studied the change in the adhesive hardness over time after the bond was made. The tests were conducted for steel discs and sheet strips. The results of the mechanical tests are shown in Figure 14 (steel discs) and Figure 15 (steel sheet strips). In the case of the steel discs, the failure of the bonds was of an adhesive nature, with an indication of decohesion (Figure 16), while in the case of the steel sheet strip bonds, the failure was predominantly of an adhesive nature.
It was noted that the bond strength for the connected steel discs was higher for tension than for shear, i.e., for the sheet metal strips. This is probably due to the fact that the bonded sheet strips were coated with zinc at the factory, which reduces the strength of such an adhesive connection. Also, the adhesive nature of the damage, in the case of the sheet strip bonds, confirms the effect of zinc on the lower strength of these bonds (Figure 17).

Results of the Adhesive Hardness Test

Examining the changes in the hardness of the adhesive, it was noted that they occurred only during the first 24 h after the adhesive was applied. There were no differences in the hardness depending on the thickness of the adhesive, confirming that crosslinking of the joint occurs virtually throughout the volume (Figure 18).

4. Discussion

Analyzing the results obtained, it can be said that already preliminary tests indicate the differentiated nature of the failure of the adhesive bond by deadhesion or decohesion (Figure 2) and the time-dependent contributions of these forms of failure to the detachment of the adhesive from the substrate. These regularities are confirmed in the basic, mechanical examinations, normal tear tests of bonded disc specimens (Figure 15), and specimens in the form of steel strips, tangentially torn (Figure 17), on which areas of deadhesion and decohesion of the adhesive layer in different proportions are visible.
The results of the non-destructive ultrasonic testing, represented by the courses over time, selected ultrasonic parameters on the screen of the ultrasonic apparatus (Figure 8a), in the form of a decibel decrease in gain between the first and second pulses of the longitudinal ultrasonic wave (Figure 11), which indicate the dependence of these parameters on the time of curing of the adhesive, both in the case of steel disc specimens and bonded steel strips (Figure 12). The nature of these courses is similar, although it promises different values of the ultrasonic parameters that are characteristic for the disc specimens (Figure 11) and strips of the steel sheet specimens (Figure 12). They have a form described by an increasing curve during the crosslinking of the adhesive, with a tendency to stabilize the values after the formation of the adhesive bond. The course at the same measurement time of the ultrasonic surface wave parameter, generated by the probe (Figure 7b), in the form of amplification of the first pulse of this wave on the screen of the ultrasonic apparatus (Figure 8b), deviates from the character of the course of the ultrasonic longitudinal wave parameter, both in terms of the gradual decrease in value, which is understandable, and in terms of the beginning of the stabilization time of the value of this parameter, which significantly differs from this time, in the case of the longitudinal wave for different samples.
Mechanical verification of the strength of adhesive bonds by means of tearing tests on a testing machine (Figure 9), both in the case of tearing glued disc specimens (Figure 5) with a normal force (Figure 14) and tearing glued steel strips (Figure 4) with a tangential force (Figure 16), confirms the nature of the kinetics of the constitution of the epoxy adhesive bond, obtained by means of an ultrasonic longitudinal wave, introduced normally (perpendicularly) to the adhesive surface with an adequate ultrasonic probe (Figure 7a,c). Also, the nature of the distribution of the hardness of the adhesive layer (Figure 18), applied to the steel strip (Figure 10) during the crosslinking of this adhesive, coincides with the nature of the kinetics of the formation of the adhesive joint, obtained both by using the non-destructive method—by an ultrasonic longitudinal wave (Figure 11 and Figure 12)—and by using the destructive method—by tearing this bond (Figure 16).
A two-component epoxy adhesive was tested, and it was noted that the mechanical strength changed with time. For shear, the greatest changes in the mechanical strength occurred during the first 24 h after the bond was made. The strength increased from 0 MPa to about 10 MPa. Over the next 24 h, the strength increased by only about 0.5 MPa. During the entire period when the values were recorded (216 h), the strength increased by only about 20% with respect to the first 24 h. It was noted that from the 96th hour, the strength was at a similar level.
For the samples in which the tensile strength was tested, it was noted that the greatest increase in strength occurred during the first 24 h (from 0 MPa to 23 MPa). During the next 72 h, the strength increased by 2 MPa, after which it stabilized at 27 MPa. At the same time, it was noted that the ultrasonic parameters recorded during the tests changed. For the tensile bonds, the significant values in the decibel drop between the height of the first two pulses obtained on the defectoscope screen were increased from about 8 dB to about 16 dB during the first 24 h. Over the next 192 h, an increase of only about 1 dB was observed. In the case of the glued steel sheet strips test and at 20 MHz probe measurements, the significant values in the decibel drop between the height of first two pulses obtained on the defectoscope screen were from about 2 dB to 3.25 dB during the first 24 h. Over the next 192 h, an increase of about 0.5 dB was observed.
In studies using the ultrasonic surface wave, it was noted that a significant decrease in the pulse height on the defectoscope screen occurs over a period of 96 h, from 0.9 to 0.55 screen height, after which it stabilizes.
The obtained results show that it is possible to monitor the kinetics of the adhesive bond formation using the ultrasonic method, while the use of surface waves may be more accurate in the later phase of the adhesive bond formation.
At the same time, for the hardness during the adhesive measuring, it was noted that, to a certain extent, hardness can be even a measure of adhesive strength. The increase in the hardness of the adhesive was noticed within 28 h of mixing two of its components. During this time, this study showed that the considered bonds gained about 85% of their full strength. Under manufacturing conditions, this is a sufficient time to transfer the technical object containing adhesive bonds for further production.

5. Conclusions

Based on this case study of the kinetics of adhesive bond formation, the following conclusions can be made:
  • The kinetics of adhesive bond formation, determined non-destructively by both ultrasonic longitudinal and surface waves and confirmed by sample tear tests, has the character of an increasing curve in the initial stage of forming, in the adopted ultrasonic and mechanical measures of bond quality, with a tendency to stabilize after a certain period of time, marking the end of the bond formation.
  • The kinetics of adhesive bond formation can be non-destructively determined using ultrasonic longitudinal and surface waves. The longitudinal wave allows for a better—in terms of inspection technology—assessment of the tested adhesive joint than the surface wave. Mechanical tests of the strength of the adhesive bond together with the adhesive hardness testing confirm the significant possibilities of the non-destructive method for determining the kinetics of the adhesive bond formation.
  • The determination of the kinetics of adhesive bond formation allows for a more accurate determination of the time of formation of such a bond than before, which can be used in the planning of technological operations in the process of the construction of bodies of means of mass transport, the cyclicity of production, and the perfection of the technology for the manufacturing of these means, including non-destructive quality control of production.
  • The sensitivity of ultrasonic waves (longitudinal and surface) to changes in the adhesive bond, found during our research, reveals the potential possibility of using these waves also for the study of the degradation of such bonds and—as a consequence—for the diagnosis of this type of permanent bond.
The nature of the penetration and reflection of the ultrasonic longitudinal wave and the outflow of the surface wave from an acoustically denser environment (metal) to an acoustically sparser environment (adhesive) also provides opportunities to study the course of crosslinking of the adhesive in its volume and the constitution of the adhesive bond in selected areas of the glued technical object, which determines the direction of our further research on the issue of the kinetics of the adhesive bond formation.

Author Contributions

Conceptualization, J.K. and M.J.; methodology, J.K., M.J., and D.W.; software, K.S.; validation, J.K. and D.W.; formal analysis, M.J.; investigation, J.K.; resources, K.S. and M.N.; data curation, J.K.; writing—original draft preparation, M.J. and J.K.; writing—review and editing, J.K., D.W., and M.J.; visualization, M.J. and K.S.; supervision, M.J. and M.N.; project administration, K.S.; funding acquisition, M.N. All authors have read and agreed to the published version of the manuscript.

Funding

This work was supported by the Polish National Centre for Research and Development under the grant decision no. DWP/TECHMATSTRATEG-III/136/2020.

Institutional Review Board Statement

Not applicable.

Informed Consent Statement

Not applicable.

Data Availability Statement

The data presented in this study are available on request from the corresponding author. The data are not publicly available due to privacy.

Conflicts of Interest

The authors declare no conflict of interest.

References

  1. Lucas, F.M.; da Silva, L.F.M.; Öchsner, A.; Adams, R.D. Handbook of Adhesion Technology, 2nd ed.; Springer: Cham, Switzerland, 2018. [Google Scholar] [CrossRef]
  2. Fay, P.A. A history of adhesive bonding. In Adhesive Bonding; Adams, R.D., Ed.; Woodhead Publishing: Sawston, UK, 2021; pp. 3–40. [Google Scholar] [CrossRef]
  3. Ayesha, K. Rubber toughened epoxy-based nanocomposite: A promising pathway toward advanced materials. J. Macromol. Sci. Part A 2020, 57, 499–511. [Google Scholar] [CrossRef]
  4. Bagheri, R.; Marouf, B.T.; Pearson, R.A. Rubber-Toughened Epoxies: A Critical Review. Polym. Rev. 2009, 49, 201–225. [Google Scholar] [CrossRef]
  5. Allen, J.C.P.; Ng, C.T. Debonding detection at adhesive joints using nonlinear Lamb waves mixing. NDT&E Int. 2022, 125, 102552. [Google Scholar]
  6. Kowalczyk, J.; Ulbrich, D.; Nowak, M.; Sędłak, K.; Gruber, K.; Kurzynowski, T.; Jósko, M. Acoustic Properties Comparison of Ti6Al4V Produced by Conventional Method and AM Technology in the Aspect of Ultrasonic Structural Health Monitoring of Adhesive Joints. Appl. Sci. 2023, 13, 371. [Google Scholar] [CrossRef]
  7. da Costa, P.R.; Sardinha, M.; Reis, L.; Freitas, M.; Fonte, M. Ultrasonic fatigue testing in as-built and polished Ti6Al4V alloy manufactured by SLM. Forces Mech. 2021, 4, 100024. [Google Scholar] [CrossRef]
  8. Kim, C.; Yin, H.; Shmatok, A.; Prorok, B.C.; Lou, X.; Matlack, K.H. Ultrasonic nondestructive evaluation of laser powder bed fusion 316L stainless steel. Addit. Manuf. 2021, 38, 101800. [Google Scholar] [CrossRef]
  9. Hsia, S.Y.; Chou, Y.T. Assessing the Hardness of Quenched Medium Steel Using and Ultrasonic Nondestructive Method. Adv. Mater. Sci. Eng. 2015, 2015, 684836. [Google Scholar] [CrossRef]
  10. Kowalczyk, J.; Jósko, M.; Wieczorek, D.; Sędłak, K.; Nowak, M. The Influence of the Hardness of the Tested Material and the Surface Preparation Method on the Results of Ultrasonic Testing. Appl. Sci. 2023, 13, 9904. [Google Scholar] [CrossRef]
  11. Dey, B.K.; Sarkar, B.; Seok, H. Cost-effective smart autonomation policy for a hybrid manufacturing-remanufacturing. Comput. Ind. Eng. 2021, 162, 107758. [Google Scholar] [CrossRef]
  12. Yang, C.-M.; Chen, K.-S. An integrated contract manufacturer selection and product quality optimization methodology for the mechanical manufacturing industry. Expert Syst. Appl. 2021, 183, 115336. [Google Scholar] [CrossRef]
  13. Omair, M.; Alkahtani, M.; Ayaz, K.; Hussain, G.; Buhl, J. Supply Chain Modelling of the Automobile Multi-Stage Production Considering Circular Economy by Waste Management Using Recycling and Reworking Operations. Sustainability 2022, 14, 15428. [Google Scholar] [CrossRef]
  14. Hayashi, A.; Sekiguchi, Y.; Sato, C. AFM observation of sea-island structure formed by second generation acrylic adhesive. J. Adhes. 2021, 97, 155–171. [Google Scholar] [CrossRef]
  15. Kowalczyk, J.; Matysiak, W.; Sawczuk, W.; Wieczorek, D.; Sędłak, K.; Nowak, M. Quality Tests of Hybrid Joint–Clinching and Adhesive—Case Study. Appl. Sci. 2022, 12, 11782. [Google Scholar] [CrossRef]
  16. Ulbrich, D.; Psuj, G.; Wypych, A.; Bartkowski, D.; Bartkowska, A.; Stachowiak, A.; Kowalczyk, J. Inspection of Spot Welded Joints with the Use of the Ultrasonic Surface Wave. Materials 2023, 16, 7029-1–7029-16. [Google Scholar] [CrossRef] [PubMed]
  17. Ulbrich, D.; Kańczurzewska, M. Correlation Tests of Ultrasonic Wave and Mechanical Parameters of Spot-Welded Joints. Materials 2022, 15, 1701-1–1701-21. [Google Scholar] [CrossRef]
  18. Borges, C.S.; Akhavan-Safar, A.; Tsokanas, P.; Carbas, R.J.; Marques, E.A.; da Silva, L.F. From fundamental concepts to recent developments in the adhesive bonding technology: A general view. Discov Mech. Eng. 2023, 2, 8. [Google Scholar] [CrossRef]
  19. Sharma, R.; Gupta, A. A critical review on influencing parameters for adhesively bonded joints in composite laminates for structural applications. Mater. Today Proc. 2023. [Google Scholar] [CrossRef]
  20. Adams, R.D.; Comyn, J.; Wake, W.C. Structural Adhesive Joints in Engineering; Chapman & Hall: London, UK, 1997; p. 359. [Google Scholar]
  21. Arenas, J.M.; Alía, C.; Narbón, J.J.; Ocaña, R.; González, C. Considerations for the industrial application of structural adhesive joints in the aluminium–composite material bonding. Compos. Part B Eng. 2013, 44, 417–423. [Google Scholar] [CrossRef]
  22. Seong, M.S.; Kim, T.H.; Nguyen, K.H.; Kweon, J.H.; Choi, J.H. A parametric study on the failure of bonded single-lap joints of carbon composite and aluminum. Compos. Struct. 2008, 86, 135–145. [Google Scholar] [CrossRef]
  23. Arenas, J.M.; Alía, C.; Ocaña, R.; Narbón, J.J. Degradation of Adhesive Joints for Joining Composite Material with Aluminum under Immersion in Water and Motor Oil. Procedia Eng. 2013, 63, 287–294. [Google Scholar] [CrossRef]
  24. Banea, M.D.; da Silva, L.F.M.; Carbas, R.J.C. Debonding on command of adhesive joints for the automotive industry, International. J. Adhes. Adhes. 2015, 59, 14–20. [Google Scholar] [CrossRef]
  25. Rudawska, A.; Haniecka, I.; Jaszek, M.; Stefaniuk, D. The Influence of Adhesive Compounds Biochemical Modification on the Mechanical Properties of Adhesive Joints. Polymers 2018, 10, 344. [Google Scholar] [CrossRef] [PubMed]
  26. Ma, X.; Shi, J. Effectiveness of Surface Treatment on Bonding Performance of Starch-Based Aqueous Polymer Isocyanate Wood Adhesive. Polymers 2023, 15, 988. [Google Scholar] [CrossRef] [PubMed]
  27. Ulbrich, D. Monitoring the boundary of an adhesive coating to a steel substrate with an ultrasonic Rayleigh wave. Open Eng. 2022, 12, 933–945. [Google Scholar] [CrossRef]
  28. Takeda, T.; Yasuoka, T.; Hoshi, H.; Sugimoto, S.; Iwahori, Y. Effectiveness of flame-based surface treatment for adhesive bonding of carbon fiber reinforced epoxy matrix composites. Compos. Part A Appl. Sci. Manuf. 2019, 119, 30–37. [Google Scholar] [CrossRef]
  29. Kalnins, M.; Avotins, J. Kinetics of Adhesion Interaction of Polyolefins with Metals Under Conditions of Contact Thermooxidation. J. Adhes. 1998, 68, 163–182. [Google Scholar] [CrossRef]
  30. Comyna, J.; de Buyl, F.; Shephardc, N.E.; Subramaniam, C. Kinetics of cure, cross link density and adhesion of water-reactive alkoxysilicone sealants. J. Adhes. Sci. Technol. 2002, 16, 1055–1071. [Google Scholar] [CrossRef]
Figure 1. Research plan for the kinetics of adhesive bond formation.
Applsci 14 00163 g001
Figure 2. An example of samples from the preliminary study (black epoxy adhesive visible DP490 SCOTCH-WELD 3M).
Applsci 14 00163 g002
Figure 3. A view of the bonds after rupture: indicated times from the formation of each bond to its break for epoxy DP490 3M (top) and hybrid Hybrix CX80 Poland (bottom) adhesives.
Applsci 14 00163 g003
Figure 4. Sample used for testing—connected sheet strips for monitoring by ultrasonic longitudinal wave: (a) a view, and (b) dimensions—in millimeters.
Applsci 14 00163 g004
Figure 5. Sample used for testing—steel discs for testing by longitudinal wave: (a) a view, and (b) dimensions—in millimeters.
Applsci 14 00163 g005
Figure 6. Sample used for testing—adhesive applied to the sheet for testing by Rayleigh (surface) wave: (a) a view, and (b) dimensions—in millimeters.
Applsci 14 00163 g006
Figure 7. Examples of images of ultrasonic wave pulses recorded on digital defectoscopes screens: (a) in time domain, and (b) in time and frequency domain.
Applsci 14 00163 g007
Figure 8. Ultrasonic measurement systems: (a) 20 MHz normal wave probe, (b) surface wave probe, and (c) 2.4 MHz normal wave probe.
Applsci 14 00163 g008
Figure 9. View of the testing machine (a) and the specimen clamped in the jaws of machine before rupture (b); 1—top clamping jaw, 2—glue sample, 3—glued joint, 4—bottom clamping jaw, and 5—bottom clamping to support machine.
Applsci 14 00163 g009
Figure 10. Adhesive hardness test.
Applsci 14 00163 g010
Figure 11. The change in decibel drop between the first and second pulses obtained on the screen of the ultrasonic defectoscope from the bond area for the ultrasonic test of connected steel discs with epoxy adhesive.
Applsci 14 00163 g011
Figure 12. The change in decibel drop between the first and second pulses obtained on the screen of the ultrasonic defectoscope from the bond area for the ultrasonic test of bonded strips of steel sheet with epoxy adhesive.
Applsci 14 00163 g012
Figure 13. Variation in pulse height on the defectoscope screen during non-destructive testing of adhesive bond by ultrasonic Rayleigh surface wave.
Applsci 14 00163 g013
Figure 14. The distribution in time of the tensile stresses for connected discs.
Applsci 14 00163 g014
Figure 15. The distribution in time of the shear stresses for connected sheet metal strips.
Applsci 14 00163 g015
Figure 16. An example of a view of the bonded surfaces of the discs after breaking the adhesive bonds.
Applsci 14 00163 g016
Figure 17. A view of torn steel strip bonds, mostly adhesive in nature.
Applsci 14 00163 g017
Figure 18. The distribution of an adhesive hardness over time.
Applsci 14 00163 g018
Table 1. Parameters of ultrasound probes used in this study.
Transducer Name/ParametersKD1-6GE20S6WB10WM
Number of ultrasonic transducer123
Frequency MHz2.42010
Transducer diameter mm123.156
Effective diameter of the beam mm11.643.055.82
Mean wave velocity in tested material m/s594059405940
Wavelength mm2.4750.2970.594
Near field mm13.17.814.1
Decibel drop ratio K0.870.87-
Sin beam divergence angle °0.110.08-
Divergence angle °6.14.85-
The width of the ultrasonic wave beam mm6.43.4
Disclaimer/Publisher’s Note: The statements, opinions and data contained in all publications are solely those of the individual author(s) and contributor(s) and not of MDPI and/or the editor(s). MDPI and/or the editor(s) disclaim responsibility for any injury to people or property resulting from any ideas, methods, instructions or products referred to in the content.