Abstract
The environmental impact of wind turbine rotor blades, both during manufacturing and at the end of their life cycle, can be significant. The aim of this study was to define and test a methodology for recycling the waste resulting from their production. Particles of waste from the mechanical machining of rotor blades, which were made up of a glass fibre/epoxy matrix mixture, were used to produce toe caps for use by the footwear industry. The addition of 1 wt.% of particles improved the mechanical properties of the epoxy matrix, with a 5.50% improvement in tension and an 8% improvement in stiffness. Characterisation of the laminates, manufactured by hand lay-up technique, revealed that in the three-point bending tests, the additive laminates showed improvements of 18.60% in tension, 7.50% in stiffness, and 10% in deformation compared to the control laminate. The compression test showed that the additive glass fibre toe cap had greater resistance to compression than the control glass fibre toe cap, with a reduction in deformation of 23.10%. The toe caps are suitable for use in protective footwear according to European standard EN ISO 20346:2022. They guaranteed protection against low-velocity impacts at an energy level of at least 100 J and against compression when tested at a compression load of at least 10 kN.
1. Introduction
In science and technology, progress is made every day with both advances and limitations. The current trend is to focus on renewable energy sources, which means that there is an effort to find more sustainable alternatives that are less harmful to the environment [1]. Composites are materials produced by combining two or more materials of different natures, each with its distinct properties, to create a new material with unique characteristics [2]. These materials typically consist of a reinforcing material, such as fibres or particles, which is embedded in a matrix material, such as a polymer, a ceramic, or a metal [1]. The reinforcing material is typically stronger and stiffer than the matrix material, which provides support and stability [2].
Landfilling, especially of composite materials, represents a high loss of high-value materials and the energy used in their production, as well as the loss of opportunities to reuse composites in other investments [3]. It is therefore imperative that industry and policymakers collaborate to develop sustainable end-of-life solutions for composite materials. This will not only minimise the environmental degradation associated with landfills but will also capitalise the inherent value of these materials. By creating new forms to reuse, and by recycling the composite materials, resources can be conserved, the carbon footprint associated with the production of new composite materials can be reduced, and a circular economy that prioritises resource efficiency over disposability can be promoted [3]. Furthermore, with the right technological innovations and infrastructural support, the recycling of composite materials can open up new markets and job opportunities, further strengthening the economic logic behind these endeavours [3].
Although composite materials offer great opportunities in engineering, their integration into a circular economy strategy remains a challenge. This is due to the specific characteristics and properties of composite materials, as well as the limited availability of sustainable waste management technologies for end-of-life materials [4]. There are several limitations when choosing to deal with composite materials in circular approaches, in terms of the limited known applications and the lack of innovation.
Due to the growing attraction of clean and affordable energy, these energy production technologies are expected to increase their share of the energy mix in the coming years [5]. The use of renewable energies will increase in any case, since the continued use of fossil fuels is limited. If the use of composite materials continues in the current way, by 2030, humans will have a considerable problem with their disposal, as there will be too much waste and not enough places that can handle the recycling of composites [5]. As it becomes more difficult to find places to dump waste, it can become expensive. In addition, simply throwing it away harms the environment, as it does not decompose easily [5].
One of the main causes of composite waste is the inefficient use of materials during the manufacturing process. In some cases, raw materials are overused and a significant amount of material is discarded as waste [6]. This not only generates environmental concerns but also results in financial losses for companies. Another factor contributing to waste from composite materials is the end of the product’s useful life. Many industrial products have a limited lifespan and when they reach the end of their useful life, they are often discarded as waste. This waste can include a significant amount of composite materials that are difficult to recycle [6].
Waste management of composite materials is a significant challenge for the industrial sector. Companies have to comply with various regulations and guidelines relating to waste management and disposal. This includes the correct labelling, storage, and transportation of waste to ensure its safe handling and disposal [7].
Recycling is one solution for reducing the amount of composite waste generated by industry. However, recycling composite materials can be challenging due to the different types of materials used in their composition. Recycling efforts often require specialised equipment and techniques to effectively separate and process the materials [6]. Another solution for reducing waste from composite materials is to design products with their end-of-life in mind. By designing products that are easier to recycle and dispose of, companies can reduce the amount of waste generated during the product’s lifetime [6].
Composite waste generated by industry is a significant challenge that requires a multi-faceted approach. Recycling, product design, government regulation, sustainable waste management practices, and education and awareness campaigns are all strategies that can be used to reduce waste and promote sustainability in the industrial sector. By implementing these strategies, companies can reduce their environmental impact, improve their bottom line, and create a more sustainable future.
The general aim of this study was to define and test a methodology for recycling the waste resulting from the production of rotor blades, which could be scaled up to an industrial environment and would make the wind energy sector more sustainable. The research presented here has a three-step strategy. First, a composite material will be studied. Then, a laminated material will be tested, and finally, the toe cap moulded from the laminates will be tested.
2. Materials and Methods
2.1. Toe Cap Planning and Mould Construction
Artec Studio (version 11.2) was the software used for 3D scanning and processing the toe cap data. It was developed by Artec Group [8], a company known for its range of professional-grade portable 3D scanners. It has human vision with colour, making it easier to detect textures, as well as ultrasound and infrared that provide a resolution of 0.10 mm (100 μm). Before using the software, the composite toe cap of a safety boot was removed, first identifying the area where the toe cap was located and then carefully removing any external coating using an DeWalt X-acto knife (Towson, MD, USA). Finally, the fasteners holding the toe cap to the boot were located and loosened, taking care not to damage the toe cap.
Several captures were made, and after this process, they were aligned. Initially, an STL file was exported, as shown in Figure 1a, and then transferred to Autodesk Fusion 360, a cloud-based 3D computer-aided design (CAD), computer-aided manufacturing (CAM), and computer-aided engineering (CAE) tool for product design and engineering. After importing the file, the shape was drawn and the views were drawn.
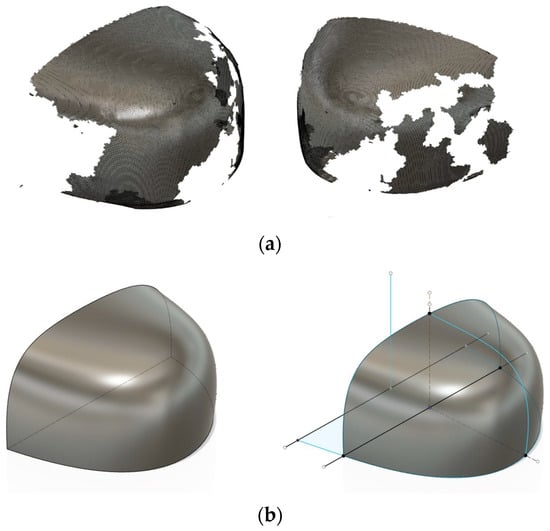
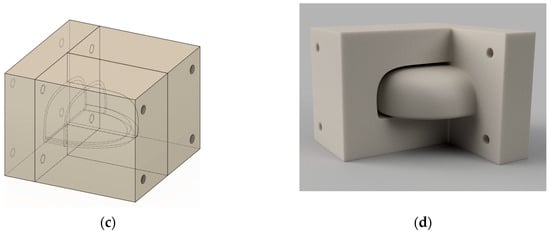
Figure 1.
Steps in the mould manufacturing process: (a) noisy toe box STL; (b) toe cap loft; (c) isometric perspective shot of the toe cap; (d) steel toe cap render.
After drawing the views, Figure 1b shows the result of using the Loft tool, which allows you to create a transition between two or more planar drawings. Next, a Shell was made, in which the material was removed from the inside, creating a hollow cavity with walls of a specific thickness of 2 mm. The Shell was then moved to provide a thicker toe cap (6 mm). After constructing the object, the mould had to be made. A parallelepiped was drawn and within it, the Boundary Fill tool was used, which allows objects to be filled with volumes using the selected boundaries. Next, four holes were designed to align and tighten the male and female moulds, as shown in Figure 1c,d.
To create the mould for the toe caps, the additive manufacturing or 3D printing process was used, given its versatility, the availability of different materials used as raw materials, and the ease of access to this technology. The process involved several stages, starting with the design and ending with the final print. The first stage was to create the model using Autodesk AutoCAD 2023for the toe cap mould, considering the dimensions, clearances, and precise specifications. The design took into account the properties of the material and the limitations of the 3D printing process.
In this case, the toe cap mould was divided into five parts to facilitate the production of the toe caps, as shown in Figure 2a. The blue, red, and orange parts were printed in polyethylene glycol terephthalate (PETG). The remaining parts, green and yellow, were printed in thermoplastic polyurethane (TPU) with a shore hardness of 95 A.
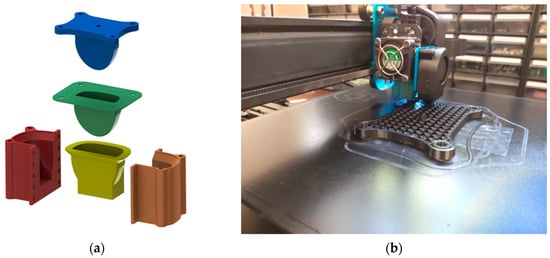
Figure 2.
Mould construction: (a) representation of the toe cap mould printed on a 3D printer; (b) toe cap mould production process on a 3D printer.
The printer, model Artillery Sidewinder X1, began printing the various parts of the toe cap mould layer by layer. The nozzle used was 0.6 mm, which expelled the printing material that is normally heated to a semi-liquid state. The polymer quickly solidified as it was deposited, forming a solid layer. The process was repeated, layer by layer, until all the parts of the toe cap mould had been formed, as shown in Figure 2b. After printing, the mould required post-processing. This included cleaning the support material used during printing, smoothing the surfaces, and the curing process.
2.2. Experimentals Procedures
Using waste particles from the mechanical machining of rotor blades supplied by a large German manufacturer, a particle size analysis was carried out by dry sieving, as shown in Figure 3a. This method is used to categorise granular material by the particle size distribution determined by maximum particle size.
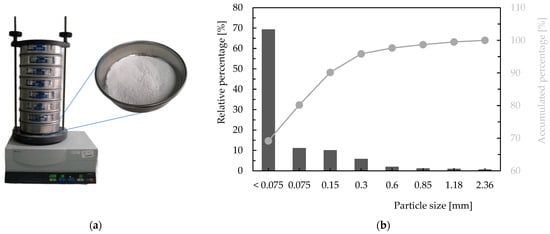
Figure 3.
Dry sieving of the particles: (a) equipment used for particle size analysis; (b) particle size distribution of glass fibre/epoxy matrix industrial waste.
The first step was to ensure that the sample was completely dry. Next, the particle size range of the sample was determined, and the appropriate sieves were selected. The sieves were arranged from top to bottom, with the largest opening at the top and the smallest at the bottom, in the following order: 2.36 mm, 1.18 mm, 850 µm, 600 µm, 300 µm, 150 µm, 75 µm, and <75 µm. A container was placed at the bottom to collect the finest particles and then a quantity of sample was placed on the top sieve. It was determined that the sieve shaking cycle should take place for 15 min, with a time interval of 10 s, to ensure that the time was sufficient for all the particles to have a chance to pass through the sieve openings until they were retained by their size on the respective sieve. Figure 3a shows one of the particle sizes, in this case < 75 µm.
After sorting by size, the amount of material retained on each sieve was weighed separately. The percentage of the total sample weight, the fraction that each sieve contained, was determined, and a graph of the particle size distribution was constructed. The particle size distribution graph, as shown in Figure 3b, is often used to represent this data, where the particle size is shown on the x-axis and the cumulative percentage on the y-axis. This graph shows the particle size distribution and the granulometric nature of the material.
In this initial phase of practical work, particles with smaller dimensions were selected due to the quantity available, as can be seen in the graph in Figure 3b and as referenced in the literature. Smaller particles, when added to epoxy resin, are preferable for improving its mechanical properties than larger particles [7].
To obtain an enhanced view and detailed characterisation of the particles, scanning electron microscopy (SEM) was used, using the Hitachi S-3400N model. The samples were coated with gold, a necessary measure due to the low conductivity of the particles under study, Figure 4.
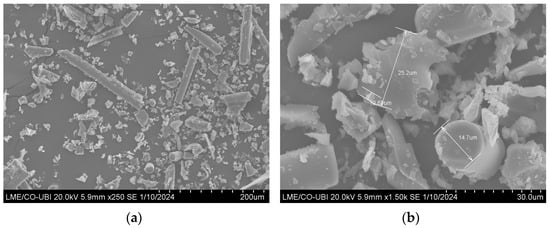
Figure 4.
SEM images of particles < 75 µm: (a) detail of the geometry; (b) detail of the size of various particles.
Given the production process and by observing Figure 4a, the variation in geometric terms of the particles with a size of <75 μm is notable, which is also reflected in the dispersion in terms of size within this analysed range, Figure 4b.
An epoxy resin SR 8100 was combined with hardener SD 8824, both supplied by Sicomin (Chateauneuf les Martigues, France) and initially cured for 24 h at room temperature and then post-cured for a further 24 h at 40 °C, according to the supplier’s instructions [9]. For the curing process used in this study, the main mechanical properties of the pure cast resin are modulus of elasticity (tension/flexion) around 2.90/3.00 GPa, resistance at break (tension/flexion) around 60/108 MPa, resilience around 52 kJ/m2, and glass transition temperature (Tg) of 63 °C.
According to the established guidelines and for samples with 1 wt.% of particles, 1.22 g of particles were mixed for every 100 g of resin. Dispersion in the resin was performed simultaneously using a 1000 rpm high-speed mixer and sonication using an ultrasonic bath with a frequency of 40 kHz for 3 h at room temperature. After 3 h of stirring under an ultrasonic bath, 22% by weight of the hardener was added, i.e., 22 g. Bearing in mind that variables such as stirring time, stirring speed, and the use or not of sonication directly influence the final mechanical properties of the composite, a method previously used in other studies was applied and proved promising [10].
This procedure continued for another 10 min at a rotation speed of just 200 rpm to mix the hardener into the system. The purpose of the low rotation speed was to minimise the formation of air bubbles and promote homogeneous mixing of the hardener in the system. When the mixture had a uniform appearance, it was subjected to a degassing process in a vacuum pan for 10 min at a pressure of 0.9 ± 0.1 bar. Finally, the mixture was poured into a cardboard mould with dimensions of 200 × 120 × 3 mm3, previously manufactured and protected by a technical plastic for this purpose. Finally, all the moulds produced were cured as recommended by the resin and hardener supplier.
After the matrices had cured, they were cut using a Struers Accutom 2 (Copenhagen, Denmark) cutting machine. A water-cooled diamond blade was used to prevent the composite from heating up, considering the cutting speed. The dimensions of these specimens were established by BS EN ISO 178:2019 [10], which describes a procedure for assessing the flexural properties of a thermosetting material [11].
The standard states that the span, referred to as the distance between supports (L), must comply with L = (16 ± 1) × t, with t representing the average thickness of the respective material [11]. To normalise the average thickness of the specimens, a constant thickness of 2.76 ± 0.50 mm was considered. Thus, the distance between supports was 50 mm. The static three-point bending (3PB) tests were carried out at room temperature using 80 × 10 × 2.76 mm3 specimens cut from the samples produced, as shown in Figure 5a. For each condition, at least five samples were tested, with a displacement rate of 2 mm/min.
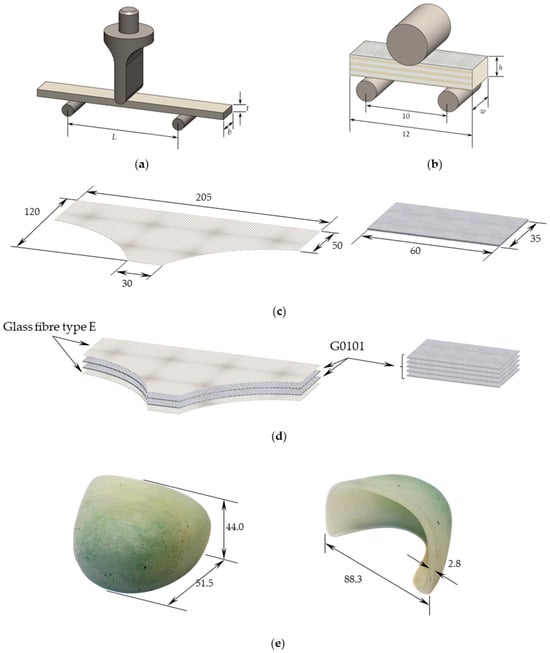
Figure 5.
Apparatus, schematic views, and geometry of the specimens for: (a) three-point bending tests; (b) interlaminar shear tests; (c) preparation of the different glass fibres used as reinforcement; (d) representation of the alternating stacking in the case of the laminate and the five layers applied to the toe cap reinforcement; (e) final version of the toe cap, manufactured in a laboratory (all dimensions in mm).
The laminate production process began with the selection of glass fibres, chosen from various types provided by the manufacturer, and a type E glass fibre, in order to reproduce the toe cap. The properties associated with these materials can be seen in Table 1. The choice of fibre directly influences the mechanical properties of the final composite according to the specific requirements of the application, optimising the performance of the composite to meet the desired mechanical requirements.

Table 1.
Types of glass fibre fabrics (adapted from information provided by the manufacturer).
The glass fibre laminates were manufactured using the hand lay-up method, with the control laminate being the first to be produced. The SR 8100 epoxy resin was mixed with the SD 8824 hardener in the exact proportions described above. This stage is crucial, as the proportion and homogeneity directly influence the quality and properties of the final laminate.
Once the different layers of glass fibre had been prepared, a layer of epoxy resin was applied to the release agent. Next, the first layer of type E glass fibre was emplaced. The fibre was then impregnated with more resin, always controlling the amount of resin between layers to 15 ± 10 mL. This sequence—resin application, fibre placement, impregnation—was repeated four times (one layer of type E fibre, two layers of higher density fibre, and one layer of type E fibre) until the desired thickness of the laminate was reached, as shown in Figure 5d.
This sequence was established in order to reproduce the laminate of a protective toe cap taken as a reference, Figure 5d, for mechanical characterization and optimization, followed by manufacturing the toe cap in the laboratory, for subsequent characterization Figure 5e. One of the challenges during this process was to ensure the elimination of air bubbles and perfect consolidation between the fibre and resin layers. A strip of felt fabric was placed around the laminate to create an air circulation channel, helping to absorb excess matrix during vacuum application.
Subsequently, the additive laminates were produced, i.e., a quantity of particles < 75 μm in size was added to the resin solution with the hardener. The sequence—resin application, fibre placement, impregnation—was repeated four times.
Once the last layer of release agent had been applied, each system was placed inside a vacuum bag and a 2.50 kN load was applied for 24 h to maintain a constant fibre volume fraction and a uniform laminate thickness. During the first 4 h, the bag remained attached to a vacuum pump to eliminate any air bubbles existing in the laminate. Finally, the post-cure was performed according to the manufacturer’s datasheet in an oven at 40 °C for 24 h. This procedure was used to produce laminates with overall dimensions of 200 × 150 × 2.10 mm3.
The samples used in this study were cut and tested using the same equipment used for the epoxy matrix, from the previously produced boards with dimensions of 60 × 10 × 2.10 mm3. The 3PB tests were carried out at room temperature with a displacement rate of 2 mm/min and, for each condition, at least five samples were tested in accordance with European standard BS EN ISO 178:2019 [10]. The distance between supports used for all configurations was 35 mm.
During the manufacture of the toe cap, also using the hand lay-up method, five small glass fibre layers (35 × 60 mm) were prepared and laminated to reinforce the tip of the toe cap, according to the model followed, Figure 5c.
Regarding interlaminar shear strength (ILSS) tests, the short beam shear method is the simplest and most widely applied. The interlaminar shear tests were carried out in accordance with ASTM D2344/D2344M-22 [11] at a speed of 1 mm/min [12]. In this study, at least five samples were considered valid. Standard-sized samples of the composites with a rectangular shape were prepared, i.e., length of 12 mm, width (w) and height (h) of approximately 4 mm and 2 mm, respectively, and distance between the supports in the specimens of 10 mm, all as a function of the height (h) of the laminate. Figure 5b shows the schematic view of the tests and the respective dimensions of the samples used in the experimental tests. In this method, the specimen is placed between two supports and a load is applied in the centre at a third point, causing the layers to slide relative to each other until failure occurs.
The failure mode that was sought was a shear failure between the laminate layers. The maximum load at which the failure occurs was recorded and, using the dimensions of the specimen, the ILSS was calculated.
ILSS is a critical mechanical property of composite materials that measures the material’s resistance to interlaminar shear forces. It is an important parameter that characterises the bond strength between adjacent fibre layers and the polymer matrix in a composite laminate. If the value is low, it may indicate poor bonding between layers or other problems with the composite manufacturing process. It should be noted that ILSS is a critical parameter for the practical case, as the toe caps will be subjected to high loads and there are concerns about the potential for delamination under service conditions.
2.3. Characterization of the Matrix, Laminates, and Toe Cap Properties
The dimensions of the specimens used in the static characterization 3PB tests were based on the BS EN ISO 178:2019 [10] standard, which specifies a method for determining the flexural properties of a thermoset with a 50 mm matrix span and 35 mm laminate span (see Figure 5a). A Shimadzu universal testing machine, model Autograph AGS-X, equipped with a 10 kN load cell was used.
The flexural strength was determined by calculating the rated stress in the mid-span section. This was achieved by using the maximum load value and applying Equation (1).
where P is the load, L is the distance between supports, b is the width, and h is the thickness of the specimen. The stiffness modulus was calculated using the linear elastic bending beam theory relationship:
Here, I represents the moment of inertia of the cross-section, while ∆P and ∆u represent the load change and mid-span bending displacement change, respectively, for an interval in the linear region of the load versus displacement graph. The stiffness modulus was obtained by performing linear regression on the load–displacement curves, considering the interval in the linear segment with a correlation factor greater than 95%. Finally, the flexural strain was calculated according to the European Standard BS EN ISO 178:2019 [10] by the following equation:
where S is the deflection.
The short-beam shear (SBS) method is the simplest and most widely used for measuring ILSS. In accordance with the ASTM D2344/D2344M-22 [11] standard, interlaminar shear tests were conducted using the same Shimadzu equipment. The ILSS value was obtained using Equation (4) with a crosshead speed of 1 mm/min on the Autograph AGS-X.
The maximum load is represented by Pc, while the width and thickness of the beam are represented by w and h, respectively. Five samples were tested under each condition at room temperature. The specimen’s nominal dimensions for ILSS tests are a length of 12 mm, with a width (w) and height (h) of approximately 4 mm and 2 mm, respectively. The distance between the supports in the specimens is 10 mm, which is dependent on the height h of the laminate.
The low-velocity impact (LVI) tests were performed using a drop-weight testing machine IMATEK-IM10, in accordance with EN ISO 20346:2022 [13] and EN ISO 20344:2021 [14] standards. An impactor with a diameter of 20 mm and total mass of 5.65 kg was used for the tests. The selected impact energy for the tests was 100 J. This specific energy level was chosen according to the standard to avoid inducing perforation in the specimens.
The equipment comprises two guiding columns, an impactor (guided by bearings), and a mechanism designed to prevent subsequent impacts. Gravity is the sole supplier of impact energy, which is regulated by adjusting the falling height, capable of reaching up to 3.50 m. Data acquisition is managed by a computer system, and the outcomes are processed and presented using Impact software (version 1.3; IMATEK). Impact force is measured through a piezoelectric load cell embedded within the impactor, capable of capturing 32,000 data points, with a precision level of 1% of the peak force. Deflection of the specimen is derived from double integration of the acceleration versus time curve. Each experiment involved testing five specimens at room temperature.
The Shimadzu model AG-IC universal testing machine with a 50 kN load cell was used for the compression tests. The main aim of this test is to assess the ability of glass fibre to withstand progressively increasing compression loads, thus guaranteeing the safety, durability, and structural integrity of the toe cap. During the test, the toe cap was subjected to an increasing force until it reached 10 kN, according to the EN ISO 20346:2022 [13] and EN ISO 20344:2021 [14] standards, Figure 6.
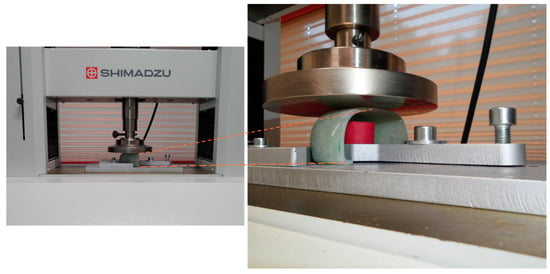
Figure 6.
Shimadzu model AG-IC universal testing equipment with a 50 kN load cell.
3. Results
3.1. Three-Point Bending Tests on Composites Matrices
From the graph shown in Figure 7a, it can be seen that regardless of particle size, all the curves show a linear increase in bending stress with deformation, followed by a non-linear behaviour in which the maximum value of the bending stress is reached. For all the conditions analysed, the bending stress decreases from the maximum value until it collapses, which is typical behaviour for this type of laminate [10].
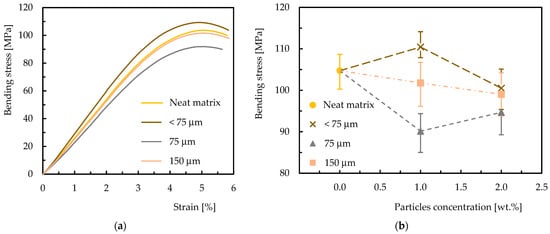
Figure 7.
Characterization of the epoxy matrix: (a) average flexural stress–strain curves for epoxy matrix with different size particles and 1 wt.%; (b) relationship between particle size and flexural strength of epoxy matrices.
For 1 wt.% of particles and a particle size of <75 μm, a 5.50% improvement in flexural strength was obtained when compared to the value obtained for the neat matrix (104.70 MPa) and that obtained for 1.0 wt.% (110.40 MPa). Subsequently, for the other particle sizes, the flexural strength decreased to 90.20 MPa for a size equal to 75 μm and 101.70 MPa for a size equal to 150 μm, i.e., a reduction of 13.90% and 2.80%, respectively. In terms of flexural rigidity, for a particle size < 75 μm, an improvement of 8% was obtained with the introduction of 1 wt.%, i.e., the value increased from 2.80 GPa in the control matrix to 3.10 GPa. For the other sizes under study, there was a decrease of 12.60% for a size equal to 75 μm and 1.70% for a size equal to 150 μm. Regarding deformation, this decreased by 1.60% for particles with a size < 75 μm compared to the control value.
Analysing Figure 7b, for particle size < 75 μm, there was an improvement for 1 wt.% followed by a loss of properties for 2 wt.%. This can be explained by the good dispersion when adding 1 wt. %. For 2 wt. % the percentage is too high, forming agglomerates, i.e., defects, which degrade the static properties. For the remaining particle sizes under study and regardless of concentration, the results obtained decreased compared to the values of the control matrix. For particles of size 75 μm, the optimum percentage is not within this range, and for particles of size 150 μm, given that the size is already considerable and taking into account their nature, the final properties of the matrix tend to decrease. According to the results obtained, the ideal particle size to obtain the highest flexural strength was <75 μm, with a concentration of 1 wt.%. The symbols represent the mean values, and the dispersion bands are the maximum and minimum values obtained from the experimental tests. For particles <75 μm in size, other weight percentages were studied to determine the ideal one to optimise the epoxy matrix. The graph in Figure 8 shows the effect of increasing the weight percentage on the flexural properties. It is clear that the optimum weight percentage is 1 wt.%, as this is when the sample reached its maximum flexural strength.
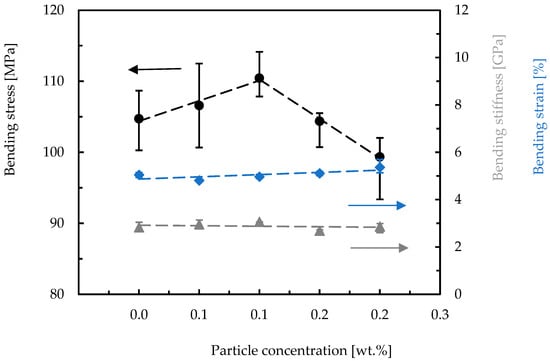
Figure 8.
Flexural properties versus weight content for <75 μm particle size (arrow and colour indicate the respective value axis).
The deformation remained relatively constant in the different compositions, i.e., the ability of the sample to deform under a bending load did not change significantly with the variation of the weight percentages. The stiffness also remained fairly constant, indicating that the flexural stiffness of the sample is not significantly affected by changes in material composition.
The SEM images shown in Figure 9 refer to the fracture surfaces of the samples tested with the epoxy matrix additive containing 1 wt.% and 2 wt.% of particles <75 μm in size. A homogeneous dispersion is evident for 1 wt.%, Figure 9a, whereas for 2 wt.%, the agglomerations/aggregations between the particles form small clusters of larger size, Figure 9b.
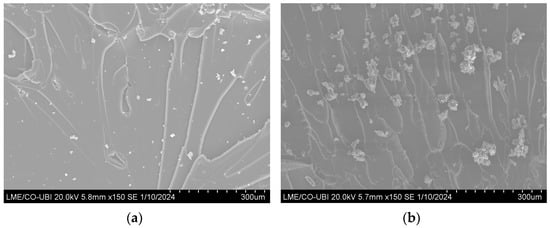
Figure 9.
SEM image of the epoxy resin with: (a) 1.0 wt.% of particles; (b) 2.0 wt.% of particles.
3.2. Three-Point Laminate Bending Tests
Once the matrix has been optimised, the study and characterisation of the laminates is essential to select the most suitable glass fibre basis weight for the intended application. The glass fibre basis weight is an important factor in determining the mechanical properties of the laminates and must be selected to ensure that the laminates meet the requirements of the application.
Static bending tests were carried out to obtain the effect of the different fabrics applied and the effect of adding 1 wt.% of particles <75 μm in size in the matrix on the flexural properties. From the graph shown in Figure 10, it can be inferred that all the curves exhibit an initial linear behaviour where the flexural strength increases proportionally with the deformation. This is followed by a peak, i.e., maximum resistance, and then a decline, where the laminate breaks, which is typical behaviour for this type of laminate [15].
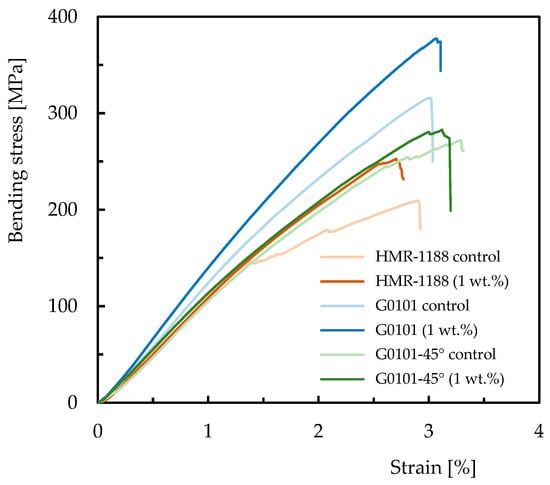
Figure 10.
Graph of representative glass fibre laminate curves.
Although in small percentage, the addition of particles to the matrix increases the flexural strength of all the laminates compared to the respective control laminates, as can be seen from the relative positions of the curves.
Analysing Figure 11, it can be concluded that laminate “G0101 (1 wt.%)” had significantly higher properties than “G0101 (control)”. There was an 18.60% improvement in flexural stress, a 7.50% improvement in flexural stiffness, and a 10% improvement in flexural deformation. These results show that the particles have a beneficial effect on the flexural strength of the G0101 laminate.
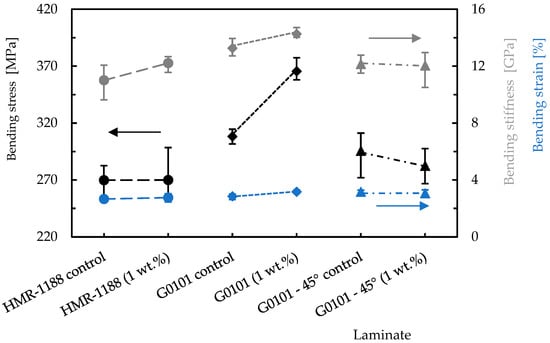
Figure 11.
Stress, stiffness and deformation graph for laminates (arrow and colour indicate the respective value axis).
Other laminates showed improvements, although less significant than the one analysed above, as shown in Figure 11. It can be said that the “G0101 (1 wt.%)” laminate showed excellent results in flexural strength compared to the other laminates. However, stiffness and deformation did not show significant changes in the different compositions, as these properties are not as sensitive to changes in the weight percentage of these laminates.
3.3. Interlaminar Shear Strength Tests
ILSS is a measure of the shear strength of a laminate, specifically between its individual layers. This is a critical parameter because it gives an indication of how well the layers of a composite bond with each other. A weak bond between layers can make the composite susceptible to delamination, which is a failure mode in which the layers of the composite separate from each other.
In many cases, the low ILSS of polymer composites can be explained by the use of fibres without surface treatment or with inadequate treatments for the matrix used [16]. Therefore, in order to assess the ILSS of the laminates produced with the different glass fibre fabrics, as well as the benefits obtained by introducing the particles in this study, the short beam shear test was used for this purpose.
All the curves obtained in the short beam shear tests showed an almost linear increase in load with displacement, after which there was a region of slight decrease in load (small delaminations) rather than a sharp drop. The slope of the curves indicates the stiffness of the material, and with the slope of the “G0101 (1 wt.%)” curve being the steepest, this indicated that this was the stiffest material. As the displacement approaches 0.5 mm, the force seems to approach around 300 N. The curve does not show any sudden drops or peaks, which means that there are no sudden failures or yield points that are reached within the displacement range shown, Figure 12.
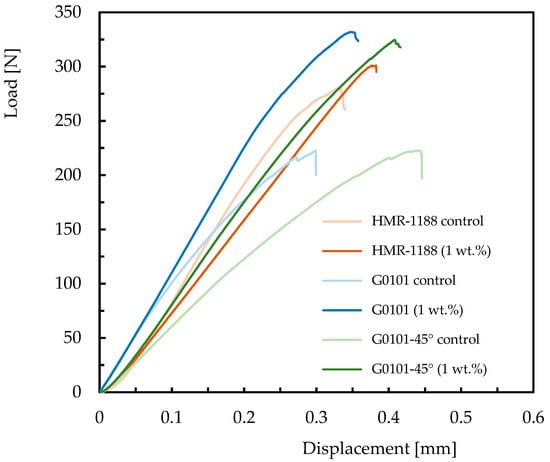
Figure 12.
Representative curves of the laminates after the ILSS test.
The ILSS of all the additive laminates was significantly higher than that of the control laminate, regardless of the glass fibre fabric used. Improvements of 7.50%, 39.90%, and 19.20% were obtained for the HMR-1188, G0101-45°, and G1101 laminates, respectively.
Looking at the graph in Figure 13, it can be concluded that the addition of 1 wt.% has a positive effect on the ILSS of all laminates, with a notable increase for G0101. This indicates that the architecture of this additive laminate is less prone to delamination compared to the others under study. The symbols represent the mean values, and the dispersion bands are the maximum and minimum values obtained from the experimental tests.
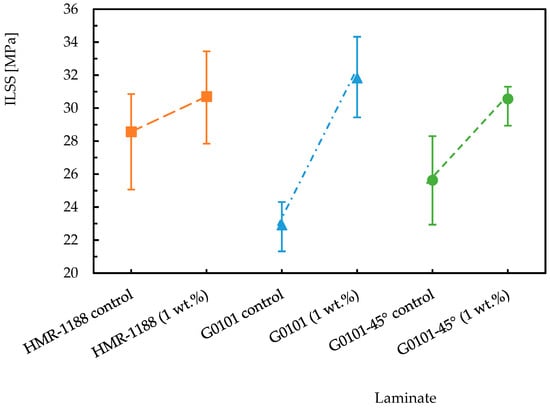
Figure 13.
Effect of particle content on ILSS for laminates with different types of glass fibre.
3.4. Low-Velocity Impact Tests
The composite architecture for the production of the toe caps had been defined based on the static bending properties of the matrix and laminates, and they were produced in the laboratory for subsequent characterisation in LVI and compression.
Once the toe caps had been subjected to the impact test, it was possible to assess the effectiveness and resistance of the components under extreme conditions. This test was crucial in determining whether the toe caps could withstand sudden impacts without suffering significant damage or structural failure, thus protecting the wearer’s physical integrity. During the test, the toe caps were subjected to a controlled impact force, in this case 100 J, simulating real-life situations where physical shocks could occur.
Figure 14 shows the characteristic curves resulting from the impact tests, the impact energy–time curve, the force–displacement curve, and the force–time curve. Figure 14a shows that the initial kinetic energy of the impactor is first completely absorbed by the toe cap, and, in the second phase of the test, part of the absorbed energy returns to the impactor due to the elastic resistance of the toe cap. As a result, the final energy absorption is lower than the initial impact energy.
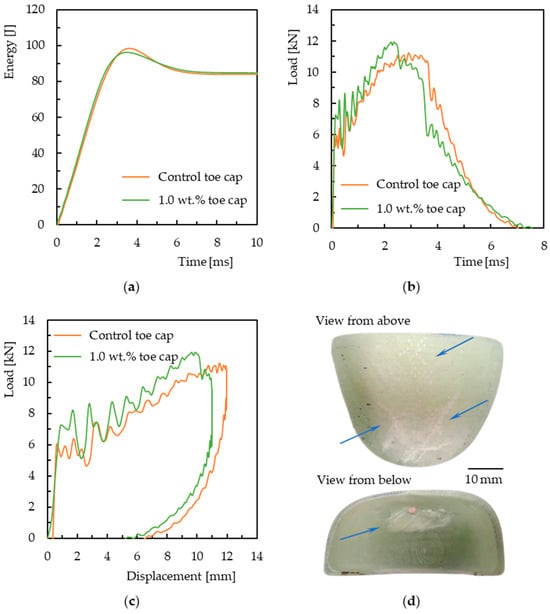
Figure 14.
Characteristic curves after LVI tests: (a) energy vs. time; (b) load vs. displacement; (c) load vs. time; (d) damage to the toe cap after a 100 J LVI test.
The force vs. displacement curve of the toe cap subjected to a load of 100 J is shown in Figure 14b. Typically, this curve can be divided into three regions for a better understanding of the mechanical events that occurred during the test [17]. The initial part of the curve refers to the region of elastic deformation in the toe cap due to the applied load. At this point, delamination and cracking of the matrix can begin. An intermediate part, in which, at the beginning, there is a sudden drop in force, corresponds to the cracking of the matrix due to the impact of the penetrator and, during this section, delamination may occur. Two distinct events can occur: the elastic response of the toe cap and its recovery; or the penetration of the toe cap begins, and its rigidity starts to decrease. Finally, in the final phase and if penetration occurs, catastrophic damage and complete penetration occur. In this study, this third phase did not occur, meaning that the toe caps did not suffer catastrophic damage for this level of impact energy, thus offering protection to the wearer.
In the case of partial damage, the force–displacement curves have a closed form, Figure 14c. The area inside the curve gives us the total energy absorbed by the specimen, i.e., the energy wasted by the damage processes. Below the return curve, from the point of load at maximum displacement to the point of residual displacement (intersection with the displacement axis), this entire area concerns the elastic energy of the toe cap [17,18].
The force vs. time graph illustrated in Figure 14c shows that the glass fibre toe cap with 1.0 wt.% is more resistant to impact than the control toe cap, thus concluding that the additive toe cap is more resistant to plastic deformation and breakage.
In terms of properties, the maximum force seen in 100 J impacts for the control toe caps was 10.05 kN, while the additive toe caps recorded a value of 10.79 kN. The introduction of 1 wt.% of particles led to an increase of 7.36%.
The absorbed energy was 86.51% for the control toe caps and increased by 2.70% to 88.82% for the additive toe caps. As a result, this increase led to a reduction in damage to the composite. The opposite occurred for the elastic energy, i.e., the introduction of particles in a quantity of 1 wt.% led to a decrease of 19.50%, from 13.37% in the control toe caps to 11.18% in the additive toe caps. In terms of the maximum displacement of the composites during impact, there was a decrease of 3.9%, from a value of 13.60 mm for the control toe caps to a value of 13.09 mm for the additive toe caps. Again, the greater displacement seen in the control toe cap indicates greater damage. Finally, in terms of contact time, for an energy of 100 J, a test of the control toe caps took around 8.25 ms, while a test of the additive toe caps took 9.08 ms.
Figure 14d shows the damage sustained by the toe cap after the LVI test. On the outside face, at the contact surface between the toe cap and the impactor, matrix breakage and glass fibre breakage can be seen (blue arrows). On the inside face, more severe damage is visible, such as fibre breakage and delamination between layers (blue arrow). The type of damage sustained is in line with the literature, which states that more severe damage is identified on the side opposite to the impact, while on the impact side, mainly due to energy, it is difficult to identify the damage that has occurred [19].
3.5. Compression Tests
This test applied to toe caps is fundamental to guaranteeing safety in protective footwear. The aim is to determine whether the toe cap is capable of withstanding a specific force without being damaged or putting the wearer’s safety at risk.
Figure 15 shows the characteristic curves of the control toe cap compared to the toe cap with 1 wt.% additive. Taking a force of 10 kN as a reference (grey dashed line), the deformation of the control toe cap was 2.80 mm, while for the additive toe cap it was 2.30 mm, i.e., a decrease of 23.10%. It can therefore be concluded that the additive glass fibre toe cap has greater resistance to compression than the control glass fibre toe cap.
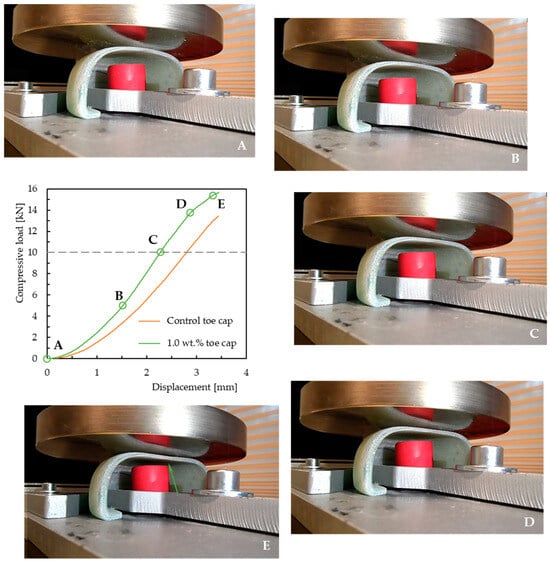
Figure 15.
Representative curves of compression tests and different stages of the toe cap during compression tests on composite reinforced with 1 wt.% of particles (Figures (A–E) refer to different stages in the compression test, as identified in the curve of the graph displacement—compressive load).
The test results indicate that the additive toe cap offers better protection for users’ feet than the control toe cap, because the additive toe cap is more resistant to compression, which means it can withstand heavy object loads without being damaged.
In order to better understand the resistance of the toe cap, Figure 15 shows the different stages of deformation (letters on the displacement vs. compressive load curve and its image) which the toe cap, in this case reinforced with 1 wt.% with particles <75 μm, went through during the compression test. At point A, the toe cap begins to deform elastically, but the chemical bonds between the molecules of the toe cap material are strong enough to resist deformation. At point B, the resistance of the toe cap to displacement is noticeable as the compressive load is gradually increased. The curve shows a linear increase in compressive load with displacement. At point C, the applied force reached the standard value of 10 kN without the toe cap undergoing any plastic deformation that would damage the glass fibre/enhanced epoxy composite. The curve maintains a linear behaviour. At point D, the toe cap was subjected to a compression load of approximately 14 kN. The curve’s behaviour was no longer linear, indicating that damage in the composite is imminent. The toe cap had not yet plastically deformed. At point E, the toe cap begins to accumulate plastic deformation. The chemical bonds between the molecules of the toe cap material begin to break, causing permanent deformation that cannot be reversed, such as breakage of the matrix and fibre in the cross-section (green arrow). At this point, the applied compressive force is approximately more than 15 kN.
4. Conclusions
By reviewing the objectives initially defined, together with the analysis and discussion of the results of the practical investigation performed, some conclusions can be drawn about the feasibility of producing glass fibre and epoxy matrix toe caps.
This study stood out for its analysis of the mechanical properties of fibre-reinforced composites, where the particle size was carefully kept below 75 μm, thus ensuring that smaller particles improve the properties of the epoxy matrix and consequently improve the properties of the composites. The amount of particles incorporated was set at 1% by weight, which proved to be sufficient to significantly alter the properties of the laminates without compromising their processability, using the hand lay-up process. Specifically, fibre type G0101 was used, which is known for its compatibility with epoxy resin and for helping to improve the flexural strength of laminates. The meticulous choice of these parameters was crucial to optimising the material’s performance and understanding the synergies between the matrix and the fibre reinforcement.
The LVI tests demonstrated that the toe caps possess the capacity to endure impacts of up to 100 joules without enduring notable damage, thus validating their appropriateness for incorporation into protective footwear. Furthermore, in compression testing, the toe caps exhibited robustness by withstanding compressive forces exceeding 10 kilonewtons without experiencing failure. Additionally, their controlled deformation behavior, coupled with the absence of residual deformation post-unloading, further affirms their suitability for protective footwear applications.
The problem of waste resulting from the manufacture of wind turbine blades is a complex issue, as these materials are made up of a mixture of glass fibres, resins, and other materials. In order to achieve this goal, glass fibre toe caps were manufactured, making it possible to reuse a valuable material and avoid landfill. In addition, this solution helps to reduce dependence on natural resources, contributing to the environmental sustainability of two sectors of activity: wind energy and footwear.
The main challenge of this study was making the mould in which the toe caps were to be produced. The material initially used did not adhere well to the release agent, making it difficult to remove the toe caps from the mould after the curing process. This required more manual effort when demoulding, which increased the risk of damage to the toe caps and the mould itself. Although this issue was overcome with the additive manufacture of the moulds, the useful time for the development of this work was significantly affected. As a proposal for future studies, it would be interesting to evaluate the development of safety toe caps and also to test solutions that could be applied to the automotive industry (non-structural parts), various components and parts (sports, music, tanks), and decorative and functional equipment (furniture).
Author Contributions
Conceptualization, T.M.L. and P.S.; methodology, T.M.L. and P.S.; validation, T.M.L. and P.S.; formal analysis, T.M.L. and P.S.; investigation, A.R.C. and P.S.; resources, P.S.; data curation, A.R.C.; writing—original draft preparation, A.R.C.; writing—review and editing, T.M.L. and P.S.; visualization, P.S.; supervision, T.M.L. and P.S. All authors have read and agreed to the published version of the manuscript.
Funding
This research received no external funding.
Data Availability Statement
Data are contained within the article.
Acknowledgments
This work was supported in part by the Fundação para a Ciência e Tecnologia (FCT) and C-MAST (Center for Mechanical and Aerospace Science and Technologies) under project UIDB/00151/2020 (https://doi.org/10.54499/UIDB/00151/2020, (accessed on 29 December 2023)).
Conflicts of Interest
The authors declare no conflicts of interest.
References
- Reddy, S.S.P.; Suresh, R.; Hanamantraygouda, M.B.; Shivakumar, B.P. Use of Composite Materials and Hybrid Composites in Wind Turbine Blades. Mater. Today Proc. 2021, 46, 2827–2830. [Google Scholar] [CrossRef]
- Lunetto, V.; Galati, M.; Settineri, L.; Iuliano, L. Sustainability in the Manufacturing of Composite Materials: A Literature Review and Directions for Future Research. J. Manuf. Process. 2023, 85, 858–874. [Google Scholar] [CrossRef]
- Chatziparaskeva, G.; Papamichael, I.; Voukkali, I.; Loizia, P.; Sourkouni, G.; Argirusis, C.; Zorpas, A.A. End-of-Life of Composite Materials in the Framework of the Circular Economy. Microplastics 2022, 1, 377–392. [Google Scholar] [CrossRef]
- De Fazio, D.; Boccarusso, L.; Formisano, A.; Viscusi, A.; Durante, M. A Review on the Recycling Technologies of Fibre-Reinforced Plastic (FRP) Materials Used in Industrial Fields. J. Mar. Sci. Eng. 2023, 11, 851. [Google Scholar] [CrossRef]
- Krauklis, A.E.; Karl, C.W.; Gagani, A.I.; Jørgensen, J.K. Composite Material Recycling Technology—State-of-the-Art and Sustainable Development for the 2020s. J. Compos. Sci. 2021, 5, 28. [Google Scholar] [CrossRef]
- Rani, M.; Choudhary, P.; Krishnan, V.; Zafar, S. A Review on Recycling and Reuse Methods for Carbon Fiber/Glass Fiber Composites Waste from Wind Turbine Blades. Compos. Part B Eng. 2021, 215, 108768. [Google Scholar] [CrossRef]
- Megahed, M.; Fathy, A.; Morsy, D.; Shehata, F. Mechanical Performance of Glass/Epoxy Composites Enhanced by Micro- and Nanosized Aluminum Particles. J. Ind. Text. 2021, 51, 68–92. [Google Scholar] [CrossRef]
- Success, E.O.; Software, H.; Policy, C. Artec 3D Scanners for Additive Manufacturing. Available online: https://www.artec3d.com/3d-scanning-solutions/additive-manufacturing (accessed on 29 December 2023).
- Sicomin SR 8100/SD 882X Infusion System. Available online: http://sicomin.com/datasheets/product-pdf94.pdf (accessed on 4 February 2022).
- Santos, P.; Maceiras, A.; Reis, P.N.B. Influence of Manufacturing Parameters on the Mechanical Properties of Nano-Reinforced CFRP by Carbon Nanofibers. IOP Conf. Ser. Mater. Sci. Eng. 2021, 1126, 012012. [Google Scholar] [CrossRef]
- BS EN ISO 178:2019; Plastics-Determination of Flexural Properties. British Standards Institution; European Committee for Standardization; International Organization for Standardization: Vernier, Switzerland, 2019.
- ASTM D2344/D2344M-22; Standard Test Method for Short-Beam Strength of Polymer Matrix Composite Materials and Their Laminates. ASTM International: West Conshohocken, PA, USA, 2022.
- EN ISO 20346:2022; Personal Protective Equipment: Protective Footwear. European Committee for Standardization; International Organization for Standardization: Geneva, Switzerland, 2022.
- EN ISO 20344:2021; Personal Protective Equipment: Test Methods for Footwear. European Committee for Standardization; International Organization for Standardization: Geneva, Switzerland, 2021.
- Ratna, D.; Chongdar, T.K.; Chakraborty, B.C. Mechanical Characterization of New Glass Fiber Reinforced Epoxy Composites. Polym. Compos. 2004, 25, 165–171. [Google Scholar] [CrossRef]
- Monjon, A.; Santos, P.; Valvez, S.; Reis, P.N.B. Hybridization Effects on Bending and Interlaminar Shear Strength of Composite Laminates. Materials 2022, 15, 1302. [Google Scholar] [CrossRef]
- Grabi, M.; Chellil, A.; Lecheb, S.; Grabi, H.; Nour, A. Impact Behavior Analysis of Luffa/Epoxy Composites Under Low-Velocity Loading. Appl. Compos. Mater. 2024. [Google Scholar] [CrossRef]
- Nejad, A.F.; Bin Salim, M.Y.; Koloor, S.S.R.; Petrik, S.; Yahya, M.Y.; Hassan, S.A.; Shah, M.K.M. Hybrid and Synthetic FRP Composites under Different Strain Rates: A Review. Polymers 2021, 13, 3400. [Google Scholar] [CrossRef]
- Minak, G.; Fotouhi, M.; Ahmadi, M. Low-Velocity Impact on Laminates. In Dynamic Deformation, Damage and Fracture in Composite Materials and Structures; Elsevier: Amsterdam, The Netherlands, 2016; pp. 147–165. ISBN 9780081008706. [Google Scholar]
Disclaimer/Publisher’s Note: The statements, opinions and data contained in all publications are solely those of the individual author(s) and contributor(s) and not of MDPI and/or the editor(s). MDPI and/or the editor(s) disclaim responsibility for any injury to people or property resulting from any ideas, methods, instructions or products referred to in the content. |
© 2024 by the authors. Licensee MDPI, Basel, Switzerland. This article is an open access article distributed under the terms and conditions of the Creative Commons Attribution (CC BY) license (https://creativecommons.org/licenses/by/4.0/).
