Abstract
Machine tools are machines that manufacture different machines and parts. Therefore, the machine tools that support all types of manufacturing are known as “mother machines”. When machining using a machine tool, a cutting tool is mounted into a female taper socket. Wear on the inner surface of the female taper which occurs when changing tools or during heavy cutting has an influence on the lifespan of a tool. Therefore, female tapers require periodic maintenance. In the maintenance on the female tapers of machine tools, sensory inspection has been standardized in JIS and ISO standards. However, this inspection is impossible to evaluate quantitatively and requires a great deal of time. Additionally, this sensory method produces varying accuracies depending on the operators. Therefore, a new method of wear amount measurement was proposed in a previous study to solve these problems. The proposed method is a quantitative measurement method independent of the skill level of the operators. This paper therefore reports an improved method to reduce the error of measurement results using the proposed method. If this proposed method is established, it will contribute to improving production efficiency at the production site. In this method, red lead paint is mixed with red lead powder and oil is used to estimate the amount of wear based on the luminance value of the red lead paint. The red lead concentration has a significant influence on the results. In this study, we investigate the influence of red lead concentration through experiments and report the results.
1. Introduction
Machine tools support the industrial fields because they are the machines that manufacture different machines and parts. Recently, the number of machine tools that can automatically change their tools has increased. Automatic tool changes and heavy cutting incur inner surface wear on female tapers. Machining when the inner surfaces of female tapers are worn lowers the quality of the machined products and production efficiency. Therefore, female tapers require periodic maintenance. In the maintenance for female tapers of machine tools, sensory inspection has been standardized in JIS and ISO standards [1,2,3]. This method is time-consuming and may not be compatible with increasingly automated production sites. Additionally, the method cannot evaluate the amount of wear quantitatively, and its accuracy varies from operator to operator. Therefore, in a previous study [4], a measurement method using fast Fourier transform was proposed to solve these problems. However, this method was not able to obtain highly valid results. Therefore, a method was proposed to measure the amount of wear based on differences in paint color [5]. This proposed method [5] enabled the execution of a quantitative evaluation. To make this proposed method [5] more practical, we aim to achieve quantification, skillessness, and automation. We would also like to further improve our proposal method [5] and contribute to strengthening the production capacity and international competitiveness of industry.
2. Proposed Method
The measurement method proposed in previous studies [5] measures the color intensity of the paint. Paint is applied onto the measurement surface and spread thinly and evenly. As worn areas are usually grooved, the amount of paint therein is greater than that in unworn areas. As the amount of paint increases, the paint film thickness increases, and thus the color of the paint becomes darker [6,7,8]. By photographing the paint area with an infrared camera, the worn area in the photographed image display higher brightness values. Figure 1 shows an example of a photographed image. The luminance value is calculated from the centerline area of the photographed image. Figure 2 shows a graph of the luminance values. Figure 3 shows a smoothed waveform of the graph of the luminance values. The difference between the maximum and minimum values in the smoothed waveform in Figure 3 is the maximum luminance difference.
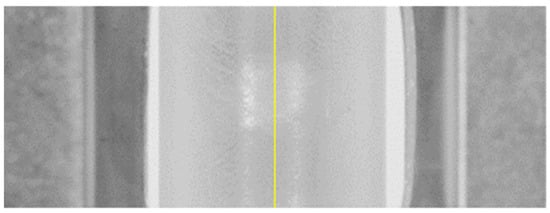
Figure 1.
Paint area photographed with an infrared camera.
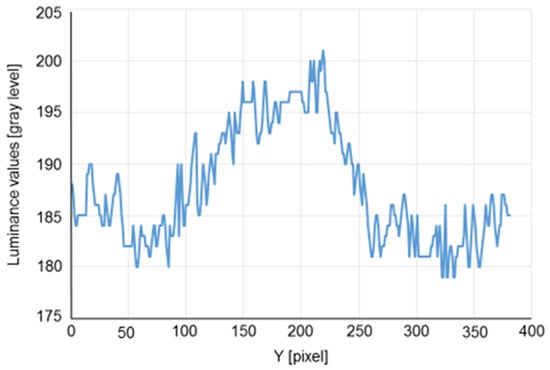
Figure 2.
Line plot of the luminance values extracted from Figure 1.
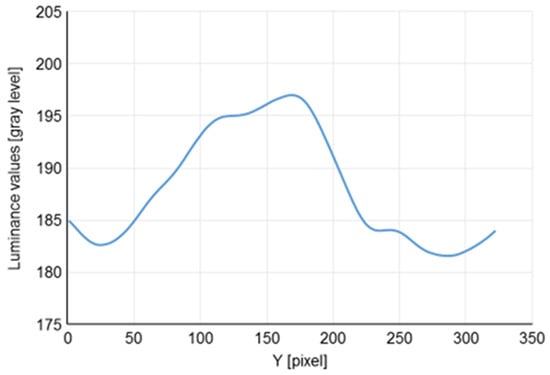
Figure 3.
A smoothed waveform of the graph of the luminance values.
3. Experiment
3.1. Experiment Equipment
In this proposed method, red lead paint mixed with red lead powder (Figure 4) and oil is used. Figure 5 shows the female taper, which is the object of measurement in this study. The amount of wear of female tapers is difficult to measure quantitatively. Therefore, comparison of experimental results is impossible. Thus, a ring gauge (Niigata Seiki Co., Ltd., Niigata, Japan), as shown in Figure 6, was used as the experimental specimen instead of the female taper in this study. Figure 7 shows the imaging device used in the experiment. The camera was an infrared CMOS camera (L-834, HOZAN TOOL IND. Co., Ltd., Osaka, Japan.), which was mounted on the magnetic base on an optical table (TT-D8040, CHUO PRECISION INDUSTRIAL Co., Ltd., Tokyo, Japan.). The light source was an infrared LED light (peak wavelength 950 nm, L-709, HOZAN TOOL IND.CO., LTD.). Figure 8 shows the cylindrical plano-convex lens (SIGMAKOKI CO., LTD., Tokyo, Japan, radius of curvature: 7.79 mm) used in the experiment. The cylindrical plano-convex lenses were also used to spread the paint thinly and evenly.
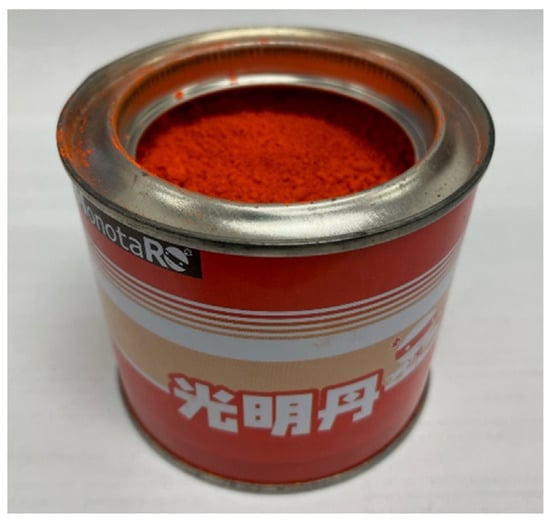
Figure 4.
Red lead powder.
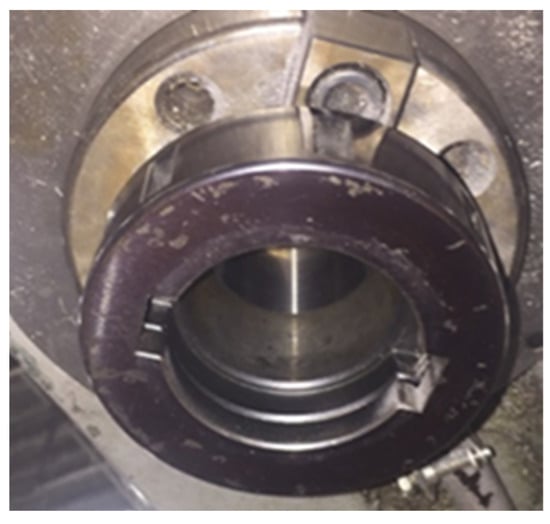
Figure 5.
Female taper.
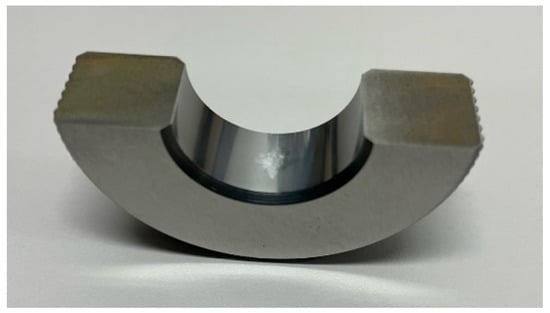
Figure 6.
Ring gauge.
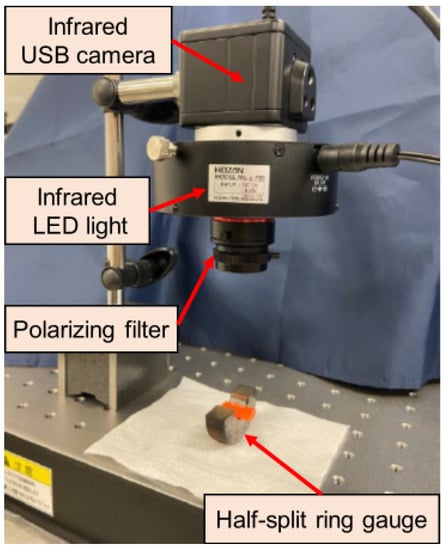
Figure 7.
Imaging device.
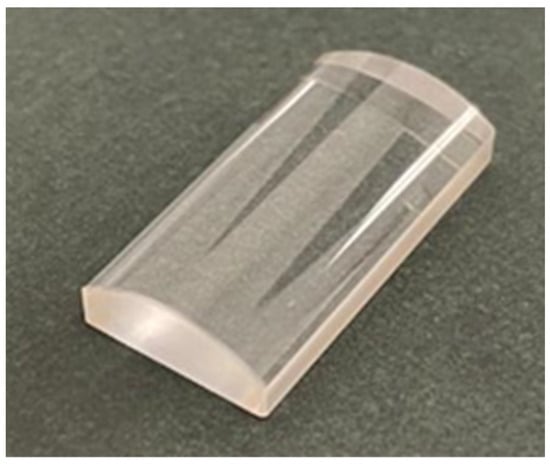
Figure 8.
Cylindrical plano-convex lens.
3.2. Experimental Method
The previous method [5] demonstrated the problem of introducing errors because the measurement conditions were not defined. In particular, the red lead concentration had a significant influence on the results. Therefore, a suitable concentration of red lead paint for the measurement was estimated to reduce the error of measurement results [9,10]. However, the previous studies [5] were conducted with a small number of experiments, and there was room for improvement in the experimental methods. Therefore, in this study, we improved the experimental method and increased the number of experiments, which fixed the wear area to be measured and reduced the error. Then, we estimated the concentration of red lead paint suitable for more accurate wear amount measurement.
In this study, experiments were conducted at five different red lead paint concentrations to decide the concentration of red lead paint necessary for accurately measuring the amount of wear [9,10]. The five concentrations of red lead paint used in this study were 2:1, 1.5:1, 1:1, 1:1.5, and 1:2. This experiment was conducted ten times for each concentration of the red lead paint, and the maximum difference in luminance was calculated. From these results, the appropriate concentration of red lead paint to measure the amount of wear can be inferred.
3.3. Experimental Results
The results of the experiment, conducted ten times for each concentration of red lead paint, are shown below. Table 1 lists the maximum differences in the luminance obtained in the experiments.

Table 1.
Maximum differences in the luminance obtained in the experiments.
4. Conclusions
In this study, we estimated the appropriate concentration of red lead paint for the wear volume measurement method for female tapers proposed in a previous study. The main conclusions are as follows.
This study fixed the wear area to be measured to improve the measurement method and accuracy. By increasing the number of experiments from the previous study, the error in the measurement results was reduced. As a result, we estimated a more appropriate concentration of red lead paint than in previous studies. The suitable conditions for measuring the amount of wear are when standard deviation and range of the maximum luminance difference are small. Therefore, we estimated that the most suitable concentration of red lead paint for measuring the amount of wear is when the ratio of red lead powder to oil is 1:1. When the concentration of red lead paint was high, spreading the paint evenly was difficult. When the concentration of red lead paint was low, the luminance values of the photographed image were more affected by light. The error in the results for the same concentration of red lead paint suggests that the paint was not evenly applied. Therefore, the most important key of the proposed method is to spread the paint thinly and evenly. In the future, we will aim to solve this problem.
Author Contributions
Conceptualization, I.Y.; methodology, I.Y. and K.F.; software, K.F.; validation, K.F.; formal analysis, I.Y. and K.F.; investigation, K.F.; resources, I.Y.; data curation, K.F.; writing—original draft preparation, I.Y., K.F. and M.M.; writing—review and editing, I.Y., K.F. and M.M.; visualization, I.Y. and K.F.; supervision, I.Y.; project administration, I.Y.; funding acquisition, I.Y. All authors have read and agreed to the published version of the manuscript.
Funding
This research received no external funding.
Institutional Review Board Statement
Not applicable.
Informed Consent Statement
Not applicable.
Data Availability Statement
Not applicable.
Conflicts of Interest
The authors declare no conflict of interest.
References
- ISO 296:1991; Machine Tools—Self-Holding Tapers for Tool Shanks. International Organization for Standardization: Geneva, Switzerland, 1991.
- JIS B 3301:2008; Taper Gauges—Morse Tapers and Metric Tapers. Japanese Standards Association: Tokyo, Japan, 2008. (In Japanese)
- ISO 7388-1:2007; Tool Shanks with 7/24 Taper for Automatic Tool Changers—Part 1: Dimensions and Designation of Shanks of Forms A, AD, AF, U, UD and UF. International Organization for Standardization: Geneva, Switzerland, 2007.
- Nakaya, D.; Yoshida, I. Feasibility study of wear measurement method by interference fringe analysis for female taper surface of machine tool. In Proceedings of the 4th STI-Gigaku 2019, Niigata, Japan, 8–9 November 2019. [Google Scholar]
- Nakaya, D.; Yoshida, I. Study on wear amount measurement method using paint for maintenance of female taper surface of machine tool. Trans. GIGAKU 2021, 8, 08006/1–08006/8. [Google Scholar]
- Kondo, T. On the relation between colour and thickness of high-solid lacquer coating films. J. Jpn. Soc. Colour Mater. 1961, 34, 2–4. (In Japanese) [Google Scholar] [CrossRef]
- Tatumi, M. Colour of printing inks and ink film thickness. J. Jpn. Soc. Colour Mater. 1961, 34, 240–245. (In Japanese) [Google Scholar] [CrossRef]
- Fujimoto, S. A Feasibility Study of Estimating Method for Thickness of the Self-Indicating Coatings by Color Image Analysis; National Maritime Research Institute: Tokyo, Japan, 2020; Volume 19, pp. 501–510. (In Japanese) [Google Scholar]
- Nagai, S.; Fujiyoshi, K.; Machida, H.; Yoshida, I. Wear amount measuring method using image analysis to innovate contact inspection for female taper socket of machine tools. In Proceedings of the 6th STI-Gigaku 2021, Online, 20–22 October 2021. [Google Scholar]
- Fujiyoshi, K.; Yoshida, I.; Mawatari, M. Wear Amount Measuring Method Using Image Analysis to Innovate Contact Inspection for Female Taper Socket of Machine Tools. Part- 2: Influence of Red Lead Concentration on Measured Results. In Proceedings of the 7th STI-Gigaku 2022, Online, 18–19 November 2022. [Google Scholar]
Disclaimer/Publisher’s Note: The statements, opinions and data contained in all publications are solely those of the individual author(s) and contributor(s) and not of MDPI and/or the editor(s). MDPI and/or the editor(s) disclaim responsibility for any injury to people or property resulting from any ideas, methods, instructions or products referred to in the content. |
© 2023 by the authors. Licensee MDPI, Basel, Switzerland. This article is an open access article distributed under the terms and conditions of the Creative Commons Attribution (CC BY) license (https://creativecommons.org/licenses/by/4.0/).