Article

Effect of Wheel Path in Raster Grinding on Surface Accuracy of an Off-Axis Parabolic Mirror

State Key Laboratory of High-Performance Precision Manufacturing, Dalian University of Technology, Dalian 116024, China
*
Author to whom correspondence should be addressed.
Appl. Sci. 2023, 13(19), 11096; https://doi.org/10.3390/app131911096
Submission received: 14 September 2023 / Revised: 6 October 2023 / Accepted: 6 October 2023 / Published: 9 October 2023
(This article belongs to the Special Issue Advances in Machining Process for Hard and Brittle Materials)

Abstract

:
Off-axis parabolic mirrors have extensive applications in X-ray optics, with the precision of their curvature directly impacting grazing-incidence focusing performance. Notably, the off-axis parabolic surface has non-rotating and non-symmetrical characteristics. Ultra-precision raster grinding utilizing a diamond wheel is a common method. Crucially, establishing an optimal wheel path stands as the key to ensuring surface accuracy during off-axis paraboloid grinding. In this study, according to the double curvature property of an off-axis parabolic surface, two different wheel paths were compared: one tracing the meridian direction (parabolic generatrix) and the other following the arc vector direction (arc). The results showed that the wheel path in raster grinding stepping along the arc vector direction can obtain a smaller scallop height and higher surface accuracy. The surface accuracy of one step along the arc vector direction is 9.6 μm, and that of the other step along the meridian direction is 32.6 μm. A model of the scallop height was established based on the relative relationship between adjacent wheel paths, and the error is within 5%. According to the correlation between scallop height and shape error, we conducted an analysis of the spatial distribution of shape errors under varying wheel paths. The wheel path that steps along the arc vector is more suitable for raster grinding of the off-axis paraboloid. The above study can provide theoretical guidance for the wheel path planning of off-axis parabolic mirrors with high surface accuracy.

1. Introduction

With the rapid development of X-ray optics, off-axis parabolic surfaces have been widely used in grazing-incidence optical systems, such as X-ray telescopes [1,2,3] and synchrotron radiation mirrors [4,5]. Monocrystalline silicon is regarded as an ideal material for X-ray mirrors with its excellent mechanical and thermal properties. However, it is difficult to machine due to its high hardness and brittleness [6,7,8]. Diamond turning, fly-cutting, and milling are the primary manufacturing technologies for generating free-form surfaces. But they are not sufficiently effective in machining free-form optics on hard and brittle materials [9]. Ultra-precision grinding has been demonstrated to have outstanding capability in machining difficult-to-cut materials [10]. To obtain better imaging quality of the mirror, it is particularly important to ensure the surface accuracy of the off-axis parabolic surface in grinding processing [11,12]. The wheel path is an important factor affecting the accuracy of the grinding surface shape. Selecting the appropriate wheel path planning methods can result in higher surface shape accuracy [13,14]. Therefore, this paper studies the wheel path planning methods in the off-axis paraboloid grinding of monocrystalline silicon.
Some scholars have conducted research on the curved surface grinding of hard and brittle materials. Yin et al. [15] presented a theoretical and experimental investigation on 3D surface generation in single-point diamond tuning using a slow tool servo. The form 0error of the off-axis paraboloid caused by a tool centering error was analyzed and verified via a cutting experiment. Wang et al. [16] used the freeform generation technique of a slow tool servo with a diamond grinding wheel (STS-DGW) previously proposed by us to manufacture free-form optics made of hard and brittle materials, established a theoretical model of the scallop height during biconical free-form grinding, and studied the effects of curvature changes on scallop height. Chen et al. [17] carried out grinding of a monocrystal silicon rotary aspheric surface in parallel and cross paths, and analyzed the influence of grinding wheel machining attitude and different wear states of the grinding wheel on the surface quality and surface shape accuracy of the machined surface in two modes. Wang et al. [18] studied the ultra-precision grinding of non-rotating asymmetric biconical free-form optics with a raster grinding path. Surface roughness down to Ra 8.4 nm was successfully achieved on the monocrystalline silicon biconical free-form optics surface via ultra-precision grinding with a vertical raster grinding path.
To improve grinding accuracy and processing efficiency, many scholars have optimized and analyzed the wheel path based on the principle of scallop height generation. In the ultra-precision and high-efficiency grinding of large-diameter aspheric lenses, Zhou et al. [19] optimized and adjusted the raster step pitch under the premise of controlling the surface waviness after grinding, which improved the material removal efficiency in complex surface grinding. Radzevich et al. [20] studied the wheel-path generation method for the multi-axis NC machining of sculptured surfaces, proposed a time-minimal wheel-path, and discussed local and global wheel-path generation, eliminating the influence of scallop height on machining accuracy. Xi et al. [21] proposed a nonuniform rational basis spline (NURBS) interpolation method based on grinding wheel path planning. The characteristic parameters of the NURBS machining program were used to calculate the accuracy of curve interpolation path planning, and the grinding wheel path control points were optimized to effectively improve the grinding accuracy and efficiency. Huang et al. [22] reduced the influence of the geometric error of a grinding wheel on the accuracy of the aspheric profile by setting the initial grinding cycle. A new compensation approach was also developed to achieve wheel path optimization by modifying the NC wheel path for the next grinding cycle, with the grinding profile measured using a Talysurf profiler. Chen et al. [23] built a theoretical scallop height model, and proposed a method to control the generation of an equal-scallop-height wheel path, which led to the uniform distribution of the scallop height of the freeform surface.
The scallop height has an important influence on the surface roughness and surface morphology after surface grinding. Therefore, Deng et al. [24] studied a mathematical model of the scallop height in rotary surface grinding. According to the corresponding relationship between the scallop height and the surface roughness, combined with the microscopic observation of the surface morphology, the influence of process parameters on the surface roughness and surface morphology upon precision grinding of a silicon nitride ceramic rotary surface workpiece was described. Wang et al. [18] carried out ultra-precision grinding of non-rotational asymmetric biconical free-form optical elements using different raster wheel paths. The effects of grinding strategy, wheel path, and scallop height on the grinding contour accuracy and surface quality of biconical free-form optical devices were discussed. Yan et al. [8] proposed a new method to calculate the surface scallop height of nano-ziro2 ceramics during ultra-precision grinding. This method can obtain a surface scallop height that conforms to the three-dimensional roughness sampling characteristics, and realize the prediction of the three-dimensional roughness following ultra-precision grinding. Yu et al. [25] proposed a multi-scale model that uses different wheel paths for grinding and predicts the surface topography of micro-aspheric-cylindrical structural array (MACSA) mold ground.
In summary, the method of controlling the wheel path to complete the entire process of free-form surface processing is widely used. And the grinding process of the off-axis parabolic surface of monocrystalline silicon can be planned and optimized based on the principle of scallop height generation. The off-axis parabolic surface is a non-rotating asymmetric surface, and is more suitable for raster path grinding. And the off-axis parabolic surface has the geometric characteristics of double curvature (the curvature in the meridian direction is different from that in the arc vector direction), and a raster path that can be divided into two wheel paths: stepping along the meridian direction and stepping along the arc vector direction [26]. There are few studies on the influence of different wheel paths on the surface shape error of a workpiece.
Therefore, two different wheel paths of off-axis paraboloid grinding are compared in this paper. The scallop height, surface roughness, and surface shape error distribution of the machined surface are measured. Based on the scallop height model and the mapping relationship between the scallop height and the surface shape error, the calculation of the scallop height value and the analysis of the distribution of the surface error are realized. The influence of different raster paths on the scallop height and shape error is explained, and the wheel path suitable for off-axis paraboloid grinding is optimized.

2. Materials and Research Methods

2.1. Experimental Details

The off-axis paraboloid is a part of the rotationally symmetric paraboloid, which is a parabola along the meridian direction and an arc in the vertical meridian direction. In essence, it belongs to the quadric rotational aspheric surface. The general expression of the quadric rotational surface in the optical system is as follows [27]:
x = c z 2 + y 2 1 + 1 c 2 k + 1 z 2 + y 2
c is the vertex curvature of the aspheric surface; k is an aspherical eccentricity function (parabola k = −1).
In this test, the off-axis parabolic equation (Equation (2)) to be processed was selected, as shown in Figure 1:
x = 0.286 z 2 + y 2 / 2 5688 x 5770 25 y 25
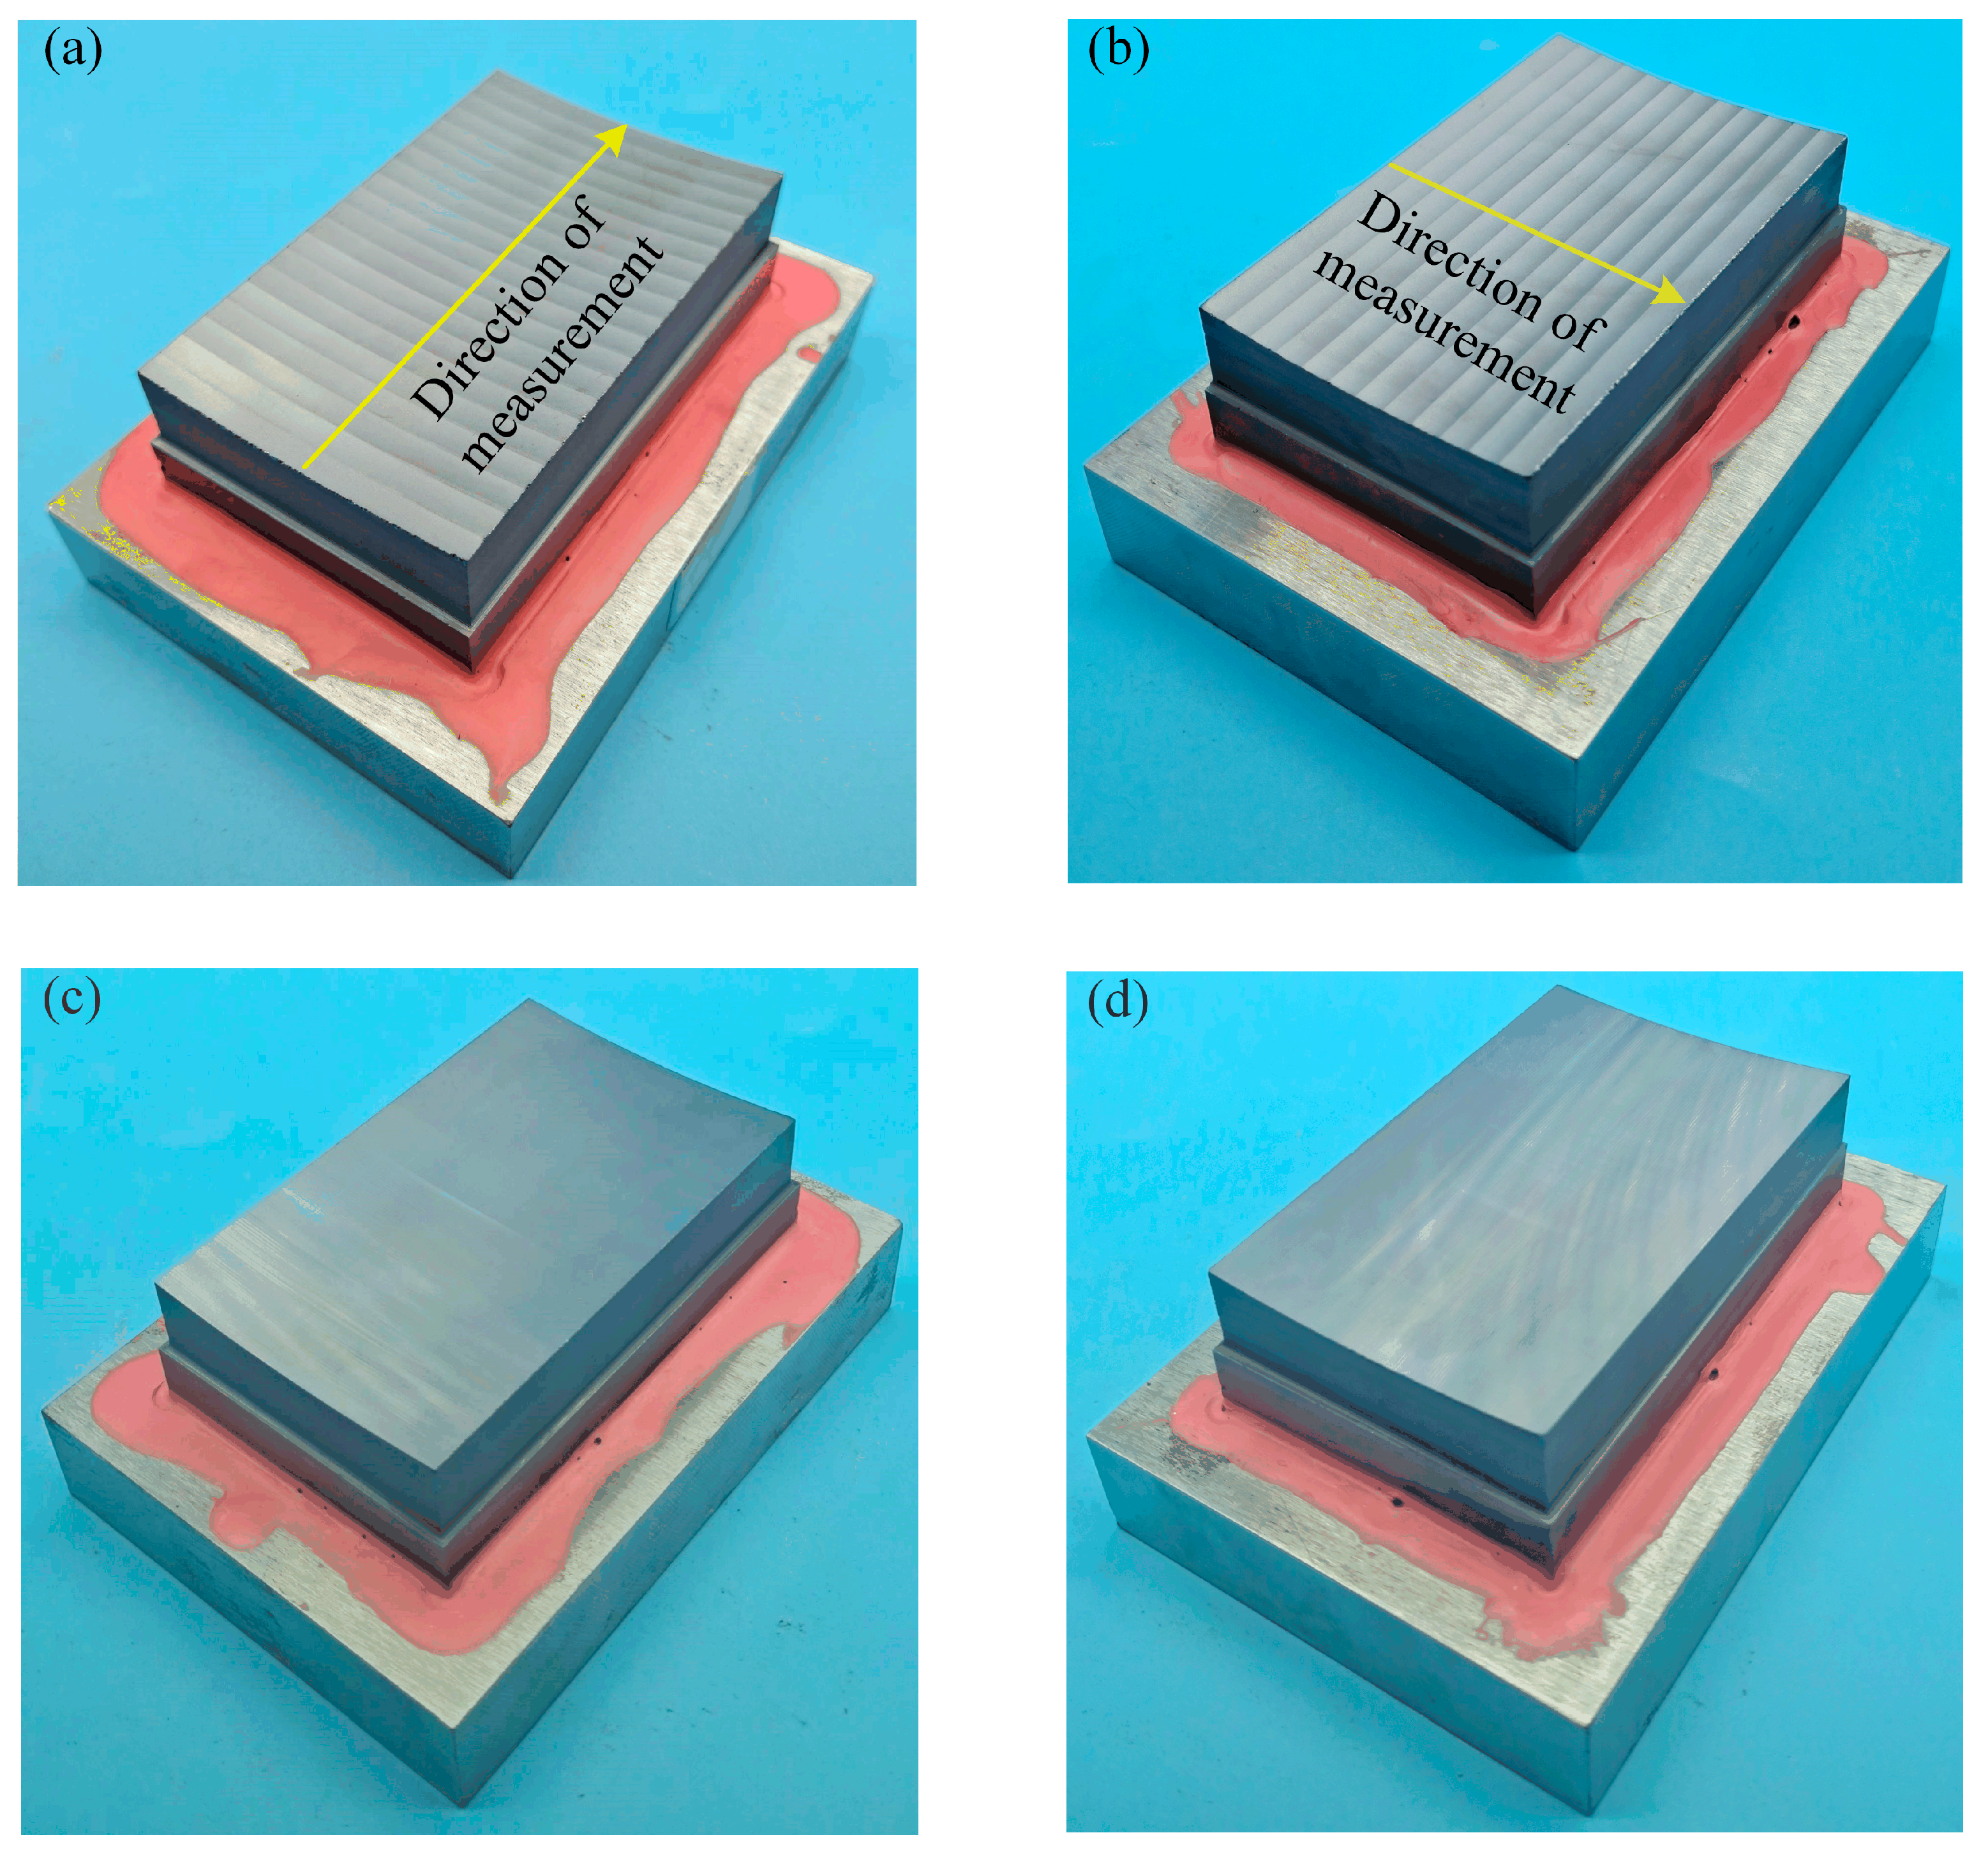
The method of controlling the wheel path to complete the entire free-form surface processing is widely used. The concept of the locus shaping technique comes from turning processing [28]. The tool tip moves along the generatrix of the rotary workpiece. At the same time, the workpiece rotates around the spindle. The shape of the workpiece is realized by the tool tip depicting the dense path curve on the workpiece. There are two raster paths in the ultra-precision grinding of the off-axis parabolic surface: one is to step along the meridian direction, and the other is to step along the arc vector direction [29,30]. as shown in Figure 2. Firstly, rough grinding was carried out to realize the rapid removal of materials, and then, finish grinding was carried out to ensure the surface accuracy of the machined surface. The size of the workpiece used was 80 mm in length, 50 mm in width, and 50 mm in thickness. The grinding wheel was a diamond cup wheel. The inner surface of the off-axis parabolic surface was a concave surface. To avoid machining interference, the wheel was tilted at a certain angle during the grinding process, so that the position of the tool contact point was located on the end face boundary contour of the wheel [31]. The experimental machine was a five-axis milling vertical machining center (KMC600S UMT, KEDE Numerical Control Co., Ltd., Shanghai, China). The control resolution of the X-axis/Y-axis/Z-axis was 0.0001 mm, and the C-axis was 0.0001°. The positioning accuracy of the X-axis/Y-axis was 0.008 mm/0.005 mm, and the repeated positioning accuracy of the X-axis/Y-axis was 0.005 mm/0.003 mm. The processing parameters are shown in Table 1.

2.2. Detection Method

The existence of the wheel step made it inevitable that there would be an unprocessed area between the adjacent wheel paths, and the scallop height had an effect on the surface accuracy of the machined surface. Therefore, the scallop height profile and surface shape after the test were detected. Because of the larger amount of step in the rough grinding, the scallop height as larger. This was more convenient for the detection of scallop height.
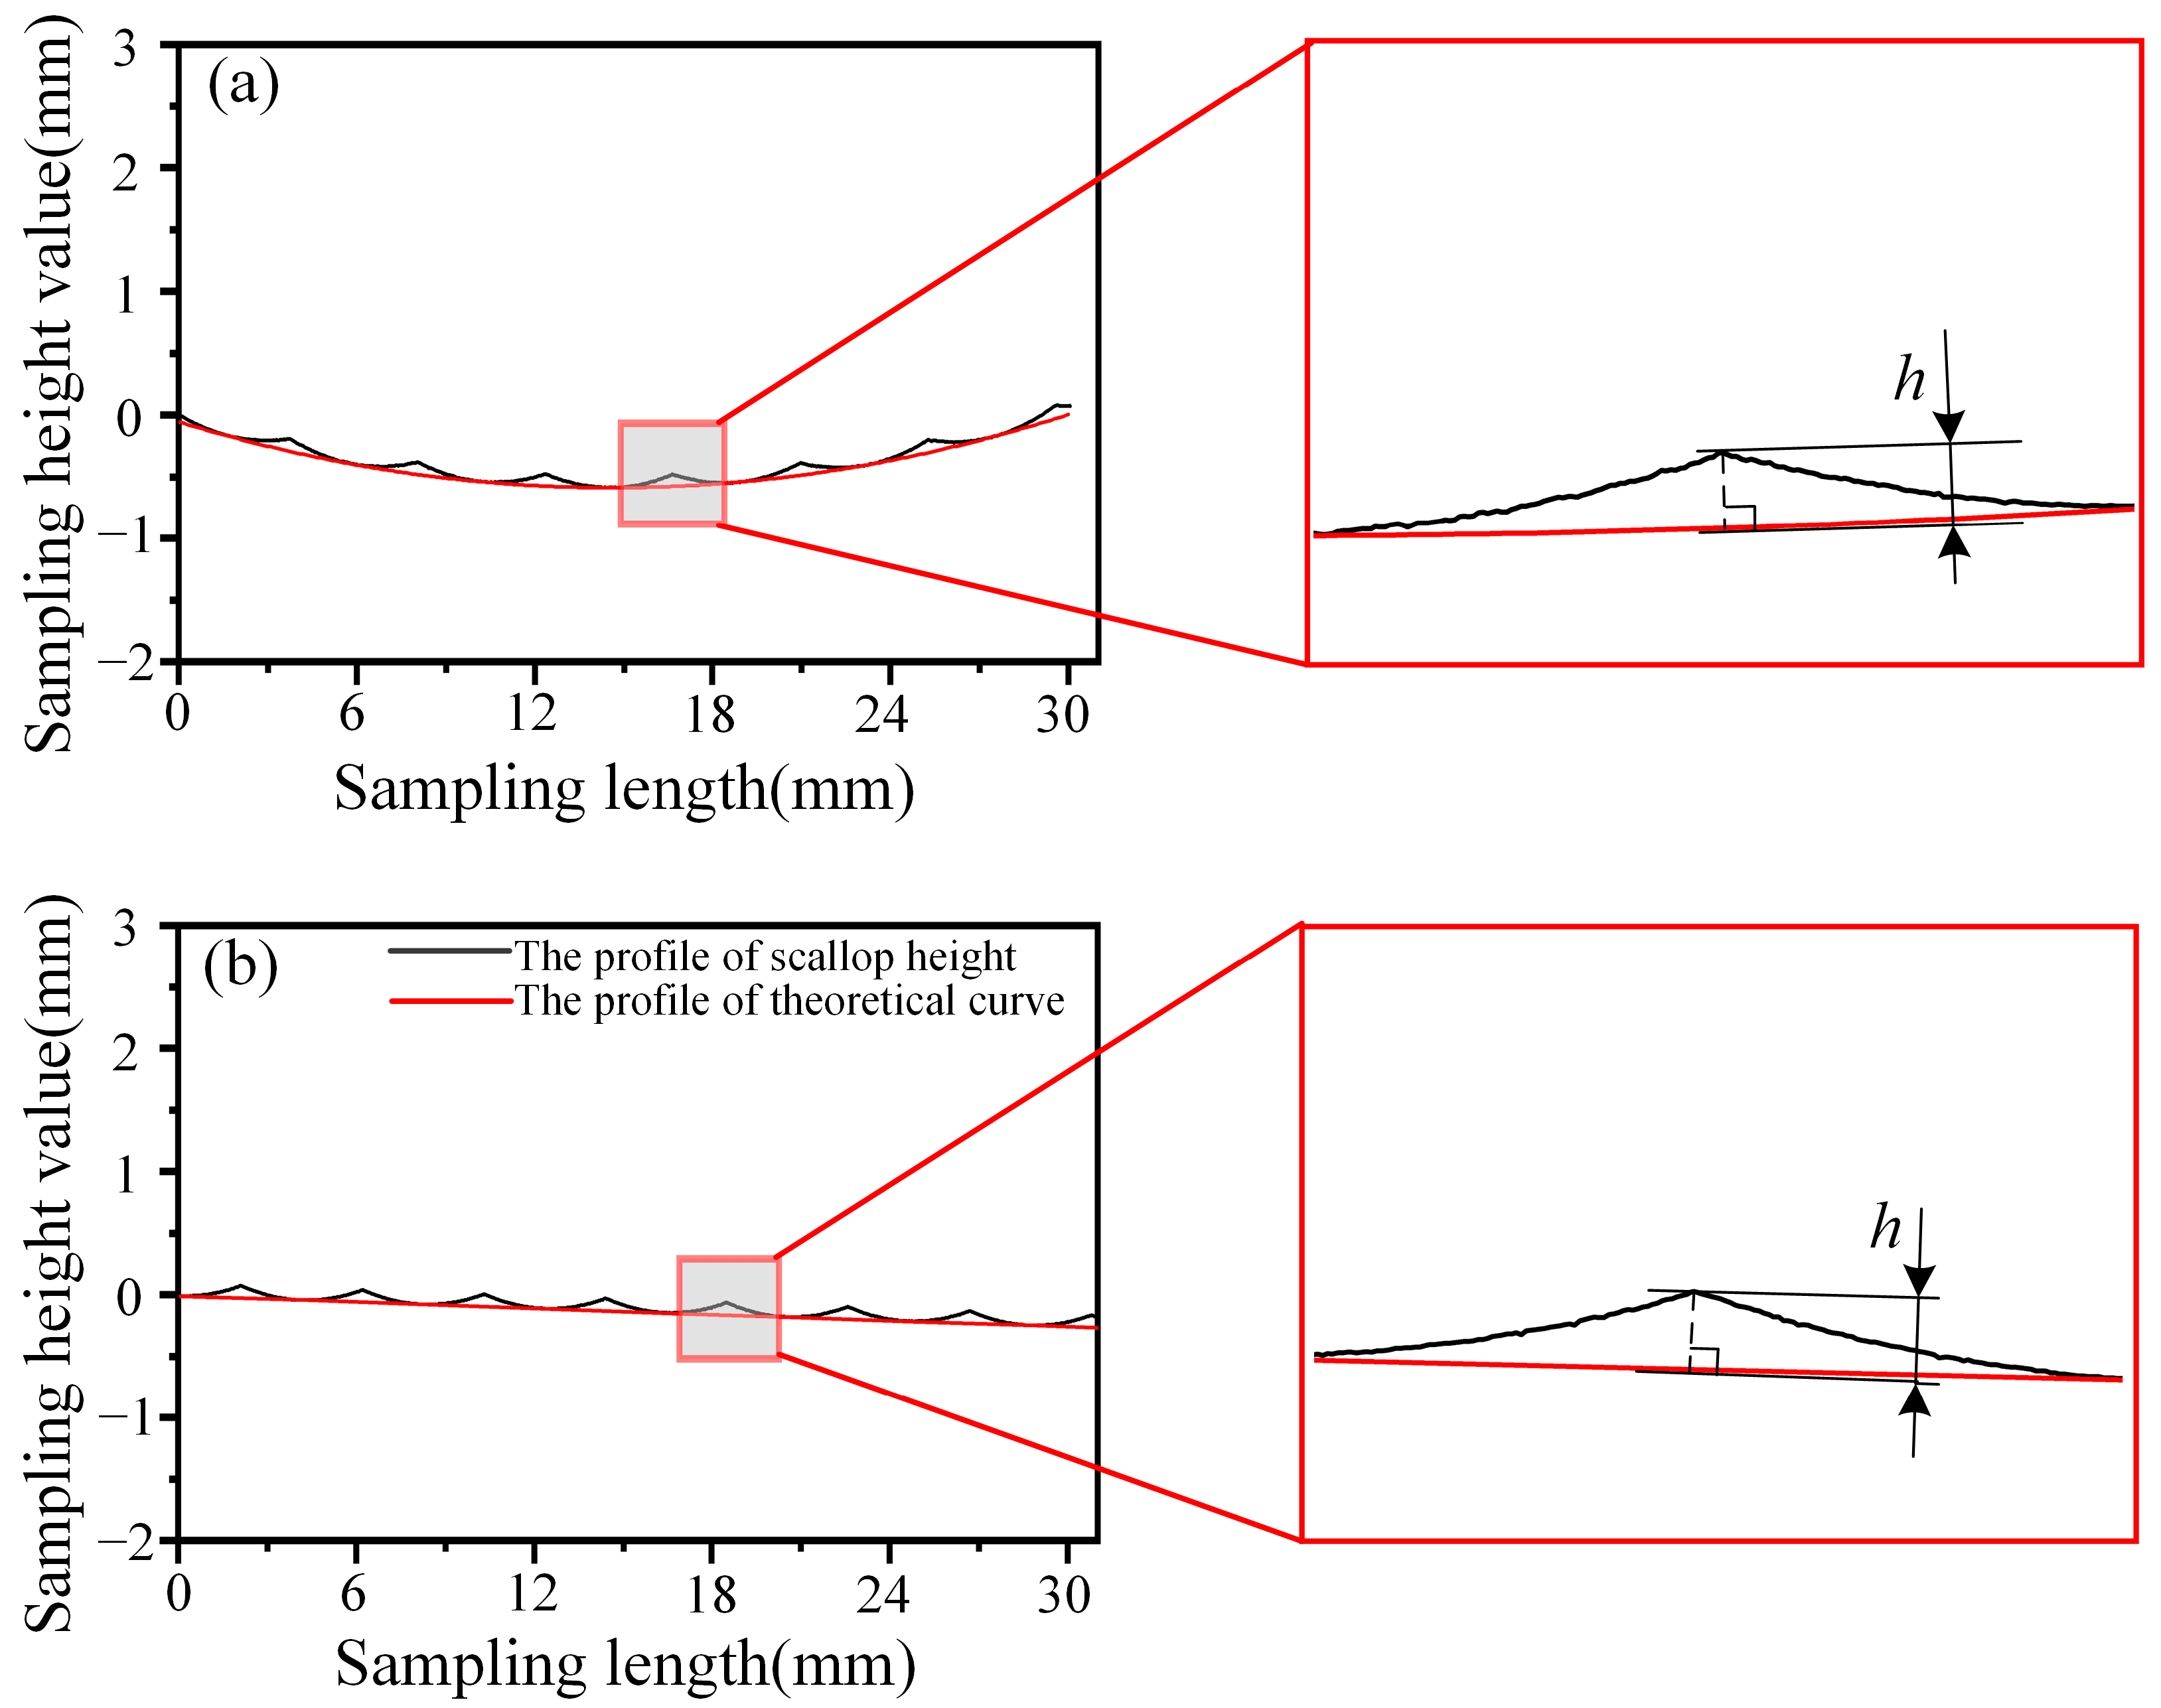
Contact profilometry (Talysurf CLI2000, Taylor Hobson Ltd., Leicester, UK) was used to detect the selected position of the surface after rough grinding (two center lines of the off-axis parabolic surface), as shown in Figure 3. The probe detects the wavy contour of the surface along the step direction, and measures the distance from the adjacent peak to the trough of the scallop height contour in the vertical direction, that is, the true scallop height value [32]. An optical interference profiler (NewView 9000, ZYGO Corporation, CT, Middlefield, USA) was used to detect the surface topography and measure the roughness of the off-axis parabolic surface after rough grinding and finish grinding. The surface accuracy of the machined surface was guaranteed via finish grinding, so the off-axis parabolic surface after finishing was detected. A three-coordinate measuring machine (PRISMO, ZEISS, Berlin, Germany) was used to realize the contact measurement of the surface accuracy [33,34]. By controlling the probe to scan the entire machining surface, the three-dimensional coordinate point cloud data of the actual machining surface was obtained.

3. Result

3.1. Scallop Height

The scallop height profile of the off-axis parabolic surface after rough grinding was measured, as shown in Figure 4. The measured value of the scallop height along the meridian direction is about 0.0964 mm, and the measured value of the scallop height along the arc vector direction is about 0.0933 mm. It was found that the scallop height of the raster path along the arc vector direction is smaller than that of the raster path along the meridian direction.

3.2. Surface Roughness

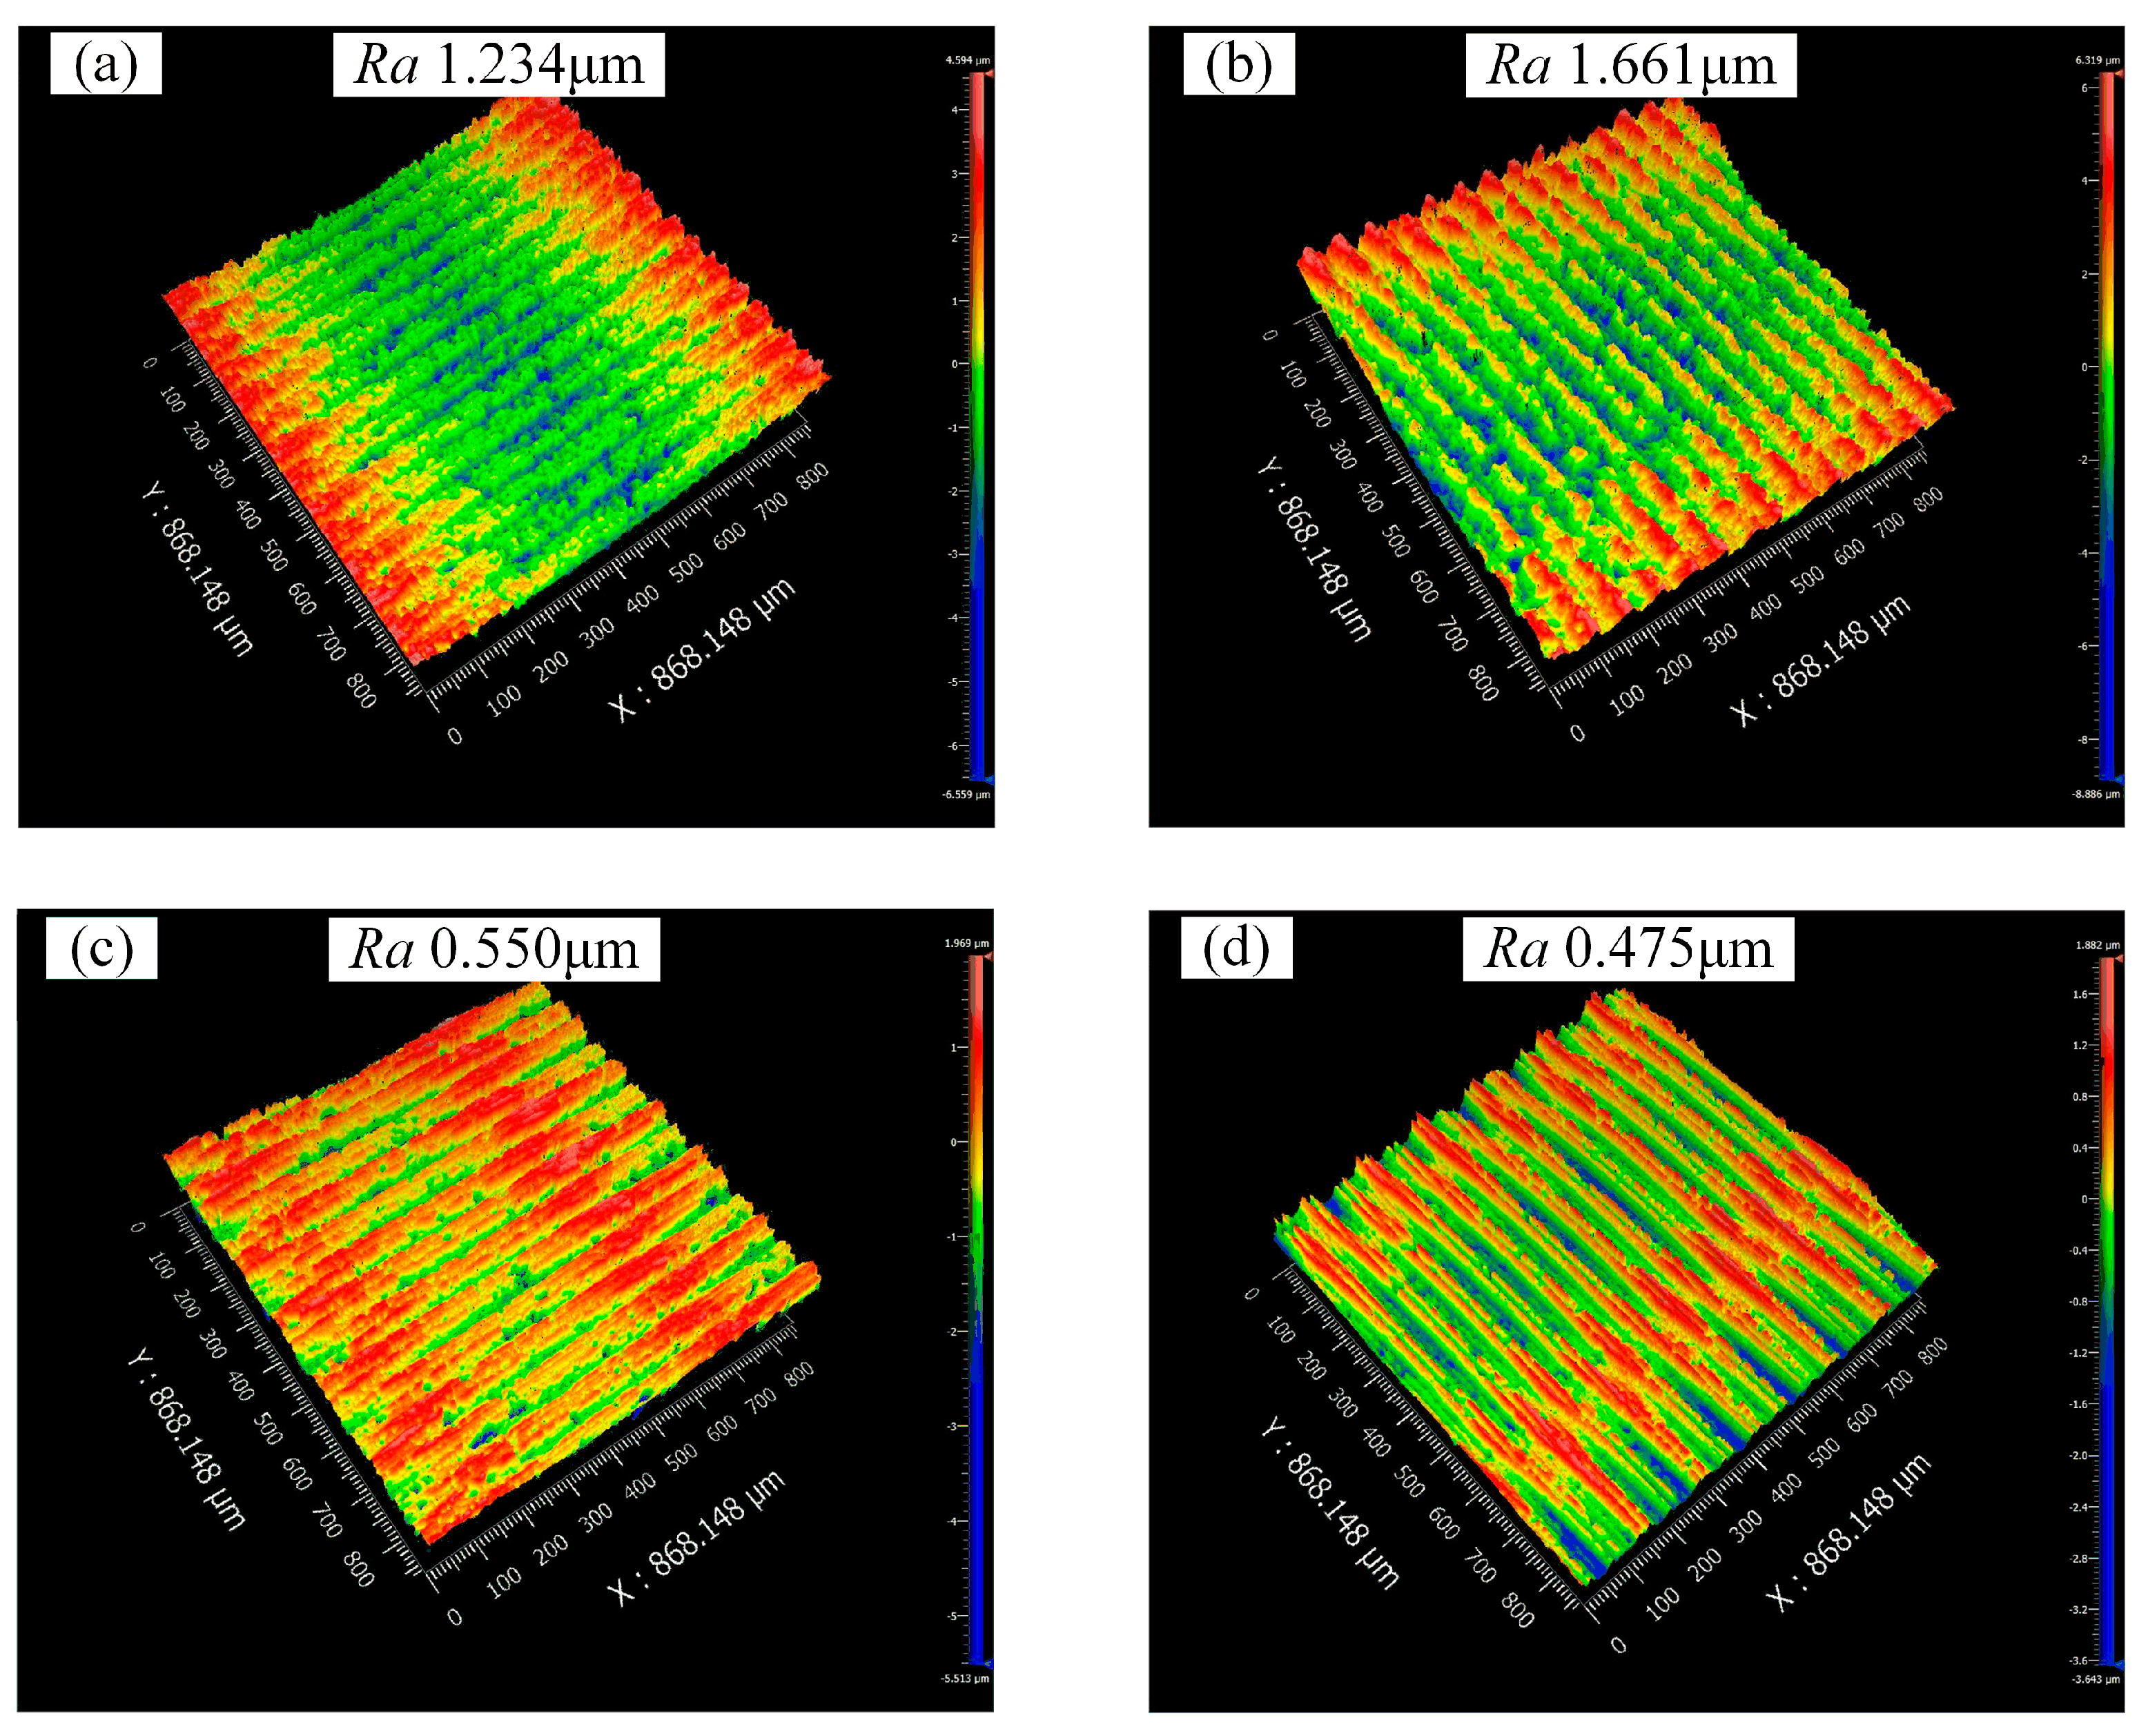
The average surface roughness (Ra) of the off-axis parabolic surface after rough grinding and finish grinding was detected, as shown in Figure 5. After rough grinding, the surface roughness following step machining along the meridian direction is 1.234 μm, and the surface roughness following step machining along the arc vector direction is 1.661 μm. After finishing, the surface roughness following step machining along the meridian direction is 0.550 μm, and the surface roughness following step machining along the arc vector direction is 0.475 μm. For both rough grinding and finish grinding, there are large peaks on both sides of the wheel path.

3.3. Surface Shape Error

The surface shape of the off-axis parabolic surface after finish grinding was measured using a three-coordinate measuring machine. The results are shown in Figure 6. There is an error between the measured surface shape and the theoretical profile surface shape, and it is found that as the x value increases, the measured surface shape changes from above the theoretical profile to below the theoretical profile, and the surface shape is different.

4. Discussion

According to the results of the grinding test, it is found that the scallop height value and the surface error distribution on the off-axis parabolic surface after the grinding of the two raster paths are different. To study the influence of the two paths on the scallop height and the surface error distribution, in this paper, a scallop height model and a prediction model of the surface error distribution were established.

4.1. Modeling Scallop Height of Off-Axis Parabolic Surface

The influences of the selection of wheel path and of process parameters such as grinding wheel radius, processing step pitch, and workpiece curvature on the scallop height are also greater. Therefore, it was of great significance to build a scallop height model and analyze the influence of wheel path and process parameters on the scallop height in off-axis paraboloid grinding.
When stepping along the arc vector direction, the radius of curvature at each point of the workpiece on the stepping arc is equal, so the radius of curvature of the cutter contacts points and the radius of curvature of the small arc segment between the adjacent cutter contacts are both R along the wheel path direction.
When stepping along the meridian direction, it is assumed that the coordinates of the cutter contact points corresponding to the adjacent grinding wheel paths are P1(x1, y1) and P2(x2, y2), respectively. Because the radius of curvature of each point on the parabola is not equal, the radius of curvature of the two cutter contacts points and the small arc between the two points on the parabola are not equal. However, in the grinding process, the step pitch between the adjacent grinding wheel path is usually very small. In the step direction, the curvature radius of the bottom point of the scallop height is close to that of the wheel contact point (R1R). To simplify the calculation, the radius of curvature R of the current wheel contact is used to replace the radius of curvature of the bottom point of the scallop height. On this basis, a generalized model of the scallop height of the two wheel paths was established.
Figure 7 shows the calculation of the scallop height of the two adjacent wheel paths in the aspheric grinding. P1 and P2 are the two adjacent grinding points on the work surface, R is the radius of curvature of the bottom point of the scallop height on the workpiece, O is the center of the curvature radius of the workpiece, r is the wheel radius, D1 is the wheel center, D2 is the center of the wheel after the workpiece has gone around once, and l is the adjacent wheel center distance. The blue solid circle is the position of the wheel during current grinding, and the blue dotted line is the position of the wheel in the previous grinding path.
The expression of the scallop height h is calculated as follows:
h = R O E ¯ E F ¯
According to the Pythagorean theorem,
O E ¯ = R r cos l / 2 R
E F ¯ = r 2 ( R r ) 2 sin 2 l / 2 R
To bring Equations (4) and (5) into Equation (3), the following equation can be used:
h = R r 2 ( R r ) 2 sin 2 l / 2 R R r cos l / 2 R
Based on the scallop height value calculated by the scallop height model and combined with the wheel attitude (fixed angle α in the feed direction of the wheel), the value H of the scallop height in the vertical direction when the wheel is tilted can be obtained.
H = h sin α = [ R r 2 ( R r ) 2 sin 2 l / 2 R R r cos l / 2 R ] sin α
According to the established scallop height model, it can be seen that the workpiece curvature, grinding wheel radius, and step pitch all affect the scallop height. Therefore, combined with the scallop height model, they provide a theoretical basis for the selection of wheel path and the determination of process parameters.

4.2. Analysis of the Factors Affecting the Scallop Height of the Grinding Surface

4.2.1. Effect of Grinding Wheel Radius on Scallop Height

The scallop height h is a function of the wheel radius r, and the partial derivative of the wheel radius r occurs on both sides of Equation (6):
h r = 2 r + 2 sin 2 ( l / 2 R ) R r r 2 R r 2 sin 2 ( l / 2 R ) + cos ( l / 2 R )
According to Equation (8):
h r < 0
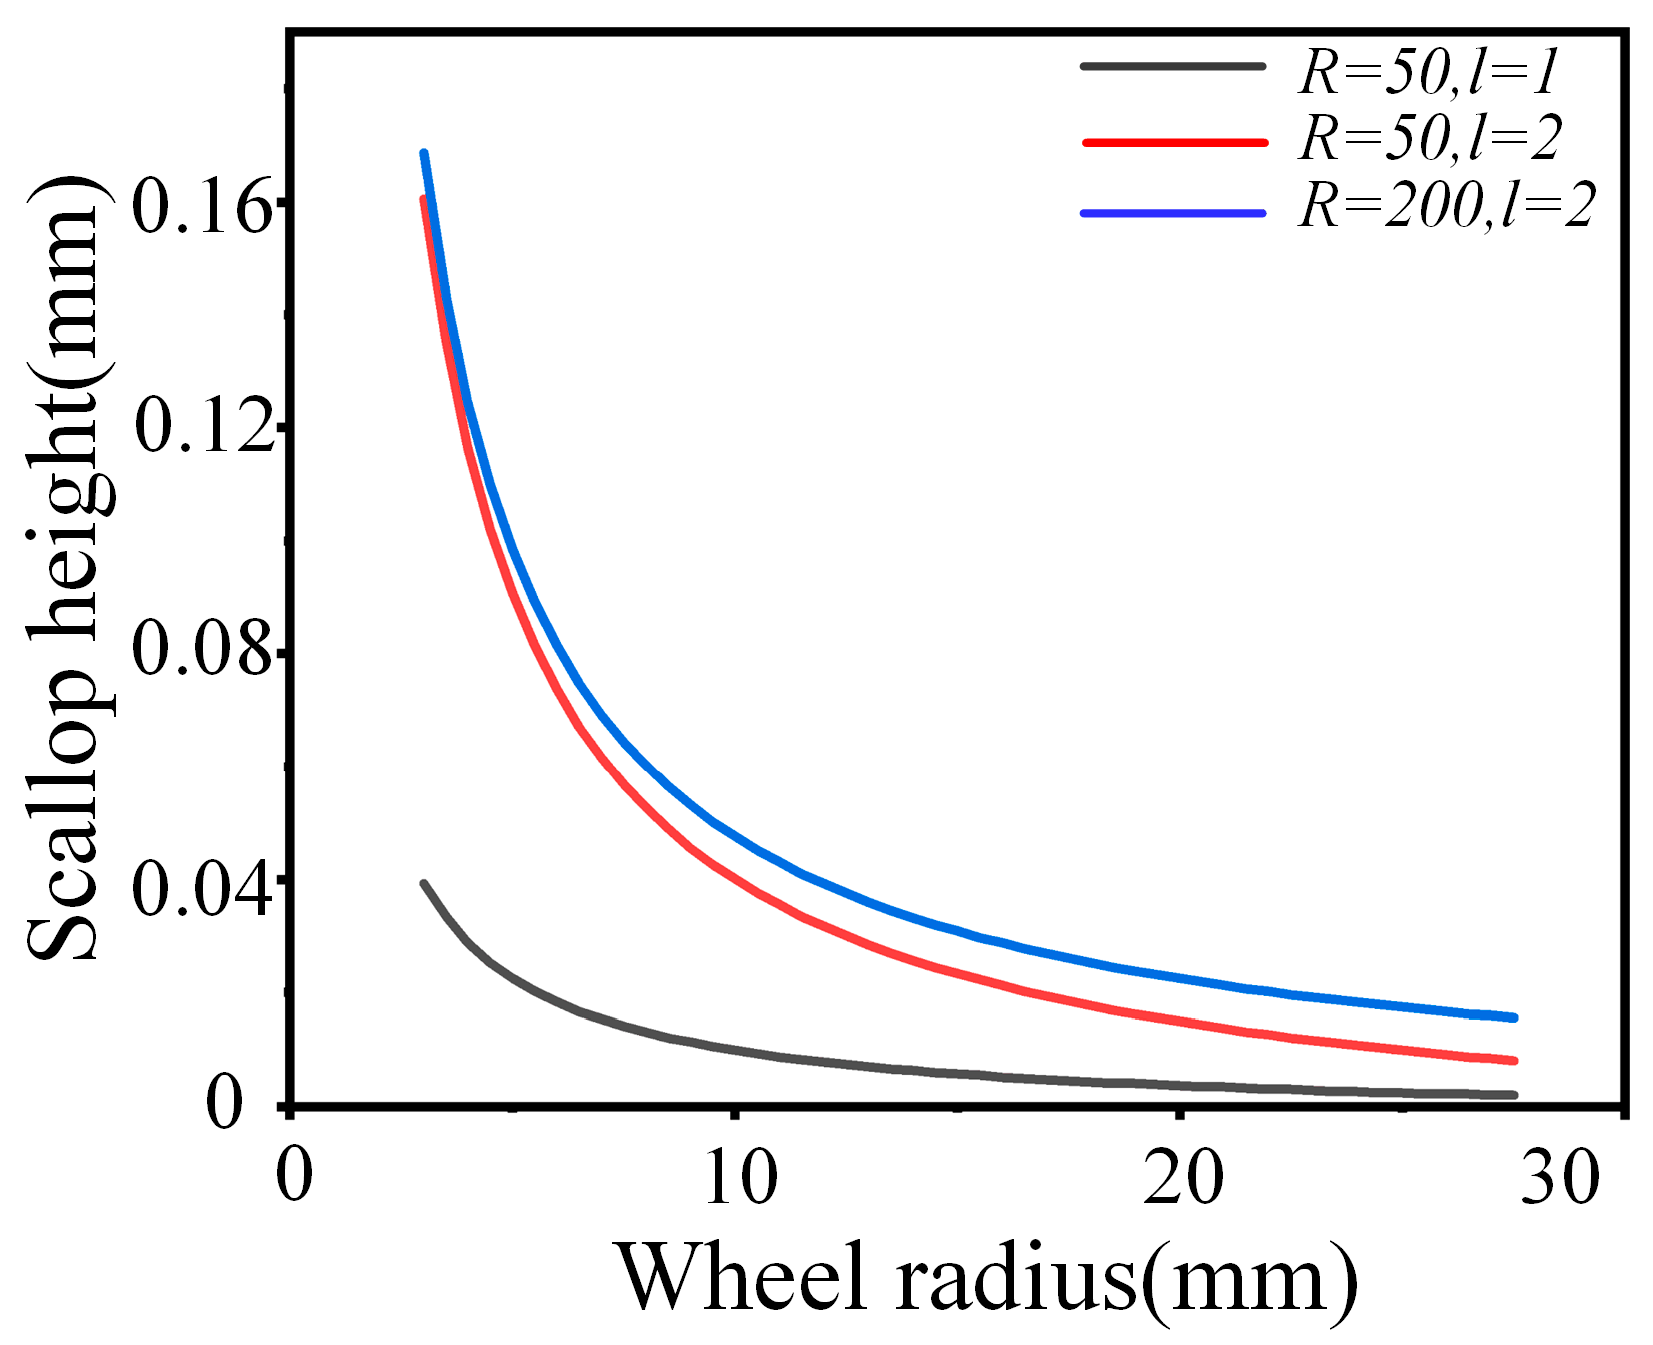
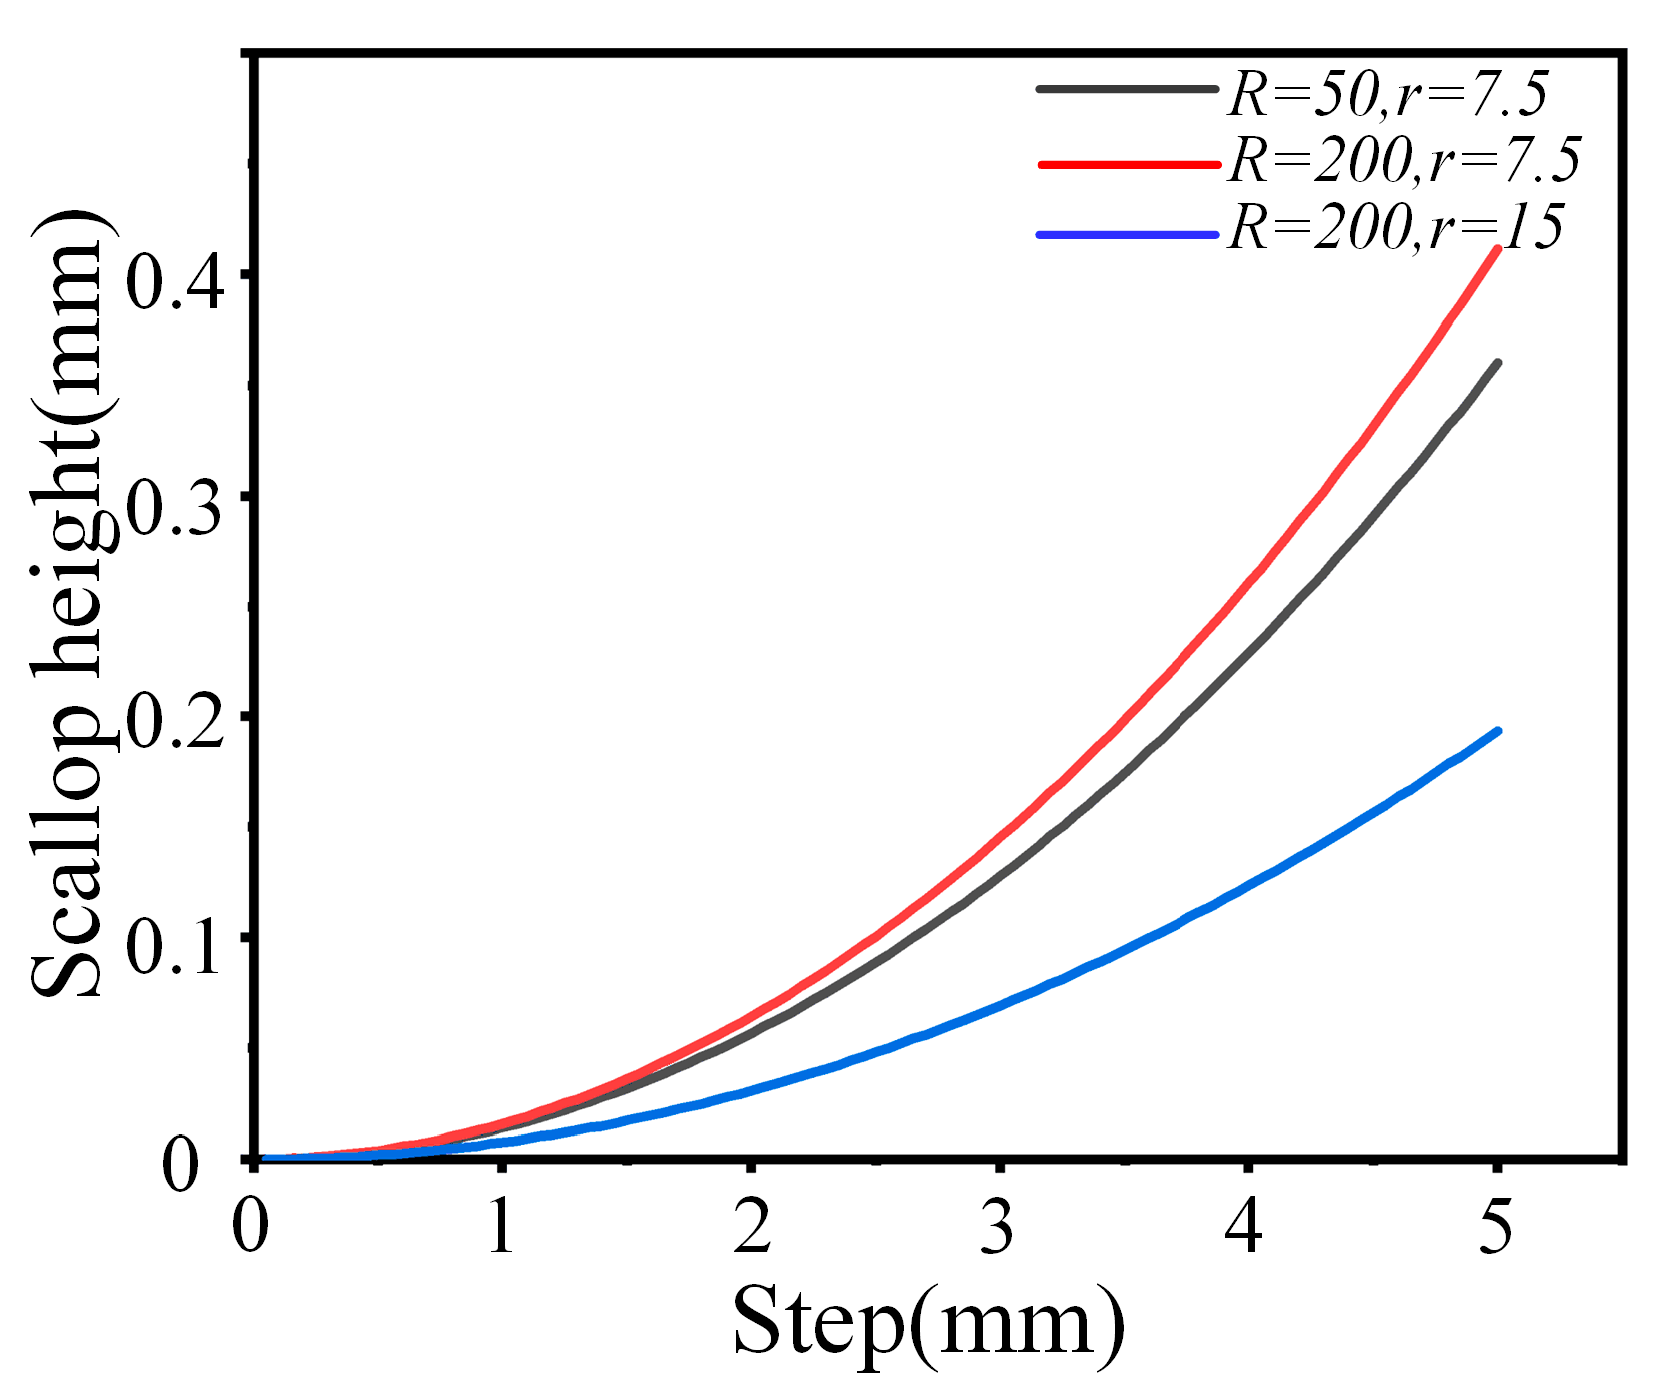
The scallop height h is negatively correlated with the radius r of the grinding wheel. Simulation calculation is shown in Figure 8. It can be seen that the larger the grinding wheel radius r, the smaller the scallop height.
In the grinding process, to obtain a lower scallop height, a larger grinding wheel radius should be selected as far as possible for processing. To avoid local interference, Equation (10)’s condition should be satisfied. The increase in the radius of the grinding wheel gradually reduces the effect of reducing the scallop height and increases the manufacturing cost, the shape accuracy of the grinding wheel is more difficult to guarantee, and the wheeling requirements are higher.
r R min

4.2.2. Effect of Step Pitch on Scallop Height

The scallop height h is a function of the step pitch l, and the partial derivative of the step pitch l occurs on both sides of Equation (6):
h l = R r 2 sin ( l / 2 R ) cos ( l / 2 R ) R r 2 R r 2 sin 2 ( l / 2 R ) + R r 2 R sin ( l / 2 R )
According to Equation (11):
h l > 0
The scallop height h is positively correlated with the step pitch l. The simulation calculation is shown in Figure 9. It can be seen that the larger the step pitch, the greater the scallop height. Therefore, in the grinding process, to obtain a lower scallop height, a smaller step pitch should be selected as far as possible when the processing efficiency allows.

4.2.3. Effect of Workpiece Curvature Radius on Scallop Height

The scallop height h is a function of the workpiece curvature R, and the partial derivative of the workpiece curvature R occurs on both sides of Equation (6):
h R = l 2 R r 2 R 2 ( 1 R r R )
According to Equation (13):
h R > 0
The scallop height h is positively correlated with the workpiece curvature R. The simulation calculation is shown in Figure 10. It can be seen that the greater the curvature R of the workpiece, the greater the scallop height. The dashed line is the asymptote. Therefore, in the grinding process, to obtain a lower scallop height, the processing step is selected in the direction of the small radius of curvature of the workpiece.
The characteristics of the parabolic surface are that the curvature in the meridian direction is different from that in the arc vector direction. The radius R1 of curvature in the meridian direction can be described by the following equation on the parabolic generatrix. The radius R2 of curvature in the arc vector direction is the same as the off-axis amount of the point.
The parabolic generatrix (XOZ plane):
z 2 = 2 c x
The radius of curvature in the meridian direction R1:
R 1 = 1 + z 2 3 2 z = c 4 z 6 + 3 c 2 z 4 + 3 z 2 + 1 c 2
The radius of curvature in the arc vector direction R2:
R 2 = z
Comparing the radius of curvature in the meridian direction and the arc vector direction of the off-axis parabolic surface yields the following:
R 1 R 2 = c 4 z 4 + 3 c 2 z 2 + 3 + 1 c 2 z 2 > 1
The radius of curvature of the same point in the off-axis parabolic surface in the meridian direction is always greater than the radius of curvature in the arc vector direction.
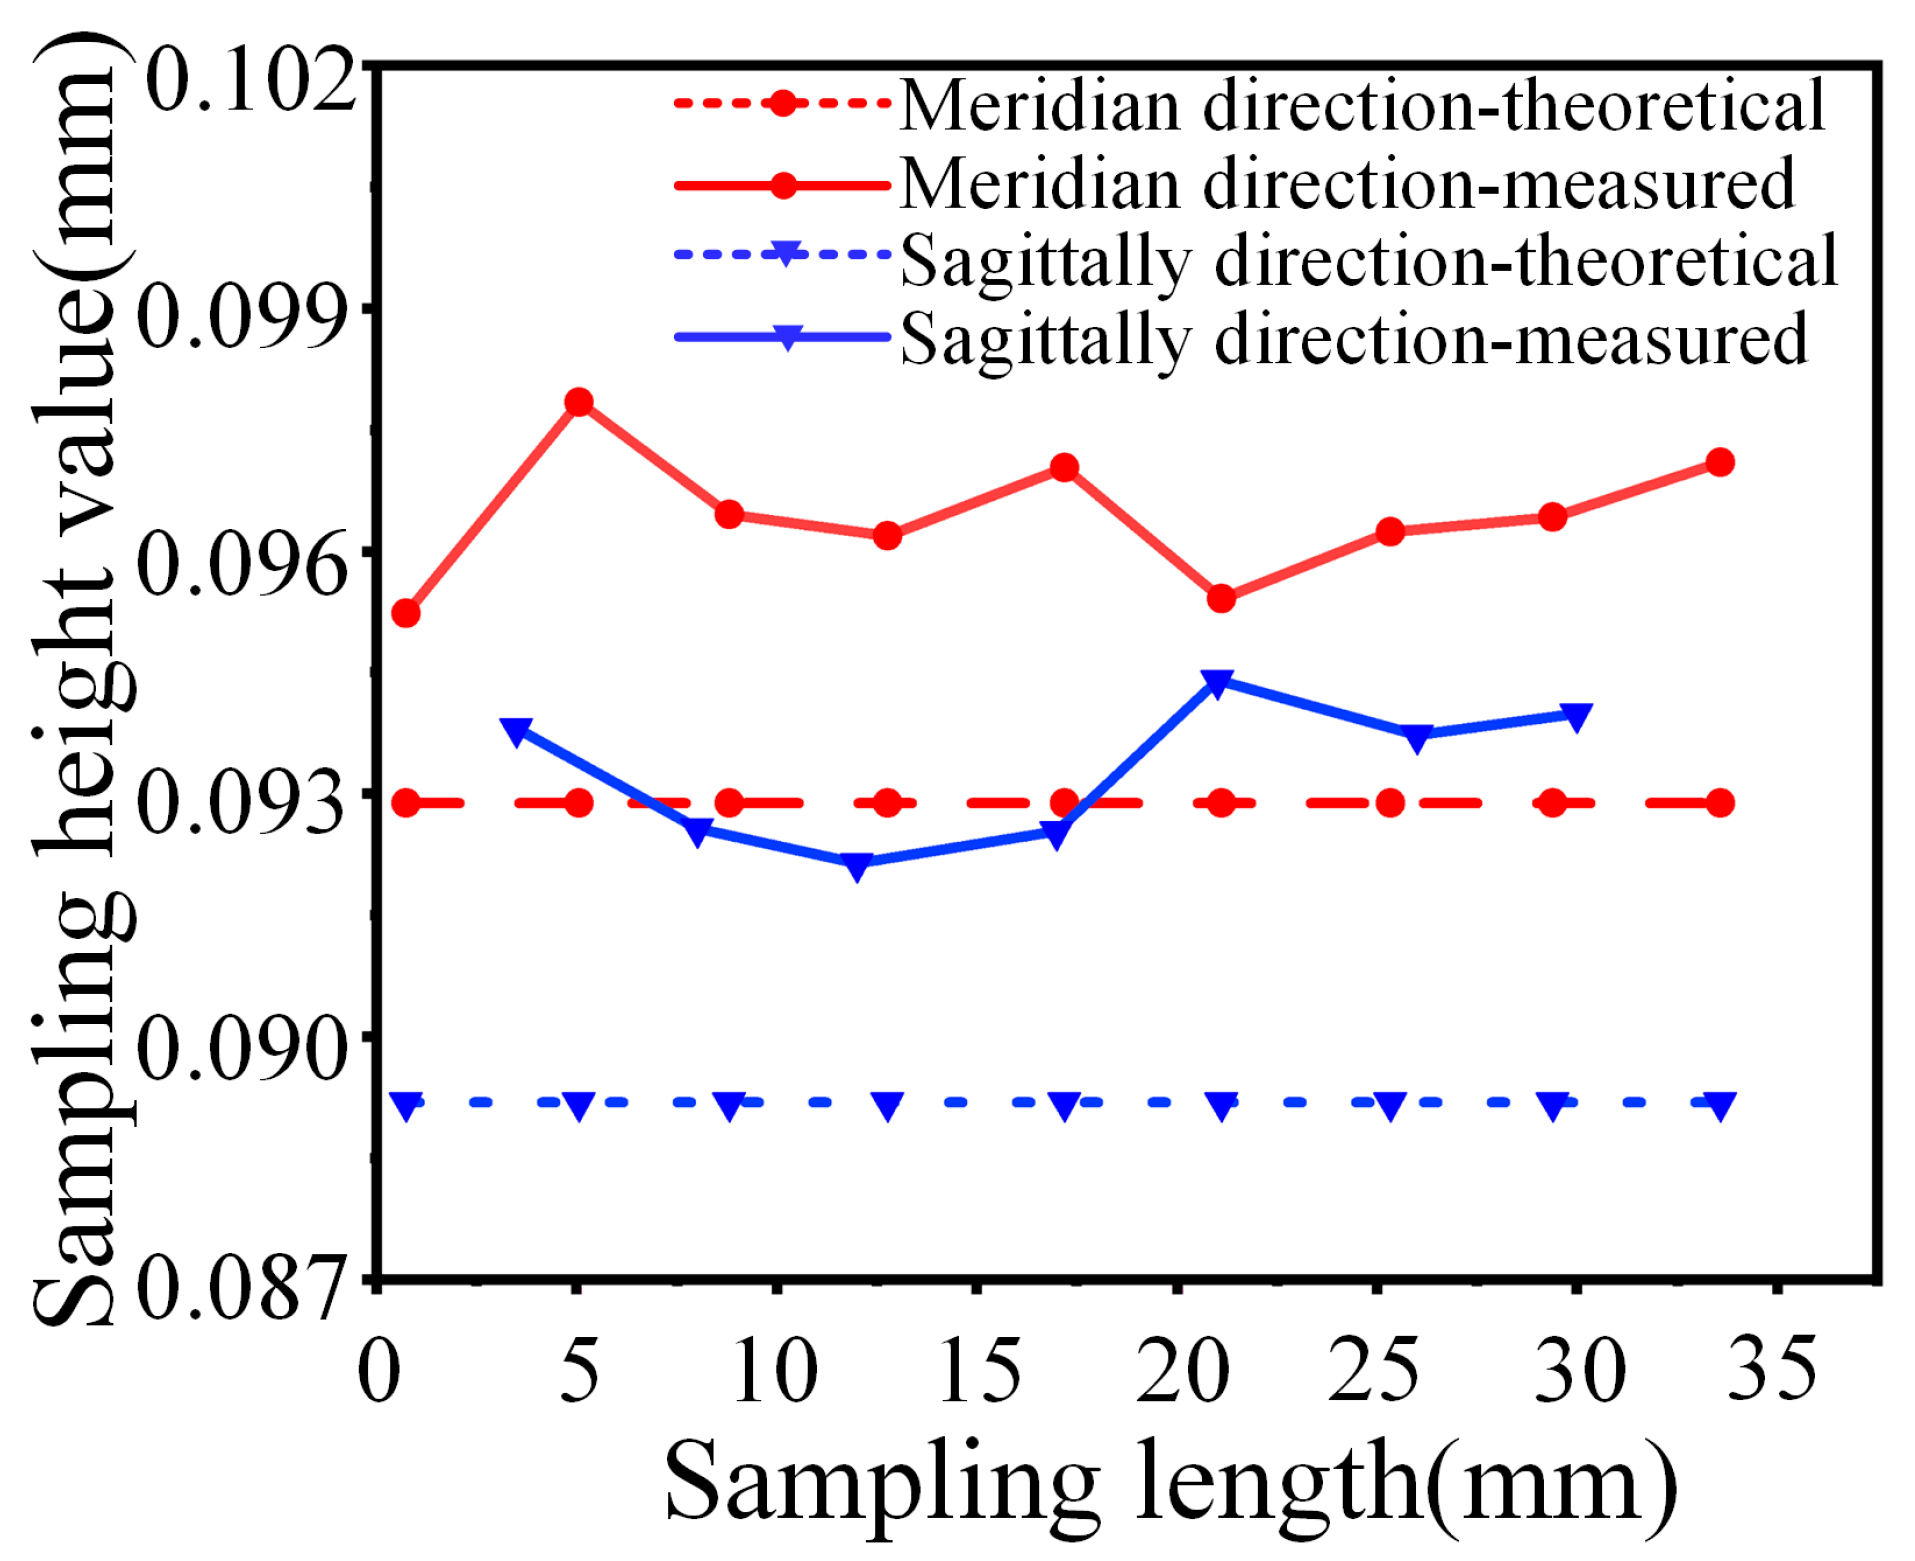
According to the scallop height model, the scallop height at the two center lines of the off-axis parabolic surface was calculated. The calculated results were compared with the experimental results, as shown in Figure 11. The measured scallop height along the meridian direction is about 0.0964 mm, and the theoretical scallop height is about 0.0928 mm. The measured scallop height along the arc vector direction is about 0.0933 mm, and the theoretical scallop height is about 0.0892 mm. The error between the simulation value and the actual value is less than 5%. The accuracy of the scallop height model is verified.
Combined with Equation (18), the curvature radius of the off-axis parabola in the meridian direction is always greater than that in the arc vector direction, and combined with Equation (14), it can be seen that the larger the curvature radius of the workpiece, the larger the scallop height. Therefore, the scallop height of the raster path along the arc vector direction is smaller than that of the raster path along the meridian direction.

4.3. The Correlation between Scallop Height and Surface Roughness

The surface defects and scallop height of optical elements would cause the sagittal height of the optical surface to deviate from the theoretical shape of the optical design. These deviations are reflected in the different spatial frequencies in spatial distribution. Scholars divide the frequency band error into three parts: the Figure, Mid-Spatial Frequency (MSF), and High Spatial Frequency (HSF) [25,35]. The scallop height is defined as the unremoved area between adjacent grinding wheel paths. Because the wheel path is periodic, the scallop height usually shows a periodic waviness error, which belongs to the category of Mid-Spatial Frequency errors. Surface roughness is the unevenness of small peaks and valleys in the microscopic area of the workpiece surface, which belongs to the category of High Spatial Frequency errors [36,37]. Therefore, the scallop height and surface roughness belong to two different spatial frequency errors of the grinding surface of optical parts, and there is no direct relationship between them.

4.4. The Correlation between Scallop Height and Surface Shape Error

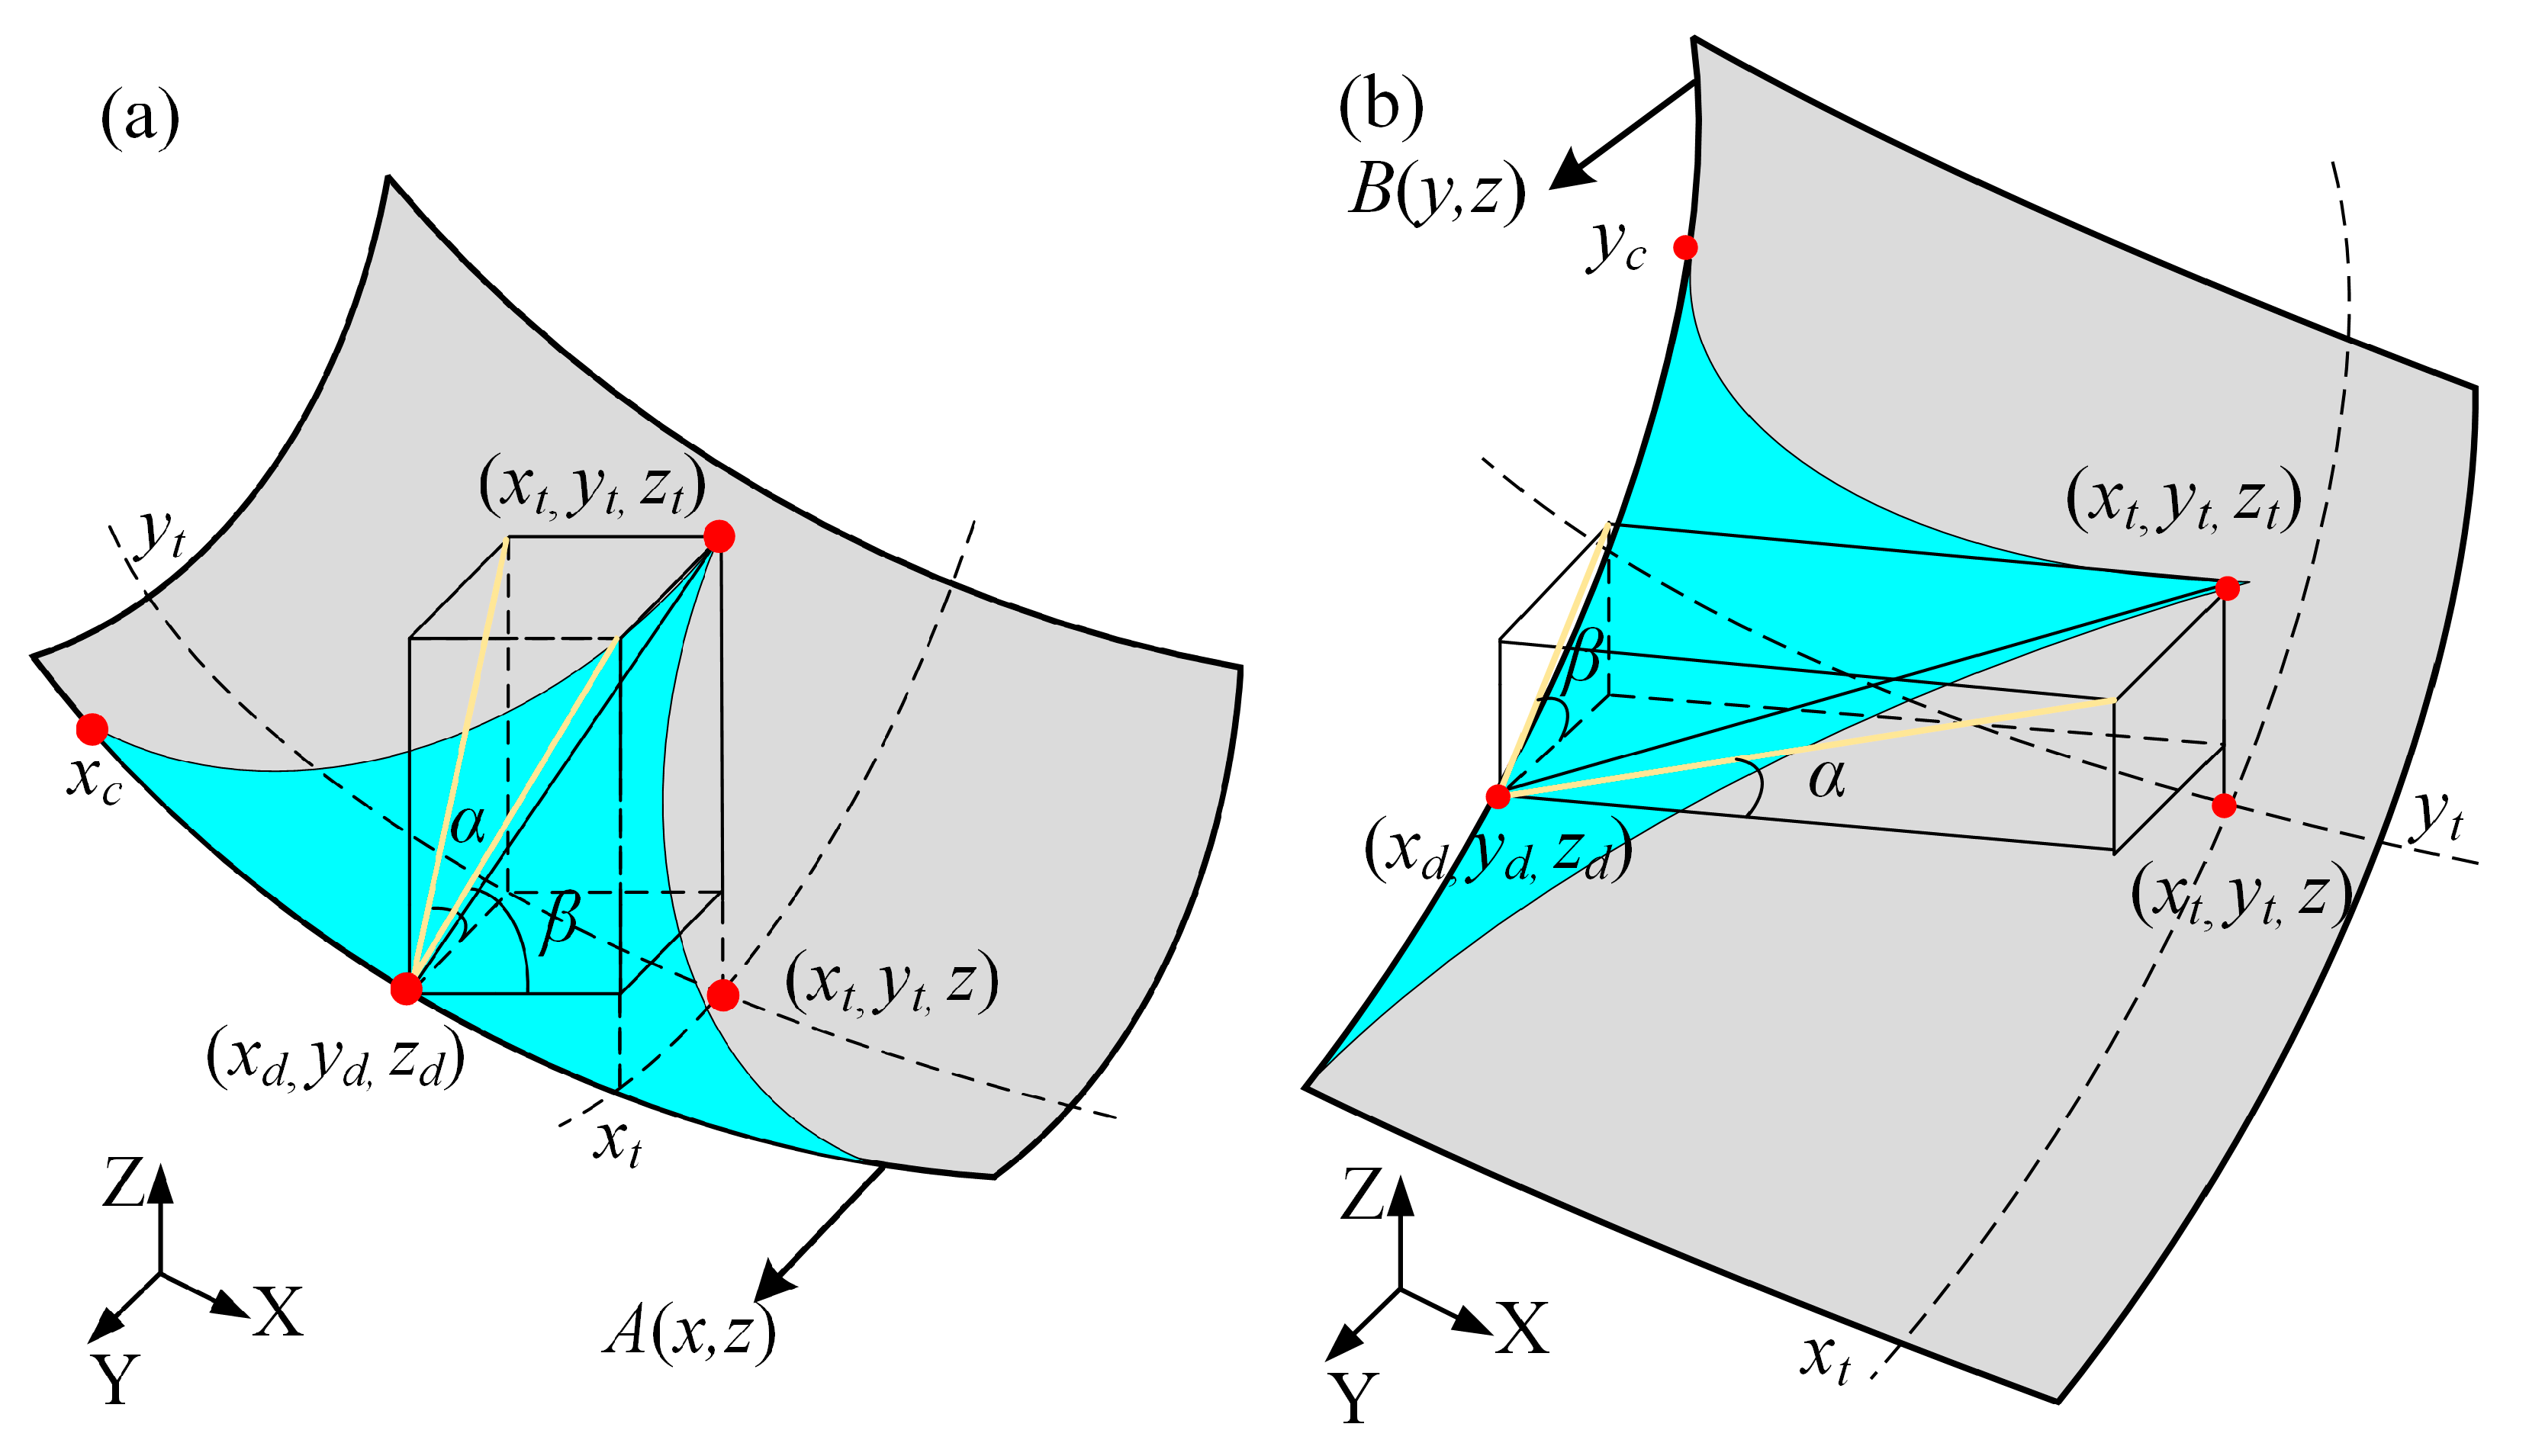
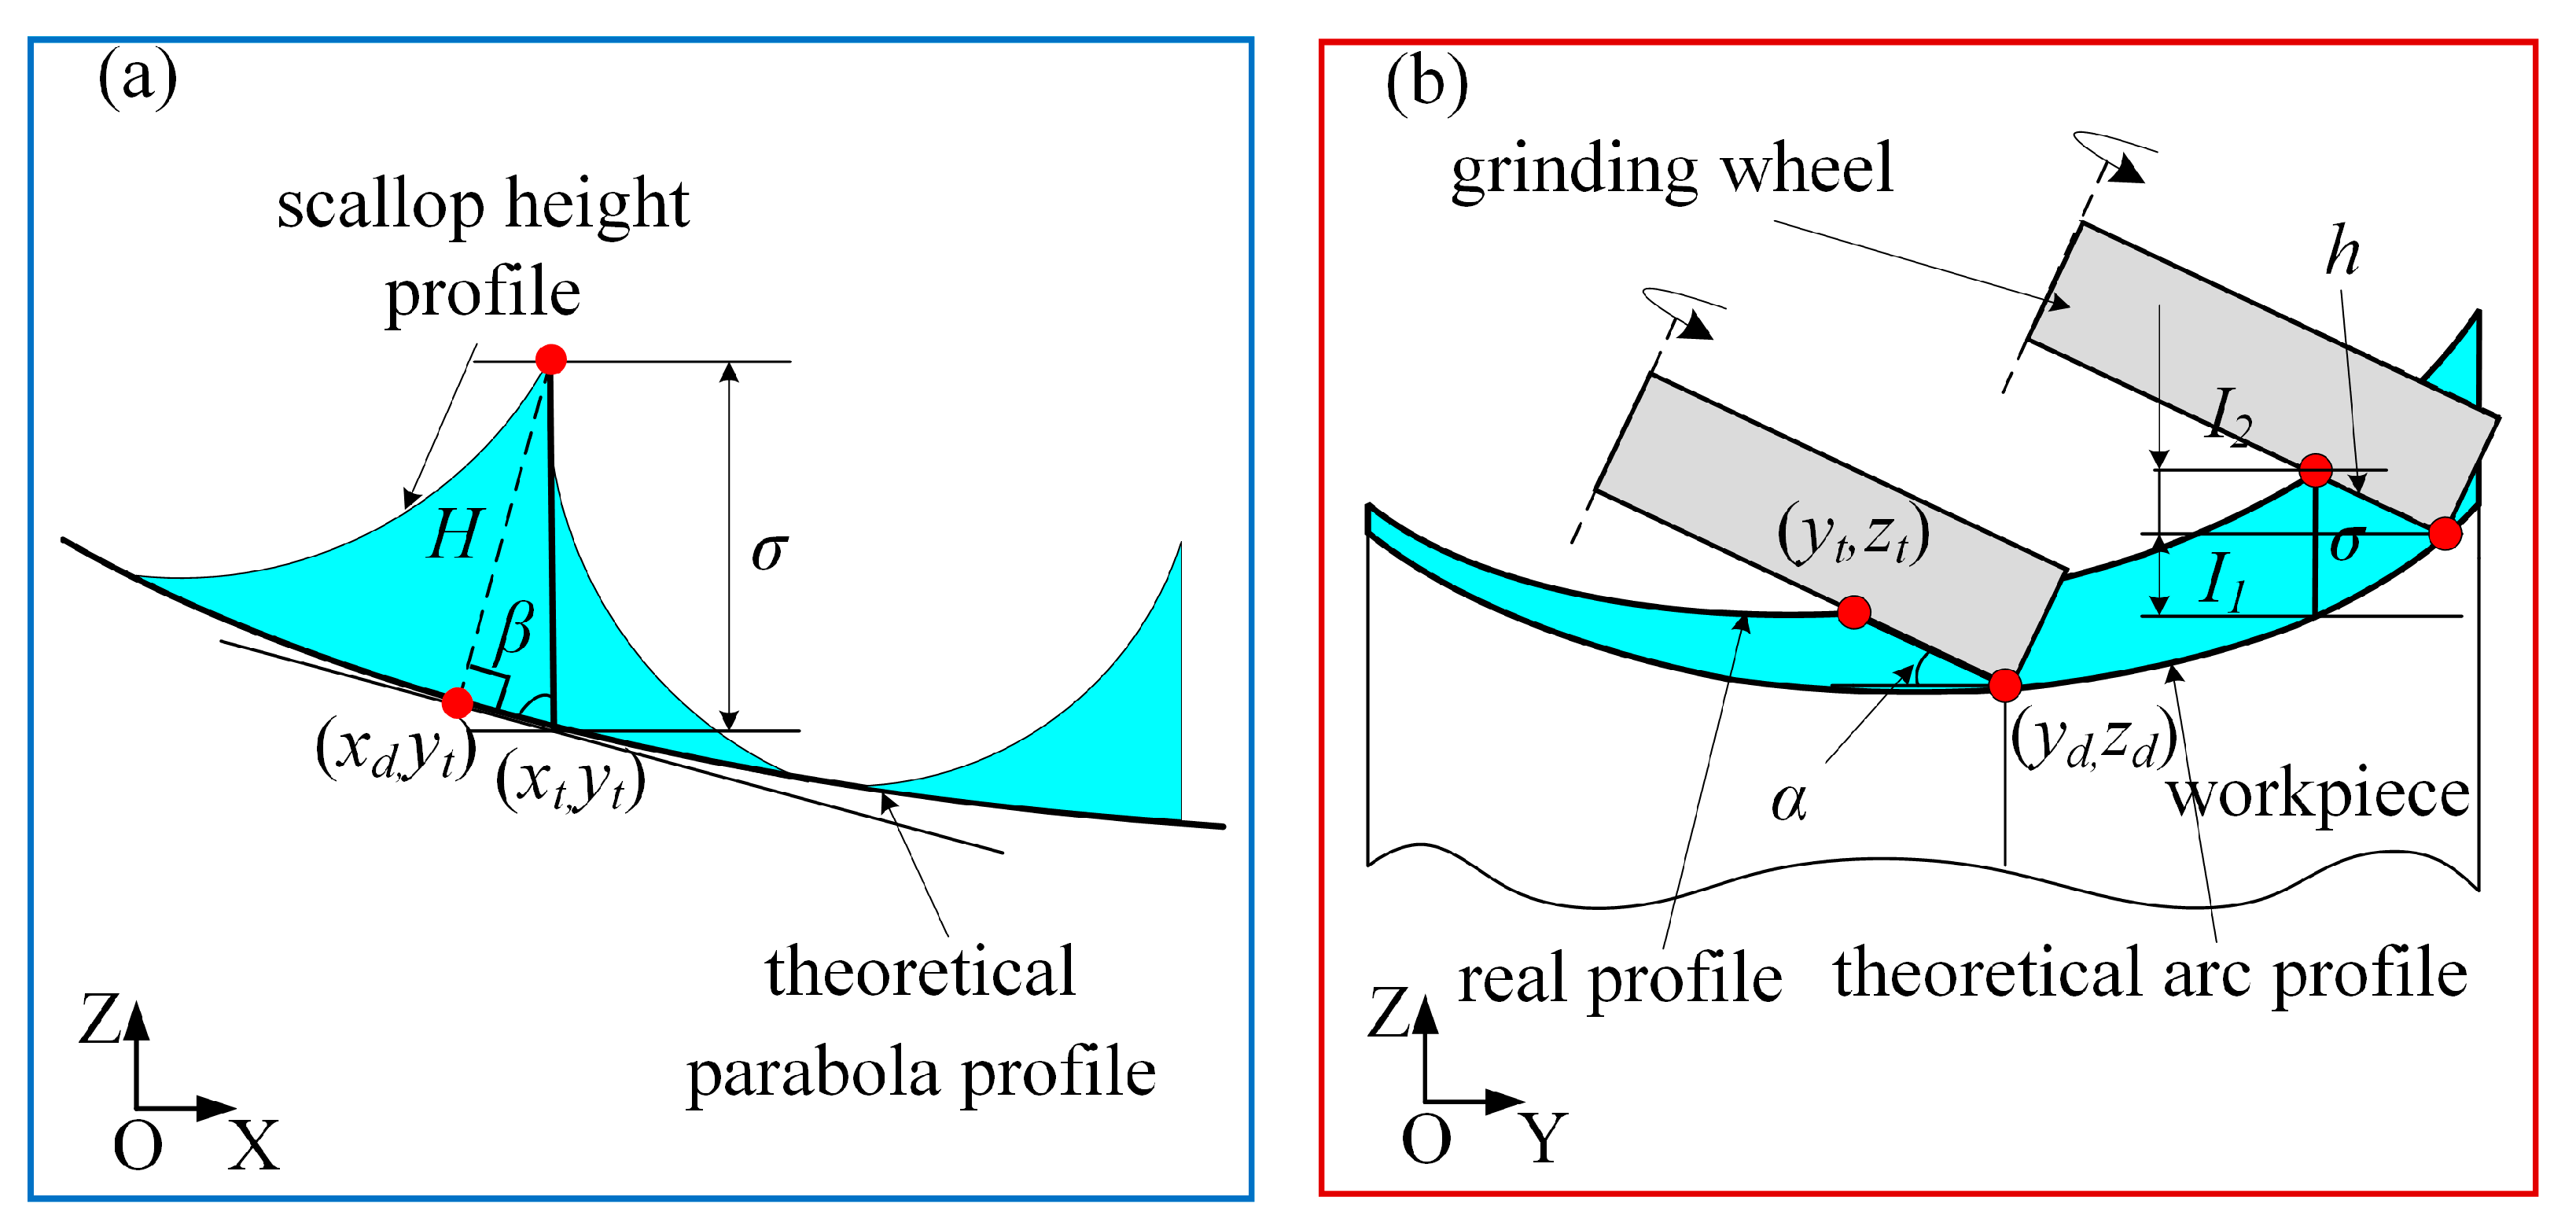
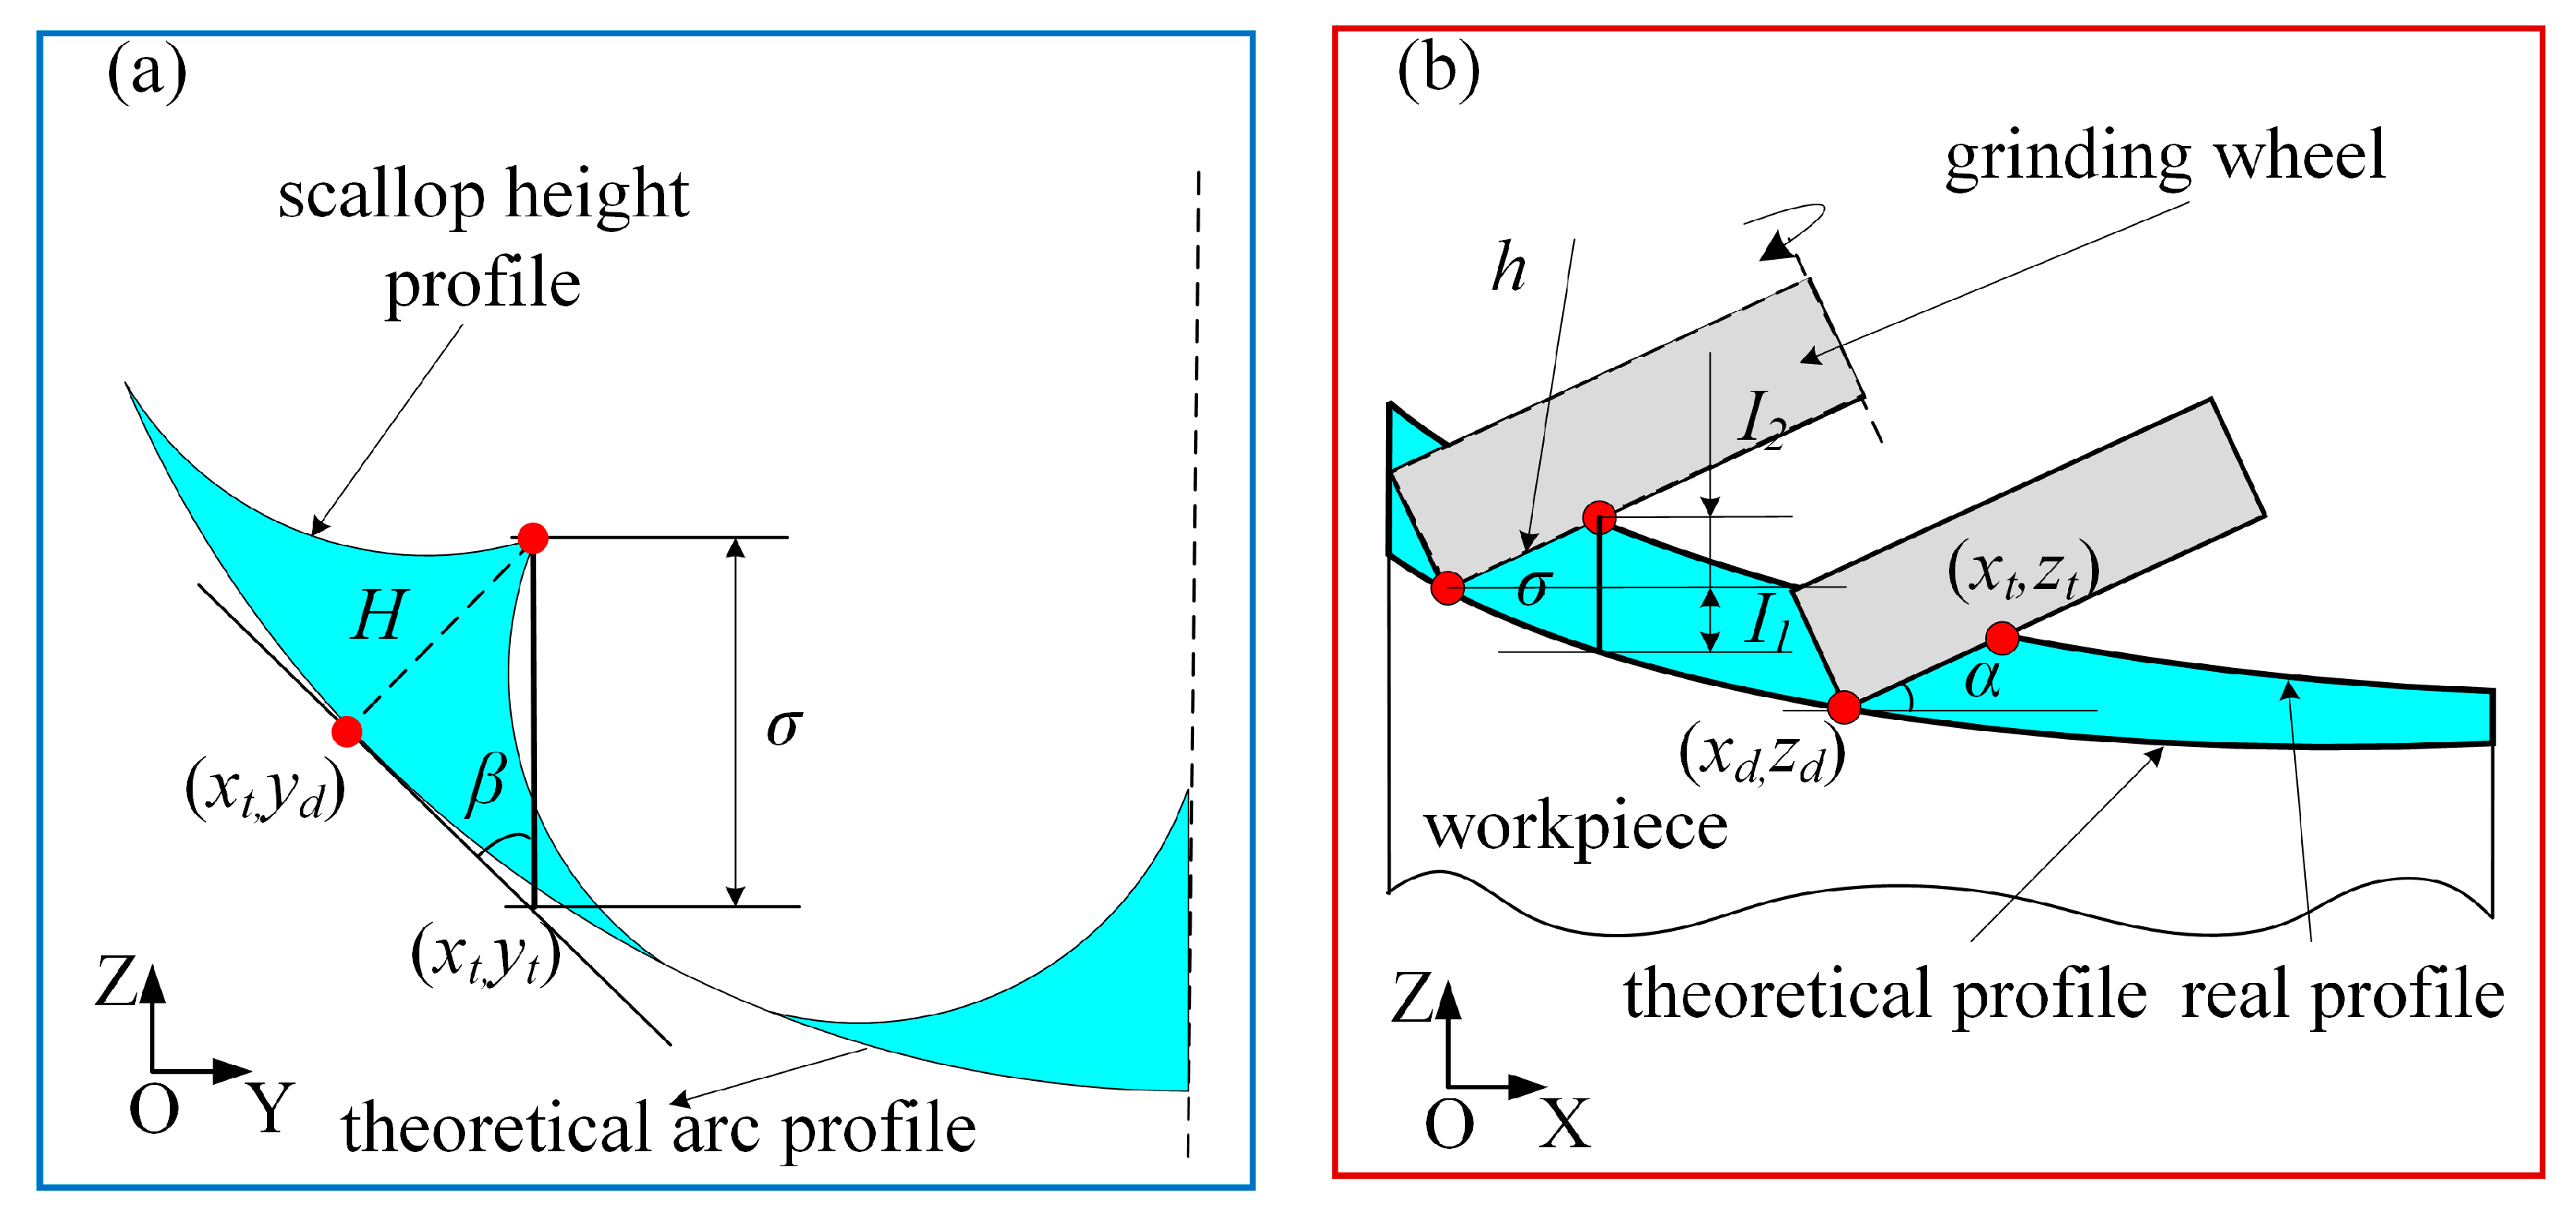
The unremoved area of the scallop height affects the accuracy of the grinding sur-face. The larger the scallop height, the larger the surface error. Figure 12 shows the spatial correspondence between the scallop height and the surface shape error, the yellow line represents the projection of the line connecting the scallop height vertex and the bottom point on the XOZ plane and the YOZ plane respectively, thus forming the angle α and β with the coordinate axis, and the black dashed line represents the line parallel to the coordinate axis. The surface shape error is the difference between the actual profile and the theoretical profile in the vertical direction in a cross-section of the parallel stepping direction. The surface error values of each point on the entire off-axis parabolic surface are different. Therefore, in order to express the surface accuracy of the entire off-axis parabolic sur-face, the surface error values of each point are integrated to obtain the distribution law of the surface error of the off-axis parabolic surface.
The solution process of the surface shape error stepping along the meridian direction:
When stepping along the meridian direction, the feed direction is in the arc vector direction, and the same wheel path is on the arc with the same radius of curvature, so the scallop height is equal in the feed direction. After determining the coordinates of the wheel contact point (xc, yc, zc), the radius of curvature R of the point in the stepping direction can be obtained. By substituting the built scallop height model, the scallop height value h can be solved.
The step pitch between adjacent grinding wheel paths is very small, so the curvature of the curve changes little. It is considered that the distance between the wheel contact point and the bottom point of the generated scallop height is l/2, and the xd coordinate value of the bottom point of the scallop height generated by the wheel path is obtained:
x c x d 1 + ( A x , z x ) 2 d x = l / 2
Through the bottom point x coordinate of the scallop height, the normal vector slope K of the point on the meridian step direction curve is solved:
K = x A x , z
The inclination angle β of the normal vector is solved by the slope of the normal vector:
β = arctan K
The x coordinate of the top point of the scallop height generated by the wheel contact is:
x t = x d + H cos β
The grinding wheel is continuously fed. Therefore, it is considered that the y coordinate of the scallop height’s bottom point generated by the wheel path is continuous in the Y direction of the surface, and its relationship with the y coordinate of the scallop height vertex is:
y t = y d h cos α
The solution of the z coordinate of the top point of the scallop height is:
z t = z d + h sin α
The solution process of the surface shape error stepping along the arc vector direction:
When stepping along the arc vector direction, the stepping direction is in the arc vector direction, so the scallop height values formed between the adjacent guide rails are equal on the arc with the same radius of curvature. After determining the coordinates of the wheel contact point (xc, yc, zc), the radius of curvature R of the arc on which the point is located can be obtained, and the scallop height value h generated between the wheel paths can be determined.
The distance between the bottom point of the scallop height generated along the sagittal direction and the wheel contact point is l/2, and the yd coordinate value of the bottom point of the scallop height generated by the wheel path is obtained:
y c y d 1 + ( B y , z y ) 2 d y = l / 2
Through the bottom point y coordinate of the scallop height, the normal vector slope K of the point on the meridian step direction curve is solved:
K = y B y , z
The solution of the inclination angle of the normal vector is shown in Equation (21), the y coordinate of the top point of the scallop height generated by the wheel contact is:
y t = y d + H cos β
The grinding wheel is continuously fed. Therefore, it is considered that the x coordinate of the scallop height’s bottom point generated by the wheel path is continuous in the X direction of the surface, and its relationship with the x coordinate of the scallop height vertex is:
x t = x d + h cos α
The solution of the scallop height vertex z coordinate zt is shown in Equation (24).
The calculation of the scallop height vertex coordinates generated by the two paths is completed by Equations (19) to (28), and the obtained coordinates are substituted into the theoretical surface equation (Equation (2)). The theoretical z coordinates can be obtained from the following formula.
z = F x t , y t
The solution of the surface shape error:
σ = z t z
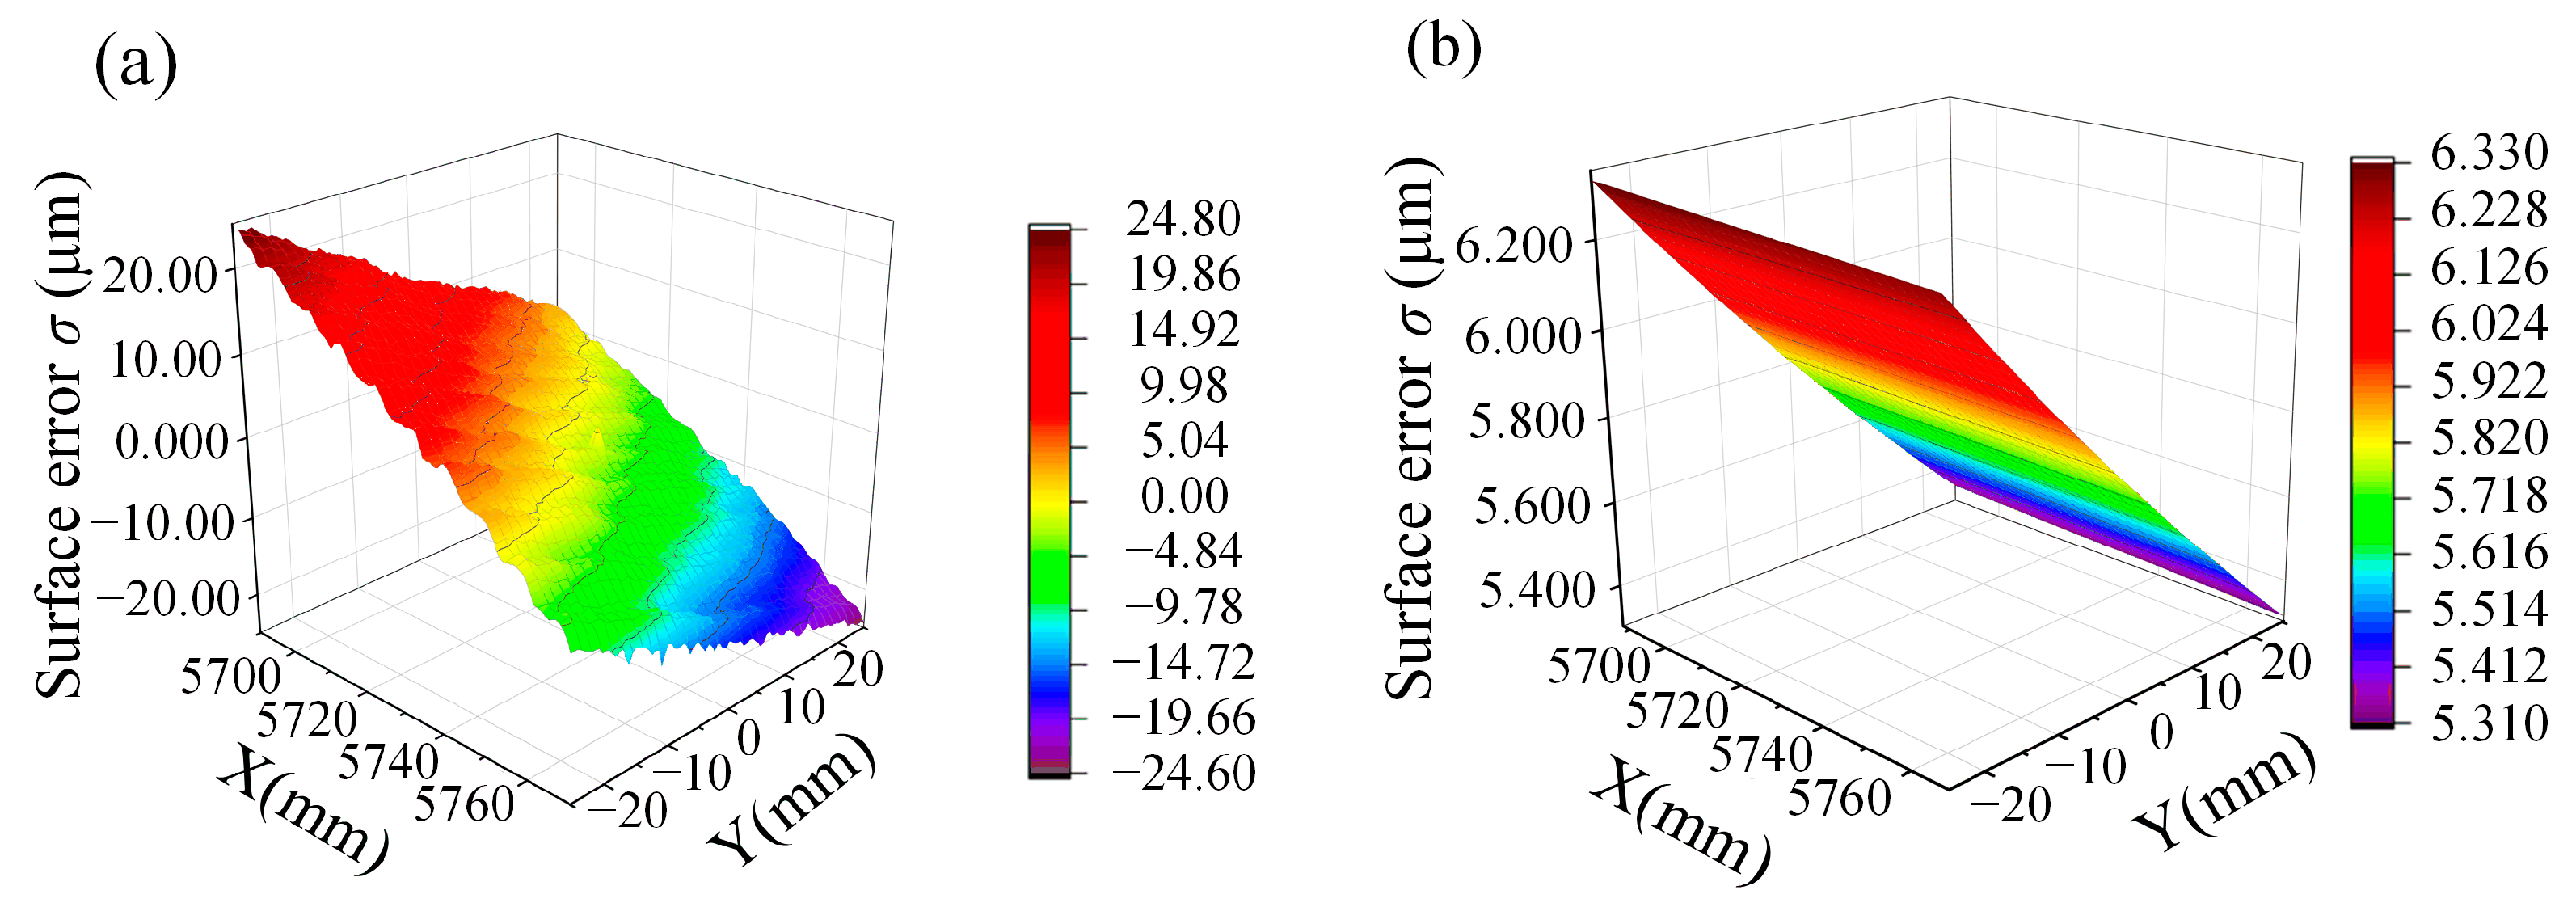
Through the above formula, the simulation of the calculated distribution law of the off-axis parabolic surface error was realized and compared with the experimental measurement results. As shown in Figure 13 and Figure 14, it is found that the distribution law of the surface error obtained by the simulation calculation is consistent with the distribution law of the surface error obtained in the experiment, which proves the correctness of the model.
The scallop height distribution along the meridian direction is shown in Figure 15. The blue part represents the scallop height, and the red points represent the vertex and bottom point of the scallop height. The difference between the scallop height and the theoretical surface in the vertical direction is the surface shape error value, which is represented by the black line in Figure 15.
In the XOZ plane, the surface shape error can be approximated as follows:
σ = H ( x ) / sin β ( x )
The calculation of the variation of the surface error with x:
σ x = ( H ( x ) sin β ( x ) H cos β ( x ) β ( x ) ) / sin 2 β ( x )
In the off-axis parabolic with a large off-axis amount, the scallop height changes very little with x, H’ ≈ 0, and β is positively correlated with x:
σ x < 0
Therefore, in the meridian direction, with the increase in the x value, the surface shape error gradually decreases.
In the YOZ plane, the feed path is an arc, and the wheel maintains a fixed angle. The distance I2 between the scallop height and the tool contact point in the vertical direction remains unchanged. As the y value increases on the arc, I1 decreases in the −Y direction and increases in the +Y direction. The calculation of the surface error value is as follows:
σ = I 2 I 1 y < 0 σ = I 2 + I 1 y 0
Therefore, the surface error gradually increases as the y value increases. The scallop height distribution along the arc vector direction is shown in Figure 16. The blue part represents the scallop height, the red points represent the vertex and bottom point of the scallop height, and the surface error is represented by black lines. In the YOZ plane, the surface shape error can be approximated as follows:
σ = H ( y ) / sin β ( y )
When stepping on the same arc, the curvature radius of the workpiece is equal, so the scallop height H(y) is equal, and β increases first, and then, decreases. Therefore, the surface error value decreases first, and then, increases in the arc vector direction, and is symmetrically distributed on both sides of y = 0.
In the XOZ plane, the feed path is a parabola, and the calculation of the surface error is as follows. As x increases, the scallop height gradually increases, but the increase is very small, as shown in Figure 10, the wheel maintains a fixed angle, so the distance between the scallop height and the tool contact in the vertical direction I2 increases very little. I1 decreases with the increase in the x value, and the decrease is much larger than the increase in scallop height, so the surface error decreases with the increase in the x value.
σ = I 2 + I 1

4.5. Future Prospects

Combined with the current research status and actual research results, the authors of this paper believe that in terms of the factors causing surface shape errors, scallop height, grinding wheel wear, and positioning accuracy will produce surface shape errors. This paper only studies the influence of scallop height on surface shape accuracy, and the remaining factors need to be further studied. In terms of measures to improve surface accuracy, wheel path planning, grinding wheel dressing, and the in-situ compensation of machined surface are effective means to improve surface accuracy, which will be the focus of future research.

5. Conclusions

According to the geometric characteristics of off-axis parabolic double curvature, two wheel paths were conducted for raster grinding; one was designed to step along the meridian direction, and the other was designed to step along the arc vector direction. A scallop height model and surface error simulation were established to study the influence of different paths on the surface accuracy of the off-axis parabolic surface.
(1)
The scallop height model error was within 5%. It was proven that the model was reasonable and accurate in predicting the scallop height of the off-axis parabolic surface.
(2)
Upon comparing the scallop height generated by the different raster paths, it was found that the wheel path in raster grinding stepping along the arc vector direction could obtain a smaller scallop height.
(3)
Based on the correlation between the scallop height and surface shape error, simulation of the surface shape error distribution was carried out. The simulation results were consistent with the experimental results, which proves the correctness of the simulation.
(4)
According to the simulation and experimental results of the surface shape error distribution, it was found that the surface error generated by the step along the arc vector direction was less than that of the raster processing along the meridian direction. In the actual grinding process of an off-axis parabolic surface, the wheel path along the arc vector step is preferred for raster grinding.

Author Contributions

Conceptualization, J.L.; methodology, J.L. and H.L.; software, J.L.; formal analysis, J.L., H.L. and X.G.; investigation, J.L. and X.G.; resources, X.G. and R.K.; data curation, J.L. and H.L.; writing—original draft, J.L.; writing—review and editing, J.L. and H.L.; visualization, J.L.; supervision, S.G.; project administration, R.K. and S.G.; funding acquisition, R.K. and S.G. All authors have read and agreed to the published version of the manuscript.

Funding

This research was funded by the National Natural Science Foundation of China (52293402, 52375411, 51975091) and the Major Science and Technology Project of Henan Province of China (221100230100).

Institutional Review Board Statement

Not applicable.

Informed Consent Statement

Not applicable.

Data Availability Statement

Not applicable.

Conflicts of Interest

The authors declare no conflict of interest.

References

  1. Zhang, W.W.; Allgood, K.D.; Biskach, M.P.; Chan, K.W.; Hlinka, M.; Kearney, J.D.; Mazzarella, J.R.; McClelland, R.S.; Numata, A.; Riveros, R.E.; et al. High-resolution, Lightweight, and Low-cost X-ray Optics for the Lynx Observatory. J. Astron. Telesc. Instrum. Syst. 2019, 5, 021012. [Google Scholar] [CrossRef]
  2. Chen, L.; Gao, Z.S.; Xu, N.Y.; Cao, X.; Zhang, J.P.; Wang, L.J.; Ye, J.F.; Yuan, Q. Construction of Freeform Mirrors for an Off-axis Telecentric Scanning System through Multiple Surfaces Expansion and Mixing. Results Phys. 2020, 19, 103354. [Google Scholar] [CrossRef]
  3. Biskch, M.P.; Allgood, K.D.; Chan, K.W.; Hlinka, M.; Kearny, J.D.; Numata, A.; Mazzare, J.R.; Riveros, R.; Saha, T.T.; Solly, P.M.; et al. Mass Manufacturing of High Resolution and Light-weight Monocrystalline Silicon X-ray Mirror Modules. In Proceedings of the Conference on Optics for EUV, X-Ray, and Gamma-Ray Astronomy IX as Part of the SPIE Optics + Photonics International Symposium on Optical Engineering + Applications, San Diego, CA, USA, 13–15 August 2019. [Google Scholar] [CrossRef]
  4. Qi, J.C.; Ye, L.L.; Chen, R.C.; Xie, H.L.; Ren, Y.Q.; Du, G.H.; Deng, B.; Xiao, T.Q. Coherence of X-ray in the Third Synchrotron Radiation Source. Acta Phys. Sin. 2014, 63, 104202. [Google Scholar] [CrossRef]
  5. Narayanan, T.; Chevremont, W.; Zinn, T. Small-angle X-ray Scattering in the Era of Fourth-generation Light Sources. J. Appl. Crystallogr. 2023, 56, 939–946. [Google Scholar] [CrossRef] [PubMed]
  6. Guo, B.; Zhao, Q.L. Wheel Normal Grinding of Hard and Brittle Materials. Int. J. Adv. Manuf. Tech. 2015, 79, 873–880. [Google Scholar] [CrossRef]
  7. Li, Z.J.; Peng, X.Q.; Song, C. Modeling and Simulation for Fewer-axis Grinding of Complex Surface. In Proceedings of the Annual Conference of the Chinese-Society-for-Optical-Engineering (CSOE) on Applied Optics and Photonics China (AOPC)—Optoelectronics and Micro/Nano-Optics, Beijing, China, 4–6 June 2017. [Google Scholar]
  8. Yan, Y.Y.; Zhang, Z.Q.; Liu, J.L.; Yan, H.Z.; Wang, X.X. Study on the Algorithm of Three-Dimensional Surface Residual Material Height of Nano-ZrO2 Ceramics under Ultra-Precision Grinding. Micromachines 2021, 12, 1363. [Google Scholar] [CrossRef] [PubMed]
  9. Wang, S.; Zhang, Q.; Zhao, Q.L.; Guo, B. Surface Generation and Materials Removal Mechanism in Ultra-precision Grinding of Biconical Optics Based on Slow Tool Servo with Diamond Grinding Wheels. J. Manuf. Process. 2021, 72, 1–14. [Google Scholar] [CrossRef]
  10. Wang, Z.G.; Kang, R.K.; Zhou, P.; Gao, S.; Dong, Z.G. Ultra-precision Grinding of Monocrystalline Silicon Reflector. Opt. Precis. Eng. 2019, 27, 1087–1095. [Google Scholar] [CrossRef]
  11. Shimizu, Y.; Goto, S.; Lee, J.; Ito, S.; Gao, W.; Adachi, S.; Omiya, K.; Sato, H.; Hisada, T.; Saito, Y.; et al. Fabrication of Large-size SiC Mirror with Precision Aspheric Profile for Artificial Satellite. Precis. Eng. J. Int. Soc. Precis. Eng. Nanotechnol. 2013, 37, 640–649. [Google Scholar] [CrossRef]
  12. Yuan, J.L.; Yu, B.H.; Hang, W.; Deng, Q.F. Review on the Progress of Ultra-precision Machining Technologies. Front. Mech. Eng. 2017, 12, 158–180. [Google Scholar] [CrossRef]
  13. Yan, G.P.; Fang, F.Z. Fabrication of Optical Freeform Molds Using Slow Tool Servo with Wheel Normal Grinding. CIRP Ann-Manuf. Technol. 2019, 68, 341–344. [Google Scholar] [CrossRef]
  14. Deng, H.; Xu, Z. Dressing Methods of Superabrasive Grinding Wheels: A review. J. Manuf. Process. 2019, 45, 46–69. [Google Scholar] [CrossRef]
  15. Yin, Z.Q.; Dai, Y.F.; Li, S.Y.; Guan, C.L.; Tie, G.P. Fabrication of Off-axis Aspheric Surfaces Using a Slow Tool Servo. Int. J. Mach. Tool. Manu. 2011, 51, 404–410. [Google Scholar] [CrossRef]
  16. Wang, S.; Zhao, Q.L.; Guo, B. Ultra-precision Ductile Grinding of Off-Axis Biconical Free-Form Optics with a Controllable Scallop Height Based on Slow Tool Servo with Diamond Grinding Wheels. Int. J. Precis. Eng. Manuf. Green. Technol. 2023, 10, 1169–1188. [Google Scholar] [CrossRef]
  17. Chen, B.; Guo, B.; Zhao, Q.L. An Investigation into Parallel and Cross Grinding of Aspheric Surface on Monocrystal Silicon. Int. J. Adv. Manuf. Tech. 2015, 80, 737–746. [Google Scholar] [CrossRef]
  18. Wang, S.; Zhao, Q.L.; Guo, B.; Pan, Y.C. Ultra-precision raster grinding of monocrystalline silicon biconical free-form optics using arc-shaped diamond grinding wheels. J. Manuf. Process. 2020, 58, 1064–1074. [Google Scholar] [CrossRef]
  19. Zhou, L.; Wei, Q.C.; Zheng, N.; Chen, X.H.; Zhang, Q.H.; Wang, J. Dressing Technology of Arc Diamond Wheel by Roll Abrading in Aspheric Parallel Grinding. Int. J. Adv. Manuf. Technol. 2019, 105, 2699–2706. [Google Scholar] [CrossRef]
  20. Radzevich, S.P. A Closed-form Solution to the Problem of Optimal Tool-path Generation for Sculptured Surface Machining on Multi-axis NC Machine. Math. Comput. Model. 2006, 43, 222–243. [Google Scholar] [CrossRef]
  21. Xi, J.P.; Zhang, L.B.; Yang, Q.; Li, B.; Zhao, Z.X.; Zhang, C. Nonuniform Rational Basis Spline Interpolation for Off-Axis Aspheric Mirror Grinding Based on Wheel Path Planning. Math. Probl. Eng. 2021, 2021, 6640299. [Google Scholar] [CrossRef]
  22. Huang, H.; Chen, W.K.; Kuriyagawa, T. Profile Error Compensation Approaches for Parallel Nanogrinding of Aspherical Mould Inserts. Int. J. Mach. Tools Manuf. 2007, 47, 2237–2245. [Google Scholar] [CrossRef]
  23. Chen, S.S.; Cheung, C.F.; Zhang, F.H.; Liu, M.Y. Optimization of Tool Path for Uniform Scallop-Height in Ultra-precision Grinding of Free-form Surfaces. Nanomanufacturing Metrol. 2019, 2, 215–224. [Google Scholar] [CrossRef]
  24. Deng, Z.H.; Wan, L.L.; Zhang, X.H.; Li, S.C. Modelling the Processing Parameters of Rotary Curved Surface Grinding Using RSM. Adv. Mater. Res. 2011, 338, 130–135. [Google Scholar] [CrossRef]
  25. Yu, S.M.; Yao, P.; Ye, Z.; Wang, W.; Chu, D.K.; Qu, S.S.; Huang, C.Z. Simulation and Experimental Research of Tool Path Planning on Profile and Surface Generation of Aspherical-cylindrical Lens Array by Ultra-precision Envelope Grinding. J. Mater. Process Tech. 2022, 307, 117690. [Google Scholar] [CrossRef]
  26. Jiang, X.; Scott, P.; Whitehouse, D. Freeform Surface Characterisation—A Fresh Strategy. CIRP Ann. Manuf. Technol. 2007, 56, 553–556. [Google Scholar] [CrossRef]
  27. Jiang, C.; Guo, Y.B.; Li, H.L. Parallel Grinding Error for a Noncoaxial Nonaxisymmetric Aspheric Lens Using a Fixture with Adjustable Gradient. Int. J. Adv. Manuf. Technol. 2013, 66, 537–545. [Google Scholar] [CrossRef]
  28. Gong, H.G.; Ao, S.J.; Huang, K.T.; Wang, Y.; Yan, C. Tool Path Generation of Ultra-precision Diamond Turning: A State-of-the-art Review. Nanotechnol. Precis. Eng. 2019, 2, 118–124. [Google Scholar] [CrossRef]
  29. de Souza, A.F.; Kasemodel, R.B.; Arias, M.; Marin, F.; Rodrigues, A.R. Study of Tool Paths Calculated by Different Commercial CAM Systems and Influences on the Real Machining Time and Surface Roughness for Milling Free-form Geometries. J. Braz. Soc. Mech. Sci. Eng. 2019, 41, 12. [Google Scholar] [CrossRef]
  30. Chen, B.; Li, S.C.; Deng, Z.H.; Guo, B.; Zhao, Q.L. Grinding Marks on Ultra-Precision Grinding Spherical and Aspheric Surfaces. Int. J. Precis. Eng. Manuf. Green. Technol. 2017, 4, 419–429. [Google Scholar] [CrossRef]
  31. Chen, F.J.; Yin, S.H.; Ohmori, H.; Yu, J.W. Form Error Compensation in Single-point Inclined Axis Nanogrinding for Small Aspheric Insert. Int. J. Adv. Manuf. Technol. 2013, 65, 433–441. [Google Scholar] [CrossRef]
  32. Kukreja, A.; Pande, S.S. Estimation of Scallop Height in Freeform Surface CNC Machining. Int. J. Adv. Manuf. Technol. 2019, 104, 4231–4242. [Google Scholar] [CrossRef]
  33. Lv, Z.K.; Su, Z.K.; Zhang, D.; Yang, Z.M.; Yang, X.H.; Wei, X.; Li, J.; Fang, F.Z.; Zhang, H.; Li, X. Displacement Measurement Method Based on the Rotating Paraboloid Array. Appl. Sci. 2019, 9, 3315. [Google Scholar] [CrossRef]
  34. Li, X.H.; Li, J.; Wei, X.; Yang, X.H.; Su, Z.K.; Liang, J.Q.; Yang, Z.M.; Fang, F.Z. A Noncontact Method for Calibrating the Angle and Position of the Composite Module Array. Appl. Sci. 2020, 10, 4358. [Google Scholar] [CrossRef]
  35. Deng, Y.H.; Hou, X.; Li, B.C.; Wang, J.; Zhang, Y. Review on Mid-spatial Frequency Error Suppression in Optical Components Manufacturing. Int. J. Adv. Manuf. Tech. 2023, 126, 4827–4847. [Google Scholar] [CrossRef]
  36. Yin, T.F.; Du, H.H.; Zhang, G.Q.; Hang, W.; To, S. Theoretical and Experimental Investigation into the Formation Mechanism of Surface Waviness in Ultra-precision Grinding. Tribol. Int. 2023, 180, 108269. [Google Scholar] [CrossRef]
  37. De Groot, P.J. A Review of Selected Topics in Interferometric Optical Metrology. Rep. Prog. Phys. 2019, 82, 056101. [Google Scholar] [CrossRef]
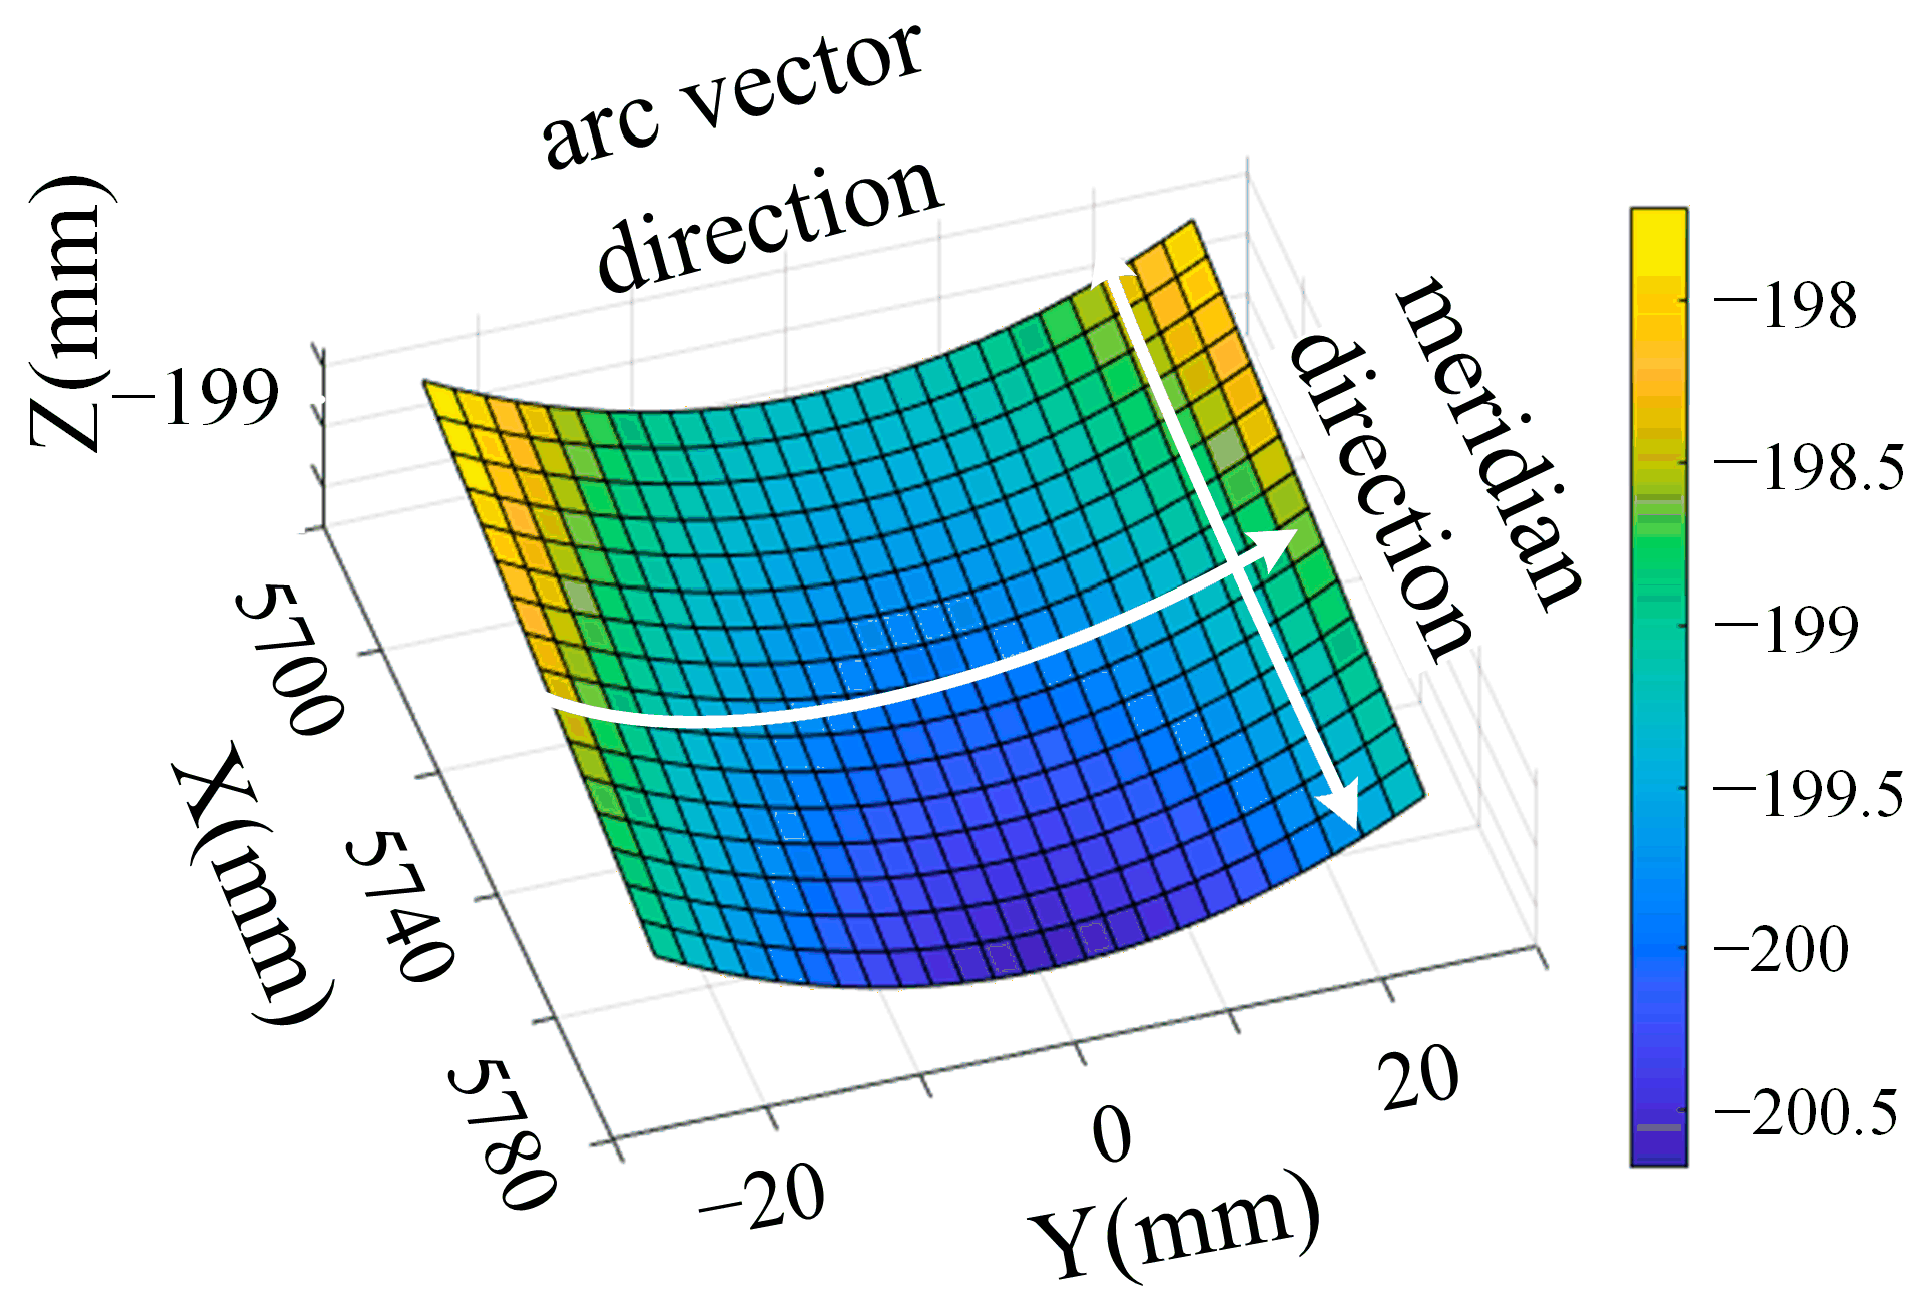
Figure 1. Schematic of off-axis parabolic surface.
Applsci 13 11096 g001
Figure 2. Schematic of the raster path: (a) step along the meridian direction; (b) step along the arc vector direction.
Applsci 13 11096 g002
Figure 3. Surface shape after grinding: (a) rough grinding surface: step along the meridian direction; (b) rough grinding surface: step along the arc vector direction; (c) finish grinding surface: step along the meridian direction; (d) finish grinding surface: step along the meridian direction.
Applsci 13 11096 g003
Figure 4. The actual contour of scallop height: (a) step along the meridian direction; (b) step along the arc vector direction.
Applsci 13 11096 g004
Figure 5. Surface roughness after grinding: (a) rough grinding surface morphology: step along the meridian direction; (b) rough grinding surface morphology: step along the arc vector direction; (c) finish grinding surface morphology: step along the meridian direction; (d) finish grinding surface morphology: step along the meridian direction.
Applsci 13 11096 g005
Figure 6. Comparison between the measured surface and the theoretical surface: (a) step along the meridian direction; (b) step along the arc vector direction.
Applsci 13 11096 g006
Figure 7. Schematic of the scallop height: (a) step along the meridian direction; (b) step along the arc vector direction.
Applsci 13 11096 g007
Figure 8. Effect of grinding wheel radius r on scallop height.
Applsci 13 11096 g008
Figure 9. Effect of step pitch l on scallop height.
Applsci 13 11096 g009
Figure 10. Effect of workpiece curvature R on scallop height.
Applsci 13 11096 g010
Figure 11. Comparison of actual and theoretical scallop height values.
Applsci 13 11096 g011
Figure 12. Diagram of correlation between scallop height and surface shape error: (a) step along the meridian direction; (b) step along the arc vector direction.
Applsci 13 11096 g012
Figure 13. Diagram of the surface error distribution of the raster path stepping along the meridian direction: (a) measurement; (b) simulation.
Applsci 13 11096 g013
Figure 14. Diagram of the surface error distribution of the raster path stepping along the arc vector direction: (a) measurement; (b) simulation.
Applsci 13 11096 g014
Figure 15. Diagram of the spatial distribution of the scallop height stepping along the meridian direction: (a) XOZ plane; (b) YOZ plane.
Applsci 13 11096 g015
Figure 16. Diagram of the spatial distribution of the scallop height stepping along the arc vector direction: (a) YOZ plane; (b) XOZ plane.
Applsci 13 11096 g016
Table 1. Grinding process parameters.
ParametersRoughFinish
Mesh number#200#500
Wheel rotation n (r/min)80008000
Feed rate v (mm/min)500300
Wheel diameter D (mm)1515
Wheel inclination α (°)2020
Step pitch l (mm)40.5
Disclaimer/Publisher’s Note: The statements, opinions and data contained in all publications are solely those of the individual author(s) and contributor(s) and not of MDPI and/or the editor(s). MDPI and/or the editor(s) disclaim responsibility for any injury to people or property resulting from any ideas, methods, instructions or products referred to in the content.