Article

Robotized Mobile Platform for Non-Destructive Inspection of Aircraft Structures

1
Department of Fundamentals of Machinery Design, Faculty of Mechanical Engineering, Silesian University of Technology, Konarskiego 18A, 44-100 Gliwice, Poland
2
Airworthiness Division, Air Force Institute of Technology, Ks. Bolesława 6, 01-494 Warsaw, Poland
*
Author to whom correspondence should be addressed.
Appl. Sci. 2024, 14(22), 10148; https://doi.org/10.3390/app142210148
Submission received: 10 October 2024 / Revised: 27 October 2024 / Accepted: 4 November 2024 / Published: 6 November 2024

Abstract

:
The robotization of the non-destructive inspection of aircraft is essential for improving the accuracy and duration of performed inspections, being an integral part of inspection and data management systems within the currently developed NDT 4.0 concept. In this paper, the authors presented the design and testing of a universal mobile platform with interchangeable sensing systems for the non-destructive inspection of aircraft structures with various angles of inclination. As a result of the performed studies, a low-cost approach of automation of existing measurement devices used for inspection was proposed. The constructed prototype of the mobile platform was equipped with eddy current testing probe and successfully passed both laboratory and environmental tests, demonstrating its performance in various conditions. The presented approach confirms the effectiveness of the automation of the inspection process using climbing robots and defining the directions of possible development of automation in non-destructive testing in aviation.

1. Introduction

Increasing demands on structural safety and reliability in the aircraft sector stimulate the development of the non-destructive testing (NDT) market, which demonstrates continuous growth, having reached the size of USD 10.3 billion in 2023 and currently being projected to reach USD 18.5 billion in 2028, according to recent reports [1]. Among other factors, the increasing attention on the automation of NDT systems plays a crucial role in the development of new technologies and solutions in this sector, which received confirmation in the mentioned report [1]. This leads to the implementation of the NDT 4.0 concept, which assumes the automation and digitization of NDT systems, including the development of robotized inspection systems with the support of automated processing tools [2,3]. This is especially important for the aircraft sector during manufacturing quality assurance and in-service inspection [4], where NDT inspections are usually laborious and time-consuming due to the necessity of scanning extended and geometrically complex structures. Introducing the automated NDT systems allows for reducing the inspection time with a simultaneous increase in the accuracy of inspection, which undoubtedly influences the overall lowering inspection costs. This is particularly important during C- and D-checks of aircraft, where the reduction of inspection time will be the most profitable [5]. According to the estimations made in [6], by the implementation of automatized inspection solutions, the overall cost of an aircraft fuselage inspection is expected to be reduced by 10% with a simultaneous reduction in inspection time by 30%.
Several solutions within robotic NDT systems are commercially available and widely used in aircraft inspections, especially employing ultrasonic testing (UT), eddy current testing (ECT), and infrared thermography (IRT) techniques due to their accuracy and efficiency, as well as portability. It is worth mentioning manipulators and robotic arms adapted for the purposes of inspections of aircraft parts and structures, e.g., YXLON robotic systems used in X-ray inspections or NSpect robotic ultrasonic scanning systems developed by Genesis for aerospace markets based on FlawInspecta technology; as well as portable inspection systems, like Boeing Mobile Automated Scanner (MAUS), which is a multi-technique system, and includes both UT and ECT. Examples of several other adaptations of robotic arms for NDT inspection are described in [7]. Apart from them, numerous NDT approaches are adapted to automatic inspection performance. An overview of automatic and robotic systems for NDT can be found, e.g., in [8,9,10,11,12,13].
Recently, unnamed aerial vehicles (UAVs) have been used for inspection purposes, including aircraft inspections [14,15,16]; however, their performance is usually limited to visual inspection only, while most of the structural inspection procedures of aircraft are based on contact techniques. The newest solutions demonstrate the ability to perform contact inspections with UAVs: the authors of [17] demonstrated the technology of a sticking inspection system with implemented equipment for UT evaluation; however, the energy consumption and control of such systems remain challenging questions.
The inspection systems based on robotic arms have already proven their effectiveness; however, their significant limitation is the possibility to perform inspections in specialized laboratories only, while in numerous cases there is a need for performing inspections in hangars or even on the aprons. This leads to the necessity of developing mobile systems which can fulfill these demands. Several efforts have been made to implement mobile robotic, including climbing robots with different adhesion mechanisms such as magnetic [18], adhesive [19], bionic [20], electrostatic [21], thrust [22], vacuum [23], and vortex suction [24,25,26]. These mechanisms also use different locomotion mechanisms such as driven wheels [27], tracks [28], propulsion impellers [29], legs [30] and moving suction pads [31], etc.
However, reports of laboratory mobile systems equipped with advanced NDT equipment such as UT, ECT, IRT, and radiography are rare. Commercial examples, such as the mobile NDT inspection robot with magnetic adhesive system presented in [16], delivered by Eddyfi Technologies (Scorpion 2 dry) or remotely operated vacuum-enabled robot (ROVER), developed by Boeing, and the mobile robot for fuselage inspection (MORFI), developed by Lufthansa Technik, with an implemented IRT inspection system, have demonstrated their utility in aircraft inspections [20]. In most reported cases, the mobile platforms are tested under laboratory conditions while the robots are tested without NDT equipment, which only is estimated as part of the system’s payload. An interesting overview of the potential applications of wall climbing robots and their prototypes with different adhesive mechanisms is discussed in [32] where magnetic and negative pressure adhesive systems are found to be particularly suitable for NDT purposes. Additional design considerations for mobile NDT systems can be found in [33]. The authors conclude that there are no robot wall climbing solutions which meet all of the requirements such as high mobility and speed, high payload, reliability and safety, usability in terms of energy consumption and maneuverability. On the other hand, they indicate that specialized solutions tailored for specific environments often offer the best balance for meeting demanding requirements.
Despite the variety of robotic systems used for NDT, in this study, we focus on a dedicated solution. Current needs in inspections for the Polish military aircraft ground maintenance sector and difficulties in manual inspections encouraged the authors of this study to develop a mobile platform (MP) with interchangeable sensing systems, which allows for the inspection of various types of aircraft structures, both metallic and polymer–matrix composite, with various angles of inclination. The objective of the development of the mobile platform was to find a low-cost solution for the automation of existing inspection techniques by their implementation onto this platform.
In this study, we described the process of conceptual design and detailed design of MP as well as building a prototype and its testing during inspection of various aircraft structures. Based on the published outcomes of suitability of different wall climbing robots for NDT inspections [32,33] we mainly focused on the consideration of the mechanism of adhesion based on negative pressure generation. Such solutions based on vacuum, suction pads or thrust are not or less constrained by the material of the inspected surface and still remain a subject of many ongoing studies and adaptations to specific requirements. For instance, in [34,35], the thrust adhesion mechanism is detailed designed using numerical simulations. The article [36] presents research about the detailed design and optimization of the suction pads for a robot with multiple legs. Another study on a control system for the robot based on the suction pads mechanism for aircraft skin inspection is presented in [37]. A pair of flexible vacuum suction feet is presented in [38]. This solution has the ability to avoid obstacles. In the study [39], a conceptual design and detailed design plan for a robot that utilizes a vacuum approach and incorporates advanced 3D printing technology is presented. A hybrid mechanism that combines locomotion and adhesive mechanisms is presented in the article [40]. The authors take advantage of the propulsion impellers for this purpose. In [41], a square rotational-flow adsorption unit is tested and used to maintain negative pressure and adsorption force by using the air’s rotational inertia effect. Article [42] presents numerical and experimental studies on the negative pressure mechanism for underwater solutions. These diverse research efforts confirm the relevance of negative pressure-based mechanisms, especially in wall-climbing robot solutions. It shows also that the wall-climbing robot design for NDT purposes often requires an individual approach to meet requirements. The solution presented in this study appears from the need to support manual NDT inspections of curved surfaces with complex geometry and to gain access to them from the aircraft. The originality of the solution is the universality of the developed MP in terms of a possibility of its adaptation to various NDT techniques and equipment used for performing inspections. Moreover, the relatively simple construction and application of fast and inexpensive manufacturing technologies made it possible to build a prototype of MP at an affordable cost, which successfully passed both laboratory and in-field tests made for various aircraft.
The remainder part of this article is organized as follows: in Section 2, a process of designing the prototype from scratch is presented. Section 3 evaluates the performance of the MP prototype including its application on real aircraft structures during non-destructive testing using ECA. In this section, a comparison of technical parameters of the MP platform with other available systems is presented. Section 4 summarizes the content of the article.

2. Structural Design and Control System

2.1. Assumptions and Initial Calculations

The MP was designed taking into account some assumptions related to the non-destructive testing systems as well as motion requirements and adhesion to the tested surfaces. Analyzing various solutions discussed in the previous section, the following assumptions were made:
  • The classical propeller drive or electric ducted fan (EDF) was assumed to be used for the generation of a payload by creating a negative pressure. This approach allows for appropriate adhesion of the MP for various curvatures of the tested surfaces. These types of driver ensure high efficiency and low weight in relation to the power output.
  • The body in the form of a shell structure is to be made of glass-epoxy laminate. This design allows for a compact structure, and the use of a glass-epoxy laminate allows for low weight and high durability.
  • The MP should be equipped with a four-wheel chassis, which usually ensures vehicle stability and good traction.
  • The minimum speed was assumed considering the speed to scanning with the selected testing system: Olympus OmniScan MX with eddy current array (ECA) testing technique, which is typically used for inspection of aircraft. Measurements are to be made using the SAB-067-005-032 low-frequency eddy current array probe, for which the scan speed is 0.1 m/s. The MP should mimic the movement of the ECA probe during inspection by following the predefined trajectories.
  • The speed during idle travel of MP is assumed to be not less than 0.5 m/s.
  • The assumption for wheels were the following: diameter of 70–100 mm, tread made of a material with a high friction coefficient (rubber, polyurethane or silicone) close to 1. Higher friction coefficient will allow to obtain a greater lifting capacity of the entire MP with the same propeller drive thrust.
  • Wheel drive is to be implemented with DC motors with integrated gear to minimize the mass of the MP.
  • The weight of the whole MP is assumed to be up to 2 kg, including ECA probes and cabling, which was estimated after a preliminary review of available components, propeller drive performance, and price.
  • DC power supply with a voltage in the range of 12–48 V is provided via converter from the power grid, which is governed by the selected ECA system, where the probe is connected to the defectoscope by wire.
Taking into account the assumed weight of MP of 2 kg and the diameter of the wheels of 100 mm, the torque of the motors driving the wheels was determined to be 0.98 Nm with a rotational speed of 95 rpm under the assumed linear speed of 0.5 m/s. The next step was to determine the minimum thrust that the propeller drive should produce so that the MP can move on surfaces inclined at arbitrary angles in the range of 0–180°. Considering the assumed mass of the MP and three values of the static friction coefficient of 0.25, 0.5, and 0.75, the thrust force was determined and presented graphically in Figure 1 The maximal values of a thrust force and the related angles of inclination for the considered values of a friction coefficient are given in Table 1.
The use of wheels with a tread made of a material with a high friction coefficient allows the use of a propeller drive with lower thrust and lower power consumption. This allows the use of smaller and lighter components, e.g., regulator, battery or power cables.
Having these assumptions and the results of the initial calculations, the development of the control system and construction of mechanical parts of MP were performed.

2.2. Selection of Components

At the assumption of building the MP, which will be functional, lightweight, and low-cost, the components were selected upon the availability at the market. To generate thrust of the MP, two types of drives can be used: a classical propeller drive and an EDF. After analyzing 19 types of drives available on the market (pre-selected considering the criteria of the maximal thrust possible to generate by a drive), its current and power consumption, efficiency, and price, the EMAX GT2826/04 drive with the APC 10x5 propeller was selected. It was noticed that EDF drives are characterized by small size and compact construction; however, they can generate much lower thrust and have significantly lower efficiency than classical propeller drives. The selected propeller drive with a propeller can generate a thrust of 3.1 kg at the efficiency of 224.3 W/kg with its own mass of 0.175 kg. The estimated thrust is sufficient under the assumption that the weight of MP will not exceed 2 kg and the friction coefficient of a wheel thread will exceed 0.8.
Next, the regulator for the selected brushless direct-current (BLDC) motor was chosen from 10 pre-selected options considering the continuous current value. The chosen regulator was ZTW Beatles-50A BEC, characterized by a continuous current of 50 A and a built-in voltage stabilizer (the so-called BEC system) with a maximum output current of 5.5 A and a voltage of 5 A. This regulator can be used to power the remaining control electronics.
Assuming a possibility of turning and changing the direction of MP during inspections, it was decided to design the wheel drive performed by four independently driven and controlled wheels. For this purpose, DC motors integrated with the gear were selected. The parameters taken into account during selection were the output torque calculated in Section 2.1, as well as rotational speed and weight. Considering them, the Pololu 4826 gear motor with a built-in encoder was selected.
To fulfill the previously defined assumptions on wheels, the DFRobot wheels with a diameter of 80 mm and a width of 17 mm were used to build the MP. This model was chosen mainly due to availability, low price, and weight, as well as the possibility of removing the treadmill and installing a treadmill made of another material.
The power supply for the designed MP was selected considering the electrical power demand of particular components. The most power consumable component is the propeller engine, whose maximum power consumption can reach 700 W at a supply voltage of 14.8 V, while the consumption of other components compared to the latter is negligible. Two options were initially considered:
  • power supply from the vehicle’s built-in lithium-polymer battery,
  • power supply via a converter from the power grid. In this case, energy is supplied to the vehicle through a two-core cable with an appropriate cross-section.
The length of the cable connecting the probe (mounted on the MP) with the flaw detector is 3 m. Therefore, the minimum length of the power supply cable is also 3 m. The weight of a two-core cable with a cross-section of 4 mm2 (this is due to the current consumption) in a silicone insulation is 0.3 kg. Silicone-insulated cables are characterized by greater flexibility and, due to the higher maximum operating temperature of the insulation, higher current carrying capacity. Batteries made using lithium-polymer technology, weighing approx. 0.3 kg and voltage 14.8 V, have a capacity of approximately 3 Ah. This amount of stored energy allows only for 4 min of operation at the maximum power consumed by the propeller drive. Therefore, considering the short operating time using the built-in battery for power supply, power to the MP will be supplied from an external network converter via a two-core silicone-insulated cable with a cross-section of 4 mm2. The conditions of inspection taking place in covered hangars also allow using of this type of power supply.
To estimate the empty weight for body and other components, the gross weight of the components selected so far was calculated, considering also the probe as a payload, which will be built on the MP during tests. The empty weight at this stage was estimated at 0.62 kg.

2.3. Development of the Control System

The designed control system consists of two main components: the main control system responsible for the operation of the wheels, propeller drive, and the probe lifting system; and the system for a remote control of the MP. Communication between the modules is wireless and bidirectional and was implemented in the ISM 2.4 GHz band, allowing the need for additional cables to be eliminated. In the following section, the details on hardware and software development for the designed MP are provided.

2.4. Hardware

The control block for the motors driving the wheels was built on specialized DRV8801PWP systems from Texas Instruments. These systems were created to control DC motors powered by voltages from 8 to 36 volts. This system was selected, among others, because of its small dimensions, which makes it possible to design a smaller and lighter circuit.
The second function block is a serial communication interface system built on the MAX3232CSE from Analog Devices. It enables the conversion of 3.3 volt logic to the RS232 interface standard with voltages of −12 and +12 V. A larger voltage difference allows data to be transmitted over longer distances and is more resistant to interference.
The next block is the MEMS digital accelerometer system from Analog Devices. It is a three-axis accelerometer that can measure accelerations in four ranges, ±2 g, ±4 g, ±8 g, ±16 g and in a resolution of 10 bits (0-1023). The power supply voltage range is from 2 to 3.6 V, and communication with the main microprocessor takes place via the I2C serial interface, which uses only two microprocessor ports. Measuring the acceleration value in three axes allows determining the angular position of the vehicle in space. This allows for automatic regulation of the thrust of the propeller drive depending on the angle of the inclined surface on which it is moving.
The fourth block is the radio communication system built on the HOPERF RFM75 system. It is a small module in a housing designed for surface mounting with dimensions of 12.8 × 16.8 mm. It operates in the ISM band 2400–2483.5 MHz and has the ability to programmatically adjust the output signal power in the range from −25 dBm to 4 dBm. It can transmit data at speeds of 250 Kbps, 1 Mbps or 2 Mbps with the possible length of a single data packet set from 1 to 32 bytes. Communication between this module and the main microprocessor takes place via the SPI interface with a maximum clock frequency of 8 MHz.
The fifth block is the Bluetooth radio communication module built into the HC-05 system. Similarly to the previous block, it allows wireless communication in the Bluetooth 2.0 standard. Working in this standard allows for the use of, for example, a phone or tablet with the appropriate application installed as a remote control.
The sixth block is the power supply system. It is composed of a linear stabilizer LM1117-3.3, which reduces the input voltage to 3.3 V. This is the voltage at which all semiconductors on the motherboard can be powered. The input of the system is protected by a rectifying diode, which protects the remaining components against reverse voltage polarity. This block also contains capacitors and a choke that filter the input voltage from interference that may come from the BLDC motor controller, brush motors or from the mains converter powering the entire system.
The next blocks are the inputs and outputs of signals controlling, among others, the servo mechanism of the head lifting system and the BLDC motor regulator. The last element is the microprocessor block that controls the entire vehicle. It is built on the ATMEGA16A chip from MICROCHIP. This block also includes a quartz resonator with a frequency of 8 MHz, which is the source of the microprocessor clocking signal, and a six-pin connector for uploading the software to the microprocessor’s flash memory.
The entire system was assembled on a double-sided printed circuit (see Figure 2) with dimensions of 60 × 100 mm.
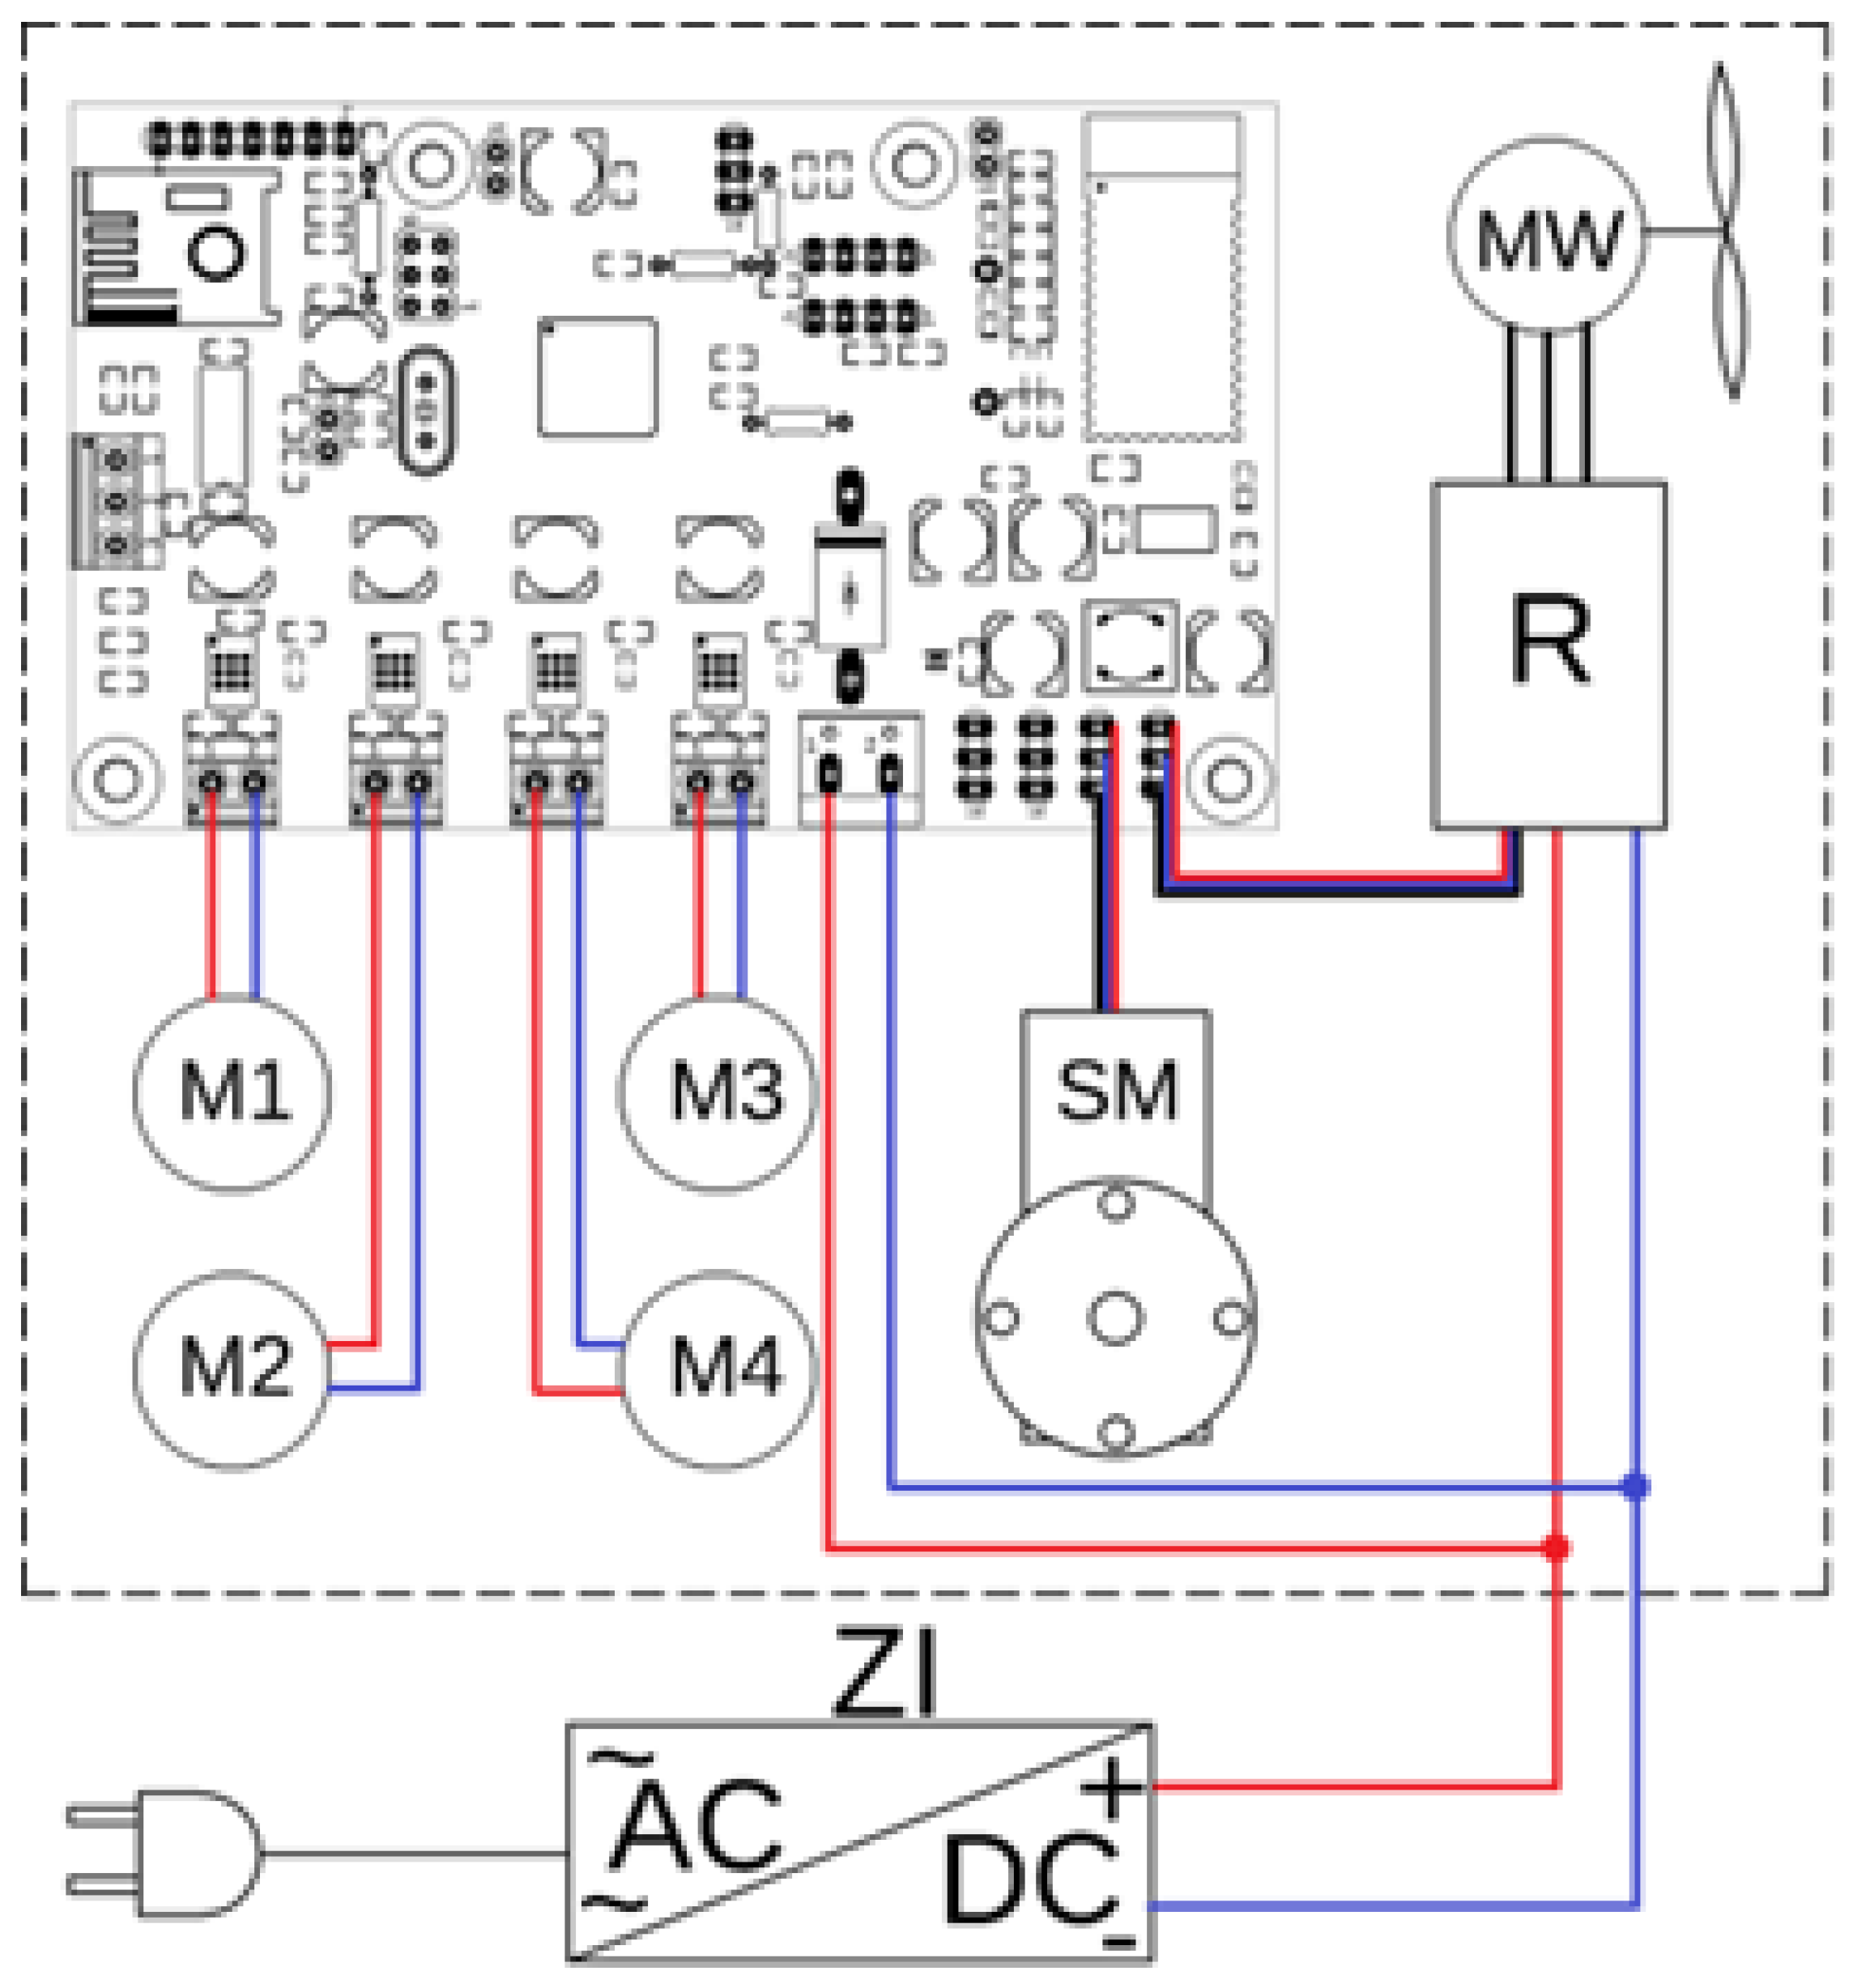
The control module (see the scheme in Figure 3) was mounted in the front part of the MP and connected to all other components. The power supply of the MP comes from an external switching power supply with an output voltage of 17 V (no load) and a maximum load capacity of 50 A. It was decided to use a power supply with a higher output voltage due to the losses (voltage drops) between the power supply and the MP. The voltage at the input of the MP, under full load (maximum power of the propeller drive), drops to 14.4 V. The voltage drop of 2.6 V results, among other factors, from the resistance of the power cable, which, for a cable with a cross-section of 4 mm2 and the sum of the lengths of both wires of 8 m, considered in this study, is 0.035 Ω with a voltage drop of 1.6 V. The remaining 1 V drop results from the internal resistance of the power supply and the resistance on the connectors used. The maximum recommended supply voltage of the main propeller drive engine, according to the manufacturer’s data, is 14.8 V. Therefore, the 14.4 V voltage that powers the engine during its maximum load should be considered correct.
The operation of the MP is controlled using a wireless remote control. Similarly to the main system, the remote control is also divided into several functional blocks.
The first one is the power supply block. It includes the MCP73831 battery charging system from Microchip. It is an integrated charging system for a single lithium-ion cell. A 18650 battery with a capacity of 2900 mAh from Samsung was used to power the remote control.
The last element of the Microchip power supply system is the TC1015-3.3V stabilizer, which is a low-dropout stabilizer. This means that it can operate with a small voltage difference between the input and the output. This is important when the system is powered by a battery, the output voltage of which ranges from 2.8 to 4.2 V, depending on the degree of charge.
The next block, similarly to the main system, is the RFM75 radio data transmission system. The third block is the ATMEGA328 microprocessor, which manages the operation of the entire remote control. The fourth block is the layout of the 12-key matrix keyboard. A total of 12 buttons are connected in a 4 × 3 matrix arrangement. This allows the microprocessor to read the status of 12 buttons using only seven input/output ports.
The next system is the LCD-AG-C128064CF display. It is a monochrome display with a resolution of 128 × 64 pixels with a chip-on-glass design, which is only 2.8 mm thick. It has a built-in ST7565R controller, which allows for simple (programmatic) graphics display. The remote control, like the main control system, is equipped with the MAX3232 serial data transmission system.
The system was assembled on a double-sided printed circuit board (see Figure 4a) using mostly surface-mount components. The whole system was mounted in the universal PL2943WH housing made of ABS plastic (Figure 4b) and covered with a front panel with holes for a display and buttons (Figure 4c).

2.5. Software

The MP and remote control applications were implemented in C in the Microchip Studio environment. The AVRDRAGON programmer from Atmel was used to program the microprocessors.
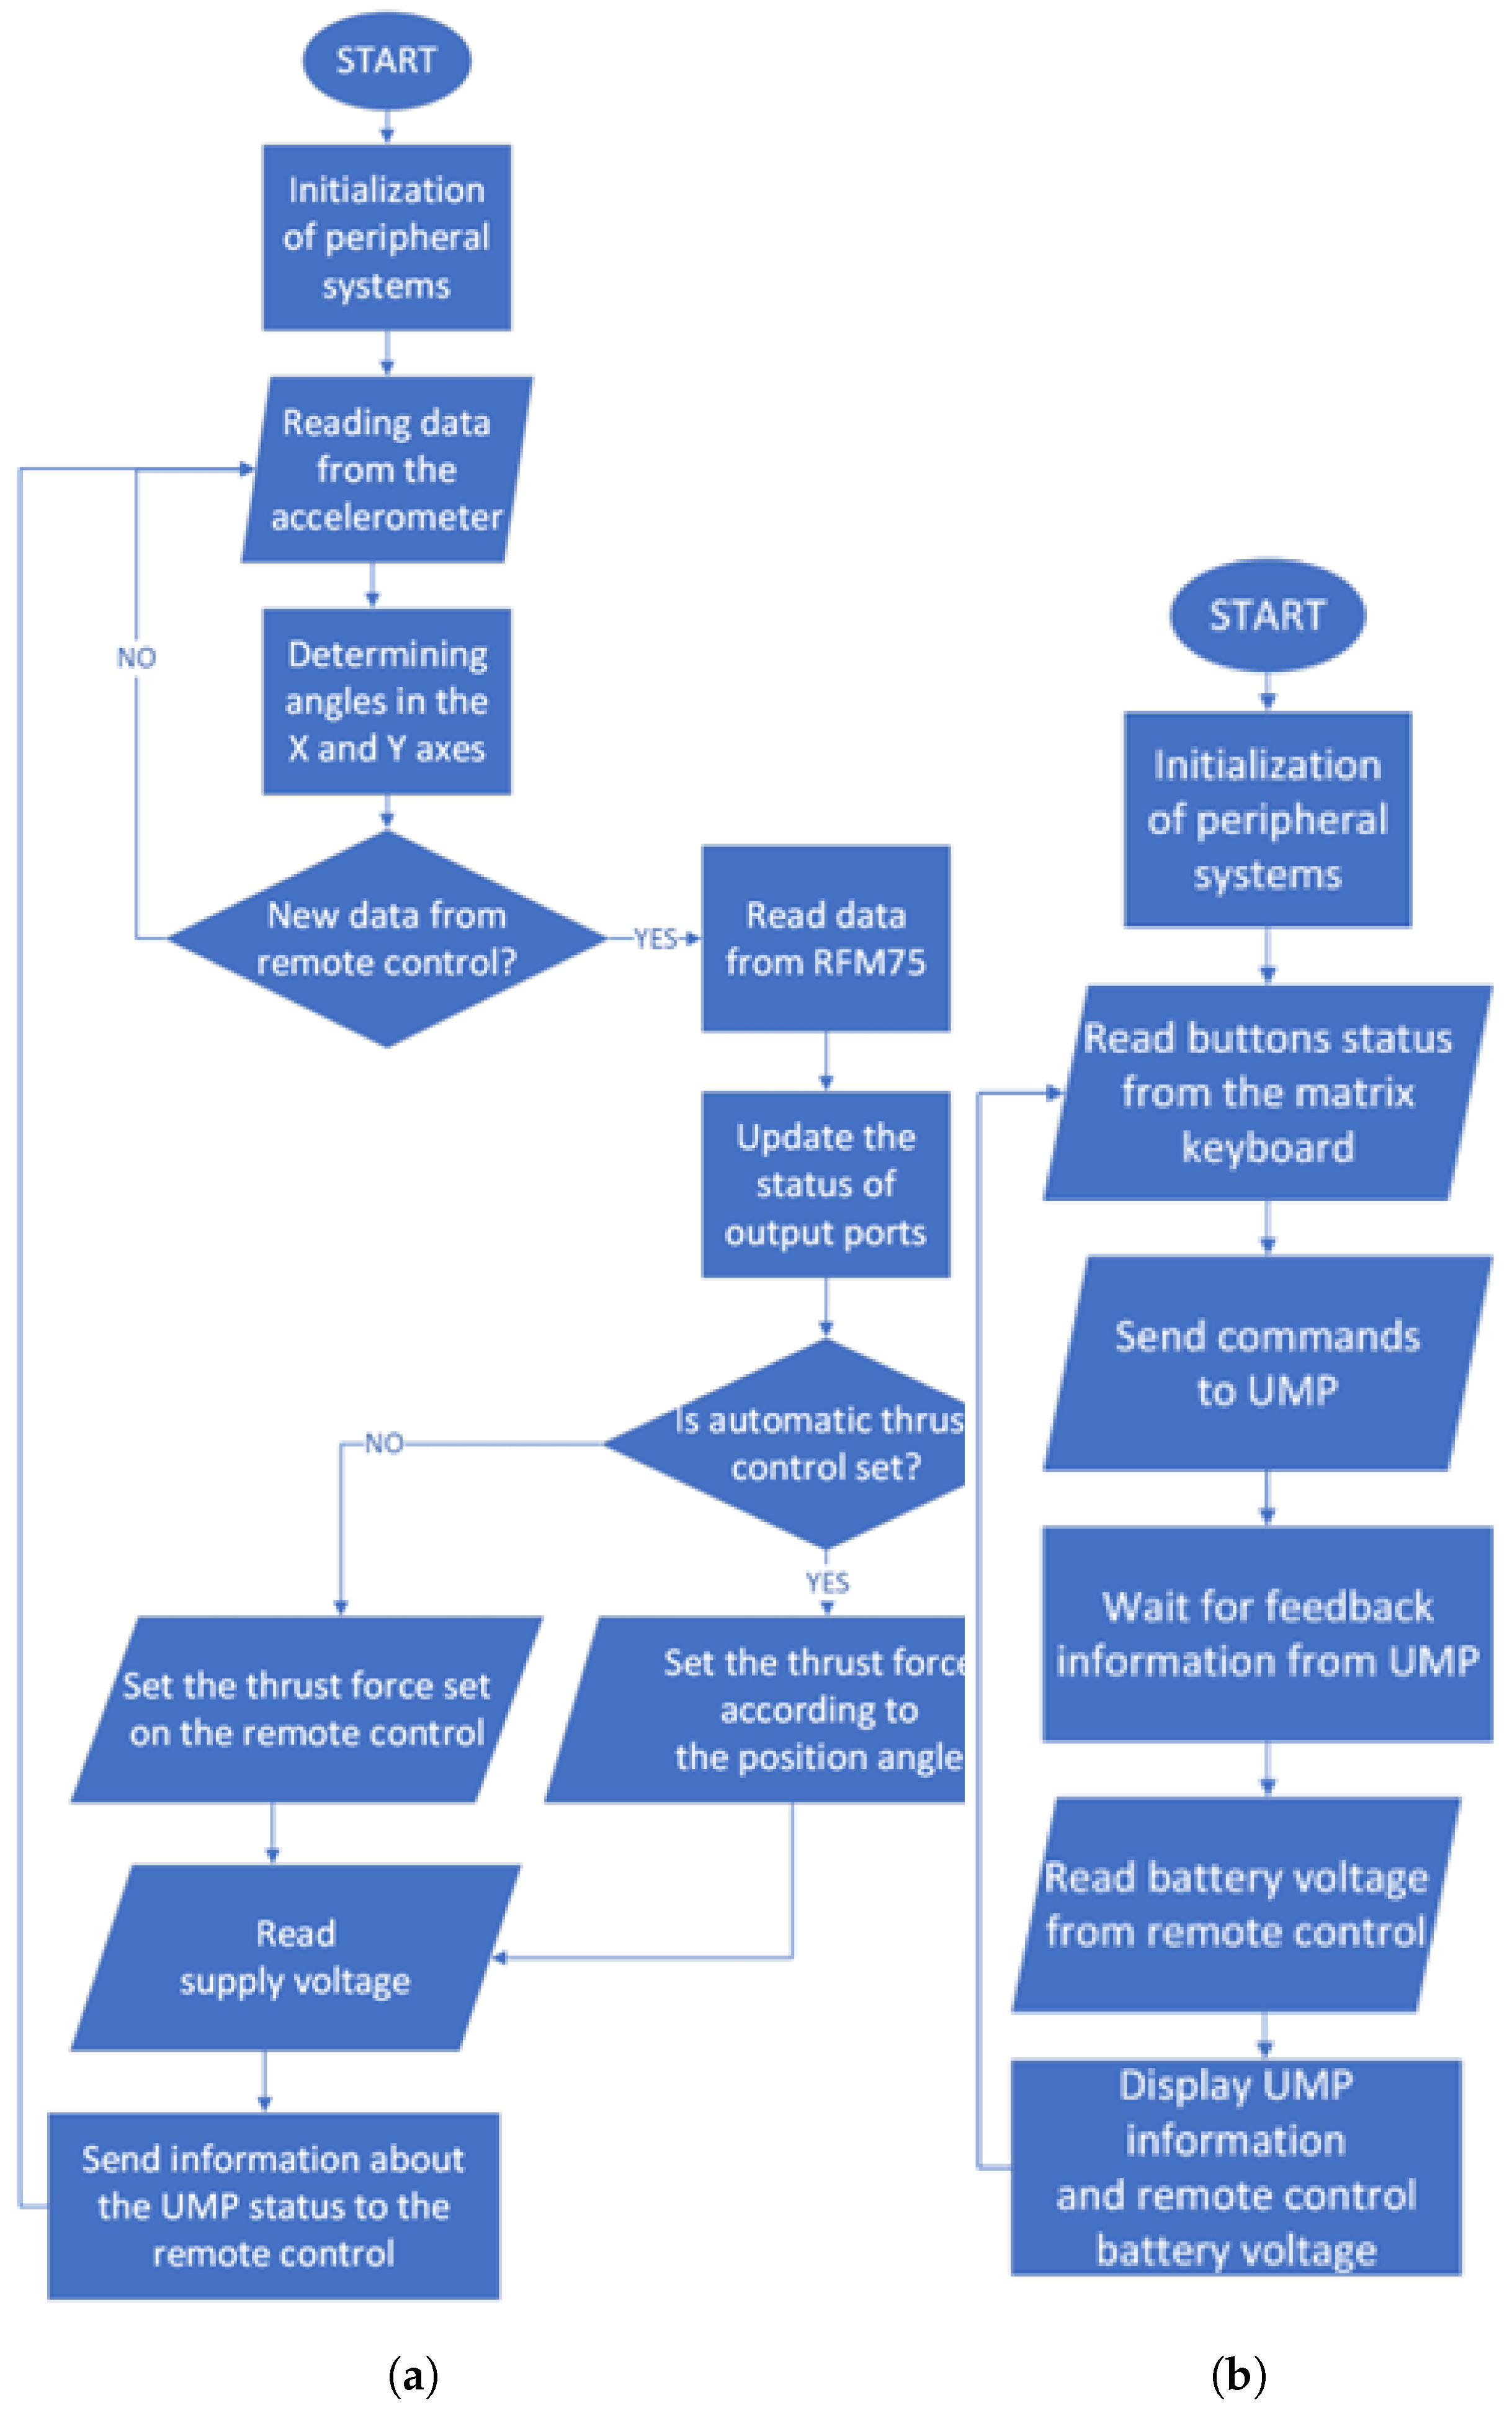
The automatic control of the propeller drive thrust is possible by determining the inclination angle of the MP in space. The input data are the acceleration values in three axes read from the three-axis ADXL345 accelerometer. These values, for simplified filtering purposes, were calculated as the average of the last 10 readings. The determined inclination angle is converted from radians to degrees, and then the propeller thrust necessary to keep the MP in balance is calculated. In practice, it is important that the friction force caused by, among others, the thrust force of the propeller drive to be greater than the G force on the x-axis in the global coordinate system. Therefore, only positive values of the thrust force are taken into account when setting the thrust force of the propeller drive.
The timer/counter built into the ATMEGA16 microprocessor was configured as a PPM signal generator with a resolution of 8 bits. The algorithm of the main function of the MP is presented in Figure 5a.
The main instructions of the algorithm for the remote control application are presented in Figure 5b. After initial initialization of peripheral systems such as the RFM75 radio communication module, LCD-AG-C128064CF display and timers built into the microprocessor, the transition to the main program loop takes place. This loop checks the status of the buttons and sends the read values to the vehicle control module. The remote control then waits for the feedback sent by the MP. The received values and the previously measured battery voltage of the remote control are displayed on the display and the entire cycle is restarted.

2.6. Mechanical Design and the Prototype of the Mobile Platform

The MP was designed as a compact structure, with a centrally located propeller drive (see Figure 6 presented in first angle projection ISO standard). The electronic system was placed inside the vehicle. There is a probe lifting mechanism in the front part and a power cable connection in the back part.
The shell of the MP was made of glass-epoxy laminate (glass fabric of weight 80 g/m2) on the polyurethane foam core. This results in a rigid structure weighing only 0.4 kg.
The engine was mounted to an intermediate disc, from which four aluminum tubes extend outwards circularly symmetrically every 90 degrees. The propeller is mounted to the engine shaft using a hub that the manufacturer supplied with the engine. This motor is mounted to the body of the MP via an aluminum plate. The original treadmill, made of hard plastic of an unspecified composition, was substituted with the silicone treadmill with a hardness of 25 Shore A.
The probe holder was made of a perforated plate with locating and eccentric sleeves. The holes and eccentric sleeves allow the handle to be adapted to various types of probes. The perforated plate is mounted to the lifting mechanism through three sleeves made of elastomer that, to a small extent, allow the scanning probe to precisely fit and adhere to the surface being inspected. A Sanwa SRM-102 modeling servo was used to lift the probe through the arm system and indirectly through the spring tension. The purpose of the spring system is to maintain the pressure of the probe against the tested surface despite any changes in its curvature or height.
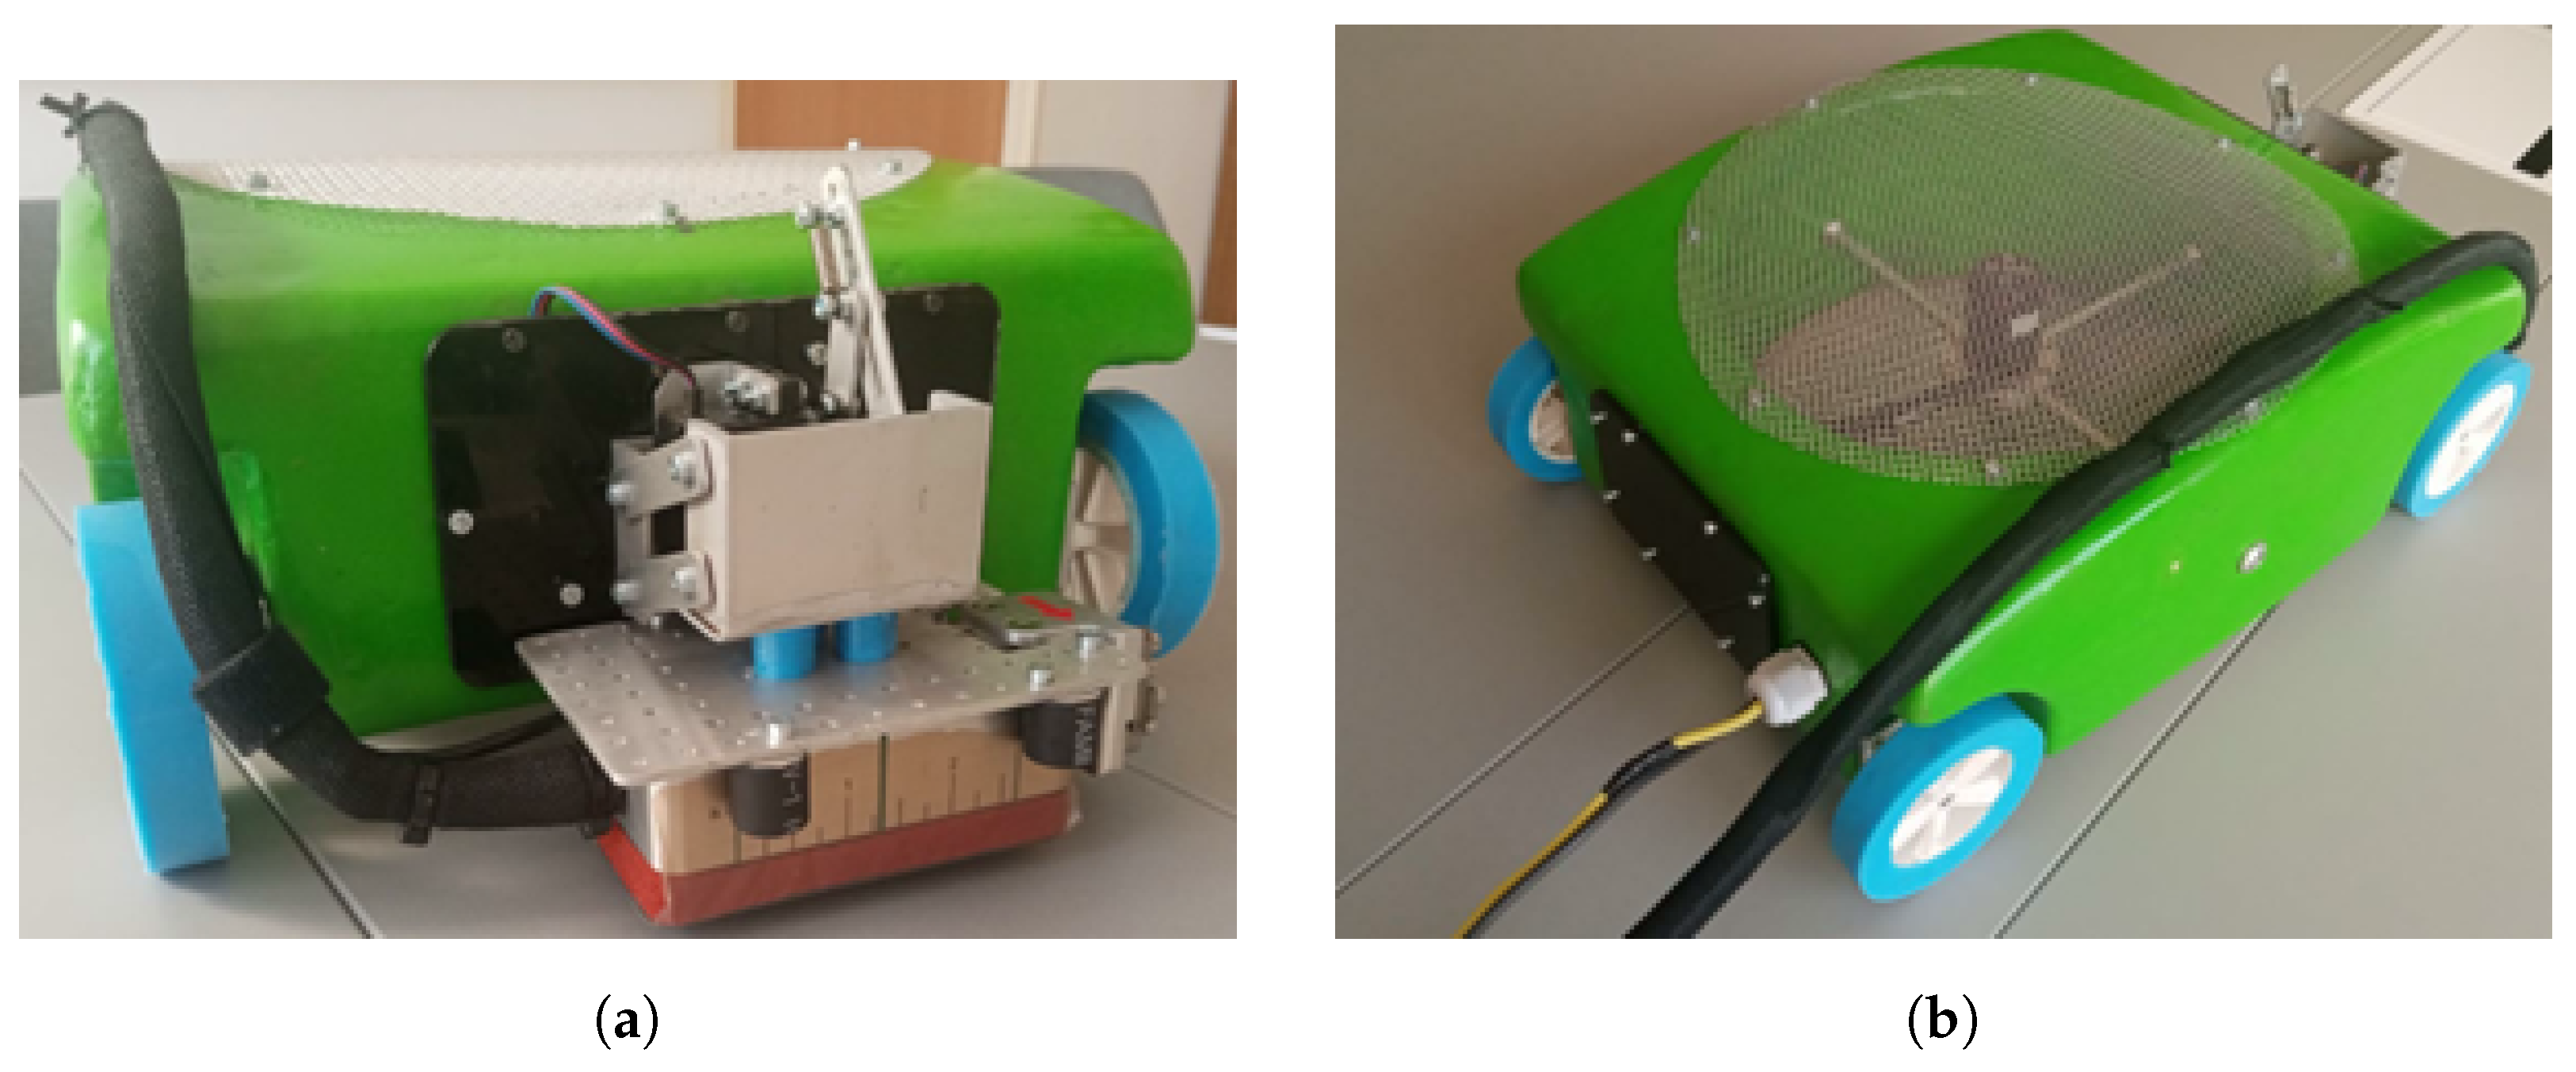
The channel in the central part of the MP, where the propeller drive is located, was secured with an aluminum mesh on both sides to protect the propeller against damage due to accidental contact with foreign objects and also to protect the operator against injury. The assembled MP is presented in Figure 7.

3. Testing and Experimental Validation

3.1. ECA Testing System

The two most frequently used testing methods in aviation using portable flaw detectors are the ultrasonic method and the eddy current method. Due to the physics of the phenomena used in detection, the ultrasonic method requires the use of a coupling agent like water or gel. This introduces an additional difficulty that influenced the decision to abandon the UT system at this stage of work. Moreover, due to the fact that the surfaces of fuselages and wings in currently operated aircraft are made mainly of Al alloys, cracks are the most expected type of damage. Therefore, it was decided to use the ET method as the most frequently used crack detection method. The Omniscan MX system with the EC Array SAB-067-005-03 head was selected for testing. This system is distinguished by the use of an array probe that allows scanning a large area. As in the case of using single transducers, currents are induced in the conductive material. Eddy current disturbances caused by defects or geometry changes cause a change in the signal received by the coil, affecting the reading on the flaw detector screen. An important advantage is the possibility of recording signals collected at a larger number of frequencies during a single scan and further post-processing of the collected signals, which allows for a reduction in the number of scans performed.
The probe SAB-067-005-03 selected for initial tests allows scanning with eddy current frequencies in the range of 1–25 kHz. The choice was dictated by the fact that it was the largest available, which made it possible to collect the signal from a relatively large area. It was also important that low frequencies allow for obtaining responses from greater depths, which in the case of multi-layer structures facilitates the interpretation of the results. The scans show not only the rivets, but also the internal elements. At this stage of the research, the aim was to assess whether the collected result was legible rather than to look for damage.

3.2. Initial and Laboratory Tests

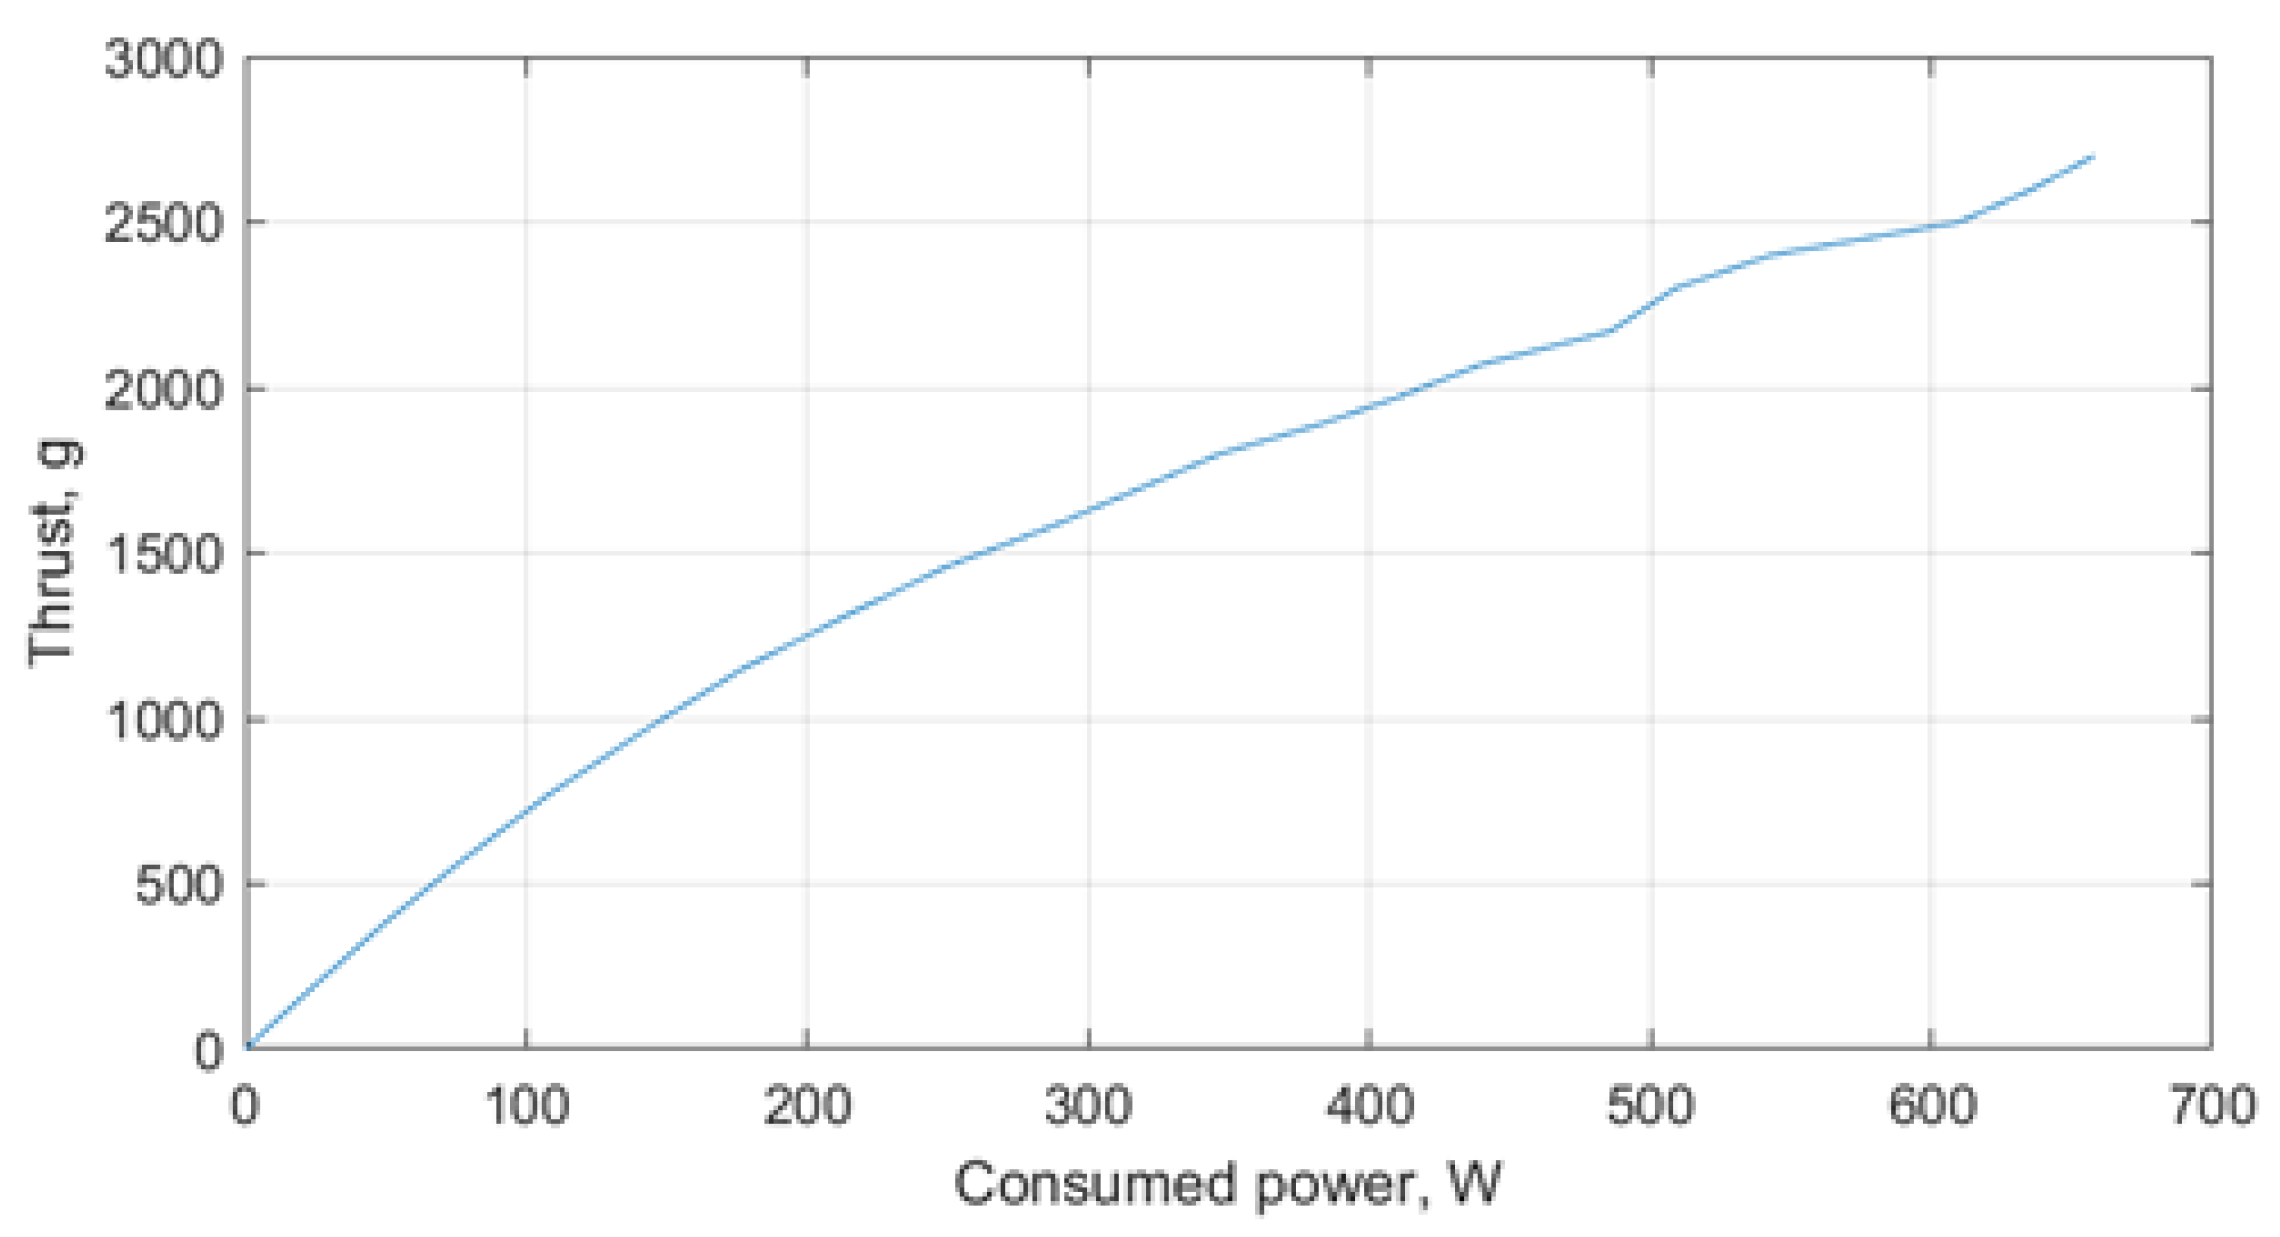
After assembling the prototype, the thrust force measurements of the propeller drive as a function of power consumption were first measured. For this purpose, two digital scales with a range of up to 5 kg, the UNI-T UT203+ clamp multimeter, which measured the current consumption, and the MASTECH MS8211 multimeter, which measured the voltage supplying the vehicle, were used in the experiment. The maximum measured thrust was 2.7 kg with a power consumption of 658 W. The diagram of the thrust in function of the consumed power is presented in Figure 8.
In the next step, the static coefficient of friction between the wheel tread and the ground was measured. An inclined plane was used for this purpose, which was made of birch plywood and MDF board. The test surface, on one side, was covered with a steel sheet painted with high-gloss aerosol varnish to simulate the aircraft skin surface. The other side was left in a shell state.
Up to a certain value of the angle, the component of G force is balanced by the friction force and the body is at rest. By increasing this angle, the limit at which the body starts moving is reached. This angle is called the friction angle, and the static friction coefficient is equal to the tangent of this angle.
A GEKO digital protractor was used for angle measurements. The results of these measurements were as follows. The friction angle for a painted steel sheet and rough plywood was 17.7° and 31°, respectively, which corresponds to the static friction coefficient of 0.32 and 0.6. Next, the MP’s holding angle when the propeller drive was operating at maximum available power was measured. For the painted steel sheet, the angle was 53°, while for the raw surface of the birch plywood, the angle was 80°.
The last laboratory test was related to the measurement of the noise generated by the propeller drive unit operating at full power. A Bruel & Kjaer Type 2239 meter was used to measure the sound intensity. The measured equivalent continuous sound level was 114 dBA.
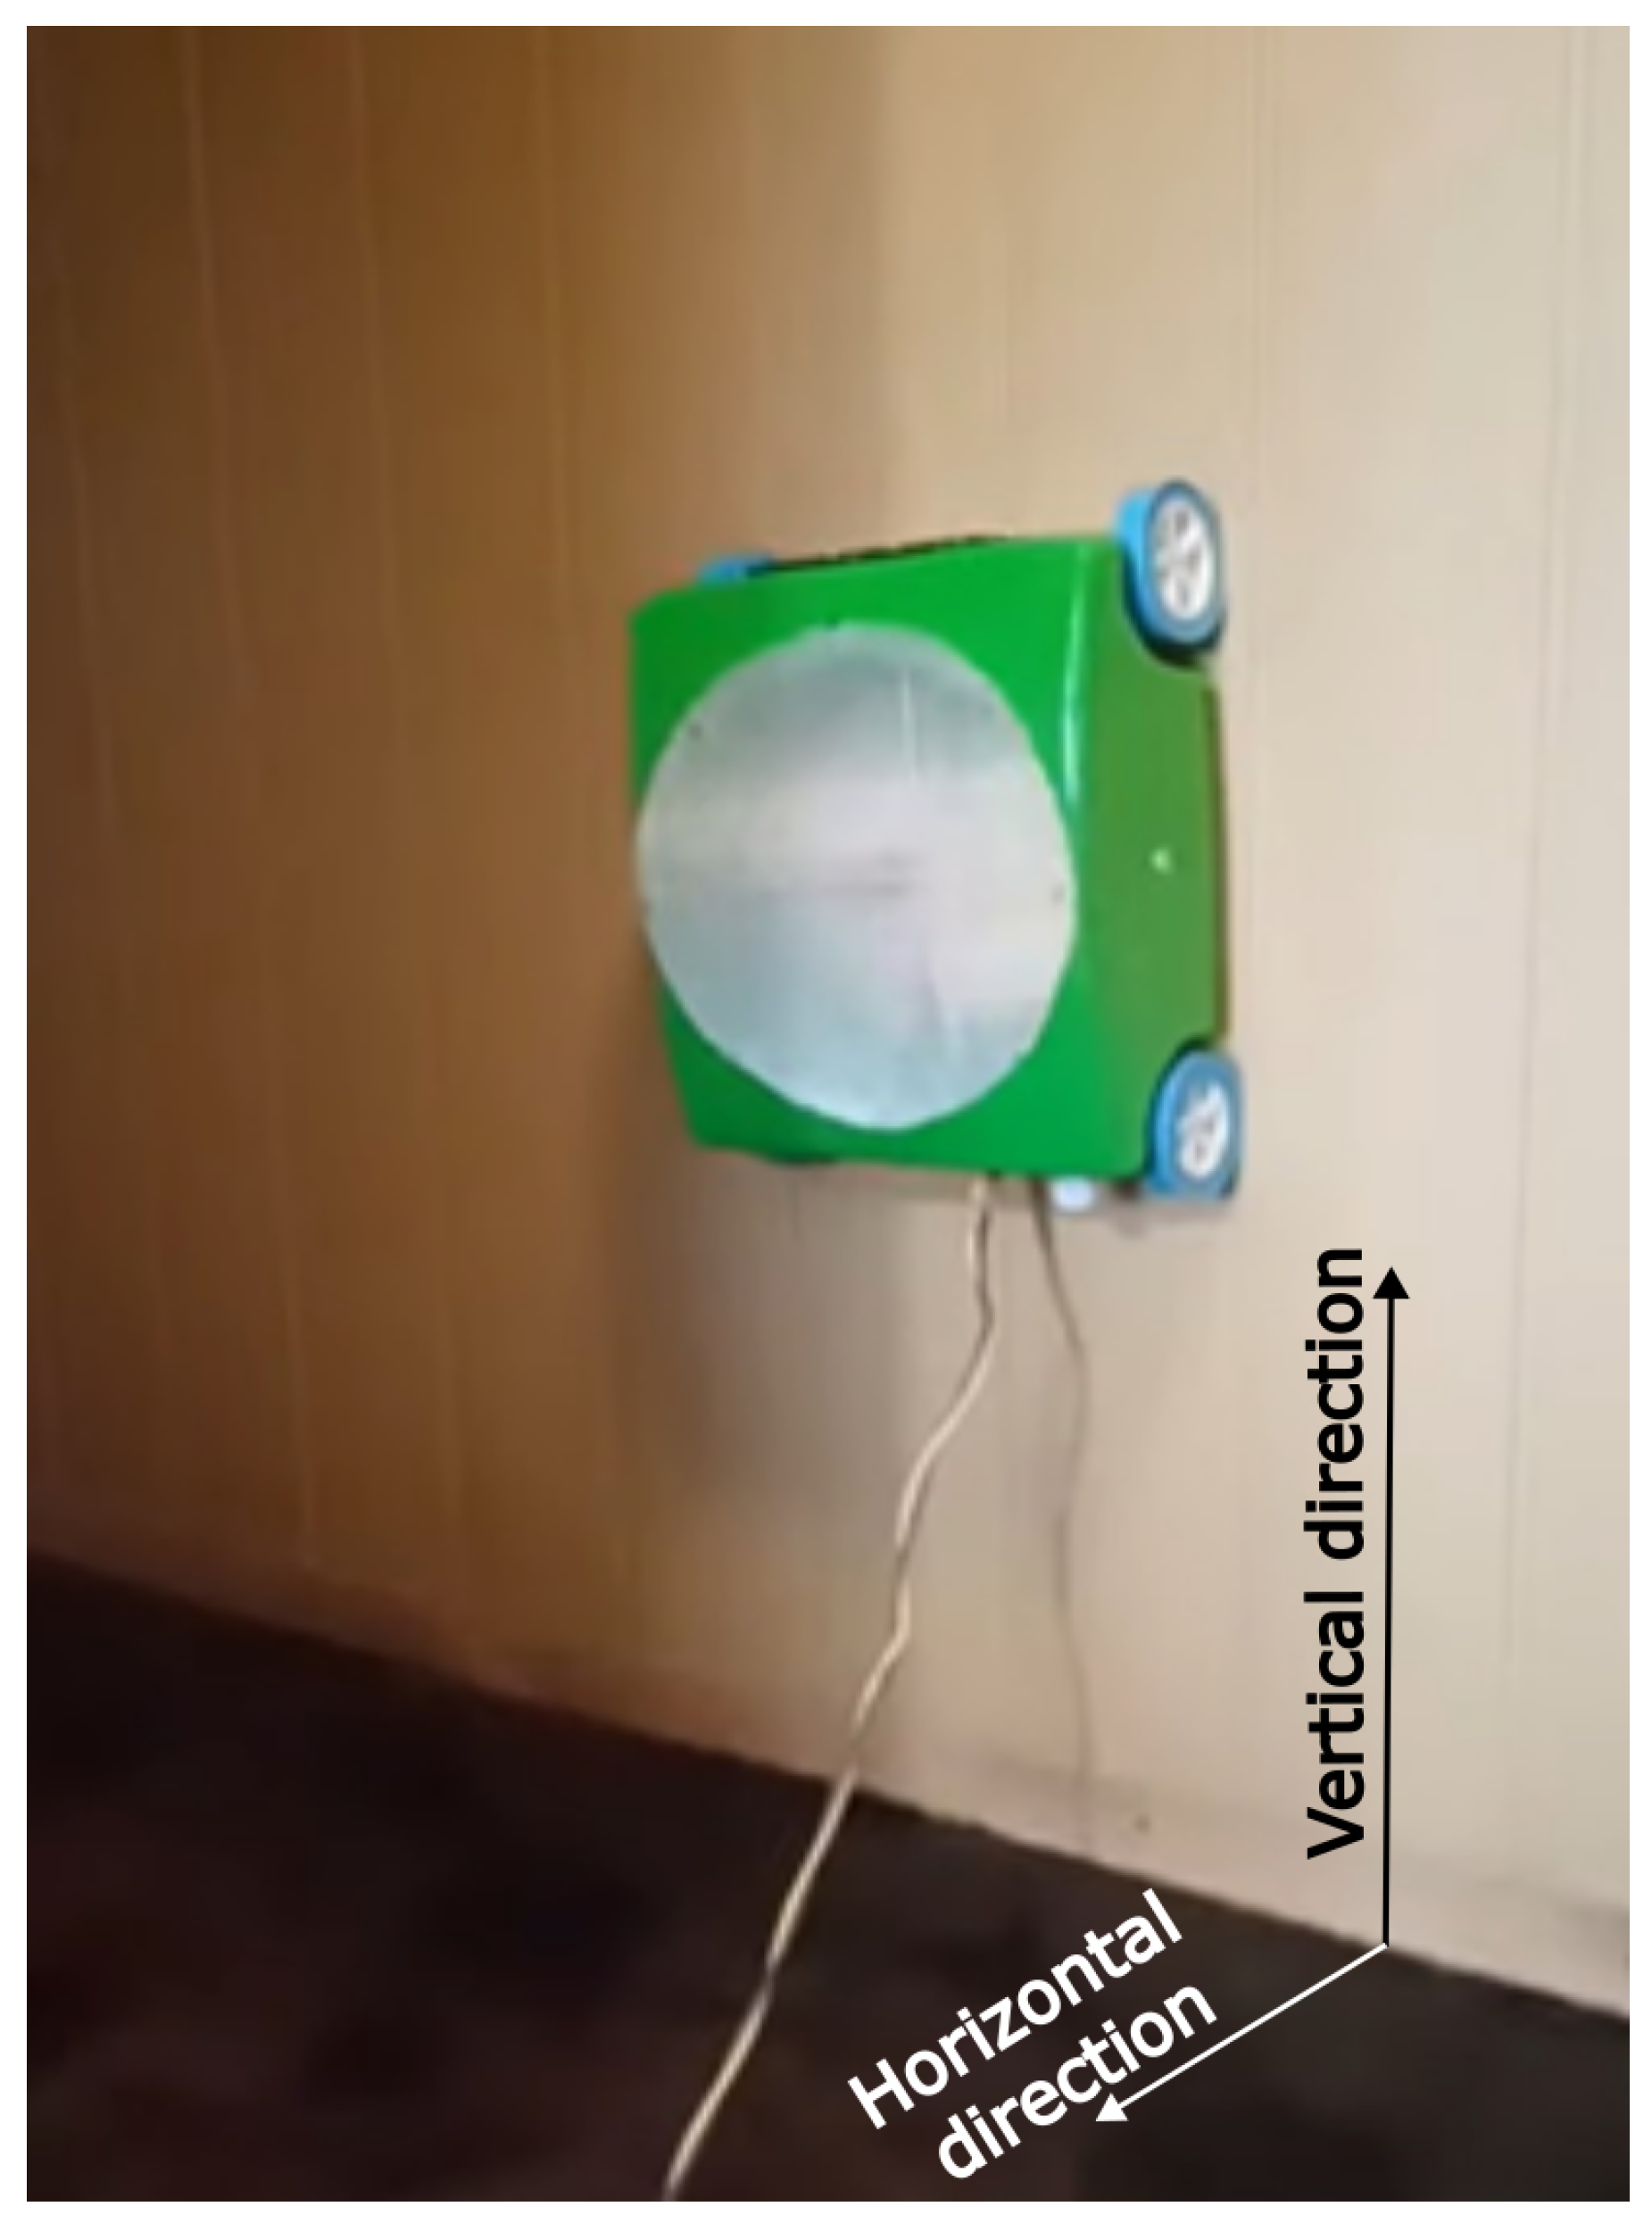
After completion of the prototype, a test on moving the MP along a vertical wall was performed (see Figure 9). The surface on which the vehicle moved was wall panels covered with wood-like veneer. Passing this test successfully, the MP was prepared for the tests in real operational conditions.

3.3. Testing of Aircraft Structures

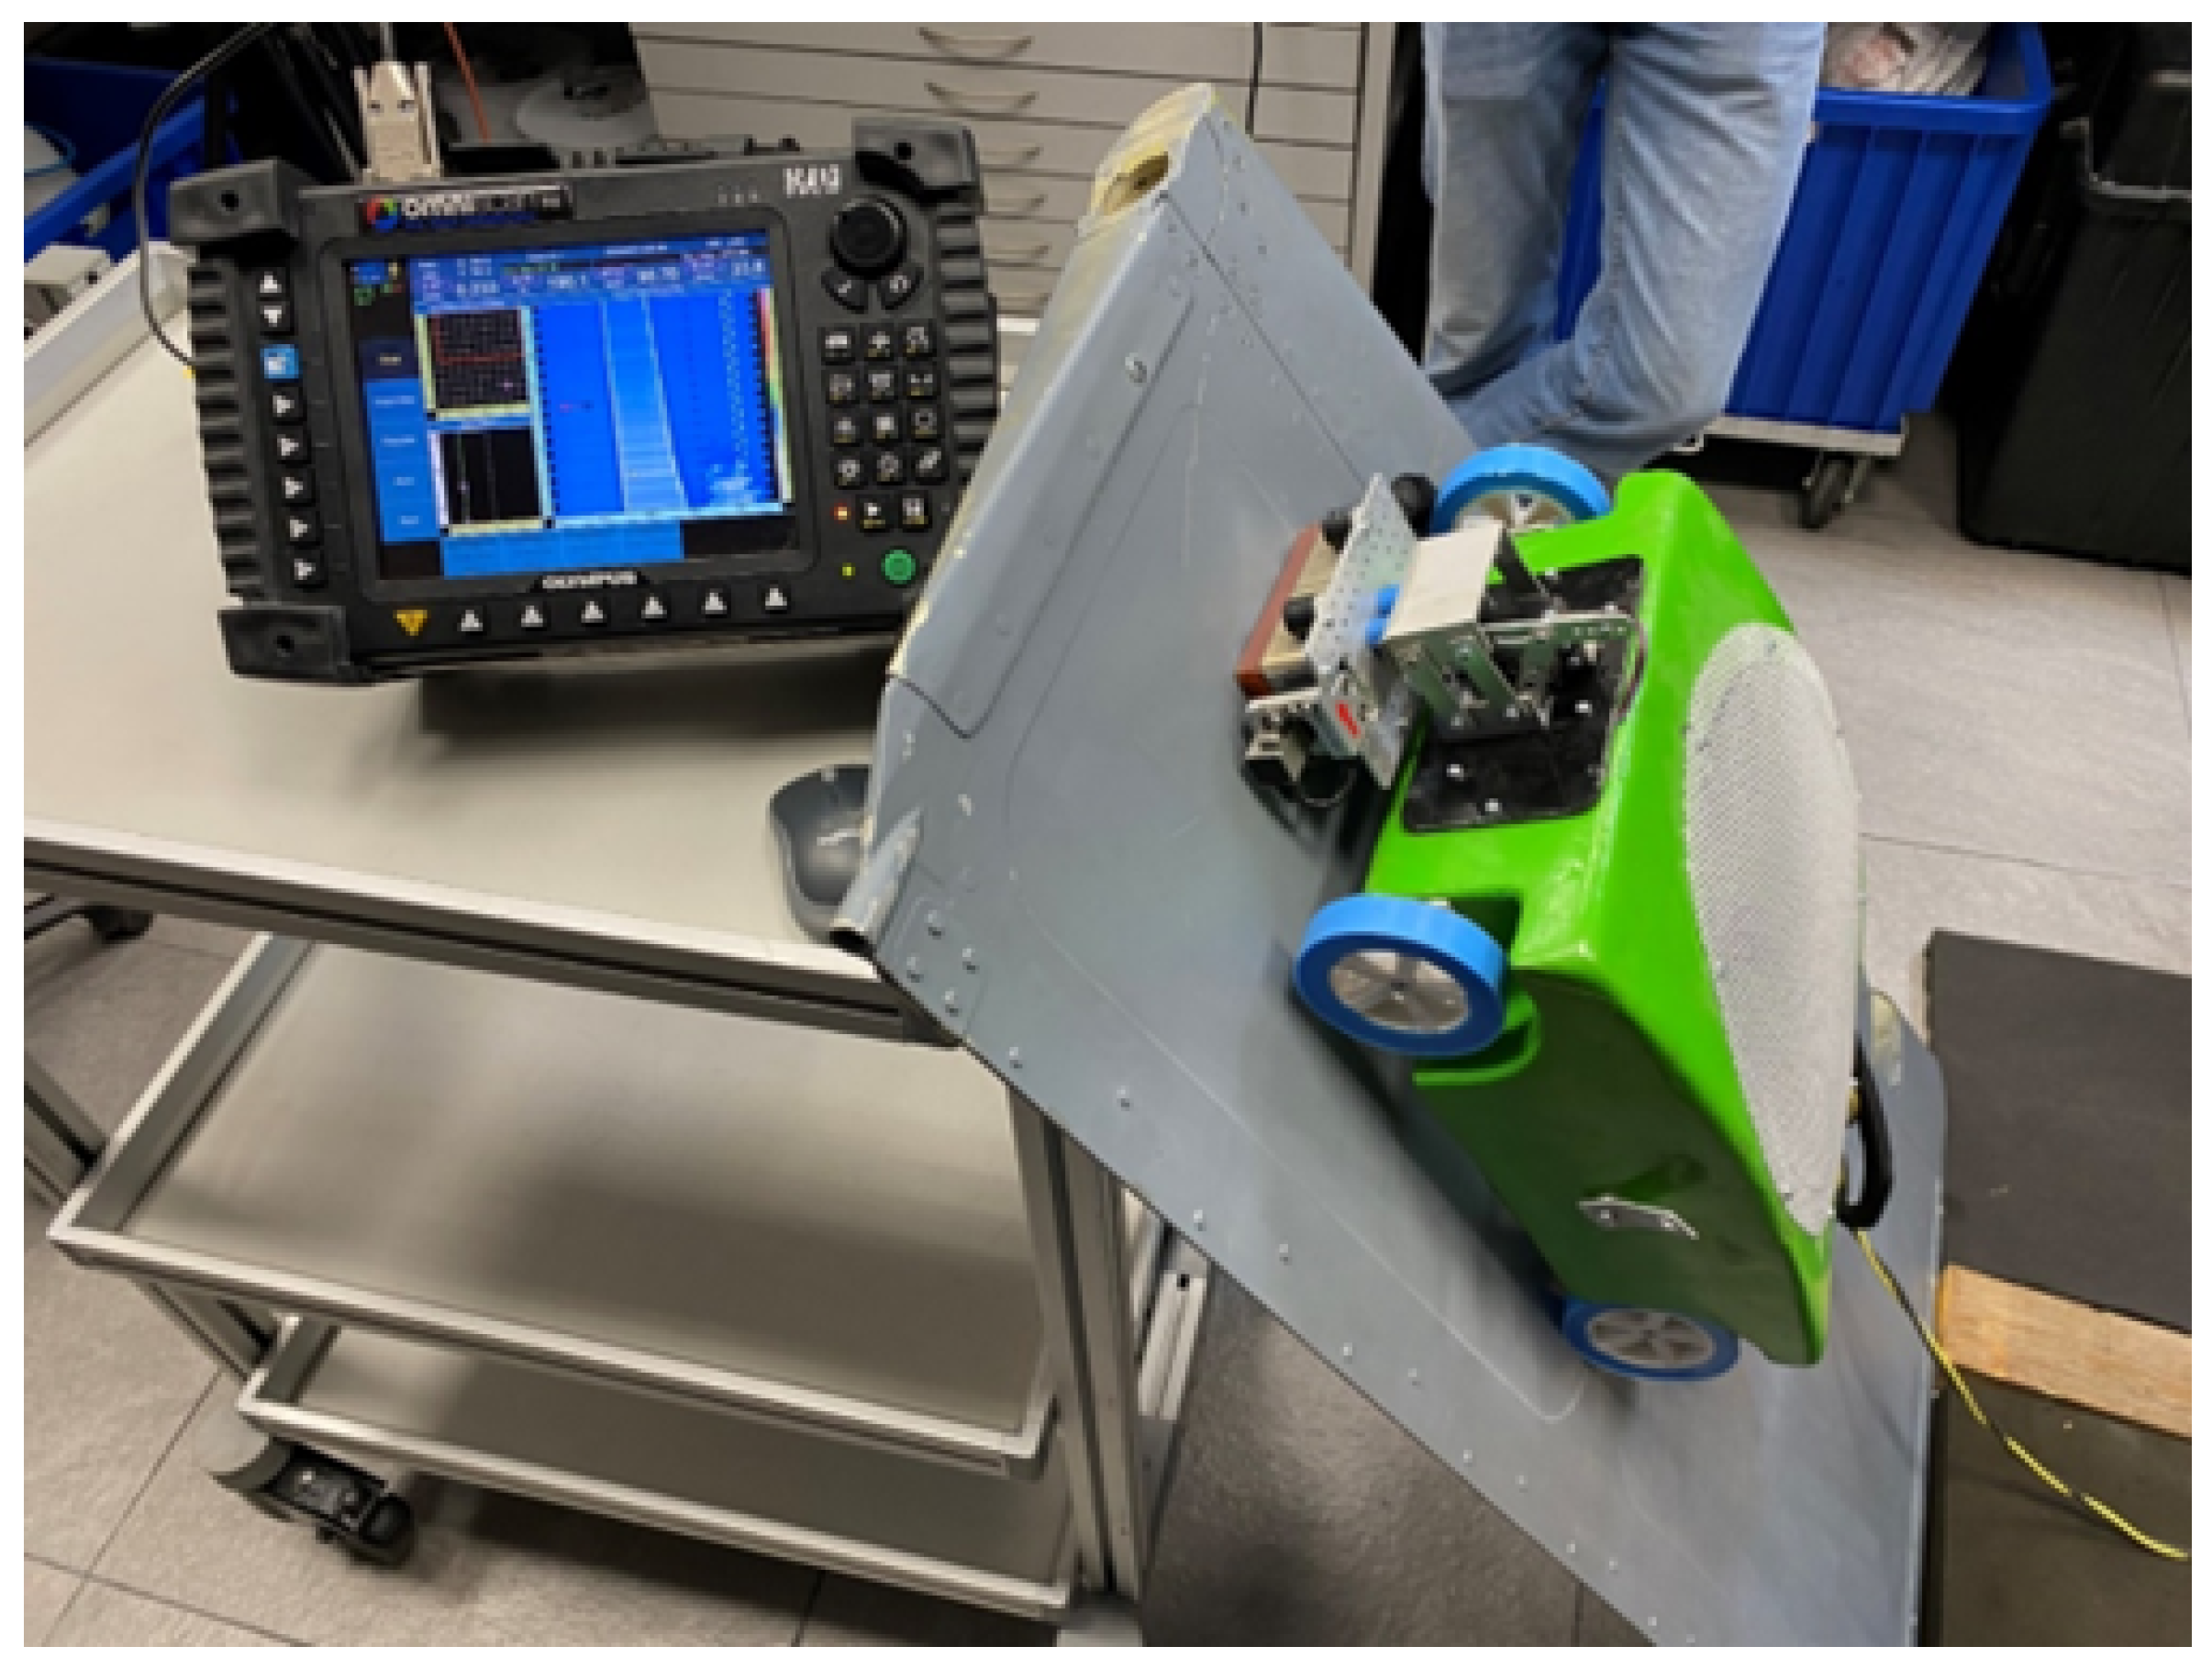
The next stage of the research required MP tests to be carried out in the laboratory using a real aircraft element. The aim was to check the performance of MP with the measurement system. Two elements from aircraft were used as part of the tests (the rudder of the MiG-29 aircraft, see Figure 10, and a fragment of the wing of the PZL-130 Orlik TC II aircraft). A series of test runs of the MP equipped with elements of the measurement system were made over aircraft elements inclined at various angles. Tests were also carried out to maneuver the vehicle in a small space. It was possible to make 180-degree turns on the surface of the tested element. Finally, a trial scanning of each element using the ECA flaw detector was carried out using the ECA flaw detector (see Section 3.1).
The first practical observation was the possibility of resigning from the MP battery power supply. The battery power was intended to make the vehicle independent of wires. Due to the need to use a cable between the flaw detector and the EC Array head, the use of main power did not cause any significant differences and reduced the weight of the MP.
It was also observed that the speed at which the vehicle moves is relatively high, which makes precise control on an object with a high inclination difficult. The maximum angle at which the MP with the head attached and loaded with cables (power and signal) was able to scan was 54 degrees. This was primarily due to the properties of the surface on which it moved. Due to the speed of the MP, scanning was only possible while the MP was moving up the elements.
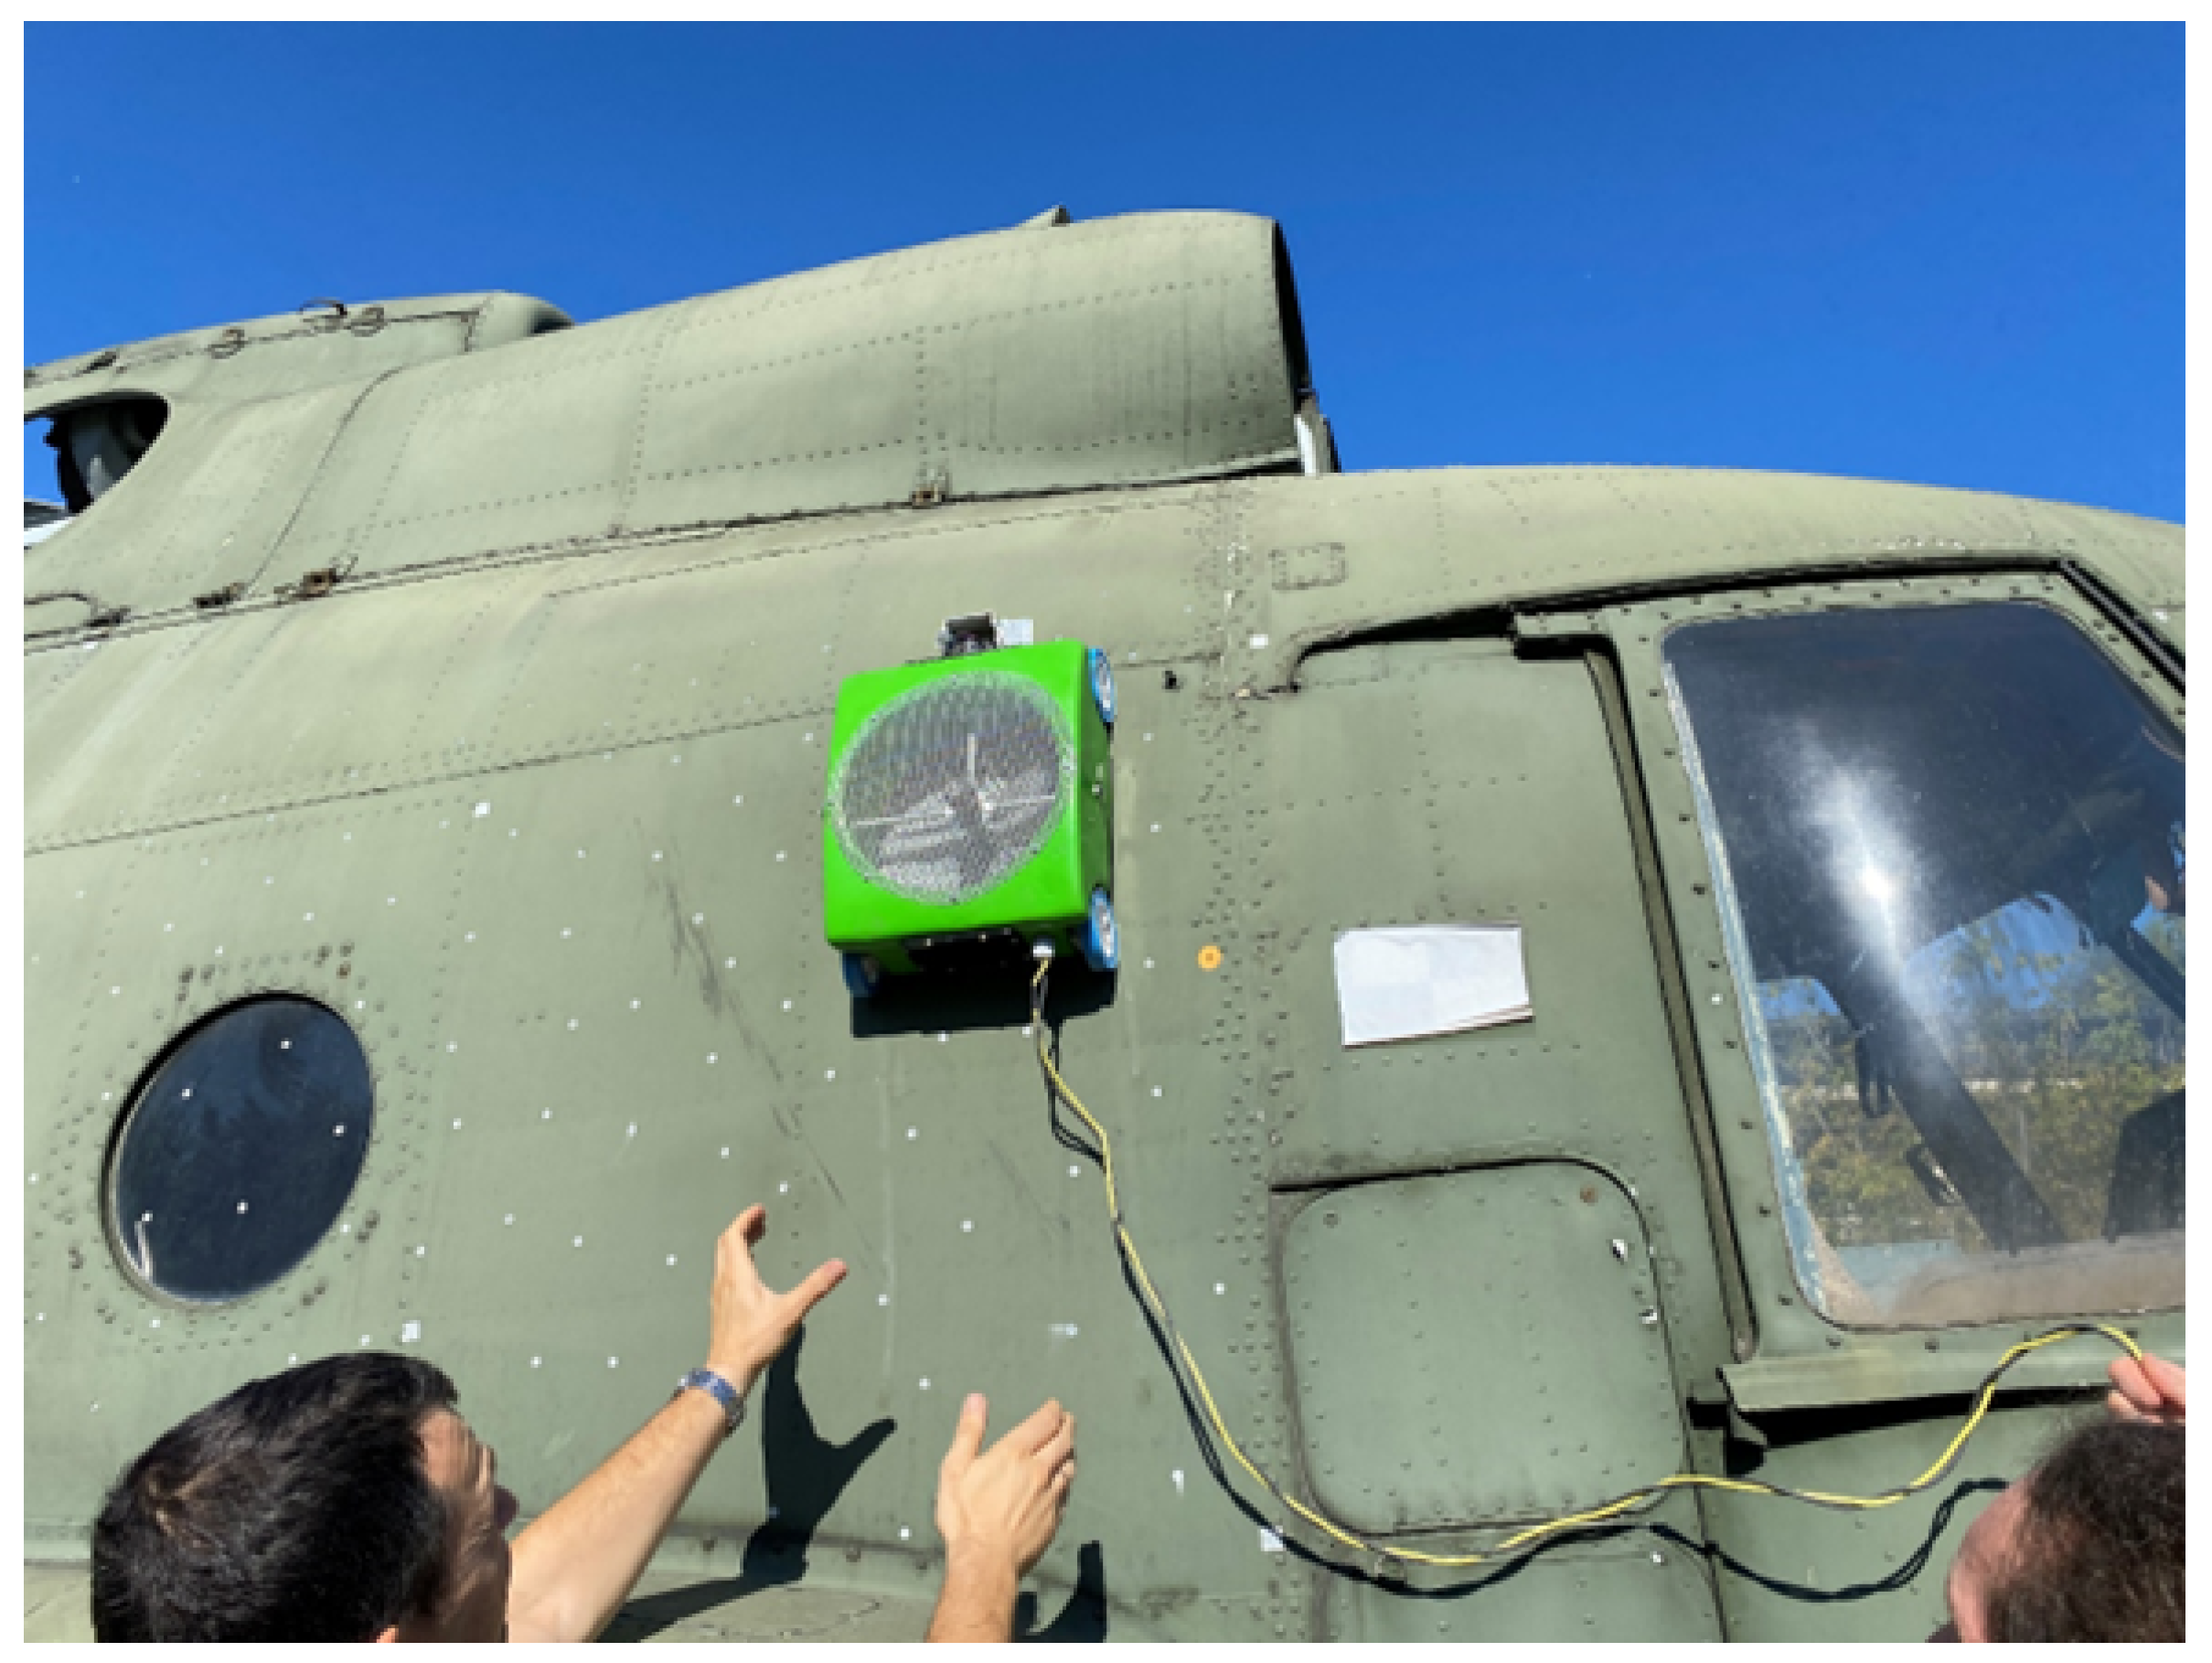
Subsequent tests were carried out in conditions similar to real ones. The fuselage of a Mil series helicopter was used for this purpose. The MP during scanning process of a helicopter fuselage is depicted in Figure 11. These tests showed that after dismantling the measuring devices, it was possible to move on the helicopter surfaces at an angle of up to 90 degrees to the ground.

3.4. Inspection Results and Discussion

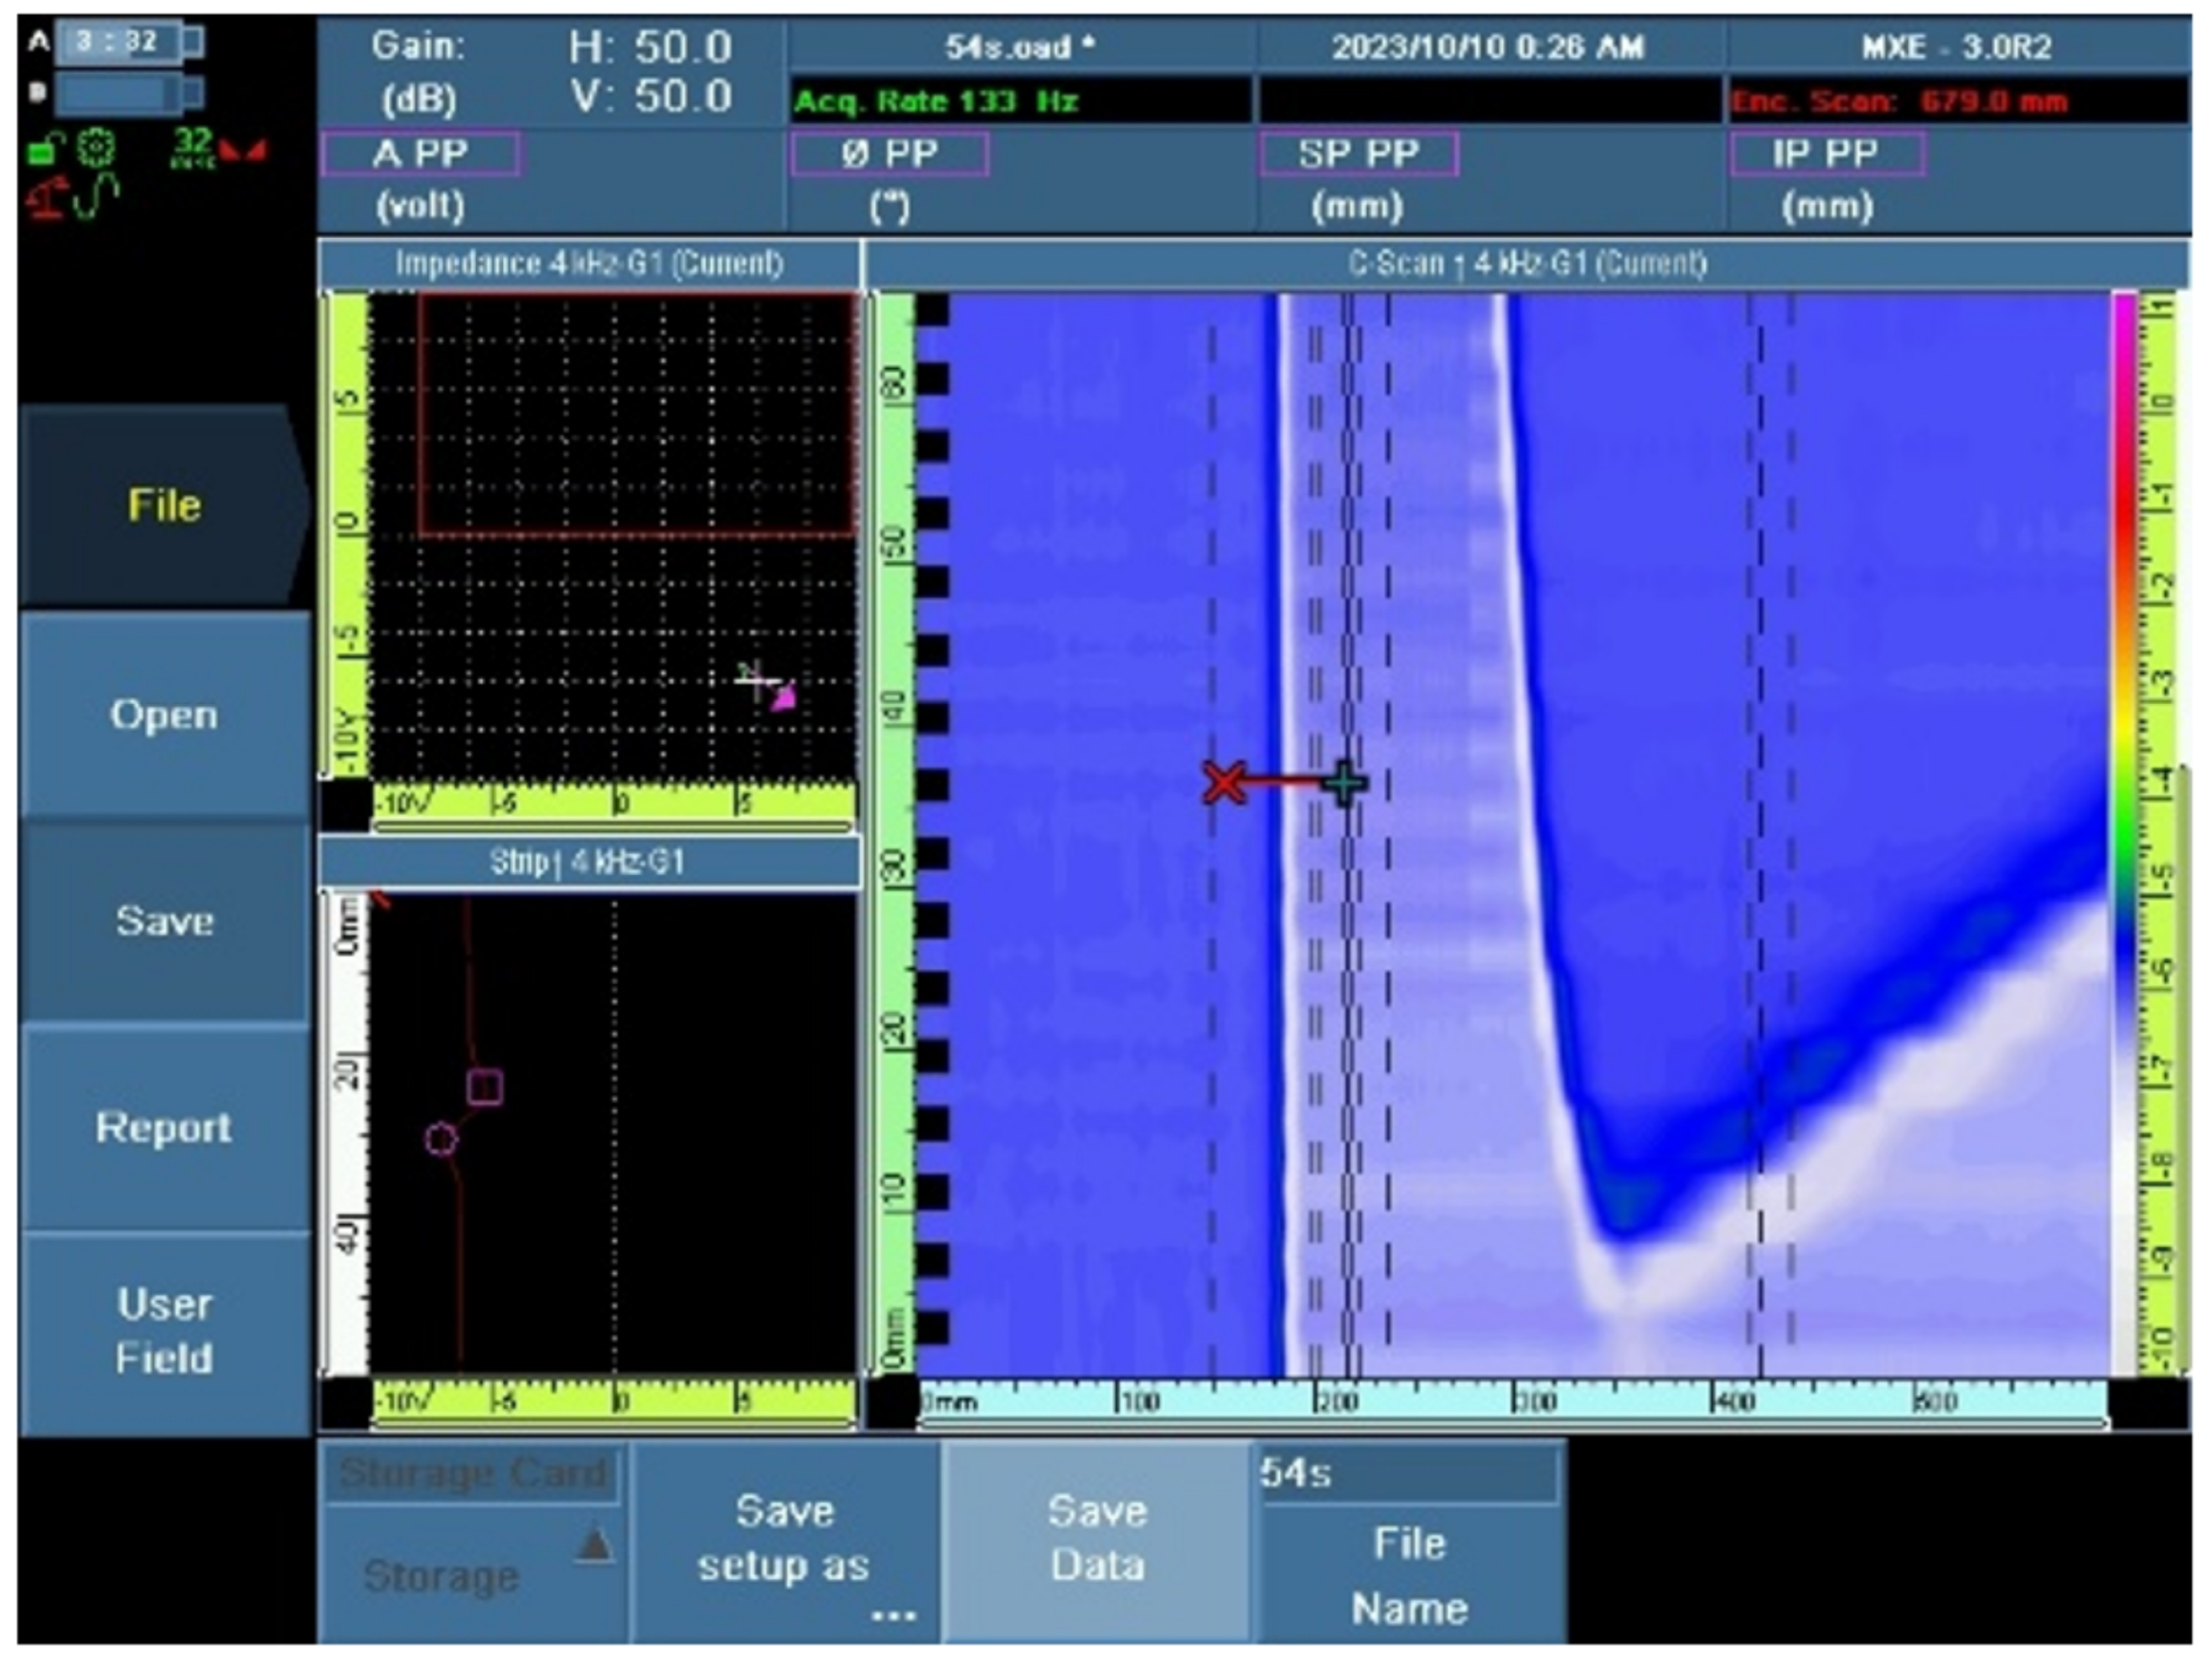
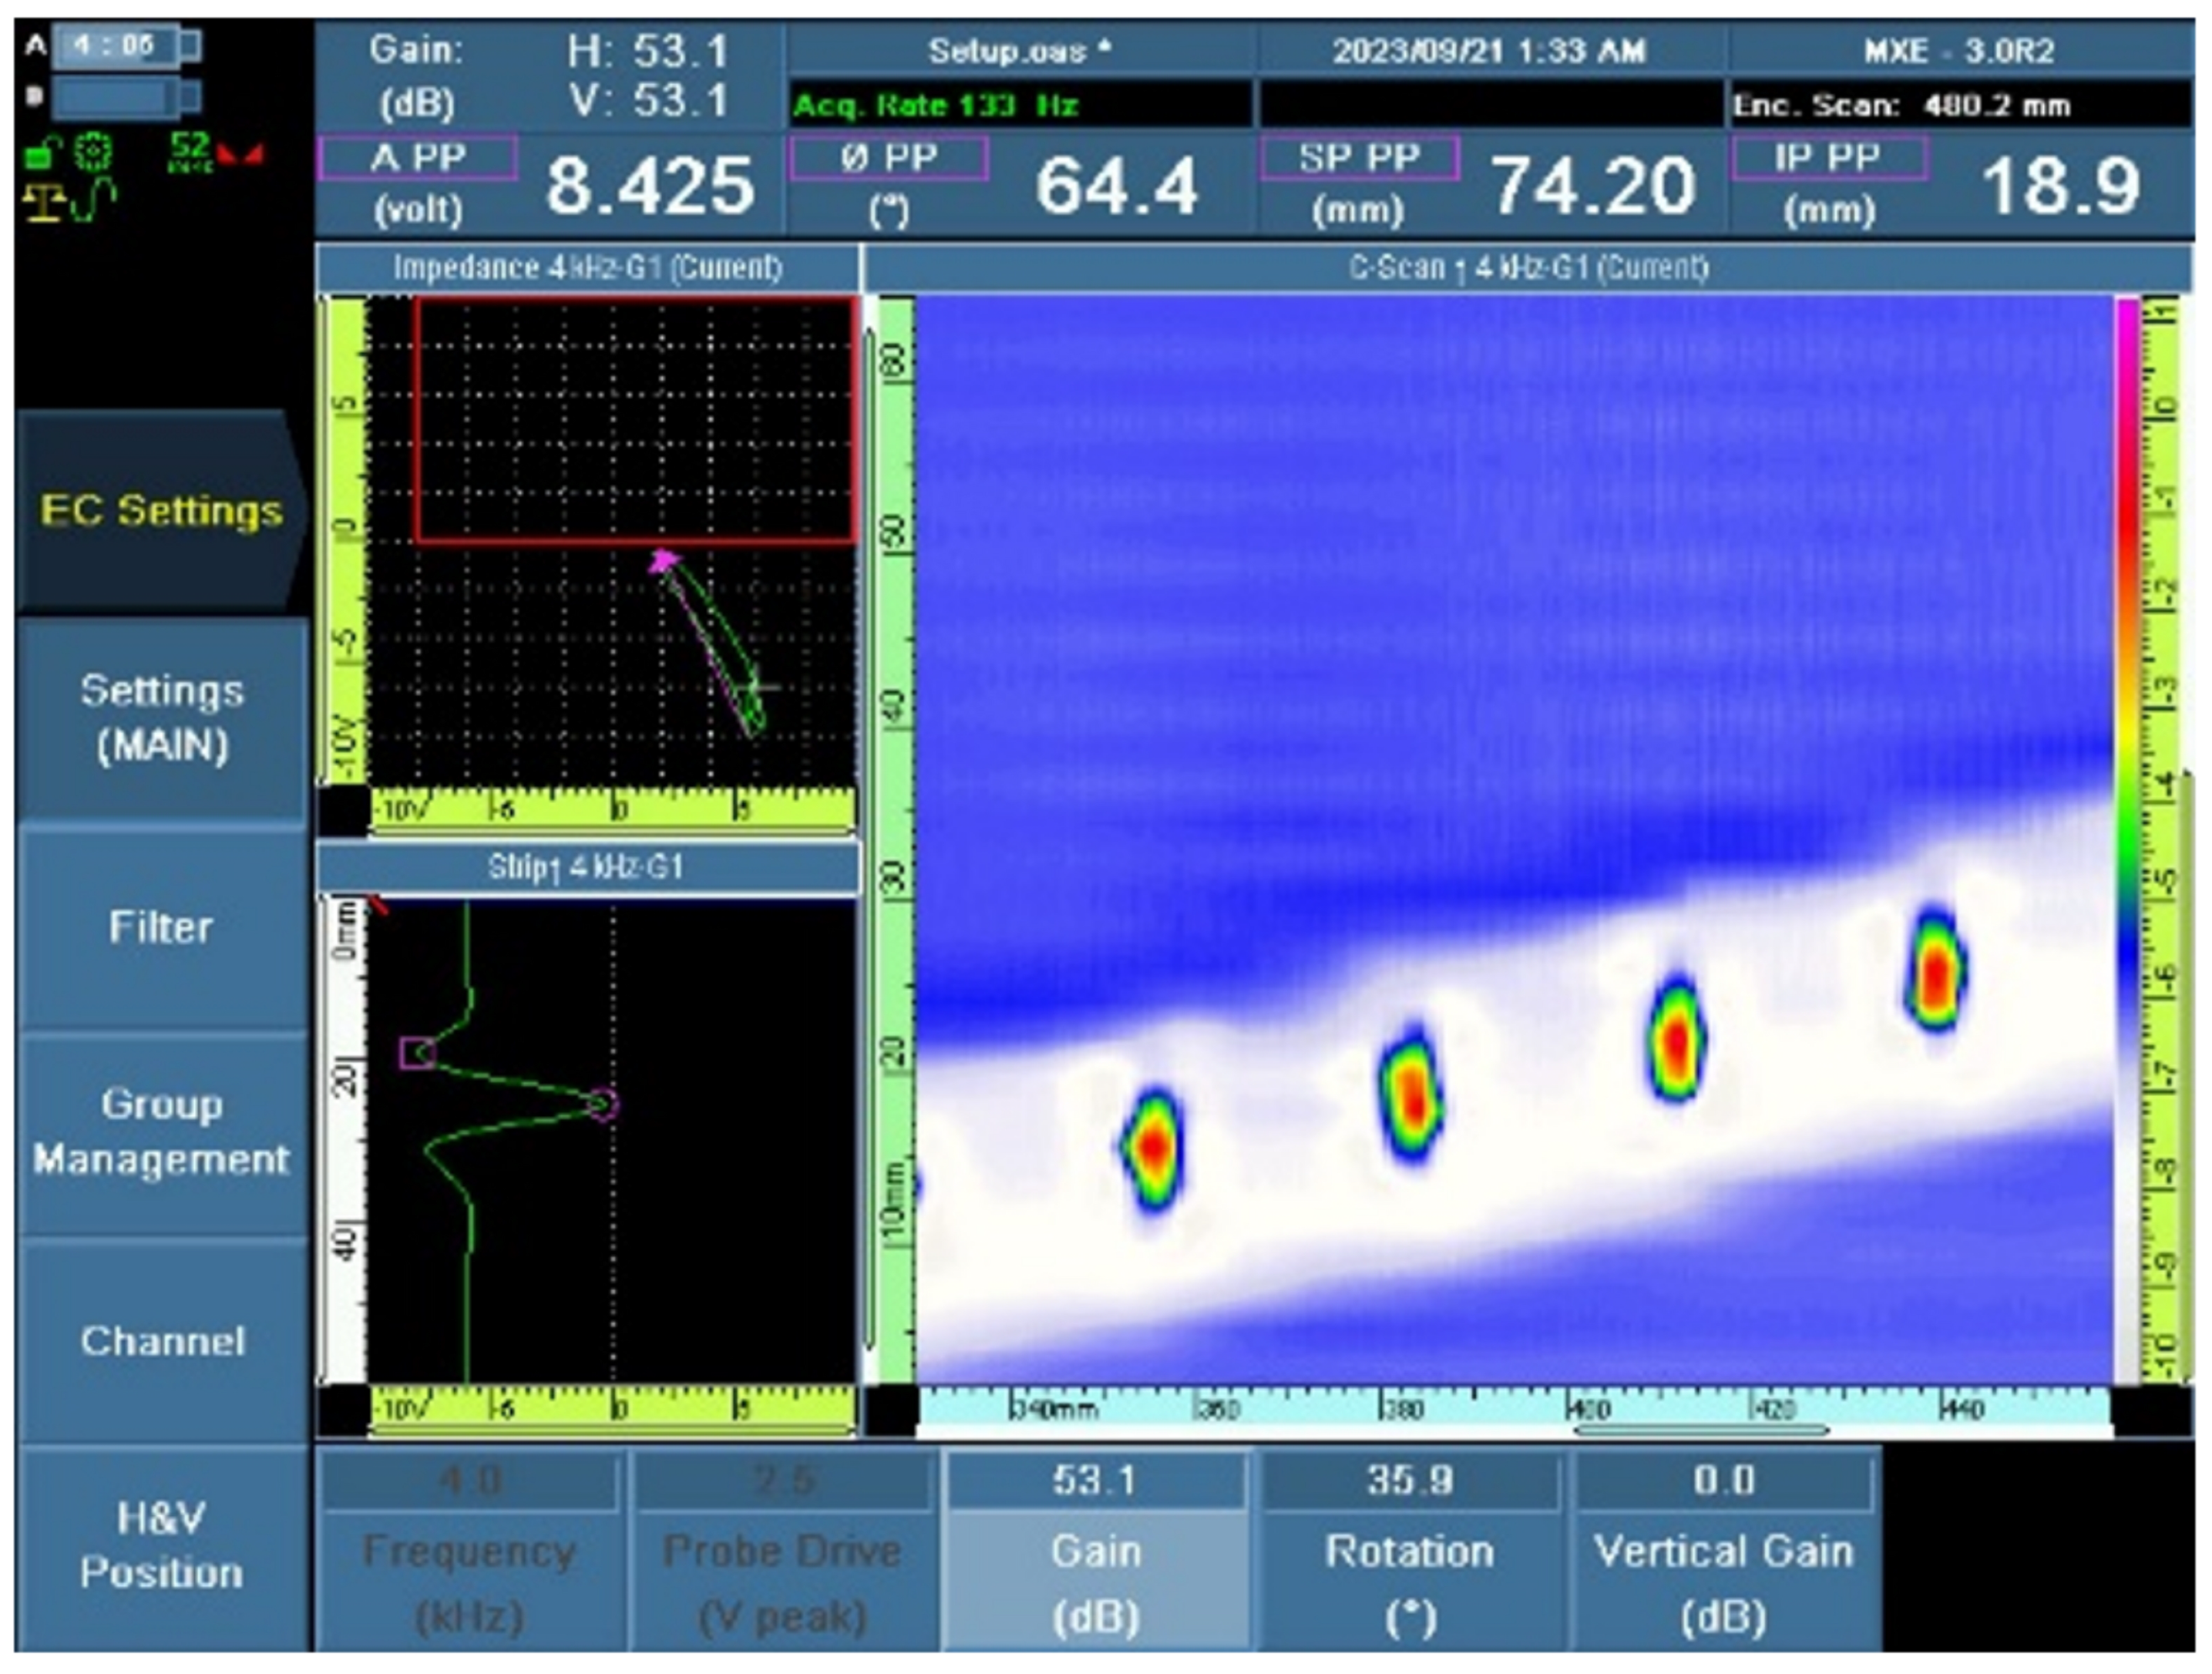
Initial tests using the EC technique were mainly aimed at verifying the possibility of cooperation between the devices. The probe used is dedicated to detecting corrosion and cracks in multi-layer structures. From the point of view of the conducted research, its advantage is the ability to observe the internal elements of the tested part. The tests were performed at a signal frequency of 4 kHz. This is a relatively low frequency that provides sufficient penetration depth. The preliminary test results from the two elements tested are presented below. The first scan (Figure 12) comes from the rudder of the MiG-29 aircraft.
The scan shows single vertical dashed lines indicating that the maximum speed allowed by the measurement system has been exceeded. Apart from that, the result can be considered correct. The scanned element has a variable thickness. A lighter color corresponds to an area of greater thickness. There were no defects in the tested element.
The second result from the wing of the PZL-130 aircraft presented in Figure 13 was collected correctly. This means that the MP speed and the pressure of the measuring probe were appropriate. The obtained scan shows rivets and the longitudinal member, which is visible in Figure 13, as a light diagonal strip and color equidistant spots representing the rivets. The A-scan in the location of a rivet is presented on the left-hand side in the monitor of the Omniscan defectoscope. There was no damage in the recorded area. Based on the results obtained, the possibility of cooperation of MP with the ECA system can be confirmed. The ECA system is able to collect measurement data, which means that the pressure of the measuring probe is even and the vehicle is able to move at a sufficiently low speed and maintain its trajectory.
The data presented in Figure 12 and Figure 13, including the positioning data, are coming from the eddy current sensor. In order to reduce the cost of the presented prototype, information from the encoder attached to the ECA was used. In this case, we used all features provided by the commercial ECA solutions, and there is no need to use an additional system for positional data from the platform.
The performance of the presented MP is highly dependent on the maximum payload that the robot can carry. To estimate the capability of the equipped robot to perform a specific NDT task, additional information should be taken into account. To evaluate the capability of the MP, among others, the range of the operation of the robot (additional mass of the cables), the friction coefficient of the investigated surface, and the maximum inclinations should be known. Then, based on these parameters, the required thrust force can be estimated and compared with the maximum thrust that the platform can generate including the required safety margin.
Table 2 shows a comparison of different parameters of the considered MP with other similar solutions published in the following articles: [22,25,27,28,29,31,43,44]. In all of the compared solutions, only platforms with the negative pressure generation mechanism were selected. Some of the MPs presented were only laboratory tested and did not have NDT accessories, or this information was not reported. In such cases, only the information about the payload is relevant regarding the capability of the other MP to perform NDT with the selected equipment. The proposed MP belongs to lightweight constructions (about 2 kg) with comparable compact sizes and similar speed. The maximum power consumption of the proposed MP belongs to the lowest range of values in the presented comparison.

4. Conclusions

This paper presents the development and testing of a new mobile platform for non-destructive inspections of aircraft structures with an emphasis on a possibility of components with testing surfaces inclined at a certain angle. The platform makes it possible to automatize the process of inspection using various NDT techniques by using NDT sensing systems interchangeably. The solution was developed to be low-cost and universal with a possibility of an adaptation to the most common NDT techniques used in aircraft inspections, such as UT, ECA/ECT, magnetic impedance, and others. The designed climbing platform ensures automated inspection of inclined surfaces thanks to the mounted propeller that creates a negative pressure between the platform and a tested surface. The platform successfully passed the laboratory and environmental tests on real aircraft structures in terms of various inclinations of tested surfaces, proper adhesion to these surfaces and speed of scanning required by the inspection devices. The tests were performed using the ECA NDT technique by mounting the testing probe in a universal probe holder. The tests were performed on components of several aircraft being used by the Polish Air Force, namely the rudder of the MiG-29 aircraft, a fragment of the wing of the PZL-130 Orlik TC II aircraft, and a fuselage of a Mil series helicopter. The results show the correctness of the achieved inspection results, i.e., no data loss due to incorrect speed and trajectory were observed. The proposed approach might significantly accelerate the speed and accuracy of non-destructive inspections, especially in those cases where the scanning is still performed manually.
Future studies will cover improvements of control and intelligent path planning and data collection to inspect various surfaces with various types of structural damage as well as further adaptation to other NDT techniques and testing devices to fulfill the needs of the Polish military aircraft ground maintenance and the ideas of NDT 4.0.

Author Contributions

Conceptualization, R.T., T.R., P.S. and A.K.; methodology, R.T., T.R., P.S. and A.K.; software, R.T.; validation, R.T., P.S. and T.R.; formal analysis, R.T.; investigation, R.T., T.R. and P.S.; resources, R.T. and P.S.; data curation, R.T. and P.S.; writing—original draft preparation, A.K., T.R., P.S. and R.T.; writing—review and editing, A.K., T.R., P.S. and R.T.; supervision, T.R., P.S. and A.K.; visualization, R.T., T.R. and P.S. All authors have read and agreed to the published version of the manuscript.

Funding

This research received no external funding.

Data Availability Statement

The data that support the findings of this study are available from the authors upon reasonable request.

Conflicts of Interest

The authors declare no conflicts of interest.

References

  1. NDT and Inspection Market by Technique (Ultrasonic Testing, Visual, Magnetic Particle, Liquid Penetration, Eddy-Current, Radiographic, Acoustic Emission), Service, Method, Vertical, Application and Region-Global Forecast to 2029. Market Research Report SE 2860. 2024. Available online: https://www.marketsandmarkets.com/Market-Reports/non-destructive-testing-ndt-equipment-services-market-882.html?srsltid=AfmBOoqaX449ZXqSqonsymf0u28QrQBdG9m-fo5iY88uDutuR-WfGhtc (accessed on 3 November 2024).
  2. Vrana, J.; Singh, R. NDE 4.0—A design thinking perspective. J. Nondestruct. Eval. 2021, 40, 8. [Google Scholar] [CrossRef] [PubMed]
  3. Meyendorf, N.; Ida, N.; Singh, R.; Vrana, J. NDE 4.0: Progress, promise, and its role to industry 4.0. NDT&E Int. 2023, 140, 102957. [Google Scholar]
  4. Prakash, N.; Nieberl, D.; Mayer, M.; Schuster, A. Learning defects from aircraft NDT data. NDT&E Int. 2023, 138, 102885. [Google Scholar]
  5. Kostopoulos, V.; Psarras, S.; Loutas, T.; Sotiriadis, G.; Gray, I.; Padiyar, M.J.; Petrunin, I.; Raposo, J.; Fragonara, L.Z.; Tzitzilonis, V.; et al. Autonomous inspection and repair of aircraft composite structures. IFAC-PapersOnLine 2018, 51, 554–557. [Google Scholar] [CrossRef]
  6. Fernandez, R.F.; Keller, K.; Robins, J. Design of a system for Aircraft Fuselage Inspection. In Proceedings of the 2016 IEEE Systems and Information Engineering Design Symposium (SIEDS), Charlottesville, VA, USA, 29 April 2016; pp. 283–288. [Google Scholar]
  7. Mineo, C.; Pierce, S.G.; Nicholson, P.I.; Cooper, I. Robotic path planning for non-destructive testing—A custom MATLAB toolbox approach. Robot. Comput.-Integr. Manuf. 2016, 37, 1–12. [Google Scholar] [CrossRef]
  8. Morozov, M.; Pierce, S.G.; MacLeod, C.N.; Mineo, C.; Summan, R. Off-line scan path planning for robotic NDT. Measurement 2018, 122, 284–290. [Google Scholar] [CrossRef]
  9. Zhou, B.; Tian, T.T.; Zhu, G.; Zhao, J.B.; Liu, D.H. An ultrasonic testing method for wall thickness of turbine blades. Measurement 2022, 198, 111357. [Google Scholar] [CrossRef]
  10. Zimermann, R.; Mohseni, E.; Vasilev, M.; Loukas, C.; Vithanage, R.K.W.; Macleod, C.N.; Lines, D.; Javadi, Y.; Silva, M.P.E.E.; Fitzpatrick, S.; et al. Collaborative robotic wire + arc additive manufacture and sensor-enabled in-process ultrasonic non-destructive evaluation. Sensors 2022, 22, 4203. [Google Scholar] [CrossRef]
  11. Foster, E.A.; Bolton, G.; Bernard, R.; McInnes, M.; McKnight, S.; Nicolson, E.; Loukas, C.; Vasilev, M.; Lines, D.; Mohseni, E.; et al. Automated real-time eddy current array inspection of nuclear assets. Sensors 2022, 22, 6036. [Google Scholar] [CrossRef]
  12. Dhoot, M.K.; Fan, I.S.; Skaf, Z. Review of robotic systems for aircraft inspection. In Proceedings of the 9th International Conference on Through-Life Engineering Service, Cranfield, UK, 7–9 November 2022. [Google Scholar] [CrossRef]
  13. Rashed, M.A.; Kimball, M.; Vega, L.; Vera, D.; Soler, J.; Correa, M.; Garcia, A.; Virk, G.S.; Sattar, T.P. Climbing robots for NDT applications, Human-Centric Robotics. In Proceedings of the 20th International Conference on CLAWAR 2017, Guedes, Porto, 11–13 September 2017; pp. 285–292. [Google Scholar] [CrossRef]
  14. Papa, U.; Ponte, S. Preliminary design of an unmanned aircraft system for aircraft general visual inspection. Electronics 2018, 7, 435. [Google Scholar] [CrossRef]
  15. Tzitzilonis, V.; Malandrakis, K.; Fragonara, L.Z.; Domingo, J.A.G.; Avdelidis, N.P.; Tsourdos, A.; Forster, K. Inspection of aircraft wing panels using unmanned aerial vehicles. Sensors 2019, 19, 1824. [Google Scholar] [CrossRef] [PubMed]
  16. Hruz, M.; Bugaj, M.; Novak, A.; Kandera, B.; Badanik, B. The Use of UAV with infrared camera and RFID for airframe condition monitoring. Appl. Sci. 2021, 11, 3737. [Google Scholar] [CrossRef]
  17. Zhang, D.; Watson, R.; MacLeod, C.; Dobie, G.; Galbraith, W.; Pierce, G. Implementation and evaluation of an autonomous airborne ultrasound inspection system. Nondestruct. Test. Eval. 2022, 37, 1–21. [Google Scholar] [CrossRef]
  18. Bogue, R. The role of robotics in non-destructive testing. Ind. Robot 2010, 37, 421–426. [Google Scholar] [CrossRef]
  19. Andrikopoulos, G.; Papadimitriou, A.; Brusell, A.; Nikolakopoulos, G. On Model-Based Adhesion Control of a Vortex Climbing Robot. In Proceedings of the 2019 IEEE/RSJ International Conference on Intelligent Robots and Systems (IROS), Macau, China, 4–8 November 2019; pp. 1460–1465. [Google Scholar]
  20. Shin, H.J.; Park, J.Y.; Hong, S.C.; Lee, J.R. In situ non-destructive evaluation of an aircraft UHF antenna radome based on pulse-echo ultrasonic propagation imaging. Compos. Struct. 2017, 160, 16–22. [Google Scholar] [CrossRef]
  21. Rochat, F.; Hirschmann, V.; Barras, T.; Bleuer, H.; Mondada, F.; Sti, E.; Lsro, I.M.T. Climbing robot with thermal glue. In Proceedings of the 14th International Conference on Climbing and Walking Robots, CLAWAR, Paris, France, 6–8 September 2011; pp. 409–416. [Google Scholar]
  22. Li, H.; Sun, X.; Chen, Z.; Zhang, L.; Wang, H.; Wu, X. Design of a wheeled wall climbing robot based on the performance of bio-inspired dry adhesive material. Robotica 2022, 40, 611–624. [Google Scholar] [CrossRef]
  23. Sabermand, V.; Ghorbanirezaei, S.; Hojjat, Y. Testing the application of Free Flapping Foils (FFF) as a method to improve adhesion in an electrostatic wall-climbing robot. J. Adhes. Sci. Technol. 2019, 33, 2579–2594. [Google Scholar] [CrossRef]
  24. Alkalla, M.G.; Fanni, M.A.; Mohamed, A.F.; Hashimoto, S.; Sawada, H.; Miwa, T.; Hamed, A. EJBot-II: An optimized skid-steering propeller-type climbing robot with transition mechanism. Adv. Robot. 2019, 33, 1042–1059. [Google Scholar] [CrossRef]
  25. Zhao, J.; Li, X. Development of Wall-Climbing Robot Using Vortex Suction Unit and Its Evaluation on Walls with Various Surface Conditions. In Intelligent Robotics and Applications. ICIRA 2017. Lecture Notes in Computer Science; Huang, Y., Wu, H., Liu, H., Yin, Z., Eds.; Springer: Cham, Switzerland, 2017; Volume 10464. [Google Scholar] [CrossRef]
  26. Andrikopoulos, G.; Nikolakopoulos, G. Vortex Actuation via Electric Ducted Fans: An Experimental Study. J. Intell. Robot Syst. 2019, 95, 955–973. [Google Scholar] [CrossRef]
  27. Altaf, M.; Ahmad, E.; Xu, Y.; Liu, R.; Li, Y.; Na, H. Design of a climbing robot platform with protection device. Int. J. Adv. Robot. Syst. 2017, 14, 1729881417716382. [Google Scholar] [CrossRef]
  28. Xiao, J.; Li, B.; Ushiroda, K.; Song, Q. Rise-Rover: A wall-climbing robot with high reliability and load-carrying capacity. In Proceedings of the 2015 IEEE International Conference on Robotics and Biomimetics (ROBIO), Zhuhai, China, 6–9 December 2015; pp. 2072–2077. [Google Scholar] [CrossRef]
  29. Božić, M.; Jerbić, B.; Švaco, M. Development of a Mobile Wall-Climbing Robot with a Hybrid Adhesion System. In Proceedings of the 2021 44th International Convention on Information, Communication and Electronic Technology (MIPRO), Opatija, Croatia, 27 September–1 October 2021; pp. 1136–1142. [Google Scholar] [CrossRef]
  30. Peters, G.; Pagano, D.; Liu, D.K.; Waldron, K. A prototype climbing robot for inspection of complex ferrous structures. In Proceedings of the 13th International Conference on Climbing and Walking Robots, CLAWAR, Nagoya, Japan, 31 August–3 September 2010; pp. 150–156. [Google Scholar]
  31. Qian, Z.; Xia, H. Study of a wall-climbing robot based on chain feet with negative pressure adhesion. Discov. Appl. Sci. 2024, 6, 132. [Google Scholar] [CrossRef]
  32. Rajendran, R.; Dhanraj, J.A. A comparative survey on weight & payload of wall climbing robot (WCR) using magnetic adhesive, suction adhesive and fusion type adhesive. Proc. Mater. Today 2023, in press. [Google Scholar] [CrossRef]
  33. Schmidt, D.; Berns, K. Climbing robots for maintenance and inspections of vertical structures—A survey of design aspects and technologies. Robot. Auton. Syst. 2013, 61, 1288–1305. [Google Scholar] [CrossRef]
  34. Li, M.; Yin, C. Axial flow impeller design and simulation for negative pressure adsorption climbing robot. J. Phys. Conf. Ser. 2024, 2785, 012026. [Google Scholar] [CrossRef]
  35. Fang, Y.; Wang, S.; Cui, D.; Bi, Q.; Jiang, R.; Yan, C. Design and optimization of wall-climbing robot impeller by genetic algorithm based on computational fluid dynamics and kriging model. Sci. Rep. 2022, 12, 9571. [Google Scholar] [CrossRef]
  36. Hernando, M.; Gomez, V.; Brunete, A.; Gambao, E. CFD modelling and optimization procedure of an adhesive system for a modular climbing robot. Sensors 2021, 21, 1117. [Google Scholar] [CrossRef]
  37. Gu, J.; Wang, C.; Wu, X. Self-adjusted adsorption strategy for an aircraft skin inspection robot. J. Mech. Sci. Technol. 2018, 32, 2867–2875. [Google Scholar] [CrossRef]
  38. Shi, X.; Xu, L.; Xu, H.; Jiang, C.; Zhao, Z.; Guo, Y.; Chen, X. A 6-DOF humanoid wall-climbing robot with flexible adsorption feet based on negative pressure suction. Mechatronics 2022, 87, 102889. [Google Scholar] [CrossRef]
  39. Pham, V.H.; Nguyen, H.C.; Nguyen, N.D.; Mach, B.N.; Nguyen, T.Q. Design and simulation of a wall-climbing robot car using 3D printing technology and the vacuum method. Adv. Mech. Eng. 2023, 15, 16878132231186277. [Google Scholar] [CrossRef]
  40. Liang, P.; Gao, X.; Zhang, Q.; Gao, R.; Li, M.; Xu, Y.; Zhu, W. Design and stability analysis of a wall-climbing robot using propulsive force of propeller. Symmetry 2020, 13, 37. [Google Scholar] [CrossRef]
  41. Zhou, Q.; Li, X. Experimental investigation on climbing robot using rotation-flow adsorption unit Rob. Auton. Syst. 2018, 105, 112–120. [Google Scholar] [CrossRef]
  42. Guo, T.; Deng, Z.D.; Liu, X.; Song, D.; Yang, H. Development of a new hull adsorptive underwater climbing robot using the Bernoulli negative pressure effect. Ocean Eng. 2022, 243, 110306. [Google Scholar] [CrossRef]
  43. Shang, J.; Sattar, T.; Chen, S.; Bridge, B. Design of a climbing robot for inspecting aircraft wings and fuselage. Ind Robot 2007, 34, 495–502. [Google Scholar] [CrossRef]
  44. Qin, G.; Li, C.; Wu, H.; Ji, A. Wall-Climbing Mobile Robot for Inspecting DEMO Vacuum Vessel. Appl. Sci. 2022, 12, 9260. [Google Scholar] [CrossRef]
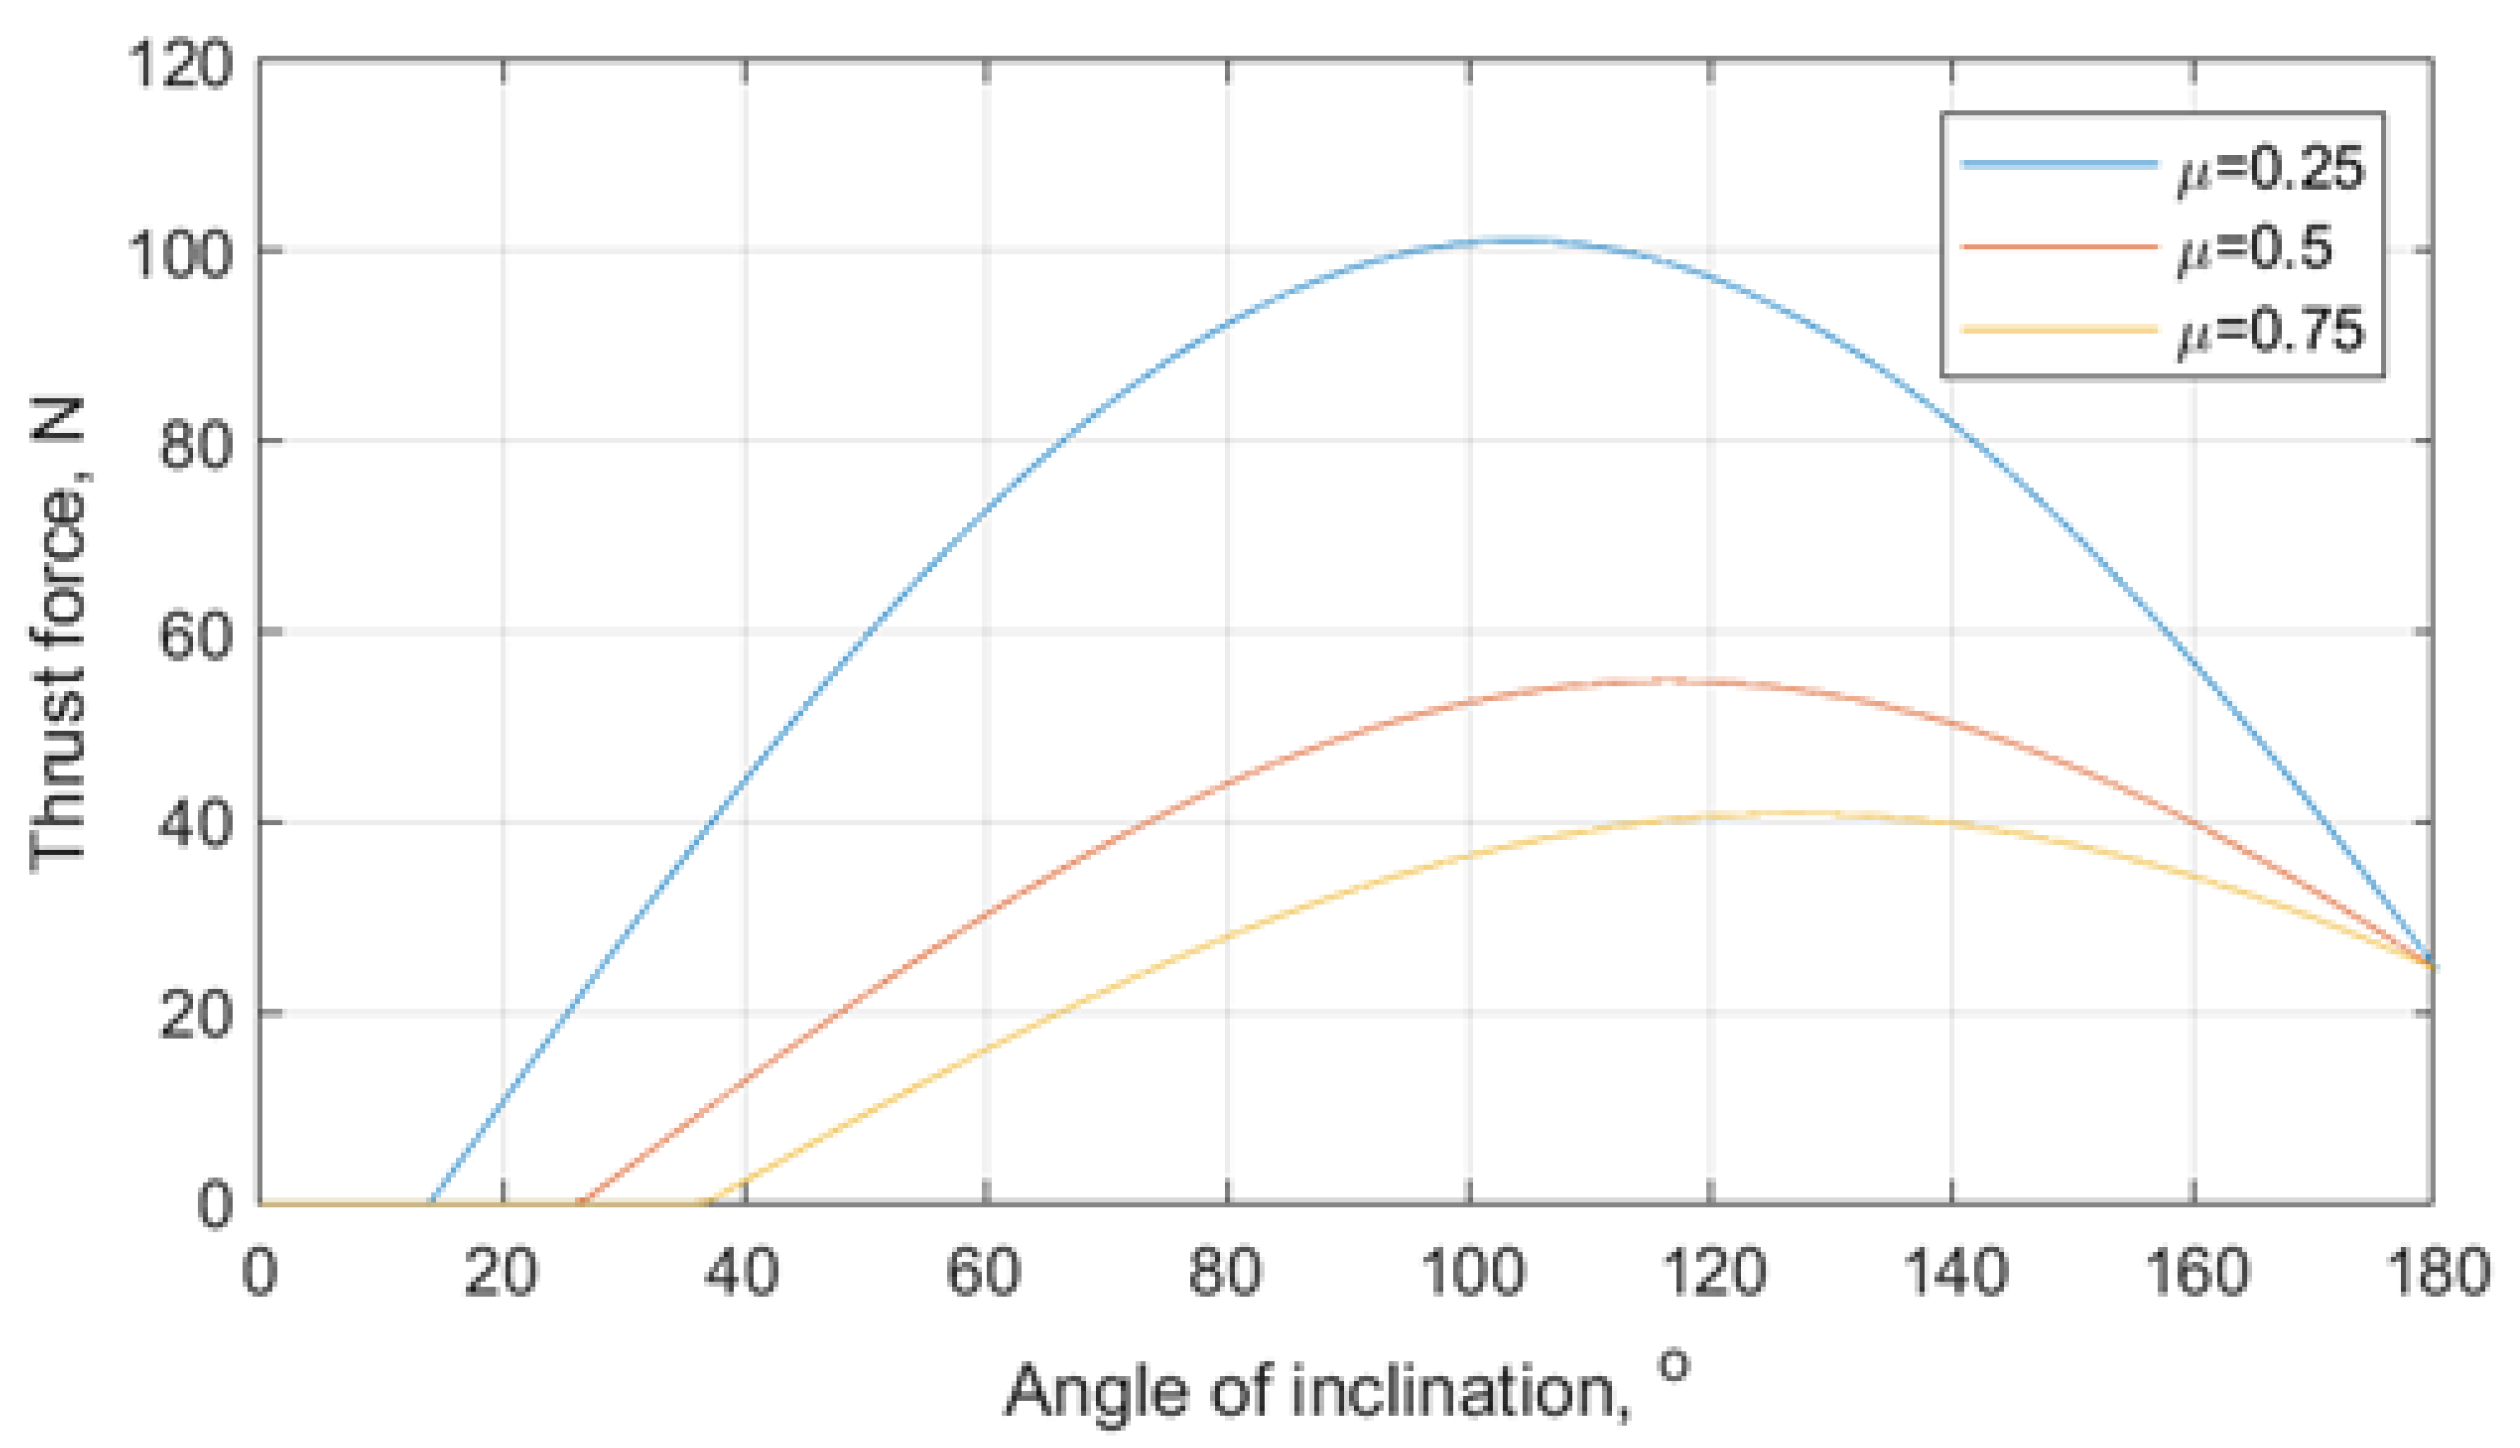
Figure 1. Relations between thrust force and angle of inclination for the considered friction coefficients.
Applsci 14 10148 g001
Figure 2. The design (a) and hardware implementation (b) of the printed circuit of the main system for the MP.
Applsci 14 10148 g002
Figure 3. The electrical scheme of the MP: M1–M4—wheel drive motors, SM—probe lifting servo, MW—propeller drive motor, R—engine speed controller, ZI—switching power supply.
Applsci 14 10148 g003
Figure 4. The design of the printed circuit (a), its hardware implementation (b), and the front panel (c) of the remote control for the MP.
Applsci 14 10148 g004
Figure 5. The algorithms for controlling the operation of MP (a) and for the remote control application (b).
Applsci 14 10148 g005
Figure 6. Top and side view of structural design of the MP.
Applsci 14 10148 g006
Figure 7. Front (a) and back (b) views of the assembled MP.
Applsci 14 10148 g007
Figure 8. The thrust of the propeller in function of the consumed power for the MP.
Applsci 14 10148 g008
Figure 9. The MP climbing on a vertical wall during preliminary tests.
Applsci 14 10148 g009
Figure 10. The MP on MiG-29 rudder during laboratory tests.
Applsci 14 10148 g010
Figure 11. The MP climbing on Mil series helicopter during outdoor tests.
Applsci 14 10148 g011
Figure 12. The result obtained during the tests on MiG-29 rudder. Thickness changes are visible. Black dashed lines indicate places where the MP speed was too high.
Applsci 14 10148 g012
Figure 13. The result obtained during the tests on PZL-130 wing.
Applsci 14 10148 g013
Table 1. Maximal values of a thrust force for the considered friction coefficients.
Friction Coefficient, –Angle of Inclination, °Thrust Force, N
0.2510480.9
0.5116.643.8
0.75126.932.7
Table 2. Comparison of selected parameters of the presented MP with other robot platforms based on the negative pressure generation mechanism.
Name

Year

Source
Presented
MP
2024
Rise-Rover

2015

[28]
Vortexbot

2017

[25]


2017

[27]


2007

[43]


2024

[31]
EJBot II

2019

[22]


2021

[29]
VCR

2019

[24]


2022

[44]
 Adhesion
type
Neg.
pressue
thrust
obtained by
propulsion
impeller
Vaccum
suction cups
embedded
in the
wheel track
Vortex
suction
unit for
generation
of
negative
pressure
Centrifugal
impeller
to generate
negative
pressure
suction
Vacuum
suction
cups
for
adhesion
Vacuum
suction
cups
for
adhesion
Neg.
pressure
thrust
obtained
by
propeller
Neg.
pressure
thrust
obtained by
electric
ducted
fans EDF
Vortex
technique
obtained by
electric
ducted fan
Vortex
technique
and
bionic
material
on
wheels
Locomotion
type
Four
independent
electric
wheel
drives
Two
electric
rotors of
tracked
wheels
Electrical
drives for
three wheels
Two
servo
motor
Two pairs
of pneumatic
cylinders
to drive
positions
of
partial cups
Electric
drive for
changing
the
positions
of suction
cups
attached
to the
chain belt
Two DC
motors for
separated
two tracks
Two
propulsion
impeller
units
Electrical
drives
of wheels
Electrically
driven
wheels
Application NDT
inspections
for
aircraft
fuselages
Test of MB
planned
for NDT
Test of MB Video
inspection
NDT
for
aircraft
Test of MBlaboratory
MB tested,
planned
for vessels
surfaces
in the
petro-
chemical
industry
Test of MB
planned for
NDT
Test of MB
planned for
inspection
and
maintenance
Test of MB
planned
for
NDT of
vessels
  Idle speed

  scan speed

  mm/s
500

100
500 [-] 100 600 [-] [-] [-] [-] [-]
      Size

      L,W,H
      mm
479

324

154
533

203

140
[-]330

330

85

frame size
518

518

180
650

530

260
[-]347

320

218
272

288

150
250

130

20
   Umbilical
   weight
   of MP

   kg
2 11 2.4 3 [-] 10.5 [-] 2.7 2.2 1.5
    Payload

    kg
0.7 7.2 2.5 818
(including
umbilical
weight)
[-] [-] 1.9 8.1 2 *
       P/W0.35

Up
to 0.55 **
0.65 1.04 2.66 [-] [-] [-] 0.7 3.7 1.33 *
Total
maximum
power
kW
0.7 4 [-] [-] [-] [-] [-] 1.5 1.17 0.6
* Parameters defined at the conceptual design stage,** withouth the safety aluminium mesh cover, [-] lack of data.
Disclaimer/Publisher’s Note: The statements, opinions and data contained in all publications are solely those of the individual author(s) and contributor(s) and not of MDPI and/or the editor(s). MDPI and/or the editor(s) disclaim responsibility for any injury to people or property resulting from any ideas, methods, instructions or products referred to in the content.