Article

Preparation of the Surface of Long-Dimensional Rods of Hydro-Cylinders for Thermal Spraying Using an Abrasive Jet

by
Gulnara Zhetessova
1,
Tatyana Nikonova
1,*,
Łukasz Gierz
2,*,
Darkhan Zhunuspekov
1,
Vassiliy Yurchenko
1 and
Olga Zharkevich
1
1
Department of Technological Equipment, Mechanical Engineering and Standardization, Abylkas Saginov Karaganda Technical University, Karaganda 100027, Kazakhstan
2
Institute of Machine Design, Faculty of Mechanical Engineering, Poznan University of Technology, 60-965 Poznan, Poland
*
Authors to whom correspondence should be addressed.
Coatings 2022, 12(10), 1514; https://doi.org/10.3390/coatings12101514
Submission received: 31 August 2022 / Revised: 29 September 2022 / Accepted: 4 October 2022 / Published: 10 October 2022
(This article belongs to the Special Issue Smart Coatings)

Abstract

:
Preliminary cleaning of the surface of hydraulic cylinder rods is of great importance for subsequent coating. The most widely used surface preparation for thermal spraying is jet-abrasive treatment. The shot blast modes provide the hardness and strength of the material being processed. The impact of the abrasive makes the surface rough, increasing the contact area. Experimental studies of jet-abrasive processing of the hydraulic cylinder rod surface, as well as its activation for the thermal spraying, were carried out. The prepared surface of the rod for thermal spraying must meet the requirements for surface roughness and the size of the hardened layer at work. The experiments made it possible to identify the optimal modes of jet-abrasive treatment, which affect surface roughness and abrasive penetration of abrasive. To obtain the desired roughness values, it is preferable to use the following: a steel shot with an abrasive particle size in the range of 0.3–1.5 mm, taking the compressed air pressure in the range of 0.4–0.7 MPa; processing time—within 3.5–5 min; counterflow angle with the surface—70–90°; consumption of abrasive particles—300–500 kg/h. A special installation for jet-abrasive processing has been designed, which makes it possible to restore the surfaces of long rods by thermal spraying directly at the site of operation of the large machines.

1. Introduction

Various coatings [1,2,3,4], which protect metals and alloys from corrosion and wear, play a large role in improving the quality characteristics of products. At the same time, it is important not only to choose the appropriate coating deposition method, optimal technical parameters, but also to take care of imparting special properties to the surface layers before the start of the deposition process itself.
The quality of the protective coating is highly dependent on the quality of the preliminary surface preparation. The presence of rust, scale, traces of the previous protective coating, dust, grease, etc. is unacceptable. Not paying enough attention to pre-cleaning the surface, you can obtain a low-quality porous coating with a high degree of peeling in the future.
At the moment, the statistics are such that about 80% of the causes of equipment failure are associated with a change in the surface layer of parts as a result of their wear, and in some industries, for example, mining, the share of failures is already 95%. Restoration of worn surfaces is especially advisable for large-sized machine building parts, in particular, for long hydraulic cylinder rods.
The performance of the hydraulic cylinder is directly dependent on the service life of the rod. The rod is most exposed to high impact and force loads, as well as chemically aggressive environments. Accordingly, the rod is subject to increased requirements for strength, wear, and corrosion resistance.
The restoration of worn surfaces is carried out in order to achieve the properties of the part close to the initial ones or exceed them. Currently, there are many technologies for hardening and restoring machine parts (chrome plating, vibration hardening, laser hardfacing, electromechanical hardening, etc.) [5,6,7,8]. One of the main methods is the restoration of the surface by thermal spraying of protective coatings [1,2,3,4,9,10,11].
In modern thermal spraying, various mechanical methods of surface preparation are used: grinding, ultrasonic finishing, and jet-abrasive processing [12,13,14]. Jet-abrasive processing is one of the most effective methods for surface preparation of metal products.
Mechanical methods are widely used, especially for powder coatings [15,16]. Along with cleaning the surface from chemisorbed contaminants, it is possible to change its roughness and, at the same time, activate the surface material with various types of dislocations when the surface material is saturated.
The most widely used jet-abrasive treatment (Table 1). Surface treatment is carried out with a jet of compressed air with abrasive particles in special protective chambers [17]. A two-phase directional high-speed flow is created using an ejection-type gun. Compressed air must be well-cleaned and meet the established standard. Processes are carried out both manually and with the use of mechanization. Electrocorundum, silicon carbide, iron, and steel shot are used as abrasive particles [18,19,20].
Research has established [21] that jet-abrasive and abrasive ultrasonic treatments make significant changes to the surface layers. Here, they are saturated with structural defects. In this case, the rate of diffusion of surface atoms and their energy increase sharply. Therefore, in nickel and nickel alloys, as a result of abrasive blast cleaning, the self-diffusion rate increases approximately 30 times [9,11].
During jet-abrasive processing, the surface of interaction of the coating material with the main material of the product increases significantly [22]. Sometimes, the difference reaches an order of magnitude or more, which always has a positive effect on the adhesive strength of the coating.
The complete process of restoration of the hydraulic cylinder rod by thermal spraying can be represented in the form of a diagram shown in Figure 1.
The authors [23,24] recommend jet-abrasive machining (JAM) as a preferred method to roughen the surface and cleaning the rods of hydraulic cylinders from oxides. The advantages of JAM lie in the possibility of obtaining favorable relief of the surface roughness of the base before applying coatings with special properties at a relatively low cost of the process.
JAM is the final operation before spray coating. It is usually carried out after washing and degreasing the product [25].
There are abrasive-pneumatic and abrasive-centrifugal methods of cleaning the surface depending on the source of energy that imparts movement to the grains of the abrasive. In the first case, the shot moves under the action of compressed air, and in the second, it moves under the action of centrifugal force developing in a rapidly rotating massive rotor. The most widely used jet-pneumatic method of cleaning is known as shot blasting.
Shot blasting modes are selected in accordance with the properties of the material being processed, its hardness and strength.
Adhesion is one of the most important characteristics of the deposition process [26]. To obtain corrosion resistant high-quality protective coatings, it is necessary to form strong adhesive bonds are necessary between the sprayed material and the substrate.
The strength of this bond, or rather the magnitude of adhesion, can be characterized by the work Wa required to separate two condensed phases brought into contact [27].
The detachment of the film from the substrate coating can be carried out in three ways:
-
Adhesive method (film material lags behind completely);
-
Cohesive method (the film is stratified, destroyed);
-
Mixed method (partial peeling of the film from the surface of the substrate occurs, and partially tearing off the film itself).
To determine the degree of adhesion of the sprayed material with the base material, special devices are used: adhesive meters. The most common are peel, peel and shear tests.
According to B.V. Deryagin, the adhesion of a coating to a solid surface can be calculated using equation [28]:
A = P δ 1 cos α
where A is the adhesion; P is the force that tends to tear off the coating from the surface; δ is the area of the coating strip to be torn off; α is the angle between the coating and the vertical, under which the coating is torn off.
The angle of twist α, at which the sprayed coating from the backing material, can act as a criterion for the adhesion strength. The adhesive strength depends mainly on the surface roughness Ra formed by pretreatment, in our case, shot blasting.
After reviewing the scientific literature [29,30,31,32,33], it can be concluded that the microrelief parameters of the surface prepared for spraying have a predominant effect on the adhesion strength of the sprayed coatings to the substrate. The impact of the abrasive makes the surface rough, increasing the contact area. Strong adhesion of the sprayed coating to the part occurs as a result of mechanical adhesion. Therefore, in order to adhere strongly to surface irregularities, the substrate must be sufficiently rough. Therefore, the creation of a roughness developed on the substrate surface due to jet-abrasive machining is an important requirement.
This is explained by the fact that, as a result of processing, it is not so much the obtained roughness parameters that are important but the total contact area of the deposited material with the substrate, which in turn depends on the number of peaks of surface irregularities.
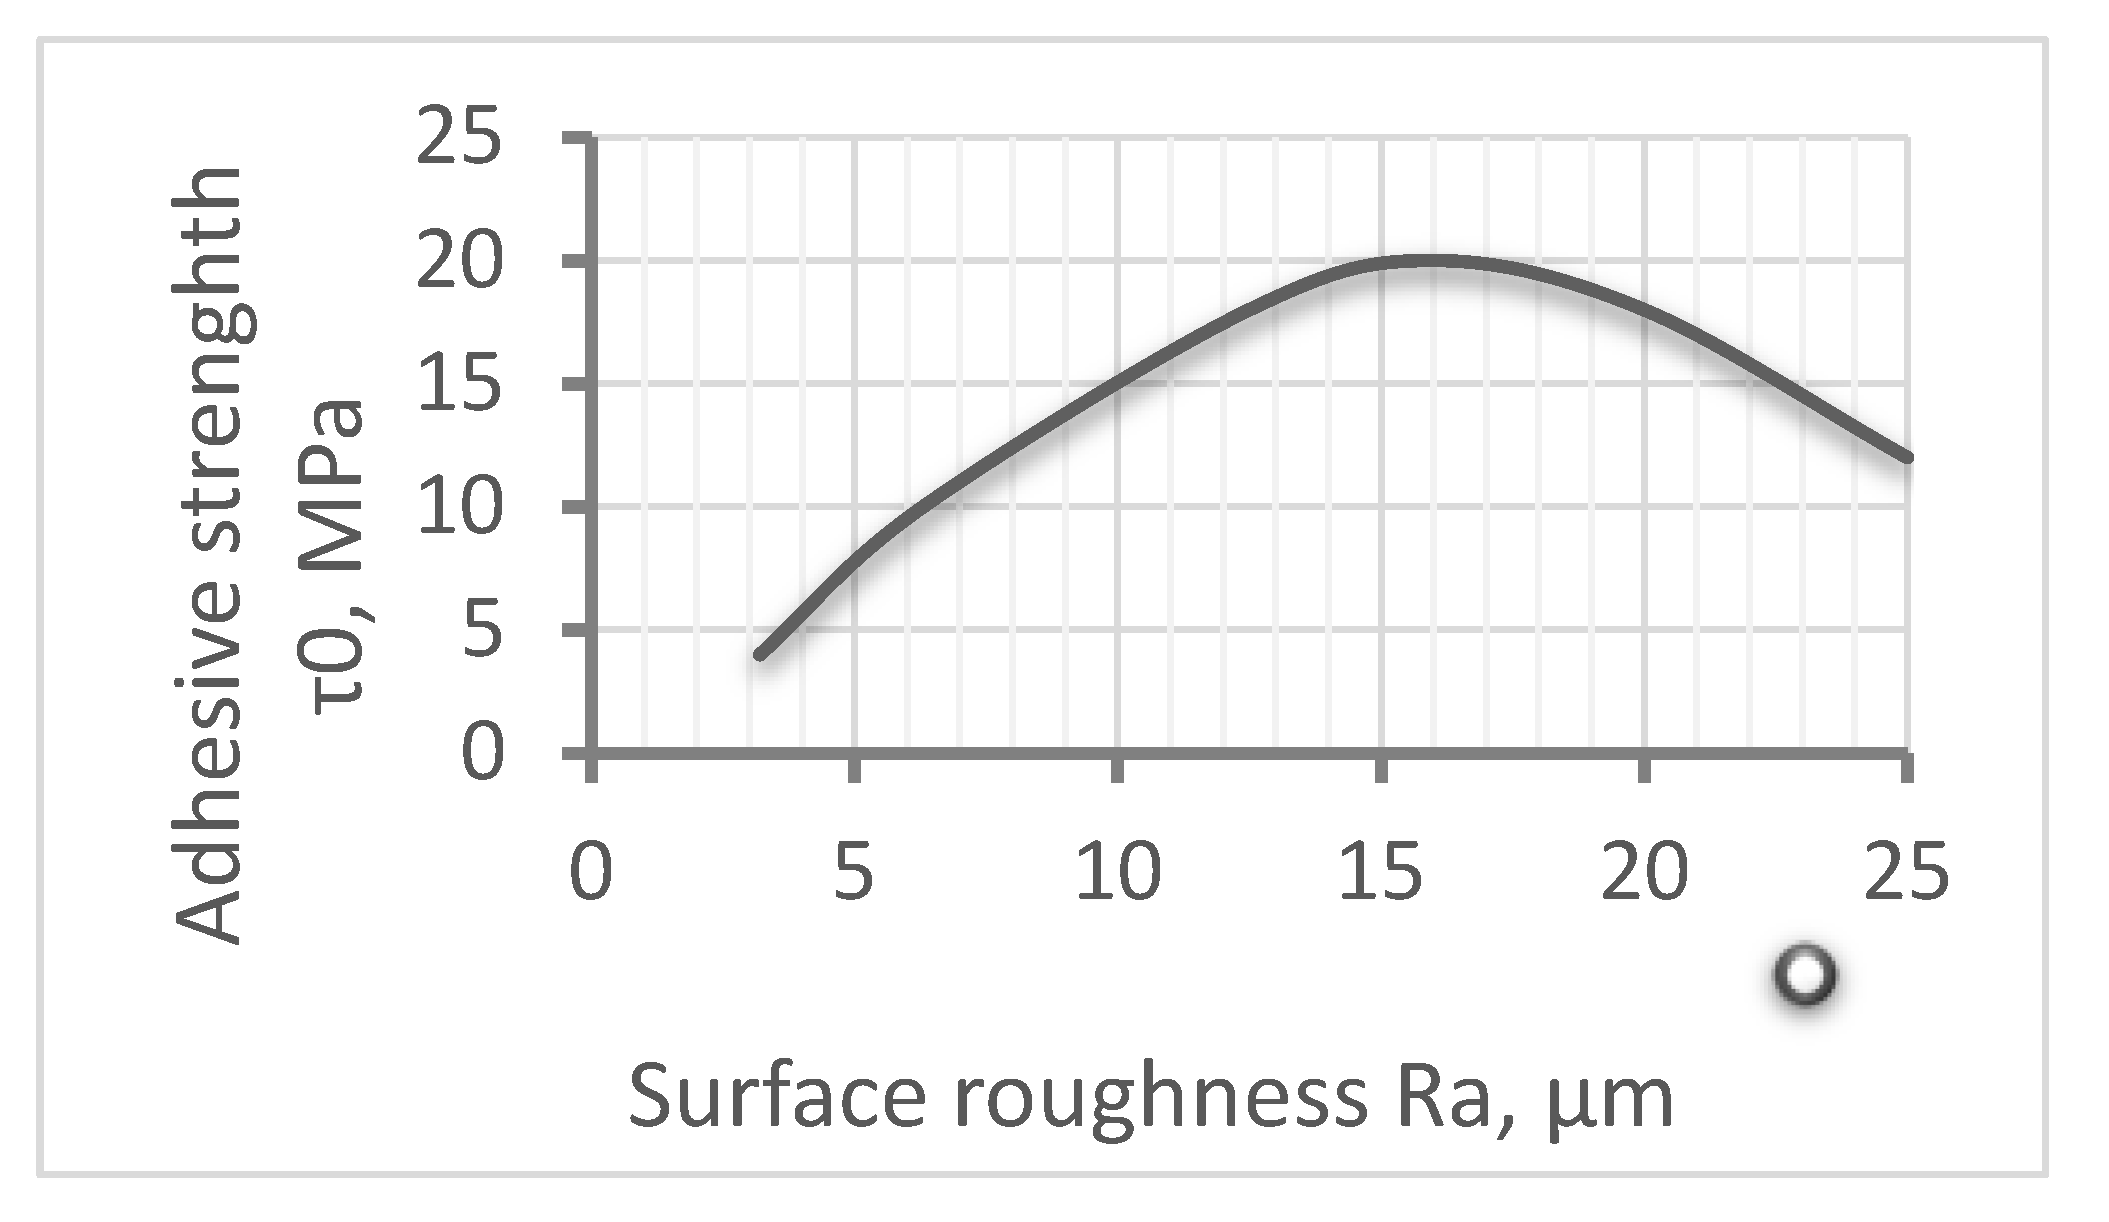
With long-term shot treatment, the degree of surface deformation increases, which, despite increasing roughness values, will lead to a decrease in the total number of peaks. The graph of the dependence of adhesive strength τ0 on the value of the roughness Ra is shown in Figure 2.
The graph shows that it is possible to achieve the minimum angle of twist α and, consequently, the maximum adhesion τ0 by obtaining optimal roughness values Ra, at which the number of peaks will be maximum. The surface roughness Ra recommended by the GOST 9.304-87 standard should be in the range of 6.3–16 µm (Rz = 25–63 µm). However, accurate data can only be obtained experimentally.
The microstructure of the surface after shot blasting depends primarily on the choice of abrasive particles. As stated above, the adhesion between the substrate and the thermally applied material depends on the roughness of the surface. The resulting microrelief should allow the sprayed material to reliably adhere to the base one.
Insufficient roughness will lead to guaranteed delamination of the coating and, consequently, excessive need to increase the thickness of the sprayed layer. To prevent the occurrence of both options, it is necessary to correctly select the shot, which evaluates criteria such as material, size, shape, and hardness of the particle.
The shot blast of a long rod before spraying is recommended to be performed with a steel shot. Depending on the material of the surface to be machined, as well as the desired result, cast steel S and steel shot G are used.
The cast steel shot S (46–52 HRC) is used to clean and harden large parts of large mass. For parts of other shapes and sizes, steel shot is used, marked according to the particle hardness as G (40–51 HRC), GL (54–61 HRC), GH (>64 HRC). However, it should be noted that if the purpose of processing is surface hardening, then a chipped shot is not suitable.
It is logical that the hardness of the shot is selected on the hardness of the material being processed. The size of the granules or beads should be such that the optimum surface roughness values described above can be obtained.
One of the important parameters of the shot blasting process is the flow rate of the abrasive particles. The speed affects the amount of penetration of the particles ∆h. The higher the particle penetration rate, the larger the resulting surface area of contact between the sprayed material and the substrate, and therefore the higher the adhesion [9].
The speed of the abrasive particles is related to the pressure in the pneumatic system using the following formula [6]:
ϑ = 2 P ρ a  
where P is the pressure in the pneumatic system; ρ is the air density; a is the total loss coefficient of abrasive particles that have kinetic energy and work to deform the surface.
The surface roughness for spraying Ra depends on the JAM modes (distance to the nozzle exit; working air pressure; shot flow rate; processing time of a single area; number and diameter of shot blasting nozzles; angle of attack of the nozzle; angle of divergence of the air jet; type, size and shape of the abrasive), as well as the number of passes and the frequency of shot change (step processing).
The compressor regulator in the range from 0.3 to 0.6 MPa and controlled using the indicators of two air pressure gauges at the inlet and outlet. The precision of the pressure measurement was ±0.05 M Pa.
By changing one or another parameter of the shot blasting process, at the output, we will obtain certain values of the characteristics that affect the quality of the future surface. However, many of these parameters cannot be accurately accounted for. Optimal roughness values must be characterized by other parameters, namely, air pressure, processing time, shot diameter, and the distance between the part and the nozzle [34].
Since surface preparation is important for applying wear-resistant coatings on the surfaces of long hydraulic cylinder rods, it is important to develop a closed-cycle shot blasting plant equipped with an abrasive regeneration system that will ensure the quality of the prepared surface. Therefore, the objective of ongoing research is to develop an innovative surface preparation method using a shot blasting machine and evaluate it in terms of combining air pressure, blasting time, nozzle attack angle, and validating surface roughness and abrasive penetration depth.
An innovative method of surface preparation consists of determining the parameters and conditions of shot blasting, then establishing optimal modes for preparatory operations on the surface of long rods, before applying protective gas-thermal spraying, due to the created software product. A special software product takes into account the input parameters of shot blasting, depending on the design parameters of the objects under study and the requirements for the quality of the surface layer. The created installation for jet-abrasive processing allows you to restore worn surfaces directly at the place of operation of large-sized equipment, part of which are long rods, without equipment downtime. The installation is characterized by the following: low cost; versatility of assembly; mobility; takes into account the design features of parts; prevents spontaneous distortion and bending of parts.

2. Materials and Methods

The failed hydraulic cylinder rod is subject to repair and restoration. This process includes operations such as removing the old coating and the activation of the surface, forming a new coating with the desired properties, and final machining.
In the course of the research, a universal installation for thermal spraying was developed, including a preliminary jet-abrasive treatment (Figure 3). The unit is pre-fabricated and consists of a base, guides made of aluminum profile, a three-jaw chuck with a belt drive, and roller bearings.
The hydraulic cylinder rod in the process of abrasive blasting was installed using a three-jaw belt drive chuck and also laid on the roller calipers of a special installation for thermal spraying [35]. Guide installations are used to precisely move the abrasive blasting machine. Jet-abrasive treatment was carried out according to the passport data of the EDUCT-O-MATIC on a long rod with dimensions d = 250 mm, L = 1350 mm. The stem material is St45. The choice of the size and hardness of the shot was made taking into account the processed material, the diameter of the nozzle, and the air pressure supplied through the shot blasting machine.
To prepare the working surface of a long rod before its complete restoration, an EDUCT-O-MATIC closed-loop shot blasting machine equipped with an abrasive regeneration system was used. The main technical characteristics of the installation are given in Table 2.
The action of abrasive regeneration was carried out by a filter bag and a retaining sieve. Dust from blasting particles arising during processing was removed to the filter bag; larger particles that did not correspond to the range of shot fractions used by us were retained by the sieve. Compressed air was supplied and pressure was regulated by a screw compressor.
The process of shot blasting the surface of the hydraulic cylinder rod is shown in Figure 4.
During abrasive blasting, the abrasive is constantly regenerated, dust is discharged into the filter bag, and large debris is retained by the sieve. Replaceable catching nozzles allow you to perform work not only on flat surfaces, but also on curly ones. The swivel head allows you to clean parts in different spatial arrangements. The shot blast was carried out according to the passport data of the EDUCT-O-MATIC installation on a long rod with dimensions d = 250 mm, L = 1350 mm. The rod material is St45.
The choice of the size and hardness of the shot was carried out taking into account the processed material, the diameter of the nozzle, and the air pressure supplied through the shot blasting machine. To obtain the desired surface roughness, the use of steel shot is preferred over cast iron shot. Despite the same speed of flight of abrasive particles, the efficiency of the processing with steel shot is much higher than that with cast shot. This is explained by the fact that at the moment of impact, the abrasive particle acts as a microcutter, thereby not only cleaning the surface from contamination but also creating a specific microrelief on it. Cast iron shot is harder, but its consumption is more than 30 times higher than steel shot. Due to the brittleness of the material, most of the particles that have reached the material being processed turn into dust [11].
Based on the foregoing, the steel shot was chosen for the experiment with the following parameters:
-
Shot type—DSK-0.3 according to GOST 11964-81;
-
Microhardness—500 HV;
-
Density—not less than 7200 kg/m3;
-
Allowable residue content on sieve No. 3—not less than 65%.
The conditions for the experiments were the following:
-
Diameter of the shot blasting nozzle—4.5 mm;
-
Type of abrasive particles—DSK-03 according to GOST 11964-81;
-
Rod rotation frequency—63 rpm.

3. Results and Discussion

To assess the quality of the surface layer of the rod after shot blasting, the main indicators were determined, such as surface roughness (Ra) and the value of the hardened layer (Δh). These indicators directly depend on the technological parameters of the process such as air pressure (P), nozzle attack angle (β), processing time (t).

3.1. Investigation of the Dependence of Surface Quality Parameters on Air Pressure

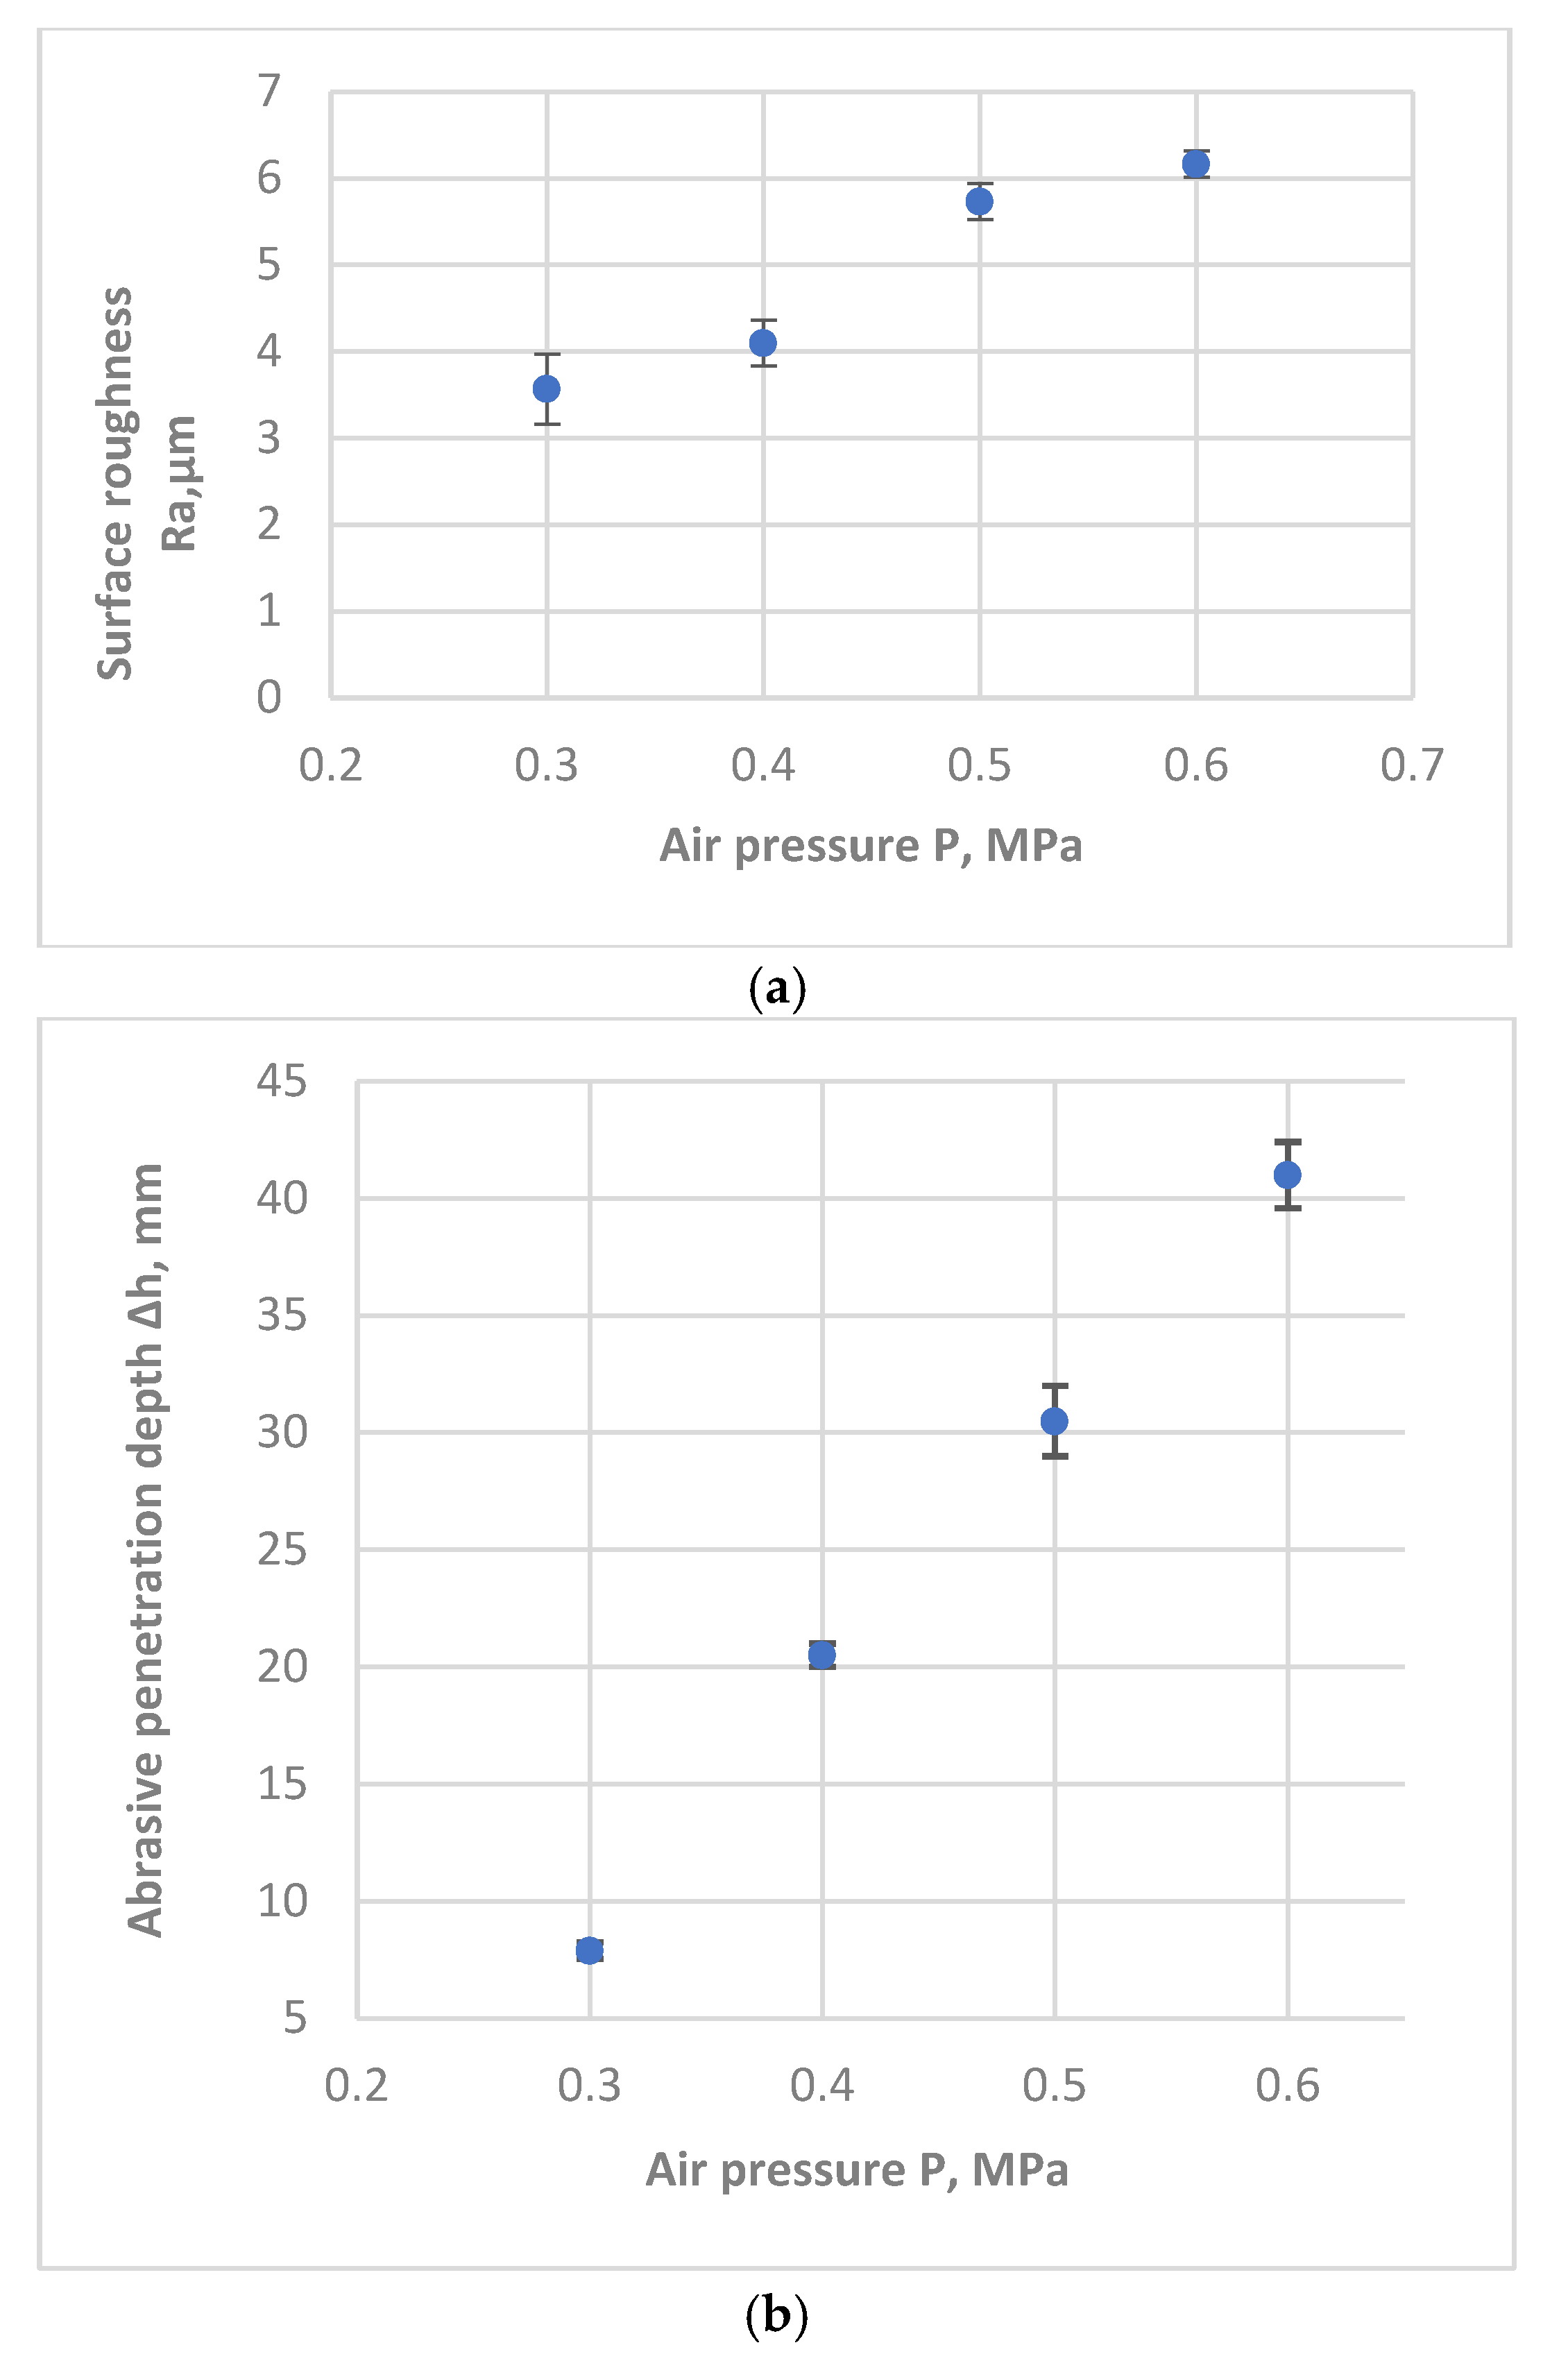
In the first part of the experimental studies, the dependence of the surface roughness Ra and the penetration depth of the abrasive ∆h on the pressure P created by the pneumatic machine was determined. The specific pressure loss observed during the shot blasting is due to the length of the air hose and the diameter of the abrasive used. The results are shown in Figure 5a,b.
The standard deviation of the surface roughness is the smallest for a pressure of 0.6 MPa and is 0.15 μm, and the largest deviation for a pressure of 0.3 MPa (0.4 μm).
The standard deviation of the penetration depth is the smallest for a pressure of 0.3 MPa and is 0.36 mm, and the maximum (1.4 mm) is for a pressure of 0.6 MPa.
In the course of the experiment, it turned out that an increase in the working air pressure, under different conditions, leads to a linear increase in both the surface roughness Ra and the cutting depth of the abrasive particles ∆h. The best results are observed at the maximum pressure of 0.6 MPa because the higher the roughness value of the processed surface, the better the adhesion to the sprayed coating.

3.2. Investigation of the Dependence of Surface Quality Parameters on the Angle of Attack of the Nozzle

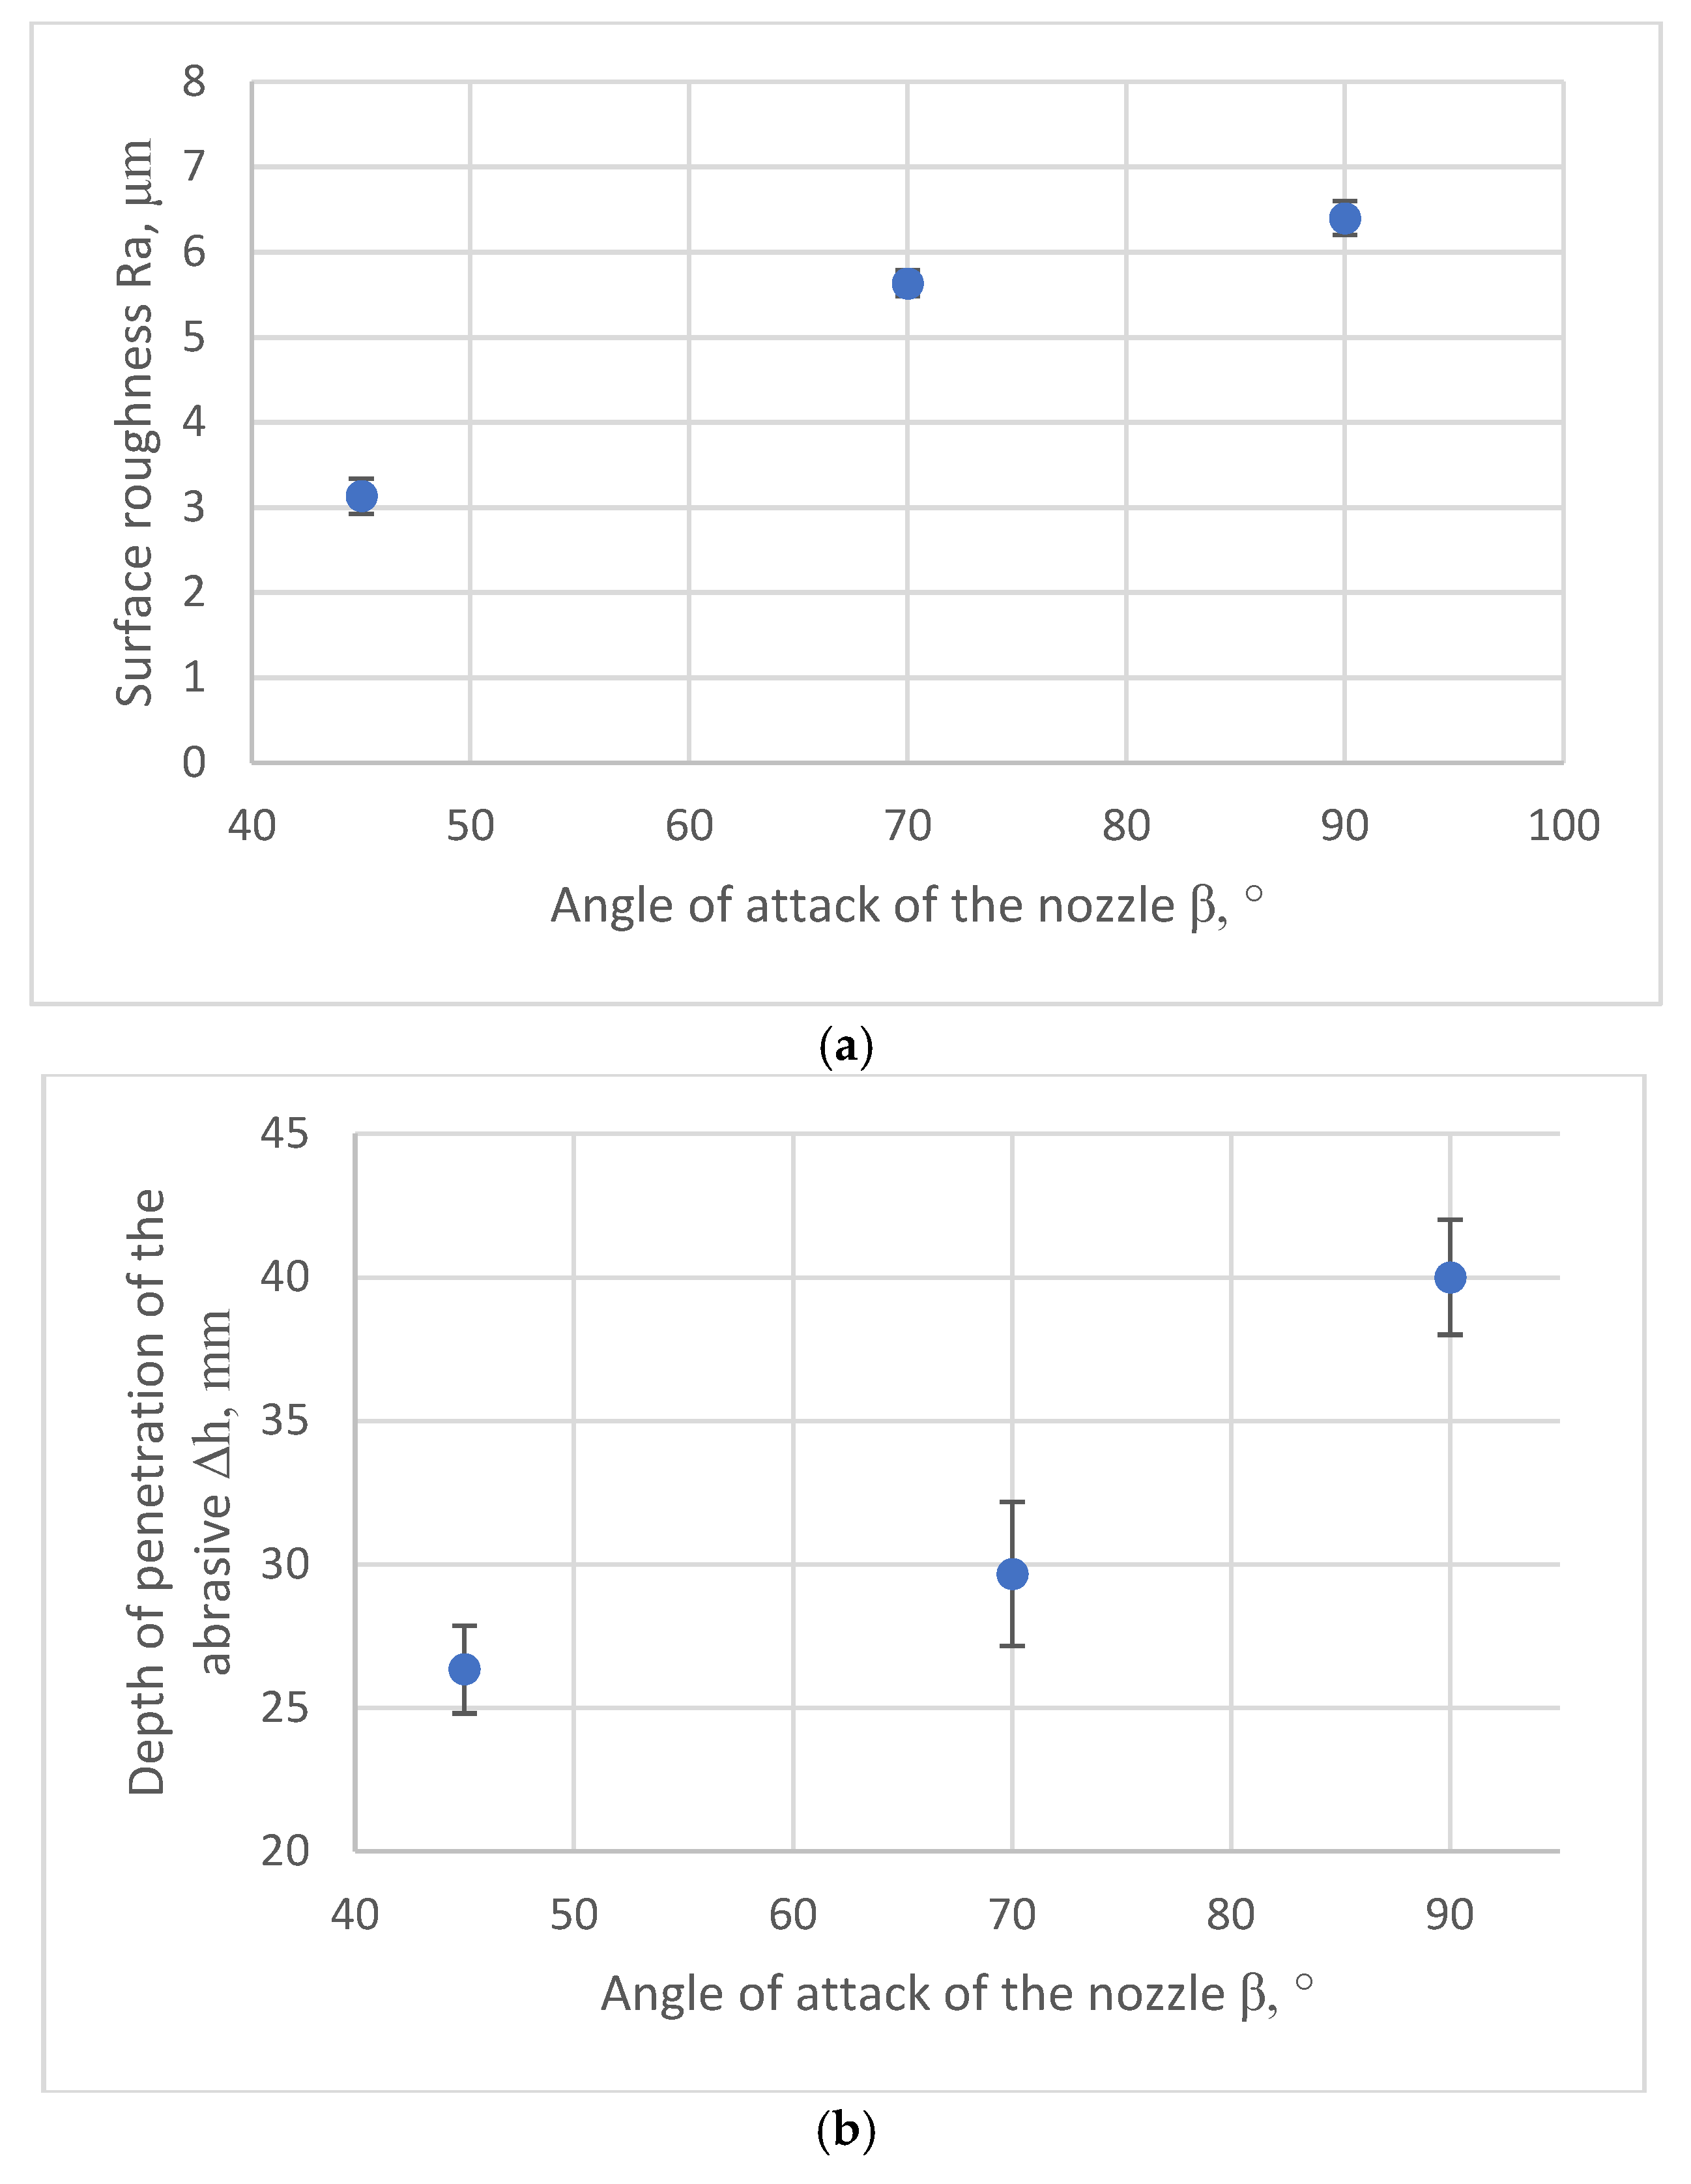
In the second part of the experiment, the angle of inclination of the jet β to the treated surface varied in the range from 45° to 90°. The angle was changed by a special holder with the ability to adjust the height and exact angle. The roughness Ra graphs and the particle penetration depth ∆h for three angular values are shown in Figure 6.
The standard deviation of surface roughness is the smallest for the 70° angle and is 0.15 μm, and the largest deviation for the 45° angle (0.21 μm).
The standard deviation of the penetration depth is the smallest for a 45° angle and is 1.53 mm, and the maximum (2.52 mm) is for a 70° angle. Therefore, it is recommended to prepare the surface of long rods of hydraulic cylinders for thermal spraying at an angle of 90°.
The angle of inclination of the jet to the treated surface for shot blasting had a great influence on both the penetration depth of the abrasive ∆h and the roughness Ra. The deviation of the spray angle from the perpendicular direction with respect to the rod surface led to an expansion of the processing area; however, it caused a decrease in flow density. As a result, during the coating metallographic analysis, sharp jumps in the irregularity peaks were observed in certain areas, but the overall roughness turned out to be slightly lower than at an angle of 90°.

3.3. Investigation of the Dependence of Surface Quality Parameters on

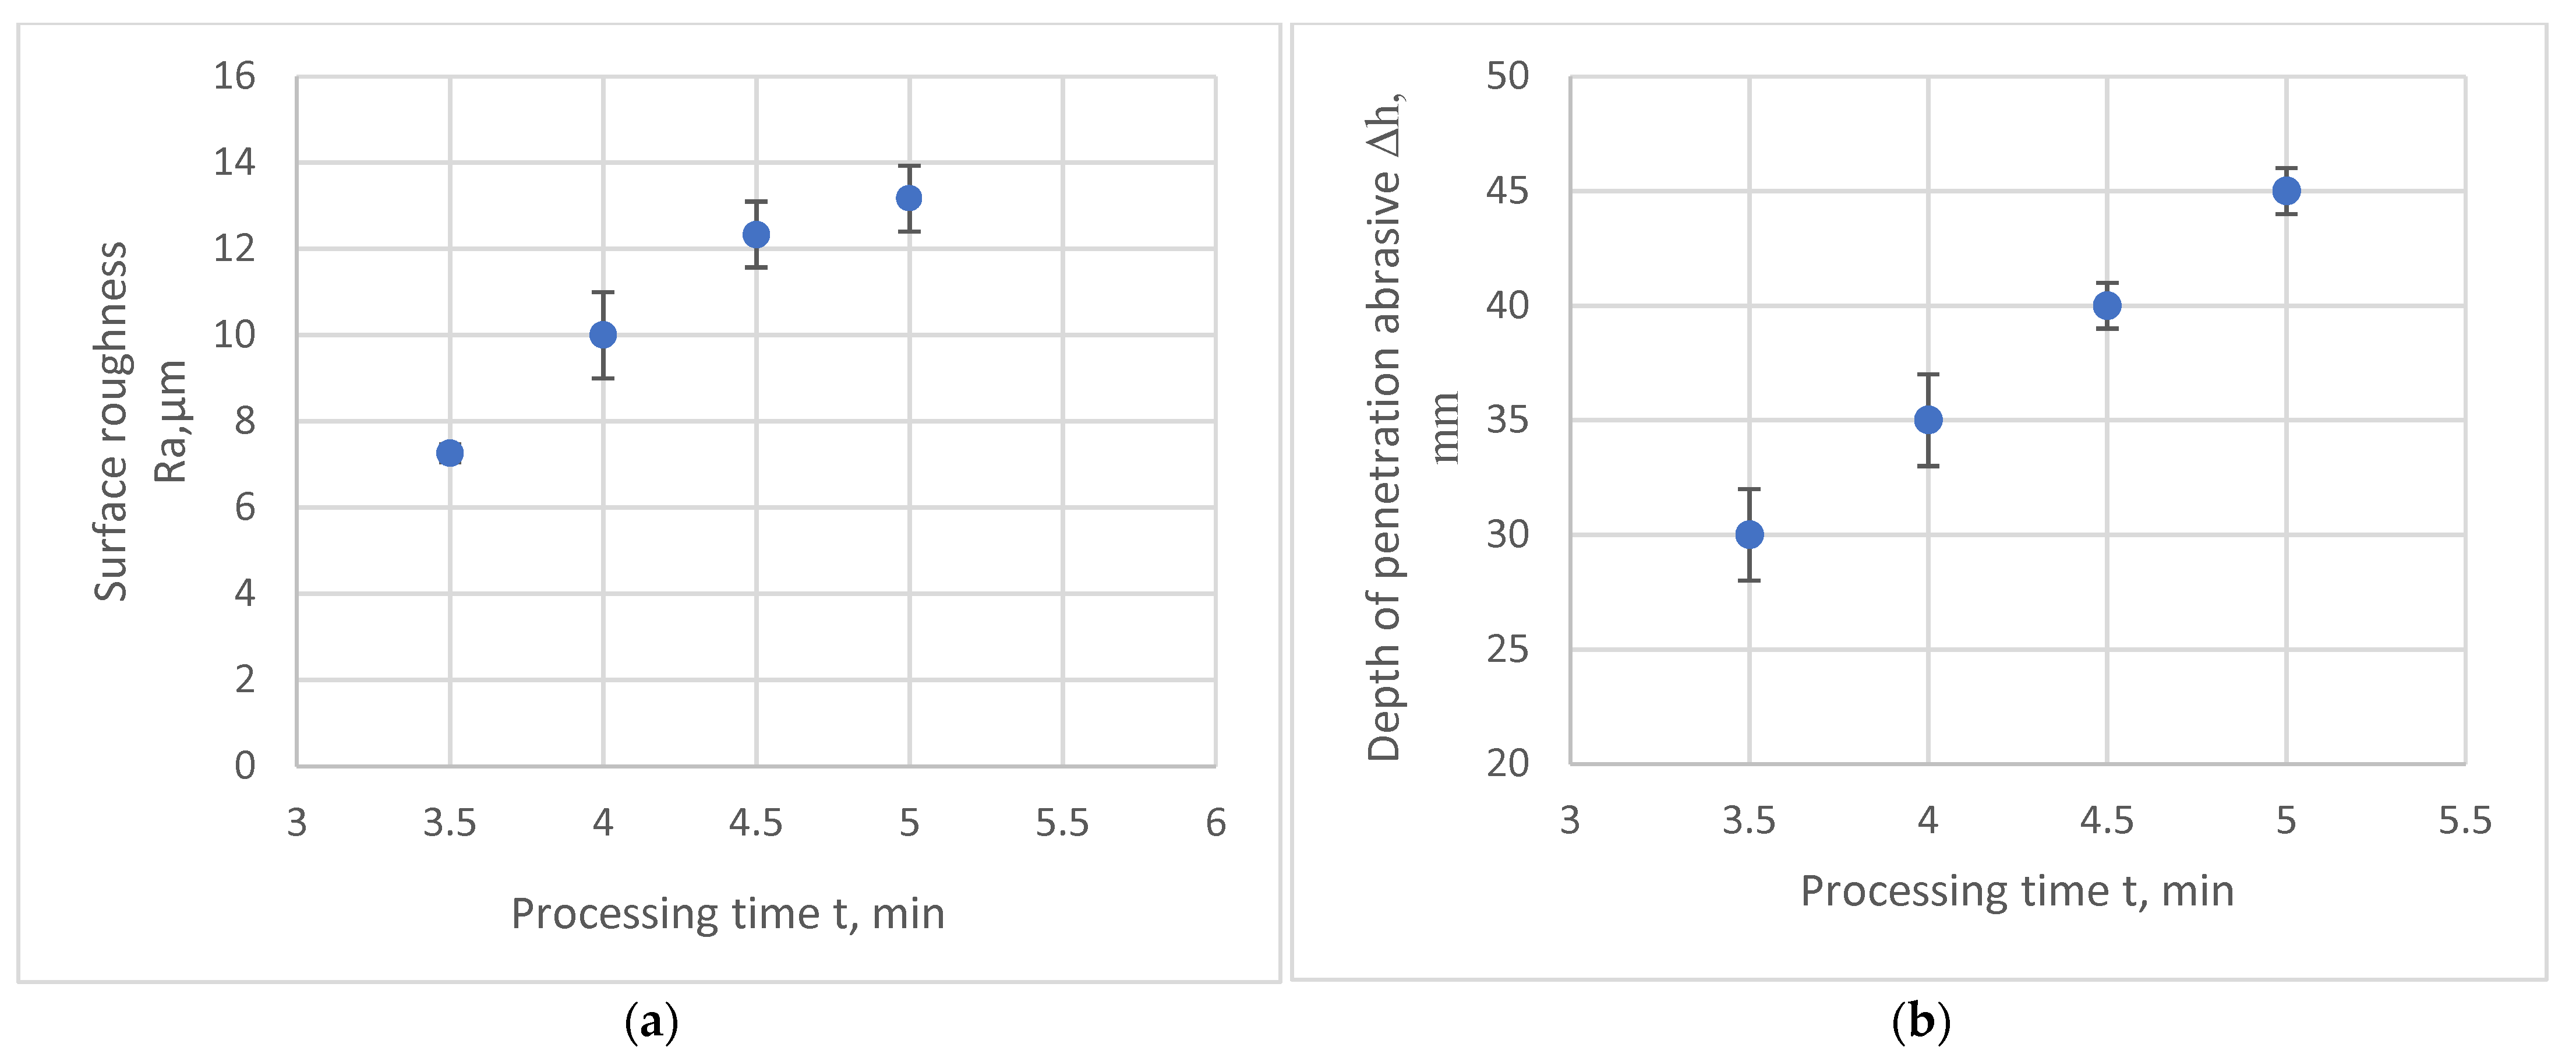
The final stage of the research was to determine the optimal processing time required to achieve the required surface roughness. The time of complete processing of the rod surface in the first case was 3 min 30 s. Furthermore, there was an increase in the duration of processing of a separate section with a width equal to the width of the strip left by the shot blasting machine in one pass. The dependence graphs for the minimum and maximum processing times are shown in Figure 7.
The standard deviation of surface roughness is the smallest for a processing time of 3.5 min (0.2 μm) and the largest for a time of 4 min (1 μm).
The standard deviation of the penetration depth is the smallest at a treatment time of 5 min (1 mm), and the maximum (2 mm) is for a treatment time of 3.5 min. Therefore, it is recommended to prepare the surface of long rods of hydraulic cylinders for thermal spraying within 4.5 min.
As can be seen in the graphs, the formation of a new microrelief occurs within the first 3 min from the start of the shot blasting, and with further processing, the values of the surface roughness Ra and the penetration depth of the abrasive ∆h change slightly.
These dependencies were obtained using the software product “Calculation of coating technological parameters of coating during gas thermal processing” [36].
Since the rod will be coated with powders after blasting, high requirements are placed on surface roughness. In this case, the surface of interaction with the coating material increases sharply and the temperature of the protrusions formed during roughness at the moment of contact with the heated accelerated particles of the gas-powder flow increases, which contributes to the production of coatings with increased adhesive strength. Roughness affects the wettability and spreadability of the coating material when it is formed from the molten state [37]. When coatings from a solid state and especially from atomic flows, the surface roughness is reduced to minimum values. It has been experimentally proven that the best results are obtained when the sizes of the sprayed particles are somewhat smaller than the depressions on a rough surface [38].
From the point of preparation of the surface of the long-dimensional rods of hydro-cylinders, the maximum standard deviation of the surface roughness is 1 µm, and the standard deviation for the depth of penetration of the abrasive reaches 2 mm, which is acceptable during the operation of the hydraulic cylinders. This method can be implemented in industrial conditions.

4. Conclusions

To prepare the working surface of the rods before restoring the surface, taking into account the nature of the damage (natural wear of the working surface, deep surface scratches, scuffs, dents, notches, nicks, burrs, chips, traces of metal corrosion), a closed-loop mobile device equipped with an abrasive regeneration system can be used, designed for abrasive blast cleaning of the surfaces of rods.
The advantage of the installed installation developed for jet-abrasive treatment presented is the high quality and adhesion strength of the coating. Installation also allows you to eliminate the need to purchase an expensive machine to process large parts. Due to the availability of materials and ease of assembly, any company will be able to independently assemble the installation of the required length at the site of operation of large equipment.
It has been established that the size of the abrasive particles must be chosen in the range of 0.3 to 1.5 mm, and it is not recommended to use brittle abrasives such as quartz sand, ground slag, etc. They form a lot of dust that is harmful to human health. The use of hard and sharp abrasives such as aluminum oxide or silicon carbide will cause rapid wear of the unit. Compressed air pressure is determined within these parameters: 0.4–0.6 MPa; processing time—within 3.5–5 min; counterflow angle with surface 70–90°; consumption of abrasive particles 300–500 kg/h.
In the course of the research, it was found that the formation of a new microrelief occurs within the first 3 min after the start of the blast, and with further cleaning, the values of surface roughness Ra and hardening depth h change slightly.
The first results are encouraging; therefore, it is necessary to carry out numerous works in determining the mechanism for the formation of a certain roughness of the surface being prepared for further deposition of wear-resistant coatings on long rods.

Author Contributions

Conceptualization, G.Z; supervision, G.Z.; methodology, T.N., O.Z. and Ł.G; formal analysis, O.Z. and ŁG.; investigation, D.Z. and Ł.G.; writing—original draft preparation, G.Z., T.N. and O.Z.; writing—review and editing, D.Z., Ł.G., V.Y. and T.N.; project administration, T.N.; funding acquisition, G.Z. and T.N. All authors have read and agreed to the published version of the manuscript.

Funding

The article was prepared as part of the implementation of grant funding for projects by the Science Committee of the Ministry of Education and Science of the Republic of Kazakhstan IRN project No. AP08856371.

Institutional Review Board Statement

Not applicable.

Informed Consent Statement

Not applicable.

Data Availability Statement

This research is published for the first time. Full research data will be published in the research report, “Development of a resource-saving technologies for repairing long rods of hydraulic cylinders of large-sized special equipment for industrial use with the possibility of restoring local damage at the place of its operation”, grant No. AP08856371, on the web portal of the National Center for State scientific and technical expertise of the Republic of Kazakhstan (https://is.ncste.kz) in December 2022.

Conflicts of Interest

The authors declare no conflict of interest.

References

  1. Belenkiy, U.; Kretinin, V.; Sokolova, V.; Parfenopulo, G. Features of formation of gas-thermal coatings with equal thickness on flat surfaces. IOP Conf. Ser. Mater. Sci. Eng. 2020, 786, 012025. [Google Scholar] [CrossRef]
  2. Radionov, A. Application of Gas-Thermal Coatings on Low-Alloyed Steel Surfaces. Solid State Phenom. 2018, 284, 1284–1290. [Google Scholar]
  3. Tejero-Martin, D.; Rezvani Rad, M.; McDonald, A.; Hussain, T. Beyond Traditional Coatings: A Review on Thermal-Sprayed Functional and Smart Coatings. J. Therm. Spray Technol. 2019, 28, 598–644. [Google Scholar] [CrossRef] [Green Version]
  4. Yin, S.; Cizek, J.; Suo, X.; Li, W.; Liao, H. Thermal Spray Technology. Adv. Mater. Sci. Eng. 2019, 2019, 8654764. [Google Scholar] [CrossRef] [Green Version]
  5. Astanin, V.K.; Pukhov, E.V.; Stekolnikov, Y.A.; Golikova, O.A. Hardening parts by chrome plating in manufacture and repair. IOP Conf. Ser. Mater. Sci. Eng. 2018, 327, 032008. [Google Scholar] [CrossRef]
  6. Semchuk, G.I. Methods of restoration and hardening of agricultural machinery parts. Technol. Audit Prod. Reserves 2013, 5, 57–59. [Google Scholar] [CrossRef] [Green Version]
  7. Dudnikov, A.; Dudnikov, I.; Dudnyk, V.; Mykhailichnko, V.; Burlaka, O.; Kanivets, O. Increasing the resource of agricultural machines. Technol. Audit Prod. Reserves 2021, 5, 6–11. [Google Scholar] [CrossRef]
  8. Dinesh Babu, P.; Balasubramanian, K.R.; Buvanashekaran, G. Laser surface hardening: A review. Int. J. Surf. Sci. Eng. 2011, 5, 131–151. [Google Scholar] [CrossRef]
  9. Espallargas, N. Introduction to thermal spray coatings, Future Development of Thermal Spray Coatings; Woodhead Publishing: Sawston, UK, 2015; pp. 1–13. [Google Scholar] [CrossRef]
  10. Kuznetsov, Y.A.; Selemenev, M.F.; Kravchenko, I.N.; Spasibin, A.V.; Pankov, G.B. Theoretical Justification of Coating Adhesion during Gas-Thermal Spraying. Mater. Res. Proc. 2022, 21, 161–168. [Google Scholar]
  11. Zhetessova, G.; Zharkevich, O.; Pleshakova, Y.; Yurchenko, V.; Platonova, Y.; Buzauova, T. Building mathematical model for gas-thermal process of coating evaporation. Metalurgija 2016, 55, 63–66. [Google Scholar]
  12. Aurich, J.C.; Kirscha, B.; Settia, D.; Axinte, D.; Beaucamp, A.; Butler-Smith, P.; Yamaguchi, H. Abrasive processes for micro parts and structures. CIRP Ann. 2019, 68, 653–676. [Google Scholar] [CrossRef]
  13. Müller, M.; Levytskyi, A.; Svobodová, J.; Lebedev, P. Abrasive-free Ultrasonic Finishing of Metals. Manuf. Technol. 2014, 14, 366–370. [Google Scholar] [CrossRef]
  14. John, M.; Ralls, A.M.; Dooley, S.C.; Thazhathidathil, A.K.V.; Perka, A.K.; Kuruveri, U.B.; Menezes, P.L. Ultrasonic Surface Rolling Process: Properties, Characterization, and Applications. Appl. Sci. 2021, 11, 10986. [Google Scholar] [CrossRef]
  15. Du, Z.; Wen, S.; Wang, J.; Yin, C.; Yu, D.; Luo, J. The Review of Powder Coatings. J. Mater. Sci. Chem. Eng. 2016, 4, 54–59. [Google Scholar] [CrossRef] [Green Version]
  16. Bidulsky, R.; Gobber, F.S.; Bidulska, J.; Grande, M.A. Coated Metal Powders for Laser Powder Bed Fusion (L-PBF) Processing: A Review. Metals 2021, 11, 1831. [Google Scholar] [CrossRef]
  17. Matarneh, M.; Al Quran, F.; Andilakhay, A.A.; Haddad, J. Speed of abrasive particles in the process of abrasive blasting by submerged jets. Int. J. Acad. Res. 2014, 6, 240–245. [Google Scholar] [CrossRef]
  18. Draganovská, D.; Ižaríková, G.; Guzanová, A.; Brezinová, J. General Regression Model for Predicting Surface Topography after Abrasive Blasting. Metals 2018, 8, 938. [Google Scholar] [CrossRef] [Green Version]
  19. Bhattacharyya, B.; Doloi, B. Chapter Seven—Micromachining Processes. In Modern Machining Technology Advanced, Hybrid, Micro Machining and Super Finishing Technology; Elsevier: Amsterdam, The Netherlands, 2020; pp. 593–673. [Google Scholar]
  20. Vipindas, K.; Kuriachen, B.; Mathew, J. Chapter 13—An Insight on Ultrasonic Machining Technology. In Handbooks in Advanced Manufacturing, Advanced Machining and Finishing; Elsevier: Amsterdam, The Netherlands, 2021; pp. 451–478. [Google Scholar]
  21. Barrôso Vieira, Á.S.; Antunes, L.; Cople Maia, L.; Guimarães Primo, L. Ultrasonic Abrasion: An Alternative for Cavity Preparation. Pesqui. Bras. Odontopediatr. Clín. Integr. 2007, 7, 181–186. [Google Scholar]
  22. Kohli, R. Chapter 14—Microabrasive Technology for Precision Cleaning and Processing. In Developments in Surface Contamination and Cleaning: Applications of Cleaning Techniques; Elsevier: Amsterdam, The Netherlands, 2016; pp. 627–666. [Google Scholar]
  23. Koivuluoto, H.; Hartikainen, E.; Niemelä-Anttonen, H. Thermally Sprayed Coatings: Novel Surface Engineering Strategy Towards Icephobic Solutions. Materials 2020, 13, 1434. [Google Scholar] [CrossRef] [Green Version]
  24. Škamat, J.; Černašėjus, O.; Zhetessova, G.; Nikonova, T.; Zharkevich, O.; Višniakov, N. Effect of laser processing parameters on microstructure, hardness and tribology of NiCrCoFeCBSi/Wc coatings. Materials 2021, 14, 6034. [Google Scholar] [CrossRef]
  25. Aiman, S.; Bhargav, R.S.; Vikhyath, V.; Darshan, K.A.; Ashitraj, V.; Nanjundeswaraswamy, T.S. Process Characteristics of Abrasive Jet Machining. Int. J. Eng. Res. Technol. 2019, 8, 593–597. [Google Scholar]
  26. Doreswamy, D.; Shivamurthy, B.; Anjaiah, D.; Sharma, N.Y. An Investigation of Abrasive Water Jet Machining on Graphite/Glass/Epoxy Composite. Int. J. Manuf. Eng. 2015, 2015, 627218. [Google Scholar] [CrossRef] [Green Version]
  27. Zaytzev, A.N.; Aleksandrova, Y.P.; Yagopolskiy, A.G. Comparative Analysis of Methods for Assessing Adhesion Strength of Thermal Spray Coatings. Proc. High. Educ. Inst. Mach. Build. 2021, 5, 48–57. [Google Scholar] [CrossRef]
  28. Kinlock, E. Adhesion and Adhesives: Science and Technology; Springer: Berlin/Heidelberg, Germany, 1991; 484p. [Google Scholar]
  29. Burov, V.; Yanpolskiy, V.; Rakhimyanov, K. Technological Aspects of Forming the Surface Microrelief of Low-Wear Coatings after Electro-Diamond Grinding. IOP Conf. Ser. Mater. Sci. Eng. 2016, 126, 012018. [Google Scholar] [CrossRef]
  30. Łatka, L.; Pawłowski, L.; Winnicki, M.; Sokołowski, P.; Małachowska, A.; Kozerski, S. Review of Functionally Graded Thermal Sprayed Coatings. Appl. Sci. 2020, 10, 5153. [Google Scholar] [CrossRef]
  31. Dorfman, M.R. Chapter 22—Thermal Spray Coatings. In Handbook of Environmental Degradation of Materials, 3rd ed.; Elsevier: Amsterdam, The Netherlands, 2018; pp. 469–488. [Google Scholar]
  32. Wang, T.; Ning, W.; Li, Y.; Yunshan, W. Study on preparation technologies of thermal barrier coatings. Surf. Rev. Lett. 2016, 24, 1730004. [Google Scholar] [CrossRef]
  33. Wang, J.; Chen, M.; Wang, Y.; Li, B.; Yu, Y.; Tian, Y.; Liu, B.; Jing, Q. Preparation and thermo-physical properties of La2AlTaO7 ceramic for thermal barrier coating application. Mater. Chem. Phys. 2022, 289, 126465. [Google Scholar] [CrossRef]
  34. Olt, J.; Maksarov, V.; Krasnyy, V. Provision of adhesion strength of gas-thermal coatings on piston rings of quarry transport engines. J. Min. Inst. 2018, 229, 77–83. [Google Scholar]
  35. Ibatov, M.K.; Zhetessova, G.S.; Nikonova, T.Y.; Zharkevich, O.M.; Olegas, Č.; Škamat, J.; Yurchenko, V.V.; Kalinin, A.A.; Dandybaev, E.S. Support for Horizontal Mobility of Device for Gas-Flame Spraying of Long Components (Patent for Utility Model)б No. 6901. 2021. Available online: https://gosreestr.kazpatent.kz/Utilitymodel/Details?docNumber=349139 (accessed on 31 August 2022).
  36. Nikonova, T.Y.; Zhetesova, G.S.; Yurchenko, V.V.; Zharkevich, O.M.; Zhunuspekov, D.S.; Kalinin, A.A. Calculation of Technological Parameters of Coating Application during Gas Thermal Treatment (Certificate for an Object Protected by the Law of the Republic of Kazakhstan), No. 27846. 2022. Available online: https://copyright.kazpatent.kz/?!.iD=zXkt (accessed on 31 August 2022).
  37. Bae, S.H.; Kim, S.; Yi, S.H.; Son, I.; Kim, K.T.; Chung, H. Effect of Surface Roughness and Electroless Ni–P Plating on the Bonding Strength of Bi–Te-based Thermoelectric Modules. Coatings 2019, 9, 213. [Google Scholar] [CrossRef] [Green Version]
  38. Oksa, M.; Turunen, E.; Suhonen, T.; Varis, T.; Hannula, S.-P. Optimization and Characterization of High Velocity Oxy-fuel Sprayed Coatings: Techniques, Materials, and Applications. Coatings 2011, 1, 17–52. [Google Scholar] [CrossRef]
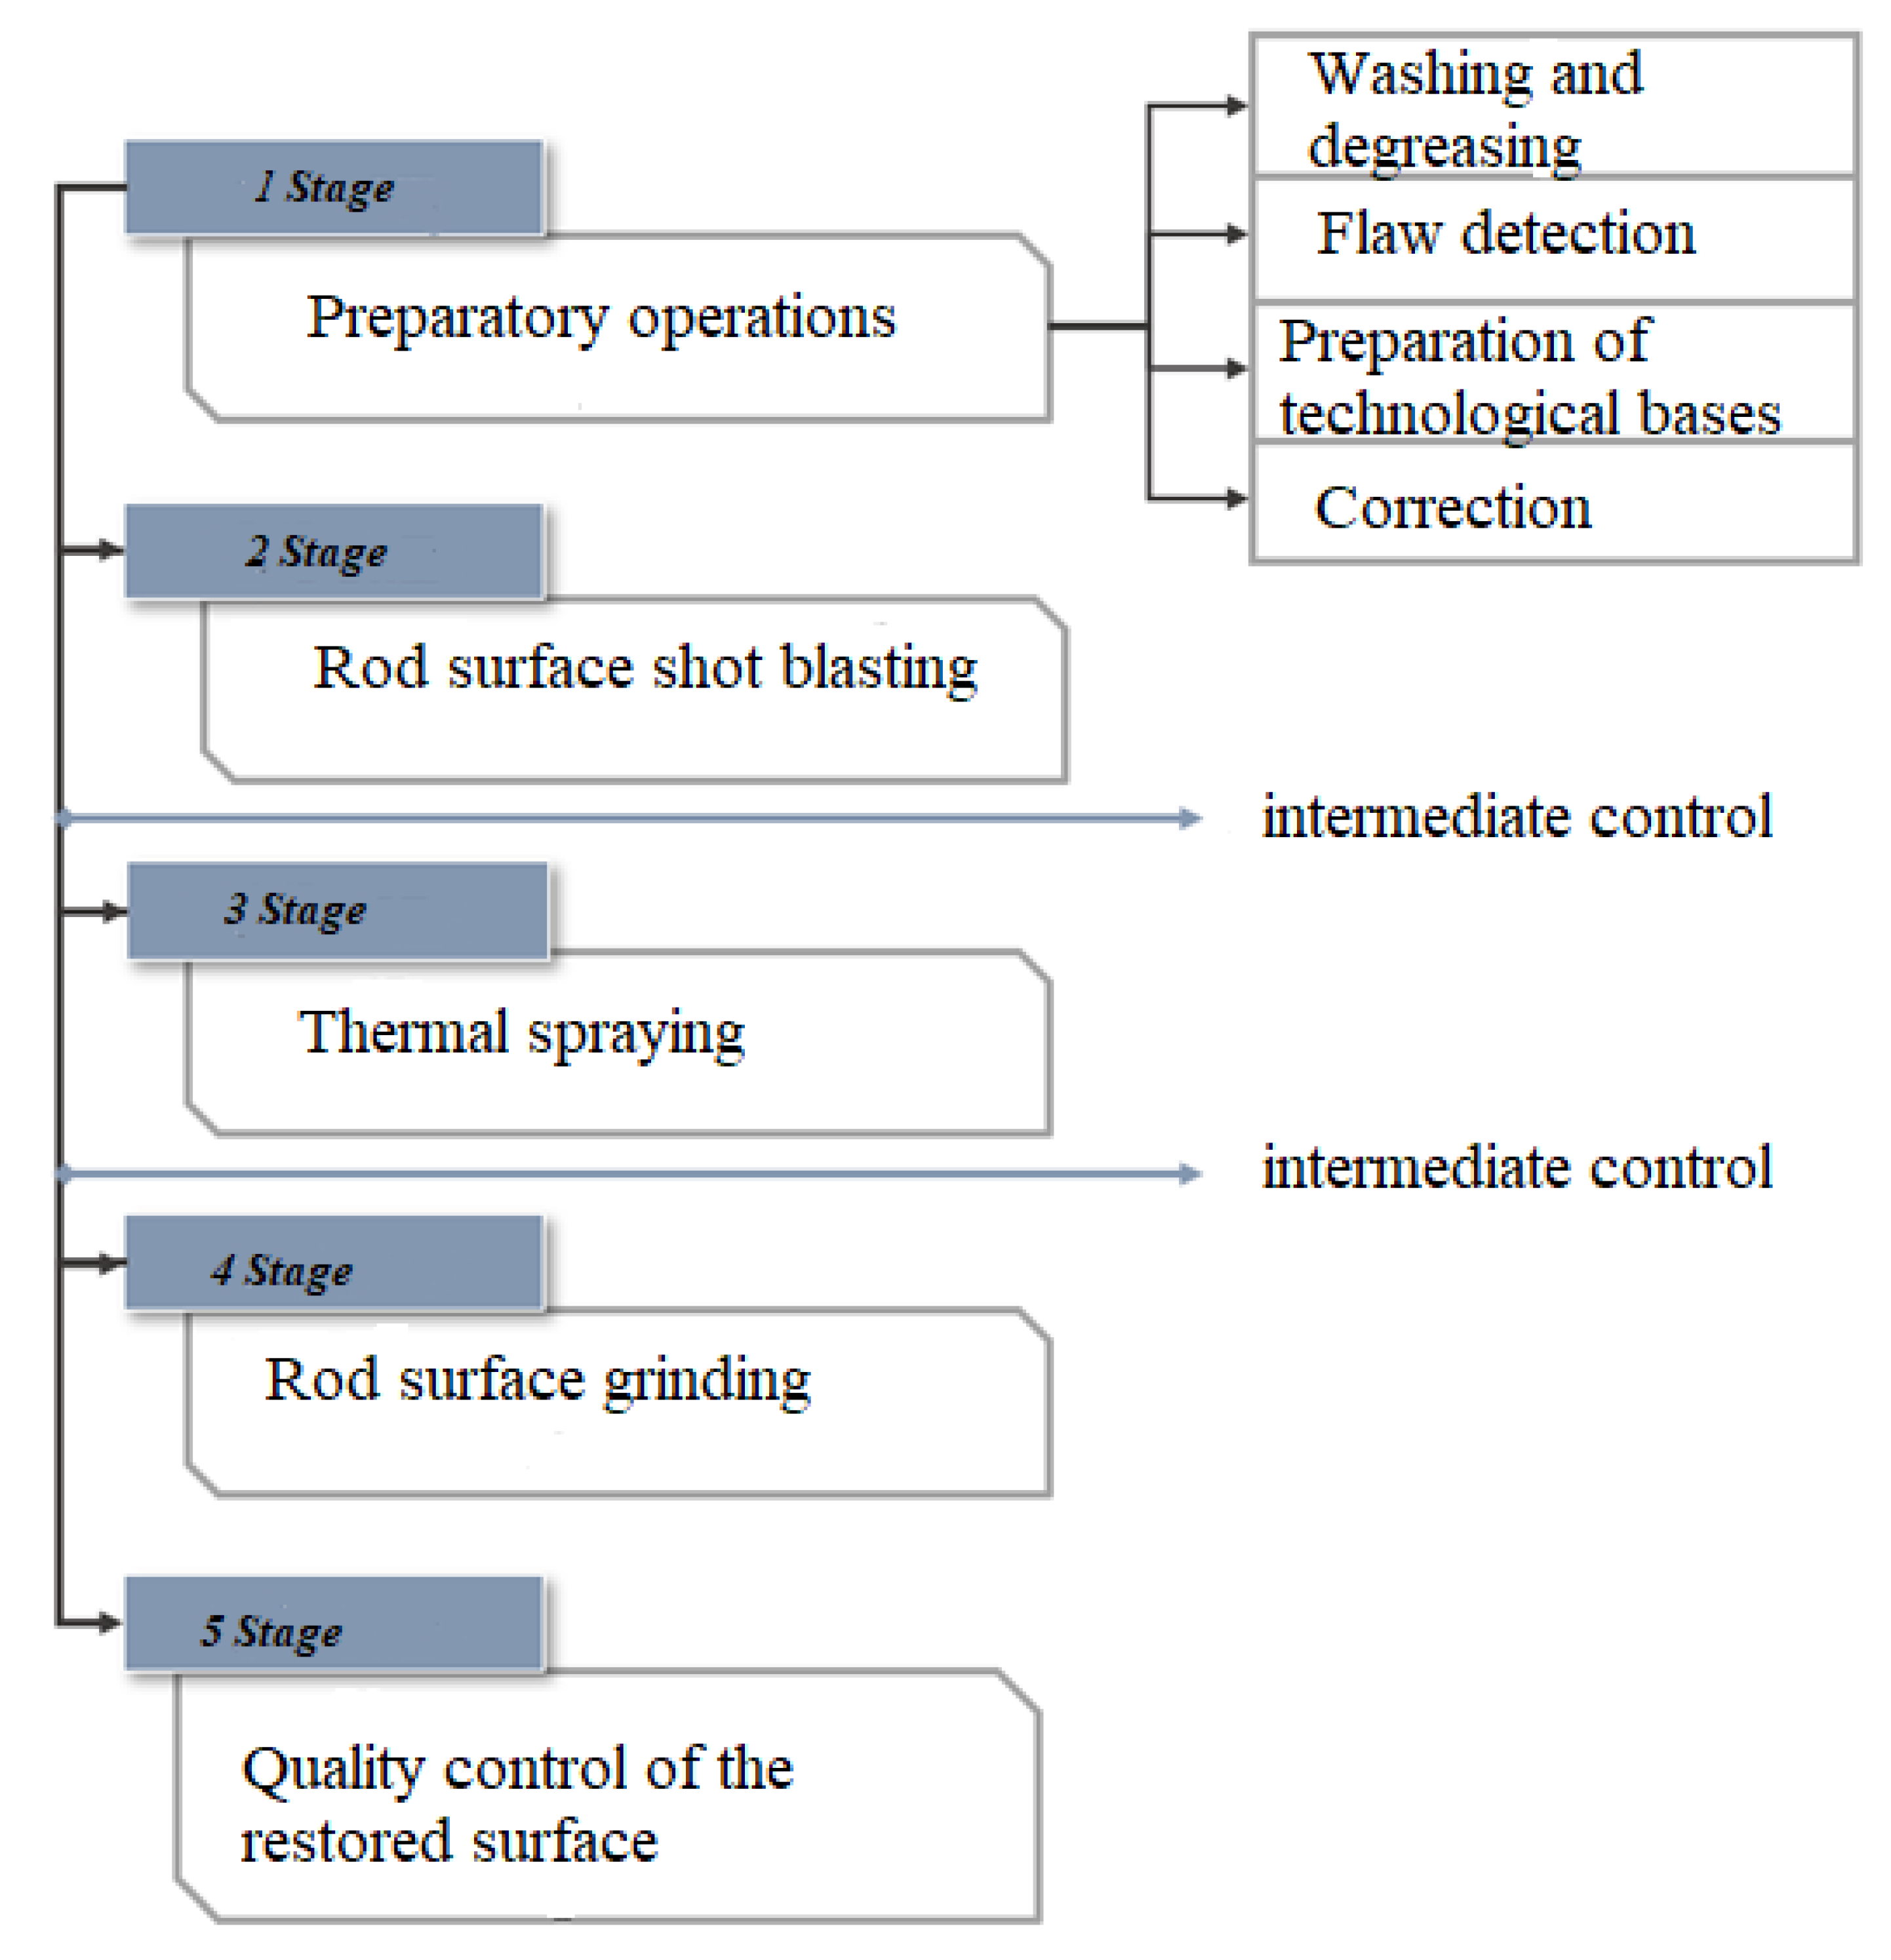
Figure 1. The technology of restoring the rod of a hydraulic cylinder by thermal spraying.
Coatings 12 01514 g001
Figure 2. The effect of surface roughness on the adhesive strength of the coating.
Coatings 12 01514 g002
Figure 3. Designed installation for restoration of a long rods.
Coatings 12 01514 g003
Figure 4. The process of shot blasting the surface of the hydraulic cylinder rod.
Coatings 12 01514 g004
Figure 5. Dependence of surface roughness Ra (a) and depth of penetration of abrasive ∆h (b) on air pressure P (nozzle attack angle—80°; processing time t—3 min, 30 s).
Coatings 12 01514 g005
Figure 6. Dependence of surface roughness Ra (a) and the depth of penetration of the abrasive ∆h (b) on the angle of attack of the nozzle β (air pressure P; processing time t—3 min, 30 s).
Coatings 12 01514 g006
Figure 7. Dependence of the surface roughness Ra (a) and the depth of penetration of the abrasive ∆h (b) on the processing time of the rod (air pressure P—0.6 MPa; nozzle attack angle—90°).
Coatings 12 01514 g007
Table 1. The main methods of mechanical preparation of the surface of parts for spraying.
Method NameTechnical ProcessApplication Area
ShotblastingSupply to the surface of metal cast iron chips or shot with a particle size of 1.5–2 mm at an air pressure of 0.5–0.6 MPaFor large flat workpieces
SandblastingBlowing the surface of parts from a gun in a special chamber with quartz sand with a grain size of 0.5–2.5 mm under an excess air pressure of 1–6 atmFor parts of complex shape, when repairing cracks in cast iron parts, for parts with sliding fit, as well as in preparation for applying heat-resistant and decorative coatings with a layer thickness of 0.02 to 3 mm
Table 2. Specifications of EDUCT-O-MATIC shot blasting machine (Kazakhstan).
Name of IndicatorIndicator Value
Developed pressure range, MPa0.3–0.7
Air consumption, m³/min1.5–2.5
Abrasive tank capacity, L2
The range of fractions of the used abrasive, mm0.3–1.4
Installation nozzle diameter, mm4.5
Maximum width of the cleaned strip in one pass, mm32
The principle of operation of shot blastingejector, dust-free
Overall dimensions (length × width × height), m0.6 × 0.2 × 0.3
Publisher’s Note: MDPI stays neutral with regard to jurisdictional claims in published maps and institutional affiliations.